1
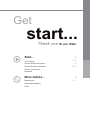
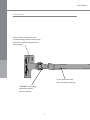
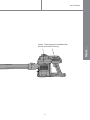
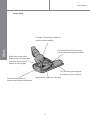
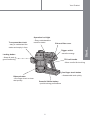
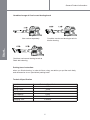
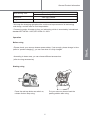
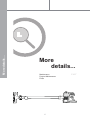
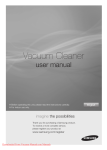
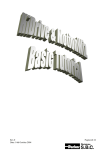
PV-8100
Cordless Cyclone Vacuum Cleanner
Instruction Manual
Get
start...
Start...
01
Your Product
01-04
General Safety Information
05
06-11
General Product Information
Product Introduction
Operation
More details...
Maintenance
Product Maintenance
FAQs
12
13-17
Your Product
Your Product
Power Head—extra motor can
provide strong suction to easy clean
short pile carpet and all articles in
narrow gaps
70 cm Aluminum tube,
easy roof reach cleaning
“Tri-balls”Technology
contributes perfect
maneuverability
01
Cylone Technology plus washable filter
quicker and easier cleaning
02
Start...
Your Product
Your Product
Power Head
Start...
“Tri-balls” Technology contributes
perfect maneuverability
Air-Tunnel-Optimized technology
ensure deep cleaning performance
Extra motor can provide
strong suction to easy clean
short pile carpet and all
articles in narrow gaps
TPU furniture guard against
the destroy of your furniture
Dust-removing article to
improve the suction performance
Nylon bristle, easy clean the dirty
03
Your Product
Exhaust filter cover
Trigger switch
--save the energy
Locking button
--Keep all parts in
good connecting
Release button
--One finger touch to clean
dust quickly
Start...
Transparent dust tank
--easy to understand the
status and empty in time
Operation Led Light
--Easy understand the
machine status
TPU soft handle
--More comfort for touching
One finger touch button
--disassemble tank quickly
Powerful lithium battery
--provide strong performance
04
General Safety Information
General Safety Information
When using the vacuum cleaner, basic safety precautions should always be
observed, including the following:
• This appliance is not intended for use by persons (including children) with reduced
physical, sensory or mental capabilities, or lack of experience and knowledge, unless
they have been given supervision or instruction concerning use of the appliance by a
person responsible for their safety.
• Only use the vacuum cleaner indoors on dry surfaces.
• Do not handle the plug or vacuum cleaner with wet hands. Do not use outdoors or
on wet surface.
Start...
• Do not use the vacuum cleaner with a damaged cord or plug.
• Do not pick up flammable or combustible materials (lighter fluid, petrol, kerosene
etc.) or use in the presence of explosive liquids or vapours. Do not pick up hot coals,
cigarette butts, matches or any hot, smoking or burning objects. Do not vacuum up
harmful or toxic material (chlorine, bleach, ammonia, drain cleaner etc.). Do not
vacuum up hard or sharp objects such as glass, nails, screws, etc.
•Do not put any objects into openings. Do not use with any openings blocked and do
not restrict airflow. Keep all openings free of dust, lint, hair or anything that might reduce
airflow. Do not use any part of the appliance to touch eyes, ears or put into mouth.
• Children should be supervised to ensure that they do not play with the appliance.
• Stop using if electric leakage or motor overheat, abnormal noise such as body
overheat, smelly, low suction, etc.
• Use the original adaptor to charge the battery. Do not use the original adaptor to
charge any other battery not belong to this vacuum cleaner. It may cause exploded,
human hurt or appliance damage.
• Store the vacuum cleaner in a cool, dry area.
• Always switch off and unplug the vacuum cleaner from the electrical outlet before
assembling, opening or emptying the dirt container, or before connecting/disconnecting
the attachments.
• If the inlet, tube is blocked, switch off the appliance and remove the blockages
before re-starting the vacuum cleaner.
05
General Product Information
General Product Information
Product Introduction
The packing contents
Main body
Crevice tool
Start...
Rotary combine brush
Appliance brush
Small cleaning tool
The dusting brush
Power head
Aluminum tube
Black power brush for floor
Charger
Red power brush for mattresses
Parking base
* Due to our products need continuous improvement, the configuration as above will be different from each model,
we reserve the this right to explain
* Some products’ base have the charging function, them depend on specific product
We keep the changing right about the continuous improvement of f all technology
and design, and we reserve final interpretation.
06
General Product Information
Aluminum tube installation instructions
Assembling the aluminum tube
Disassembling the aluminum tube
Start...
Power head installation instructions
Assembling the power head
Disassembling the power head
Using accessories
Except the aluminum tube and power head, you can choose our Crevice tool and
dusting brush to extend using range.
Crevice
Suit for the narrow and substandard surface, such as wall corner, window, appliances,
drawers, car cushion, frame, keyboard and so on.
Dusting brush
Suit for cleaning soft material, such as curtain, textile, sofa and so on
07
General Product Information
Combined usage of Crevice and dusting brush
Combine crevice and dusting brush As
bristle cleaning
Start...
Use crevice separately
Combine crevice and dusting brush as
Static belt cleaning
Parking base instruction:
when you finish cleaning, in order to future using, we advise you put the main body
and accessories to our specialized parking base.
Technical Specification
Item
Voltage
Rating Power
Battery volume
Dust capacity
Noise Level
Charging Time
Technical Specification
22.2V
150W
1500mAH
0.35L
≤73dB
3-4Hours
08
General Product Information
MAX running Time
Successive:12-15min
Discontinuity:30min
Dimension
Weight
1200*230*220MM
2.7KG
* We keep the changing right about the continuous improvement of all technology
and design, and we reserve final interpretation.
* Concerning noise: this data is from our lab testing, which is executed by international
standard IEC 60704-1:1997,IEC 60704-2-1:2001.
Operation
• Please check your vacuum cleaner power status, if not enough, please charge in time.
(refer to “product charging”), you can use when it is fully charged.
• According to clean area, you can choose different accessories.
(refer to using accessories)
Starting using
Press the red trap button as switch on,
release It when stop using.
Put your vacuum cleaner back the
parking station after using.
09
Start...
Before using
General Product Information
Dust Empty
Start...
Switch off your vacuum cleaner and
pull dust release button to empty.
Close the dust tank after emptying
dust.
Battery Charging
Connect the charging pin with battery
and plug in.
Put the battery on the parking base which
has charging function and plug in.
10
General Product Information
Concerning indicator light
Working
Persistent green light
Charging
Fully charged
Lower power
Blinking red light
Persistent green light
Blinking red light
Reminder:
Every 3 month after getting the product, please charge 3 hours (no need fully
charged) with specialized charger.
•
It is forbidden to put the battery on charger for long time. please stop charging
when it Charge overtime, in case of battery high heat , deformation or even burn.
•
When battery is not used for long time or be deeply discharged, the working
time will reduce, in order to get the best using effect, we advise you can use up
power (normally above 6 hours), and repeat this action for twice. It can renew.
More details...
•
11
More details...
More
details...
Maintenance
Product Maintenance
FAQs
12
13-17
Maintenance
Maintenance
Product Maintenance
To reduce the problem of daily using, periodic maintenance is needed.
Unit(handle part)
(Figure 1)
(Figure 2)
(Figure 3)
Dust bin & dust filtration frame
The structure of the vacuum cleaner is transparent, please pay attention to the dust
bin & dust filtration frame, and clean them periodically to avoid the normal using.
13
More details...
• Always switch off and unplug the vacuu cleaner from the electrical outlet before
maintenance. (Figure 1)
• Clean the vacuum cleaner by water or Neutral detergent, the cloth should be dry
when clean the vacuum cleaner. (Figure 2)
• After finishing the cleaning, the unit should be placed on the position. Pay attention
to let the unit avoid the sunshine or damp place. (Figure 3)
Maintenance
More details...
Dust bin maintenance
Once the dust reachs to the Max, pls clean the dust bin in time, over loading is not
allowed. Disassembling the tube or the accessory before cleaning the dust bin.
• After the vacuum cleaner switch off, press the button at the side of the dust bin to
remove the dirt(as the figure shows) (figure 4)
• If the dirty on the inner dust bin, press the dust bin inner button to remove the dust
bin, and use damp cloth to wipe the inner dust bin(figure 5)
• When cleaning is done, assemble the unit, and make sure to click into place when
secure.(figure 6)
(Figure 4)
(Figure 5)
(Figure 6)
Important:
If clean the inner dust tank by wet cloth and put back the tank only to be
sure it is totally dry.
Dust tank filtration frame maintenance
• When the vacuum cleaner switch off, press the button of the inner dust bin
disassemble the dust bin(figure 7)
• Clean the filtration frame by clean cloth.(figure 8)
• When cleaning is done, assemble the unit, and make sure to click into place when
secure.(figure 9)
(Figure 7)
(Figure 8)
(Figure 9)
Important:
Do not clean the dust bin filtration frame By water directly to
protect motor & PCB
14
Maintenance
Exhaust Filter Maintenance
To make sure the normal using, periodically cleaning is required. 3-6 months changing
the HEPA is needed.
• Press the release button, pull the filter, remove the dirt on it. (figure 10)
• Clean the filter by water if the dirt is too much. Assemble the unit again after dry.
(figure 11)
(Figure 10)
(Figure 11)
Battery replacement
• Switch off, press the bottom button, pull the battery (figure 12)
• Assemble the new battery as the same direction of the arrow which will click into
place when secure. (figure 13)
(Figure 12)
(Figure 13)
Important:
•
•
Keep the battery in cool, dry place when long time not using, keep half power.
Keep away from metal parts to avoid energy loss.
15
More details...
Important:
to use the cold water when clean the filter, and assemble the
It to the unit when it is totally dry.
Maintenance
Power head maintenance
To clean the power brush after 4-5 times usage of the power brush
More details...
•
•
•
•
To pull the agitator out as the direction of the arrow. (figure 14)
Remove the hair or the dirt by the gifted tool. (figure 15)
Wipe the agitator by the dry cloth. (figure 16)
Assemble the agitator after cleaning. (figure 17)
(Figure 14)
(Figure 15)
(Figure 16)
(Figure 17)
16
Maintenance
usual problems
possibility
solution
the vacuum cleaner
does not work
The battery is power off
Charge the vacuum cleaner
before using
suction is blogged
clean the suction socket
Clean the dust bin, filter etc
Clean the dust bin and the
exhaust filter
Agitator is rolled by the hair or
somthing
Clean the agitator
Debugging the above situation,
the vacuum still cannot work
normally
contact our after service
Suction tube or the aluminum
tube is blogged
Clean the suction tube or the
aluminum tube
Debugging the above situation,
the vacuum still cannot work
normally
contact our after service
Many Obstacles in the cleaning
area
Remove the obstacles
Suction tube is blogged
Clean the suction tube
Debugging the above situation,
the vacuum still cannot work
normally
Contact our after service
Main unit did not match the
electrical connector
Check and match correctly
The battery place in the wrong
way
Check and place correctly
Debugging the above situation,
the vacuum still cannot work
normal
Contact our after service
Suction is weak
Abnormal sound of
the motor
Working difficulty of
the vacuum cleaner
Cannot charge
* We keep the changing right about the continuous improvement of all technology and design,
and we reserve final interpretation.
17
More details...
FAQs
Pro Logic International Limited
Tel: (852) 2365 0655
FAX: (852) 2365 0235
Email: [email protected]
Website: www.primada.com.hk