1
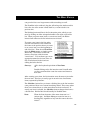
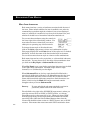
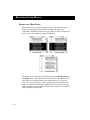
THE MENU EDITOR THE MENU EDITOR INTRODUCTION This chapter explains how to use Resorcerer’s Menu Editor. The Menu Editor lets you edit all aspects of standard Macintosh text menus, normally kept in resources of type ‘MENU’ (or, for MacApp developers, type ‘cmnu’) . The Menu Editor completely supports editing of each menu’s optional color table (‘mctb’ minor resource), in which color information about menu items, menu titles, and the menu bar is kept. You can also try out a menu’s balloon help, kept in a separate ‘hmnu’ resource. If you are not already familiar with general resource editing, see the “Editing Resources” chapter earlier in this manual. TOPICS COVERED • • • • • • • • • • • Menu resource sets Creating a new menu Opening an existing menu Closing a menu Using the Menu Editor Trying out the sample menu Cutting and pasting menu items Setting menu colors Printing a menu Decompiling a menu Menu Editor commands 259 RESORCERER USER MANUAL MENU RESOURCE SETS The Menu Editor is responsible for editing two major resources and their related minor resource: Standard Mac Menus Major: ‘MENU’ Minor: ‘mctb’ MacApp-style Command Menus Major: ‘cmnu’ Minor: ‘mctb’ The ‘MENU’ and ‘cmnu’ major resource types are nearly identical in structure: they each declare a menu title and other menu-specific information, followed by a variable-length list of menu items. The only difference is that each listed item in a ‘cmnu’ resource can have an extra attribute, called a command number, that is associated with each item. Color Mac systems let you associate different colors with various parts of any menu simply by creating entries in a parallel optional resource, called the menu color table, of type ‘mctb’. The ‘mctb’ resource must have the same resource ID as its major resource in order for the Menu Manager to link the two automatically when it builds the menu. The Menu Editor edits these two resources together to make it easy to maintain the required synchronization between the two resources while you make changes. 260 THE MENU EDITOR CREATING A NEW MENU To create a new menu in a given file, use the New button in the File Window or the New Resource command in the Resource menu. If you wish to pre-specify the resource’s attributes, make sure the file’s Types List is the active list. If the Resources List is the active list, then make sure that it is displaying either ‘MENU’ or ‘cmnu’ resources, whatever you’re interested in. The Editor will automatically create a related minor ‘mctb’ resource with the same resource ID as the menu. Note: Apple’s documentation warns against making ‘MENU’ resources purgeable. If you are already editing a menu, and want to create a new, empty menu in the same file as the existing menu, choose New Resource Set from the Resource menu. If you are already editing a menu, and want to duplicate it in a new menu, choose Duplicate Resource Set, also in the Resource menu. This duplicates the ‘mctb’ resource also. Once the Menu Editor creates the new menu, its resource set is added to your file, and the Editor opens the set and displays it in its own new menu editing window. New menus are given the title “Untitled”, which is left selected so that you can immediately begin typing something more appropriate. 261 RESORCERER USER MANUAL OPENING AN EXISTING MENU To open an existing menu, select it in the Resources List of its File Window, and click on the Open button (or just double-click on the selected resource). If a menu’s optional color table is missing, it will be created temporarily while you are editing so that the full resource set will be available to the Editor. If you do not change any data that would be kept in the newly created ‘mctb’ resource, the optional resource will be deleted automatically when you close your menu editing window; otherwise, it will be saved. CLOSING A MENU To save your changes when you’re done editing a menu, click in the Editor’s GoAway box, or choose Close Resource Set from the Resource menu. If you have asked Resorcerer to confirm your resource saves (for more on this, see the “Preferences” chapter later in the manual), Resorcerer will ask you if you want to save or discard your changes. To save your changes, click on the Save button. Remember that your changes will not be saved back to disk until you save the entire file later on. If you want to discard the changes you’ve made since you opened the resource, click on the Cancel button or choose Cancel Edit Session from the Resource menu. Again, you may be asked to confirm discarding your changes, depending on the setting of the Confirm resource cancels and reverts preference in Resorcerer’s Preferences dialog. Sorcery: 262 c W is the keyboard equivalent of Close Resource Set. c . (period) is the keyboard equivalent of the Cancel button. THE MENU EDITOR USING THE MENU EDITOR The Menu Editor presents each open menu in a dialog window that displays • • • • • • • the menu title in the upper left, the list of menu items below the title, the selected item’s text below the list, the MDEF and MenuID fields in the upper right, buttons for setting different types of colors, a group of controls in the lower right for setting item attributes, and a Cancel button in the lower right for discarding change THE MENU TITLE To change the menu title, simply type into the title string edit box. You can click once in the button to replace the title with the single character. To enable or disable the entire menu, click in the Menu enabled checkbox, to the right of the title. THE ‘MDEF’ AND MENUID FIELDS Every menu has an associated Menu Definition Function, or ‘MDEF’ resource, whose ID is kept as a field in your menu resource. The standard system ‘MDEF’, whose resource ID is 0, is usually all you 263 RESORCERER USER MANUAL need. However, for your own custom menus, you can create a custom ‘MDEF’ resource and declare its ID in the MDEF field. The MenuID field lets you set the menu’s internal ID, which normally should be the same as its resource ID, but doesn’t have to be (certain Mac toolbox calls identify menus using this ID during the time the menu is installed in the application’s menu list. Because it’s a good idea to keep the two numbers in sync with each other, the Menu Editor will warn you when you close the window in case they are different. THE MENU ITEM LIST The Editor presents you with the text of each menu item in a standard Resorcerer list. If there is a command key ( ) equivalent, it is drawn to the right of the item in its usual spot. Any mark characters are shown to the left of the item in their usual position. If the item has a hierarchical sub-menu, then the standard right-pointing triangle is drawn in as well. c Note: Any icons (small or large) associated with items are not shown in the list. To see the icons, you must look at the sample menu in the menu bar. Note also that only those icons that are saved on disk will be visible; new icons that you have not yet saved will not be visible. To select an item for editing, click on it in the list. The Editor highlights the item, and its text and attributes will be loaded into the various item editing boxes and controls below and to the right of the list, where you can change them. You can make any selection of items in the list you want. To extend the selection, hold the Shift key down while dragging the cursor. Hold the key down to toggle any item’s selection status without affecting others. However, you can only edit the text and attributes of one selected item at a time. c Note: Unlike most other Resorcerer lists on color displays, your current hilite color is not used in the menu item list to indicate selected items. Rather, the Editor hilites items in the list the same way as the Menu Manager would, which is to swap the foreground and background colors. You can grow the list and its window when you click and drag the grow box directly below the list’s scroll bar. If you have a larger screen, you 264 THE MENU EDITOR can grow the list to see larger menus without needing to scroll. The ZoomBox in the window’s drag bar will enlarge the window and its list to the size of the screen it finds itself on, or zoom it back to its previous size. The blinking horizontal line is the list insertion point, which you can move by clicking on either triangular handle to the right or left of the list. When you paste menu items, or create new items, the Editor inserts them wherever the list insertion caret is found. To create a new item in the list, make sure the list insertion caret is between the items at the position where you want to see a new item (or at the beginning or end of the list). Then choose New Item from the Menu: menu, or simply tap the Return key. The Editor creates and inserts a new item, with the name “<new item>”. You can then type a more appropriate name for the item, since its title is left selected in the item text editing box below the list. Sorcery: c N is the keyboard equivalent of New Item. Double-clicking on the list insertion caret’s handle after you have positioned the caret also creates and inserts a new item. After creating a new item, the list insertion caret advances to just after the new item. This lets you easily type in an entire set of new menu items, separated by Returns. The –Divider– button lets you insert a dividing line at the list insertion caret position if there is no current item being edited. This occurs when there is no selected item, or when more than one item is selected. If exactly one item is selected, the –Divider– button changes that item to a divider line. Divider lines should usually be disabled items. Note: When the first character of the menu item text is a ‘-’ (minus sign), the Menu Manager treats the item as a dividing line, regardless of any text that comes after the initial ‘-’. 265 RESORCERER USER MANUAL MENU ITEM ATTRIBUTES Each menu item has a variety of attributes associated with the text of the item. These include whether the item is enabled or not, what its command key equivalent might be, whether it has an icon displayed next to it, whether it is marked or not, the style of the item’s text, and whether it should have a hierarchical sub-menu attached to it. You can set these attributes using the controls in the lower right of the editor dialog window. You must select the item or items that you want to affect prior to operating any of these controls. To change the text style of all selected items, click on the Style popup menu to choose any combination of styles. This popup displays the word Plain if none of the styles in it is checked. Otherwise, it shows the name of the first checked style in the menu. You can choose more than one style at a time to create combinations. Each menu item can have a key equivalent, or a hierarchical sub-menu, but not both. You can choose one or the other of these attributes when you click on the Key Equiv or Sub-menu ID radio buttons. When Key Equiv is set, type the key equivalent character into the field to the right of the radio button. The field accepts either a single character, or a ‘$’ followed by two hex digits. When Sub-menu ID is set, the key equivalent field is filled with a special code ($1B) which indicates to the Menu Manager that the item has a hierarchical sub-menu, whose resource ID you can now enter. Items with hierarchical sub-menus cannot have mark characters (see below), which is why the Mark field and its associated controls disappear when you choose Sub-menu ID. Sorcery: To open and edit the sub-menu attached to an item in your menu, double-click on the item in the list. The edit field to the right of the ICON/SICN popup menu is where you enter the resource ID of an ‘ICON’ or ‘SICN’ resource, or 0 if none. These IDs must be in the range 257 to 511. When you choose ‘SICN’ from the popup menu, the key equivalent field is filled with another special hex code ($1E) that lets the Menu Manager know that the resource ID should be taken as that of a ‘SICN’ resource, not an ‘ICON’ resource. This means that menu items with ‘SICN’s attached to them 266 THE MENU EDITOR cannot have hierarchical sub-menus or key equivalents. The Choose button lets you see all the current ‘ICON’ resources with IDs in the range of 257 to 511 in the same file as your menu. If you double click on one of them, its ID will be installed into the icon ID field. Note: For a given resource ID, the Menu Manager actually looks for a ‘cicn’ (color icon) resource first and uses it (if it’s 32 by 32). If no ‘cicn’ resource is found, then it looks for the ‘ICON’ resource with the given ID. The Mark field lets you type in a character that marks the left hand side of a menu item. The two most common mark characters are available as their own buttons to the left of the Mark field, since they are not normally easy to type. Click on either button to enter that mark into the field. To enable or disable all selected items, click on the Item enabled checkbox. Note: Only the first 31 items in a menu resource can be disabled or enabled; in longer menus, items 32 and greater are always enabled. You can use the Show Item Numbers command to see the index of any item in the list. 267 RESORCERER USER MANUAL THE SAMPLE MENU Although the Menu Editor shows you your menu items in a list that closely resembles what the menu looks like in your running application, there are times when it cannot accurately portray exactly what the menu looks like. The Editor therefore keeps a copy of the menu you’re editing installed in the menu bar at all times while you are editing the original. If any items in the sample menu have hierarchical sub-menus, copies of these sub-menus are also installed so you can get a better idea of how the whole collection of related menus operates. The sample menu is found next to the Editor’s own menu, which has the title “Menu:” to indicate the special nature of the menu to its right. The sample menu is only installed at those times that the menu editing dialog is the frontmost window. Both the menu and its color table are installed as the sample menu. Since one of the entries in the menu color table is for setting the color of the menu bar and the default colors of all menus in the menu bar, other Resorcerer menus may be temporarily affected by this entry. For more on this, see the next section, “Setting menu colors”. The sample menu is constantly updated while you are editing, so that at any point you can click on its title in the menu bar and get a look at how the Menu Manager will display your menu. When you choose an item from the sample menu, the Editor selects that item in the menu’s item list. All other items are deselected first. When you choose an item from any hierarchical sub-menu installed with the sample menu, the Editor opens that sub-menu (or brings its editing dialog to the front if it is already open) and selects the item you’ve chosen. Note: 268 Any command key equivalents in the sample menu are ignored, even if they appear in enabled items. THE MENU EDITOR TRYING OUT A MENU’S BALLOON HELP Under System 7, balloon help messages for a menu are kept in an ‘hmnu’ resource with the same ID. To try these out, turn balloon help on, and point the mouse at the sample menu title, or browse its items. Note: Balloon messages for sub-menus are not installed. CUTTING AND PASTING MENU ITEMS To cut, copy, or clear one or more items in the menu, select them in the list and choose Cut, Copy, or Clear from the Edit menu. Both the text of the item, as well as any color entry for it will be cut, copied, or cleared. To break a menu up into two menus, select all those items in the first menu that you want to place in the second one, choose Cut, bring the second menu’s editing window to the front, click and drag the list insertion caret to place it where you want the new items, and then Paste the items into the second menu at its insertion point. Discontinuous selections from the source menu will be pasted back in as continuous ones in the destination. When you initially select one menu item in the list, its text is entered into the text editing box below the list. The text is then automatically selected. Cutting, copying, and clearing will only affect the item as a whole if all of its text is selected; otherwise, only the selected text in the edit box will be subject to the clipboard operation. When you copy or cut a colored menu item to the clipboard, it is either explicitly colored or its color is defined by a default entry in the menu color table, where the entry refers to the menu as a whole. If the color is explicit, it will stay with the item when you paste it, no matter what colors are in the destination menu. However, if the colors in the destination menu are themselves only default colors, the Editor may ask you which menu default color you want the destination menu to take on. Usually, you want the destination menu to keep its default colors. 269 RESORCERER USER MANUAL REARRANGING MENU ITEMS Often when you are trying to design a menu it can take a few tries before you really figure out the right ordering and grouping of commands. The Editor makes it easy to quickly re-order a selection of items in your menu without cutting and pasting. To reorder a group of items, select them and choose Reorder items in the Menu: menu. The selection must be continous. The Editor turns item indices on, and invalidates your selected items so you can see which ones you have left to reorder. Simply click on the items in the order you want them rearranged within the selection. Each item you click is swapped with the earliest selected item, where it is deselected and assigned its proper index. 270 THE MENU EDITOR MENU COLORS To the right of the menu item list are three buttons in a panel labeled Colors. These buttons let you set colors for the three types of entries in your menu’s color table resource. In each case, the Menu Editor opens a non-modal dialog window that displays the colors for that color table entry. Each of these dialogs displays three or four colors, labeled with their functions. Each window also contains a Delete button, which deletes the entry that the window represents from the table. In all three cases, if there was no entry prior to opening the dialog window, the Editor creates a new default entry. If you Cancel out of the dialog, the new entry will be deleted; old entries will revert to their previous values. Note: You can tell when an entry is new or not by whether the Delete button is disabled or not. To select a color, click on its box. An outline is drawn around the box to indicate that it is selected. To copy the RGB values of a color from one box to another, select the source color box, choose Copy from the Edit menu, select the destination color box, and choose Paste. You can copy into other Resorcerer Editors’ color boxes as well, which makes it easier to color coordinate your windows (for example) with your menus. INDIVIDUAL MENU ITEM COLORS Each item in a menu can have three colors explicitly assigned to the item’s three foreground parts: its text, its command key equivalent, and its mark character. To set any of these three part colors, choose the item (or items) and click in the Menu Item button in the Colors panel. For each selected menu item, this opens a dialog that shows you the three part colors, each in a box with its own Set button, which you can click in to pick a new color. 271 RESORCERER USER MANUAL Use the Copy and Paste commands described above to conform colors among items that you want to be the same. ENTIRE MENU COLORS To set the color of the title of your menu, or to set the default colors for all items in the menu that don’t already have explicit color entries, click in the This Menu button of the Colors panel. You can set the title color, the default background color for the entire menu, or the default text color for all items in the menu. Usually it is a good idea to keep the coloring of all items in one menu consistent; otherwise it tends to look bad. MENU BAR COLORS To set the color of the menu bar that will contain your menu, or to set the default colors for all menus in the menu bar that don’t already have explicit defaults, click in the Menu Bar button of the Colors panel. You can set the menu bar color, the default menu title color, the default menu background color, or the default text color for all menus in the menu bar that don’t have their own default entries, or explicit entries. Note: 272 Generally, only one menu among all menus in a menu bar should have a color table with the menu bar colors entry defined. If two menus have conflicting menu bar entries, then the last menu installed will have the entry that the Menu Manager uses to color the menu bar. THE MENU EDITOR PRINTING A MENU To get a quick printout of a menu you are editing, choose Print to Printer from the File menu. The subsequent output will look much like the Editor’s list, with the exception that if you have set visible item numbers, they will be printed to the left of the menu items rather than within them. The Editor currently supports black & white output only; any color table information is ignored. DECOMPILING A MENU The Menu Editor will decompile the resources comprising a menu directly to the clipboard, using the Rez language. To do so, make sure that all items in the menu item list are deselected, including the menu title, and choose Copy from the Edit menu. You can then Paste the text form of the resource set into the Rez text file with which you are compiling your resources. If you don’t want or need the default ‘mctb’ resource declaration, just delete it from your text file. MENU EDITOR COMMANDS The Menu Editor keeps two menus installed to the right of Resorcerer’s Resource menu. The first menu is entitled Menu: and it contains commands that perform operations on the current menu you’re editing. The second menu is the sample menu that shows you the same menu you are editing. The title of the sample menu is taken from the menu being edited in the frontmost window. Choosing an item from the sample menu is the same as selecting that item in the list of menu items. The following is a short overview of each of the commands in the Editor’s Menu: menu. You can find more complete explanations in the earlier sections of this chapter. 273 RESORCERER USER MANUAL New Item Create a new menu item and insert it at the current position of the menu item list insertion caret. Tapping a Return, or double-clicking on the insertion caret handle, is equivalent to choosing New Item. Enable/Disable Item If any item in the selection is disabled, all selected items are enabled. If all items in the selection are enabled, they are all disabled. Clicking in the Item enabled checkbox is equivalent to choosing this command. Select Colored Items Select all menu items that have explicit entries in the menu’s color table; items that are colored due to default entries for the entire menu or the menu bar are not included in the selection. After choosing this command, you can click in the Menu Item button to open each item’s color table entry for viewing. Reorder Items If the current selection is continous and has at least two items in it, this changes the order of the items in the menu according to the sequence of items that you click on. During reordering, the Editor makes the item index numbers visible, and displays those items not yet reordered with an index of “??”. Show Item Numbers Make the indices of each item visible on the left side of the menu item list. These are the numbers that the Menu Manager returns when the user chooses an item from this menu. Show Hierarchical IDs For those items in your menu that have hierarchical sub-menus attached, you can show the resource IDs of each sub-menu with this command. The IDs are drawn in to the right of the triangular submenu symbol on the right side of the menu item list. You may need to grow the menu list sideways to open up space for the menu resource IDs to be completely visible. 274