1
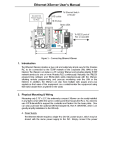
Appendix A Extended File System
EXTENDED FILE SYSTEM FOR F-SERIES PLC
Before you begin, please download a sample I-TRiLOGI program that will be referred to
throughout this manual from our website:
http://www.tri-plc.com/trilogi/ExtendedFileSystem.zip
A.1 Introduction
An F-series PLC with r77 or later firmware now supports up to 1,740K bytes of file
space that can be used for storing up to 435 web page control files!
More importantly, an F-series PLC with a new r77 firmware can open local data files in
this file space and write/append data to it. The PLC can therefore log a large amount of
data into one or more data files, which can be retrieved for analysis anytime.
There are two ways to retrieve the stored data files from the PLC:
1. Download the file from the PLC’s built-in web server: The file created by the PLC
can be downloaded from the PLC’s built-in web server using any web browser.
This allows the user to access the data file at any time of the day.
2. Automatic FTP upload from the PLC to an external web-server: You can program
the F-series PLC to make an FTP client connection to any web server on the
local network or on the Internet/Cloud and upload the data file it has created to
the web-server using any filename.
Imagine what the F-series PLC can do with this new uploading capability! The ability to
log data locally and automatically upload the data to a web server transforms the PLC
into a potent data-logger! The PLC can be programmed to capture daily, weekly or
monthly data and then periodically upload the data file to an Internet web server with a
unique, time-stamped filename (E.g. “temperaturelog2012-01-01.xls”). This allows the
PLC to log data completely unattended.
The data uploaded by the PLC to the external web server can therefore be viewed or
downloaded into a PC using any web browser, anywhere in the world. This allows you
to carry out analysis of past logged data file for performance or diagnostic analysis at
any time without having to physically access the PLC to retrieve the logged data.
Appendix A Extended File System
A.1.1 Advantage of Using Data Uploading
1) Although it is possible to directly access the PLC’s internal web server to
download the data file it has created, this does require active action by the user
and to ensure that the data are retrieved before the file is full and deleted by the
PLC to create space to log new data.
2) By programming the PLC to upload the data periodically the PLC can delete the
file after it has successfully uploaded the data file to free up space to accept new
data. In other words the PLC will never run out of data space to log data since it
can store the logged files on any server including the Cloud!
3) To directly access the file stored on the PLC from outside of the LAN, you will
need to setup the router or firewall to “forward” the PLC’s server port (e.g. 9080)
to the PLC. If you have multiple PLCs logging data, then each PLC will need to
have a different port number in order to properly forward the data. This not only
complicates the setup, but also is often frown upon by System Administrator and
may not even be permitted by the corporate network security policy.
4) The PLC is designed to upload data to any web server via FTP passive mode by
providing the login username and password. Using FTP passive mode allows the
PLC to open a network connection to an external web-server to upload a file and
then close the connection immediately. It does not require opening a port on your
router to permit external access to the PLC from the Internet. Hence there is no
complicated router setup involved as there is no port forwarding required. It also
eliminates the security risk from someone trying to take control of the PLC from
outside of your LAN and is generally much more acceptable to the System
Administrator.
If you have multiple PLCs in use, you can program each PLC to upload data to a
different directory or append a different file name prefix, or to a different server, and
once programmed all PLCs will happily log data unattended indefinitely!
A.2 File Structure and File Naming of The Extended File System
F-series PLC uses a very simple file system, where the 1740K bytes of file space are
divided into 435 slots of 4K bytes each. The file system does not use any kind of file
allocation table; hence it must follow a strict naming scheme because the file name
directly relates to where it is stored in the file space. The followings describe how the
files are named and where they are stored.
1. The first 35 files are named “0.yyy”, “1.yyy”….”X.yyy”, “Y.yyy”.
Appendix A Extended File System
2. The ‘yyy’ part of the file name is the “extension”, and only the following MIME
extension are accepted by the PLC:
HTM, JPG, GIF, CSS, JS, BIN, TXT, JAR, ZIP, XLS
Any other extension names will be replaced by “???”. The MIME extension are
respected by the web browser when you download a file from the built-in web
server so you should always only store files with one of the above extension.
3. The file “0.yyy” occupies the first 4K byte slot, “1.yyy” occupies the second slot…
the “Y.yyy” occupies the 35th slot.
4. The next 400 files can only use the file name “Zxxx.yyy”. where the xxx part of
the filename is a 3 digit decimal number which can be any number from 000 to
399. The yyy part is an extension and the same as what’s described in (2)
above.
5. “Z000.yyy” occupies the 36th slot, “Z001.yyy” occupies the 37th slot .., and the file
“Z399.yyy” occupies the last 4K slot.
6. Any file may occupy more than 1 slot so you can specify “0.yyy” to occupy the
entire 1740K bytes of the file space. Or you can configure “Z000.yyy” to occupy
20K (=5 slots) from the 36th slot, and the next valid file should only start from
Z005.yyy. i.e. If you want to allocate 20K bytes of file space to file Z000.yyy you
cannot use any file name Z001, Z002, Z003 and Z004, otherwise these file will
corrupt the file space of Z000.yyy.
7. This means that the programmer will have to design the file space carefully and
determine how to best use the file structure to provide the right balance between
the number of data files and the amount of data space allocated to each data file.
Note: The file name restriction only applies to files stored on the PLC’s internal file
space. When you use the FTP upload function described later, you can specify any
destination filename as long as they are acceptable to the external FTP server.
A.3 Transferring Files To The PLC’s Web Server
If you are only using the extended file space for the purpose of storing additional web
pages on the built-in web server, then you can use the FTP client software such as
FileZilla client to transfer the program to the PLC.
Appendix A Extended File System
A.4 Accessing The Extended Data Files Using TBASIC
TBASIC program on an F-series PLC with r77 firmware can directly access any data file
with names from “Z000.yyy to Z399.yyy”. File with names from “0.yyy” to “Y.yyy”
are reserved for storing web pages only and hence are not accessible by TBASIC.
The PLC can open a new file for writing new data (essentially deleting the old file
content), or open an existing file and append data to the end of the file. It can also open
a file and read data from the file as ASCII strings. It can achieve this by using the
PRINT #8 and INPUT$(8) functions, which will be described in details in the following
sections. We have created a sample program: “ExtendedFileSystem.PC6” (click here:
http://www.tri-plc.com/trilogi/ExtendedFileSystem.zip to download) that demonstrates all
these new capabilities.
A.4.1 Open A File For Writing New Data
Syntax: PRINT #8 “<WRITE
Zxxx.yyy>”
where “Zxxx.yyy” is the file name. If successfully executed, the “<WRITE>”
command will open the file and set the file pointer to the beginning of the file.
Thereafter the PLC can start writing ASCII data to the file using the PRINT #8
<string data> command. [Note: the PRINT #8 command automatically appends
a carriage return to the end of the string data unless the string data is terminated
with a semi-colon (‘;’) ].
When the PLC has completed writing data, it must close the file by executing the
command: PRINT #8 “</>”.
E.g.
PRINT
PRINT
PRINT
PRINT
#8
#8
#8
#8
“<WRITE Z005.TXT>”
“The current Greenwich Mean Time is”
STR$(TIME[1]);”:”;STR$(TIME[2]);”:”;”00”
“</>”
The CPU should use the STATUS(2) command to check whether the <WRITE>
has been successfully executed before begin writing data to it. STATUS(2)
command returns a 1 if “<WRITE>” operation is successful and returns a ‘0’ if the
operation failed. The CPU can only write or access to a single file at a time so
any opened file must be closed by the PRINT #8 “</>” command before another
file can be opened for writing.
A.4.2 Open A File For Appending Data To The End Of The File
Syntax: PRINT #8 “<APPEND Zxxx.yyy>”
Appendix A Extended File System
where “Zxxx.yyy” is the file name. If successfully executed, the “<APPEND>”
command will open the file and set the file pointer to the end of the file.
Thereafter any string data following a PRINT #8 command will be appended to
the end of the file. When the PLC has completed appending data, it must close
the file by executing the command: PRINT #8 "</>".
As per the “<WRITE>” command, the CPU should also use the STATUS(2)
command to check whether the <APPEND> command has been successfully
executed before begin writing data to it.
Example
PRINT #8 "<APPEND Z"+STR$(F,3)+".txt>"
S = STATUS(2)
‘ Status(2) returns 1 if successful.
IF S <> 1 RETURN: ENDIF
FOR I = 1 to 100
PRINT #8 STR$(I,4)+":This is the Appended first line"
PRINT #8 STR$(I,4)+":This is the Appended second line"
SETLCD 1,1, "Append #"+STR$(I,4)
NEXT
PRINT #8 "</>"
‘ close the file
A.4.3 Delete A File
Syntax: PRINT #8 “<DELETE Zxxx.yyy>”
where “Zxxx.yyy” is the file name of the file to be deleted. There is no need to
close a deleted file.
A.4.4 Open A File For Reading
Syntax: PRINT #8 “<READ Zxxx.yyy>”
where “Zxxx.yyy” is the file name of the file to be opened for reading. If the file
has been successfully opened for reading after execution of the PRINT #8
“<READ>” command, the PLC can start to retrieve ASCII data from the file lineby-line using the INPUT$(8) command. A line is either a string that is terminated
with a Carriage Return character (ASCII 13), or is a 70-character long string
(which is the maximum length of any string variables A$ to Z$) without carriage
return. In either case the return string does not contain the CR character itself.
The PLC can check if a file has been successfully opened for reading using the
STATUS(2) function AFTER executing the PRINT #8 “<READ>” command.
STATUS(2) will only return a 1 if a file has been successfully opened.
Appendix A Extended File System
The PLC can determine if the End-of-File (EOF) has been reached using the
STATUS(2) function after every INPUT$(8) command has been executed.
STATUS(2) returns a 255 if the EOF has been reached. The PLC should then
close the file by executing the “PRINT #8 “</>” command.
A$ = "<READ Z"+STR$(F,3)+".txt>"
S = STATUS(2)
IF S <> 0
SETLCD 1,1, "Failed to Open File"
GOTO @100
ENDIF
C = 0
PRINT #8 A$
SETLCD 1,1, A$
WHILE 1
A$ = INPUT$(8)
S = STATUS(2)
IF S = 255 EXIT : ENDIF
' S = 255 means EOF
SETLCD 2,1,A$
DELAY 50
' So that reader can read from the screen.
C = C+1
ENDWHILE
SETLCD 1,1, "Read ” +STR$(C) + " lines "
@100
PRINT #8 "</>"
' close the opened file
Appendix A Extended File System
A.5 Setting Up The FileZilla FTP Server
One important capability of the new PLC with r77 firmware is the ability to upload file
created by the PLC to an external server on a local area network or on the Internet via
the FTP protocol. If you have access to an FTP username and password on your
company’s server (or if the SysAdmin is authorized to set up an account for you) you
can certainly use your own account for testing. If not, you can download the free Filezilla
FTP Server and set it up for testing. The “ExtendedFileSystem.PC6” has an FTP upload
demo and it was configured to work with a FileZilla FTP server.
Using Filezilla has the advantage that you can see the login sequence performed by the
PLC when it attempts to connect to the FTP Server so that it is easier to troubleshoot
connection problem. (For professional grade troubleshooting, one handy program to
have is the “Wireshark” program which is a TCP/IP packet sniffer that allows you to look
at the actual TCP/IP packets sent between your PC and the PLC). However, it is
important to setup the Filezilla server program properly to minimize connection trouble.
A.5.1 Download and Setup FTP Server
1. First download the FileZilla server installer from the following website:
http://filezilla-project.org/download.php?type=server
2. Run the “FileZilla Server Interface” program which is meant for managing the FTP
Server settings.
3. If the FileZilla Server is running on the same PC that you are running the FileZilla
Server Interface program then you can use the localhost IP address which is
127.0.0.1 – the Port can be anything since this is a client port that the Interface
Appendix A Extended File System
program is using to interact with the FTP Server (don’t be confused with the FTP
Server listening port which is by default = 21).
4. If this is the first time you run the program after setting up Filezilla FTP Server there
will be no Administration password so you can leave it blank. Click OK to connect.
5. Click “Edit->Settings” and then “General Settings -> Welcome message” – leave
only one line of welcome message so that the PLC has less work to do. Then click
OK to accept the change.
6. Click “Edit –> Users” in order to setup a user name and password for your test. The
“ExtendedFileSystem.PC6” program uses a username = “PLC” and password =
“1234” so for a quick test you may like to setup the same username and password:
7. At the “General” page of the setup screen, click “Add” button at the “Users” pane to
add a username “PLC”. Since no group has been defined simply leave the default as
“<none>” in the second text box as shown in the following diagram.
Appendix A Extended File System
8. Next click “Shared folders” page and you must setup a folder that is to be used to
receive uploaded file. Click “Add” at the “Directories” pane to add the folder. You can
choose any folder on your PC to be used for the FTP upload and you just have to
remember the location so that you can look for the uploaded file later in the test.
However, make sure that you check all the check boxes for “Read”, “Write”,
“Append” etc as shown in the diagram.
9. Click “OK” to complete the setup. The FTP server should now be waiting for
connection.
A.5.2 Testing Connection To The FTP Server Using Telnet
You can now test the FTP Server using the FileZilla client as mentioned in Chapter 2.9
of the PLC User’s Manual.
But a better way to test is to use the “Telnet” program on your PC (if you are running
Windows Vista or Windows 7 you may need to enable the Telnet program since it is
disabled by default – do a quick Google search on how to enable the Telnet client
software on your PC).
Also you may want to find out the IP address of your PC that is running the FileZilla
Server. If you have TLServer running on your PC your IP address is reported on the
TLServer’s front panel. You can also get the IP address from the Windows “Network
Connection Status” as shown below. Our test PC has an IP address = 192.168.1.168
which will be used in the following tests as well as used in the PLC program to connect
to the FTP Server.
Appendix A Extended File System
1. First open a command prompt window and then type “telnet 192.168.1.168 21”
- this will open a telnet connection to the FTP server on our test PC with IP address
192.168.1.168 and listening at port 21. Please replace the IP address with the
actual IP address of your PC. The following screen shot captures the test sequence.
Note that the same command/response sequence with the server is also shown on
the FileZilla Server Interface program front panel:
USER PLC
PASS 1234
Appendix A Extended File System
2. Once you get the “230 Logged On” message you know that the FTP setup is done
correctly. Note that the welcome message from the FTP Server shows only one line
“220 FileZilla Server Version x.xx” which is what we have set it up to be.
You can now disconnect from the FTP server by typing “Quit” at the command
prompt.
3. There is one more things you need to do before you proceed to test the FTP upload
features of the PLC to avoid connection problem – that is to temporarily TURN OFF
the Windows Firewall and any software firewall setup by anti-virus software
during your test. You can always re-enable your software firewall(s) after the test if
you wish. PC operating system are designed to run client program normally instead
of acting as a server so Windows Firewall by default is to block all incoming
connections to the FTP Server. Thus it can give you a lot of headache when you are
trying to connect to the FTP server operating behind the Windows Firewall.
Notes:
a) The main purpose of Windows Firewall is to protect your PC when you are
connected to say a public wi-fi network. But if your PC is connected to the Internet
via a router at work or at home, the router hardware itself would act as a firewall to
isolate your PCs and a software Firewall is actually redundant. (If a hacker tried to
connect to a port to your public Internet IP address what he reached would be the
port on the router and he would not be able to reach your PC, unless you have
specifically set up to forward all TCP/IP messages sent to that port to a specific PC).
b) If you really want to use the Filezilla FTP Server as a permanent server on a PC to
receive files, and still want to have the Windows Firewall enabled, you can refer to
the last section in this chapter which describes how to do it.
Appendix A Extended File System
A.6 Uploading File From PLC to FileZilla FTP Server Directory
A.6.1 Overview of The FTP Protocol
The FTP protocol requires two socket-connections between the devices performing the
file transfer. One connection is the “command” channel where FTP commands such as
STOR or DELE and the responses are sent as plain ASCII text strings between the FTP
client and the FTP server. The second connection is the “data” channel where only the
file content or the file directory data are being transferred.
There are two transfer modes: “Active” mode and “Passive” mode. Active mode requires
that the server establish a data connection back to the client. Passive mode on the
other hand, requires that the client also be the one to establish the data connection. i.e.
For passive mode, both the command and the data connections are performed by the
client (the PLC in this case).
The PLC has been designed to use only passive mode to transfer file to the FTP
server. Passive mode is preferred because that is the only way to transfer file if the FTP
Server is located on the Internet. The alternative active mode transfer requires the
server to make a data connection back to the PLC that is sitting behind a router firewall,
and that can be problematic unless the router is specifically configured to forward the
data port to the PLC.
A.6.2 PLC FTP Upload Procedure
In order to upload file to the FTP Server, the PLC would use the PRINT #4 “<TCPConnect
xxx.xxx.xxx.xxx:21>” command tag to connect to the FTP server port 21 to establish the
“command” connection to the FTP Server. The PLC uses its PRINT #4 to send and
INPUT$(4) to receive ASCII text strings from the FTP server via the command channel.
The PLC would then send the command “PASV” to inform the FTP server that it wants to
transfer a file in passive mode.
At this point you can use the PRINT #4 command to send any valid FTP command to the
server, including changing directory (CWD command – make sure the directory exist),
deleting a file (DELE command – beware of what you are deleting!) etc.
When the PLC is ready to start a file transfer to the FTP server, the server will in turn
provide the PLC with the port number that it has opened for the PLC to connect to establish
a data connection. Upon receiving this port number the PLC will make a second TCP
connection to the given port and then the actual file transfer will begin.
A new, network service command tag named “FTPUPLD” handles the negotiation between
the FTP Server and the PLC as well as handling of the data transfer from the PLC to the
FTP server. The following is the syntax:
PRINT #4 “<FTPUPLD Zxxx.yyy
[destination file name]>”
Appendix A Extended File System
Where: Zxxx.yyy is the file name of the extended file that the PLC has access to. The
[destination file name] can be any legal name acceptable to the server so you
can attach a date or time stamp to the file name for easy identifications.
When the above <FTPUPLD> command is run, the PLC will send the actual “STOR”
command in the background to the FTP server and then obtain the port number from the
server and it will then make a data connection to it, and file transfer can then begin.
A.6.3 Monitoring The FTP Upload Progress
Once the file transfer begins the PLC firmware will handle the rest of the file transfer until
either the file has been completely transferred or the transfer is aborted due to a network or
server trouble. You can monitor the progress of the file transfer using either the STATUS(4)
or STATUS(20) functions.
STATUS(4)= 0 : FTP client was idle or last FTP failed
1 : FTP data transfer just started
2 : 1st FTP segment transferred, now transferring the rest
3 : FTP data transfer completed.
STATUS(20) > 0: Number of bytes uploaded to FTP Server. Transfer is in progress.
< 0: Total number of bytes uploaded. Transfer completed.
For example, If 2,345 bytes has been uploaded to the server and the transfer has ended,
STATUS(20) will return the number = –2345.
Since file transfer can take substantial amount of time to complete, it is not wise to run a
loop to wait for the file transfer to complete since this will block the PLC from processing
any other part of the program. The demo “ExtendedFileSystem.PC6” shows you how to
setup a monitoring function to periodically monitor the progress of the file transfer and
report the transfer status on the LCD display.
Please refer to the comments in the custom function “fnConnFTP” and “fnMonFTP” of the
“ExtendedFileSystem.PC6” program for more detailed descriptions of each command
involved in the FTP file transfer.
Appendix A Extended File System
A.7 Setting Up A FTP Server Behind a Windows Firewall.
Please refer to the following Microsoft document describing issues and solutions related to
FTP server behind the Windows Firewall.
http://technet.microsoft.com/en-us/library/dd421710(WS.10).aspx
Microsoft focuses mainly on the FTP server in their IIS server (for obvious reasons) instead
of Filezilla. If you are setting Filezilla as a permanent FTP server behind a software firewall
you can try to make the following configuration setup:
1) You must specifically setup a range of port number for Passive mode use. These are the
port number that Filezilla will assign to the PLC to make a data channel connection when it
attempts to transfer a file using passive mode. The following is an example where two port
numbers are assigned so that two PLCs may connect to the Filezilla simultaneously. You
can add a larger port range if more PLCs may connect to the FTP Server simultaneously.
Next, open up Windows Firewall and add to the Exception list the port 21 (command port)
and ports 41000 to 41001 (or whatever range limit you have set to in the FileZilla Setup
screen). This should allow the FTP Server to receive connection from these ports that the
PLC will be using to make the command and data connections.
Appendix A Extended File System