1
SAAELIP Authority Portal - User Guide
SAAELIP AUTHORITY PORTAL – USER GUIDE
South Africa Department of
Environmental Affairs
(DEA)
Version: 1.0
Issued Date: June 30, 2015
1368 How Lane
North Brunswick, New Jersey 08902
www.enfotech.com
Page 1 of 128
SAAELIP Authority Portal - User Guide
TABLE OF CONTENTS
1
OVERVIEW OF SAAELIP ..................................................................................................................... 5
1.1
1.2
2
DEFINITIONS, ACRONYMS, AND ABBREVIATIONS ................................................................................. 5
PREREQUISITES ................................................................................................................................ 6
OVERVIEW OF BUSINESS PROCESSES IN SAAELIP ..................................................................... 7
2.1
ACCOUNTS AND SECURITY MANAGEMENT .......................................................................................... 7
2.1.1
Facility Account Creation ......................................................................................................... 7
2.1.2
Licensing Authority Account Creation ..................................................................................... 8
2.2
AEL ASSESSMENT AND ISSUANCE ................................................................................................... 10
2.3
AEL POST-ISSUANCE MANAGEMENT................................................................................................ 12
2.3.1
AEL Renewal Process ........................................................................................................... 12
2.3.2
AEL Transfer / Variation Process .......................................................................................... 13
2.3.3
AEL Review Process (Initiated Only by Licensing Authority) ................................................ 14
2.3.4
AEL Termination Process ...................................................................................................... 15
2.4
PERFORMANCE METRICS MANAGEMENT .......................................................................................... 16
2.5
ANNUAL EMISSION INVENTORY REPORTING CYCLE IN NAEIS ........................................................... 16
2.5.1
The BIG Picture ..................................................................................................................... 16
2.5.2
Emission Inventory Data Model............................................................................................. 17
2.5.3
NAEIS Process Overview ...................................................................................................... 18
3
WEB PART .......................................................................................................................................... 19
3.1
SUBMITTAL SUMMARIES .................................................................................................................. 19
3.2
MY TASKS ...................................................................................................................................... 20
3.3
MY INSPECTIONS ............................................................................................................................ 20
3.4
MESSAGE CENTER .......................................................................................................................... 20
3.5
MY QUERIES................................................................................................................................... 20
3.5.1
System Default Queries ........................................................................................................ 20
3.5.2
Self-Created Queries ............................................................................................................. 21
4
ACCOUNT AND SECURITY MANAGEMENT.................................................................................... 21
4.1
MANAGE “MY ACCOUNT” ................................................................................................................. 21
4.2
MANAGE SYSTEM USERS ................................................................................................................ 21
4.2.1
Viewing User Information ...................................................................................................... 22
4.2.2
Creating New System User ................................................................................................... 24
4.3
MANAGE FACILITY USERS................................................................................................................ 24
4.3.1
Viewing User Information ...................................................................................................... 25
4.3.2
Change User’s Account Type and Account Association ....................................................... 26
4.3.3
Creating New Facility User .................................................................................................... 27
5
FACILITY MANAGEMENT ................................................................................................................. 28
5.1
VIEW/EDIT AN EXISTING FACILITY .................................................................................................... 28
5.1.1
Search for a Facility ............................................................................................................... 28
5.1.2
View/Edit a Facility ................................................................................................................ 28
5.2
ADD A NEW FACILITY....................................................................................................................... 29
Page 2 of 128
SAAELIP Authority Portal - User Guide
5.2.1
5.2.2
5.2.3
6
Source Identification Section ................................................................................................. 29
Relevant Authority Only Section............................................................................................ 30
Primary EI Contact Section ................................................................................................... 30
AEL ASSESSMENT AND ISSUANCE ............................................................................................... 32
6.1
OVERVIEW OF SUBMISSION REVIEW FEATURES ................................................................................ 32
6.1.1
Submittal List ......................................................................................................................... 32
6.1.2
Summary of Review Status ................................................................................................... 33
6.1.3
Submission Info ..................................................................................................................... 33
6.1.4
Work Activities ....................................................................................................................... 34
6.1.5
Final Decision ........................................................................................................................ 36
6.1.6
Correspondence .................................................................................................................... 37
6.1.7
Email History ......................................................................................................................... 38
6.1.8
Violation/Enforcement ........................................................................................................... 38
6.1.9
Reporting Obligation .............................................................................................................. 38
6.2
LICENSE MANAGER ......................................................................................................................... 39
6.3
TRACKING CORRESPONDENCES WITH APPLICANTS ........................................................................... 39
6.4
MANAGE PAPER SUBMISSIONS ........................................................................................................ 40
6.4.1
Create New Submittal ........................................................................................................... 40
6.4.2
Edit Pending Submittal .......................................................................................................... 41
6.5
INSPECTION MANAGEMENT .............................................................................................................. 42
7
PERFORMANCE METRICS TRACKING ........................................................................................... 45
7.1
OVERVIEW OF REPORT VIEWER FUNCTIONS..................................................................................... 45
7.1.1
Filtering Criteria ..................................................................................................................... 45
7.1.2
Export & Print Report ............................................................................................................ 45
7.2
SUBMITTALS PROCESSED REPORT .................................................................................................. 46
7.3
INTERMEDIATE MILESTONES REPORT............................................................................................... 47
7.4
PENDING SUBMITTALS REPORT ....................................................................................................... 48
8
NAEIS – ANNUAL EMISSION INVENTORY REPORTING ............................................................... 49
8.1
NAEIS MASTER LIST PREPARATION ................................................................................................ 49
8.1.1
Generate Master List ............................................................................................................. 50
8.1.2
Approve Master List .............................................................................................................. 50
8.1.3
Add/Remove Source ............................................................................................................. 51
8.1.4
Publish Master List ................................................................................................................ 52
8.1.5
Email Notification and Confirmation ...................................................................................... 53
8.1.6
Delete and Regenerate Master List ...................................................................................... 54
8.1.7
View Master List History ........................................................................................................ 54
8.2
NAEIS EI REPORT DATA ENTRY ..................................................................................................... 55
8.2.1
Source Form .......................................................................................................................... 55
8.2.2
Contact Form ......................................................................................................................... 59
8.2.3
Stack Form ............................................................................................................................ 61
8.2.4
Emission Unit Form ............................................................................................................... 66
8.2.5
Reporting Group Form .......................................................................................................... 71
8.2.6
Activity and Emission Form ................................................................................................... 73
8.2.7
Completeness Check ............................................................................................................ 84
Page 3 of 128
SAAELIP Authority Portal - User Guide
8.2.8
Certification and Submission ................................................................................................. 87
8.2.9
Reports .................................................................................................................................. 90
8.3
NAEIS REPORTING OBLIGATION MANAGEMENT ............................................................................... 92
8.3.1
Submission Tracking ............................................................................................................. 92
8.3.2
Non-Compliance Submission Notification ............................................................................. 92
8.4
NAEIS AUDIT CONSOLE.................................................................................................................. 94
8.4.1
Pre-Audit Result Tab ............................................................................................................. 94
8.4.2
Audit Assignment .................................................................................................................. 95
8.4.3
NAEIS Report Site Map in Audit Module ............................................................................... 96
8.4.4
Audit Detail Tab ..................................................................................................................... 97
8.5
NAEIS DATA MINING AND GIS ........................................................................................................ 99
8.5.1
GHG Data Analysis Report ................................................................................................... 99
8.5.2
Emission Search by GIS ..................................................................................................... 100
9
ADDITIONAL SAAELIP FUNCTIONALITIES................................................................................... 101
9.1
CALENDAR.................................................................................................................................... 101
9.1.1
Task Calendar ..................................................................................................................... 101
9.1.2
Inspection Calendar ............................................................................................................ 101
9.2
W ORK TASK MANAGEMENT ........................................................................................................... 102
9.2.1
Tracking My Task ................................................................................................................ 103
10
10.1
10.2
10.3
11
OTHER HELPFUL INFORMATION............................................................................................... 103
SUBMITTAL STATUS DESCRIPTIONS ............................................................................................ 103
LICENSE STATUS DESCRIPTIONS ................................................................................................ 104
INSPECTION STATUS DESCRIPTIONS........................................................................................... 104
APPENDIX ..................................................................................................................................... 105
11.1
AEL ASSESSMENT W ORK FLOW ................................................................................................ 105
11.1.1 AEL Assessment Work Flow Overview ............................................................................... 105
11.1.2 New AEL: EIA + AEL ........................................................................................................... 106
11.1.3 New AEL: AEL Only ............................................................................................................ 107
11.1.4 AEL Renewal ....................................................................................................................... 108
11.1.5 AEL Review ......................................................................................................................... 109
11.1.6 AEL Transfer ....................................................................................................................... 110
11.1.7 AEL Variation....................................................................................................................... 112
11.1.8 AEL Section 22A ................................................................................................................. 113
11.2
GROUP AND ROLE RELATIONSHIP .............................................................................................. 115
11.2.1 Work Groups ....................................................................................................................... 115
11.2.2 Roles ................................................................................................................................... 117
11.3
CREATING AND SUBMITTING APPLICATIONS ................................................................................ 119
11.3.1 AEL Application ................................................................................................................... 119
11.3.2 Submit AEL Compliance Report.......................................................................................... 126
Page 4 of 128
SAAELIP Authority Portal - User Guide
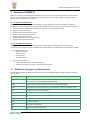
1 Overview of SAAELIP
SAAELIP is a One-Stop Portal designed to provide single sign-on entry for Atmospheric Emission Licensing and Air
Emission Inventory Reporting to regulated community and Authorities, and also to support the general public to
query environmental data of their interests.
(A) For DEA and Local Authorities:
SAAELIP will serve as a central platform for the DEA to review submissions, license management, compliance
monitoring, and authority performance monitoring. SAAELIP offers the authority users the following functionality:
Process and assess submissions, as well as track status at every step of the work flow
Approve or deny submissions
Manage license status and issue licenses
Create and accept paper submissions
Manage inspections and results
Provide performance metrics reporting tools
Manage facility and authority users
(B) For the Regulated Community:
SAAELIP will serve as a central platform for the facility to manage license applications, licenses, reporting
requirements, and compliance reports. SAAELIP offers online options for a wide spectrum of submittals, including:
Environmental Licensing
o Apply new licenses
o Amend licenses
o Renew licenses
o Terminate licenses
Environmental Reporting
o Submit compliance reports and monitoring data
o Submit annual emission inventory reports and emission data
1.1
Definitions, Acronyms, and Abbreviations
This subsection provides the definitions of all terms, acronyms, and abbreviations required to properly interpret
the User Guide.
Term
Definition
SAAELIP
South African Atmospheric Emission Licensing & Inventory Portal. The portal provides
a single sign-on access to SNAEL and NAEIS systems.
SNAEL
System for National Atmospheric Emission Licensing (SNAEL) System
NAEIS
National Air Emission Inventory System of South Africa, under the SAAQIS II project
DEA
Department of Environmental Affairs
AEL
Atmospheric Emission License
EI
Emission Inventory
AQO
Air Quality Officer
ACO
Accounting Officer
ECO
Emission Control Officer
ESA
Electronic Signature Agreement
Page 5 of 128
SAAELIP Authority Portal - User Guide
Term
Definition
PIN
Personal Identification Number
AELA
Atmospheric Emission Licensing Authority
LA
Licensing Authority
1.2
Prerequisites
In order to use the SAAELIP system, the user will need the following:
Internet connection
IE 7.0 or higher
PDF file Viewer (for viewing PDF files only)
Page 6 of 128
SAAELIP Authority Portal - User Guide
2 Overview of Business Processes in SAAELIP
In order to utilize SAAELIP, the user needs a firm grasp of certain business processes to effectively utilize the
modules. This section provides a high level overview of the business processes supported by SAAELIP.
2.1
Accounts and Security Management
To use SAAELIP, accounts must be first set up so that users can access SAAELIP. There are two different sets of
accounts that SAAELIP manages:
Facility
Authority
2.1.1
Facility Account Creation
The facility accounts can be created and accessed through the SAAELIP facility portal but the users are managed
through the authority portal. The authority can also create facility users. In addition, the authority is responsible
to approve/disable facility associations and add facilities that are not currently in the database. In order to
approve user accounts, the Licensing Authority will need to receive a signed subscriber agreement. Without
approved facilities, the facility user cannot submit applications in SAAELIP.
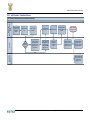
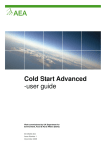
The diagram below outlines the steps necessary to create and activate an ACO / ECO account.
Create an ACO / ECO Account
Phase
Facility User
Already
registered in
NAEIS?
No
Self Registration on
the Portal
Facility found
in the Portal
database?
Indicate role as
“ACO / ECO”
Yes
Logs into the Portal
using the password
sent by system
Print and sign
Electronic Signature
Agreement
Registrant can resubmit ACO / ECO
authorization
request
End
Yes
Log into the Portal
with NAEIS
username &
password
Enter general
information
Select & answer
security questions
Click “Associate
Facility” to link
facilities to the
account
End
No.
Applicant
Contacts
AQO
to Add Facility
Complete account
registration process
1. Search Facility
and add to account
2. Able to prepare
application(s) for the
facilities ONLY
Mail signed
agreement to
Authority
A email / notification
is sent out to the
invalid user to
explain why he/she
is being rejected.
Able to certify &
submit
application(s) /
reports for the
facilities
Authority
No
Add new facility into
the Portal database
Receive the ACO/
ECO’s ink signature
Valid ACO/
ECO?
Yes
Turn on the ACO/
ECO’s right for the
associated facilities
on the Portal
The diagram below outlines the steps to create a Consultant account.
Create a Consultant Account
Phase
Consultant
Already
registered in
NAEIS?
No
Self Registration on
the Portal
Indicate role as
“Consultant”
End
Yes
Log into the Portal
with NAEIS
username &
password
Enter general
information
Select & answer
security questions
Logs into the Portal
using the password
sent by system
End
The diagram below outlines the steps on how an ACO/ECO can associate a consultant to work for him/her.
Page 7 of 128
SAAELIP Authority Portal - User Guide
ACO/ECO User to Associate Consultant to Prepare Applications / Reports
Phase
ACO/ECO User
Consultant
2.1.2
Enter the
consultant’s
registered email
Go to “My Account”
Manage Consultants
and Preparers
Choose authorized
facility(s)
Add authorizations
Set effective &
expiration dates, if
any
Choose authorized
submittal type (i.e.
AEL application)
Save the
association settings
Set permission as
“Prepare only”
Able to prepare an
application / report for the
ACO / ECO
Create a consultant
user account
Receive email
notification on the
association
Licensing Authority Account Creation
Authority accounts can be added by managers and administrators of the DEA. Authority users will need their
accounts set up before being able to use the access the SAAELIP authority portal. Accessibility and visibility of the
user are based on the role and grouping association.
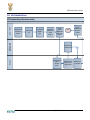
The below diagram demonstrates the steps needed to create an authority user account.
Create a New Authority User Account
Authority User
Prospective
Authority User
Notifies Authority
Super Administrator
Portal Super
Administrator
Super Administrator
Creates Account,
Assigns roles and
groups
SNAEL
Admin
Accounts are
created in SNAEL
NAEIS
Admin
Phase
Accounts are
created in NAEIS
Receive email
notification on
account login and
password
New Authority User
logs into the Portal
End
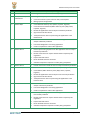
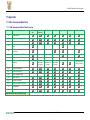
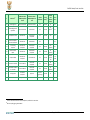
Currently SAAELIP has nine distinct roles that can be given to a user. The below table shows the general goals for
each user role. For more information on the current security groups and role association configuration continue to
section 8.5.
ID
Role Name
Goals, Motives, and Usage Patterns
Authority Actors
1
Portal Super
Create user accounts in the Portal
Page 8 of 128
SAAELIP Authority Portal - User Guide
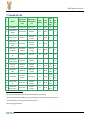
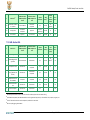
ID
2
3
4
5
Role Name
Goals, Motives, and Usage Patterns
Administrator
Manage user access to SNAEL or NAEIS system(s)
SNAEL / NAEIS Super
Administrator
Manage security and permission setup
Create and maintain system reference data, and templates
Manage system configurations
Create National Authority users (Clerks, Inspector, Engineer)
Create Provincial and District/Metro Authority users (AQO, Clerks,
Inspector, Engineer)
Review AEL applications that are subject to National jurisdiction
Sign and issue AEL final license
Track performance metrics of processing AEL applications at the
National level
Determine fee amount and issue invoices to AEL applications that are
subject to National jurisdiction
Issue acknowledgement of receiving applications
Conduct completeness audit on AEL applications
Perform pre-licensing inspections on AEL applications that are subject
to National jurisdiction
Review and comment on reports and documents required by AEL
regulations
Prepare draft AEL license
Revise draft AEL based on comments
Schedule and perform inspection on facility being complained
National AQO
National Role 1
National Role 2
6
National Role 3
Provide comments on draft AEL that are subject to National jurisdiction
7
Provincial AQO
Create Provincial Authority users (Clerks, Inspector, Engineer)
Create District/Metro Authority users (AQO, Clerks, Inspector,
Engineer)
Review AEL applications that are subject to its Provincial jurisdiction
Sign and issue AEL final license
Track performance metrics of processing AEL applications at the
Provincial level
Determine fee amount and issue invoices to AEL applications that are
subject to Provincial jurisdiction
Issue acknowledgement of receiving applications
Conduct completeness audit on AEL applications
Perform pre-licensing inspections on AEL applications that are subject
to Provincial jurisdiction
Review and comment on reports and documents required by AEL
regulations
Prepare draft AEL license
Revise draft AEL based on comments
Schedule and perform inspection on facility being complained
8
9
Provincial Role 1
Provincial Role 2
Page 9 of 128
SAAELIP Authority Portal - User Guide
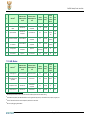
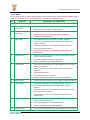
ID
Role Name
Goals, Motives, and Usage Patterns
10
Provincial Role 3
Provide comments on draft AEL that are subject to Provincial
jurisdiction
11
District/Metro AQO
Create District/Metro Authority users (Clerks, Inspector, Engineer)
Review AEL applications that are subject to its jurisdiction
Sign and issue AEL final license
Track performance metrics of processing AEL applications at the
Provincial level
Determine fee amount and issue invoices to AEL applications that are
subject to its jurisdiction
Issue acknowledgement of receiving applications
Conduct completeness audit on AEL applications
Perform pre-licensing inspections on AEL applications that are subject
to its jurisdiction
Review and comment on reports and documents required by AEL
regulations
Prepare draft AEL license
Revise draft AEL based on comments
Schedule and perform inspection on facility being complained
Provide comments on draft AEL that are subject to its jurisdiction
Associate Consultant(s) to prepare AEL application for relevant facilities
Check and review completeness of AEL application
Certify and submit AEL application
Request to revise or withdraw submitted AEL application
Track review statuses of submitted AEL applications
Renew, amend, transfer or terminate AEL license for relevant facilities
12
13
14
District/Metro Role 1
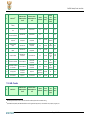
District/Metro Role 2
District/Metro Role 3
Facility Actors
15
ACO
16
ECO
Same as above
17
Consultant
Prepare AEL application for relevant facilities
Initiate AEL revision, renewal, transfer and variation processes
Check and review completeness of AEL application
No system account needed
Search for AEL application submitted in SNAEL system
Search for AEL licenses issued in SNAEL system
Public Actors
18
2.2
General Public
AEL Assessment and Issuance
To effectively process a submission, SAAELIP has broken down each submittal type to their own distinct workflows.
The list of different work flows and submittal types can be found in section 8. Please note that licenses are issued
during the workflow steps and final licenses cannot be issued without completing the work flow.
Page 10 of 128
SAAELIP Authority Portal - User Guide
AEL Assessment & Issuance Processes
Phase
System
ACO / ECO
AEL Licensing Authority
Continue work flow:
Determine AEL
application fee and
issue invoice to
applicant
Yes
Application
package
complete?
o
o
o
o
o
o
New: EIA+AEL, or AEL Only
Renewal
Review
Issue Final AEL
Variation
Transfer
Section 22A
No
Send application
back to facility
AEL Application
Submitted
Base off AEL
application reason
to generate work
flow
Pay invoiced
amount to
Authority
ACO/ECO/Consultant
Revise application
Send e-notification to
applicant on
incomplete
application and
amendment needed
Send enotification to
ACO/ECO on the
issuance event
Issued AEL (PDF)
version will be
shown on ACO/
ECO’s screen
End AEL
Assessment Process
Page 11 of 128
SAAELIP Authority Portal - User Guide
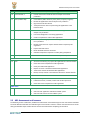
2.3
AEL Post-Issuance Management
After an AEL is issued, SAAELIP allows both Facility users and Authority user to renew, transfer, amend, or terminate a license; as well as allow only Authority users
to review an issued AEL. The diagrams below outline the high level processes of managing an AEL after it is issued.
2.3.1
AEL Renewal Process
AEL Renewal Process (Post-Issuance Activity)
Applicant
(Consultant / ACO /
ECO)
Search for the AEL
that needs to be
renewed
System
Phase
Send out e-alert to
ACO/ECO on a
specific AEL near
expiration
Select an issued
AEL
Previous
application
data exists in
Portal?
Click “Renew”
Yes
System will create a
new application; and
copy the previous
application data to the
new application
Enter/revise data
on application form
System will create a
new application, and
pre-populate only
facility data to the
new application
Insert Attachment
ACO/ECO certifies &
submits Application
in Portal
Perform Data
Validation &
Completeness
Check
End AEL Renewal
Process
Display successful
submission receipt
page & email the
receipt to ACO/ECO
Backend Task will be
triggered to save a
copy of the submission
to Portal Database
Licensing
Authority
No
Receive e-notification
that a renewal is
submitted and pending
for review
Page 12 of 128
SAAELIP Authority Portal - User Guide
2.3.2
AEL Transfer / Variation Process
AEL Transfer / Variation Process (Post-Issuance Activity)
System
Applicant
(Consultant / ACO /
ECO)
Phase
Search for the AEL
that needs to be
transferred /
amended
Click “Transfer /
Variation”
Select an issued
AEL
Previous
application
data exists in
Portal?
Yes
System will create a
new application; and
copy the previous
application data to the
new application
Enter/revise data
on application form
System will create a
new application, and
pre-populate only
facility data to the
new application
Insert Attachment
ACO/ECO certifies &
submits Application
in Portal
Perform Data
Validation &
Completeness
Check
End AEL Transfer /
Variation Process
Display successful
submission receipt
page & email the
receipt to ACO/ECO
Backend Task will be
triggered to save a
copy of the submission
to Portal Database
Licensing
Authority
No
Receive e-notification
that a transfer/variation
is submitted and
pending for review
Page 13 of 128
SAAELIP Authority Portal - User Guide
2.3.3
AEL Review Process (Initiated Only by Licensing Authority)
AEL Review Process (Post-Issuance Activity)
System
Licensing
Authority
Phase
Search for the AEL
that needs to be
reviewed
Populate a
comment box for
LA to enter reason
for review
Select an issued
AEL
Previous
application
data exists in
Portal?
Click “Review”
Yes
System will create a
new application; and
copy the previous
application data to the
new application
Review data on
application form
System will create a
new application, and
pre-populate only
facility data to the
new application
Certifies & submits
Application in Portal
Perform Data
Validation &
Completeness
Check
Licensing
Authority
No
Page 14 of 128
Start “AEL Review”
work flow
Display successful
submission receipt
page & email the
receipt to ACO/ECO
End AEL Review
Process
Backend Task will be
triggered to save a
copy of the submission
to Portal Database
SAAELIP Authority Portal - User Guide
2.3.4
AEL Termination Process
AEL Termination Process (Post-Issuance Activity)
Search for the AEL
that needs to be
terminated
Select an issued
AEL
Go to “Request for
Termination”
section
Enter reason for
termination & click
“Request
Termination”
Upload a
termination
notification letter to
EIA Authority as an
attachment
System
Licensing
Authority
ACO / ECO
Phase
End
Review to approve
termination request
System sets the AEL
status as
“Termination
Pending”
Page 15 of 128
Send email to relevant
Authority to notify of
termination request
Receive enotification that the
AEL has been
terminated
Approve
Set the AEL record
as “Terminated”
SAAELIP Authority Portal - User Guide
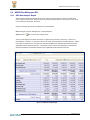
2.4
Performance Metrics Management
Being able to analyze the data within SAAELIP is one of the key features provided by the system. The system
allows the user to review all the data that is stored in SAAELIP thus providing a powerful tool in managing the
submission and compliance process.
SAAELIP provides several management tools to track performance metrics for DEA management, which include:
Dashboard Summary: to track branch wide submittal review status, as well as work task status of each
staff (Please refer to Section 0)
Summary Reports: which include Acknowledgement Letters, Submittals Processed Report, Intermediate
Milestones Report, Pending Submittals Report, AEL Report, and AEL facility Inquiry Reports (Please refer
to Section 6)
Work Tasks Management Tool: using Calendar View and Grid View to intuitively track the progress of each
work task. (Please refer to Section 7)
Queries: allow the user to create a customized search and database analysis (Please refer to section 3.4)
These tools will be described in the later sections of this guide.
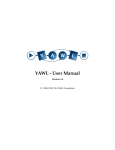
2.5
2.5.1
Annual Emission Inventory Reporting Cycle in NAEIS
The BIG Picture
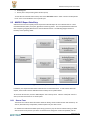
The NAEIS is an all-in-one data reporting and management system that aims to achieve the following goals by
providing a user-friendly platform for:
Authority to add, remove, and manage facilities
Reporters to report necessary EI Reports
Quality Assurance Staff to check and verify prepared EI Reports
Authority to audit submitted EI Reports
Authority to view reports that break down emission information by different categories
Figure 3.1 NAEIS High Level Overview
Page 16 of 128
SAAELIP Authority Portal - User Guide
The NAEI System has the capability to track emissions for Industrial as well as Non-Industrial Sources.
Examples of Industrial Sources are factories, plants, drill sites, etc. Examples of Non-Industrial Sources are
Residential Areas, Sea Ports, Vehicle Emission, etc.
The NAEI System will include Stack, Emission Unit, Reporting Group, Activity, and Individual Pollutant
Reporting.
The reported data can assist the National Air Quality Department with further emission analysis. The NAEI
System includes some analysis features such as the GHG Data Analysis Report and the Emission Search by
GIS.
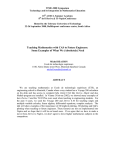
2.5.2
Emission Inventory Data Model
The diagram below shows the emission inventory data model. This outlines the hierarchical relationship of
facilities, their emission units and stacks, and processes and emissions.
Modules:
Facility
Emission Unit and/or Reporting Group
Stack
Process (Activity)
Emissions
Relationship:
Reporting Year
Data Hierarchy
Figure 3.2 Emission Inventory Model
Page 17 of 128
SAAELIP Authority Portal - User Guide
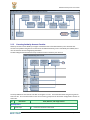
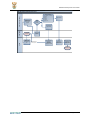
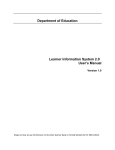
2.5.3
NAEIS Process Overview
NAEIS Process Overview
Phase
Authority
No
Master List Preparation
(Refer to Section 5.1 in
Training Manual for more
information on Master List
Preparation)
Is it Past
Compliance Date?
Yes
Send Notification of
Compliance
Reminder
Need
Auditing?
Yes
Pass Audit?
Yes
No
Facility Reporter
(AO, ECO, Preparer,
Reviewer)
NAEI System
No
Does Facility have
AO registered in
System?
Yes
Report Submitted?
No
Yes
Perform Pre-Audit
No
Create AO Account
(AO Only)
Login to Prepare
and/or Revise
Report
Page 18 of 128
Send Report Back
for Revision
Review is Complete
– No further action
needed
SAAELIP Authority Portal - User Guide
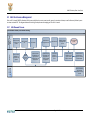
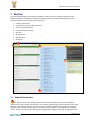
3 Web Part
The home page of SAAELIP is also called the ‘Dashboard’, which gives the user visibility of key features that
SAAELIP has to offer. The dashboard contains the following customized elements which display to the user a
general overview of current activities associated to them:
Summary of AEL Issued
Annual Emission Inventory Report Summary
Summary of AEL Applications
Compliance Report Summary
My Tasks
My Inspections
Message Center
My Queries
6
1
2
4
5
3
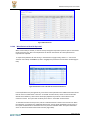
SAAELIP Data Summary on the Dashboard
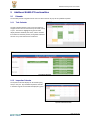
3.1
Submittal Summaries
1
The submittal, license, and reporting summary of the dashboard display provides several breakdown
analyses of the system activities. This allows the user to quickly understand their current submission status and to
prioritize. In the ‘Submittal Summary’ the user can view the number of submissions that have been submitted
alongside those that need attention, approved, amended, revised, withdrawn, or denied/failed in the SAAELIP
system. The user can view the items that have been categorized by clicking on the number of submittals in that
Page 19 of 128
SAAELIP Authority Portal - User Guide
category. This will bring the user to the ‘Submittal Review’ section of SAAELIP, displaying only those submissions
that belonged to the specified category. The same applies for the other summary sections on the left side of the
user’s dashboard.
3.2
My Tasks
2
The ‘My Task’ feature is a useful feature that has been implemented so that the user can see what tasks
have been assigned to them. The list is ordered by the ‘Due Date’ descending so that the activities that have been
overdue the longest take priority in the view.
3.3
My Inspections
3
The “My Inspection” feature allows the user to see which inspection tasks have been assigned to them. They
can choose which inspection items they see by using the option using the options in the drop down menu.
3.4
Message Center
4
The ‘Message Center’ notifies the user of any sort of communication that requires attention. By clicking on
the notification, it will bring the user to the section where the message is displayed.
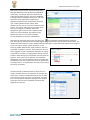
3.5
My Queries
5
‘My Queries’ is versatile in its approach to provide information to the user. The details of these queries are
configured under ‘Report -> Query -> My Queries’. This allows the user to customize their results with precision.
Unless the user is extremely familiar with the database structure, modification of these queries is not advised.
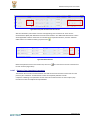
6
SAAELIP provides additional visibility tools for users in multiple groups and/or who manages other users.
The filter tool above ‘My Task’ allows the user to view tasks for their associated groups or by individuals.
Filter Tool on the Dashboard
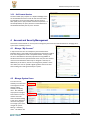
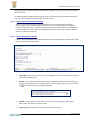
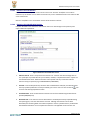
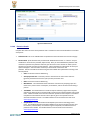
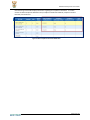
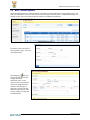
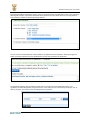
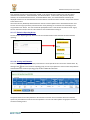
3.5.1
System Default Queries
Although SAAELIP already provides several tools to
analyze data, the user might want a more specific
breakdown.
Currently SAAELIP has the following queries that have
been pre-configured.
‘Over Due Work Assignment’ contains input
parameters so that the user can filter overdue tasks
by system user.
‘Registered User Summary’ displays all current
facility users registered in SAAELIP.
‘Inspection Status’ contains multiple parameters that
the user can use to search inspections in several
ways.
‘Application Review Work Assignment Summary’
displays the work assignments based on the system user selected.
‘License Application Summary’ contains input parameters so that the user can filter submittals by type, review
status, and date range.
Page 20 of 128
SAAELIP Authority Portal - User Guide
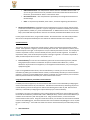
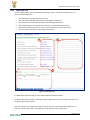
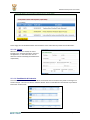
3.5.2
Self-Created Queries
The self-created query requires an in-depth knowledge of the
current database structure in order for this tool to be useful.
For example, if the current search filters did not contain a
filter option, then a query could be created to compensate. In
the example below, the query will return all the addresses in
the database filtered by the city name ‘Pretoria’.
4 Account and Security Management
This section contains details on not only how to manage the personal account but also details on managing other
system users and facility accounts.
4.1
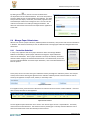
Manage “My Account”
In ‘My Account’ the user can modify their personal information.
Situations where a user might need to change their information could be
if the user changed their e-mail or telephone number. Having a valid
current e-mail address is extremely important for using SAAELIP in
situations where the user password needs to be reset, the user wants to
receive e-mail notifications when they are assigned a new task, etc.
Additionally in this section, the user can change their password. If the
user desires, the user can upload a digital signature that can be used
when sending out e-mails generated by the system.
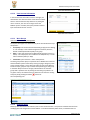
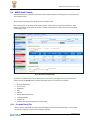
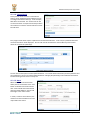
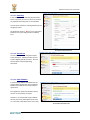
4.2
Manage System Users
From time to time,
authority users will need
to manage the account
settings of both
authority and facility
users. This module is
only open for managers.
Cases where a user will
need to access this
section would be adding
a new user or deleting a
user from their group.
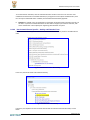
To manage system users,
navigate to ‘System
Settings -> Authority
Users’. This feature will
Page 21 of 128
SAAELIP Authority Portal - User Guide
only be available to
those with certain access
levels.
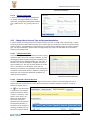
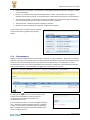
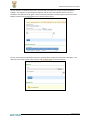
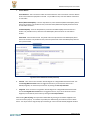
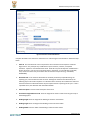
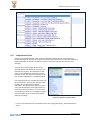
In the above Search Screen, the administrator can search for a system user based on the search filter criteria. The
search can be conducted by using the following fields, which are displayed upon clicking the ‘Advanced Search’ link:
User Name: Indicate the system user account name
First Name: User given name
Last Name: User family name
E Mail: Email address
Account Status: Choose a status for your account:
Active or Inactive
Security Group: Group in which user is associated
with
User Account Accepted: All, Yes or No
A User can also sort the search results by simply clicking the corresponding label. (For example, click First Name
label to sort the results in ascending/descending order). Managers and administrators have access to the following
functions to properly manage authority users:
View and edit current authority user information
Creating new authority user accounts
Delete authority user accounts
Associate/de-associate groups and roles
4.2.1
Viewing User Information
SAAELIP user grid view provides a general overview of the users but usually not in enough detail and contains little
ability to edit the user information. In order to edit the user information and view more detail, the user can simply
click the View / Edit (
) button. In the User Information screen, the administrator can navigate through the
different sections for making updates, if required.
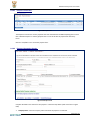
4.2.1.1
General Information
Managers and administrators will need to use this tool in
order to maintain proper user information. In the General
Information screen to the right, the administrator can
update or change an user’s information through the
following fields; First Name, Last Name, Employer, Job Title,
Address Line 1, Address Line 2, City, State, Zip, Country,
Phone Number, Extension, Mobile Number, and Email.
Page 22 of 128
SAAELIP Authority Portal - User Guide
System User Detailed Information
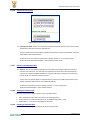
4.2.1.2
User Account Information
In the User Account Information screen to the right, the
administrator can select the status of User Status to either
active or inactive from the drop down list. By setting the
user to ‘Inactive’, the user can no longer access the
SAAELIP system. If needed, the system provides a field to
input notes about the user account.
System User Account Activation
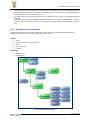
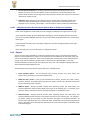
4.2.1.3 Work Groups
User Accounts and Security Management
The System will support role-based security which will include three major
components:
User/Group: user account and the functional group(s) the user belong
to. For example, a User could be assigned to a National, Province,
District or Metropolitan Municipality work group.
Role: a “Title” that represents a predefined job functions (see 4.2.1.4
below). For example, the User could have an ACO/ECO role, or could
have an Authority Role (i.e. AQO)
Permission: system function a “Role” could perform
The work group feature plays an important role in SAAELIP due to the fact
that the SAAELIP system relies heavily on the grouping to assign key tasks
and to provide visibility. This is allows the authority users from different
branches and/or groups to only see those items pertaining to their group.
In the Work Groups screen to the right, administrators can associate
groups with a particular user by clicking the associate groups button. At
any point of time, the administrator can delete the user from the existing
Groups by simply clicking the delete ( ) button of
the corresponding User.
4.2.1.4 Authority Roles
Authority roles determine if the authority user can see certain functions. This prevents unauthorized users from
modifying data and configurations within SAAELIP. In the below Authority Roles screen, an administrator can
Page 23 of 128
SAAELIP Authority Portal - User Guide
assign any user to a System Role by selecting the corresponding checkbox. By associating the user to the role, that
user now has the role access level.
Role and User Association
4.2.2
Creating New System User
Since authority users cannot create their own accounts, a
manager or administrator will need to use the ‘Add New’
system user feature. To create a new system user, click the
‘Add New’ button. In the New User Information screen,
enter the necessary information in the following sections
and clicks the ‘Save User Info’ button to save the
information of newly added user. In addition, the user can
designate the username and associate the user to a
security group. In order to have the user account
acknowledged, set the user status to active.
New System User Registration
4.3
Manage Facility Users
It is important to note that the facility users are managed by the authority. Therefore, the authority user will
should be familiar with this module in order to assist the facility users. The module contains the following features:
Edit facility user information
Reset password/pin
Enter user account without having the users password
Create/delete/de-activate a new facility user
Change user group type and facility association
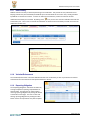
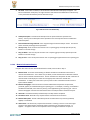
By clicking System Setting -> Facility Users, an admin user can open a search page with all currently existing facility
users displayed in the results grid-view by default.
Page 24 of 128
SAAELIP Authority Portal - User Guide
Facility User Account Grid View
In the above Search Screen, the administrator can search for a facility user based on the search filter criteria. The
administrator can search by using the following fields, which are displayed upon clicking the “Advanced Search”
link:
User Name: Indicate the system user account name
First Name: User given name
Last Name: User family name
E Mail: Email address
Account Status: Choose a status for your account:
Active or Inactive
The administrator can also sort the search results by clicking the corresponding label. (For example, click First
Name label to sort the results in ascending/descending order).
4.3.1
Viewing User Information
In the above Search Results screen, the administrator can view any User Information by clicking the View / Edit
(
) button. In the User Information screen, administrators can navigate through the different tabs to make any
necessary updates. In addition, administrators can perform the following actions:
a.
Click Change Status “
b.
Click Reset Password “
c.
Click Reset PIN “
4.3.1.1
” icon to change facility user’s status.
” icon to reset facility user’s login password.
” icon to reset facility user’s PIN.
General Information
When the View / Edit (
) button is clicked
for the user, the administrator can update or
change the facility user information through
the following fields; First Name, Last Name,
User Name, Status, Company, Job Title,
Primary Phone Number, Extension, Mobile
Phone Number, Fax Number, Email, Address
Line 1, Address Line 2, City, Country, State,
and Zip.
Page 25 of 128
SAAELIP Authority Portal - User Guide
Facility Account Detail Menu
4.3.1.2 Address Information
In the screenshot to the right, the administrator
can update or change the facility user address
information through the following fields; Address
Line 1, Address Line 2, City, country, State, and
Zip.
Facility Account Information
4.3.2
Change User’s Account Type and Account Association
In some instances, the LA may need to turn a facility ‘inactive’ for a user or change a user’s account type. In other
instances, the authority will modify the facility user’s account type since a facility user cannot once his/her account
has been created. The ACO/ECO may request from the LA to allow him/her additional rights to another submittal
type. This section describes in detail on how to manage facility user accounts so that facility users can function
properly on the Facility Portal.
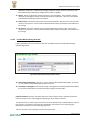
4.3.2.1 Change User’s Role
A consultant might become an ACO/ECO for a facility and may
request for their account role to change in SAAELIP. To make
the change, the authority will need to go to the facility user’s
account and access the ‘Manage Account Type’ sub menu. In
this menu, the user has the ability to configure the account
type of a facility user. The user can select whether or not the
user is a ‘Consultant’ or an ‘ACO/ECO’. If the user was
selected as a ‘Consultant’, the ‘ACO/ECO’ would associate the
‘Consultant’ via the Facility Portal. In addition to selecting the
facility user role, the type of submittal the ‘ACO/ECO’ can
utilize can also be selected.
Facility Account and Facility Association
4.3.2.2 Inactivate / Activate Account
For security reasons, a facility user’s account might need to be set to ‘Inactive’ so that the facility user may no
longer access their account such as in cases when a facility user has left the company or position. In order to
activate an account, click on
the
icon. This will prompt
a menu for the user to either
switch the account to ‘Active’,
‘Inactive’, or ‘Pending’. If the
status is set to ‘Active’, the
facility user will be able to
then create and submit
submittals that were selected
for that particular facility. If
the status is set to ‘Inactive’ or
‘Pending’, the facility user can
still see the status but will not
Page 26 of 128
SAAELIP Authority Portal - User Guide
have any rights to that facility.
Besides being able to manage the associated facility, the authority can also see which ‘ACO/ECO’ a ‘Consultant’ is
associated with. The ‘Manage Account Association’ tab within ‘Manage Public User’ allows the user to view.
SAAELIP is currently configured so that a ‘ACO/ECO’ can be a ‘Consultant’ for another ‘ACO/ECO’.
4.3.2.3 Issue / Reset PIN
For ACO/ECO, once their account is set up, they will need a PIN issued in order to submit AEL applications or
reports. In this module, the user would click on the image below to ‘Issue’ a PIN to the facility user selected. The
PIN will be sent in the form of an e-mail to the selected facility user. This feature helps reset a pin if the facility
user forgot their pin or set it incorrectly.
Issue Pin Button
4.3.2.4 Reset Password
In certain cases a user might need their password reset. Through this module, the user can reset a facility user’s
password by clicking on the ‘lock’ button displayed in the image below.
Reset Password Button
4.3.3
Creating New Facility User
An administrator also has the ability to add a new user by simply clicking the ‘Add New’ button. This feature is
often times used if the authority is setting a facility user in order to submit a paper submission. In the New User
Information screen, a user can enter the necessary information in the following sections and click the ‘Save’ button
to save the information of newly added user. After saving the user info, a message on the top of the screen will
display “Save Successfully” to notify that the user account has been created.
The newly created user will then receive an e-mail with a new password. They will have to log into the Facility
Account using this information to reset his/her password, pin, and security questions.
Page 27 of 128
SAAELIP Authority Portal - User Guide
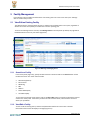
5 Facility Management
If an Authority wants to modify the information of an existing source or create a new source, the “Manage
Source” function may be used.
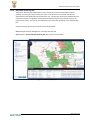
5.1
View/Edit an Existing Facility
The "Manage Source" function allows the users to maintain source/facility data in the system, regardless of
whether or not the source/facility is included in the current reporting year.
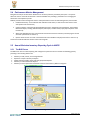
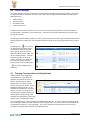
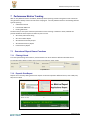
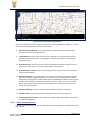
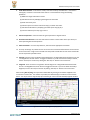
To access the "Manage Source" function, click Manage Source on the left panel. By default, the page will be
loaded with all the sources in your district (Figure 8.1).
Figure 6.1 Web Page of Managing Source
5.1.1
Search for a Facility
In the search panel (Figure 6.1), specify the desired search criteria and click on the Search button to find
the desired sources. The search criteria include:
Work Group (District)
Source Name
NAEIS Flag
SRN
Address
District Municipality
Local Municipality
To reset the user-entered search criteria, click on the Clear Filter button to remove the previously entered
values in the search panel. Note that if you leave the search criteria blank, it will search for all sources
within your jurisdiction.
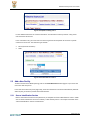
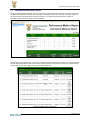
5.1.2
View/Edit a Facility
To view or edit an existing source, click the View/Edit button before the source name. The basic
information of the source will display in the page (Figure 6.2).
Page 28 of 128
SAAELIP Authority Portal - User Guide
Figure 6.2 View/Edit an Existing Source
For the detailed instructions on “Source Information” and “Emissions Inventory Contact” tabs, please
refer to Sections 8.1 and 8.2.
In the “Comments” tab, you can choose a Comment Type from the drop-down list to search a specific
comment on the source. The comment types include:
Source (General comments)
Audit
Figure 6.3 View Comments on a Source
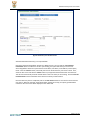
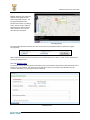
5.2
Add a New Facility
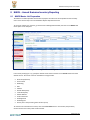
To add a new source for NAEIS reporting, click on the Create New Source button (Figure 6.1) to access the
new source data entry form.
In the new source data entry form (Figure 6.4), enter the information in the Source Identification, Relevant
Authority Only, and Primary Contact Information Sections.
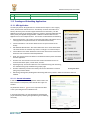
5.2.1
Source Identification Section
Refer to instructions for Source Form (Section 8.1) to complete the "Source Identification" section. Make
sure to choose whether this source is an Industry or Non-Industry Source. An example screenshot of the
“Source Identification” section is shown below.
Page 29 of 128
SAAELIP Authority Portal - User Guide
Figure 6.4 Data Entry Form of a New Source
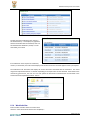
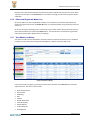
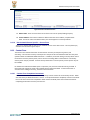
5.2.2
Relevant Authority Only Section
NAEIS Source Flag: Select “Yes” if this source needs to be reported this year; select “No” if this source is
not required to be reported this year; if you are unsure, select “Undecided”.
Figure 6.5 Relevant Authority Only Section
Work Group: Select the district to which the new source belongs.
5.2.3
Primary EI Contact Section
Refer to instructions for Contact Form (Section 8.2) to complete the sections of "Primary EI Contact
Information".
Page 30 of 128
SAAELIP Authority Portal - User Guide
Figure 6.6 Data Entry Form of a New Source
All fields marked with asterisks (*) are required fields.
Note that if the Accounting Officer already has a NAEIS account, you may click the “Get Contact’s
Information” button to search for the AO. Upon clicking, the system will allow you to search for
Accounting Officers within the system based on First Name, Last Name, E-mail Address, and Company
Name. Click the “Search” button, which will yield a list of results based on your search criteria. Then,
select the AO’s name and click the “Select” button to pre-populate the AO information onto the form.
This will also automatically associate the AO with the source in which you are creating. Click the Clear all
EI Contact Data to clear all the fields in the Emisions Inventory Contact Section.
Once the data entry form is completed, click on the Save Source button to save the form and create the
new source. When the message “Saved Successfully” appears at the top, the system-generated SRN
number for the new source will be displayed in the “SRN” field.
Page 31 of 128
SAAELIP Authority Portal - User Guide
6 AEL Assessment and Issuance
SAAELIP provides the Licensing Authority with several features to manage both submissions and licenses. Having
these tools available gives the LA flexibility to modify/review submissions and licenses. The features can be
summarized by the following four parts:
Submission review tools
License/certification management
SAAELIP communication tool with facility users
Submitting paper submissions
6.1
Overview of Submission Review Features
The submission review features provide the authority several tools to assist in the submittal review process. These
application features allow the user to see the work activity done per submittal. The user can also view the
submittal and its issuance. This section can be broken down into several parts:
Submittal List
Summary of Review Status
Submission Info
Work Activities
Final Decision
Issuance
Correspondence
Email History
6.1.1
Submittal List
When a facility user sends a submittal, the submittal will appear in the ‘Submittal Review’ module of the
‘Submittal’ section. From this module, the user is given multiple search functions ranging from ‘Submittal ID’ to
‘Facility Name’. By clicking on ‘Facility’, the submittal will sort by ascending or descending order. By clicking on
‘App. Info’, the submittal will sort by submittal ID in ascending or descending order.
Submittal List
Page 32 of 128
SAAELIP Authority Portal - User Guide
The advanced search options give the user much more flexibility in defining what should be viewed. The key
difference is that the advanced filter will allow the user to filter by ‘Department’.
6.1.1.1 Grid View
By default, SAAELIP loads the ‘Submittal Review’ section as a grid view. The grid view lets the user to view
submittals by a list.
6.1.2
Summary of Review Status
The ability to review submittals by their current status is available in the grid view. This allows the authority user
to quickly glance over submittals to understand the current situation of a submission. The ‘Review Status’
currently displays the current scheduled task. If the submittal is complete, it will display ‘Complete’ and if the
submittal was withdrawn, it will display ‘Withdrawn’.
Submission Review Status
6.1.3
Submission Info
The ‘Submission Info’ contains all the information that was provided by the applicant. The LA can use this tab to
review the attached submission document, the online form, and to view the form as a PDF for printing. By clicking
on the
icon on the ‘Submittal Review’ section, the submittal ‘Submission Info’ will open up. In this window,
SAAELIP provides a header that provides additional detail of the submittal. The header has two active features
currently: Receipt and Notification. The receipt function provides the digital record of the submission logging the
users IP address. The send notification feature allows the user to e-mail the applicant directly.
Submittal Header
In the actual ‘Submission Info’ module, the user can view the submittal in either PDF format per each section or in
a digital version. To view the submittal as a PDF, the user can select from the ‘Form View’ column and click on the
section that is desired to be viewed. If the user wants to view the digital version, the same logic would apply but
the user would click on the respective field in the ‘Online Form(s)’ column.
Page 33 of 128
SAAELIP Authority Portal - User Guide
Submittal Documents
The last part of the ‘Submission Info’ section is
the ‘Review History’. This displays any significant
activities associated with the submittal, such as if
the submittal was withdrawn, denied, or in the
case below, put on hold.
If the submission had a request for withdrawal,
revision, or termination, the status would display in this section for the user to either approve or deny the request.
The ‘Submission Info’ documents tab displays all current documents associated with the submission. This could
range from ‘Required Documents’ to ‘Review’ depending on the requirement for the submittal. If documents were
received by general mail, the user can scan and upload the documents associated with the submittal in the
‘Received Files for Required Documents’ section.
Supplemental Documents for Submissions
6.1.4
Work Activities
Each work flow is broken down into several work
activities. Unless all the work activities are completed, a
Page 34 of 128
SAAELIP Authority Portal - User Guide
final license cannot be issued. Each work activity has its
own logic depending on the requirements specified for
each activity. For example, due to the importance of
‘Public Advisory Determination’, the task is highlighted
in orange and once completed, will be green. For more
information on the logic feature, please see the
appendix submission review and particular submission
type. Under ‘Submittal Review’ and the ‘Work
Activities’ tab, the user can view each task of the review
process. The user can either filter by the ‘Status’ of the
task or the ‘Assigned To’ individual. Work tasks
highlighted in green marks the task completed, while
tasks in tan means scheduled. Any task that is grey
signifies that they are not currently accessible.
To view descriptions, documents, and additional
information for each work task, the user can click on the
icon to display the detail description of the work
task. Although each work task screen may differ slightly, the general format is typical of what is shown below. The
detailed work task consists of a status, complete date, and description. Keep in mind that only the person assigned
to the work task can change, upload documents, or save.
Currently, SAAELIP allows for four types of statuses, which are
‘Scheduled’, ‘Cancelled’, ‘Overdue’, and ‘Completed’. Once the
task is triggered, the task is defaulted to ‘Scheduled. By setting
a work task to ‘Cancelled’, it will grey out the item from the list
of tasks in ‘Work Activity Info’ and will open the next task in the
sequence. If the status is set to ‘Overdue’, the task will be
highlighted in red in the ‘Work Activity Info’ as an overdue task.
To complete a task, all the task criteria must be completed such
as issuing a license. A complete date is necessary for the task to
be saved as ‘Completed’.
The work task has an additional feature in which users can
assign a particular person to the work task. On the right side
of the screen, a side bar is displayed where the user can filter
system users by groups or by name. By clicking on the ‘chain’
icon, new users can be assigned or existing users un-assigned
to the task. Once the task is completed, the side bar will
disappear from the task.
Assigning User Menu
Page 35 of 128
SAAELIP Authority Portal - User Guide
Once a work task is completed, the work task can
be accessed but the information cannot be
modified. The sections will be greyed out. The
only exception is the ‘Assigned to’ function which
will be described further in the review process.
Locked Screen
After a draft AEL has been issued in the work task, the User can
update the draft using the only form. The user can check
checkboxes and add additional comments or upload reports all in
SAAELIP.
Once the ‘Issue Final AEL’ work task has been completed, the Authority can click on the ‘edit’ icon to access the
work task. The User can download the license and prepare the AEL for issuance to the facility. Once the hard copy
AEL is completed, the Authority can upload the document to SAAELIP.
6.1.5
Final Decision
The ‘Final Decision’ tab allows the user to change the status of a submittal during the work flow process. The
current statuses are listed below.
Admin Review - The submittal is ready for the authority to start the review process.
Approved - Submittal has been approved and license can be issued to the user/facility.
Cancelled - Sets the submittal as canceled. All work flow is stopped.
Denied – Sets the submittal as denied. All work flow is stopped.
License Issued – The license has been issued to the applicant.
Public Comment Period Closed – The public participation process is complete.
Page 36 of 128
SAAELIP Authority Portal - User Guide
Public Comment Period Open – The submittal is in the public participation stage and is waiting for a public
announcement date.
Revision – The submittal was requested and approved for revision. The submittal can no longer be
altered and all work flow is halted. A new submittal was created with the data from the revised submittal.
Tech Review Completed – All attachments have been submitted, fee has been paid in full, and submittal
form is complete; Submission ID remains the same when status is updated.
Technical Review – Default status when reviewing an submittal
Withdrawal - Sets the submittal as withdrawn. All work flow is stopped.
The user can monitor the actions taken by referring
to the ‘Review History’ grid below the ‘Decision’
section.
6.1.6
Correspondence
SAAELIP provides an additional feature for allowing the authority to notify the applicant. Being able to contact the
applicant is necessary to resolve any issues that require attention and effectively lessen the time needed to resolve
any issues. The ‘Correspondence’ section can be accessed in two different ways. If a facility user has sent a
correspondence to the LA user who is responsible for their submittal, a notification on the dashboard’s ‘Message
Center’ will be displayed. Unread messages are tagged with a yellow flag as an indicator.
By clicking on the
icon, the conversation detail can be
viewed. The screen displays the user who sent the
correspondence and a time stamp of when the
correspondence was sent.
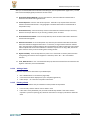
If no correspondence exists, one can be created by clicking on
‘New’. The below window will display asking for a ‘Category’
in reference to the matter described in the correspondence.
Both the subject and message are mandatory fields in order
for the message to be sent.
Page 37 of 128
SAAELIP Authority Portal - User Guide
6.1.7
Email History
SAAELIP maintains a history of all emails pertaining to each submittal. This provides an easy method of record
keeping of when they were notified by the SAAELIP system and the details of the e-mail. Only e-mails generated
by SAAELIP are stored in this section. LA users can utilize the ‘Email History’ section for reference of what
notifications the facility user received. By clicking on the
icon, the user can view the notification that was sent
to the facility user. The LA user can resend the notification in situations where the facility user did not receive the
notification the first time.
E-mail History Gridview
E-mail History View
6.1.8
Violation/Enforcement
The “Violation/Enforcement” tab within Submittal Review is for the Authority to view any violations and related
enforcements that are associate to that specific submittal or license.
6.1.9
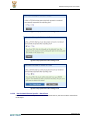
Reporting Obligation
The “Reporting Obligation” tab allows the Authority
to assign compliance reporting responsibilities for
that submittal. The Authority can add a single or
recurring reporting obligations by clicking the button
at the bottom of the page. The User can also edit
existing reporting obligations by clicking the “Edit”
button next to the requirement they wish to update.
Page 38 of 128
SAAELIP Authority Portal - User Guide
6.2
License Manager
The ‘License Manager’ provides a useful tool in managing licenses that were issued through SAAELIP. The module
can be found under the ‘Submittal’ drop down menu. The license management module offers the Applicant the
following features:
Amend licenses
Set license status
Set effective dates
View physical license
The basic search functions allow the user to search licenses via certain input parameters such as ‘Submittal ID’,
‘License Number’, ‘Site Address’, and ‘Facility Name’. The licenses can be further filtered by type of license with
the ‘App List’ function.
By clicking the ‘Advanced Search’ option, the user can search licenses by the date range of submission/license date,
category, department, and by type. Once the desired license is found, the user has several options they can select
from.
By clicking on the
icon, the user
can change the status of the license.
The edit button when selected will
open a pop up where the user can
define the effective license dates and
status and add comments. Currently
the license statuses can be set as
'Issued', 'Terminate', and 'Extension'.
If the user just wants to view the
license, then the user can click on the
icon to load a digital copy of
the license.
6.3
Tracking Correspondences with Applicants
SAAELIP provides a messaging utility,
‘Correspondence’, which allows the
applicants to communicate to the LA
directly. The Authority has several
different ways to access this section.
The user can access this section via the
dashboard’s ‘Message Center’ or the
submittal itself as detailed in the earlier
sections. The user can also utilize the
‘Correspondence’ module which can be
found under the ‘Submittal’ tab. New
messages are signaled by the
icon that
appears in the ‘Total Messages’ column.
The correspondences are connected through the submittal identification. In order to find the correspondence the
user is looking for, SAAELIP provides a basic search above the grid view. The user can search by the ‘Submittal ID’,
‘Correspondence Category’, or the ‘Date Range’. The user can also filter the list by limiting the search to new
messages by clicking on the checkbox for ‘New Messages Only’.
Page 39 of 128
SAAELIP Authority Portal - User Guide
By clicking on the
icon, the user can view the detail of the
correspondence for the selected submittal. The screen will provide a
prompt to allow the user to respond back to the applicant. The detail
view provides the subject, create date, conversation, applicant name,
and timestamps of when each message was sent. The user can also
mark the conversation as unread by checking the checkbox. This
allows the user to filter and come back to respond to the applicant at
a later date.
Correspondence Menu
6.4
Manage Paper Submissions
When the LA receives a paper submission, SAAELIP provides the authority a way to enter and store the information
in SAAELIP. This allows the authority to have an additional tool to manage paper submission alongside electronic
submissions.
6.4.1
Create New Submittal
In many cases, applicants will send a paper submission rather than through SAAELIP.
SAAELIP has the ability to process paper submissions through the ‘Paper Submission’
section under ‘Submittals’. Once a paper submittal is received, the authority will need to
determine which category the submittal would fall under. Once determined, the user can
go to the ‘Submittal Module’ and under ‘Paper Submission’, click ‘Create New Submittal’ to
start the process.
At this point, the user can select the type of submittal necessary and begin the submission process. The first part
of the process involves selecting the applicant for the submittal. SAAELIP provides a search toolbar in order to
search by the applicant’s first/last name, address, or the facility name.
Applicant Search Tool Bar
If the applicant exists, please select the radio button to make the selection and click ‘Create Submittal’. If the user
does not exist, then click on ‘New Applicant’.
Applicant Search Grid View
The new applicant option allows the user to enter in the ‘Account Type’ the user is responsible for. The facility
name contains an auto-fill feature. This allows the user to partially type in a facility name and allow the user to
select from facilities that match what already has been entered.
Page 40 of 128
SAAELIP Authority Portal - User Guide
New Applicant Facility Association
The ‘First Name’, ‘Last Name’, ‘Phone Number’, ‘Email’,
‘Address’, ‘State’, and ‘Zip Code’ are required fields. The
Email must be unique to the system or it will generate an
error in the creation process.
New Applicant Account General Information
At this point, the LA will be able to continue on in filling the submittal. For more information of the different
submittal types and process, please see section 9.6.
6.4.2
Edit Pending Submittal
In certain cases the user might have not finished a paper submittal completely so SAAELIP has them categorized
under pending submittals. These submittals can be found under the submittal tab -> paper submission -> edit
pending submittal. The page is defaulted to list the submittal as a gallery view.
Page 41 of 128
SAAELIP Authority Portal - User Guide
Edit Pending Submittal Gallery View
By placing the mouse over the
icon, the user will be able to view
additional details pertaining to the submittal such as the status, updated
date/time, owner, and full address. The user can also at this point decide
that the submittal is no longer needed and can delete the pending
submittal by clicking on the
icon. Clicking the ‘edit’ button allows the
user to continue on finishing the submittal from the point when the last
submittal was saved.
Edit Pending Submittal Mouse Over
6.5
Inspection Management
‘Pre-Licensing Inspection’ is a work task during AEL assessment process. SAAELIP will automatically schedule a PreLicensing Inspection for each AEL submittal, and assign to the corresponding personnel. Besides going to the
corresponding work task to view/edit/complete an inspection, SAAELIP also provides ‘Inspection’ module for
Authority user.
The ‘Inspection Management’ provides the necessary tools to schedule, manage, and give visibility on inspections.
SAAELIP provides a search tool to search for inspections based on the ‘Inspection ID’, ‘Status’, ‘Date Range’,
‘License Number’, ‘Site Address’, ‘Facility Name’, or by ‘Batch Number’.
Inspection Management Search Toolbar
If additional search parameters are needed, the user can use the ‘Advanced Search’ feature to filter by inspection
type and inspector.
Page 42 of 128
SAAELIP Authority Portal - User Guide
If any inspection was scheduled in error and needs to be deleted, the user can select the checkboxes for the
desired inspection and delete by clicking on the ‘Delete Selected Insp’ button below the grid view. Inspections that
have been set as ‘Compliant’ and ‘Out of Compliance’ and marked as approved by the inspection manager cannot
be deleted and the checkbox will be hidden for those inspections.
Inspection Grid View
By selecting the
icon, the user can enter the detail inspection view. The user can change the inspection status
to the several different options listed below:
Scheduled: This option is the default option once an inspection has been created.
In Compliance: Once an inspection is set as ‘In Compliance’, the user can only change the status to ‘Out of
Compliance’.
Out of Compliance: Once an inspection is set as ‘Out of Compliance’, the user can only change the status
to ‘Out of Compliance’.
Not Ready: This indicates that the facility is still not ready for inspection.
In Progress: This option is used to show that the inspector is in the inspection process
Inspection Detail View
Page 43 of 128
SAAELIP Authority Portal - User Guide
The user can enter in additional comments at any time before the inspection is approved by the inspection
manager. The inspector can also change the inspection date as long as the inspection status is not set as
scheduled. The inspection can be given a name to identify the inspection and the inspector can be also altered.
SAAELIP tracks the status changes made in the ‘Inspection Status History’.
Inspection Status History
The user can also upload supporting documents to go along with the inspection and provide a description. This
allows the user to keep records of the inspection such as images taken during the inspection.
Page 44 of 128
SAAELIP Authority Portal - User Guide
7 Performance Metrics Tracking
With so many different features in SAAELIP, SAAELIP provides reporting and task management tools to allow the
user gain better visibility of the work task status and progress. Currently SAAELIP allows for the following different
types of reporting:
Submittal Processed
Intermediate Milestone
Pending Submittals
The above only list out reports related to performance metrics tracking. In addition to above, SAAELIP also
provides additional canned reports for Authority users to track:
AEL Facility and Contact Listing
AEL License Status Report
AEL Submission Summary Report
AEL Submission History Report
Emission History Report
7.1
7.1.1
Overview of Report Viewer Functions
Filtering Criteria
From the report filtering criteria section, records selection can be set based on different individual criteria.
For example: Report Name or Report Type can be used to filter the search results
Report Filter Tool
7.1.2
Export & Print Report
Reports can be saved by clicking the disk icon. Report can also be exported to different format, such as XML, CSV,
PDF, Excel or Word.
Exporting Report Function
Page 45 of 128
SAAELIP Authority Portal - User Guide
7.2
Submittals Processed Report
The ‘Application Processed Report’ provides a breakdown of the different types of submittals that were processed
and the median review time.
Submittal Processed Report Example
The navigation bar on the side allows the user to look up submittals that
were used in generating the report. By double clicking on the individual
submittal number, the user will be directed towards the detail submittal
section of the report. This provides the user with a high visibility of the
amount of time a submittal review process takes. Be sure to click the
icon
to open the report to view the full details.
Submittal Processed Report Side Bar
Submittal Report Expand Feature
Page 46 of 128
SAAELIP Authority Portal - User Guide
7.3
Intermediate Milestones Report
The ‘Intermediate Milestone Report’ plays an intricate role in informing the user how long it has taken a task to be
completed for a particular submittal. As an example, the AEL Renewal form was selected. The report displays all
the work activities associated with the particular submittal. The report then breaks down the number of
submittals completed and the length it took to complete.
Intermediate Milestone Report Example
By utilizing the side navigation bar, the user can navigate to a particular submittal in question. The detail reporting
provides information like the status, date started, and assigned to for each particular task for that submittal type.
This provides the user with a high visibility of each type of work task.
Intermediate Milestone Report Detail Example
Page 47 of 128
SAAELIP Authority Portal - User Guide
7.4
Pending Submittals Report
The ‘Pending Application Report’ can be
filtered by submittal type and age. In this case,
AEL Renewal submittals were used to generate
the results. The report will provide the
number of total submittals not completed.
Pending Submittal Report Example
The submittal detail will be listed by
the submittal number. It will show the
submittal number, the most current
task, status, start date, and assigned
user.
Pending Application Report Detail
Page 48 of 128
SAAELIP Authority Portal - User Guide
8 NAEIS – Annual Emission Inventory Reporting
8.1
NAEIS Master List Preparation
The Master List module provides the functions to prepare the master lists and to publish the lists to facility
users. This is the first step in the annual NAEIS EI Reports Preparation Process.
To access the "Master List" function, go into the Source Management Module, then click on the Master List
menu option on the left panel.
Figure 7.1 Web Page of Master List Management
In the search panel (Figure 7.1), specify the desired search criteria and click on the Search button to find the
desired sources. The search criteria on the Master List Page include:
Work Group (District)
Source Name
NAEIS Flag
SRN
Address
District Municipality
Local Municipality
Submit Method
Confirm Received
Staff Approved
Staff Assigned
Status: (This is the processing status of each report)
To reset the user-entered search criteria, click on the Clear Filter button. Once clicked, the previously
entered values in the search panel will be removed.
Page 49 of 128
SAAELIP Authority Portal - User Guide
The following buttons are available in the Master List web page (Figure 7.2 & 7.3):
Export to Excel – exports the searched results to excel format
Approve by WorkGroup Staff – approves source from a Work Group staff (the first level of QA/QC)
Approve by Supervisor – approves source from a Supervisor (the second and final level of QA/QC)
Add Source to Masterlist – adds a source not in the current year Masterlist into the Masterlist
Remove Source – remove source from the current year Masterlist.
Publish – Publish the source. This will make the status change from “Prepared” to “Blank”.
Reports – Display reports about the Masterlist
eNotify – Notify Industry users for their obligation to report for the current EI Year
Confirm – Manually confirm the receipt of e-mail for Industry users
Delete All – removes all sources from the Masterlist and regenerates the Masterlist
Delete – removes only the selected sources from the Masterlist and regenerates those sources
Calculate Emissions for Searched Sources – calculate emissions for the selected sources
Calculate Nation-wide Emissions – calculate emissions for the whole Masterlist
Note that these buttons will be explains in further detail later on in this section.
Figure 7.2 Web Page of Master List Management - Buttons
Users with different application security settings may see different buttons displayed on the Master List web
page. For example, the "Approve by Supervisor" button is only available to the user with the "District
Supervisor" access security role.
8.1.1
Generate Master List
At the beginning of each reporting year, the National Authority will initiate the generation of the Master
List. The Master List generation is only available
th
after the 15 of January each year. For example, if
you want to generate the Master List for reporting
year 2013, the function will be available after
January 15, 2013. To generate the Master List, click
the Generate Master List button (Figure 7.3).
Figure 7.3 Master List Generations
Once the Master List is generated, the Generate Master List button will become invisible, and the initialized
Master List will show in the page.
Note that because this is the responsibility of the National Authority, the Generate Master List button will
only available to users of a National capacity.
8.1.2
Approve Master List
The approval of the Master List is a two-step process. Each district staff member should approve the Master
List under his/her name, and then the district supervisor will issue the final approval. However, for some
Page 50 of 128
SAAELIP Authority Portal - User Guide
districts, there may not be the capacity for district staff members to perform the first step of approval. In
this case, the supervisor may bypass the first step and directly click the Approve by Supervisor button.
Approve by WorkGroup Staff: District staff users may need to review the sources listed in the Master List. If
the list is verified to be correct, click on the Approve by WorkGroup Staff button to approve the source list.
Approve by Supervisor: After the Master List is verified and approved by district staff, the district
supervisor will issue the final approval on the Master List by clicking on the Approve by Supervisor button.
When a source is approved by the district supervisor, its EI Report status will be changed from “Preparing”
to “Prepared”.
Figure 7.4 Approved by WorkGroup/Supervisor
8.1.3
Add/Remove Source
To add a source to the Master List, click the Add Source button to display the Add Source window (Figure
7.4).
Figure 7.5 Pop-up window of Adding a Source
Users have the options of searching for an existing source by Source Name, SRN, Address, District
Municipality, or Local Municipality.
Page 51 of 128
SAAELIP Authority Portal - User Guide
To search for a source, enter the desired text into the search fields, and then click on the Search button to
search for the desired source.
When the search is completed, applicable results will be shown in the Search Result section. Select any
source(s) to add to the Master List by clicking the checkbox in front of the Source Name. Click the OK
button to add the selected source(s) into the Master List.
If the source is a new source (does not exist in the NAEI system), click on the Create New Source button to
create the source record (see instructions in Chapter 6), then return to the Master List section to add the
newly created source(s).
To remove a source from the Master List, select the source from the Master List grid-view (Figure 7.1), then
click on the Remove Source button. The Remove Source window from the Master List will display (Figure
7.6).
In the pop up window, select “No” from the NAEIS Flag drop-down list. If this source has stopped
operation, enter the End Operation Date.
In the Comments textbox, enter the applicable reason for the removal of the source from the Master List.
Figure 7.6 Pop-up window of Removing a Source
8.1.4
Publish Master List
When a source(s) has been approved by the district supervisor on the current year’s Master List, the
supervisor will publish the source to the Facility side. Select one or more source(s) in the Master List gridview, and then click on the Publish button (Figure 7.2). The status of source will change from “Prepared” to
“Blank”.
Page 52 of 128
SAAELIP Authority Portal - User Guide
8.1.5
Email Notification and Confirmation
To notify facility users about the obligation to report for the current year, select the applicable source(s)
and click on the eNotify button. The Email Template window will be displayed (Figure 7.6). Modify the email
contents (as needed) and click on the Send button to send the email(s) to facility users.
Figure 7.7 Pop-up Window of Email Notification
When facility users receive the email notification of the published Master List, they may click on the link in
the email text to confirm the receipt of notification (Figure 7.8).
Figure 7.8 Email of Notification
Page 53 of 128
SAAELIP Authority Portal - User Guide
If facility users notify the state staff that they have received the notification by mail, phone or other media,
authority users may click on the Confirm button in the Master List page to confirm the receipt of EI Report
notification.
8.1.6
Delete and Regenerate Master List
At any time before any source is published to facility users, if authority users feel the entire Master List
needs to be regenerated, click on the Delete All button, and repeat the Master List generation process (see
section 7.1).
At any time during the reporting process, if a particular source record needs to be re-generated, select the
source from the Master List and click the Delete button. The selected source record will be re-generated
and returned to the initial EI Report status of "Preparing".
8.1.7
View Master List History
This section is used to access all the Master Lists that have been created in the previous years. The Master
List History can be accessed by clicking Source Management > Master List History (Figure 7.9).
Figure 7.9 Master List History
In the search panel (see Figure 7.8), specify the search criteria and click on the Search button to find the
expected sources. The search criteria include:
Work Group (District)
Source Name
NAEIS Flag
SRN
Address
District Municipality
Local Municipality
Submit Method
Confirm Received
Staff Approved
Page 54 of 128
SAAELIP Authority Portal - User Guide
Staff Assigned
Status: (This is the processing status of each report)
To reset the user-entered search criteria, click on the Clear Filter button. Select a value in the drop-down
list of “Year” to see the Master List in a specific year.
8.2
NAEIS EI Report Data Entry
Authorities who have the capacity will be required to submit EI Report for non-industrial sources. These
include Residential, Waste, Transport, Agriculture and Fishing sectors. The concept behind Non-Industrial
Source reporting is slightly different than that of Industrial Sources. The following diagram outlines a
hierarchy of the reporting model:
Figure 8.1 Non-Industry Source Process Map
In addition, this chapter describes both industrial and non-industrial sources. In each section within the
chapter, there will be a section dedicated to Non-Industry source specific details.
To access the Source Form, click the “NAEIS Report” link at the top menu. Click the “View/Edit” icon for a
source, and then click “Source” on the left panel.
8.2.1
Source Form
The Source Form collects basic information about the facility, which includes location and ownership. All
sources, both stationary and portable, should complete only one Source Form.
For facilities that submitted a NAEIS report during a previous year, this form should be entirely pre-filled
with the most recent previous year data. If information has changed or needs to be updated, edit the
Page 55 of 128
SAAELIP Authority Portal - User Guide
appropriate fields. If all the information is accurate and no editing is necessary, continue to the next form –
the Contact Form.
For facilities submitting a NAEIS report for the first time, this form will be partially completed. Follow the
instructions for completing the required fields on the Source Form.
8.2.1.1
Source Form Completion Instructions
This form consists of two sections; the Source Identification section and the Owner Information
section. Make sure that all the pre-filled information is correct. If all required fields are completed,
continue to the Contact Form. If this form needs to be completed or fields need to be edited, follow the
instructions below for completing the Source Identification and Owner Information Sections. Required
fields are marked with asterisks (*).
8.2.1.2
Source Identification Section
Complete the required fields in this section if information needs to be updated or new information needs
to be entered. Follow the steps below.
Figure 8.2 Source Identification Section
1.
Source Name: Enter the name of the source. For portable sources, enter the name of the company
that owns the portable source.
2.
SIC Code: From the drop-down list, select the Source Identification Code (SIC) that best describes
the major product produced or service provided by your source (Figure 8.3). Users can elect to click
the
icon to search and select appropriate SIC Codes.
Figure 8.3 SIC Code on Source Form
3.
Portable: From the drop-down list, select “Yes” if the source is portable (e.g. asphalt batch
plant). Select “No” if this is a stationary source.
4.
Source Type: Select whether this is an Industry or Non-Industry source.
Page 56 of 128
SAAELIP Authority Portal - User Guide
5.
Source Address
Street Address 1: This is the street number and name where the source is located. Enter the address
of the source where the equipment is located. For portable sources, enter the address of the home
or main office.
District/Metro Municipality: From the drop-down list, select the District/Metro Municipality where
the source is located. For portable sources, select the District/Metro Municipality where the home
or main office is located.
Local Municipality: From the drop-down list, select the Local Municipality where the source is
located. For portable sources, select the Local Municipality where the home or main office is
located.
Postal Code: Enter the Postal code. The postal code must represent the Local Municipality where
the source is located. For portable sources, enter the postal code of the Local Municipality selected
in the previous field.
Figure 8.4 Source Identification Section (continued)
6.
Latitude: Enter the source’s latitude in decimal degrees or in Degree:Minute:Second format. Use
the Use Deg:Min:Sec Format button to toggle the formats. If you do not know the source’s
latitude/longitude, use the Get Lat/Lon function by clicking the Get Lat/Lon button.
7.
Longitude: Enter the source’s Longitude in decimal degrees or in Degree:Minute:Second format.
Use the Use Deg:Min:Sec Format button to toggle the formats. If you do not know the source’s
longitude, use the Get Lat/Lon function by clicking the Get Lat/Lon button.
When clicking Get Lat/Long, the map location will default by pointing to the address supplied in the
same source form (Step 4). If no address is provided, the default drop pin will be the center of South
Africa. You may choose to drag the drop pin around to get a more accurate latitude/longitude location.
Page 57 of 128
SAAELIP Authority Portal - User Guide
Figure 8.5 Get Latitude/Longitude by Map (Source)
After you are comfortable with the location of the drop pin, click the update button (Figure 8.5). You will
then see the latitude/longitude pre-filled on the source form.
8.
Horizontal Collection Method: From the drop-down list, select the collection method used to
determine the latitude and longitude listed.
9.
Source Map Scale: Enter the scale of the map used. This field is only required if the horizontal
collection method code entered is “The geographic coordinate determination method based on
interpolation-map.”
10. Horizontal Accuracy: Enter the accuracy measure of the collection method and report in meters,
based on the map or GPS used. If you are using a website, enter 25 meters.
11. Horizontal Reference Datum: From the drop-down list, select the datum code used to determine
the latitude and longitude.
12. Reference Point Code: From the drop-down list, select the point that best describes the location
where the latitude and longitude were taken. For instance, if you are using horizontal collection
method code “The geographic coordinate determination method based on address matching-house
number”, reference point code “Entrance of a facility or station” may be used. If you are using a
GPS, choose the point closest to where you were standing when reading the GPS, such as code
“Center of a facility or station.”
13. Number of Employees: Enter the average number of people employed at this location.
14. Principal Product: Enter the principal product produced at the source (e.g., “Platinum”).
15. Company Registration Number: Enter the source’s “Company Registration Number” that is tied to
your Section 21 Obligations.
8.2.1.3
Owner Information Section
Complete the required fields in this section if information needs to be updated or new information needs
to be entered.
Page 58 of 128
SAAELIP Authority Portal - User Guide
Figure 8.6 Owner Information Section
15. Owner Name: Enter the name of the owner of the source or the parent/holding company.
16. Contact Address: If the owner’s address is different than the source address, complete these
fields. Fill out the name and address exactly as it should appear on all correspondence.
8.2.1.4
Non-Industrial Source Specific – Source Form
There are no specific fields or logic for non-industrial sources on the Source Form. The only field to pay
attention to is the Source Type in step 4.
8.2.2
Contact Form
The Contact Form collects information for the emission inventory contact person (primary and
secondary). The emission inventory contact person is the person who the Authorities will call if they have
questions about the submitted NAEIS information. In addition, the annual mailing in January will be sent to
the emission inventory contact person, who is also the Accounting Officer. Information for a secondary
contact person may be provided. It will be used by Authorities in case the primary contact person may not
be available.
For facilities that submitted a NAEIS report in a previous year, this form should be entirely pre-filled. If
information has changed or needs to be updated, edit the appropriate fields. If all the information is
accurate and no editing is necessary, continue to the Stack Form.
8.2.2.1
Contact Form Completion Instructions
This form consists of two sections: one for the primary contact and one for the secondary contact. Make
sure that all the pre-filled information is correct. If all required fields are completed, continue to the Stack
form. If this form needs to be completed or fields need to be edited, follow the instructions below for
completing the Emission Inventory Contact Form.
Page 59 of 128
SAAELIP Authority Portal - User Guide
8.2.2.2
Emission Inventory Contact Section
Figure 8.7 Primary Emission Inventory Contact Section
If existing information needs to be updated or new information needs to be entered, complete the
required fields in this section. Follow the steps below.
1.
Primary Contact Information: A source contact (the Accounting Officer) must be identified. The
address entered is where future NAEIS correspondence will be sent. Enter the name, mailing
address, telephone number (including extension and fax number), and e-mail address.
Figure 8.8 Secondary Emission Inventory Contact Section
2.
8.2.2.3
Secondary Contact Information: A secondary contact may or may not be identified. This person must
be a source contact. This address is where future NAEIS correspondence will be sent when the
primary contact cannot be reached. Enter the name, mailing address, telephone number (including
extension and fax number), and e-mail address.
Non-Industrial Source Specific – Contact Form
There are no specific fields or logic for non-industrial sources on the Contact Form. Make sure the
Primary EI Contact is the Province or District AQO in charge of the reporting area source.
Page 60 of 128
SAAELIP Authority Portal - User Guide
8.2.3
Stack Form
The Stack Form collects information about stacks that are connected to emission units listed on the
Emission Unit Form. If an existing stack that was entered during a previous year becomes
decommissioned, it can be removed from NAEIS by clicking the "Delete" icon of this stack (see instructions
below). However, this means that only the stack form does not have to be completed – all of the other
NAEIS forms are still required. The emissions coming from the emission unit that was once linked to the
stack must still be reported on the Emission form because the emissions are reported at the emission unit
level, not at the stack level.
8.2.3.1
Stack Form Relationship to Other Forms
The stacks created in this form will be displayed as a selection in the drop-down list in the Emission Unit
Stack(s) Section on the emission unit form.
8.2.3.2
Stack Form Completion Instructions
This form consists of one section: the Stack Identification section. If the stack was added during a
previous year, this information will be pre-filled. If your source does not contain any stacks, you do not
need to complete this form and may proceed to the Emission Unit form. If any existing/pre-filled
information about any stack is incorrect, enter the correct information in the Stack Identification
Section. Following is an explanation of each section of the Stack form, as well as step-by-step instructions
on how to complete the required fields.
8.2.3.3
Stack Identification Section
Click the stack form option on the left panel to display the stack list web page (Figure 8.9). This page lists
all the stacks in this source. Click the "View/Edit" icon to edit an existing stack, the "Delete" icon to delete
an existing stack, or the "Add New Stack" to add a new stack for this source.
Figure 8.9 Stack List
If you choose to edit an existing stack or add a new stack, the stack detail page will display (Figure 8.10).
Page 61 of 128
SAAELIP Authority Portal - User Guide
Figure 8.10 Section of Stack Identification
Complete the fields in this section for new stacks or to make changes to old information. Follow the steps
below.
1.
Stack ID: This is the Stack ID. Enter a unique ID for each stack that must be reported. Stack IDs
begin with an “SV” prefix plus any combination of up to 14 letters, numbers, or keyboard
characters. Spaces are not allowed within the ID. Stack IDs may have already been established in a
Section 21 Permit. If so, be sure to use the ID that is in the permit. If a stack ID does not already
exist, create an ID that is easy to associate with the stack that it represents (e.g. SVSTACK#1,
SVBOILER#3).
2.
Dismantle Date: If the stack was dismantled or rendered permanently inoperable during the
reporting year, enter the date that this occurred. Although the stack has been dismantled, the
following steps must still be completed. If a dismantle date is entered, do not delete this stack from
the stack list because a dismantled stack may still require emissions reporting for this year. If this is
a portable source, the dismantle date should be left blank.
3.
Stack Description: Provide a brief description of the stack.
4.
Actual Stack Height Above Ground: Enter the height of the stack in meters from the ground up to
the discharge point.
5.
Building Height: Enter the height of the building in which the stack resides.
6.
Building Length: Enter the length of the building in which the stack resides.
7.
Building Width: Enter the width of the building in which the stack resides.
Page 62 of 128
SAAELIP Authority Portal - User Guide
8.
Inside Stack Diameter: If the stack is circular, enter the inside top stack diameter. If the stack is
rectangular, convert the area inside of the stack to a circular diameter using the following
procedure:
(a) Obtain the length and width in meters.
(b) Calculate the area by multiplying the length times the width.
(c) Divide the area by 3.14.
(d) Take the square root of the value from step (c) to obtain the radius.
(e) Calculate the diameter by multiplying the radius (from step [d]) by 2.
(f) Enter the diameter (from step [e]) in item 5.
9.
Exit Gas Temperature: Enter the stack exit gas temperature in degrees Celsius.
10. Actual Exit Gas Flow Rate: Enter the stack exhaust volume in actual cubic meters per second, at
actual operating load and temperature.
11. Stack Orientation: From the drop-down list, select the most appropriate orientation.
12. For steps 15 through 19, smaller sources can use the same coordinate information that was entered
on the source form. Larger sources should enter the specific coordinates for each stack. These fields
are not required for portable sources.
13. Latitude: Enter the source’s latitude in decimal degrees or in Degree:Minute:Second format. Use the
"Use Deg:Min:Sec Format" button to toggle the formats. If you do not know the facility’s latitude,
use the "Get Lat/Lon" function by clicking the "Get Lat/Lon" button in the source form.
14. Longitude: Enter the source’s Longitude in decimal degrees or in Degree:Minute:Second format.
Use the "Use Deg:Min:Sec Format" button to toggle the formats. If you do not know the facility’s
longitude, use the "Get Lat/Lon" function by clicking "Get Lat/Lon" button in the source form.
When clicking Get Lat/Long, the map location will default by pointing to the address supplied in the
source form in Section 8.2. If no address is provided, the default drop pin will be the center of South
Africa. You may choose to drag the drop pin around to get a more accurate latitude/longitude location.
Figure 8.11 Get Latitude/Longitude by Map (Stack)
Page 63 of 128
SAAELIP Authority Portal - User Guide
After you are comfortable with the location of the drop pin, click the update button (Figure 8.11). You will
then see the latitude/longitude pre-filled on the source form.
15. Horizontal Collection Method: From the drop-down list, select the collection method used to
determine the latitude and longitude listed.
16. Source Map Scale: Enter the scale of the map used. This field is only required if the horizontal
collection method code entered is “The geographic coordinate determination method based on
interpolation-map.”
17. Horizontal Accuracy: Enter the accuracy measure of the collection method and report in meters,
based on the map or GPS used. If you are using a website, enter 25 meters.
18. Horizontal Reference Datum: From the drop-down list, select the datum code used to determine
the latitude and longitude.
19. Reference Point Code: From the drop-down list, select the point that best describes the location
where the latitude and longitude were taken. For instance, if using horizontal collection method
code “The geographic coordinate determination method based on address matching-house number”
reference point code “Point where substance is released” may be used. If using a GPS, choose the
point closest to where you were standing when reading the GPS.
20. Bypass Stack Only: From the drop-down list, select “Yes” if this stack is used only when emissions
are bypassing the emission control equipment. Otherwise, select “No.” “No” is the default
selection.
21. If Yes, Main Stack ID: If “Yes” was selected for Step 16, select the Stack ID of the stack that this vent
bypasses. Otherwise, leave this field blank.
8.2.3.4
Adding a Stack
Follow the steps below to add a stack to your NAEIS report.
1.
2.
3.
8.2.3.5
Click "Add New Stack" in the stack list (Figure 8.9).
A new stack form will be displayed for you to complete (Figure 8.10).
Follow Steps 1 – 21 in the Form Completion Instructions.
Deleting a Stack
If you have stack information that you would like to delete, follow the steps below.
1.
2.
In the stack list, click the "Delete" icon to delete a stack.
If this stack is newly added this year, the stack will be directly deleted. If this stack has been
reported in a previous reporting year, follow the instructions in the pop-up window to delete this
stack.
Page 64 of 128
SAAELIP Authority Portal - User Guide
Figure 8.12 Pop-up Window 1 when deleting a stack
Figure 8.13 Pop-up Window 2 when deleting a stack
Figure 8.14 Pop-up Window 3 when deleting a stack
8.2.3.6
Non-Industrial Source Specific – Stack Form
Because there is no such concept of a stack for non-industrial sources, this form has been omitted from
the EI Report.
Page 65 of 128
SAAELIP Authority Portal - User Guide
8.2.4
Emission Unit Form
The Emission Unit Form identifies and describes a facility’s emission units. Emission units that were entered
during previous reporting periods will be pre-filled. If you have an emission unit at your facility that is not
already included on the emission unit form, it may need to be added. Use the guidelines on the following
pages to help you determine which emission units at your facility need to be reported.
8.2.4.1
Emission Unit Form Relationship to Other Forms
For each emission unit entered on the emission unit Form, an activity form is automatically generated. In
addition, the user may link stack IDs (that were created on the stack form) to the emission unit in the
Emission Unit Stack(s) Section.
8.2.4.2
Emission Unit Form Completion Instructions
The Emission Unit form consists of six sections:
Emission Unit List section,
Emission Unit Identification section,
Capacity Information section,
Permit Applicability Section,
Control Device(s) section,
Emission Unit Stack(s) section.
If an emission unit was added to your facility during the reporting period and it must be reported, add it
to the emission unit form by clicking the "Add New Emission Unit" button.
For emission units that were added in previous years, the information will already be pre-filled. If any
information has changed or needs to be updated, edit the appropriate fields. If no emission units were
added during the reporting period and if all the information that is pre-filled is still accurate, you do not
have to complete this form and you may proceed to the reporting group or activity form (Section 8.5 and
8.6).
Following is an explanation of each section of the emission unit form, as well as step-by-step instructions
on how to complete the required fields.
Figure 8.15 Emission Unit List
Page 66 of 128
SAAELIP Authority Portal - User Guide
8.2.4.3
Emission Unit List Section
This section lists all the reported emission units in this source. Click the "View/Edit" icon to edit an
emission unit, the "Delete" icon to delete an emission unit, or the "Add New Emission Unit" button to add
a new emission unit.
Click the "View/Edit" icon to access other sections of this emission unit form.
8.2.4.4
Emission Unit Identification Section
Complete the fields in this section for new emission units or to make changes to the previous year’s
report. Follow the steps below.
Figure 8.16 Emission Unit Identification Section
1.
Emission Unit ID: Enter a unique ID for this emission unit. Emission unit IDs must begin with an
“EU” prefix plus any combination of up to 14 letters, numbers, or keyboard characters. Spaces are
not allowed within the ID. Make the emission unit ID specific and easy to associate with the
emission unit(s) it represents (e.g. EUPAINTBOOTHS, EUBOILER#2).
2.
SIC Code: From the drop-down list, select the Source Identification Code (SIC) that best describes
the major product produced or service provided by your source. Users can elect to click the
to search and select appropriate SIC Codes.
icon
3.
Installation Date: Enter the date that the emission unit was first installed using the date format
provided (MM/DD/YYYY).
4.
Dismantle Date: If the emission unit was dismantled or rendered permanently inoperable during
the reporting year, enter the date that this occurred. Although the emission unit has been
dismantled, the remaining fields must still be completed. If this is a portable source, the dismantle
date should be left blank. Do not complete this field if it is not applicable to the emission unit.
Page 67 of 128
SAAELIP Authority Portal - User Guide
5.
8.2.4.5
Emission Unit Description: Enter a brief narrative description of the emission unit. Make sure that
this description is specific and will help to identify the emission unit, especially if there are several
emission units that are alike.
Capacity Information Section
Complete the fields in this section for new emission units or to make changes to the previous year’s
report. Follow the steps below.
Figure 8.17 Capacity Information Section
6.
Is this a Combustion Source: If the emission unit is a combustion source, choose Yes from the dropdown list. If “No” is chosen, please ignore steps 7-10.
7.
Design Capacity: Only complete this field if the emission unit is a combustion source. Enter the
design capacity.
8.
Design Capacity Numerator and Denominator: Only complete these fields if you completed the
Design Capacity field in Step-7
9.
Design Capacity Unit Numerator: Choose the appropriate code from the Unit Code dropdown list.
Design Capacity Unit Denominator: Choose the appropriate code from the Unit Code dropdown list.
Is this combustion source used to generate electricity: Choose “Yes” if this emission unit is used to
generate electricity. If “No” is chosen, please ignore step 10.
10. Maximum Nameplate Capacity: Only complete this field if this emission unit is used to generate
electricity. Report the electric generator’s rated design capacity at 100% (maximum) operation in
megawatts.
Page 68 of 128
SAAELIP Authority Portal - User Guide
8.2.4.6
Control Device Section
Figure 8.18 Control Device and Emission Unit Stack Section
11. Control Device Code: If there is a control device associated with the emission unit, select the most
appropriate control device from the drop-down list.
If there is more than one control device, additional control device codes may be added. Follow the
steps below to add a control device.
(a) After the first control device code has been selected, click the "+" icon in the grid view.
(b) Another drop-down field will appear. Select another control device.
8.2.4.7
Emission Unit Stack Section
12. Stack ID: Click on this field and a drop-down list will appear containing the Stack ID’s that were
created on the stack form. If a stack that was reported on the stack form is associated with the
emission unit, select the appropriate Stack ID. Every Stack ID that was created on the stack form
must be listed on at least one emission unit form.
If more than one reported stack is associated with the emission unit, additional Stack IDs may be
added. Follow the steps below to enter additional Stack IDs.
(a) After the first Stack ID has been selected, Click the "+" icon in the grid view.
(b) Another field will appear. Select another Stack ID.
8.2.4.8
Adding an Emission Unit
Follow the steps below to add an emission unit to your NAEIS report.
1.
2.
3.
8.2.4.9
Click "Add New Emission Unit" in the emission unit list (Figure 8.15).
A new emission form will be displayed for you to complete (Figure 8.16 – 5.18).
Follow Steps 1 – 12 in the Form Completion Instructions.
Deleting an Emission Unit
If you want to delete emission unit information, follow the steps below.
Page 69 of 128
SAAELIP Authority Portal - User Guide
1.
2.
In the emission list (Figure 8.15), click the "Delete" icon to delete an emission unit.
If this emission unit was newly added this year, it will be directly deleted. If this emission unit has
been reported in a previous reporting year, follow the instructions in the pop-up window to delete
this emission unit.
Figure 8.19 Pop-up Window 1 when deleting an emission unit
Figure 8.20 Pop-up Window 2 when deleting an emission unit
Figure 8.21 Pop-up Window 3 when deleting an emission unit
Page 70 of 128
SAAELIP Authority Portal - User Guide
8.2.4.10 Non-Industrial Source Specific – Stack Form
For Non-Industrial Source Emission Units, the following will be omitted from the form:
1.
Control Device Section – The control devices currently in NAEIS pertain only to Industry Emission
units only. Hence, no control devices need to be linked to non-industrial emission units.
2.
Stack Section – Because there is no concept of stack in Non-Industrial Sources, there will be no need
to link any emission units to any stacks.
The following are data fields/features specific to Non-Industrial Source Emission Units:
1. Get Lat/Lon – There is a section for users to provide the Latitude/Longitude for the emission unit. In
addition, users can specify the radius to make an area source.
Figure 8.22 Latitude/Longitude (Emission Unit)
By clicking the Get Lat/Lon button, users can specify the exact latitude and radius of the area source.
The map location will default by pointing to the address supplied in the source form in Section 8.2. If no
address is provided, the default drop pin will be the center of South Africa. You may choose to drag the
drop pin around to get a more accurate latitude/longitude location. In addition, type in the length of the
area radius, then click Apply Radius to see the area covered for the emission unit.
Figure 8.23 Get Latitude/Longitude by Map (Emission Unit)
8.2.5
Reporting Group Form
The Reporting Group Form is used to combine emission units into reporting groups to simplify emission
calculations. THIS IS AN OPTIONAL FORM – facilities are not required to create reporting groups. However,
for some facilities, reporting emissions at the reporting group level may be easier than at the emission unit
Page 71 of 128
SAAELIP Authority Portal - User Guide
level if multiple emission units have common emission limits and record keeping requirements. If this form
is used, the Activity form and the Emissions form must be completed at the reporting group level.
8.2.5.1
8.2.5.2
Reporting Group Form Completion Instructions
If a reporting group was created during a previous reporting year, the fields in this form should be prefilled. Check to ensure that all the information is accurate. If any information needs to be changed,
follow the instructions below and edit the appropriate fields. If you would like to add or delete a
reporting group, see the instructions below.
Reporting Group List
Figure 8.24 Reporting Group List
This section lists all the reporting groups in this source. Click the "View/Edit" icon to edit a reporting
group, the "Delete" icon to delete a reporting group, or the "Add New Reporting Group" button to add a
new reporting group.
Click the "View/Edit" icon to access other sections of this reporting group form.
8.2.5.3
Reporting Group Identification
Complete the fields in this section for new reporting groups or to make changes to the previous year’s
report. Follow the steps below.
Figure 8.25 Reporting Group Form
1.
Reporting Group ID: Enter a unique ID for this reporting group. Reporting Group IDs must begin
with an “RG” prefix plus any combination of up to 14 letters, numbers, or keyboard
characters. Spaces are not allowed within the ID. Make the reporting group ID specific and easy to
associate with the reporting group it represents (e.g. RGBOILERS).
Page 72 of 128
SAAELIP Authority Portal - User Guide
2.
8.2.5.4
Reporting Group Description: Provide a brief narrative description of the reporting group.
Reporting Group Emission Units Section
3.
Emission Unit ID: To add an emission unit to this list, click the "+" sign in the grid view, the select
the emission unit ID to be included in this reporting group. Repeat this step to add more emission
units. Click the "x" sign to delete an emission unit from this reporting group.
8.2.5.5
Non-Industrial Source Specific – Reporting Group Form
Because there is no such concept of a reporting group for non-industrial sources, this form has been
omitted from the EI Report.
8.2.6
Activity and Emission Form
The Activity Form describes operating schedules and material information for an emission unit or reporting
group. One activity form must be completed for each reporting group and each emission unit that is not
part of a reporting group.
8.2.6.1
Activity Form Completion Instructions
The activity form consists of three sections: the Emission Unit and Reporting Group List section, the
Activity Information section, and the Material Information section. For portable sources, the form also
includes a section of Portable Material Usage Schedule.
All activity information that was entered for emission units in previous years will be pre-filled, except the
material throughput information. This is a required field that must be updated every reporting year. If
any other information needs to be updated, edit the proper fields. If no other information needs to be
added and if all the information that is pre-filled is still accurate, all you have to do is enter the proper
material throughput information for each activity and move on to the emission form (discussed in later
sections in this page). Following is an explanation of each section of the activity form, as well as step-bystep instructions on how to complete the required fields.
8.2.6.2
Emission Unit and Reporting Group List Section
Figure 8.26 Activity List
This section lists all the activities in this source. Click the "View/Edit" icon to edit an activity, or the
"Delete" icon to delete an activity.
Page 73 of 128
SAAELIP Authority Portal - User Guide
If the SCC Code for an emission unit or a report group is blank, there is currently no activity in this
emission unit or reporting group. To add an activity for this emission unit or reporting group, click the
"View/Edit" icon to enter Activity and Emission Details (Figure 8.27a) and then click the "Add New
Activity" button to add an activity.
Emission Calculation: Click "Calculate Emissions" in this view to calculate emissions for all emission units
and reporting groups in this source.
8.2.6.3
Activity Information Section
Figure 8.27a Activity and Emission Details
Page 74 of 128
SAAELIP Authority Portal - User Guide
Figure 8.27b Activity and Emission Details (Part 2)
Every source must complete one of these sections for each activity associated with the emission unit or
reporting group displayed in the emission unit and reporting group list (Figure 8.26)
1.
NAEIS Source Code: The NAEIS Source Code is a set of codes mandated by the South African
Department of Environmental Affairs that contain and describes the process for creating emission in
an emission unit or reporting group. For licensed sources, these will be your Section 21 codes. For a
new activity, Click on the "+" icon (Figure 8.24a) and a listing of all NAEIS Source Codes (NSC) will
appear (Figure 8.28). Select the NSC that most accurately describes the activity from the drop-down
list. If more than one activity takes place at the emission unit or reporting group, select an NSC for
each of the activities that take place at the emission unit/reporting group. To add a new activity,
simply click the "Add New Activity" button (Figure 8.27a).
Figure 8.28 NAEIS Source Code Information
Page 75 of 128
SAAELIP Authority Portal - User Guide
Figure 8.29 NAEIS Source Code List
2.
IPCC Code: The Intergovernmental Panel on Climate Change (IPCC) set up at the request of member
governments. Its mission is to provide assessments of information worldwide about the risk of
climate change caused by human activity. The 2006 IPCC Guidelines for National Greenhouse Gas
Inventories (2006 IPCC Guidelines) provide methodologies for estimating national inventories of
anthropogenic emissions by sources and removals by sinks of greenhouse gases.
Once an NSC is selected, the IPCC Code would be selected by the system.
IPCC needs to be manually selected only when the uncategorized/Non-Industry NSC is
chosen (Figure 8.30a&b).
Figure 8.30a Uncategorized NSC
Figure 8.30b Manually Select an IPCC Code
Page 76 of 128
SAAELIP Authority Portal - User Guide
3.
SCC Code: Once a NSC is selected, a sub-set of Source Classification Codes (SCC) will appear. The
Source Classification Code (SCC) is an eight-character code linked to the NAEIS Source code and may
or may not further describe the process selected in step 1.
Figure 8.31 NSC to SCC Code Relationship
8.2.6.4
4.
Activity Description: Provide a brief description for the process that best represents this
activity. You may use the description that is provided in the read-only field "Source Classification
Code Description".
5.
Seasonal Material Usage Schedule: Enter the percentage of material used per season. The total of
all four seasonal percentages must equal 100%.
6.
Hours per Day: Enter the hours this emission unit or reporting group normally operates per day
based on an annual average.
7.
Days per Week: Enter the days this emission unit or reporting group normally operates per week
based on an annual average.
8.
Days per Year: Enter the days this emission unit or reporting group operated over the reporting year.
Material Information Section
Complete this section for the material identified for the NSC, IPCC and SCC in Step 1.
9.
Material Code: This field is automatically pre-filled if the NSC-SCC Combination selected has a
material associated with it. If this field is not pre-filled, it means the NSC-SCC Combination selected
does not have a material associated with it. Click on the field and a drop-down list with a selection of
material codes will be displayed. Select the most appropriate material for the NSC-SCC
Combination. To make your search easier you may want to refer to the Material Code section in
System Utilities Module.
10. Material Throughput: Enter the amount of material identified in Step 8 that was processed,
produced, applied, or combusted during the reporting year. For example, if “Coating” is identified in
the Material Code field, enter how many liters (L) were applied during the reporting year. Be sure
that the throughput entered in this field matches the unit code pre-filled or selected in Step 10.
11. Unit Code: This field should be pre-filled if Step 1 and Step 9 were completed.
12. Net Caloric Value: This field is only required if there is Greenhouse Gas emission.
13. Material Description: Provide a brief description of the material that is processed, produced,
applied, or combusted.
14. VOC Content: This field is only required if the material is a coating or solvent. Enter the weight
percent of the volatile organic compounds (VOC) contained in the throughput material, “as
applied.” “As applied” refers to the composition of the throughput material at the point of
Page 77 of 128
SAAELIP Authority Portal - User Guide
application. If thinners are added to the throughput material, the VOC content of the thinner must
be considered when calculating the weight percent of VOC “as applied.”
15. Density: Density is required for materials that have a mass throughput. In the first field, enter the
density of the throughput material at standard temperature and pressure. Click on the second field
and a drop-down list with unit options will appear.
16. Sulfur Content: This field is required only if the material identified in Step 8 is a fuel. Enter the sulfur
content in mass percent. Please consult the National DEA Air Quality and Climate Control Office for a
list of ranges.
17. Ash Content: This field is required only if the material identified in Step 8 is a fuel. Enter the ash
content in mass percent. Please consult the National DEA Air Quality and Climate Control Office for a
list of ranges.
8.2.6.5
Portable Material Usage Schedule
If this is a portable source, the activity form will have an additional section: Portable Material Usage
Schedule (Figure 8.32).
Figure 8.32 Portable Material Usage Schedule Section
18. District/Metro Municipality: Click the "+" icon to add a new District/Metro Municipality, or click the
"x" icon to delete a District/Metro Municipality from the list.
19. Percentage of Throughput: Enter the percentage of throughput for each District/Metro Municipality
for the process listed above. The totals of these percentages must equal 100%.
Emission Calculation: Click the "Calculation Emissions" button in Figure 8.27a to calculate all emissions
under this emission unit or reporting group, depending on which activity is selected.
The Emissions Form is used to report all emissions of criteria pollutants and any other pollutants relevant
to the process. An emissions record must be completed for each emission unit or reporting group
identified on the emission unit and reporting group forms.
Click the "Emissions" tab to display the emission list (Figure 8.33)
Page 78 of 128
SAAELIP Authority Portal - User Guide
Figure 8.33 Emission List
8.2.6.6
What Emissions Must Be Reported?
When a new activity is created, or when an activity having been reported in previous years is accessed for
the first time this year, all the criteria pollutants are listed in the emission list. These pollutants are
required to be reported.
To report more pollutants for this activity, in the Emission List (Figure 8.33), click the "+" icon next to
"Emission List" label (in the white area, NOT in the gray area) to load the emission factor window (Figure
8.34).
Figure 8.34 Emission Factor Table with SCC Code and Pollutant List
In the SCC/Pollutant List (see Figure 8.34), some of the criteria pollutants have additional emission factors
that do not have a radio button. These are “controlled” emission factors, which are used to calculate
default control efficiency. These entries will be pre-populated if you select a control device on the
emission unit level. The system will not allow you to select a “controlled” emission factor.
To calculate emissions for this process, click the "Calculate Emission" button in the emission list. When
the calculation is completed, the "NAEIS Calculated Value" column will be populated in the grid view. If
the system-calculated value is verified to be correct, click the checkbox under "Use System Calculated
Value" to auto-fill the other fields of each emission (Figure 8.35).
Page 79 of 128
SAAELIP Authority Portal - User Guide
Figure 8.35 Use System Calculated Value for Emission
After the calculation, there will be a few new rows appearing on the Emission List. These are the
Greenhouse Gas (GHG) with default IPCC Emission Factors filled in. The "NAEIS Calculated Value" column
will be populated as well for these GHG. To calculate the CO2 Equivalent Emission, click the “Calculate
GWP” button. For calculation details, just point to the
.
Figure 8.36 GHG Calculation
Beside each pollutant name in the emission list, there is an
for each emission (Figure 8.37).
8.2.6.7
icon. Click this icon to enter emission form
Emission Form Completion Instructions
The emission form consists of emission details. No fields on this form have been carried over from the
previous year’s submittal. Annual emissions values of all required pollutants must be
completed. Following is an explanation of each section of the emission form as well as step-by-step
instructions on how to complete the required fields.
Page 80 of 128
SAAELIP Authority Portal - User Guide
Figure 8.37 Emission Form
8.2.6.8
Emission Details
Complete this section for each criteria pollutant that is emitted from the material identified in correlated
activity form.
1.
Pollutant Code: This is non-editable field. The pollutant has been selected in the emission list page.
2.
Emission Basis: (If this field has been pre-filled with “NAEIS Emission Factor” or “IPCC EF” and you
would like to use the factors provided, skip this field). After you have identified the pollutants that
need to be reported in the pollutant code field, you will need to enter the basis on which you will
calculate your annual emissions for that pollutant. Click on the field and a drop-down list with your
options will appear. Select the basis on which you will estimate emissions for this
pollutant. Emissions should be estimated using the best available site-specific data according to the
hierarchy below.
CEM - Continuous Emissions Monitoring
Site Specific Stack Test - Stack test protocol. Results from the most recent stack test
(generally conducted less than five years previous) should be used.
PEM - Parametric Emissions Monitoring
Mass Balance - The method that allows estimation of emissions by analyzing inputs of a
material to a process minus consumption, accumulation, and loss of that material during a
process.
Tank Model - The TANKS model is an US-EPA computer software program that computes
estimates of volatile organic compound (VOC) emissions from fixed and floating-roof storage
tanks. TANKS are based on the emission estimation procedures from Chapter 7 of US-EPA's
Compilation of Air Pollutant Emission Factors (AP-42), plus recent updates from the
American Petroleum Institute. The TANK software can be accessed via the Internet at
www.epa.gov/ttn/chief.
Landfill Model - This US-EPA model was developed by the Control Technology Center
(CTC). The Landfill Air Emissions Estimation Model can be used to estimate emission rates
for methane, carbon dioxide, non-methane organic compounds, and individual toxic air
pollutants from landfills. The Landfill software can be accessed via the Internet at
www.epa.gov/ttn/chief.
Page 81 of 128
SAAELIP Authority Portal - User Guide
3.
NAEIS Emission Factor - SCC code/emission factors that are in the NAEIS reference table. If
you are using an emission factor not provided in the emission factor table at the bottom of
the screen, you should select “Other” as the emission basis.
IPCC Emission Factor - IPCC code/emission is provided by The Intergovernmental Panel on
Climate Change
Other - If not previously identified, select “Other”, and attach supporting documentation.
Emission Factor/Exponent: These fields must be completed only if you are using an emission factor
to estimate emissions for the pollutant. If you are using another method to calculate your emissions
(e.g. Mass Balance, TANKS, etc.), leave these fields blank. If “NAEIS Emission Factor” was entered for
Step 2, these fields will be pre-filled. If “IPCC EF” was entered, these fields will be blank and not used.
List the proper emission factor, using scientific notation. The emission factor unit code will be pre-filled
with the unit code pounds divided by the unit code for the material entered on the activity form.
Scientific Notation:
The emission factors are expressed in scientific notation, which means that the decimal point has been
moved. If the exponent is negative, move the decimal point to the left. If the exponent is positive, move
the decimal point to the right. If the exponent is zero, the decimal point does not move. For example, if a
number is expressed as 2.0E-1, move the decimal point one place to the left to get 0.20. If a number is
expressed as 2.0E2, move the decimal point 2 places to the right to get 200. If a number is expressed as
2.0E0, the decimal point does not move – the number is 2.0.
4.
Control Efficiency %: Enter the control efficiency percent of the control device(s) for the pollutant
being reported (this could be a combination of capture and destruction efficiencies). Control
efficiencies may be listed on the equipment, in the equipment documentation, or by contacting the
equipment supplier.
If you are using NAEIS emission factors, after control efficiency is entered, you can run the Emission
Calculation (by clicking the "Calculate Emission" button) to automatically calculate your actual controlled
emissions. If you are not using NAEIS emission factors to calculate your actual emissions, see the Control
Efficiency Discussion below to calculate your actual emissions after control.
Using the Control Efficiency to Calculate Actual Emissions:
If a facility has control equipment, the actual emissions after control can be calculated by multiplying the
actual uncontrolled emissions by a control factor. Calculate the control factor by subtracting the percent
control efficiency (entered for Step 4) from 100 and then dividing that number by 100. Overall control
efficiency is calculated by multiplying the capture efficiency by the control efficiency.
For example, if you have a control device with a capture efficiency of 85% and a control efficiency of 95%,
the overall control efficiency would be 0.85 x 0.95 = 0.8075 (80.75%). Use the overall control efficiency to
calculate the control factor (100 – 80.75)/100 = 0.19. Using the control factor, we can estimate the
annual emissions after control. Using the control factor above, if an emission unit has actual uncontrolled
emissions of 129,600 kg/year, the actual emissions after control would be 129,600 kg/year x 0.19 = 24,624
kg/year or 24.62 ton/yr. You would enter 24.62 tons into the Annual Emissions/Unit Code fields (see step
5).
5.
Annual Emissions:
Page 82 of 128
SAAELIP Authority Portal - User Guide
To use the emission calculator, click the "Calculate Emission" button in this form. You can enter usercalculated annual emission in this field. Otherwise, if you agree to use the system-calculated value, click
the "Use System Calculated Value" checkbox, and this field will automatically populate.
6.
8.2.6.9
Comment: If needed, enter any explanation or description of the information entered on this form in
this field. If you have to submit calculations or other data to support your emissions estimate, click
on the "Attachment" tab to upload your supporting documentation to system.
Non-Industrial Source Specific – Activity and Emission Form
For Non-Industrial Sources, please make sure to select SA99-99 Non-Industry Code for the NAEIS Source
Code.
Figure 8.38 NAEIS Source Code – Non-Industry
In this case, IPCC Code needs to be selected manually.
Figure 8.39 IPCC Code – Non-Industry
From there, the dropdown for the SCC Code selection will show all Non-Industrial SCC Codes, as seen
below.
Page 83 of 128
SAAELIP Authority Portal - User Guide
Figure 8.40 SCC Code – Non-Industry
8.2.7
Completeness Check
Once you have completed all the forms, use the Completeness Check function to scan the forms for
possible warning/error message. The Completeness Check ensures that there are reasonable responses in
required data fields. If fields are incomplete or incorrect, the System will generate warning or error
messages.
The error report and messages will describe the
potential problem and indicate on which form and
field must be corrected. The completeness check
does not verify whether the information you have
entered is correct, but rather if the information you
have entered is adequate for a complete submittal.
Errors generated from the Completeness Check must
be corrected before the forms are submitted, while
warnings will not hold back the EI Report
submissions. After the corrective actions are taken,
running the Completeness Check again will then reassess the result of these actions. If you encounter
any Completeness Check error messages that appear
to be irresolvable, please contact the appropriate
Authority accordingly.
Figure 8.41 Completeness Check Function
If errors are encountered in the Completeness Check, this message will display: "Failed Completeness
Check".
Page 84 of 128
SAAELIP Authority Portal - User Guide
Figure 8.42 Completeness Check with Error(s)
If no error is generated from the Completeness Check, this message will display: "Passed Completeness
Check".
Figure 8.43 Completeness Check without Error
There are three ways of viewing error or warning message details:
1.
Go to the NAEIS Report Site Map and hover the mouse over the data entry form with an error or
warning icon (Figure 8.42). The error message is indicated by the use of “Red” icon. The warning
message is indicated by the use of “Yellow” icon. The error or warning message will appear in the
tooltips.
Figure 8.44 NAEIS Report Site Map - Completeness Check Error/Warning Message
2.
In the Site Map, click the entry with an error or warning icon. The system will lead you to the specific
source, contact, stack, emission unit, reporting group, activity, preparer, or Accounting Officer
form. The warning/error message generated from the completeness check will display in the upper
portion of the specific form (shown below). The error message is indicated by the use of “Red”
background. The warning message is indicated by the use of “Yellow” background.
Page 85 of 128
SAAELIP Authority Portal - User Guide
Figure 8.45 Sample: Stack Form with Completeness Check Warning/Error Displayed
3.
All of the Completeness Check errors and warnings are compiled into a report, “Completeness Check
Report”. The “Completeness Check Report” can be accessed in NAEIS Report Module Report
Management Other Reports Completeness Check Report (See Figure 8.46).
Page 86 of 128
SAAELIP Authority Portal - User Guide
Figure 8.46 Completeness Check Report
Click the "View" icon next to "Completeness Check Report" to view the details of the report. The report
will list the basic information of this source, and the error and warning messages in each form. This
report will be useful in the correction of relevant forms based on the Completeness Check results.
A sample of the Completeness Check Report is shown in Figure 8.47.
Figure 8.47 Sample of Completeness Check Report
8.2.8
Certification and Submission
8.2.8.1
Preparer Form Overview
The Preparer Form is an optional form which displays information about the person(s) responsible for the
individual Emission Units in the NAEIS Report.
Some companies have different people responsible for emissions from different processes at the
facility. Therefore, instead of making one person responsible for all of the emissions, each person can list
their respective data. If a facility has more than one preparer listed on this form, the reporting groups
and emission units that the preparer is responsible for must be listed on the "Emission Unit(s) Preparer
worked on" section of the form.
8.2.8.2
Preparer Form Completion Instructions
Completion of this form consists of three sections: the Preparer List section, the Preparer Information
section, and the "Emission Unit(s) Preparer worked on" section. If you submitted a NAEIS report during a
previous reporting period, all of this information should be pre-filled. If any information has changed or
needs to be updated, edit the proper fields. If all the information that is pre-filled is still accurate, you do
not have to complete this form. Following is an explanation of each section of the preparer form, as well
as step-by-step instructions on how to complete the required fields.
Page 87 of 128
SAAELIP Authority Portal - User Guide
8.2.8.3
Preparer List Section
Figure 8.48 Preparer List
The Preparer List shows the current preparers who have contributed to the NAEIS reporting of this source.
Click "Add New Preparer" to add any preparer that is not in this list but has prepared the data entry
forms.
Click the "View/Edit" icon to access the preparer form.
8.2.8.4
Preparer Information Section
Figure 8.49 Preparer Form
Complete the fields in this section for each preparer. Follow the steps below (refer to the form in Figure
8.49).
1.
Company Name: Enter the company name with which the preparer is associated.
Page 88 of 128
SAAELIP Authority Portal - User Guide
8.2.8.5
2.
Preparer's Information: Enter the preparer’s name, title, mailing address, telephone, fax number,
and e-mail address. Every source must have at least one preparer.
3.
Emission Unit(s) Preparer worked on:
If there is only one preparer in this source, select the “All” radio button.
When there is more than one preparer in this source, select the radio button "Select Specific
Units from list below", and check the applicable emission units and reporting groups.
Primary Preparer Form Overview
Click the Certification tab (Figure 8.50) and enter the Accounting Officer Form.
Figure 8.50 Accounting Officer Form
This form is required for all submittals. The Accounting Officer of the NAEIS Report submission will need
to fill in his/her contact information here, certify the data entry forms, and make the submission.
8.2.8.6
Form Completion Instructions
1. Accounting Officer Contact Information: Enter the Accounting Officer’s name, title, mailing address,
telephone, fax number, and e-mail address.
2.
PIN: Enter the PIN number. The PIN number can be retrieved in the "My Account" module.
Page 89 of 128
SAAELIP Authority Portal - User Guide
8.2.8.7
3.
Security Question & Answer: A randomly picked security question will display for the Primary
Preparer to answer. Enter the user-defined answer to this question. The security questions and
answers will be set when the user logs into the NAEI system for the first time. They can be accessed in
"My Account" module as well.
4.
Submission. When everything in the data entry form is verified, click the checkbox "Based on the
information and belief formed after reasonable inquiry, the statements and information in this
submittal are true, accurate, and complete." Click the "Submit" button to submit the NAEIS Report.
Completeness Check Executed by the System When an EI Report is Submitted
When an EI Report is submitted, a completeness check will be executed by the system on all data entry
forms. If the completeness check failed, the error message(s) will display in the upper portion of page.
Upon seeing this message, go to the NAEIS Report Site Map (on the left navigation panel) to review the
form errors, and make applicable corrections to ensure the validity of submitted data. Then, submit the EI
Report again.
If the completeness check passes, an EI Report submission successful message will display in the upper
portion of page.
Please see Section 8.7 for more information on Completeness Check.
8.2.9
Reports
The use of reports within the NAEIS is a feature that allows authority users to view data about specific EI
Reports in a presentable format. Reports can be exported into several different formats (excel, word, pdf)
and can be printed upon command. These are very helpful when authority users need to perform further
analysis on the emission data for a particular source. Because of the reports flexibility, it can show
comparison between the current year data and previous years’ data. This is helpful in allowing auditors to
draw comparison between different years.
The following list contains pre-defined reports that exist in the NAEI System.
1.
Source Summary Report – lists user-entered source, contact, emission unit, stack, activity, and
emission data, presented in a summarized table formats.
2.
NAEIS Data Entry Forms – prints the user-entered Source, Contact, Emission Unit, Stack, Activity,
Emissions, Preparer, and Certifier data in the format of “paper” EI forms. This report has the look and
feel of a traditional “paper” EI Report.
3.
Additions Report – displays all Stacks, Emission Units, Reporting Groups, SCC Code Activity, and
Preparers (Operators) that have been added to the source in this reporting year. For example, if you
add a new stack to the Stack form, then that stack will appear on the Additions report.
4.
Removed Report – displays all Stacks, Emission Units, Reporting Groups, SCC Code Activity, and
Preparers (Operators) that have been removed from the source in this reporting year. For example, if
you delete a stack from the Stack List, then that stack will appear on the Removed Report. All
Emission Units and Stacks that have a "Dismantle Date" entered will also be listed on the Removed
Report. Information that is dismantled or deleted from the system will not appear in the blank report
in the following year.
Page 90 of 128
SAAELIP Authority Portal - User Guide
5.
Emission Comparison (Source Totals Report) - Shows the comparison between the emissions
calculated by the reporting facility and the emissions calculated by DEA. This is for the whole source
in general. Note that this report is only applicable to Industrial sources.
6.
Emission Comparison (Emission Unit Totals Report) – Shows the comparison between the emissions
calculated by the reporting facility and the emissions calculated by DEA. This is sorted by emission
unit. Note that this report is only applicable to Industrial sources.
7.
Completeness Check Report – uses the administrative completeness check to edit the entered data
for errors. The Completeness Check edit must result in zero errors before the database can be
submitted. This completeness check ensures that there are reasonable responses in required data
fields. If something is missing or incorrect, the system will generate an error report to show the error
messages. The error report will describe the problem and indicate which form and field must be
corrected. Note that this report is only applicable to Industry type sources.
In each pop-up report window, you will see an option of "view/print/export" at the top of the report (Figure
8.51).
To export, select a file format from the drop down list, then click "export". Choose the file path you want to
save and then save the file.
Figure 8.51 View/Export a Report
Page 91 of 128
SAAELIP Authority Portal - User Guide
8.3
NAEIS Reporting Obligation Management
Compliance Officers may want to perform a search at any time during the reporting period to see which
facilities have submitted their EI Reports and which have not. This chapter details steps to perform these
searches as well as send out notifications for non-compliance. Notifications for Non-Compliance is an e-mail
sent out to the Industry’s AO detailing that the deadline to submit the EI Report has passed and that they
must do so immediately.
8.3.1
Submission Tracking
Submission tracking allows authority users to track reports of different statuses. For instance, you may
view all reports that have not been submitted. In addition, you may view all reports that have passed audit.
A scenario has been provided below.
Step 1: Go to NAEIS Report >> Current Year NAEIS Report.
Step 2: This page will list out all of the current year reports and their statuses.
Step 3: To view all reports that have not been submitted, select “Draft” under the “Status” filter.
Step 4: Click the “Search” button.
Figure 9.1 Submissions Tracking via NAEIS Report Module
8.3.2
Non-Compliance Submission Notification
For submissions that have not been submitted past the deadline, Compliance Officers have the capability of
sending these notifications of non-compliance. Please follow the steps below to perform this action:
Step 1: Go to NAEIS Report >> Current Year NAEIS Report.
Step 2: To view all reports that have not been submitted, select “Draft” under the “Status” filter.
Step 3: Click the “Search” button.
Step 4: Select the Sources in which you wish to notify of Non-Compliance.
Step 5: Click the “eNotify” button.
Step 6: A pre-defined e-mail template will appear. Modify the template if necessary.
Step 7: Click the “Send” button.
Page 92 of 128
SAAELIP Authority Portal - User Guide
Note that the grid view table displays information regarding the compliance notification. It includes
columns for Date Compliance Notification Sent, Compliance Notification Method, Compliance Confirm
Received, Date Confirmed.
Figure 9.2 Non-Compliance Submission Notification
Page 93 of 128
SAAELIP Authority Portal - User Guide
8.4
NAEIS Audit Console
After NAEIS reports are submitted, some of the reports will be audited. The auditing will ensure the quality of
source-reported data.
The Pre-Audit and Audit function will be accessed in Audit Console.
Each reporting year, some NAEIS reports will be audited. Audit Console is a centralized module for state
auditors to Pre-Audit, Assign Audit, and Audit. Click Source Management - Audit Console to load the Audit
Console (Figure 10.1).
Figure 10.1 Audit Console Web Page
To search for a specific source, use the Search Panel. In the search panel (Figure 10.1), specify the search
criteria and click the Search button to find the expected sources. The search criteria include:
8.4.1
Work Group (District)
Source Name
NAEIS Flag
SRN
Address
District/Metro Municipality
Local Municipality
Assigned To
Status: This is the processing status of each report.
Pre-Audit Result Tab
When a report is submitted, the system will automatically perform the Pre-Audit process. In the process,
the system will identify sources recommended for auditing.
Page 94 of 128
SAAELIP Authority Portal - User Guide
The following audit recommendations will be displayed here if they are identified in the Pre-Audit process:
Stack Added/Removed
Emission Unit Added/Removed
Reporting Group Added/Removed
Activities Added/Removed
Completeness Check Warning Messages >50
Emissions Exceed Threshold Value
Reported Material Throughput Exceeds design capacity
Previous Year Comparison report > 20% (for 1 to <4 tonne mass difference)
Previous Year Comparison report > 20% (for 4 to <15 tonne mass difference)
Previous Year Comparison report > 20% (for 15 to <40 tonne mass difference)
Previous Year Comparison report (for >40 tonne mass difference)
Figure 10.2 Pre-Audit Result Tab
Based on the Pre-Audit results, an auditor can choose whether or not to forego the audit. The next
section demonstrates how to assign audits to sources.
8.4.2
Audit Assignment
If authority users determine that a source is required to be audited, they can complete the Audit
Assignment Information section (Figure 10.3). The source(s) to be audited can be set individually or in a
batch by selecting one or more source(s) in the Audit Console grid-view.
Page 95 of 128
SAAELIP Authority Portal - User Guide
Figure 10.3 Audit Assignment Information
After the authority user determines whether or not a source needs audit, he/she can send out a Pre-Audit
Notify (Figure 10.3) to notify users whether or not their report has been selected for further review. An
example of a Pre-Audit eNotify e-mail is shown below:
Figure 10.4 Pre-Audit Notification
8.4.3
NAEIS Report Site Map in Audit Module
To see the details of each data entry form, click on the NAEIS Report Site Map tab (Figure 10.5). Click any
form name and the system will lead users to the corresponding data entry form.
Figure 10.5 NAEIS Report Site Map
Page 96 of 128
SAAELIP Authority Portal - User Guide
8.4.4
Audit Detail Tab
To audit a NAEIS report, click on the Audit Detail tab (Figure 10.6). In this tab, the authority users may
perform the following actions:
View Audit Reports/Checklist (Figure 10.6 Area 1)
Determine which Audit Reports/Checklist Evaluated (Figure 10.6 Area 2)
Enter Comments for Audit Reports/Checklist Evaluated (Figure 10.6 Area 2)
Revise NAEIS Report for selected Source via clicking the “Revise NAEIS Report” button
Determine the Audit Result ("Fail" or "Pass") for the selected source (Figure 10.6 Area 3)
Enter an “overall” audit result comment (Figure 10.6 Area 3)
2
1
3
Figure 10.6 Audit Detail Tab
If a NAEIS report passes the audit, its status will be updated to Review Complete.
If a NAEIS report fails the audit, its status will change to Audit-Failed. In this case, industry users will need
modify the reports and re-submit.
After the authority user completes the audit, he/she can send out an Audit Notification (Figure 10.7) to
notify users of their audit result. An example of an Audit eNotify e-mail is shown below:
Page 97 of 128
SAAELIP Authority Portal - User Guide
Figure 10.7 Audit Notification
Page 98 of 128
SAAELIP Authority Portal - User Guide
8.5
8.5.1
NAEIS Data Mining and GIS
GHG Data Analysis Report
The Data Analysis Reporting Module allows users to query emission data for a select list of pollutants
under a given inventory year. Authority users may select the specific IPCC sector of interest. Then, they
may narrow down by location of interest.
Steps for launching the Data Analysis Report are outlined below.
Step 1: Navigate to Source Management >> Analysis Reports.
Step 2: Click the
icon to launch the analysis report.
The tree node diagram for location of interest is organized in the hierarchy of Country >> Province >>
District/Metro >> Facility. If a province is chosen, the result will show data for the whole province. Within
the results, the authority user can expand to show the breakdown for individual districts/metros (when
applicable) that fall within the province. The authority user can take it one step further and expand to
show the breakdown for individual facilities (when applicable) within each district/metro.
Figure 11.1 GHG Data Analysis Report
Page 99 of 128
SAAELIP Authority Portal - User Guide
8.5.2
Emission Search by GIS
The Emission Search by GIS module allows users to view points of interest on the map by search of
pollutant, inventory year, area of interest, and sector. Once the search is conducted, drop pins will
appear based on the specified area of interest by the user. The drop pins will be color coded based on the
value of the emission. The gradient of the shading will change from green (low emission value) to red
(large emission value). The user can view additional source information by clicking on the individual drop
pins.
Steps for launching the Emission Search by GIS are outlined below.
Step 1: Navigate to Source Management >> Emission Results by GIS.
Step 2: Click the “Search Emission Results by GIS” link to launch the GIS Viewer.
Figure 11.2 Emission Search by GIS
Page 100 of 128
SAAELIP Authority Portal - User Guide
9
9.1
Additional SAAELIP Functionalities
Calendar
The calendar provides a hyperlink so the user can click on the link to jump to the specified inspection.
9.1.1
Task Calendar
The task calendar allows the user to see what tasks are
assigned to them and can view them by the week, month,
or year. The tasks are highlighted in green and will
display the date scheduled, the status, and the duration.
If the tasks are viewed by month, the hyperlink will direct
the user to my task rather than the task itself.
Task Calendar Month View
Task Calendar Week View
9.1.2
Inspection Calendar
The inspection calendar display can be viewed by day,
week, or the year. Any scheduled inspection that falls
in the date range of the view will be displayed in green.
Inspection Calendar Month View
Page 101 of 128
SAAELIP Authority Portal - User Guide
9.2
Work Task Management
‘Work Task Management’ is a powerful tool that can modify work task assignments in several different ways. The
basic search bar allows the user to search by task name, task type, or filter by status. If additional parameters are
needed, the user can use the ‘Advance Search’ option to view additional parameters.
Task Management Grid View
The advance search lets the user
specify the date range – start, due,
and complete date.
Task Management Advanced Search
By selecting the
icon next
to the work task, the user will
navigate to the task
information menu. In this
menu, the user can specify the
task name, change the status,
due/start date, and type of
work item. The user can add
additional information in order
to track, modify, or simply add
a task description.
Work Task Detail Menu
Page 102 of 128
SAAELIP Authority Portal - User Guide
By clicking the
button,
the user can now assign the work task to
whomever they want. Multiple users can
be selected by checking the checkbox next
to the desired users.
Task Assignment Selection Tool
9.2.1
Tracking My Task
My Task Grid View
10 Other Helpful Information
10.1 Submittal Status Descriptions
SAAELIP Submittal
Status
Submittal Status Description
Admin Review
The submittal is ready for the authority to start the review process.
Canceled
The submittal was requested and approved for cancelation. The submittal can no longer be altered and
all work flow halted.
Revision
The submittal was requested and approved for revision. The submittal can no longer be altered and all
work flow is halted. A new submittal was created with the data from the revised submittal.
License Issued
The license has been issued to the applicant.
Technical Review
The draft AEL will be reviewed and revisions will be made based on the review comments.
Page 103 of 128
SAAELIP Authority Portal - User Guide
SAAELIP Submittal
Status
Submittal Status Description
Tech Review
Completed
All attachments have been submitted, fee has been paid in full, and submittal form is complete;
Submission ID remains the same when status is updated.
Public Comment
Period Open
The submittal is in the public participation stage and is waiting for the process to complete.
Public Comment
Period Closed
The public participation stage is complete.
Approved
Submittal has been approved and license can be issued to the user/facility.
Withdraw
Submittal has been withdrawn by the Applicant; Submission ID remains the same when status is updated,
but submission is closed and no further work can be performed on the submission.
Denied
License has been denied due to various reasons; Submission ID remains the same when status is updated.
10.2 License Status Descriptions
SAAELIP
License Status
License Status Description
Issued
License has been issued.
Termination
License has terminated and is no longer valid.
Extension
The license was given an extension and given a new expiration date.
10.3 Inspection Status Descriptions
Status
Description
Out in Compliance
Compliance Inspection completed and site inspection results are in violation of provisions associated to license
Not Ready
Submittal has not been Accepted for SAAELIP to schedule inspection records
In Compliance
Compliance Inspection completed and Site inspection results are in compliance of provisions associated to license
Scheduled
Inspector has accepted to conduct inspection on a specified date and time
In Progress
The inspector can use this status when they are going the inspection process.
Page 104 of 128
SAAELIP Authority Portal - User Guide
11 Appendix
11.1 AEL Assessment Work Flow
11.1.1 AEL Assessment Work Flow Overview
#
Work Task
1A
Fee Management
1B
Acknowledgement of Application
3
New AEL: EIA +
AEL
New AEL:
AEL Only
AEL Renewal
AEL Review
AEL Variation
Optional
Optional
Optional
Optional
Compulsory
when Step 6
is needed
Compulsory
when Step 6 is
needed
Compulsory
when Step 6
is needed
AEL Transfer
AEL Section 22A
Completeness Audit
4A
Study & Comment on the Scoping
Report
4B
Study & Comment Scoping Report &
Plan of Study
5
Study & Comment on EIR & EMPr
6
Review & Comment AIR
7
Public Participation Process &
Assessment
8A1
Pre Licensing Inspection
8A2
Review Emission Report
8B1
Review Compliance Report
8B2
Prepare Draft AEL
8C1
Comment on Draft AEL
8C2
Revised AEL based on comments
9
Finale Signature
10
Issue Final AEL
Minimum Data Elements Tracked at Each Step
Person, Due Date, Complete Date, Task Status, Comments
Page 105 of 128
Optional
Compulsory when
Step 6 is needed
SAAELIP Authority Portal - User Guide
11.1.2 New AEL: EIA + AEL
1
#
Work Task
1A
Fee Management
Submission Status
BEFORE Completion
of Task
Submission Status
UPON Completion of
Task
Upload
Document?
Work
Group 2
Default
Task
Duration
(Days)
Admin Review Start
Admin Review Start
Yes
Role #1
10
Issue
AEL?
No
3
10 Parallel
1B
Acknowledgement of
application
Admin Review Start
Admin Review
Yes
Role #1
2
Completeness Audit
Admin Review
Admin Review
Completed
Yes
Role #2
3
Study & Comment
Scoping Report & Plan
of Study
Admin Review
Admin Review
Completed
Yes
Role #2
4
Study & Comment on
the EIR & EMPr
Admin Review
Completed
Admin Review
Completed
Yes
Role #2
5
Review & Comment
AIR
Admin Review
Admin Review
Yes
Role #2
6
Public Participation
Process & Assessment
Admin Review
Admin Review
Yes
7A
Pre-Licensing
Inspection
Admin Review
Completed
Admin Review
Completed
Yes
Role #2
107
(Parallel)
No
7B
Review Emission
Report
Admin Review
Admin Review
Completed
Yes
Role #2
10
(Parallel)
No
8
Prepare Draft AEL
Admin Review
Completed
Technical Review
Yes
Role #2
20 (after
issue of
EA)
Yes
draft
9A
Comment on Draft
AEL
Technical Review
Tech Review
Completed
Yes
Role #3
10
(Parallel)
No
9B
Revise Draft AEL
based on comments
Technical Review
Tech Review
Completed
Yes
Role #2
10
(Parallel)
No
1
2
3
4
434
43
10711
No
No
No
No
No
No
Both AEL Application Status and the current work task will be visible to Applicant for review status tracking
Specific Work Groups TBD by DEA. Roles Identified here are for organizational purposes only. Roles could be clerks, inspectors, engineers, etc.
“Parallel” indicates that this item must be completed in parallel with the item above.
After receipt of triggering documentation.
Page 106 of 128
SAAELIP Authority Portal - User Guide
1
Submission Status
BEFORE Completion
of Task
Submission Status
UPON Completion of
Task
Upload
Document?
Work
Group 2
Default
Task
Duration
(Days)
Issue
AEL?
#
Work Task
10
Final Signature
Tech Review
Completed
Approved
Yes (scan
signed copy)
Role #4
10
No
11
Issue Final AEL
Approved
License Issued
Yes
Role #4
10
Yes
Submission Status
BEFORE Completion
of Task
Submission Status
UPON Completion of
Task
Upload
Document?
Work
Group 6
Default
Task
Duration
(Days)
Issue
AEL?
Admin Review Start
Admin Review Start
Yes
Role #1
10
11.1.3 New AEL: AEL Only
5
#
Work Task
1A
Fee Management
No
7
10 Parallel
1B
Acknowledgement of
application
Admin Review Start
Admin Review
Yes
Role #1
2
Completeness Audit
Admin Review
Admin Review
Completed
Yes
Role #2
5
Review & Comment
AIR
Admin Review
Admin Review
Yes
Role #2
6
Public Participation
Process & Assessment
Admin Review
Admin Review
Yes
7A
Pre-Licensing
Inspection
Admin Review
Completed
Admin Review
Completed
Yes
Role #2
107
(Parallel)
No
7B
Review Emission
Report
Admin Review
Admin Review
Completed
Yes
Role #2
10
(Parallel)
No
8
Prepare Draft AEL
Admin Review
Completed
Technical Review
Yes
Role #2
20 (after
issue of
EA)
Yes
draft
9A
Comment on Draft
Technical Review
Tech Review
Yes
Role #3
10
No
5
6
7
8
438
No
No
No
No
Both AEL Application Status and the current work task will be visible to Applicant for review status tracking
Specific Work Groups TBD by DEA. Roles Identified here are for organizational purposes only. Roles could be clerks, inspectors, engineers, etc.
“Parallel” indicates that this item must be completed in parallel with the item above.
After receipt of triggering documentation.
Page 107 of 128
SAAELIP Authority Portal - User Guide
#
Work Task
5
Submission Status
BEFORE Completion
of Task
AEL
Submission Status
UPON Completion of
Task
Upload
Document?
Work
Group 6
Completed
Default
Task
Duration
(Days)
Issue
AEL?
(Parallel)
9B
Revise Draft AEL
based on comments
Technical Review
Tech Review
Completed
Yes
Role #2
10
(Parallel)
No
10
Final Signature
Tech Review
Completed
Approved
Yes (scan
signed copy)
Role #4
10
No
11
Issue Final AEL
Approved
License Issued
Yes
Role #4
10
Yes
11.1.4 AEL Renewal
#
Work Task 9
Submission Status
BEFORE Completion
of Task
Submission Status
UPON Completion of
Task
Upload
Document?
Work
Group 10
Default
Task
Duration
(Days)
Issue
AEL?
1A
Fee Management
Admin Review Start
Admin Review Start
Yes
Role #1
10
No
1B
Acknowledgement of
application
Admin Review Start
Admin Review
Yes
Role #1
10
Parallel11
No
2
Completeness Audit
Admin Review
Admin Review
Completed
Yes
Role #2
4312
No
5
Review & Comment
AIR
Admin Review
Admin Review
Yes
Role #2
6
Public Participation
Process & Assessment
Admin Review
Admin Review
Yes
7A
Pre-Licensing
Inspection
Admin Review
Completed
Admin Review
Completed
Yes
Role #2
107
(Parallel)
No
7B
Review Emission
Admin Review
Admin Review
Yes
Role #2
10
No
9
No
No
Both AEL Application Status and the current work task will be visible to Applicant for review status tracking
10
11
12
Specific Work Groups TBD by DEA. Roles Identified here are for organizational purposes only. Roles could be clerks, inspectors, engineers, etc.
“Parallel” indicates that this item must be completed in parallel with the item above.
After receipt of triggering documentation.
Page 108 of 128
SAAELIP Authority Portal - User Guide
9
Submission Status
BEFORE Completion
of Task
Submission Status
UPON Completion of
Task
Upload
Document?
Work
Group 10
Default
Task
Duration
(Days)
Issue
AEL?
#
Work Task
Report
Completed
7C
Review Compliance
Report
Admin Review
Admin Review
Completed
Yes
Role #2
8
Prepare Draft AEL
Admin Review
Completed
Technical Review
Yes
Role #2
20 (after
issue of
EA)
Yes
draft
9A
Comment on Draft AEL
Technical Review
Tech Review
Completed
Yes
Role #3
10
(Parallel)
No
9B
Revise Draft AEL based
on comments
Technical Review
Tech Review
Completed
Yes
Role #2
10
(Parallel)
No
10
Final Signature
Tech Review
Completed
Approved
Yes (scan
signed copy)
Role #4
10
No
11
Issue Final AEL
Approved
License Issued
Yes
Role #4
10
Yes
Submission Status
BEFORE Completion
of Task
Submission Status
UPON Completion of
Task
Upload
Document?
Work
Group 14
Default
Task
Duration
(Days)
Issue
AEL?
(Parallel)
No
11.1.5 AEL Review
#
Work Task
13
1A
Fee Management
Admin Review Start
Admin Review Start
Yes
Role #1
10
No
1B
Acknowledgement of
application
Admin Review Start
Admin Review
Yes
Role #1
10
Parallel15
No
2
Completeness Audit
Admin Review
Admin Review
Completed
Yes
Role #2
4316
No
3
Study & Comment
Admin Review
Admin Review
Yes
Role #2
43
No
13
14
15
16
Both AEL Application Status and the current work task will be visible to Applicant for review status tracking
Specific Work Groups TBD by DEA. Roles Identified here are for organizational purposes only. Roles could be clerks, inspectors, engineers, etc.
“Parallel” indicates that this item must be completed in parallel with the item above.
After receipt of triggering documentation.
Page 109 of 128
SAAELIP Authority Portal - User Guide
#
Work Task
13
Submission Status
BEFORE Completion
of Task
Scoping Report & Plan
of Study
Submission Status
UPON Completion of
Task
Upload
Document?
Work
Group 14
Role #2
Default
Task
Duration
(Days)
Issue
AEL?
Completed
5
Review & Comment
AIR
Admin Review
Admin Review
Yes
6
Public Participation
Process & Assessment
Admin Review
Admin Review
Yes
7A
Pre-Licensing
Inspection
Admin Review
Completed
Admin Review
Completed
Yes
Role #2
107
(Parallel)
No
7B
Review Emission
Report
Admin Review
Admin Review
Completed
Yes
Role #2
10
(Parallel)
No
7C
Review Compliance
Report
Admin Review
Admin Review
Completed
Yes
Role #2
8
Prepare Draft AEL
Admin Review
Completed
Technical Review
Yes
Role #2
20 (after
issue of
EA)
Yes
draft
9A
Comment on Draft AEL
Technical Review
Tech Review
Completed
Yes
Role #3
10
(Parallel)
No
9B
Revise Draft AEL based
on comments
Technical Review
Tech Review
Completed
Yes
Role #2
10
(Parallel)
No
10
Final Signature
Tech Review
Completed
Approved
Yes (scan
signed copy)
Role #4
10
No
11
Issue Final AEL
Approved
License Issued
Yes
Role #4
10
Yes
Submission Status
BEFORE Completion
of Task
Submission Status
UPON Completion of
Task
Upload
Document?
Work
Group 18
Default
Task
Duration
(Days)
Issue
AEL?
No
No
No
11.1.6 AEL Transfer
#
17
18
Work Task 17
Both AEL Application Status and the current work task will be visible to Applicant for review status tracking
Specific Work Groups TBD by DEA. Roles Identified here are for organizational purposes only. Roles could be clerks, inspectors, engineers, etc.
Page 110 of 128
SAAELIP Authority Portal - User Guide
#
Work Task
17
Submission Status
BEFORE Completion
of Task
Submission Status
UPON Completion of
Task
Upload
Document?
Work
Group 18
Default
Task
Duration
(Days)
Issue
AEL?
1A
Fee Management
Admin Review Start
Admin Review Start
Yes
Role #1
10
No
1B
Acknowledgement of
application
Admin Review Start
Admin Review
Yes
Role #1
10
Parallel19
No
2
Completeness Audit
Admin Review
Admin Review
Completed
Yes
Role #2
4320
No
6
Public Participation
Process & Assessment
Admin Review
Admin Review
Yes
7A
Pre-Licensing
Inspection
Admin Review
Completed
Admin Review
Completed
Yes
Role #2
107
(Parallel)
No
7B
Review Emission
Report
Admin Review
Admin Review
Completed
Yes
Role #2
10
(Parallel)
No
8
Prepare Draft AEL
Admin Review
Completed
Technical Review
Yes
Role #2
20 (after
issue of
EA)
Yes
draft
9A
Comment on Draft AEL
Technical Review
Tech Review
Completed
Yes
Role #3
10
(Parallel)
No
9B
Revise Draft AEL based
on comments
Technical Review
Tech Review
Completed
Yes
Role #2
10
(Parallel)
No
10
Final Signature
Tech Review
Completed
Approved
Yes (scan
signed copy)
Role #4
10
No
11
Issue Final AEL
Approved
License Issued
Yes
Role #4
10
Yes
19
20
No
“Parallel” indicates that this item must be completed in parallel with the item above.
After receipt of triggering documentation.
Page 111 of 128
SAAELIP Authority Portal - User Guide
11.1.7 AEL Variation
#
Work Task
21
Submission Status
BEFORE Completion
of Task
Submission Status
UPON Completion of
Task
Upload
Document?
Work
Group 22
Default
Task
Duration
(Days)
Issue
AEL?
1A
Fee Management
Admin Review Start
Admin Review Start
Yes
Role #1
10
No
1B
Acknowledgement of
application
Admin Review Start
Admin Review
Yes
Role #1
10
Parallel23
No
2
Completeness Audit
Admin Review
Admin Review
Completed
Yes
Role #2
4324
No
3
Study & Comment
Scoping Report & Plan
of Study
Admin Review
Admin Review
Completed
Yes
Role #2
4
Study & Comment on
the EIR & EMPr
Admin Review
Completed
Admin Review
Completed
Yes
Role #2
5
Review & Comment
AIR
Admin Review
Admin Review
Yes
Role #2
6
Public Participation
Process & Assessment
Admin Review
Admin Review
Yes
7A
Pre-Licensing
Inspection
Admin Review
Completed
Admin Review
Completed
Yes
Role #2
107
(Parallel)
No
7B
Review Emission
Report
Admin Review
Admin Review
Completed
Yes
Role #2
10
(Parallel)
No
7C
Review Compliance
Report
Admin Review
Admin Review
Completed
Yes
Role #2
8
Prepare Draft AEL
Admin Review
Completed
Technical Review
Yes
Role #2
20 (after
issue of
EA)
Yes
draft
9A
Comment on Draft AEL
Technical Review
Tech Review
Completed
Yes
Role #3
10
(Parallel)
No
21
22
23
24
43
10711
No
No
No
No
No
Both AEL Application Status and the current work task will be visible to Applicant for review status tracking
Specific Work Groups TBD by DEA. Roles Identified here are for organizational purposes only. Roles could be clerks, inspectors, engineers, etc.
“Parallel” indicates that this item must be completed in parallel with the item above.
After receipt of triggering documentation.
Page 112 of 128
SAAELIP Authority Portal - User Guide
#
Work Task
21
Submission Status
BEFORE Completion
of Task
Submission Status
UPON Completion of
Task
Upload
Document?
Work
Group 22
Default
Task
Duration
(Days)
Issue
AEL?
9B
Revise Draft AEL based
on comments
Technical Review
Tech Review
Completed
Yes
Role #2
10
(Parallel)
No
10
Final Signature
Tech Review
Completed
Approved
Yes (scan
signed copy)
Role #4
10
No
11
Issue Final AEL
Approved
License Issued
Yes
Role #4
10
Yes
Submission Status
BEFORE Completion
of Task
Submission Status
UPON Completion of
Task
Upload
Document?
Work
Group 26
Default
Task
Duration
(Days)
Issue
AEL?
11.1.8 AEL Section 22A
#
Work Task
25
1A
Fee Management
Admin Review Start
Admin Review Start
Yes
Role #1
10
No
1B
Acknowledgement of
application
Admin Review Start
Admin Review
Yes
Role #1
10
Parallel27
No
2
Completeness Audit
Admin Review
Admin Review
Completed
Yes
Role #2
4328
No
3
Study & Comment
Scoping Report & Plan
of Study
Admin Review
Admin Review
Completed
Yes
Role #2
4
Study & Comment on
the EIR & EMPr
Admin Review
Completed
Admin Review
Completed
Yes
Role #2
5
Review & Comment
AIR
Admin Review
Admin Review
Yes
Role #2
6
Public Participation
Admin Review
Admin Review
Yes
25
26
27
28
43
10711
No
No
No
No
Both AEL Application Status and the current work task will be visible to Applicant for review status tracking
Specific Work Groups TBD by DEA. Roles Identified here are for organizational purposes only. Roles could be clerks, inspectors, engineers, etc.
“Parallel” indicates that this item must be completed in parallel with the item above.
After receipt of triggering documentation.
Page 113 of 128
SAAELIP Authority Portal - User Guide
#
Work Task
25
Submission Status
BEFORE Completion
of Task
Submission Status
UPON Completion of
Task
Upload
Document?
Work
Group 26
Default
Task
Duration
(Days)
Issue
AEL?
Process & Assessment
7A
Pre-Licensing
Inspection
Admin Review
Completed
Admin Review
Completed
Yes
Role #2
107
(Parallel)
No
7B
Review Emission
Report
Admin Review
Admin Review
Completed
Yes
Role #2
10
(Parallel)
No
7C
Review Compliance
Report
Admin Review
Admin Review
Completed
Yes
Role #2
8
Prepare Draft AEL
Admin Review
Completed
Technical Review
Yes
Role #2
20 (after
issue of
EA)
Yes
draft
9A
Comment on Draft AEL
Technical Review
Tech Review
Completed
Yes
Role #3
10
(Parallel)
No
9B
Revise Draft AEL based
on comments
Technical Review
Tech Review
Completed
Yes
Role #2
10
(Parallel)
No
10
Final Signature
Tech Review
Completed
Approved
Yes (scan
signed copy)
Role #4
10
No
11
Issue Final AEL
Approved
License Issued
Yes
Role #4
10
Yes
No
Page 114 of 128
SAAELIP Authority Portal - User Guide
11.2 Group and Role Relationship
All User’s within the Authority portal must be assigned not only to a work group but also a role. This gives the user
access privileges to different screens and views that are applicable to their work responsibilities.
11.2.1 Work Groups
Work groups are used to determine the User’s access privileges to data. The User can be assigned under the
following work groups:
National: The User will be able to view nation-wide AEL applications. A National User will be able to
assign a new user to any work group.
Province: The User will only be able to view AEL applications that are within the jurisdiction of their
assigned province. A Provincial User will only be able to assign a new User to that particular province
group or a district or metropolitan municipality.
District/Metropolitan Municipality: The User in this group will only be able to view AEL applications that
are within the jurisdiction of their assigned district or metropolitan municipality. A District/Metropolitan
Municipality User will only be able to assign a new user to that particular district/metro group.
ID
Work Group Levels
1
2
3
4
5
6
7
8
9
10
11
12
13
14
15
16
National
Province
District/Metropolitan Municipality
National
The Eastern Cape
The Free State
Gauteng
KwaZulu-Natal
Mpumalanga
North West
The Northern Cape
Limpopo
The Western Cape
Alfred Nzo
Amathole
Buffalo City Metropolitan
Cacadu
Chris Hani
Joe Gqabi
Page 115 of 128
SAAELIP Authority Portal - User Guide
ID
17
18
19
20
21
22
23
24
25
26
27
28
29
30
31
32
33
34
35
36
37
38
39
40
41
42
43
44
45
46
47
48
49
50
51
52
53
54
55
56
57
58
59
60
61
62
Work Group Levels
Nelson Mandela Bay Metropolitan
O.R. Tambo
Fezile Dabi
Lejweleputswa
Mangaung Metropolitan
Thabo Mofutsanyane
Xhariep
City of Johannesburg Metropolitan
City of Tshwane Metropolitan
Ekurhuleni Metropolitan
Sedibeng
West Rand
Amajuba
eThekwini Metropolitan
iLembe
Sisonke
Ugu
UMgungundlovu
Umzinyathi
Uthukela
Uthungulu
Zululand
Umkhanyakude
Ehlanzeni
Gert Sibande
Nkangala
Bojanala
Dr Kenneth Kaunda
Dr Ruth Segomotsi Mompati
Ngaka Modiri Molema
Frances Baard
John Taolo Gaetsewe
Namakwa
Pixley Ka Seme
Zwelentlanga Fatman Mgcawu
Capricorn
Greater Sekhukhune
Mopani
Vhembe
Waterberg
Cape Winelands
Central Karoo
City of Cape Town Metropolitan
Eden
Overberg
West Coast
Page 116 of 128
SAAELIP Authority Portal - User Guide
11.2.2 Roles
A User is assigned roles in order to determine which tasks they will be able to complete using the SAAELIP system.
Please refer to section 7.1 for a more detailed view on the workflows for different roles.
ID
Role Name
Goals, Motives, and Usage Patterns
Authority Actors
1
2
3
4
5
Portal Super
Administrator
Create user accounts in the Portal
Manage user access to SNAEL or NAEIS system(s)
SNAEL / NAEIS Super
Administrator
Manage security and permission setup
Create and maintain system reference data, and templates
Manage system configurations
Create National Authority users (Clerks, Inspector, Engineer)
Create Provincial and District/Metro Authority users (AQO, Clerks,
Inspector, Engineer)
Review AEL applications that are subject to National jurisdiction
Sign and issue AEL final license
Track performance metrics of processing AEL applications at the
National level
Determine fee amount and issue invoices to AEL applications that are
subject to National jurisdiction
Issue acknowledgement of receiving applications
Conduct completeness audit on AEL applications
Perform pre-licensing inspections on AEL applications that are subject
to National jurisdiction
Review and comment on reports and documents required by AEL
regulations
Prepare draft AEL license
Revise draft AEL based on comments
Schedule and perform inspection on facility being complained
National AQO
National Role 1
National Role 2
6
National Role 3
Provide comments on draft AEL that are subject to National jurisdiction
7
Provincial AQO
Create Provincial Authority users (Clerks, Inspector, Engineer)
Create District/Metro Authority users (AQO, Clerks, Inspector,
Engineer)
Review AEL applications that are subject to its Provincial jurisdiction
Sign and issue AEL final license
Track performance metrics of processing AEL applications at the
Provincial level
Determine fee amount and issue invoices to AEL applications that are
subject to Provincial jurisdiction
Issue acknowledgement of receiving applications
Conduct completeness audit on AEL applications
Perform pre-licensing inspections on AEL applications that are subject
8
9
Provincial Role 1
Provincial Role 2
Page 117 of 128
SAAELIP Authority Portal - User Guide
ID
Role Name
Goals, Motives, and Usage Patterns
to Provincial jurisdiction
Review and comment on reports and documents required by AEL
regulations
Prepare draft AEL license
Revise draft AEL based on comments
Schedule and perform inspection on facility being complained
10
Provincial Role 3
Provide comments on draft AEL that are subject to Provincial
jurisdiction
11
District/Metro AQO
Create District/Metro Authority users (Clerks, Inspector, Engineer)
Review AEL applications that are subject to its jurisdiction
Sign and issue AEL final license
Track performance metrics of processing AEL applications at the
Provincial level
Determine fee amount and issue invoices to AEL applications that are
subject to its jurisdiction
Issue acknowledgement of receiving applications
Conduct completeness audit on AEL applications
Perform pre-licensing inspections on AEL applications that are subject
to its jurisdiction
Review and comment on reports and documents required by AEL
regulations
Prepare draft AEL license
Revise draft AEL based on comments
Schedule and perform inspection on facility being complained
Provide comments on draft AEL that are subject to its jurisdiction
Associate Consultant(s) to prepare AEL application for relevant facilities
Check and review completeness of AEL application
Certify and submit AEL application
Request to revise or withdraw submitted AEL application
Track review statuses of submitted AEL applications
Renew, amend, transfer or terminate AEL license for relevant facilities
12
13
14
District/Metro Role 1
District/Metro Role 2
District/Metro Role 3
Facility Actors
15
ACO
16
ECO
Same as above
17
Consultant
Prepare AEL application for relevant facilities
Initiate AEL revision, renewal, transfer and variation processes
Check and review completeness of AEL application
No system account needed
Search for AEL application submitted in SNAEL system
Public Actors
18
General Public
Page 118 of 128
SAAELIP Authority Portal - User Guide
ID
Role Name
Goals, Motives, and Usage Patterns
Search for AEL licenses issued in SNAEL system
11.3 Creating and Submitting Applications
11.3.1 AEL Application
The main purpose for AEL application is to initiate the first step for a user to apply,
renew, and amend air emission license. An Authority can enter information for a
facility’s AEL if they have received a paper submission from the facility. The AEL
Application process for the Authority will be very similar to the steps followed by the
Facility if they had applied through SAAELIP. SAAELIP has broken down the AEL
Application Form into multiple sections. The sections are described as the following:
General Information: This section contains the basic facility information such as
rules/regulations and pollutants that are associated with the facility.
Contact Information: This section allows the user to input contacts for the
facility.
Raw Materials & Production: This section allows the user to enter details about
raw materials that are used that may result in a change in air emission output.
Control Device: This section details the control units relevant to the license and
allows the user to select the associated pollutants.
Stack: This section lets the user define in the detail the release points associated
with the application.
Emission Unit: The emission source lists the emission and allows the user to
associate the release point, control device, and rule.
Reporting Group: This section allows the user to define if testing and monitoring
are needed for the group and define the group by type.
Emission and Activity: Emission and activity lets the user describe the emission
path group in further detail.
Monitoring, Management, & Mitigation: Monitoring defines the process in which each emission source is
handled.
AEL Navigation Wizard
11.3.1.1 General Information
In this section, the standard AEL application will be used as the
base and does not completely reflect how all other types are
handled.
Any fields that contain a
as an icon is required to be filled
or the system will generate a validation error.
In ‘General Information’, the user will begin by describing the
project followed by selecting the application type and selecting
the facility.
AEL General Information
Page 119 of 128
SAAELIP Authority Portal - User Guide
By selecting the different application reasons, the form will alter based on the application needs. In the instance of
selecting ‘AEL Transfer”, the previous description box was altered to a drop down menu for ‘Licensing Authority’
and a ‘Summary of Name or Ownership Change’ field box.
AEL Application Reason Selection
The next section provides additional required fields for the application to be completed. Selecting the right SIC
Code is extremely important since this will determine the unit that will receive the application.
AEL Application Description
The applicable regulation and the pollutant section play an intricate part of the application process. The
regulations have been designed by using a search tool. In this utility, the user can search by description, rule, or
filter by rule type. Once selected, the rule will populate in a grid view.
AEL Rule Search Tool
Page 120 of 128
SAAELIP Authority Portal - User Guide
AEL Rule Grid view
At this stage, the user should click either the save button or the next button to prevent loss of information.
11.3.1.2 Contact
After the next button is clicked, the user is
brought to the ‘Contact Information’ section of
the application. In this section the user can
select the contact individual(s) and declare their
responsibility.
11.3.1.3 Raw Materials & Production
This section allows the user to enter details about raw materials that are used that may result in a change in air
emission output. The User can click the “Add New Record” button to add different raw materials or production
information to the License.
Page 121 of 128
SAAELIP Authority Portal - User Guide
11.3.1.4 Control Device
As the process moves on to the ‘Control Device’
section, certain guidelines will be explained on how
to configure the selected device(s). In this example,
filter fabric was selected. The ‘Control Unit ID’ and
‘Control Unit Name’ are required to be unique within
control devices so that the same ID and name cannot
be used twice.
Every single control device requires a pollutant to be associated with them. In this case, the pollutant selected in
‘General Information’ will be displayed. The user will need to also define the control efficiency of the control
device for the particular pollutant(s).
Control Device Pollutant Selection
The user also has the option to ‘Batch Update Pollutants’. For control devices with exactly the same pollutants and
control efficiency, the user can ‘Batch Update Pollutants’ and apply the pollutant(s) to all checked control devices
instead of having to enter them in one by one.
11.3.1.5 Stack
When all the control units have been
added, the user should click on the ‘next’
button to validate and save all entered
data. Once verified that all the entered
data has passed validation, the user will
be brought to the ‘Stack’ section.
In ‘Stack’, similar to control devices, the
‘Stack ID’ and the ‘Stack Name’ are to be
unique within the section.
Page 122 of 128
SAAELIP Authority Portal - User Guide
Stack Form
SAAELIP allow the user to find the
latitude and longitude of each
stack using a Map interface. The
lat./long is defaulted to the
location of the facility. By clicking
on the ‘Get Lat./Long’ a map will
be displayed and the user will be
able to move the cursor to the
exact position of the stack.
Stack Mapping Utility
Once the desired position is selected, the user can then click on the ‘Update’ button to replace the original
lat./long fields.
Lat./Long Display
When all desired release points are entered, the user should either click on ‘Save’ or ‘Next’ to store the data and
move on to ‘Emission Unit’.
11.3.1.6 Emission Unit
The ‘Emission Unit’ is extremely dynamic and similar to the control devices where the form will alter based on the
emission unit type selected. Also similar to the control device section, the ‘Emission Unit Identifier’ and the
‘Emission Unit Name’ are unique and cannot be repeated.
Emission Unit Form
Page 123 of 128
SAAELIP Authority Portal - User Guide
Once the basic emission source information is filled, a new section will open up where the user will need to
‘Associate Control Device’, ‘Associated Stack’, and ‘Associate Rule’. In some cases, this portion is optional.
However, the ‘Associated Control Device’, ‘Associated Release Point’, and ‘Associated Rule’ will always be
displayed and the user can associate both the control devices and rules that were entered in the previous sections
to the emission unit.
Like control devices, SAAELIP provides features for the user to batch update rules to all checked emission units.
The user can also copy a previously entered emission unit by checking on an emission unit and clicking on the
‘Copy Emission Unit’ button. The user will then be prompted to enter a new emission unit ID and name. Again,
the user should save and/or click the ‘next’ button to store all data before moving on.
11.3.1.7 Emission Reporting Group
The next section ‘Reporting Group’ allows the user to associate emission units that have the same emissions
reporting.
11.3.1.8 Activity and Emission
Each emissions reporting group in ‘Activity and Emissions’ can be opened for the user to enter further detail. By
clicking on the
next to the emissions reporting group, the user is prompted to a screen to select the pollutants
associated with the emissions reporting group and fill in additional information.
Emission & Activity Grid View
The system allows for the same pollutant to be entered in more than once in situations where the emissions
reports may have different results for the same pollutant. The user can ‘Batch Update’ the groups if more than
one have matching criteria.
Page 124 of 128
SAAELIP Authority Portal - User Guide
11.3.1.9 Monitoring, Management, and Mitigation
Based on the emission reporting group, some groups will be required to complete additional information in the
‘Monitoring, Management, and Mitigation’. If the indicator states ‘No’ in either of the ‘Specified Monitoring
Entered?’ or ‘Specified Mitigation Entered?’ field, then no further action is required.
Monitoring, Management, and Mitigation Grid View
If the indicator displays ‘Yes’, then the user must click on the
icon to enter in the required data. The user will
have a prompt that will allow the user to specify the monitoring and mitigation method separately for each
emission reporting group.
11.3.1.10 Data Validation
In the final step, SAAELIP will validate that all required
inputs and sections were completed based on the
validation rules required by the application forms.
If the application passes the validation checks, the user
can then submit the application.
However, if any section fails to pass, SAAELIP will alert the
user by marking the section with an ‘X’ and with a
description of the reason why.
AEL Validation Screen
Page 125 of 128
SAAELIP Authority Portal - User Guide
11.3.1.11 Submission Receipt
After the application is submitted, the user
will receive a receipt confirming the
submission and providing the user IP address.
Submission Receipt
11.3.2 Submit AEL Compliance Report
After approval of a facility’s AEL License, the facility will be required to submit
AEL Compliance reports. This allows for the Authority to monitor facilities and
verify whether facilities are staying within the regulations of their license.
Sometimes the Authority may receive a paper submission of the compliance
report from the facility. An Authority User will be able to input the information
from the compliance report into SAAELIP for the facility. The Authority will
need to search for the application via their first name/last name, address, or
the associated facility name. The Authority user will follow similar steps as the
Facility would when entering a compliance report.
Data Entry/AEL Compliance Report: This section contains the basic facility
information such as the facilities addresses, phone number, and a place to
add an executive summary or comments. The User must also enter the
Licensing Authority that is associated to the particular license.
Attachment: This is where the user will specify how they wish to submit
their compliance report. The report can either be uploaded and submitted
through SAAELIP or the User can choose to mail in the report via the
address that is listed on the Attachment page. The User may upload any
other supporting documents related to their compliance report.
Before beginning a new Compliance Report in SAAELIP, the user
should download the Report through the ‘Start a New Submittal’
submodule in ‘Submittal.’ This will allow the User to fill out the
report and later upload it to SAAELIP via the ‘Attachment’ step of
the wizard. The User can download the document by clicking on
the Word document icon.
The User can hold the cursor over the icons to view more
information about what they do.
Page 126 of 128
SAAELIP Authority Portal - User Guide
11.3.2.1 Data Entry
In this section, the User will verify all information
that is entered on the screen is correct or will enter
any required information that is not completed.
The User must associate a Licensing Authority to the
compliance report.
Any fields that contain a
as an icon is required to
be filled or the system will generate a validation
error.
AEL Compliance Report-Data Entry
11.3.2.2 Attachment
The User must attach the compliance report
to the submission. SAAELIP provides the user
to either digitally upload the report. The User
has the option to upload supporting
documents.
AEL Compliance Attachments
11.3.2.3 Data Validation
In the final step, SAAELIP will validate that all
required inputs and sections were completed
based on the validation rules required by the
report forms.
If the application passes the validation checks,
the user can then submit the report.
However, if any section fails to pass, SAAELIP
will alert the user by marking the section with
an ‘X’ and with a description of the reason why.
AEL Compliance Validation Screen
Page 127 of 128
SAAELIP Authority Portal - User Guide
11.3.2.4 Submission Receipt
After the report is submitted, the user will
receive a receipt confirming the
submission and providing the user IP
address.
Submission Receipt
Page 128 of 128