1
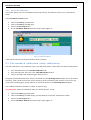
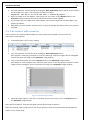
Telescopio Nazionale Galileo HARPS-N OPERATION GUIDE Draft Manual version 1.2 TNG-MAN-HARPN-0003 Date: 14-01-2013 (v1.1) Prepared R. Cosentino TNG-MAN-HAN-0003 2 Change Record Issue/Rev. Date V1.0 14-12-2012 V1.1 14-01-2013 V1.2 04-02-2013 Section/Page affected First version Reason/Remarks Autoguider added TNG-MAN-HAN-0003 3 Contents Change Record .........................................................................................................................................2 1 2 Introduction ......................................................................................................................................4 1.1 Scope ........................................................................................................................................4 1.2 Additional information................................................................................................................4 1.3 Contact information ................................................................................................................4 Before the observations .....................................................................................................................5 2.1 The Observation blocks preparation ............................................................................................5 2.2 The Sequencer GUI (initialization and operation)..........................................................................6 2.2.1 Initialization........................................................................................................................6 2.2.2 Before the calibration..........................................................................................................7 2.3 3 The standard calibration (daily calibration) ..................................................................................7 Observations .....................................................................................................................................8 3.1 The start night............................................................................................................................8 3.2 The focus procedure ...................................................................................................................8 3.3 The pointing model procedure ....................................................................................................8 3.4 The science OB execution ...........................................................................................................9 3.5 The Autoguide.......................................................................................................................... 10 3.5.1 The HARPS-N AutoGuider windows .................................................................................... 11 3.5.2 The Integrated Image window ........................................................................................... 11 3.6 The end of observation ............................................................................................................. 11 TNG-MAN-HAN-0003 4 1 Introduction 1.1 Scope This User Manual is intended to give all necessary information to pote ntial users of the HARPS-N instrument, to help them to use the instrument and manages the observation at the TNG telescope. The following do cume nts are closely related to this manual and should be consulted as well: The HARPS-N User Manual (TNG-MAN-HARPN-0 002) The HARPS-N Startup Manual (TNG-MAN-HARPN-000 1) The New Short Term Scheduler User Manual (NSTS) The DRS User Manual (OG-MAN-HAN-13-0004) Both are available through the TNG web page http://www.tng.iac.es/instruments/harps/ 1.2 Additional information The latest information updates ab out the HARPS-N instrume nt can be found on the HARPS-N web pages http://www.tng.iac.es/instruments/harps/ 1.3 Contact information Feedback on this User Manual from users is encouraged. Please email to [email protected] TNG-MAN-HAN-0003 5 2 Before the observations Starts up the system following the instructions of the “HARPS-N Quick Start Guide” and take care to read all the advices reported at the beginning of the manual. 2.1 The Observation blocks preparation From the NSTS the observer can prepare the sequence of observation blocks of the night (Figure 1). The target can be inserted directly in the NSTS or by using a catalog file that contains the objects information. The format of the catalog file is an ascii file and the fields separator is a TAB (ascii code = 9). The fields of the catalog are shown in , the mandatory fields are shown in bold format. An example of catalog file is shown in the HARPS-N webpage: (http://www.tng.iac.es/instruments/harps/data/SpStdHARPSN.cat) Table 1- Catalog file entries name alpha delta mualpha mudelta mv bv TypSp radvel sn spectr remarks tpltype equinox progid piname object code right ascension (nn:nn:nn.nn) Declination (nn:nn:nn.nn) proper motion alpha(arcsec/year) proper motion delta (arcsec/year) magnitude V bv spectral type mean radial velocity (KM/sec) or -99999 Signal/Noise (550nm) spectral type for the mask(two chars only) remarks template (es. HARPN_ech_acq_objA) equinox program identificator (es. TAC_xx) PI name Figure 1 - Short Term Scheduler TNG-MAN-HAN-0003 6 2.2 The Sequencer GUI (initialization and operation) After the startup of HARPS-N the instrument is ready to the the initialization of the subsystems and the start of operation. The sequencer GUI (Figure 2) is divided into several sections: The sequence control buttons, for the interaction with the observing blocks The Instrument control buttons, for the interaction with the HARPS-N’s subsystems The observing status window, where the commands execution and the errors are shown The acquisition image window, where the autoguider’s image is shown The acquisition image button (accept, repoint, etc), allows to do actions related with the autoguider’s image. During the command execution the status is visualized into the observing status window and, at the end of execution, a bell sound confirms the correct execution of the command (if the sound is a horn noise, this means that something does wrong and an error should be shown in the observing status window). 2.2.1 Initialization From the instrument control section, click on the LCU Init button and wait until the command ends. Then click on the AG Init button and wait until the command ends. The system now is ready to calibrations (but not for the observations). Figure 2 - The sequencer GUI TNG-MAN-HAN-0003 7 2.2.2 Before the calibration Few minute before the start of calibration (about 10 minutes), the observer has to turn on the thorium lamps. In the Instrument control section: 1. 2. 3. 4. Click on the ON flag of THO1 lamp Click on the ON flag of THO2 lamp Click on the Set Lamp button On the LCU Device Monitor verify the lamps status (Figure 3) Figure 3 - LCU Device Monitor A bell sound confirms the correct execution of the command 2.3 The standard calibration (daily calibration) The daily calibration is very important to do in the afternoon (about 1 hour before the start of observation). 1. From the NSTS selects the ‘standard calibration’ OB 2. From the sequencer GUI, click in the ‘Next Observation’ button. 3. Verify in the DRS if the calibration goes without errors During the command execution the status is visualized into the observing status window and, at the end of execution, a bell sound confirms the correct execution of the command (if the sound is a horn noise, this means that something goes wrong and an error should be shown in the observing status window). The standard calibration procedure is about 11 minutes long. Very important: When the calibration ends, turn off the thorium 1 lamp: 1. 2. 3. 4. Click on the OFF flag of THO1 lamp Click on the ON flag of THO2 lamp (if you will observes in thorium simultaneous mode) Click on the Set Lamp button On the LCU Device Monitor verify the lamps status (Figure 3) TNG-MAN-HAN-0003 8 3 Observations 3.1 The start night Before the start of observation the system needs that some processes starts and that the telescope is ready to work in HARPS-N mode. 1. Be sure that the system is initialized and ready to work (Start-up procedures, in the HARPS-N Quick Start Guide) 2. In the sequencer GUI, click in the Start Night button in the Instrument Control section and wait the end of execution of the command. Now HARPS-N is ready for observations. 3.2 The focus procedure At the beginning of the night, may be suitable do a focus procedure doing the following actions: 1. In the NSTS selects a star from the catalog 2. Delete the HARPN_ech_obs_all template 3. Change the HARPN_ech_acq_objXX to HARPN_focus 4. From the sequencer execute this OB by clicking the Next Observation button. (The sequencer sends the commands to: point the telescope, move the M2 mirror, acquire an image from the autoguider camera and shows the image in the Acquisition Image window.) 5. Click on the star and then click on the Repoint button in the Acquisition Image window. (The sequencer executes the focus procedure and moves the M2 mirror at the best position) The focus procedure is about 10 minutes long. 3.3 The pointing model procedure Sometimes the pointing precision can be poor and the telescope could need the execution of a pointing procedure. The pointing procedure must be done in collaboration with the telescope operator (TO) and the TO has to know some information during the procedure. The sequences of actions to manage the pointing procedure are: 1. In the NSTS select a star from the catalog HARPSN-PointingModel.cat located in /home/guest/GAPS/CATALOGS 2. Delete the HARPN_ech_obs_all template TNG-MAN-HAN-0003 9 3. From the sequencer execute this OB by clicking the Next Observation button and tell to the TO when the AG image starts, (this is the critical point of this procedure) : Sequencer: Thu Dec 27 23:12:29 UTC 2012 -> launch AG_expose 4. When the image of the star appears, clicks on the star, then clicks on the Repoint button in the Acquisition Image window and tell to the TO that the offset has been applied. 5. The TO takes note in the VME of the offset applied, the paralactic angle and uses these data in the pointing procedure. 6. Repeat the cycle with another star (from point 1.) until the pointing procedure reaches the precision expected. 3.4 The science OB execution In the execution of a scientific OB the object has to be pointed and centered in the fibre with the intervention of the observer. 1. In the NSTS select a star from the catalog 2. From the sequencer execute this OB by clicking the Next Observation button. (The sequencer sends the commands to: move the telescope, acquire an image from the autoguider camera and shows the image in the Acquisition Image window.) 3. Click on the star and then click on the Repoint button in the Acquisition Image window. (The sequencer sends an offset to the telescope, puts the star in the fiber position, acquires another image from the autoguider camera and shows the image in the Acquisition Image window) Figure 4 - Acquisition Image window 4. When the image appears, if the star is in the fiber position (red circle), click in the Accept button in the Acquisition Image window. After that the sequencer starts the auto-guide and the spectroscopic acquisition. When the OB ends, a bell sound confirms the correct execution of the command and the Next Acquisition button turns in active mode. TNG-MAN-HAN-0003 10 3.5 The Autoguide The autoguider starts when the observer clicks on the accept button of the sequencer GUI and two windows opens (Figure 5 and Figure 6): 1. The HARPS-N AutoGuider windows 2. The Integrated Image window Figure 5 - Autoguider and Front End Monitor (automatic mode). Figure 6 - Autoguider and Front End Monitor (manual mode). TNG-MAN-HAN-0003 11 3.5.1 The HARPS-N AutoGuider windows This window shows the autoguider images, some information about the guide settings and status and allows to change the guide mode: 3.5.1.1 Feedback (offload) tab The feedback tab open a menu where the user can change the parameter of the tip-tilt correction. Use Feedback enable/disable the tip tilt correction and offload The gain and delay value change the behaviour of tip-tilt Wait for user freeze the starting of autoguider Guiding now unfreeze the starting of autoguider (start autoguide) The Wait for user button remains active few seconds before the automatic starting of autoguide. If the user sets this button on Yes the autoguide get stuck until the Guiding Now button is selected. 3.5.1.2 Mask tab To avoid the contamination of others star close to the guide-star in the guide, a mask around the guide star can be selected. Figure 7 - Feedback panel [to be completed](Masksize, On/off) 3.5.1.3 Hole tab With this panel is possible to select the hole- find method, the centering algorithm, and the hole’s dimension (optional) Manual Hole Find selects the manual or automatic method The auto hole method select the algotithm for guiding end for the holecenter calculation Fix fit Hole Radius change the default hole dimension to a user selected In the The HARPS-N AutoGuider windows (Figure 6) the white cross represent the center of the star and the red cross is the center of the fiber. At the bottom of the panel, a button menu allow the user to change the zoom, ............ auto hole method : The algorithm for the calculation of the fiber position and for the star’s center position can be choose between the centroid or 2Curve algorithm. 3.5.2 The Integrated Image window This window shows the integrated images, some informations of the guide's execution and allows to change the reference point (fiber position) when the manual mode is setted. The information shown depends by the hole’s find method selected: Manual mode: the fiber’s reference position is based on a table and can be modified by the user dragging with the mouse the green cross pointer. Automatic mode: the fiber’s reference position is calculated by the selected algorithm. The red circle represent the contour of the star, the blue circle the shape of the hole. 3.6 The end of observation At the end of observations is very important to shut down the system correctly and starts the telemetry. TNG-MAN-HAN-0003 The shut down procedures are described in details in the capter 5 of the HARPS-N Quick Start Guide. 12