1
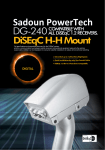
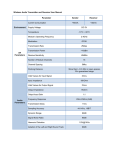
CAUTION:
1. This product is suitable for 12V power
2. Please consult a certified installer to install product
3. The wire harness must avoid high temperature and high pressure location
4. Any exposed wire must be insulated properly
5. Check functions and test the device after installation
Wireless Installation Kit
For Back Up Camera
Model:DG240
Installation/User’s Manual
Receiver
Transmitter
www.rydeenmobile.com
Rydeen North America Inc.
dba Rydeen Mobile Electronics
2701 Plaza Del Amo, Suite 705, Torrance, California 90503 USA
Phone: 1-877-777-8811 Fax: 1-310-943-3778
Copyright © 2013 Rydeen North America Inc. All Rights Reserved.
These materials are protected by copyright law and international treaties. Any unauthorized use, reproduction or distribution of these materials, or any portion
herein, will result in severe civil and criminal penalties and fines. Violators will be prosecuted to the fullest extent of the law.
Quick Start Guide
DG240 = Transmitter + Receiver
Wireless Transmitter box:1
Wireless receiver:1
RCA video to camera cable Adaptor:1
Male to Female RCA Cable:1
Specifications:
Camera
Packing List:
Model: DG240
Camera
Image Sensor
1/4" CMOS
Effective Pixels
Video Format
View Angle
80 O(NTSC), 82 O(PAL)
656 X 488
NTSC/PAL
<0.5 Lux
1Vp-p±0.2@75Ω
Minimum illumination
Video output
Power Supply
DC12V±0.5V
65mA±10
IP66
2400~2483.5MHz
4.4 (20dB BW)
16QAM,QPSK,BPSK
Consumption Current
Waterproof Capacity
Transmitter Frequency
Receiver
Transmitter
Data Bandwidth
Modulation/Demodulation Mode
+14dBm@16QAM EVM 5%,
+18dBm@QPSK EVM 8%
Transmitter Power
Receiving Sensitivity
Unobstructed Effective Range
Power Supply
Consumption Current
-72dBm@QAM, -85dBm@QPSK
50M (MAX.)
DC 12~24V
DC 12V@250mA; DC24V@150mA
Dimensions (W X D X H)
Weight
Transmission Frequency
Receiver
Prompts:
1. This product is suitable for 12V power
2. Please find a certified installer to install the product
3. The wire harness must avoid high temperature
and high pressure location
4. Any exposed wire must be insulated
Installation Wired Camera:
Antenna
Transmission Power
+14dBm@16QAM EVM 5%,
+18dBm@QPSK EVM 8%
Receiving Sensitivity
Unobstructed Effective Range
Power Supply
Video output
Dimensions (W X D X H)
Weight
-72dBm@QAM, -85dBm@QPSK
Operation Temperature
Operation Humidity
-10 OC~+50 OC/14 OF~122 OF
15%~85%RH
50M (MAX.)
DC 12~24V
1Vp-p±0.2
66 X 35 X 12mm
60g
Wiring diagram and pairing set up:
Wired camera+Wireless Transmitter box:
Wireless Transmitter box
Connect the vehicle
power supply
Modulation/Demodulation Mode
Data Bandwidth
Transmitter
Product Structure:
66 X 35 X 12mm
60克
2400~2483.5MHz
4.4 (20dB BW)
16QAM,QPSK,BPSK
Indicator
Video Input
Red line
RYDEEN
Wired camera
Pairing
DG240
Wireless Transmitter box:
Rear
lamp
Black line
Wireless Receiver
Connect the vehicle
power supply
Antenna
Indicator
Video Output
1. In the proper position of rear license plate
drill a screw hole for mounting screw.
2. Use a screwdriver to the first screw is screwed
into the screw hole of the drilled.
Wireless Receiver:
Red line
Monitor
Pairing
DG240
Wireless Receiver
Rear
lamp
Black line
Wired Camera
Pairing: After devices have been succesfully connected, press and hold the pair button on the wireless Transmitter
box for 3 seconds, indicator light starts to flash. Then in 30 seconds, to press and hold the pair button on
the wireless receiver for 3 seconds, until the indicator light flashes, equipment began to pair. Until the
indicator light stops flashing, you can view image in the corresponding display equipment.
Bracket
Camera Lens
Video Output
3. Move the camera angle to adjust
the display image.
4. After adjustments, mount and tighten the 2nd
screw to secure the camera
Wireless Transmitter box
Wireless Receiver