1
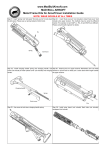
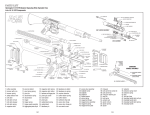
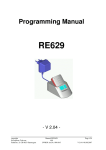
www.PoliceOne.ch - www.P1CH.com
GLOCK KPOS G2
USER MANUAL
WARNING!
Make sure your Glock is unloaded before you begin
any assembly or disassembly procedures.
2
9
4
1
8
2
3
5
7
6
4
10
Fig. 1
Part No
Part Name
Part No
Part Name
1
Receiver
6
Rear Locking Pin
2
Flash-hider 7
Buttstock Hinge
3
Handguard
8
Buttstock
4
Triggerguard Foregrip
9
Charging Handle
5
Locking Lever
10
Glock Semiautomatic Pistol
43, Yakov Olamy St.
Mishmar Hashiva
ISRAEL 50297
Tel: +972 3 960 3399
Fax: +972 3 960 3312
Website: www.fab-defense.com
- 2 KPOS G2 –SYSTEM SET ADJUSTMENT
The KPOS G2 is supplied factory preset for the Glock 19 Semi Automatic Pistol.
When using the Glock 17 Semi Automatic Pistol the preset must be adjusted.
Adjustment of the factory preset from Glock 19 to Glock 17 is performed as follows:
1. Place the KPOS G2 upside down and pull back the Charging Handle (9) until the
Slide Drawer (9.1) will be completely exposed within the KPOS G2 chassis.
2. Holding the Charging Handle (9), unscrew the Slide Drawer’s Screws (9.2) and
remove the Slide Drawer (Fig.2).
9.1
9
Fig. 2 Glock 19 - set position
9.2
3. Place the Slide Drawer in forward position as shown in Fig. 3 and fasten the
Slide Drawer’s Screws (9.2).
9
9.1
Fig. 3 Glock 17 - set position
9.2
43, Yakov Olamy St.
Mishmar Hashiva
ISRAEL 50297
Tel: +972 3 960 3399
Fax: +972 3 960 3312
Website: www.fab-defense.com
- 3 KPOS G2 – SYSTEM ASSEMBLY
8
3
Fig. 4
5
6
Step 1. Open the Locking Lever (5) to the front and rotate to vertical position pointing
down (Fig.4).
Pull out the Rear Locking Pin (6), lower the Handguard (3) and lift the Buttstock (8) up.
3
Fig. 5
10
3.1
Step 2. Slide your Glock Pistol (10) into the Handguard (3) so the Pistol Rail Grooves
will fit securely into the Hand guard's Rails (3.1) (Fig 5).
43, Yakov Olamy St.
Mishmar Hashiva
ISRAEL 50297
Tel: +972 3 960 3399
Fax: +972 3 960 3312
Website: www.fab-defense.com
- 4 -
1
6
8
Fig. 6
5
Fig. 7
Step 3. Push the Handguard (3) upwards until the pistol is positioned into the Receiver (1).
Push the Buttstock (8) downwards and secure the system by inserting the Rear Locking
Pin (6) back into place (Fig.6).
Fasten your Glock by closing the Locking Lever (5) in horizontal position (Fig. 7).
KPOS G2 – FOLDING/UNFOLDING THE BUTTSTOCK
8
7
Fig. 8
Fig. 9
• To fold the Buttstock(8) apply downward pressure parallel to the Hinge ( 7) and
rotate forward (Fig 8).
• Unfold the Buttstock by simply pulling it back (Fig. 9).
43, Yakov Olamy St.
Mishmar Hashiva
ISRAEL 50297
Tel: +972 3 960 3399
Fax: +972 3 960 3312
Website: www.fab-defense.com
- 5 KPOS G2 – GLOCK TRIGGER SAFETY
4
4.1
Fig. 10
4.2
Fig. 11
Step 1. In order to secure the the Trigger, fold the Triggerguard Foregrip to horizontal
position by pressing the Button (4.1) (Fig 10).
Step 2. Pull out the Triggerguard Foregrip Extension Slide (4.2) until the Trigger is fully
covered (Fig 11).
KPOS G2 – GLOCK TRIGGER SAFETY - DISENGAGEMENT
Fig. 12
4
4.3
Option A
Unfold the Triggerguard Foregrip (4)
to vertical position (Fig.12).
4
Fig. 13
Option B
Press the Release Buttons (4.3) positioned
on the Triggerguard Foregrip (4).
The Triggerguard Foregrip Extension
Slide (4.2) will return to the initial
“disengaged” position (Fig 13).
43, Yakov Olamy St.
Mishmar Hashiva
ISRAEL 50297
Tel: +972 3 960 3399
Fax: +972 3 960 3312
Website: www.fab-defense.com
- 6 KPOS G2 – BUTTSTOCK HEIGHT ADJUSTMENT
8.1
Fig. 14
8
Fig. 15
Step 1. Loosen the Buttstock Screw (8.1) (Fig. 14).
Step 2. Adjust the Buttstock (8) to your desired position and then tighten the
screw back into place (8.1) (Fig. 15).
KPOS G2 – DIMENSIONS WITH GLOCK 19
598mm/23.54in
59mm/2.324in
146mm/5.75in
Weight – 960 gr/2.62 lb
Weight with Glock 19 – 1555 gr/3.43 lb
Weight with Glock 17 – 1630 gr/3.59 lb
Do not hesitate to contact your swiss FAB distributor: P1 Switzerland Ltd. - P.O. Box 114 - 8833 Samstagern - Switzerland
43, Yakov Olamy St.
Mishmar Hashiva
ISRAEL 50297
Tel: +972 3 960 3399
Fax: +972 3 960 3312
Website: www.fab-defense.com