1
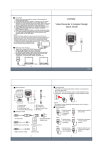
Pet CAMERA USER MANUAL
Invite you to experience a new product development and design company, pet camera. Eyes from your pet to
see the world. The camera has a built-in power supply (lithium-ion battery), you can record sound and video,
or thousands of photos. Let your pet from your point of view it's full of adventure. Every pet owner may often
curious about their pets gone done. With this camera, pet owners can observe a consistent line of kids. Their
leisurely life at a glance. For those who want to know everything about pet behavior, this is an essential
equipment.
1. STRUCTURE
① On / Off Key: Switch Button
② Start Key: Start Button
③ Photo / Adj Key: Key Camera Settings
④ Video / Adj Key: Video Settings Button
⑤ Tel: Telephone Number Display Area
⑥ Tf Card: Tf Card Size Display Area
⑦ Photo / Video Timer: photo / video / time display area
⑧ red and blue lights
⑨ backlight: turn on or off state, press any key, the backlight will light for 10 seconds.
2.
Parameters:
● Video resolution :640×480,30 frames / sec, 16bit PCM audio, AVI file format.
● Camera: resolution 1280×960, JPEG file format.
● Transmission Interface: USB 2.0 interface.
3.
Operating instruction
◆ How to display the phone number?
◥ first step: the machine connected to the computer USB, refer to the following format to modify the
machine TF card TEL.txt file.
886-12345678
Note: The phone number can display numbers 0-9 and "-" and spaces can display up to 12.
◥ Step two: Unplug the USB cable, press ON / OFF button start, 2 seconds after the phone number
that is displayed on the LCD's "phone number display area."
Note: The startup and shutdown state, phone number remain displayed.
◆ How to display the available capacity of TF card?
◥ In the boot state, TF card, the remaining available capacity will be displayed in the "TF card size
display area.
◥ in the boot state, "TF card size display area," If the "no", said detected TF card, then insert the TF
card should be turned off, and then boot.
◥ in the off state, "TF card size display area" no display.
◥ each time before using this product, recommended that users backup file format TF card.
◆ How regular camera?
◥ first step: connect USB, remove the product on a computer used in the PHOTO directory of TF
card to all content (users need to backup before you delete the file).
◥ Step Two: In the shutdown mode, press ON / OFF button for 2 seconds to boot, "photo / video
time display area" show "00." If the "PL", indicates that the battery is too low, you can not do anything.
◥ third step: press the "camera setting keys", "photo / video time display area" display time time "1 0
sec", then a "camera setting keys", regular time into "20 sec", followed by and so on.
Regular camera can set the time value:
00-10sec-20sec-30sec-40sec-50sec-1min-2min-3min-... ...-99min
The following is the corresponding function:
00: Do not take pictures
10sec: every 10 seconds, automatically take a photo.
20sec: Every 20 seconds, automatically take a photo.
1min: every 1 minute automatically take a photo.
99min: Every 99 minutes, and automatically take a photo.
◥ fourth step: the time to change into the desired time after time, press the "start button", the
machine began to regularly take pictures.
◥ regular camera is activated, LCD on the "clock icon" start flashing to indicate regular camera has
been launched.
◥ regular camera starts, the blue LED flashes once every three seconds to indicate the regular
camera has been launched.
◥ press "start button" to turn off or turn on the LED indicator.
◥ in the photo process, if enough free space in TF card, this product will stop regular camera, and
then shut down.
◥ in the photo process, if only the remaining 5% of the battery, this product will stop regular camera,
and then shut down.
◆ How timer recording?
◥ first step: connect USB, remove the product on a computer used in the VIDEO directory of TF card
to all content (users need to backup before you delete the file).
◥ Step Two: In the shutdown mode, press ON / OFF button for 2 seconds to boot, "photo / video time
display area" show "00." If the "PL", indicates that the battery is too low, you can not do anything.
◥ Step three: Press the "Video Settings button", "photo / video time display area" display time time "3
min", press the "Video Settings button", regular time into "4 min", and so on .
Timer recording can be set to the time value:
00-3min-4min-... ...-99min
The following is the corresponding function:
00: no video
3min: every 3 minutes automatically start recording, video recording automatically stops after 2
minutes.
4min: every 4 minutes automatically start recording, video recording automatically stops after 2
minutes.
99min: Every 99 minutes, and automatically start recording, video recording automatically stops after
2 minutes.
◥ fourth step: the time to change into the desired time after time, press the "start button", the
machine starts timer recording.
◥ timer recording function is activated, LCD on the "clock icon" start flashing to indicate timer
recording function is activated.
◥ timer recording function is activated, the red LED flashes once every three seconds to indicate
timer recording function is activated.
◥ press "start button" to turn off or turn on the LED indicator.
◥ in the video process, if enough free space in TF card, this product will stop the timer recording
function, and then shut down.
◥ in the video process, if only the remaining 5% of the battery, this product will stop the timer
recording function, and then shut down.(Note: There is no normal video files stored by third-party
software can try to repair.)
◆ How to stop time taking pictures and stop the timer recording?
Time in the regular camera or video recording starts, press ON / OFF button for 2 seconds, the
machine stop time, and regular video camera function, and then shut down.
◆ How to shut down?
In boot mode, if the time or regular video camera function is on, then you can press ON / OFF button
for 2 seconds, the machine stop time, and regular video camera function, and then shut down.
In boot mode, if the time or regular video camera is not enabled, then you can press ON / OFF button
for 2 seconds, then immediately shut down the machine. If no key operation, one minute after the
machine will automatically shut down.
◆ How to charge?
An ordinary USB cable connected to a computer or other 5V charger to charge the battery.
◥ alternating red and blue lights flash slowly, indicating that the battery is charging.
◥ long bright red and blue light to indicate battery charge has been completely filled. Then you can
disconnect the USB cable.
(From no electricity to fully charge the battery takes about three hours.)
◥ select the time of purchase is less than 1.5 ohm resistor USB cable wire, or not completely filled
with lithium batteries.
◆ how to connect u disk and into the PC Camera?
In the product off the state, with ordinary USB cable to connect to your computer, you can enter the u
disk mode.
In the u-disk mode, press ON / OFF button to enter the PC Camera function.
◆ how to display the correct time on the video file?
This product has video recording capabilities and time synchronization, you can adjust the time
according to their requirements change.
To do the following:
This product is turned on, will be in the root directory of TF card to automatically create a text file
named time.txt, the document is :2011 -05-01 23:59:59, the user can modify the date in this format
and time and save the file. When switched on again, this time the product will be read and saved to
the product. After both startup and shutdown, the product will automatically time.