1
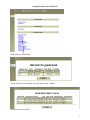
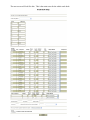
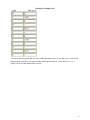
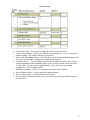
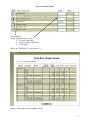
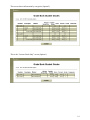
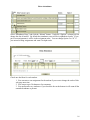
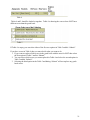
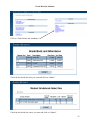
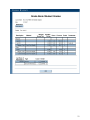
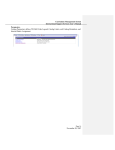
Iowa Central Community College
WebAdvisor
Grade Book System
User’s Manual
Developed by: Warren Bauer
April 2009
Table of Contents
Signing in to WebAdvisor ............................................................................................................ 2
Getting Started with Grade Book................................................................................................ 3
Setting the Overall Grading Method....................................................................................... 5
Setting the Grading Scale ......................................................................................................... 6
Selecting Categories .................................................................................................................. 7
Special Area for the Health Department ................................................................................ 8
When are Assignments Published ........................................................................................... 8
Cross-Listed Courses ................................................................................................................ 8
Enter Assignments ........................................................................................................................ 9
Enter Grades ........................................................................................................................... 10
Other Screens .............................................................................................................................. 12
Look at Current Grades ......................................................................................................... 13
Look at and Enter Blank Grades .......................................................................................... 15
Enter Attendance .................................................................................................................... 16
Attendance Summary ............................................................................................................. 17
Enter Final Grades ................................................................................................................. 18
Importing Grades from iNET ................................................................................................ 19
Grade Book for Students ............................................................................................................ 22
1
Signing in to WebAdvisor
Go to the Iowa Central Community College home page. Click on the TritonPass link.
Username = Your email username name
Password= Your email password
Click on WebAdvisor
2
Getting Started with Grade Book
Then click on “Grade Book”.
Check the box by the term that you want and click on “Submit”.
Select the course you want.
3
The next screen will look like this. This is the main setup for the whole grade book.
4
Setting the Overall Grading Method
Overall grading Method:
Examples
Weight
Test
60
Test 1
Test 2
Quizzes
Quiz 1
Quiz 2
Possible
300
100
200
40
Score
230
Percent
76.66
50
180
50.00
90.00
100
90
90.00
20
80
17
73
85.00
91.25
CW – Weight Each Category
(76.66% * 60+ 90% * 40) /
(60 + 40) =
8199.6/100 = 82.00%
CS – Category Score Equally
(76.66% + 90.00%) / 2 = 83.33%
ES – Each Score Equally
(50% + 90% + 85% + 91.25%) / 4 = 79.06%
EP – Each Point Equally
(230 + 90) / (300 + 100) = 80.00%
5
Setting the Grading Scale
You may enter any grade that you want with a minimum score. If you don’t put a score beside
each grade the first time, you can manually add the grades back in. Only whole (no + or -)
grades will be put into Datatel final records.
6
Selecting Categories
You may check any category that you want included in your grading structure.
Weight: You will only have to put in weight if you have selected the “CW” option on the
overall grading method.
Throw Out: If you want to throw out the lowest scores you can put a number in here to
throw out. If the number of throw out is less then five the grade book will not throw out
the lowest scores if it helps the student overall grade.
Factor Blanks: If you don’t won’t to have a blank grade count against the student you can
uncheck this box. IMPORTANT YOU NEED TO UNCHECK THESE IF YOU ARE
TEACHING A FLEXNET COURSE
Default Points: If you fill this in, it will auto fill the next page. You will still be able to
change each assignment.
Sort Order: If you don’t like the order the categories are in you can put numbers to
determine the order you want them displayed.
Weight Method: Same as overall grading method only dealing with each assignment
instead of categories.
If your category is not listed above, you can type it in here.
If you use the attendance feature of the grade book, you can give points for participation.
The “Category Weight” is used if you select “CW” for the overall grading method.
7
Special Area for the Health Department
If you require a minimum percentage for any category before the rest of the work be
considered, then use this area to do it. Example:. A student has to have at least 75% on test
and quizzes before any other work is included in the final grade. Important: this is based
on sort order so test and quizzes must be 1 and 2. Put a 2 in the first box and 75 in the
second box. Then select which overall type you want.
When are Assignments Published
You have three options regarding when an assignment is published to the students.
1. When Scores Entered - As soon as you enter one score for an assignment all the
students will see the assignment.
2. Control Manually – You will manually check each assignment when you want the
assignment published to the students.
3. Show All Assignments – Shows all assignments to the students. (This is good for
Internet courses)
Note: You can always override the publish flag.
Cross-Listed Courses
This section is for cross-listed courses. You can select which cross-listed courses will be
included on this grade book.
Click on the “Submit” button.
8
Enter Assignments
This is the main page for the grade book system. After you have filled in the grade book setup
screen, this is the screen that you will go to when you select the course.
Enter the assignment descriptions in the “Assignments” column. Enter the possible points. You
can enter 0 for extra credit assignments. “Due Date” is not being used for anything at this time.
“Weight” only needs to be filled if you used assignment weighting for the category.
You may enter up to three assignments for each category before clicking the “Submit” button.
By submitting the page, an additional three blank lines will be added.
9
Enter Grades
Fill in the “Assignment” description and “Possible Points.” Then check the “Choose One”
column. If you want to include dropped students, check the box at the bottom. Click on the
“Submit” button.
Enter the score for each student. You can also enter up to a 50 character comment that the
student will see. The fastest way to enter the scores may be to enter the score and then tab 3
times. If you click on the student’s name you can view that student’s current grade information.
Optional Scores
-1 = Student is excused from the assignment. Shows up on the grade book for the
student as excused. Does not count in final grade.
-2 = Same as above only the assignment does not show up in grade book at all.
Click the “Submit” button when finished.
10
Notice the “Entered” column. It tells you how many scores you have entered for that assignment
and also tells the average score and percentage. The checkmark under “Publish” means the
students can see the assignment.
11
Other Screens
1. Grade Book Setup - If you need to change the basic setup of the course.
2. Look at current grades – It shows you what the current grades are. You can change the
Options column. The student will always see option 3.
3. Look at and Enter Blank Grades - This will show you all students with blank grades and
allows you to enter them. It displays by student and assignment.
4. Attendance Entry - You can change the date under the Options column. If you enter a
seating assignment on the Attendance Entry screen, it will by default sort by that order.
You can enter “N” and it will sort alphabetically. If you don’t enter any seating
assignments, it will sort alphabetically.
5. Attendance Summary - Shows you a summary and detail of each student.
6. Move Midterm Grades – Used to submit the midterm grades.
7. Move to Final Grades - Used to submit the final grades.
8. Select Another Grade Book- allows you to go to the next grade book without having to
go to the menu.
12
Look at Current Grades
Check the box.
Decide which option you want.
1. = Current Grade only
2. = Show Category totals only
3. = Full Detail
This is the “Full Detail” screen (Option 3).
Option 3 is the same view the student will see.
13
This screen shows information by categories (Option 2).
This is the “Current Grade Only” screen (Option 1).
14
Look at and Enter Blank Grades
Check the box by “Look at and Enter Blank Scores” and click the “Submit” button.
Enter the score for each student. You can also enter up to a 50 character comment that the
student will see. The fastest way to enter the scores may be to enter the score and then tab 3
times.
Optional Scores
-1 = Student is excused from the assignment. Shows up on the grade book for the
student as excused. Does not count in final grade.
-2 = Same as above only the assignment does not show up in grade book at all.
Click the “Submit” button when done.
15
Enter Attendance
Select “Attendance Entry” and click the “Submit” button.. Under the “Options” column you can
change the date if needed. By default the attendance roster will be in alphabetical order. If you
put in seat assignments it will be in the assignment order. You can change Option 2 to “N” if
you entered seating assignments and want it in alpha order.
Check one checkbox for each student.
1. You can enter a seat assignment for the student if you want to change the order of this
web page next time.
2. You can put up to 50 characters for comments.
3. You must mark every student or if you check the box at the bottom it will count all the
unmarked students as present.
16
Attendance Summary
Check the box by “Attendance Entry” and click the “Submit” button.
Attendance summary looks like this.
17
Enter Final Grades
Check the box by “Move to Final Grades” and click the “Submit” button.
The grade book grade will automatically load the current grade book grade into the final grade
column, if the student has no blank scores. If the student does have blank scores, please go to the
“Look at and Enter Blank Scores” screen and enter a score for all assignments. You can change
the final grade at this point. The “Last Date of Attendance” will be loaded if the grade book
grade is an “F” and you have used the attendance system. You must check the box at the bottom
to submit the final grades.
18
Importing Grades from iNET
First you will need to export the grades out of iNET. You can export both assignments and quiz
grades. The link to export the grades is in the last column. You can export each assignment
separately or all at once. (Note: these links will only show when all assignments have been
graded.)
After you have exported the grades, go to the “WebAdvisor Grade Book Assignment Entry”
screen.
.
When the grades have been moved from iNET to Datatel you will see the above line. Check the
box and hit “Submit”.
If you do not see the import screen next there is a mismatch for assignment name. Look at the
top of the screen for assignment names that do not matched.
I have two mismatched assignment names. Add the new assignments or change a current
assignment to match the iNET name. Then select “Load Scores from Inet.”
19
“Load InetScores” is the import screen.
Table 1
Table 1 shows the assignments that are being imported and what category each assignment is
under.
Table 2
Table 2 shows the new scores that are being imported.
Table 3
Hopefully you will never have any students show up here. This means you exported some scores
for students that are not enrolled in your course.
20
Table 4
Tables 4 and 5 should be looked at together. Table 4 is showing the scores where iNET has a
different score than the grade book.
Table 5
If Table 4 is empty you can select either of the first two options in Table 5 and hit “Submit”.
If you have scores in Table 4 then you must decide what you want to do:
1. If you want to replace all the scores in the grade book with the ones for iNET then select
the first option in Table 5 and hit “Submit”.
2. You can select which scores you want replaced in Table 4 and select the second option in
Table 5 and hit “Submit”.
3. Selecting the third option in the Table 5 and hitting “Submit” will not replace any grade
book scores.
21
Grade Book for Students
Click on “Grade Books and Attendance”
Check the box beside the term you want and click on “Submit”.
Check the box beside the course you want and click on “Submit”.
22
23