1
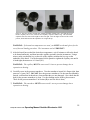
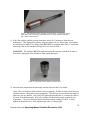
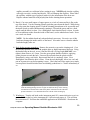
Figure 2: The 20/1 capillary and the 40/1 capillary and their capillary nuts. Note that the nut for the 40/1 capillary has a recess, while the 20/1 capillary requires a distance ring. The assembled capillaries have the same linear heights as shown at right. Note the slight elevation of the central portion, which indicates that the capillaries are in right-side up. WARNING: If elevated test temperatures are used, you MUST use thermal gloves for the rest of the tool-loading procedure. The instrument can be VERY HOT!! 5) After the barrel has reached the desired test temperature, wait 10 minutes to allow the barrel to be heated uniformly, and then insert the capillary assembly into the instrument. Using a mirror, make sure that the key on the side of the capillary matches the keyway on the underside of the barrel. Use the hexagonal sickle spanner to tighten the capillary nut until it is hand-tight, then unscrew it 1/4 turn (90). WARNING: The capillary MUST be unscrewed 1/4 turn to prevent damage due to expansion on heating. 6) Carefully screw in the pressure transducer. Turn the transducer in until it is finger-tight, then unscrew it 1 turn (360). DO NOT force the pressure transducer if it does not turn smoothly. Instead, reaffirm that its threads are clean and that they are not damaged. Also check that the hole for the pressure transducer is clean. Use the cleaning tool to do this (please turn to "Hole for the pressure transducer" in Section (X) to see how this is done). 7) WARNING: The transducer MUST be unscrewed 1 turn to prevent damage due to expansion on heating. 12 29 Sept 2014 minor edits Operating Manual Goettfert Rheotester 1000