1
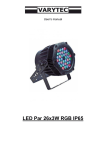
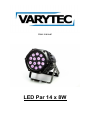
User manual
LED Par 14 x 8W
Table of contents
1.
Safety instructions ............................................................................................................................ 3
1.1.
FOR SAFE AND EFFICIENT OPERATION ............................................................................ 3
2.
Technical data .................................................................................................................................. 4
4.
Operating Instruction: ....................................................................................................................... 5
5.
4.1.
Auto function ............................................................................................................................ 5
4.2.
Master/Slave Function ............................................................................................................. 6
Dmx Chart ........................................................................................................................................ 7
2/8
1. Safety instructions
•
This device is suitable for indoor use only.
•
All modifications to the device will void the warranty.
•
Repairs are to carry out by skilled personnel only.
•
Use only fuses of the same type and original parts as spare parts.
•
Protect the unit from rain and humidity to avoid fire and electric shocks.
•
Make sure to unplug the power supply before opening the housing.
1.1. FOR SAFE AND EFFICIENT OPERATION
Be careful with heat and extreme temperature
Avoid exposing it to direct rays of the sun or near a heating appliance.
Not put it in a temperature bellow 32°F /0°C, or ex ceeding 104°F /40°C.
Keep away from humidity, water and dust
Do not place the set in a location with high humidity or lots of dust.
Containers with water should not be placed on the set.
Keep away from sources of hum and noise
Such as transformer motor, tuner, TV set and amplifier.
To avoid placing on un-stable location
Select a level and stable location to avoid vibration.
Do not use chemicals or volatile liquids for cleaning
Use a clean dry cloth to wipe off the dust, or a wet soft cloth for stubborn dirt.
If out of work, contact sales agency immediately
Any troubles arose, remove the power plug soon, and contact with an engineer for repairing,
do not open the cabinet by yourself, it might result a danger of electric shock.
Take care with the power cable
Never pull the power cable to remove the plug from the receptacle, be sure
to hold the plug. When not using the device for an extended period of time, be sure to
disconnect the plug from the receptacle.
3/8
Important:
Damages caused by the disregard of this user manual are not subject to
warranty. The dealer will not accept liability for any resulting defects or
problems. Make sure the electrical connection is carried out by qualified
personnel. All electrical and mechanical connections have to be carried out
according to the European safety standards.
2. Technical data
Technical specifications:
Output
Light source
Electrical
Control
Optical system
Lux@2m
2060Lux
Lux@4m
560Lux
Lux@6m
250Lux
Lux@8m
150Lux
LED Qty.
14*8W (4in1 LEDs)
Driver current
500mA
Color range
16.7million color
Input voltage
100-240VAC
Power
90W
On-board
Four digital display
Control protocol
DMX512
Channel mode
8 Channels
dimmer
0-100%
strobe
0-20Hz
Beam angle
25°
Weight
5kg
Size
240*190*280mm
Housing
Die-cast aluminum
Fixture connection
Signal in/out power in/out
Fixture Connection
Qty
220VAC:36pcs, 110VAC:18pcs
Cooling
Convective heat transfer
Certificate
CE and IP65
Environment
IP65
Operation
-40°C~50°C(operation)
Temperature
-20°C~50°C(start up)
4/8
4. Operating Instruction:
1.Four Buttons: Menu, Up, Down, Enter
2.Four digital display dormant state after one minutes working,
4.1. Auto function
MENU is a function key ton enter the functions menu.
Press UP,DOWN keys to scroll the menu points
These menus are described as follows:
Addr:
DMX function. Press ENTER key to display Axxx. Press UP to increase the data,
Press DOWN to reduce the data, press and hold UP or DOWN to adjust the value for
DMX address quickly.
rL--
Red Dimmer. Press ENTER key to display rLxx. Press UP to increase the data, Press
DOWN to reduce the data, press and hold UP or DOWN to adjust the value for
Brightness quickly. There are 16 steps for brightness from rL00 up to rL15.
gL --
Green Dimmer. Press ENTER key to display gLxx. Press UP to increase the data,
Press DOWN to reduce the data, press and hold UP or DOWN to adjust the value for
Brightness quickly. There are 16 steps for brightness from gL00 up to gL15.
bL --
Blue Dimmer. Press ENTER key to display bLxx. Press UP to increase the data, Press
DOWN to reduce the data, press and hold UP or DOWN to adjust the value for
Brightness quickly. There are 16 steps for brightness from bL00 up to bL15.
5/8
oL --
White Dimmer. Press ENTER key to display oLxx. Press UP to increase the data,
Press DOWN to reduce the data, press and hold UP or DOWN to adjust the value for
Brightness quickly. There are 16 steps for brightness from oL00 up to oL15.
FLAS
Strobe effect. Press ENTER key to display FLxx. Press UP to increase the data, Press
DOWN to reduce the data, press and hold UP or DOWN to adjust the value for Strobe
speed quickly. There are 16 steps for speed from FL00 up to FL15.
ASC-
Seven Colors running effect. Press ENTER key to display ASxx. Press UP to increase
the data, Press DOWN to reduce the data, press and hold UP or DOWN to adjust the
value for program speed quickly. There are 16 steps for speed from AS00 up to AS15.
CE--
Chasing way effect. Press ENTER key to display CExx. Press UP to increase the
data, Press DOWN to reduce the data, press and hold UP or DOWN to adjust the
value for the way of chasing quickly. There are 16 kind of chasing from CE00 up to
CE15.
FAdE
Fade in and Fade out. Press ENTER key to display FAxx. Press UP to increase the
data, Press DOWN to reduce the data, press and hold UP or DOWN to adjust the
value for Fade speed quickly. There are 16 steps for speed from FA00 up to FA15.
4.2. Master/Slave Function
Set up the DMX address 1 for all slave items. The unit which you told to work in program or setting as
described above is automatically the master sending dmx data to the slaves. Make sure that the
master is always the first item in line. If you use other fixtures controlled by dmx in this line they will do
strange stuff because they will get the same dmx data as the other par cans.
6/8
5. Dmx Chart
CH1
0-255
Main dimmer
CH2
0-255
Red dimmer
CH3
0-255
Green dimmer
CH4
0-255
Blue dimmer
CH5
0-255
White dimmer
1-14:pure white 15-29:White
75-89:Bluish violet
CH6
120-134:pink
165-179:yellow
90-104:reddish violet
135-149:red
180-194:lime
225-239:bluish green
CH7
CH8
0-255
30-44:light blue 45-59:Blue 60-74:Purple
105-119:peach blossom
150-164:orange
195-209:light green 210-224:green
240-254:cyan
strobe peed from slow to fast(grey scale is set by CH1,
CH2, CH3,CH4,CH5 and CH6)
6-240
gradual change speed from slow to fast;
241-254
Running
255
off
7/8
Importer:
B & K Braun GmbH
Industriestraße 1
D-76307 Karlsbad
www.bkbraun.com
[email protected]
8/8