1
SCOTTY ProMax
User's Manual
Copyright 2012 SCOTTY Group Austria GmbH. All rights reserved.
SCOTTY Group Austria GmbH. (SCOTTY) retains copyright in this manual and associated user
documentation (the Documentation). SCOTTY and its suppliers retain all copyright and other
intellectual property rights in the software embedded in and associated with the product described
in the documentation (the Software). Some products include unmodified software distributed
under GNU General Public License (GPL); please contact SCOTTY for further information and
source code. No liability for consequential damages. All rights reserved.
By purchasing the product described in the documentation you are granted a limited licence to
use the Software, provided you do not copy, alter or adapt the Software in any way including
decompiling, disassembling or reverse-engineering. The information provided in the
Documentation is believed to be accurate and reliable, however, SCOTTY assumes no
responsibility for its use, and reserves the right to revise the documentation without notice.
SCOTTY, the SCOTTY logo, MobileTM, ProMaxTM, Z470TM, TeleporterTM, and BeamerTM are
Trademarks of SCOTTY.
Microsoft and Windows are registered Trademarks of Microsoft Corporation.
Version 2.16.02
SD204500B
SCOTTY ProMax User's Manual
Table of Contents
1 Welcome.............................................................................................1
1.1 Welcome..............................................................................................................1
1.2 Customer Support................................................................................................2
2 Quick Guide .......................................................................................3
2.1 Quick Guide ........................................................................................................3
2.2 Starting the SCOTTY Teleporter........................................................................3
2.3 The Main Window ..............................................................................................4
2.4 Making a Call ......................................................................................................4
2.5 Editing a Phone Book Entry................................................................................5
2.6 Creating a New Phone Book Entry .....................................................................5
2.7 Receiving a Call ..................................................................................................5
2.8 Terminating a Call...............................................................................................6
2.9 Recording a Video...............................................................................................6
2.10 Playing Back a Video........................................................................................6
2.11 Transfer of Files with Automatic Hang Up.......................................................6
2.12 Transfer of Files during a Video Call ...............................................................7
2.13 Opening a Data Conference ..............................................................................7
2.14 Making and Sending a Video Snapshot ............................................................8
2.15 Making a Video Snapshot .................................................................................8
2.16 Controlling the Local Camera...........................................................................8
2.17 Controlling the Far End Camera .......................................................................9
2.18 Turning Off the System.....................................................................................9
3 System Interfaces............................................................................11
3.1 System Interface Connectors.............................................................................11
3.2 Power switch .....................................................................................................11
3.3 Power supply.....................................................................................................11
3.4 Display ..............................................................................................................11
3.5 Keyboard and Mouse ........................................................................................11
3.6 Front panel ........................................................................................................12
3.7 Audio and Video interfaces...............................................................................12
3.7.1 Video Camera ...........................................................................................12
3.7.2 Video Output.............................................................................................13
3.7.3 Microphone ...............................................................................................14
3.7.4 Loudspeaker ..............................................................................................14
3.7.5 Headset......................................................................................................14
3.7.6 Auxiliary Equipment.................................................................................15
3.8 Interfaces and Pinouts .......................................................................................16
3.8.1 Scotty ProMax Connectors .......................................................................16
3.8.2 Scotty EMV ProMax Connectors .............................................................16
3.8.3 Scotty ProMax Telemed Connectors ........................................................17
3.8.4 Audio und Video Connector for ProMax Telemed...................................18
All rights reserved.
i
SCOTTY ProMax User's Manual
3.8.5 Connectors on Audio and Video Breakout Box....................................... 18
3.8.6 Equipment Connector Pinout ................................................................... 18
3.8.7 Network Interface Pinout ......................................................................... 19
4 System Configuration .....................................................................21
4.1 System Configuration ....................................................................................... 21
4.2 The Configuration Utility ................................................................................. 22
4.2.1 The "Setup" - Tab..................................................................................... 22
4.2.2 The "Equipment" - Tab ............................................................................ 23
4.2.3 The "LAN" – Tab ..................................................................................... 24
4.2.4 The "ISDN" - Tab..................................................................................... 28
4.2.5 The "Shortcuts" – Tab .............................................................................. 29
4.2.6 The "Remote Control" – Tab.................................................................... 30
4.2.7 The "Data Channels" – Tab...................................................................... 31
4.3 LAN Network Configuration............................................................................ 32
4.4 Setting the ISDN D-Channel Protocol.............................................................. 32
4.5 DVI/VGA Configuration.................................................................................. 33
4.6 System Security ................................................................................................ 33
4.6.1 Write Changes to the Disc........................................................................ 34
4.6.2 Permanently Disable the Write Protection ............................................... 35
4.6.3 Enable the Write Protection ..................................................................... 35
5 Network Access...............................................................................37
5.1 Network Access................................................................................................ 37
5.2 LAN/WAN Connections .................................................................................. 37
5.2.1 INMARSAT BGAN / Swift Broadband Modem ..................................... 38
5.3 ISDN Connections ............................................................................................ 40
5.3.1 INMARSAT GAN / Swift64 Satellite Modem ........................................ 40
5.3.2 BONDING Calls with a INMARSAT Modem ........................................ 41
5.3.3 INMARSAT BGAN / Swift Broadband Modem ..................................... 41
5.4 Synchronous Interface ...................................................................................... 42
5.4.1 INMARSAT-B Satellite Telephone ......................................................... 42
5.4.2 VSAT Satellite Connections .................................................................... 42
5.4.3 KIV7 / STE............................................................................................... 42
5.5 Other Networks................................................................................................. 42
6 Teleport Details ...............................................................................43
6.1 Teleport Details ................................................................................................ 43
6.2 The Main Window............................................................................................ 44
6.2.1 The Standard Toolbar............................................................................... 44
6.2.2 Camera Control, Controlling the Camera................................................. 46
6.2.3 Audio, Controlling the Audio System ...................................................... 46
6.3 The File Menu .................................................................................................. 47
6.3.1 Dial, Making a Call .................................................................................. 47
6.3.2 Creating or Modifying a Telephone Book Entry...................................... 49
6.3.3 Format for Entering the Telephone Number ............................................ 50
6.3.4 Disconnect, Terminating a Call................................................................ 51
6.3.5 Recorder, the Record and Play Mode....................................................... 52
6.3.6 File Transfer, Transfer Files Efficiently................................................... 54
6.3.7 Share, Starting the Data Package.............................................................. 57
6.3.8 T.120 Netmeeting ..................................................................................... 57
6.3.9 H.239 Dual Video Stream ........................................................................ 59
ii
All rights reserved.
SCOTTY ProMax User's Manual
6.3.10 Snap & Send............................................................................................59
6.3.11 Snapshot, Taking a Still Picture..............................................................60
6.3.12 Far End Cam Ctrl, Controlling a Far End Camera..................................60
6.3.13 Exit, Ending the Program........................................................................60
6.4 The View Menu.................................................................................................61
6.4.1 Video Window, Manipulating the Video Window ...................................61
6.4.2 Camera Control, Activating the Camera Toolbar .....................................62
6.4.3 Local Camera Control, Controlling the Local Camera .............................62
6.4.4 Far End Camera Ctrl, Controlling the Far End Camera............................64
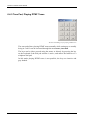
6.4.5 Tone Pad, Playing DTMF Tones ..............................................................66
6.4.6 Audio & Video Controls ...........................................................................67
6.4.7 Video Switch Matrix.................................................................................68
6.4.8 Pic In Pic, Setting the Picture in Picture view ..........................................69
6.4.9 Toolbars, Manipulating the Toolbars........................................................69
6.4.10 Received Files, Listing the Received Files .............................................69
6.4.11 Recorded Files, View recorded Files ......................................................70
6.4.12 Connection Info, Displaying the Connection Status...............................70
6.5 The Options Menu.............................................................................................72
6.5.1 Dialing, Setting the Dialing Parameters....................................................72
6.5.2 Audio, Setting the Audio Levels...............................................................74
6.5.3 Video, Setting the Video Parameters ........................................................76
6.5.4 Data, Adjusting the Data Channel Parameters..........................................77
6.5.5 Directories, Setting the SCOTTY Directory Structure.............................79
6.5.6 Preferences, Setting the System Parameters .............................................80
6.5.7 File Exchange Server (optional) ...............................................................81
6.5.8 File Exchange Server, Setup and Operation .............................................82
6.5.9 Save, Saving the Current Settings.............................................................85
6.5.10 Factory Defaults, Restoring the Factory Defaults...................................86
6.6 The Help Menu .................................................................................................86
6.6.1 Help Topics, the SCOTTY Help System ..................................................86
6.6.2 Context Help, the Topical Help ................................................................86
6.6.3 About Teleporter, Displaying the SCOTTY Configuration .....................87
6.7 Shortcuts............................................................................................................88
7 System Recover...............................................................................91
7.1 Restoring the System.........................................................................................92
7.2 Restoring the System using Recovery Media ...................................................94
7.3 Creation of a User defined Hard Disk Image....................................................96
7.4 Creation of New Recovery Media.....................................................................97
7.5 Full System Backups.........................................................................................98
8 Maintenance...................................................................................101
8.1 Maintenance ....................................................................................................101
8.2 Internal Battery Replacement..........................................................................101
8.3 Fan filter pad replacement...............................................................................101
9 Appendix ........................................................................................103
9.1 Application Notes............................................................................................103
All rights reserved.
iii
SCOTTY ProMax User's Manual
1 Welcome
1.1 Welcome
Welcome to the world of advanced communication... welcome to the world of
SCOTTY!
This manual has been designed to help you take full advantage of your
SCOTTY solution. It is not only a comprehensive guide to the operation of the
system, it also provides technical details, simple step by step instructions on
how to perform the most common applications, and more. We recommend you
read this manual carefully in order to fully benefit from SCOTTY's advanced
solutions.
SCOTTY provides a unique offering of live audio, video, and data
communication, live video surveillance transmission, and HD quality imagery
transfer from air, land, and sea – over satellite and terrestrial networks. This
package is used by customers around the world to support their border control,
intelligence gathering, reconnaissance, surveillance, search and rescue, and
other missions which require beyond line-of-sight connectivity and
ruggedized/reliable equipment.
SCOTTY is EN9100:2009 certified and has over fifteen years' experience
serving government customers around the world.
Please find detailed information on our website: www.scottygroup.com
All rights reserved.
1
SCOTTY ProMax User's Manual
1.2 Customer Support
The Support section on our website www.scottygroup.com offers help to
maximize the functionality of your SCOTTY system.
Choose Downloads to retrieve the latest documents, manuals and software.
Go to the section Demo Numbers to find the updated phone and IP information
to place demonstration and test calls to our demonstration systems.
Find useful hints and background information under Troubleshooting and
Communication Networks.
Choose Contact Support Team to find out how to get into contact with our
support experts.
Finally, if you need urgent help for your SCOTTY solution, call the direct
customer support number:
Europe, Middle East, Africa,
Asia
Austria (UTC +1): +43 664 454 2827
The Americas, Asia
Atlanta, USA (UTC -6): +1 770 380 7186
Please help our support team in providing superb support by including the
serial number of your SCOTTY unit or license in all requests.
2
All rights reserved.
SCOTTY ProMax User's Manual
2 Quick Guide
2.1 Quick Guide
In the following section we want to make the user familiar with the basic
functions of the SCOTTY Teleporter software. Making a professional
videoconference, using the quick file transfer feature, recording and playing
back videos and additional features of the Teleporter are described step by step
to be carried out very easily.
For further details, see the following chapters.
2.2 Starting the SCOTTY Teleporter
Step 1: Switch on the unit, Windows loads itself
automatically.
Step 2: When Windows is ready, choose the appropriate
Teleporter icon on the desktop.
The SCOTTY Teleport application can be configured for auto start operation. Step 2 is not
necessary in such a setup.
The desktop shows one SCOTTY Teleporter icon for each configured communication
network. By double-clicking the appropriate Teleporter icon, the software starts and
configures the system for the chosen network. By clicking the "Teleport" icon the system gets
configured for standard operation (ISDN and LAN).
Because the SCOTTY Unit's communication interfaces are already pre-configured, it is very
easy for the user to alternate between different available networks. Just a simple click on the
appropriate icon and all parameters necessary for operation are loaded. Even the system's
"Telephone Book" containing the telephone numbers of remote stations can remain
unchanged when, for example, the unit is switched between ISDN and INMARSAT.
All rights reserved.
3
SCOTTY ProMax User's Manual
2.3 The Main Window
After double-clicking on the SCOTTY Teleporter icon, it takes a few moments
for the system to initialize. The running initialization steps are displayed in the
status bar at the bottom of the Main Window. Video-communication is ready to
begin once this process is complete.
The SCOTTY Teleporter Main Window
SCOTTY video-communication is as easy as placing a telephone call. The
most often used functions are accessible by tool buttons. These and all other
functions are also available using the menu bar.
2.4 Making a Call
Step 1: From the standard toolbar of the SCOTTY main window
select the Dial button.
Step 2: Select the entry of the desired party.
Alternatively you can directly enter the phone number or IP
address into the Number edit field. If you do not want to use
the keyboard, clicking at the button Pad opens a dial pad
which can be used to enter the number with the input device
Step 3: Press Dial to start the call using the default dialing parameter.
Press Low Cost to start the call with reduced bandwidth.
Press Voice Only to call a normal telephone.
4
All rights reserved.
SCOTTY ProMax User's Manual
2.5 Editing a Phone Book Entry
Step 1: From the standard toolbar of the SCOTTY main window
select the Dial button.
Step 2
Click the Edit Entry button to edit the selected phone book
entry.
In order that the ISDN telephone number is valid regardless of the systems present location
and the available network type, the telephone numbers should have the following format:
+<country code><area code><number>, e.g.+43 316 407849.
There are several ways to address a LAN videoconferencing partner: IP-address
(e.g. 91.209.75.198), hostname (e.g. demograz.scottygroup.com), or using a
gatekeeper.
See chapter Format for Entering the Telephone Number for details.
2.6 Creating a New Phone Book Entry
Step 1: From the standard toolbar of the SCOTTY main window
select the Dial button.
Step 3: Click New Entry.
Step 4: Enter name and number and press OK.
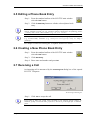
2.7 Receiving a Call
An incoming call is announced by the Incoming Call dialog box of the opened
SCOTTY Teleporter.
The Incoming Call dialog box
Step 1: Click Yes to accept the call.
If no action is taken, the system reacts according to the Teleport pick-up settings. If
automatic pickup is activated under preferences, the call is put through after a moment's
pause.
All rights reserved.
5
SCOTTY ProMax User's Manual
2.8 Terminating a Call
Step 1: The ongoing videoconference can be terminated by clicking
the Dial button.
2.9 Recording a Video
Step 1: From the standard toolbar of the SCOTTY main window
select the Recorder button (optional).
Step 2: Start the recording.
Step 3: Stop recording. The recording is saved with an
automatically assigned name.
Step 4: The name of the saved recording is now displayed in the
field File of the section "Play" and can be played back with
the Play button if desired.
2.10 Playing Back a Video
Step 1: From the standard toolbar of the SCOTTY main window
select the Recorder button (optional).
Step 2: In the section "Play" choose the Browse button, select one
of the recorded files on the hard drive and choose Open. To
play back a previously received file, browse to the
Incoming directory.
Step 3: Press the Play button.
2.11 Transfer of Files with Automatic Hang Up
Step 1: From the standard toolbar of the SCOTTY main window
select the File Transfer button.
Step 2: Click on Add.
Step 3: In the "Open" dialog select the file to transmit and press
Open.
Step 4: Repeat Step 2 and Step 3 to add several files to the
displayed list.
Step 5: Click on Send.
Step 6: Double-click the desired party.
The SCOTTY File Transfer is possible between two SCOTTY systems using Teleporter or the
File Transfer software.
6
All rights reserved.
SCOTTY ProMax User's Manual
2.12 Transfer of Files during a Video Call
Step 1: Establish a videoconference.
Step 2: After connection has been established, select the File
Transfer button.
Step 3: Click on Add.
Step 4: In the "Open" dialog select the file to transmit and press
Open.
Step 5: Repeat Step 3 and Step 4 to add several files to the list.
Step 6: Click on Send.
The SCOTTY File Transfer is possible between two SCOTTY systems using Teleporter or the
File Transfer software.
2.13 Opening a Data Conference
Step 1: Establish a videoconference.
Step 2: After connection has been established, select the
Share button. Teleworking is ready to begin.
Depending on the configuration of the local and
remote system, the button automatically activates
either H.239 Dual Video (optional), T.120
Netmeeting or activates Snap & Send.
Step 3: When using T.120 Netmeeting, share applications
with "Share", "Collaborate" or use the Whiteboard.
When using H.239 Dual Video (optional), the
content of the Windows Desktop is transmitted to
the remote station.
Step 4: To close the Data Package, press:
The optional H.239 Dual Video is closed by
pressing the Share button again.
All rights reserved.
7
SCOTTY ProMax User's Manual
2.14 Making and Sending a Video Snapshot
Step 1: Select a camera view.
Step 2: Click on the Snap&Send button. The still is
now saved to the Records folder and is
automatically transferred to the remote side.
Step 3: If not already in a call and Auto Dial is not
activated, enter desired number in the
upcoming Phonebook and click Dial.
Step 4: The snapshot is automatically displayed on
the receiving side if Auto Show incoming
Images is activated.
The SCOTTY Snap&Send transfer is possible between two SCOTTY systems using Teleporter
or the File Transfer software.
2.15 Making a Video Snapshot
Step 1: Select a camera view.
Step 2: Click on the Snapshot button. The still is
now copied into the clipboard and is stored
as a JPG image to the Records folder.
2.16 Controlling the Local Camera
Step 1: Activate the camera toolbar with View | Camera Control.
Step 2: Be sure that the Local/Far end camera button on the camera
toolbar is not selected.
Step 3: Control the camera with the available functions on the
camera toolbar.
Step 4: Click the Next button to use further controls in the toolbar.
8
All rights reserved.
SCOTTY ProMax User's Manual
2.17 Controlling the Far End Camera
Step 1: Establish a videoconference.
Step 2: Select File | Far End Cam Ctrl to activate far end camera
control. The camera toolbar appears and displays all far end
cameras.
Step 3: Control the far end camera with the available functions on
the camera toolbar.
Step 4: Click the Next button to use other controls in the toolbar.
2.18 Turning Off the System
Step 1: Close the SCOTTY Teleporter main window with
and confirm the appropriate message.
Step 2: Click on Start (usually lower left corner).
Step 3: Click on Turn Off Computer.
Step 4: Select the option Turn Off.
If the system is not shut down in the correct fashion, data-loss can occur.
Congratulations! You have now mastered the main functions of the SCOTTY
Teleporter successfully.
All rights reserved.
9
SCOTTY ProMax User's Manual
3 System Interfaces
3.1 System Interface Connectors
The following section gives some details about available interface connectors
of the SCOTTY unit.
3.2 Power switch
The power switch is located at the front behind the front lid. Throwing the
power switch turns on the unit. The AC power supply unit at the rear side has
also an own power switch.
3.3 Power supply
The SCOTTY ProMax unit runs on AC power. The valid voltage range can be
seen on the type plate of the power supply unit. Please conduct SCOTTY
customer support on any unclarities.
For operation connect the ProMax unit to the power supply using an
appropriate AC cable. The corresponding socket is located on the back side.
3.4 Display
The connecting cable of the monitor needs to be connected to the VGA or DVI
input of the graphics adapter.
Only use the identified video output to connect a monitor to the system.
3.5 Keyboard and Mouse
Connect the keyboard connector to the keyboard jack and the mouse connector
to the mouse jack. When using USB keyboard or mouse choose a free USB
port for this.
All rights reserved.
11
SCOTTY ProMax User's Manual
3.6 Front panel
The front interface panel is located behind the front lid. It contains the
following components:
-
Power switch
-
Reset button
-
Removable hard disk (optional)
-
Optical drive
-
2 USB ports
-
Network and hard disk LED
3.7 Audio and Video interfaces
Usually, the Audio and Video Breakout Box is used to connect external
equipment to the system. Connect this box to the equipment connector on the
endplate of the system, and then connect the audio and video equipment to it.
The cable between the codec and the breakout box is long enough to place the
box on a convenient location, e.g. on top of the computer.
In some cases no Audio and Video Breakout Box is used to connect external
equipment to the system, but a breakout cable is connected directly to the
SCOTTY ProMax. In this case some of the available inputs may not be used.
Detailed description of the equipment connector and all available interfaces can
be found in this chapter.
3.7.1 Video Camera
Two cameras can be connected to Camera 1 and Camera 2 on the backside of
the Audio and Video Breakout Box, and two additional cameras to Video In 3
and Video In 4.
Two connectors are available for Camera 1 and Camera 2: An S-Video and a
high density style connector. The S-Video connector can be used to directly
connect the video of the camera. The high density connector can be used by an
adapter cable designed for the specific camera type. It supports one video,
audio and microphone input, power for camera supply, and a serial RS232
interface for camera control.
If a camera adapter cable is used:
• Plug one side of the camera adapter cable to Camera 1 or Camera 2.
• Plug the connector(s) on the other side to the corresponding inputs and
outputs of the camera.
• Choose the camera type as video source in the Configuration Utility, see
section The Equipment - Tab for details.
• If the camera features an integrated microphone it can be configured in the
12
All rights reserved.
SCOTTY ProMax User's Manual
Teleport application; Camera 1 microphone is enabled by default (see
chapter Audio & Video Controls).
The camera power supplied by the camera connector is limited and shared between Camera
1 and Camera 2. If the connected cameras exceed the power limit, use the camera power
supply instead. It is recommended to power only one pan-tilt-zoom camera from the camera
connector, powering a second one might exceed the total power limit.
The video signal of Camera 1 or Camera 2. is shared between the S-Video and the high
density connector. Do not use both connectors at the same time.
The camera adapter cable can be extended by using a high-quality VGA extension cable.
If no camera adapter cable is used:
• Connect the video output of the camera to the S-Video connector of
Camera 1 or Camera 2. If composite video is needed, use the S-Video to
Composite adapter.
• Additional cameras can be connected to Video In 3 or Video In 4 using
composite video.
• For control of a pan-tilt-zoom camera, connect the control port of the
camera to a serial port of your PC (Com1 or Com2).
• Configure the camera settings in the Configuration Utility, see section The
Equipment - Tab for details.
In the Teleport application preset A (Cam 1) is pre-programmed for Camera 1,
preset B (Cam 2) for Camera 2 (refer to chapter Audio & Video Controls).
3.7.2 Video Output
The video outputs can be used to display the received or transmitted video on a
TV, video beamer or any other video equipment. Two outputs are available on
the Audio and Video Breakout Box: Video Out for composite video and Video
S-Out for S-Video. S-Video always displays the receive video; the composite
video can be controlled using via Audio & Video Controls. To maximize video
quality, using Video S-Out is recommended if possible.
The Teleport application can be used to configure the video displayed on the
VGA screen independent of the video displayed on the video outputs. Refer to
chapter Audio & Video Controls for details.
Connecting a TV or video beamer to the video output makes dual monitor operation
possible: The VGA screen is used to monitor the transmitted video, while the TV or video
beamer is used to show the received video to the audience.
All rights reserved.
13
SCOTTY ProMax User's Manual
3.7.3 Microphone
Two XLR style microphones can be connected to Mic 1 and Mic 2 on the
backside of the Audio and Video Breakout Box; the inputs provide +24V
phantom power.
A 3.5mm jack microphone can be connected to Mic 3. This input provides
+2.25V phantom power on the signal pin.
Two Microphones integrated into a camera, external audio systems or any other
acoustic audio sources providing line level can be connected to Line In L and
Line In R. For mono audio sources either audio input can be used.
Microphones can be configured in the Teleport application; Mic 1 is enabled by
default (see chapter Audio, Controlling the Audio System).
The Teleport application features a professional audio mixer where up to 8 microphones and
other audio sources can be individually mixed together. Level meters and an integrated
audio test mode allow easy setup and monitoring.
3.7.4 Loudspeaker
Connect active (not passive!) speakers to the Spkr plug on the backside of the
Audio and Video Breakout Box. Active speakers, an external sound system or
any other amplifier using line level can be connected to Line Out L and Line Out
R. For mono either audio output can be used.
Do not use the audio output of the mainboard to connect a loudspeaker to your system
3.7.5 Headset
Connect a headset to the Headset connector of the Audio and Video Breakout
Box.
In the Teleport application, switch to the pre-programmed audio levels preset
"Headset" for headset operation (refer to chapter Audio & Video Controls).
14
All rights reserved.
SCOTTY ProMax User's Manual
3.7.6 Auxiliary Equipment
The system provides two additional video inputs, two video outputs, two audio
inputs and two audio outputs to connect additional audio and video equipment.
A VCR, DVD player or recorder, CD player and more is easily connected to the
VCR section on the Audio and Video Breakout Box.
Connect the video output of an auxiliary device to Video In 3 or any other video
input. Use the Configuration Utility to configure video source type and video
format.
Use Video Out or any other video output to record or display the video signal.
The audio of an external audio source can be connected to Aux In L and Aux In
R. The audio signal on these inputs is not just sent to the remote side during a
videoconference (like Line In), but can also be heard locally on the speakers.
Use Aux Out L and Aux Out R to record the audio of an ongoing
videoconference. The audio signal provided on these outputs is not just the
audio received (like Line Out), but also the local audio sent to the remote side.
In the Teleport application preset C (VCR) is pre-programmed for Video In 3. It
mutes Aux Out to avoid feedback if the same VCR is used both for recording
and playback (refer to chapter Audio & Video Controls).
Using a VCR or DVD player to present a video is very convenient: The audio can be heard
by the local as well as the remote audience, while speaking to the presentation and getting
questions from the remote side is still possible. Showing the transmit video full screen allows
the local audience to watch the presentation, using the Pic-In-Pic or dual monitor features
allows to see both the video presentation as well as the remote audience.
Recording an ongoing videoconference can easily be done by connecting a VCR or DVD
recorder: The audio recorded contains both the local and remote audio, using the Pic-In-Pic
feature allows recording of both local and remote video.
All rights reserved.
15
SCOTTY ProMax User's Manual
3.8 Interfaces and Pinouts
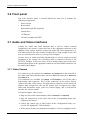
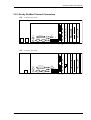
3.8.1 Scotty ProMax Connectors
Rear view:
PC Back Panel
Mouse
Keyboard
LAN
Parallel LPT1
COM1
USB
USB
Port 1
AC Input
VGA
DVI
ISDN
Equipment
Synchron
(optional)
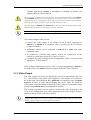
3.8.2 Scotty EMV ProMax Connectors
Rear view
PC Back Panel
Mouse
Keyboard
AC Input
16
LAN
Parallel LPT1
COM1
USB
USB
Port 1
VGA
DVI
ISDN COM3
COM2
Equipment Synchron
All rights reserved.
SCOTTY ProMax User's Manual
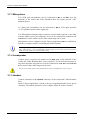
3.8.3 Scotty ProMax Telemed Connectors
4HE – version, rear view:
PC Back Panel
Parallel LPT1
Mous e
Keyboard
AC Input
COM 1
LAN
U SB
US B
AC Sw itch
P ort 1
VGA
DVI
COM3 , ISDN
COM4
VGA
DVI
COM 3, ISD N
COM4
Equipment
Fire- S ynchron
w ire
3HE – version, rear view:
Mouse
Keyboard
AC Input
All rights reserved.
P arallel LP T1
COM1
LAN
US B
USB
Equipment
Fire- Synchro n
w ire
17
SCOTTY ProMax User's Manual
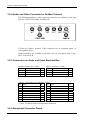
3.8.4 Audio und Video Connector for ProMax Telemed
The following interfaces of the equipment connector are available on the front
panel of a SCOTTY ProMax Telemed unit:
S-Video In Grabber: optional. Video connector for an integrated photo- or
video grabber device.
Further interfaces are available at the back side via a breakout cable: Cam1,
Mic3, Line Out L+R.
3.8.5 Connectors on Audio and Video Breakout Box
Headset Connector (3.5mm)
Pin
Tip
Ring
Sleeve
Signal
Mic*
Out
GND
Mic3 Connector (3.5mm)
Dir.
In
Out
Pin
Tip
Ring
Sleeve
Signal
Mic*
not connected
GND
Dir.
In
Signal
GND
GND
+5V / 1A max**
RTS (RS232)
TX (RS232)
RX (RS232)
GND
Dir.
* 2.25V phantom power
Camera 1 and Camera 2 Connectors (HD15)
Pin
1
2
3
4
5
6
7
8
Signal
Y_COMP
C
MIC (line level)
+12V / 1A max*
GND
GND (for Y_COMP)
GND (for C)
GND (for MIC)
Dir.
In
In
In
Pin
9
10
11
12
13
14
15
Out
Out
In
* max. 1A shared between both camera connectors
** max. 1A shared between both camera connectors
3.8.6 Equipment Connector Pinout
18
All rights reserved.
SCOTTY ProMax User's Manual
Pin
1
2
3
4
5
6
7
8
9
10
11
12
13
14
15
16
17
18
19
20
21
Signal
+12V / 1A max
CAM1_TX
CAM1_RX
CAM1_MIC
CAM1_C
CAM1_Y_COMP
VIDEO_IN3
VIDEO_OUT_C
VIDEO_OUT_Y
res*
res*
res*
SPEAKER_OUTR
AUX_OUTR
LINE_OUTR
LINE_INR
AUX_INR
HEADSET_MIC***
HEADSET_OUT
BAL_MIC_2_POS**
BAL_MIC_2_NEG**
Pin
22
23
24
25
26
27
28
29
30
31
32
33
34
35
36
37
38
39
40
41
42
Signal
GND
GND
CAM2_RTS
CAM1_RTS
GND
GND
GND
GND
GND
res*
res*
res*
GND
res*
res*
GND
GND
GND
GND
GND
GND
Pin
43
44
45
46
47
48
49
50
51
52
53
54
55
56
57
58
59
60
61
62
Signal
+5V / 1A max
CAM2_TX
CAM2_RX
CAM2_MIC
CAM2_C
CAM2_Y_COMP
VIDEO_IN4
VIDEO_OUT_COMP
res*
res*
res*
res*
SPEAKER_OUTL
AUX_OUTL
LINE_OUTL
LINE_INL
AUX_INL
UNBAL_MIC***
BAL_MIC_1_POS**
BAL_MIC_1_NEG**
* reserved for future use, do not connect.
** 24V phantom power
*** 2.25V phantom power
3.8.7 Network Interface Pinout
DB25 Network Connector:
Pin
1
2
3
4
5
6
7
8
9
10
11
12
13
All rights reserved.
Signal
GND
SD (TX Data) A
RD (RX Data) A
RS (Ready to Send) A
CS (Clear to Send) A
DM (Data Mode) A
GND
RR (Receiver Ready) A
RT (RX Clock) B
RR (Receiver Ready) B
TT (Terminal Timing) B
ST (TX Clock) B
CS (Clear to Send) B
Dir.
Out
In
Out
In
In
In
In
In
Out
In
In
Pin
14
15
16
17
18
19
20
21
22
23
24
25
Signal
SD (TX Data) B
ST (TX Clock) A
RD (RX Data) B
RT (RX Clock) A
Dir.
Out
In
In
In
RS (Ready to Send) B
TR (Terminal Ready) A
Out
Out
DM (Data Mode) B
TR (Terminal Ready) B
TT (Terminal Timing) A
RI (Ring Indicator) A
In
Out
Out
In
19
SCOTTY ProMax User's Manual
4 System Configuration
4.1 System Configuration
The system’s software is already pre-defined for easy operation. Anyhow, after
initial system setup or when the setup is changed, the software might need to be
re-configured.
This chapter describes the configuration of the Teleport application using the
Configuration Utility, and global Windows settings needed for Teleport
operation. Please refer to Microsoft literature for the configuration of other
Windows settings.
If you want to change the current system configuration, administrator rights are needed.
Further settings can be configured inside the Teleport application, for more
information see chapter Teleport Details.
On systems featuring a change-protected system partition, configuration changes must be
saved permanently to the hard disc, see chapter System Security.
Systems featuring the security option utilize a write-protected internal hard disc.
Configuration changes are only possible by SCOTTY.
All settings will be restored to factory defaults by a system recovery. Therefore, it can be
advisable to create a new recovery image after changing the system configuration. See
chapter System Recover for details.
All rights reserved.
21
SCOTTY ProMax User's Manual
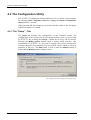
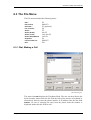
4.2 The Configuration Utility
The SCOTTY Configuration Utility enables the user to define system settings.
By choosing Start | Programs | SCOTTY | Config, the SCOTTY Configuration
Utility window is opened.
When pressing OK the settings are saved and will take effect on the Teleporter
software next time it is started.
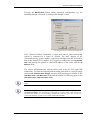
4.2.1 The "Setup" - Tab
The Setup tab displays the configuration of the installed system. The
configuration of the system can only be changed when a new key is provided
by SCOTTY. By pressing the Change… button the new key can be entered.
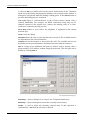
Pressing the Modify Options button opens a dialog which provides, after
consultation of SCOTTY, an easy way to change the system configuration
without editing the key manually. Free key-tokens can be added or removed
manually in this way. The Add button is used to add, the Remove button to
delete and the Modify button to change entries.
The Configuration Utility dialog box, the folder Setup
22
All rights reserved.
SCOTTY ProMax User's Manual
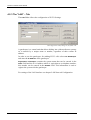
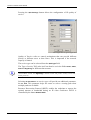
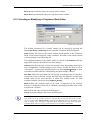
4.2.2 The "Equipment" - Tab
In the folder Equipment, video source settings can be made.
The Configuration Utility dialog box, the folder Equipment
In Video Inputs the video equipment connected to the video inputs Camera 1,
Camera 2, Video In 3 and Video In 4 can be configured.
The field Video Source selects the type of the equipment connected. "Fixed"
specifies a fixed camera or another non-controllable video source. The setting
"VCR" should be used if connected to a VCR.
Under Video Format allows the selection between the video formats supported
by the system. Choosing “SDI” (optional) uses the digital HD-SDI input for the
selected video and audio source.
If a controllable camera is set in Video Source, the connection of the serial
cable for camera control can be selected in Control Port. For all video inputs
the "Com" ports of the system are available. If available on the hardware of the
SCOTTY system, additional choices of control ports on the corresponding
camera connectors are selectable. Some camera types support chaining to
connect two cameras to a single control port; select "Pos2" for the camera
linked to the camera on the control port.
To configure a controllable camera just select the camera type in the field Video Source;
Video Format and Control Port get automatically preset.
Pressing Video Standard… allows the user to change the video standard of the
video inputs and outputs between "PAL" and "NTSC". Caution: The selected
video standard must match the connected equipment.
All rights reserved.
23
SCOTTY ProMax User's Manual
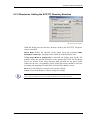
4.2.3 The "LAN" – Tab
The LAN folder allows the configuration of H.323 Settings.
The Configuration Utility dialog box, the folder LAN
A gatekeeper is a central unit that allows dialing into videoconference systems
on a network by a unique name or number, regardless of their current IP
address.
In order to use the gatekeeper for making H.323 calls select Use Gatekeeper
and enter the IP Address of the gatekeeper.
Registration information contains the system name that can be entered in the
Name field and the E.164 address which is equivalent to a telephone number;
this number can be entered in the Number field. This information is used to
register the system with the gatekeeper.
For settings of the LAN interface see chapter LAN Network Configuration.
24
All rights reserved.
SCOTTY ProMax User's Manual
Pressing the NAT/Firewall button allows advanced configuration, e.g. for
tunneling through a Firewall, or making calls through a router.
LAN configuration tab, LAN/Firewall configuration
NAT, Network Address Translation, is often used when a videoconferencing
system is connected to a router or firewall. The NAT support of the
videoconferencing system enables connections through firewalls and routers
that do not feature H.323 support. NAT support is enabled by selecting Enable
NAT and entering the global or external IP-address of the router into the IP
Address field.
The system will dynamically allocate which ports to use for TCP and UDP
connections. To limit the outgoing and incoming ports used to a specific range
activate Use specified Port Ranges and enter both starting port number in the
UDP Base Port / TCP Base Port fields and the number of following ports in the
UDP Port Count / TCP Port Count fields.
For reliable videoconferencing between networks, the Port Count number should be 10 or
higher.
To tunnel through a Firewall that is not supporting H.323, activate Enable NAT and Use
specified Port Ranges. The specified ports must then be opened to allow traffic through the
Firewall (also known as port forwarding). Additionally, following ports are used by the
system and should be opened as well: 1718, 1719, 1720 and 1503.
All rights reserved.
25
SCOTTY ProMax User's Manual
Pressing the QoS Settings button allows the configuration of IP quality of
service.
LAN configuration tab, QoS configuration
Quality of Service refers to control mechanisms that can provide different
priority to different users or data flows. This is important if the network
capacity is limited.
The service type can be selected from the QoS Type field.
The Type of service TOS value itself can then be set in the fields Audio, Video,
Data and Signaling for different data streams.
Audio refers to Audio RTP stream, Video to Video RTP stream, Data to far end camera
control FECC stream, and Signaling to RTCP streams and packets used by H.225 and
H.245 protocols.
Selecting IP Precedence as service type will provide an additional parameter,
the IP TOS. This parameter helps the router to select a routing path when
multiple paths are available.
Resource Reservation Protocol (RSVP) enables the endpoints to request the
optimal amount of bandwidth during an IP video conference. RSVP is
controlled by the button Enable RSVP.
26
All rights reserved.
SCOTTY ProMax User's Manual
Pressing the File Transfer … button allows the configuration of the TCP and
UDP ports used for File Transfer.
The SCOTTY Teleporter uses TCP for a file transfer using the LAN interface. For highperformance file transfer e.g. over satellite links, a high speed UDP based transfer is
available.
By default, the Default port (14000) is used both for incoming and outgoing
transfers. Selecting User-defined port, a different port value can be entered into
the Listening Port field.
LAN configuration tab, LAN File transfer configuration
For file transfer during a video call, both parties need to be configured to the same TCP
respectively UDP port settings.
All rights reserved.
27
SCOTTY ProMax User's Manual
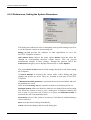
4.2.4 The "ISDN" - Tab
The ISDN folder allows configuring the ISDN interfaces of the internal IMUX
ISDN card.
The Configuration Utility dialog box, the folder ISDN Interface
For each of the 4 interfaces the local phone number of the 1st and 2nd B Channel
can be configured separately, the number entered for B Channel 1 will be
automatically suggested as value for B Channel 2 though.
A wrong configuration of the phone numbers on the Inverse Multiplexer still allows 1B and 2B
calls, but will fail for incoming BONDING calls.
It is only needed to specify the different extensions of the ISDN lines, not the complete phone
numbers. All extensions must have the same length.
Likewise, in this folder settings for MSN (Multiple Subscriber Number) can be
made. MSN are usually used if more than one ISDN devices share a single
ISDN line. By selecting the checkbox Use MSN for incoming and outgoing calls
and entering the Number(s) into the fields B Channel 1 and B Channel 2 of
Interface 1, the system becomes configured to this MSN number(s). Incoming
calls with other MSN numbers will be ignored, outgoing calls use this MSN. If
the system should be reached within more than one MSN number, multiple
numbers can be entered separated by commas. When making calls, the first
MSN number from field B Channel 1 is used for the first line and the first
number from field B Channel 2 for the second line if entered.
If MSN is used, the system is only reachable through number(s) with the last digits matching
the provided MSN numbers.
Active MSNs are shown under Help |About Teleporter.
The D - channel protocol of the ISDN interfaces are system wide settings, see
chapter Setting the ISDN D-Channel Protocol for details.
28
All rights reserved.
SCOTTY ProMax User's Manual
On systems where only a single ISDN interface is available, the ISDN tab is
reduced to a single ISDN number field. The configuration of MSNs is similar
to the previous description, but only 1B and 2B calls are possible; BONDING
connections are not supported.
4.2.5 The "Shortcuts" – Tab
With the Shortcuts tab, the Teleport shortcuts in the Start Menu and on the
Desktop can be enabled or disabled.
The Configuration Utility dialog box, the folder Shortcuts
Activating the Teleport on Desktop option puts a Teleport shortcut at the
desktop; enabling Teleport in Autostart automatically starts Teleport at login.
If supported by the hardware of the SCOTTY system, additional shortcuts for
special communication or encryption devices are displayed. Activating a
shortcut option will place the corresponding Teleport shortcut on the desktop.
All configured shortcuts can also be found on the Windows Start Menu under
Start | Programs | SCOTTY.
All rights reserved.
29
SCOTTY ProMax User's Manual
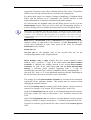
4.2.6 The "Remote Control" – Tab
With the SCOTTY Remote Control functionality it is possible to remotely
control the SCOTTY Teleport, for example by a Touch panel Media Control.
The Configuration Utility dialog box, the folder Remote Control
To control the SCOTTY Teleport via LAN, click on Enable in the Telnet
Access field. Define a Username and Password to prevent unauthorized access.
Activate Enable Echo if the characters entered at the remote site shall be
echoed by the SCOTTY system.
Clicking on Enable in the Serial Access field allows controlling SCOTTY
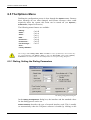
Teleport using a serial RS232 interface. The control device has to be connected
to the chosen Port using the selected Baudrate.
Please contact your SCOTTY representative for additional information about
the SCOTTY Remote Control functionality.
30
All rights reserved.
SCOTTY ProMax User's Manual
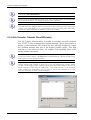
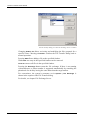
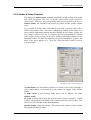
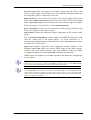
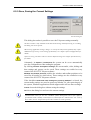
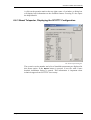
4.2.7 The "Data Channels" – Tab
The Data Channels tab allows configuring external data channels.
The Configuration Utility dialog box, the folder Data Channels
The position information supplied by an external NMEA source, like a GPS
unit, can be used to tag snapshot made by the Teleport application. Choosing
Enable in the NMEA field will configure the Teleport application to use the
selected serial RS232 port as information source.
The system will decode the latitude, longitude, altitude, date and time from NMEA $GPRMC
and $GPGGA sequences.
The current status of the received position information can be viewed in the Teleport
application under Help | About Teleporter.
Choosing Enable in the Serial Data Channel field will make the SCOTTY
Teleport software transmit the data stream of the selected serial RS232
interface in parallel to the video conference if this is supported by the other
endpoint.
It is possible to choose the same COM port for both NMEA and Serial Data Channel,
assumed that both are configured to the same Baud rate. This way, the position information
from an external GPS can be used both to tag local snapshots and to track the system on the
remote side.
All rights reserved.
31
SCOTTY ProMax User's Manual
4.3 LAN Network Configuration
The internet protocol settings of the system must be configured according to
the requirements of the local network access.
To change the current IP settings, follow the following steps:
• Start | Control Panel
•
Open Network Connections in
Connections,
the category Network and Internet
•
Select Local Area Connection with the right mouse button and select
Properties
• Select Internet Protocol (TCP/IP) and click on Properties
•
IP and DNS settings can now be configured.
Choose Obtain an IP address automatically to enable DHCP.
4.4 Setting the ISDN D-Channel Protocol
The ISDN interfaces of the system need to be correctly configured to the local
"D - channel protocol" (e.g. Euro-ISDN, AT&T 5ESS, etc.). Because the ISDN
interfaces can also be used e.g. for Windows network access, this setup is
located outside the SCOTTY Config application.
To change the current "D - channel protocol" or to enter SPIDs, carry out the
following steps:
• Start | Control Panel
• Open System in the category Performance and Maintenance
• Select Hardware folder and choose Device Manager button
• Open the Network adapter list
•
Select Stollmann tina-C4S with the right mouse button and select Properties
and choose the ISDN Folder
• Choose the ISDN folder
• Select the correct Switch Type or D-Channel Protocol
•
32
Use Configure to configure further details like MSN (for windows
networking) or SPID
All rights reserved.
SCOTTY ProMax User's Manual
4.5 DVI/VGA Configuration
Systems with a single, combined DVI/VGA-interface automatically restore the
last saved interface mode during start-up. If required, the current mode can be
changed using following keyboard shortcuts:
Ctrl+Alt+F1: Switch to VGA mode
Ctrl+Alt+F4: Switch to DVI mode
These shortcuts can be used „blind“ when, for example, the display has been changed and
the system is configured to the wrong display mode.
Enhanced settings, like simultaneous operation of a DVI and VGA monitor, are
available using the graphic card settings:
Ctrl+Alt+F12: Open graphic card settings dialog
The dialog uses Monitor for VGA, Digital Display for DVI.
Systems with multiple DVI/VGA interfaces or with a pure VGA interface can
be configured using Window’s Display Properties dialog:
• Start | Control Panel | Display
4.6 System Security
SCOTTY systems feature a number of unique methods preventing the system
from unintended changes, thus remaining the system operational even when the
system’s software gets corrupted.
Usually, the system uses three partitions on the internal hard disk. System
partition C: contains the operating system and the installed applications, the
data partition D: is used for storing data like the phone book, videos, snapshots,
etc. A hidden recovery partition is used by the System Recover (optional).
For security relevant applications, systems can be configured without data
partition. The phone book and all recorded media will be stored to external
memory devices. Before using such a system, the external media, like USB
stick or USB hard disk, needs to be connected to the system.
All rights reserved.
33
SCOTTY ProMax User's Manual
Furthermore, the system partition can be protected:
On change-protected systems (optional) the data partition, if available, can be
used freely to save data, the system partition is protected by a write protection
mechanism.
Change-protected systems: Any configuration changes made in the system will be lost after
reboot. See the following chapters below to write changes permanently to the disc.
On write-protected systems (security option) there is no data partition. The
system partition is write-protected by hardware. All recorded media need to be
stored to external memory devices.
Write-protected systems: Any configuration changes made in the system will be lost after
reboot. Writing changed to disc is not possible! Changes can be made by SCOTTY only!
4.6.1 Write Changes to the Disc
Only valid for change-protected systems: If the changes can be applied
without needing to reboot the system, use the following to apply changes to the
system partition of the disk.
• Make a clean configuration: Fresh boot up, apply desired changes
• Log on as Administrator
• Apply further changes that require administrator rights
• Open Windows Command Window (Start | Run, enter "cmd")
• Enter "ewfmgr c: -commit"
• Reboot to apply settings, write protection becomes active again
• Check if settings are applied
As soon as the system is rebooted or switched off and on, the write protection mechanism is
active again.
34
All rights reserved.
SCOTTY ProMax User's Manual
4.6.2 Permanently Disable the Write Protection
Only valid for change-protected systems: It is also possible to permanently
disable the write protection mechanism, for example if software or driverinstallation requires rebooting the system.
Warning: With disabled write protection, the system’s flash disk operates like an ordinary
hard disk allowing random read write access. Disabling the write protection mechanism is a
security risk. We strongly recommend only disabling write protection when absolutely
necessary and enabling it again as soon as possible.
• Make a clean configuration: Fresh boot up
• Log on as Administrator
• Open Windows Command Window (Start | Run, enter "cmd")
• Enter "ewfmgr c: -commitanddisable"
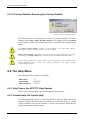
4.6.3 Enable the Write Protection
Only valid for change-protected systems: If write access to the hard disk is
not needed anymore, it is strongly encouraged to enable write protection again:
• Make a clean configuration: Fresh boot up
• Log on as Administrator
• Open Windows Command Window (Start | Run, enter "cmd")
• Enter "ewfmgr c: -enable"
All rights reserved.
35
SCOTTY ProMax User's Manual
5 Network Access
5.1 Network Access
SCOTTY systems feature a wide variety on pre-defined network connection
possibilities, depending on the hardware and software options of the system.
For details about the network setup, see chapters System Interfaces, System
Configuration, check the Appendix or ask the local SCOTTY representative.
For outgoing LAN/WAN or ISDN connections, the correct interface, LAN or ISDN is
automatically chosen depending on the entered number format. Incoming calls are picked up
from any interface.
5.2 LAN/WAN Connections
The LAN interface of the SCOTTY system needs to be connected to the
Ethernet network.
A double-click on any "Teleport" icon starts the SCOTTY software.
The easiest way to establish H.323 connections is entering the IP address of the
videoconferencing partner as a telephone number into the telephone book.
The system’s current IP address is shown under Help | About Teleporter
If the videoconferencing partner can be reached by name, it can be used as a
telephone number in the telephone book, e.g. demograz.scottygroup.com.
If a gatekeeper is configured in the Configuration Utility, H.323 connections
can be made by inputting the Name or Number of the other party into the
Telephone Book.
For details, see chapter Format for Entering the Telephone Number.
All rights reserved.
37
SCOTTY ProMax User's Manual
5.2.1 INMARSAT BGAN / Swift Broadband Modem
The LAN interface of the SCOTTY system needs to be connected to the
Ethernet port of the modem.
A double-click on any “Teleporter” icon starts the SCOTTY software. Enter
the IP address or the host name of the remote system, choose a dial rate below
the maximum data rate of the INMARSAT service in use, and press the Dial
button. Or, use the Low Cost button for a 128 kbit/s call (on default).
When using background service, for reliable video calls choose a rate low
enough to allow variance of the service’s data throughput. When using a
streaming class service, choose the dial rate 64 kbit/s below the data rate of the
service to allow IP overhead.
For the best file transfer throughput, please use the background service. In the
SCOTTY Teleporter software, use UDP (Sat optimized) as the preferred IP
mode.
Before a call can be established, make sure the desired INMARSAT service is
connected to the SCOTTY system. Depending on the modem and its
configuration, several approaches are commonly used by the INMARSAT
modem manufacturers:
• The background service can be pre-configured as default service, using the
modem’s web interface or the Launch Pad software.
• The modem needs to be connected to the service before a call can be made,
using the modem’s web interface or the Launch Pad software. This is often
required when using a streaming class service.
• The service can be connected by dialing up a PPPoE connection.
Such a connection can be configured on the SCOTTY system as following:
Select Start | Control Panel, double-click Network Connections, and choose
Create a new connection. Select Connect to the Internet, then Set up my
connection manually, then Connect using a broadband connection that
requires a user name and password. Now general settings and settings
required by the service provider can be made. After creating the
connection, further settings are available by opening it and clicking on
Properties; for example, some modems require a service class identifier
entered into the Service name field.
The PPPoE connection can be dialed up manually when required. Access
to the connection can be simplified by placing a shortcut onto the desktop.
For special applications, like using a streaming class only during a video
call, the PPPoE connection can be entered as part of a Teleport phone book
entry; see chapter Format for Entering the Telephone Number for details.
After connecting the SCOTTY system with the INMARSAT network, the
overall network must be configured in a way that IP data packets are routed
38
All rights reserved.
SCOTTY ProMax User's Manual
between the SCOTTY system and the remote system. Again, depending on the
INMARSAT modem and its configuration, different approaches are commonly
used by the modem manufacturers:
• Modem or single user mode: The SCOTTY system directly receives the IP
address supplied by the INMARSAT service provider.
• PPPoE: The SCOTTY system receives the IP address supplied by the
INMARSAT service provider after dialing up the PPPoE connection.
• H.323 Gateway: The modem automatically handles the H.323 protocol.
• Port Forwarding: The modem assigns a local IP address to the SCOTTY
system, but does not support the H.323 protocol. Port forwarding needs to
be configured manually, see chapter The "LAN" – Tab for details.
When the network is not configured accordingly, often outgoing video and audio is possible,
whereas the SCOTTY system will not receive incoming video and audio.
To receive incoming calls the SCOTTY system needs to be reachable from the
internet. This means that the modem needs to get a globally routed, statically IP
address from the INMARSAT service provider. Furthermore, the INMARSAT
modem needs to be connected to the network in advance, preferably by using
the auto-connect feature of the modem if available.
For details, please refer to the instructions from the modem manufacturer.
All rights reserved.
39
SCOTTY ProMax User's Manual
5.3 ISDN Connections
The ISDN interfaces of the SCOTTY system needs to be connected to the
ISDN network.
A double-click on any “Teleporter” icon starts the SCOTTY software. Enter
the phone number of the remote system, choose the desired dial rate, and press
the Dial button. Or, use the Low Cost button for a 64 kbit/s call (on default).
When making a 2 x 64 kbit/s call, usually both channels of the call will use the
same phone number. If two different numbers are required, enter both numbers,
separated with a comma.
Choosing data rates of 128 kbit/s or higher will use the BONDIG protocol to
establish the call. Only the phone number of the first channel needs to be
entered, all other numbers are automatically exchanged.
For details, see chapter Format for Entering the Telephone Number.
5.3.1 INMARSAT GAN / Swift64 Satellite Modem
One ore more ISDN interfaces of the SCOTTY system needs to be connected
to the ISDN ports of the modem.
A double-click on the pre-defined "Teleport" icon starts the software. Enter the
phone number of the remote system. By choosing the Dial button a 2 x 64 kbit/s
call is performed if supported by the INMARSAT modem. Pressing Low Cost
dials a 1 x 64 kbit/s connection, choosing Voice Only will dial a regular voice
call.
By selecting "Use 00 as Prefix (Satellite-Style Dialing)" in the dialog Options |
Dialing, phone numbers starting with “+” can be used and are automatically
converted into a satellite-compatible style.
To receive incoming calls, the calling station needs to dial one of the access
numbers assigned by the INMARSAT provider. For video and data calls, the
64 kbit/s access number must be used; for voice calls, choose one of the voice
numbers.
If the INMARSAT modem supports 2 x 64 kbit/s incoming calls, the calling
station needs to dial the 64 kbit/s data access numbers of both channels. Enter
both numbers, separated with a comma, into the calling station’s phone book.
40
All rights reserved.
SCOTTY ProMax User's Manual
5.3.2 BONDING Calls with a INMARSAT Modem
Using multi-channel INMARSAT modems, video calls with data rates of
192 kbit/s and higher are possible by the SCOTTY Live Bonding feature
(optional).
A double-click on the pre-defined "Teleport" icon starts the software. Enter the
phone number of the remote system, starting with “00” and followed by the
country code. A trailing “#” is not allowed and not required. Choose a data rate
of 128 kbit/s or higher to use SCOTTY Live Bonding, and press the Dial
button.
To receive incoming calls, the access numbers of the modem’s channels need
to be configured once. Enter the 64 kbit/s data access numbers assigned by the
INMARSAT provider into the ISDN tab of the SCOTTY Configuration Utility.
Then the system can be reached by dialing the access number of the first
channel.
Due to data slips common to satellite connections, the regular BONDING protocol can not
be used with INMARSAT. The SCOTTY Live Bonding protocol overcomes this limitation and
allows easy and reliable connections providing high video quality over satellite.
The SCOTTY Live Bonding feature needs to be activated on both sides of the connection.
5.3.3 INMARSAT BGAN / Swift Broadband Modem
The INMARSAT BGAN and Swift Broadband services not only support IPbased connections, but also regular voice and data calls.
If the INMARSAT modem features an ISDN port, it can be connected to the
SCOTTY system to make and receive regular voice telephone calls. ISDNbased video and data calls are also possible, depending on the capabilities of
the modem. See previous chapters for usage.
The SCOTTY system can be connected both to the LAN and the ISDN port of the INMARSAT
modem. This way, high-bandwidth video and data communication is possible using the LAN
interface, whilst regular telephone calls can be made via the ISDN port.
All rights reserved.
41
SCOTTY ProMax User's Manual
5.4 Synchronous Interface
5.4.1 INMARSAT-B Satellite Telephone
The appropriate adapter cable is inserted into the unit's optional network
interface socket and connected to the satellite telephone. A double-click on the
pre-configured SCOTTY Teleporter icon (titled: "Teleport [telephone name]")
initializes the software.
For details see chapter Appendix or ask the local SCOTTY representative.
5.4.2 VSAT Satellite Connections
One end of the network cable is plugged into the optional network interface
connector of the SCOTTY unit, the other end is connected to the satellite
modem. A double-click on the correct pre-configured SCOTTY Teleporter icon
loads the software. Synchronization can be started manually by opening the
Dial dialog and pressing the Dial or Low Cost button.
Transmit and receive timing are independent from each other; something essential for
satellite connections.
For details see chapter Appendix or ask the local SCOTTY representative.
5.4.3 KIV7 / STE
Connect the red side of the KIV7 / STE to the optional network interface of the
SCOTTY unit. The black side of the encryption device is connected to your
communication network (e.g. the ISDN network).
A double-click on the correct pre-configured Teleport "Teleport KIV" or
"Teleport STE" icon initializes the hardware. After a secure connection has
been established, the Teleport application will ring and synchronize the call.
For details see chapter Appendix or ask the local SCOTTY representative.
5.5 Other Networks
The SCOTTY Unit supports many other network configurations. For details see
chapter Appendix or ask the local SCOTTY representative.
42
All rights reserved.
SCOTTY ProMax User's Manual
6 Teleport Details
6.1 Teleport Details
Based on many years of experience in the area of video-communication and
user interfaces, SCOTTY systems are easy-to-use, multi-featured tools with
clear user interfaces. All functions that are frequently used are directly
available by clicking on buttons; the less used functions are found through the
menus.
To avoid undesired changes to the Teleport configuration, new settings need to
be saved manually. This way, Teleport will come up each time with welldefined settings. Alternatively, the system can be configured to auto-save
settings. See chapters Save and Preferences for details.
On default, many Teleport settings are lost when SCOTTY Teleport is closed. To save settings
permanently see chapter Save.
When saving application settings, change- or write-protected systems (optional) may require
additional steps to keep saved settings permanently. See chapter System Configuration for
details.
System recovery procedures will reset all user defined settings. See chapter System Recovery
for details.
SCOTTY Teleport has a unique setting management system feature to make
video-communication easier for the user. For different operational modes of the
application, the settings of the Video window will be saved. When switching
modes, the corresponding adjustments are reloaded. This frees the user from
having to constantly reset these settings. See chapter Video Window for details.
All rights reserved.
43
SCOTTY ProMax User's Manual
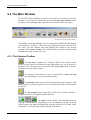
6.2 The Main Window
The SCOTTY Main Window comprises of the title bar, the menu bar, and the
toolbar(s). The menu bar includes the menu options File, View, Options (when
not deactivated) and Help, whose functions are described in the next pages.
The SCOTTY Teleporter Main Window
The toolbars in the Main Window can be repositioned individually and dragged
to the Windows "Desktop". This is done by clicking between two buttons or on
the "strip" near the button's edge and dragging the toolbar to the desired
position. Under View | Toolbars, the toolbars can be activated and deactivated
and their size (large, small) can be set.
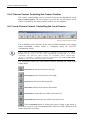
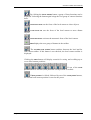
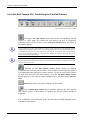
6.2.1 The Standard Toolbar
The Dial button displays the Telephone Book. The desired remote
station can be called by selecting the name appearing on the list by mouse or
keyboard. The videoconference is started by clicking the Dial button or doubleclicking the remote station's name.
An ongoing videoconference can be terminated by clicking the Dial
button – now depicting an arrow pointed downwards.
The Recorder button starts the Record and Play mode (optional). This
enables audio and video sequences to be saved onto the hard drive and replayed
at anytime.
The File Transfer button starts the SCOTTY File Transfer function designed to achieve the highest possible data rate.
The Share button enables data sharing during an
ongoing videoconference. Depending on the configuration of the local and
remote system, the button automatically switches between H.239 Dual Video
(optional), T.120 Netmeeting and the Snap & Send feature.
44
All rights reserved.
SCOTTY ProMax User's Manual
With Snapshot a still image of the video can captured. The snapshots
are copied into the clipboard and are stored automatically as JPG files into the
Records folder in the resolution of the video source.
By clicking Preset A the first video and audio setting is selected. These
settings can be defined in View | Audio & Video Controls. Preset A typically
activates the preset for the live camera. When the mouse cursor is positioned in
the button, a "Tool Tip" appears, displaying the defined name for this preset.
Preset B
activates the second video and audio preset.
By clicking Preset C, the third video and audio setting is activated.
Volume Down decreases the volume.
Volume Up
increases the volume.
interrupts the transmission of the audio signal. When
activated (indicated by a red crossed-out microphone), this feature makes the
local conversation private. The transmitted audio is resumed by pressing Mute
again.
Mute
All rights reserved.
45
SCOTTY ProMax User's Manual
6.2.2 Camera Control, Controlling the Camera
The Camera Control toolbar (activated by View | Camera Control) controls the
current local camera as well as the far end camera.
The Local Camera Control toolbar
The Local/Far end camera button switches between the local and far
end camera toolbar.
The Far End Camera Control toolbar
The toolbar can be docked into the Main Window or placed where desired.
When the mouse cursor is positioned on a button, a "Tool Tip" appears
displaying the function of the button.
6.2.3 Audio, Controlling the Audio System
The function of the Audio toolbar (activated by View | Toolbars | Audio
System) is only available if an external audio system is configured by
SCOTTY.
Train starts a process in which the room acoustics are analyzed to
eliminate acoustic feedback from the loudspeaker to microphone. This process
involves playing a signal from the loudspeaker to evaluate its "reflection". This
function should always be started when the room acoustics are changed in
some way.
46
All rights reserved.
SCOTTY ProMax User's Manual
6.3 The File Menu
The File menu includes the following items:
Dial…
Disconnect
Recorder…
File Transfer…
Share…
Share (H.239)
Share (T.120)
Share (Snap&Send)
Snapshot
Far End Cam Ctrl
Exit
F2
Shift+F2
F3 (optional)
F4
F5
Alt+F5
Ctrl+Alt+F5
Ctrl+F6
F6
Shift+F5
F10
6.3.1 Dial, Making a Call
The Dial dialog box
The menu item Dial displays the Telephone Book. The user can now choose the
desired remote station from the list with the help of the mouse or keyboard or
alternatively directly enter the phone number or IP address into the edit field
Number. In case of selecting an entry from the phone book the number is
displayed inside this edit field as well.
All rights reserved.
47
SCOTTY ProMax User's Manual
A click on Dial or a double-click on the remote station name in the Telephone
Book closes the Dialog and begins the dialing to the selected remote station. A
dialog box is displayed while the dialing is taking place. If the Cancel button is
pressed, the dialing process is aborted.
begins a videoconference to the selected remote station with a
reduced bandwidth. For example, an ISDN connection using only one Bchannel (instead of the normal two), reduces the running costs of a videoconference connection by fifty percent.
Low Cost
enables a voice call to any telephone, if supported by the current
network type.
Voice Only
Close closes
the dialog.
allows the user to select the dial rate to be used. The available choices
are dependent on the selected interface.
Dial Rate
selects the interface to be used for this call. The available choices are
dependent on the present hardware and shortcut used to start the software.
Interface
brings up an additional dial pad (see below) used to directly enter a
phone number or IP-address without using the keyboard. This dial pad can be
hidden by clicking Pad <<.
Pad >>
The Expanded Dial dialog box
New Entry…
opens a dialog box to create a new Telephone Book entry.
Edit Entry… opens
a dialog box to alter the currently selected entry.
is used to delete the currently selected entry. If this operation is
confirmed by a Yes then the selection is deleted.
Delete…
48
All rights reserved.
SCOTTY ProMax User's Manual
Move up
repositions the entry one step up in the column.
Move down
repositions the entry one step down in the column.
6.3.2 Creating or Modifying a Telephone Book Entry
The Edit Entry dialog box
The dialing parameters for a remote station can be entered by pressing the
button New Entry or Edit Entry in the expanded Telephone Book dialog box.
defines the name of the remote station which appears in the Telephone
Book. If the network supports "caller’s number" the name of the remote station
is also displayed on an incoming call.
Name
The telephone number of the remote station is entered in the Number field (the
appropriate format is described in the next chapter).
describes the type of network interface used. Depending on the hardware configuration, varying settings can be chosen. Usually the field is left on
"Automatic" – meaning the default interface set under Options | Dialing is used,
or another available interface identified by the phone number entered.
Interface
defines the used data rate for the call. According to the set interface,
several rates can be selected. Usually the field is left on "Default"- meaning the
default value of the used interface is taken. The default values for each
available interface can be set under Options | Dialing.
Dial Rate
defines the network mode to be used, if supported by the network
interface. Usually the field is left on "Default"- meaning the default value of the
used interface is taken.
Mode
OK
confirms the entry and closes the dialog box.
Cancel
aborts the changes and closes the dialog box.
The user can create a Telephone Book entry for every desired remote station. This entry
stays valid even if the system's location is changed. By entering the data of the system's
current location under Options | Dialing, Teleporter automatically knows if the dialing prefix
must be dialed. This "intelligent" Telephone Book administration also makes the same
Telephone Book valid for varying communication networks (ISDN, INMARSAT).
All rights reserved.
49
SCOTTY ProMax User's Manual
If a Telephone Book entry is set to a value which is not supported by the currently used
hardware, it is indicated "Not Supported" and the default values will be automatically used.
6.3.3 Format for Entering the Telephone Number
The Telephone Book supports different number formats; the basic distinction is
between LAN (H.323) and ISDN (H.320) numbers.
6.3.3.1 ISDN (H.320) Telephone Numbers
The number can be entered directly:
<number>
Example:
0043 316 407849
Or, the number can be entered using the international format:
+<country code> <area code> <number>
Example:
+43 316 407849
Spaces can be inserted to make the numbers more readable if desired.
If the "+" in the telephone number is not entered, the number is dialed directly
without alteration. This option can be useful when, for example, an internal call
is dialed through an in-house system.
In order to ensure that the Telephone Book entries remain valid independent of
location and network type (e.g. ISDN, INMARSAT), an "intelligent" process is
implemented to make the numbers entered in the Telephone Book continue to
function regardless of the current situation. When such a telephone entry
beginning with "+" is selected, the codes necessary for the current network type
are added and, according to the settings under Options | Dialing, prefixes are
either added or prefix numbers in the Telephone Book entry are ignored. For
example, a domestic call (e.g. through ISDN) is recognized by Teleporter
automatically, triggering the removal of the international prefix.
If different numbers are required for a remote station (e.g. two ISDN lines) the
entire numbers can be entered separated by commas. Moreover it is possible to
enter the common part followed by a dash and the rest of the number segments
separated by commas.
Example:
+1 408 252 9447,+1 408 252 9457
Example:
+1 408 252-9447,9457
If an extension through a gateway (TCS4 extension) to a LAN endpoint is
desired, add ">" and the extension number.
Example:
50
+43 316 407849>1920
All rights reserved.
SCOTTY ProMax User's Manual
6.3.3.2 LAN (H.323) Telephone Numbers
Phone numbers can be entered in one of the following formats:
• IP address e.g.: 91.209.75.198
• Hostname, e.g.: demograz.scottygroup.com
• Computer name inside a domain or workgroup, e.g.: SI2038010
• H.323 calls using an external gatekeeper:
Format: <ip-address of gatekeeper>,<E.164 address>
Optionally, following parameters can be used:
• H.323 calls: The name of the network connection to be dialed up before
the call is made and to be disconnected when the call ends.
Format: RAS:<connection> <number>
Example: RAS:Streaming 21.23.24.11
The network connection needs to be configured in the system’s Network
If the name of the connection contains spaces, it needs to be
put under single quotes.
Connections.
Example: RAS:’Streaming 256’ 21.23.24.11
• LAN Filetransfer calls: The port number of the SCOTTY File Transfer
application on the remote system.
Format: <number>:<port>
Example: 121.23.24.11:14000
• H.323 calls using an external gatekeeper: The H.225.1 port number.
Format: <ip-address of gatekeeper>:<port>,<E.164 address>
If a gatekeeper is configured in the Configuration Utility, the gatekeeper is used
to resolve the telephone number for H.323 calls. Following phone number
formats are available in this case (note that inputs are case sensitive):
• IP address, e.g.: 121.23.24.11
• Number (E.164 address), e.g.: TEL:1920
The TEL: can be left out if LAN is the current interface.
• Name (H.323 ID), e.g.: SI2038010
If the name is numerical only, a prefix NAME: is required.
6.3.4 Disconnect, Terminating a Call
This terminates an ongoing call and the system returns to the standby mode.
All rights reserved.
51
SCOTTY ProMax User's Manual
6.3.5 Recorder, the Record and Play Mode
To record or play back videos, click the Recorder button to open the Recorder
(optional). The recorder mode enables audio and video sequences to be
recorded into a file on the hard disk and later replayed. The audio and video is
highly compressed according to the MPEG (optional AVC/H.264) standard,
enabling very long sequences to fit onto the hard drive.
Analog video inputs (SD) and digital (HD-SDI, optional) inputs are available
for recording. The Recorder will record the video selected under Screen in the
Video Switching Matrix (see chapter Video Switch Matrix for details), and the
audio selected in Input Mixer and Auxiliary In (see chapter Audio). For special
applications, like surveillance systems, the Recorder can be configured by
SCOTTY to record the video selected under Transmit instead.
The recordings, saved as a file, can be transferred at a later time
("Store & Forward"). This feature offers the advantage that a high quality video
can be recorded "off-line" with high data rates and sent at a lower data rate (for
example 256 kbit/s) – at a correspondingly longer transmission time.
"Store & Forward" is ideal for low bandwidth networks where the problem of
low data rate no longer prevents the transmission of high quality video and
audio files. The originally recorded sequence is restored at the remote end by
replaying the video/audio file via the Recorder.
The MPEG-Recorder dialog box
In the section Record, the settings for the recording are defined. It is only
available if the MPEG-recording option is installed.
In the field File, the name of the file is entered where the sequence will be
stored. When opening the Recorder dialog box and after every recording, a filename consisting of date and time for the next recording is automatically
suggested.
enables the user to look through the record files on the hard drive. If one of
them is selected it will be overwritten by the next recording.
52
All rights reserved.
SCOTTY ProMax User's Manual
Rate chooses the data rate and
resolution at which the recording takes place.
AVC/H.264 option: Depending on the format of the video source the settings
High, Medium, Low and Lowest corresponds the following recording settings:
High, Medium:
Rate
Resolution of
video source
1080i60
1080p30
1080i50
1080p25
720p60
720p50
720p30
720p25
SD NTSC
SD PAL
High
Resolution Bitrate
1080i60
36Mbit/s
1080p30
36Mbit/s
1080i50
30Mbit/s
1080p25
30Mbit/s
720p60
32Mbit/s
720p50
26Mbit/s
720p30
16Mbit/s
720p25
13Mbit/s
480i60
6Mbit/s
576i50
6Mbit/s
Medium
Resolution Bitrate
1080i60
18Mbit/s
1080p30
18Mbit/s
1080i50
15Mbit/s
1080p25
15Mbit/s
720p60
16Mbit/s
720p50
13Mbit/s
720p30
8Mbit/s
720p25
7Mbit/s
480i60
3Mbit/s
576i50
3Mbit/s
Low, Lowest:
The resolution of the recorded video is limited to SD format (NTSC or PAL,
depending on the input format). The data rate for “Low” is set to 1,5Mbit/s and
for “Lowest” to 750kbit/s. These settings are ideal to record SD or highresolution video sources and transferring them via “Store & Forward” to a
remote party.
Audio
selects if audio is recorded. AVC/H.264 option always records audio.
In the section Play, the file to be played is selected. After every recording the
field is set to the last recorded file for immediate play back.
With
stored MPEG-files can be selected to play back.
displays the possible record time which is calculated by the
indicated data rate and the free space available on the hard disk.
Free record time
Total play length
shows the play time of the selected MPEG-file in the Play
field.
Record
Stop
starts the record process.
stops the recording or playback.
plays the file currently in the Play field. The playback can be
paused by clicking into the video area. The seek bar indicates the progress of
the current clip. The progress indicator can be dragged to select a place in the
clip to start playing.
Play
All rights reserved.
53
SCOTTY ProMax User's Manual
The location of the recorded files can be defined in Options | Directories. The folder can be
opened using View | Recorded Files.
When selecting the digital SDI input under in the video switching matrix, the recorded video
will be always this source, even during an ongoing video conference.
If the digital SDI audio input is selected as audio source in the audio dialog, this audio is
recorded exclusively. If digital audio is not selected, all other audio sources according to the
settings in the audio dialog can be recorded. When selecting an analog video input under
transmit, the digital audio from the SDI source cannot be recorded.
6.3.6 File Transfer, Transfer Files Efficiently
The File Transfer function makes it possible to exchange stored files between
two SCOTTY video-communication systems through a direct data transfer or
during a videoconference. This feature has been specially designed to exploit
the available network data rate to the highest possible degree. This high
efficiency is also achieved when, for example, long signaling delays occur
during satellite connections.
The SCOTTY File Transfer is only possible between two SCOTTY systems using Teleporter
or the File Transfer software. The Send button is disabled during a H.320 call when using
data conference or far end camera control.
Measurements have shown that the T.120 or FTP data transfer protocol makes the data rate
through satellite links collapse to about 10 to 15%. The SCOTTY file transfer usually
reaches a net throughput of more than 95% during GAN connections, and more than 90% in
BGAN connections when using the UDP mode – plus further increase by the automatic
online compression. Furthermore, files can also be transferred simultaneously in both
directions with nearly no impact on the throughput.
54
All rights reserved.
SCOTTY ProMax User's Manual
The File Transfer dialog box during a transfer
Clicking on Add opens another dialog to select the files to be transferred. The
selected files are added to the File Transfer list and are automatically copied
into a separate transfer folder on the hard drive. After a file is successfully
transferred, it is deleted from this folder.
Clear removes the selected file from the list and deletes it from the transfer
folder.
Clear All
deletes the entire list and all files in the transfer folder.
Clicking Send starts the transfer of the displayed files.
If a video-communication connection is already underway, the files are
transferred immediately. If there is no running videoconference, the Telephone
Book is displayed. After selecting the desired remote station, the connection is
made, the files are transferred, and the connection is then immediately ended.
This mode is called "File transfer only" mode, and is compatible to SCOTTY
File Transfer software. The same functionality is true for Send, Download and
Exchange. The buttons are disabled during a H.320 call, when using data
conference or far end camera control.
A file transfer during a H.323 call automatically uses the TCP or UDP mode which is
supported by both sides of the call. If both modes could be used, the preferred mode
configured in Options | Data is used. “File transfer only” H.323 calls will always use the
preferred mode configured at the caller’s side; if this mode is not supported by the remote
end, the setting needs to be changed.
When a file transfer is started, the SCOTTY remote system displays the
Received Files dialog box (see chapter Received Files).
A running transfer can be discontinued through Abort.
Download will download files from a File Exchange Server (optional). A dialog
box requesting username and password to log on to the server opens.
The name of the file being transferred, the number of already transferred bytes,
as well as the actual data rate are continually displayed. A bar gives a visual
representation of the progress of the transfer.
The File Transfer can be configured under Options | Data.
If the connection is suddenly broken when transferring a file with the SCOTTY File Transfer
system, it is not necessary to retransmit the entire file. The SCOTTY File Transfer will finish
the transfer from the point of disconnection without any data loss.
Because the file(s) to be transferred are copied onto a separate folder on the hard drive,
individual files can be assembled - for example from several USB sticks. The folder can be
configured under Options | Directories.
If the optional File Exchange Server is configured, the File Transfer dialog gets
expanded:
All rights reserved.
55
SCOTTY ProMax User's Manual
The File Transfer dialog box when File Exchange Server is enabled
Changing Outbox for allows reviewing and modifying the files prepared for a
specific client. Choosing <Transfer> switches the File Transfer dialog back to
normal operation.
Pressing Add allows adding a file to the specified Outbox.
With Clear one entry in the specified Outbox can be removed
Clear all removes
all files in the specified Outbox.
Pressing the Exchange button starts the file exchange. If there is no running
videoconference, a phone number is suggested automatically by searching the
phonebook for an entry having the same name than the target station.
For convenience, the system’s username set in Options | File Exchange is
shown in the caption of the File Transfer dialog.
For details, see chapter File Exchange Server.
56
All rights reserved.
SCOTTY ProMax User's Manual
6.3.7 Share, Starting the Data Package
Depending on the capabilities of the local or remote system, and parameters
entered under the menu Options | Data, this function either starts the T.120 data
application package, the H.239 Dual video (optional) or activates the Snap &
Send feature.
This button starts T.120 Netmeeting, see chapter T.120 Netmeeting for
details on this.
This button starts H.239 Dual Video (optional), see chapter H.239 Dual
Video Stream for details on this.
This button starts Snap & Send, see chapter Snap & Send for details on
this.
The data sharing requires bandwidth which can result in a decrease of the live video quality.
6.3.8 T.120 Netmeeting
The Share function starts the Netmeeting application, which automatically
opens a data channel to the remote video communication station.
The NetMeeting main window
All rights reserved.
57
SCOTTY ProMax User's Manual
The Hang Up button terminates the data conference and closes the data
channel.
When the Share Program button is clicked, all presently opened
applications are listed in the Sharing dialog box. Select the name of the
program you want to share and click the Share button. If an application is
shared, both video-communication partners can see the application on the
screen.
To allow the other site to control your shared program, select the Allow Control
button. If the button is selected, the button name changes to Prevent Control.
Selecting the Prevent Control button stops the collaboration.
To work in a program shared by someone else, select the Control menu of the
shared program window and click Request Control. The person who shared the
program receives a confirmation message and must click Accept.
During collaboration one site has control in the shared application(s) while the
other site is remotely controlled. To obtain control, click the mouse button. To
stop collaborating the shared program press ESC.
NetMeeting participants with earlier versions of NetMeeting can not take control of a
program or computer shared by someone with NetMeeting 3.0 or later. However if
applications are shared and collaborated by earlier NetMeeting versions, the NetMeeting 3
user can take control.
With the share and collaborate option it is possible to remote control a computer by sharing
and collaborating Windows Explorer. In this way, for example, applications can be opened
or software can be installed on the remote site. It is advisable, however, to pay careful
attention not to delete or move important files accidentally.
Chat
facilitates to send small text messages to the remote site.
By clicking the Whiteboard button the Whiteboard is opened on both
video-communication sites.
If the other site uses an earlier version of NetMeeting, select Whiteboard (1.0-2.x) from the
NetMeeting Tools menu instead.
For some purposes (e.g. large graphics) application sharing of MS Paint may be more
effective than using the Whiteboard.
58
All rights reserved.
SCOTTY ProMax User's Manual
6.3.9 H.239 Dual Video Stream
The H.239 dual video stream feature enables to send or receive a second highresolution video channel. When activated, pressing the Share button opens the
second video channel that sends the content of the Windows Desktop. Now,
sharing a PowerPointTM presentation or any other application can begin. During
the H.239 session, the Share button remains pressed. Pressing the Share button
again closes the second high-resolution video channel.
The remote side sees the full content of the local display. Therefore, it is advisable to pay
careful attention which applications and files are opened during the H.239 session.
When receiving H.239, on the remote side a presentation video appears. The
receiving side can either close the presentation window, which will also close
the incoming second video channel, or open the second video channel for itself
by pressing the Share button, which will open a transmitting second video
channel and closes the incoming one.
H.239 is only available during H.320 calls.
H.239 captures the content of the primary monitor. When Windows extended desktop is used,
the secondary monitor can be used to display local content like the Teleport application and
its live video window.
6.3.10 Snap & Send
The Snap & Send feature allows users to easily transfer a high resolution still
image of the currently selected video source to the far end. The Snapshots are
copied into the clipboard, stored in the Records folder as JPG files and then
transferred to the remote party using the SCOTTY File Transfer feature. Snap
& Send files are prioritized during an ongoing File Transfer.
Snap & Send can be used during an ongoing conference as well as in idle
mode. When using in idle mode, the user gets displayed the Phonebook to enter
the dial parameters of the remote party or, if Auto dial under Options | Data is
activated, the currently active dial parameters are used. If the connection was
established due to Snap & Send, it will be automatically disconnected after the
transfer is complete.
The snapshot is automatically displayed on the receiving side if Auto Show
incoming Images is activated.
For more details about snapshots, see chapter Snapshot; details about the data
transfer can be found in the chapter File Transfer.
All rights reserved.
59
SCOTTY ProMax User's Manual
6.3.11 Snapshot, Taking a Still Picture
This function takes a still picture from the video source currently appearing in
the Video Window (for example, an external camera or the received video).
Snapshots are stored automatically as JPG files into the Records folder.
Furthermore, the picture is copied into the Windows clipboard and is available
to other applications.
The location of the Records folder can be defined in Options | Directories.
The folder can be opened using View | Recorded Files.
If a position information source like an external GPS unit is configured in the SCOTTY
Configuration Utility, the position, date and time information is stored into to JPG file using
an EXIF header. This allows tracking the position where a snapshot was taken.
Snapshots are taken from the video selected under Screen in the Video Switching Matrix
(see chapter Video Switch Matrix for details). For special applications, like surveillance
systems, the snapshot source can be configured by SCOTTY to capture the video selected
under Transmit instead (optional).
6.3.12 Far End Cam Ctrl, Controlling a Far End Camera
This function is only available during an ongoing videoconference. It activates
the Far End Camera toolbar at both sites and opens a low-bandwidth data
channel for camera control.
For H.320 calls, the Far End Cam Ctrl function is disabled during SCOTTY file transfer.
For details see chapter View | Far End Camera Ctrl.
6.3.13 Exit, Ending the Program
This function shuts down the SCOTTY Teleporter.
60
All rights reserved.
SCOTTY ProMax User's Manual
6.4 The View Menu
This menu enables to activate the Video Window and the Camera Control
toolbar, allows the arrangement of the toolbar(s) and the activation of several
dialogs.
The following points are available:
Video Window
Camera Control
Tone Pad…
Audio & Video Controls…
Pic in Pic
Toolbars
Received Files...
Recorded Files...
Connection Info...
Ctrl+W
Ctrl+M
Ctrl+B
Ctrl+O
Ctrl+R
Ctrl+Y
Ctrl+S
The settings are only "permanently" saved when they are saved manually with Options | Save
or when the Save on Exit setting under Options | Preferences is activated. Otherwise the modifications are lost upon ending Teleport.
6.4.1 Video Window, Manipulating the Video Window
The Video Window can be activated or deactivated through the menu View |
Video Window. The size of the window can be adapted to the current situation
by clicking on the edge or corner of the window and dragging it to the desired
size. If the Maximize button is clicked, the Video Window expands to full
screen. With the aid of the Minimize button, the Video Window can be "set
aside". By clicking the appropriate button in the Windows task bar, the Video
Window reappears.
When using a full screen Video Window it is possible to display the Teleporter
function by clicking a mouse button. With another mouse click the Video
Window is brought up to the front again. The same behavior applies to the
H.239 presentation window.
SCOTTY systems distinguish between four different operational modes:
• Standby
• Videoconferencing
• Video and Data Conferencing
• Record and Play (optional)
The position and size of the Video Window in each of these modes can be
individually adjusted. When switching modes, the corresponding adjustment
will reappear. This frees the user from having to constantly reset the window
positions and sizes. When these settings are saved, the window positions
reappear each time the system is restarted.
All rights reserved.
61
SCOTTY ProMax User's Manual
6.4.2 Camera Control, Activating the Camera Toolbar
The camera control toolbar can be activated or deactivated through the menu
View | Camera Control. The local camera as well as the far end camera can be
remote controlled by the camera control toolbar, see next chapters.
6.4.3 Local Camera Control, Controlling the Local Camera
The Local Camera Control toolbar
The availability of the functions in the camera toolbar depends on the current
remote-controllable camera which is configured using the SCOTTY
Configuration Utility.
If more than one remote-controllable camera is configured in the system, the camera
displayed on the screen is set for control automatically, provided that it is remote
controllable. The auto-select feature chooses the controllable camera selected under
"Screen" or "Transmit" or "Output" of the Video Switch Matrix under View | Audio & Video
Controls or selects the first controllable camera available.
The first group controls the zoom function and the panning and tilting of the
camera head.
Local left
pans the local camera to the left.
Local right
Local up
pans the local camera to the right.
tilts the local camera upwards.
Local down
tilts the local camera downwards.
Local zoom in
zooms the lens of the local camera in.
Local zoom out
zooms the lens of the local camera out.
If the Local track button is clicked, the person's image in the center of
the field of vision is seized and automatically "followed" until a different local
camera function is activated.
62
All rights reserved.
SCOTTY ProMax User's Manual
By clicking the Focus toolbar button a group of focus functions can be
displayed. Selecting the button again brings the first group of camera functions
back.
Local focus near sets
Local focus far
the focus of the local camera to closer objects.
sets the focus of the local camera to more distant
objects.
Local auto focus activates the automatic focus of the local
Next displays
camera.
the next group of buttons in the toolbar.
The Local/Far end camera button switches between the local and far
end camera toolbar. If this button is not checked, the local camera toolbar is
displayed.
Clicking the Next button will display controls for saving and recalling up to
seven local camera positions.
If one of the Local
preset buttons is activated, that particular saved position is recalled.
If Save position is clicked, followed by one of the Local preset buttons,
the current local camera position is saved as the preset.
All rights reserved.
63
SCOTTY ProMax User's Manual
6.4.4 Far End Camera Ctrl, Controlling the Far End Camera
The Far End Camera Control toolbar
Pressing a Far end camera button selects the corresponding far end
camera or video input. The chosen far end camera can now be controlled.
When the mouse cursor is moved onto a Far end camera button, the name of
the camera appears.
If the remote site of the videoconference selects a far end camera, the SCOTTY system
switches the transmitted video to the corresponding video input in the Video Switch Matrix,
so that the far end can see and control the selected far end camera. The corresponding
preset in the standard toolbar gets unselected to display the change. Selecting the preset
again will reload the old settings.
SCOTTY systems support a "Video Source Switched" message. If both videoconference
systems support this standard switching the transmitted video locally, will update the far end
camera at the remote site.
Pressing the Far End Camera Control button during an ongoing
videoconference activates the Far End Camera toolbar at both sites and opens a
low-bandwidth data channel for camera control. To end far end camera control
on both sites and close the data channel, press the Far End Camera Control
button again. Far end camera control settings can be specified under Options |
Data.
Next displays
the next group of buttons in the toolbar.
The Local/Far End camera button switches between the local and far
end camera toolbar. If this button is checked, the far end camera toolbar is
displayed.
The availability of the functions in the far end camera toolbar depends on the
selected far end camera.
64
All rights reserved.
SCOTTY ProMax User's Manual
Clicking the Next button will display controls for zooming, panning and tilting
of the camera head.
Far end left
pans the far end camera to the left.
Far end right
Far end up
pans the far end camera to the right.
tilts the far end camera upwards.
Far end down
tilts the far end camera downwards.
Far end zoom in
zooms the lens of the far end camera in.
Far end zoom out
zooms the lens of the far end camera out.
Far end focus near
sets the focus of the far end camera to closer
objects.
Far end focus far
sets the focus of the far end camera to relatively
distant objects.
Clicking the Next button will display controls for saving and recalling up to
seven far end camera positions.
If one of the Far end
preset buttons is activated, that particular saved position is recalled.
All preset buttons are always active, even if the far end camera does not support preset
functions.
If Save Position is clicked, followed by one of the Far end preset
buttons, the current far end camera position is saved as the preset.
All rights reserved.
65
SCOTTY ProMax User's Manual
6.4.5 Tone Pad, Playing DTMF Tones
The Tone Pad dialog box for playing DTMF tones
The tone pad allows playing DTMF tones manually while setting up or actually
being in a call. It can be activated through the menu View | Tone Pad.
The keys can be either pressed using the mouse or directly by pressing the key
on the keyboard if the dial pad window is active, and mimic the behavior of a
telephone dial pad.
In idle mode playing DTMF tones is not possible; the keys are inactive and
gray shaded.
66
All rights reserved.
SCOTTY ProMax User's Manual
6.4.6 Audio & Video Controls
The dialog box Audio & Video Controls enables the flexible setting of the audio
and video parameters. The user can decide which video source should be
shown where. Moreover, the corresponding audio preset (defined by the user in
Options | Audio), the location of the picture in picture, and the speaker volume
is set.
It is possible to define three individual presets and save them each with a
different descriptive name. The name is changed by clicking on the name of an
entry with the right mouse button and then entering the new name. Usually the
first setting is reserved for the live camera, the second and third for external
video sources. These presets can be easily called up through the buttons in the
Standard Toolbar. To make the function of a preset immediately apparent, the
name of the preset appears as a "Tool Tip" when the mouse cursor is moved
onto the button.
The Audio & Video Controls dialog box
In Video Select, the independent selection of various video sources through a
video switch matrix can be made. For more details see chapter Video Switch
Matrix.
In Audio Levels a user defined audio preset can be chosen (set under
Options | Audio).
Pic in Pic activates and controls the location of the "picture in picture", a small
window displaying the transmitted video inserted into the received video. This
function is also available under View | Pic in Pic.
adjusts the volume. The setting of the volume is also possible
through the Standard Toolbar.
Speaker Volume
All rights reserved.
67
SCOTTY ProMax User's Manual
When doing a professional videoconference, the control matrix not only enables the easy
manipulation of the video and audio inputs and outputs, it also lets the user define presets
for special situations. A typical example is a videoconference between two large audiences.
In this case it is often required to switch between the internal camera and the internal
microphone and the external camera and the external microphone. By arranging a preset for
every situation, switching to a specific setup is made easy with only one mouse click!
Example: The illustration at the beginning of this section depicts an example of the Controls
function in action. The preset labeled "Cam1" is active. The live video camera is transmitted
to the remote station; the received video signal is displayed on the screen and outputted on
the video output. Furthermore, because the "picture in picture" function is enabled, the video
being transmitted to the remote station is inserted in the upper left of the "Receive" video.
The Audio Levels of the preset "Default" are set.
The presets are only "permanently" saved when they are saved manually with Options | Save
or when the Save on Exit setting under Options | Preferences is activated. Otherwise the modifications are lost upon ending Teleporter.
6.4.7 Video Switch Matrix
The section Video Select in the Audio & Video Controls window enables the
independent selection of the following video sources:
• video received from the remote system (Receive),
• one of the video inputs (Cam1, Cam2, Input 3, Input 4),
• Video transmitted to the remote system (Transmit).
These signals can be either:
• transmitted to the remote system (Transmit),
• displayed on the screen (Screen),
• Outputted to the video outputs (Output).
Which combinations are possible depends on the hardware configuration of
your system.
If Transmit is selected as a source then the video shown locally on the screen or video
output is always the same as the video signal the remote station receives.
If a video source is configured as SDI (optional), selecting this source will use the digital
HD-SDI input of the system. See chapter The Configuration Utility on configuration details.
68
All rights reserved.
SCOTTY ProMax User's Manual
6.4.8 Pic In Pic, Setting the Picture in Picture view
In the Pic in Pic menu settings for the "picture in picture", a small window
displaying the transmitted video inserted into the received video can be
activated.
The entries Disabled, Upper Left, Upper Right, Lower Left and Lower Right
correspond to the Pic in Pic settings under View | Controls.
6.4.9 Toolbars, Manipulating the Toolbars
The menu View | Toolbars is used to manipulate the toolbars.
Use Big Icons displays
the toolbars with enlarged buttons.
reshapes the toolbars vertically. If this control box is
activated, the buttons are enlarged, and the Recorder and File-Transfer buttons
disappear.
Vertical Alignment
enables the Standard Toolbar. The available functions are explained
in chapter The Standard Toolbar.
Standard
Audio System switches on the toolbar to control an external audio system (see
chapter Audio).
alters the display of the status bar in the Main Window. The status
bar displays contextual help, the currently running system operation, and other
helpful information.
Status Bar
6.4.10 Received Files, Listing the Received Files
If a file is transferred by the SCOTTY File Transfer function of a remote
station (see chapter File Transfer) the Received Files dialog box is
automatically displayed.
The Received Files dialog box during a transfer
All rights reserved.
69
SCOTTY ProMax User's Manual
The Received Files dialog box displays a list of files already received as well as
the transfer progress of the currently transmitted file. This is also displayed by a
bar.
Clear List
deletes the list (though naturally not the files in the Incoming folder).
starts Windows Explorer. It is then very easily to copy, move, or
open received files.
Explorer…
Close closes
Abort
the dialog box.
cuts off the currently active transfer of a file.
If the system is operating in File Exchange mode (optional) additional
information is displayed to the user by showing the sender of a transmitted file.
See chapter File Exchange Server for details on this.
If the SCOTTY Teleporter software is active but unattended and the Automatic Pickup
feature is activated (see chapter Preferences), the system can connect and receive file
transfers automatically. After disconnection the dialog box Received Files remains visible.
When the system is reattended, this is an indication that a file has been received.
The location of the received files can be defined in Options | Directories. When operating in
File Exchange (optional) mode, the files are stored in subdirectories named by the account
transmitting these files.
6.4.11 Recorded Files, View recorded Files
This function opens the Windows Explorer, showing the Records folder which
holds the recorded videos and snapshots.
6.4.12 Connection Info, Displaying the Connection Status
The Connection Info dialog box
The function View | Connection Info opens the Connection Info dialog box. All
the current network data rates for receive (RX) and transmit (TX), the elapsed
time of the ongoing connection, as well as the present video and audio
standards are displayed here.
The video and audio standards of the running connection can be changed by
clicking first the arrow next to the field and then selecting the desired standard
from the appearing list.
70
All rights reserved.
SCOTTY ProMax User's Manual
The Expanded Connection Info dialog box
Details >> expands
the displayed information.
In the expanded Connection Info dialog box, the currently used network
interface and peripheral information is displayed. In the idle mode it
corresponds to the default interface set under Options | Dialing. During a
connection the video and audio receive (RX) and transmit (TX) status is also
displayed.
Alg Err: shows
the counter of the alignment errors.
Bit Err: displays
the bit error counter.
A pulsing square indicates that the SCOTTY system is functioning properly.
Changing the audio and video standards during an ongoing videoconference is only possible
if the remote station supports this!
All rights reserved.
71
SCOTTY ProMax User's Manual
6.5 The Options Menu
Defining the configuration presets is done through the Options menu. Because
these normally are not often changed, and because incorrect values could
negatively affect the system, this menu can be turned off (see Options |
Preferences, chapter Preferences).
The following menu features are available:
Dialing...
Audio...
Video...
Data...
Directories…
Preferences...
File Exchange…
Save...
Factory Defaults...
Ctrl+D
Ctrl+A
Ctrl+I
Ctrl+T
Ctrl+Q
Ctrl+P
Ctrl+F
The settings under Dialing, Audio, Video and Data are only "permanently" saved when they
are saved manually with Options | Save or when the Save on Exit setting under Options |
Preferences is activated. Otherwise the modifications are lost upon ending Teleporter.
6.5.1 Dialing, Setting the Dialing Parameters
The Dialing Configuration dialog box
In the Dialing Configuration dialog box, the interface and the standard values
for the dialing process can be set.
Default Interface describes the type of network interface used. This is usually
set automatically when the Teleporter software is loaded (by clicking on the
72
All rights reserved.
SCOTTY ProMax User's Manual
appropriate Teleporter icon) unless manually altered. The choice of interfaces
which can be selected is limited by the currently used configuration.
For phone book entries (see chapter Creating or Modifying a Telephone Book
Entry) with the interface set to "Automatic", the selected interface is used
unless substituted by an interface identified by the phone number.
For each interface the standard values for the dialing process can be set in the
Default Values section. These are active when the corresponding interface is
used for dialing, unless overridden by manual entries in the Telephone Book.
These values are individually saved for each interface. All interface-specific settings should
be defined in this dialog so that the Telephone Book entries remain as universal as possible
(interfaces set to "Automatic" and all settings set to "Default"). This ensures that the
Telephone Book entries can be used regardless of the currently used network type (e.g. ISDN
or INMARSAT).
defines if Unrestricted (Nx64) or Restricted (Nx56) should be used as the
standard setting, if supported by the interface. Usually Unrestricted is the
correct choice although in some areas (parts of the USA, for example)
Restricted must be selected.
Mode
Normal rate and
set the standard value of the network data rate for the
corresponding buttons in the Telephone Book.
Low-cost rate
Phone Numbers with "+"-Sign controls how the system translates phone
numbers with a prefixed "+"-sign. If the radio button Use Phone Number
Translator is checked, the settings entered in the section Phone Number
Translator are used. If the radio button Use "00" as Prefix (Satellite-Style
Dialing) is activated, phone numbers beginning with a "+"-sign are
automatically converted into a satellite compatible style by substituting the "+"sign with "00". Note: A "#" is not added and usually not needed. Depending on
the used shortcut, the correct selection is active by default.
The settings in section Phone Number Translator are essential for the automatic
completion of the telephone number. This setting must be reentered when
changing the system's location.
In the field Country code the country prefix of the system's current location is
entered. For example, 43 in Austria, 49 in Germany and 1 in the USA.
In the field International call, the prefix to call internationally must be entered.
In Europe, usually "00" must be entered here, "011" should be entered in the
USA.
In the field Long-distance call, the prefix to call long distance must be entered.
In Europe, usually "0" must be entered here, "1" should be entered in the USA.
If a prefix is needed to get an outside line, this is entered in the Prefix to get line
field.
All rights reserved.
73
SCOTTY ProMax User's Manual
6.5.2 Audio, Setting the Audio Levels
The Audio Configuration dialog box
The Audio Configuration dialog box enables the setting of the audio levels of
the audio sources and audio outputs. By being able to define three groups of
settings, frequently used configurations can be quickly activated.
A meaningful name can be entered for each of the three presets by clicking on
the name field with the right mouse button (e.g. "Headset" is clicked and the
desired name is inputted). These settings are available under View | Audio &
Video Controls.
In section Input Mixer, the input levels of the acoustic audio sources (e.g.
microphones) can be regulated. Activating Mute disables an input. All enabled
inputs are mixed together and, if the "Mute" button on the main toolbar is not
pressed, transmitted to the remote side during a video conference.
The section Output Mixer controls the base levels of the acoustic audio outputs
(e.g. speakers). Activating Mute disables an output. The master output level
itself is controlled by the "Speaker Volume" in the Audio & Video Controls
window.
The section Auxiliary Levels regulates the auxiliary audio input and output (e.g.
for a VCR). Pressing Mute disables the input or output.
If enabled, the Aux In audio signal is not only transmitted to the remote side
during a videoconference, but also mixed to the audio outputs to be heard by
the local audience.
74
All rights reserved.
SCOTTY ProMax User's Manual
contains the same signal as the audio outputs, plus the audio of the
acoustic audio inputs, so that both the received and the transmitted audio can
be recorded by a device connected to Aux Out.
Aux Out
Mixer Levels In is a level meter for the sum of the acoustic inputs mixed by the
Input Mixer. Mixer Levels Out shows the basic level that is fed into the Output
Mixer. Aux Levels displays level information for the auxiliary input and output.
Echo processing is activated in the section Audio Processing.
Echo cancellation activates the echo canceller which prevents feedback from
the acoustic outputs to the acoustic inputs.
Gain Control
activates the automatic volume adjustment of the acoustic audio
inputs.
The section Soundcard Input is used to enable and disable the Windows sound
from the sound card to the audio outputs. To avoid interference it is
automatically disabled during a videoconference. Note: Aux Level In also shows
the signal level of this input.
Audio Test enabled
Enabling Local Loop
testing the audio equipment without making a call.
mixes the acoustic audio inputs to the audio outputs.
Caution: This will usually generate very loud feedback! When the Audio
Configuration dialog is closed, Local Loop is disabled automatically.
Which inputs and outputs are available depend on the hardware configuration
of your system.
The level meters and the local loop feature greatly simplify audio setup. To level the acoustic
audio sources input by input, simply activate Mute for all other inputs, use the Mixer Level In
meter to check the level and adjust it with the input slider of the input.
If a video source is configured as SDI (optional), the corresponding audio input in the
section Input Mixer can be used to control the embedded audio on the HD-SDI input. The
audio signal will then be activated together with the video signal, i.e. when the digital SDI
input is selected under Transmit in the video switch matrix. See chapter The Configuration
Utility on configuration details.
All rights reserved.
75
SCOTTY ProMax User's Manual
6.5.3 Video, Setting the Video Parameters
The Video Configuration dialog box
The dialog box Video Configuration contains the video parameter settings for
the screen display and for the transmitted video.
The section Transmit Video enables the setting of the brightness, contrast, and
saturation of the transmitted video. Again, if the Default control box is selected,
the standard values are used.
The section Video Overlay is available if supported by the video display.
76
All rights reserved.
SCOTTY ProMax User's Manual
6.5.4 Data, Adjusting the Data Channel Parameters
The Data Configuration dialog box
This dialog box makes the selection of the data channel parameters possible.
Data Sharing
controls the data sharing options.
H.239 Dual Video Channel
enables the activation of the H.239 Dual Video
Channel (optional).
T.120 Netmeeting
Snap & Send
enables the activation of the T.120 data package.
enables the Snap & Send feature.
Preferred: If more then one data sharing option is available
the Share button will switch to the preferred standard.
Far End Camera Control
Enable FECC
at the same time,
controls the Far End Camera Control functions.
enables the Far End Camera Control function.
prevents the remote site from controlling the local
system, but does not prevent controlling the remote system.
Reject local camera control
Snap & Send controls the Snap & Send function. Note:
Transfer allows further settings relevant for Snap & Send.
The section File
When not in a call and using the Snap & Send feature, activating Auto Dial will
automatically dial up a connection using the current phonebook settings.
File Transfer controls
the SCOTTY specific File Transfer function.
Enable File Transfer enables
All rights reserved.
the SCOTTY specific File Transfer function.
77
SCOTTY ProMax User's Manual
In the section Data Rate, the bandwidth of the data channel and thus the
distribution of video, audio and data can be adjusted to optimally fit current
demands. The distribution selected only pertains to the current transfer; after
the completion of the transfer, the original bandwidth distribution (video/audio)
is restored. This setting does not apply to the TCP File Transfer.
sets a very low data channel bandwidth (5% of call rate in H.323 calls, 6.4
kbit/s in H.320 calls). In this case the videoconference is hardly affected,
although the data transfer is correspondingly slower.
Low
establishes a moderate data transfer speed, audio and video remain
active. In H.323 calls the data rate is limited to 20% of the video rate. In H.320
calls the audio quality is set to G.728, 24 kbit/s are used as data bandwidth,
reducing the bandwidth available for video transmission.
Medium
If High is selected, audio remains active. In H.323 calls, video transmission is
disabled and the bandwidth reserved for video is used for the File Transfer. On
H.320 calls, the audio is set to G.728 and a data rate of 40 kbit/s is used; on 64
kbit/s calls, video is deactivated.
Max uses full bandwidth for the data transfer. The audio is turned off and the
video freezes during transfer.
Preferred IP Mode:
Selects the preferred data protocol for H.323 calls.
utilizes the SCOTTY UDP/IP protocol designed for high
efficiency and throughput over IP networks with long delay and high packet
loss. This setting greatly enhances the data throughput over satellite links.
UDP (Sat optimized)
uses TCP/IP technique and is optimal for low-delay and highly reliable
networks such as terrestrial IP networks.
TCP
If the checkbox Use data compression is selected, all files get compressed for
transmission if possible and decompressed by the SCOTTY system on remote
site automatically. By selecting Overwrite without query existing files in the
incoming-directory of the partner station with the same filename get
overwritten without confirmation by the user. Reject incoming files prevents
files from a remote station to be received. Enable File Exchange Server enables
the optional File Exchange Server (see chapter File Exchange Server for
details). When enabling Log activities to journal file, every activity of the file
transfer (no matter if successful or not) is logged to a journal file.
When receiving snapshot files via File Transfer, the image files are opened
automatically with the associated Windows program if Auto Show incoming
Images is activated.
The journal file can be viewed by clicking on the button View… and it can be
emptied by clicking on the button Clear…
78
All rights reserved.
SCOTTY ProMax User's Manual
6.5.5 Directories, Setting the SCOTTY Directory Structure
The Directories dialog box
With this dialog box the directory structure used by the SCOTTY Teleporter
can be controlled.
Phone Book defines the location of the phone book. By activating Make
Phonebook "read only", the phone book cannot be modified by the user.
If Use Phone Book as default path is activated, the folders used for the file
transfer utility, the optional Recorder or the optional SCOTTY File Exchange
Server are located in the same directory than specified for the phone book.
Otherwise the user can manually specify which directories should be used for
incoming and outgoing files and where recorded files shall be stored.
Save closes
Cancel
the dialog box and saves the current settings.
closes the dialog box without saving the settings.
The Telephone Book is saved in a text-file. Therefore, it can be edited with an external text
editor; copying a different system's Telephone Book into the system is possible.
All rights reserved.
79
SCOTTY ProMax User's Manual
6.5.6 Preferences, Setting the System Parameters
The Preferences dialog box
This dialog box enables the user to manipulate some general settings as well as
to set the system's reaction to an incoming call.
prevents the windows of other applications to cover the
SCOTTY Teleporter windows.
Always on top
removes the menu option Options from the menu bar
(though its corresponding shortcuts remain active). This can prevent
unintentional changes in these settings. Through the shortcut Ctrl+P the
Preferences dialog box can be displayed and used to re-enable Options.
Hide options menu
The section Save on Exit controls which settings should be saved when ending
the Teleporter.
If Current Settings is activated, the current audio, video, dialing and data
settings and presets are saved. These are reloaded at each start of SCOTTY
Teleporter.
If Window and toolbar positions is activated, the most recent window and toolbar positions are saved.
In the section Incoming Call, the system's reaction to an incoming call is set.
defines the behavior when no user input follows an incoming
call. When the system receives a call, a dialog box is displayed enabling the
user to take or reject the call. If there is no input and Automatic Pickup is
activated, the call is automatically taken.
Automatic pickup
selects if the system’s screensaver is disabled or enabled during a
video conference.
Screensaver
Save saves
Cancel
80
the chosen settings immediately.
cancels the changes and closes the dialog box.
All rights reserved.
SCOTTY ProMax User's Manual
6.5.7 File Exchange Server (optional)
The File Exchange dialog box allows the configuration of the File Exchange
Server feature. It is available only if this option is installed in the system.
The File Exchange dialog box
indicates which accounts are available on the local system.
An account can be used by a remote system to download prepared files, or, if
File Exchange is configured on both sides, for bi-directional file exchange.
Installed Accounts
With Add… a new remote user account can be added to the system. The
Account Settings dialog box opens where Username and Password can be
specified. A remote system needs these settings to be able to log on to the
account. For file exchange, Username is also used to find the phone book entry
to connect to the remote system.
Edit…
allows editing the selected user account.
Use Delete... to remove the chosen account from the system. If empty, the
account’s incoming and transfer folders are also deleted.
specifies the system’s username. During a file exchange, this entry,
in conjunction with the password set in the account for the remote system, is
used to log on.
Username
Save closes
Cancel
the dialog box and saves the current settings immediately.
closes the dialog box without saving the settings.
For details, see next chapter.
All rights reserved.
81
SCOTTY ProMax User's Manual
6.5.8 File Exchange Server, Setup and Operation
The SCOTTY File Exchange feature (optional) greatly enhances the existing
SCOTTY File Transfer. It is not only possible to actively send files to a target
system, but files prepared at a remote system can be retrieved from there by
clients. The SCOTTY File Exchange combines receiving and transmitting and
therefore provides full data exchange between two systems.
The SCOTTY File Exchange Server can be used in two different scenarios:
• Download only: In this mode clients can download files from the File
Exchange Server. For this mode only the server needs to be equipped with
the File Exchange Server option, the clients need not have to have this
option.
• File Exchange: In this mode each station features the File Exchange Server
option. Files are transferred bi-directional between a central server and the
individual clients, or even between any two stations. In this mode the
exchange process can be initiated either by the server or the client.
These two different scenarios do not exclude each other but only define different ways of
operation. Set up of networks operating both scenarios together is easily possible.
6.5.8.1 Download Only Mode
In this operation mode multiple clients can download files from a File
Exchange Server. For each client an individual outbox is available on the
server where the files for the download are prepared. Also, for each client a
different password can be used to protect the prepared files from unauthorized
download.
The server needs to be configured as following:
• For each client add an account with Options | File Exchange. Username and
password can be chosen freely for each client.
• Check if File Exchange Server is activated in Options | Data.
• For unattended server operation, check if Automatic pickup is enabled in
Options | Preferences. To monitor download activities on the server while
not attended, Log activities to journal file in Options | Data can be enabled.
82
All rights reserved.
SCOTTY ProMax User's Manual
After configuration, files can be prepared on the server for downloading:
• Open the File Transfer dialog by clicking on the File Transfer button.
• Choose which files should be prepared for any particular client by selecting
the client’s name from the Outbox for list.
• Use the Add…, Clear and Clear All buttons to modify the list of files that
shall be transferred to the client.
• Repeat above steps to prepare files for different clients.
A client can connect to the server at any time and download the files prepared:
• Open the File Transfer dialog by clicking on the File Transfer button.
• Click on the Download button.
• Enter Username and Password. These entries must match the settings for
this client’s account on the server.
• The Dial dialog opens. Connect to the server using the server’s phone
number and desired connection speed.
• Files prepared on the server are transferred to the client. The Received Files
dialog opens and shows the progress of the transfer.
• On the server, each file is removed from the client’s outbox after
successful transfer and will therefore not be transferred again during a
following download session.
• After all prepared files for this client have been transferred; the client
automatically disconnects the call.
6.5.8.2 File Exchange Mode
In this operation mode multiple systems exchange data amongst each other.
Each station can be configured with a number of accounts representing remote
stations paired to this station. Which station is paired with which other is just a
matter of needs; in a pure server-client scenario for example, a central server is
paired with each client, but no client is paired with another client. For each pair
of systems a different password can be used to protect the files from
unauthorized access.
When two stations are paired, outbox and inbox with the name of the other
station are created on each system. When a file exchange takes place, files
provided to outboxes on each side are transferred to the corresponding inboxes
at the other side.
All rights reserved.
83
SCOTTY ProMax User's Manual
The stations need to be configured as following:
• Each station must have a unique name, which must be set in Options | File
Exchange, field Username.
• For pairing two systems, add an account on both sides with Options | File
Exchange. Set Username to the unique name of the remote side. Use the
same Password on both sides to protect the connection.
• Repeat above step for each exchange connection to be configured.
• A phone book entry can be created to simplify dial-up to a paired system.
Open the phone book with File | Dial and add a New Entry. Set Name to the
unique name of the remote system.
• Check if File Exchange Server is activated in Options | Data.
• For unattended server operation, check if Automatic pickup is enabled in
Options | Preferences. To monitor exchange activities on the system while
not attended, Log activities to journal file in Options | Data can be enabled.
After configuration, files can be prepared on a station to be sent to a paired
system:
• Open the File Transfer dialog by clicking on the File Transfer button.
• Choose for which other station files should be prepared by selecting the
station’s name from the Outbox for list.
• Use the Add…, Clear and Clear All buttons to modify the list of files.
• Repeat above steps to prepare files for different stations.
A station can connect to a paired station at any time and exchange prepared
files amongst each other:
• Open the File Transfer dialog by clicking on the File Transfer button.
• Select the station you want to connect to in the Combo Box Outbox for.
• Additional files can be added to this outbox if desired. The outbox can stay
empty if files should be downloaded only.
• Click on the Exchange button.
• The system suggests the phone number to connect to the remote system if
found in the phone book. Press Dial or Low Cost to start connecting, or
choose Phone Book to use a different phone number or connection speed.
• Files prepared on this station are transmitted. At the same time files
prepared on the other station are received. The Received Files dialog opens
and shows the progress of this transfer.
• Each file is removed from the corresponding outbox after successful
transfer and will therefore not be transferred again during a following
exchange session.
• After all prepared files have been exchanged the call is automatically
disconnected.
84
All rights reserved.
SCOTTY ProMax User's Manual
6.5.9 Save, Saving the Current Settings
The Save dialog box
This dialog box makes it possible to save the Teleporter settings manually.
The Save window is only available in the idle mode. During videoconferencing or recording,
the dialog can not be opened.
When saving application settings, change- or write-protected systems (optional) may require
additional steps to keep saved settings permanently. See chapter System Configuration for
details.
System recovery procedures will reset all user defined settings. See chapter System Recovery
for details.
Alternately, in Options | Preferences the system can be set to automatically
save the configurations when ending the program.
By clicking Controls and options settings, the current audio, video, dialing and
data settings and presets can be saved. These settings are recalled at every
restart of the SCOTTY Teleport software.
enables the window and toolbar positions to be
saved for all modes (see info below). These settings are also recalled at every
restart of the SCOTTY Teleporter software.
Window and toolbar positions
If the checkbox Audio and video settings as power-up defaults is selected, the
current audio settings are saved as power-up defaults. So, after powering up of
the system, Windows applications which support audio will use these settings.
Cancel
OK
closes the dialog box without saving the settings.
closes the dialog box and saves the current settings.
SCOTTY Teleporter has a unique setting management system feature to make videocommunication easier for the user. SCOTTY systems distinguish between four different
operational modes: Standby, Videoconference, Dataconference and Recorder. For each of
these modes, the size and position of the Video windows is saved separately.
All rights reserved.
85
SCOTTY ProMax User's Manual
6.5.10 Factory Defaults, Restoring the Factory Defaults
The Restore Factory Defaults dialog box
This function opens the dialog box to restore the factory defaults. The user's
settings under View | Audio & Video Controls, all settings under the Options
menu, and the window and toolbar positions are restored to the original factory
values.
The Restore Factory Defaults window is only available in the idle mode. During
videoconferencing or recording, the dialog can not be opened.
Restore Factory Defaults permanently overwrites all current settings! Especially the settings
in the dialog box Options | Dialing under "Number Prefix" should be checked afterwards.
When restoring application settings, change- or write-protected systems (optional) may
require additional steps to keep these settings permanently. See chapter System
Configuration for details.
6.6 The Help Menu
The following menu options are available:
Help Topics
Context Help
About Teleporter
F1
Shift+F1
Ctrl+F1
6.6.1 Help Topics, the SCOTTY Help System
The SCOTTY on-line help is opened through this menu option.
6.6.2 Context Help, the Topical Help
The contextual help feature is started through this function. When this menu
option is clicked, the mouse arrow transforms into a question mark ("?") and it
is then possible to click on an element (i.e. menu option, button, dialog box) to
display information on that element.
86
All rights reserved.
SCOTTY ProMax User's Manual
A click on the question mark at the top right corner of a window or dialog box
will display help information on the available features. Pressing F1 also opens
the help function.
6.6.3 About Teleporter, Displaying the SCOTTY Configuration
The About Teleport dialog box
The system's version number and a list of installed components are displayed in
this menu option. If the Report button is pressed, a text file with a more
detailed installation listing is opened. This information is important when
technical support from SCOTTY is necessary.
All rights reserved.
87
SCOTTY ProMax User's Manual
6.7 Shortcuts
In order to simplify the operation of the system, various "Shortcuts" are
available. Frequently used functions can be activated directly through the use of
certain key combinations instead of using the menus.
Key
F1
Ctrl+F1
Function
display help
information on Teleporter
F2
dial
Shift+F2
hang up
F3
start Record and Play mode (optional)
F4
start File Transfer
F5
start Data Package
Shift+F5
start Far End Camera Control
Alt+F5
start Data Package H.239
Ctrl+Alt+ start Data Package T.120
F5
Ctrl+F6 start Data Package Snap & Send
F6
take snapshot
F7
decrease Volume
F8
increase Volume
F9
mute Transmit Audio
F10
end Teleporter
F11
dialog boxes in foreground, video in
background
Video Window in foreground, dialog
boxes in background
F12
88
Menu
Help
Help |
About Teleport
File |
Dial
File |
Disconnect
File |
Recorder
File |
File Transfer
File |
Share
File |
Far End Cam Ctrl
File |
Share (H.239)
File |
Share (T.120)
File |
Share (Snap & Send)
File |
Snapshot
View |
Audio & Video Controls
View |
Audio & Video Controls
View |
Audio & Video Controls
File |
Exit
All rights reserved.
SCOTTY ProMax User's Manual
Key
Ctrl+A
Function
Menu
Options
|
open dialog box for audio configuration
Ctrl+B
open tone pad dialog box
Ctrl+D
open dial dialog box
Ctrl+F
Ctrl+I
open dialog box for file exchange server
(optional)
open dialog box for video configuration Options |
Ctrl+M
active camera toolbar
Ctrl+O
open dialog box for audio / video
settings
open dialog box for presets
Ctrl+P
Ctrl+Q
Ctrl+R
open dialog box for setting directory
structure
Received Files
Ctrl+Y
Recorded Files
Ctrl+S
display the connection status dialog box
Ctrl+T
Ctrl+W
open dialog box for data channel
settings
show video window
Ctrl+1
select Control Preset 1
Ctrl+2
select Control Preset 2
Ctrl+3
select Control Preset 3
Audio
View |
Tone pad
File |
Dial
Options |
File Exchange Server
Video
View |
Camera Control
View |
Audio & Video Controls
Options |
Preferences
Options |
Directories
View |
Received Files
View |
Recorded Files
View |
Connection Info
Options |
Data
View |
Video Window
View |
Audio & Video Controls
View |
Audio & Video Controls
View |
Audio & Video Controls
While the Telephone Book is displayed, the following Shortcuts are available:
Keys
Function
Button
Dial
Enter
dial
Low Cost
Shift+Enter
low cost dial
Voice Only
Ctrl+Enter
dial voice only
New Entry
Insert
insert new entry
Move Up
Shift+Up
move entry upwards in the
column
Move Down
Shift+Down
move entry downwards in the
column
All rights reserved.
89
SCOTTY ProMax User's Manual
7 System Recover
SCOTTY systems are optionally featuring an integrated system recovery,
allowing recovering the system to delivery state. If application files are
accidentally destroyed or the operating system is malfunctioning, the system
can be put into a working state again by restoring the delivery state. Note:
System recover is not needed for write-protected systems (security option).
SCOTTY systems are using up to three hard-disk partitions. The system
partition C: contains the operating system and installed applications. The data
partition D:, if available, is used to save data, videos and the phonebook. An
additional hidden recovery partition is used by the SCOTTY System Recover
mechanism. Restoring the systems delivery state can be done directly on device
without any additional tools or media, even if the Windows operating system
cannot be started anymore. If on-disk system recovery is not possible, due to a
destroyed recovery partition or hard-disk, the system can be also restored using
external recovery media (USB-sticks or DVD’s).
In summary SCOTTY system recover has the following features:
All rights reserved.
•
Access control for all recovery functions using passwords.
•
On-disk system recover without additional recovery media.
•
System recover from bootable recovery media.
•
Creation of new recovery media.
•
Creation of a user defined hard disk image, a so-called “admin image”.
Apart from the delivery state, an arbitrary system state can be saved and
restored at any time.
•
Creation of full system backups to external media. An arbitrary system
state, including the data partition, can be stored onto external media and
restored at any time using the recovery software.
•
Displaying of additional system information.
91
SCOTTY ProMax User's Manual
7.1 Restoring the System
• Reboot the computer.
• The boot manager screen is displayed for several seconds during the startup.
Boot manager
• Choose Recover V3 using the Arrow-down Key and press Return.
• After recovery software has started use password “restore“ to proceed.
• The main menu of the recovery software is displayed. Depending on the
system configuration some menu items might not be available.
Recovery software: Main menu
92
All rights reserved.
SCOTTY ProMax User's Manual
The recovery software can be left with Exit.
The menu item Display system information can be used to display information about the
hardware and software configuration of the stored delivery state.
Choose one of the following functions:
• Restore C: with factory Image:
The system partition C: will be restored to delivery state.
• Restore C: and D: with factory Image:
The system partition C: and the data partition D: will be restored to delivery
state.
• Restore C: with admin Image:
Only available if an admin image exists: The system partition C: will be
restored to the user defined state.
• Restore C: with admin image, D: with factory Image:
Only available if an admin image exists: The system partition C: will be
restored to the user defined state and the data partition D: will be restored to
delivery state.
• Confirm the upcoming warning with Yes.
• Reboot computer after restoring.
Warning: When restoring a partition C: or D: to delivery state all data stored on the
particular partition after delivery will be lost.
All rights reserved.
93
SCOTTY ProMax User's Manual
7.2 Restoring the System using Recovery Media
Restoring the system from a recovery media is only necessary if the recover
partition is destroyed or not available.
• Use only a recover media with the correct system serial number.
• Plug in the recovery USB stick or insert the first recovery DVD.
• Reboot the computer.
Booting from USB sticks is disabled at delivery state. When using a recovery USB stick, or if
booting from DVD has been deactivated, follow the instructions below (instructions may
vary depending on BIOS version):
If a BIOS boot menu is available: Press F10 or F11 to enter the boot menu, depending on
the system, and then choose the recover media from the list.
If there is no BIOS boot menu, enter BIOS setup by pressing DEL or F2 at the beginning of
the boot process. Select Boot Options, Boot Sequence and put USB-Media
respectively CD-ROM on top of the list. Save this setting and exit BIOS. After system
recovery the boot sequence can be reset to the previous state.
• The computer is now booting from the recover media.
• The main menu of the recover media recovery software is displayed.
Recover media recovery software: Main menu
The recovery software can be left with Exit.
The menu item Display system information can be used to display information about the
hardware and software configuration of the stored delivery state.
94
All rights reserved.
SCOTTY ProMax User's Manual
Choose one of the following functions:
• Restore whole HDD with factory images:
The whole hard disk will be reset to delivery state.
• Restore C: with factory Image:
The system partition C: will be restored to delivery state. This function
should be used only if the remaining partitions are functional.
• Confirm the upcoming warning with Yes.
• Reboot computer after restoring.
• If asked for, insert additional recovery DVD’s.
Warning: When restoring the whole hard disk to delivery state all data stored after
delivery onto C: or D: as well as an optional admin image are lost!
All rights reserved.
95
SCOTTY ProMax User's Manual
7.3 Creation of a User defined Hard Disk Image
As SCOTTY offers the possibility to create a user defined image of the system
partition, am arbitrary system state can be saved and restored at any time. This
user defined image, a so-called “admin image”, is saved onto the hidden
recovery partition together with the factory image containing the delivery state.
Thus, the restoration of the delivery state remains possible, even after creation
of an admin image.
An admin image can be created after a possible change of the systems state or
after installation of additional software. The saved system state can then be
restored at any time without additional tools. Without an admin image, only the
systems delivery state not containing any custom changes can be restored.
Creation of a user defined hard disk image:
• Reboot the computer.
• The boot manager screen is displayed for several seconds during the startup
(see figure: Boot manager).
• Choose Recover V3 using the Arrow-down Key and press Return.
• After recovery software has started use password “restore“ to proceed.
• The main menu of the recovery software is displayed (see figure Recovery
software: Main menu).
• Choose Create admin image.
• Enter password for creating an admin image and press the button Create.
• After creation of the admin image the system returns to the main menu.
To restore a user defined hard disk image please follow the instructions in
chapter Restoring the system.
When creating a new recovery media, a present admin image is automatically copied to the
recovery media. When restoring the full hard disk from this recovery media, the admin image
is copied back to the hard disk and is available from the recovery software’s main menu.
96
All rights reserved.
SCOTTY ProMax User's Manual
7.4 Creation of New Recovery Media
A new recovery media can be created at any time using the SCOTTY recovery
software. This is useful, if the original recovery media is lost or an admin
image was created and an updated recover media should be created.
Creation of new recovery media:
• Reboot the computer.
• The boot manager screen is displayed for several seconds during the startup
(see figure: Boot manager).
• Choose Recover V3 using the Arrow-down Key and press Return.
• After recovery software has started use password “restore“ to proceed.
• The main menu of the recovery software is displayed (see figure Recovery
software: Main menu).
• If an USB recovery stick should be created, connect the stick to the system.
Warning: When creating an USB recovery stick, the previous content of the stick will be
deleted! The stick must have adequate memory capacity.
• Choose Create recover media and select one of available USB media or the
DVD drive.
• Press button Create media.
• Follow the instructions on the screen and insert further writeable DVD disks
if asked for.
All rights reserved.
97
SCOTTY ProMax User's Manual
Recovery software: Create Recover Media
7.5 Full System Backups
A “full system backup” contains the current state of the entire system including
all data of the data partition. A system backup can be stored to an external
memory device and can be restored at any time using the recovery software.
As system backups are stored with user defined file names, any number of
different system backups are possible on a single external memory device. To
create backups in regular intervals a USB hard disk with sufficient capacity is
recommended.
Creation of full system backups:
• Reboot the computer.
• The boot manager screen is displayed for several seconds during the startup
(see figure: Boot manager).
• Choose Recover V3 using the Arrow-down Key and press Return.
• After recovery software has started use password “restore“ to proceed.
• The main menu of the recovery software is displayed (see figure Recovery
software: Main menu).
• Choose Create backup.
98
All rights reserved.
SCOTTY ProMax User's Manual
• Choose the path to the external memory device to store the system backup
by pressing the Browse button. A custom file name can be specified, if no
file name is provided the systems serial number will be used.
• Press button Create backup.
• After creation of the system backup the system returns to the main menu.
When creating a „backup“, an image of the entire hard disk is created. Thus, a backup also
contains the image of the delivery state as well as an optional user defined admin image.
Restoring a full system backup:
• Enter the main menu of the recovery software as described earlier.
• Choose item Restore backup.
• Select a stored system backup from an external memory device by pressing
the Browse button. Only select system backups which have been created on
this system!
• Press button Restore backup.
• After restoration of the system backup reboot the system.
To restore the system from a system backup, the system must have operational SCOTTY
recovery software. In case of a hard disk failure or change, restore delivery state from a
bootable recovery media first.
All rights reserved.
99
SCOTTY ProMax User's Manual
8 Maintenance
8.1 Maintenance
Under normal operation, the system requires no regular maintenance; only the
internal battery needs a regular replacement.
8.2 Internal Battery Replacement
The system uses an internal battery for the real time clock. In event of loss of
battery power, the unit will remain functional with the exception of the real
time clock. This will result in a wrong date and time stamp on each created or
modified file.
Battery replacement is recommended after 24 months.
For battery replacement, return the system to SCOTTY.
8.3 Fan filter pad replacement
For SCOTTY systems containing a case fan, the fan filter pad must be
replaced. Life cycle time of the filter pad may vary depending on the operating
environment.
A replacement of the fan filter pad not later than 24 month is recommended.
A proper filter pad can be ordered at SCOTTY.
All rights reserved.
101
SCOTTY ProMax User's Manual
9 Appendix
9.1 Application Notes
Because SCOTTY network interfaces have been designed to be very universal,
it is possible to connect the SCOTTY Video-Communication systems directly
to many network configurations and support various applications.
Depending or your specific setup, the following pages may include detailed
information for communication networks, specific applications, customized
usage, and more.
All rights reserved.
103