1
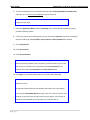
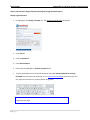
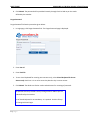
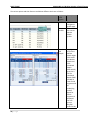
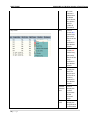
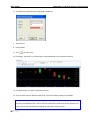
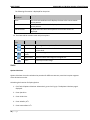
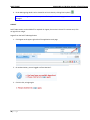
SWIFT TRADE SAVASHARE An E‐Broking Initiative of Sushil Finance SWIFT TRADE – Software User’s MANUAL How do I get Login thru Swift trade‐ Web Version? LOGIN To start, connect the Web through a dial‐up connection or through a dedicated line. Open the Microsoft Internet Explorer 6.0/7.0or above. In the browser, enter the URL www.savashare.in Î Click on Equity Login and press Enter. This topic provides reference about: •
System Requirements •
Login Swift Trade System •
Forgot Password •
Trouble in Logging the Application System Requirements 1. Windows 98 and above 2. Internet Explorer 6.0/7.0 or above. 3. 256/ 512 MB RAM 4. In Internet Explorer enable Tools à Internet Options à Security à Custom Level à enable ActiveX controls and plug‐ins 5. For pop‐up problems enable in Tools menu à select Popup Blocker Login Swift Trade 1. Invoke the browser (Internet Explorer 6.0/7.0 or above). 2. In the browser, enter the URL https://itrading.sushilfinance.com 3. Press Enter. The Swift Trade Login page is displayed. 4. In Login page, Enter User Id. 5. Enter Password. 1 | P a g e SWIFT TRADE SAVASHARE An E‐Broking Initiative of Sushil Finance 6. To enter password by means of Virtual Keyboard, select Virtual Keyboard for Password only check box. It is an online screen keyboard to key in password. Use of Virtual Keyboard is not mandatory. It is optional. Position of keys will change with each login. 7. Select the Application Mode as Lite or Streaming. Lite is refresh based, whereas streaming provides streaming quotes. 8. If you are trying to connect behind proxy server, then select Use Proxy check box. Accordingly the other fields such as Proxy IP/Port, Proxy UserId and Proxy Password are enabled. 9. Enter Proxy IP/Port. 10. Enter Proxy UserId. 11. Enter Proxy Password. If you check the Remember Proxy check box, Proxy IP/Port and Proxy UserId details are securely saved on your computer so you don't have to type it each time you log on. You will have to remember your Proxy Password as the computer only saves the Proxy IP/Port and Proxy UserId details. 12. Click Login. On successful authentication, the Swift Trade is displayed. For security reasons, three consecutive unsuccessful attempts lock the respective User Id. The password needs minimum one alphabet and at least one numeric digit. If you check the Remember My ID check box, User ID is securely saved on your computer so you don't have to type it each time you log on. You will have to remember your password as the computer only saves the User ID. 2 | P a g e SWIFT TRADE SAVASHARE An E‐Broking Initiative of Sushil Finance Swift Trade facilitates change of password using the Change Password option. Change Logon Password 1. In Login page, click Change Password link. The Change Password page is displayed. 2. Enter User Id. 3. Enter old Password. 4. Enter New Password. 5. Enter new password again in Confirm Password field. 7. To enter password by means of Virtual Keyboard, select Use Virtual Keyboard for Entering Password (check box only for password). It is an online screen keyboard wherein the user can click required characters on virtual keyboard using mouse. Use of Virtual Keyboard is not mandatory. It is optional. Position of keys will change with each login. 3 | P a g e SWIFT TRADE SAVASHARE An E‐Broking Initiative of Sushil Finance 8. Click Submit. The password will be provided instantly through Email or SMS as per the mode defined by the member. Forgot Password Forgot Password? Follow the procedure given below: 1. In Login page, click Forgot Password link. The Forgot Password page is displayed. 2. Enter User Id. 3. Enter Email ID. 4. To use virtual keyboard for entering secret answer only, select Virtual Keyboard for Secret Answer only check box. It is an online screen keyboard to key in secret answer. 5. Click Submit. The details are further send to administrator for resetting of password. The password will be provided instantly through Email or SMS as per the mode defined by the member. Use of Virtual Keyboard is not mandatory. It is optional. Position of keys will change with each login. 4 | P a g e SWIFT TRADE SAVASHARE An E‐Broking Initiative of Sushil Finance Trouble in Logging the Application If you have trouble in logging the application, click on the Login FAQ link. The Login FAQ page is displayed. Follow the steps given in the page to remove the bugs in order to access the Swift Trade application. Still if the problem persists, contact administrator. WORK ENVIRONMNET This topic covers the following major elements of the Swift Trade application main page. On successful login the application main page is displayed. The Market Watch and Order Entry pane forms the part of the default page. •
Index View •
Quote •
Member Id •
Client Id •
Logout •
Exchange Status •
Tool Bar •
Menu Bar •
Profile •
Ticker •
Market Watch •
Order Entry •
Messages Index View The Index View appears on upper‐right side of the page displaying the real time online information for NSE index and BSE index namely Nifty and Sensex. The index value is shown by the change in direction of arrow. The direction of the arrow change to up with Green color when the index value increases and direction of the arrow change to down with RED color when the index value decreases. This is displayed when you login to the application. 5 | P a g e SWIFT TRADE SAVASHARE An E‐Broking Initiative of Sushil Finance Quote Quote provides financial Market Information on NSE, BSE, MCXSX, segments. Enter a stock symbol to search for current quotes and info. Member Id User Id of the logged user. Client Id Client Id of the logged user. Exchange Status Displays current market status Tool Bar Tool Bar provides quick access to commonly used functions Tool Bar Icon Name Chart Description Click to invoke Chart page. Scrip Info Click to invoke Scrip Information page. Market Movement Click to invoke Market Movement page. Best Five Click to invoke Best Five page. Buy Click to invoke Buy Order Entry pane. Sell Click to invoke Sell Order Entry pane. Menu Bar The menu bar is displayed at the top of the Swift Trade application main page. The menus are provided in the form of tabs on the menu bar. For example, clicking on the Trading menu, the corresponding commands (such as Market Watch, Order Book, Order Entry, Trade Book, Net Position, Stock View, Funds View, Ex Book, Ex History, Limits Set, Ex Entry) are displayed in the form of links. By clicking on the link, the corresponding page is displayed. Click Trading à Funds View. The Funds View page is displayed. 6 | P a g e SWIFT TRADE SAVASHARE An E‐Broking Initiative of Sushil Finance Profile The Profiles created are available in the form of tabs at the lower portion of the application main page. At a time maximum of Five profiles can be displayed in application main page. User can create more than five profiles. Ticker The Ticker is used to view the online market information of the securities for a particular portfolio for the equity, derivatives and commodities segment. The selected profile information is made available using distinct color code for immediate understanding. Blue indicates price increase, Red indicates the decrease in price value, and no color is a constant price. Press Shift + F4 to view Ticker. Market Watch The Market Watch pane is displayed below the menu bar. The Market Watch pane is used to view the real time online market details for a particular defined portfolio. Order Entry The Order Entry pane is displayed below the Market Watch. The Order Entry pane is used to submit the orders. Messages The Messages such as system‐related and exchange messages (order confirmations, trade details and so on) are displayed at the bottom row of the application page. The other messages such as Broker Messages, Order Messages, and Exchange Messages view are provided in the form of tabs at the bottom of the application page. Trading Market Watch Market Information for the securities is updated on‐line. Market Watch is displayed as a part of the main Swift Trade page. It facilitates viewing the detailed market information of scrips in the Equities, F&O, market segments. The Market Watch displays and reflects the most recent price updates occurring in the market on real‐
time basis. Further, it enables displaying a predefined profile by default and browse required market details. A customized column template can be saved for future use and can be applied to different profiles. On applying a profile, the placing of orders is also supported from within the Market Watch pane. 7 | P a g e SWIFT TRADE SAVASHARE An E‐Broking Initiative of Sushil Finance User can configure scrips and get quotes for multiple market segments in the same market watch. Since this is configurable almost unlimited profiles of scrips of different market segments can be created. Profiles can be selected through single click using tab based option. By default, maximum of five profiles are displayed in the application page. This topic provides reference about: •
View Market Details •
Place Orders from within the Market Watch •
Right Click Option in Market Watch Features •
Display of real‐time market details within a self‐adjusting grid •
Selection of different profiles at a single‐click •
Customizable Profile in real‐time •
Place Buy and Sell orders at market price •
Customizable display of market information •
One‐click selection of the entire (scrip) row •
Arrange the column contents in ascending or descending order •
Create five profiles of scrips of different market segments •
Scrips can be configured through Market Watch View Market details On successful log on to Swift Trade, the main page is displayed along with the Market Watch details. Alternatively, Click Trading à Market Watch menu or press F7 key will display Market Watch. By default, the following market information is available on real‐time basis: Exchange Symbol Series Expiry Date Strike Price Option Type Instrument Remove Trend Buy Quantity Buy Pro Net Change (Rs.) Sell Quantity Last Updated Time Sell Pro Open Pro Last Traded Time Close Pro High Pro Low Pro Volume Last Traded Price Total Buy Quantity Total Sell Quantity 8 | P a g e SWIFT TRADE SAVASHARE An E‐Broking Initiative of Sushil Finance Open Interest Last Traded Quantity % Change Action If the market watch pane is empty, the profiles can be selected from the profile list drop‐down above the market watch pane. They can also be selected by switching between different profiles by clicking the profile tabs below the Market Watch. To arrange the column data in ascending or descending order, click the respective column heading. To customize Market Watch, refer Column Template. Place Orders from within the Market Watch Using the Market Watch pane, you can select the scrip that you wish to buy or sell. 1. Double‐click on the security symbol link. The focus changes to the Qty. (quantity field) in the Order Entry pane. The fields for Exchange, Instrument type, Scrip Symbol, Series, Expiry Date, Strike Price, Option Type, Order Type, Price, Buy/Sell fields will be pre populated with the data as available in the Market Watch. One can select the order of your choice from the Buy/Sell side. 2. Type the Quantity and Price in the Order Entry pane. Click Submit. The Order Entry pane is displayed for confirmation. 4. Click Confirm. On confirmation a new Buy/Sell order is added to the Order Book pane and the order status and confirmation messages are displayed at the bottom of the order‐entry pane. 5. Click Cancel, to cancel the order. The orders cannot be modified or canceled after it has been submitted. Press F1 or (+) to use the Buy Order Entry pane and F2 or (‐) to use the Sell Order Entry pane. Right Click Option in Market Watch Swift Trade supports right‐click option in Market Watch for scrip/contract related functionalities. These options are available at different levels in Market Watch (such as Market Watch Tool Bar, Column Level and Scrip Level). Depending upon the functionality, these options may differ for each level. 9 | P a g e SWIFT TRADE SAVASHARE An E‐Broking Initiative of Sushil Finance The various options and their features available at different levels are as follows: Level Market Watch Tool Bar Right‐
click option Profile Save Profile Combined Depth 10 | P a g e Combin
ed Depth Description Click to navigate to profile page. Click to save the current Market Watch profile. Highlight a scrip in the Market Watch. Right Click inside the Market Watch and Click Combined Depth. Alternatively press Ctrl + F6. The combined depth of BSE and NSE in case of cash segment and its underlying market depth for future segments is displayed. You can place a Buy/Sell order for the SWIFT TRADE SAVASHARE An E‐Broking Initiative of Sushil Finance selected scrip. Click on the column heading (
)/(
Sort Column Column Level Add column Remove Column 11 | P a g e ). The Order Entry pane is populated with the scrip details. Click to sort the column data in ascending or descending order. Click to navigate to the edit option of the active Column Template page, for modification of the template. The changes done can be saved for the specified column template. Click to remove a column. This option is not applicable for mandatory columns (columns that cannot be deleted). SWIFT TRADE SAVASHARE An E‐Broking Initiative of Sushil Finance Buy Scrip Level Sell Best Five Market Movem
ent Scrip Info 12 | P a g e if a new column is added then to delete that column, this option will be visible & functional. Click to invoke Buy Order Entry pane with details of the scrip selected in the Market Watch. Click to invoke Sell Order Entry pane with details of the scrip selected in the Market Watch. Click to display the best five buyers and sellers for a security selected in the Market Watch. Click to display the market movement of the selected scrip. Click to display the scrip/contrac
t information SWIFT TRADE SAVASHARE An E‐Broking Initiative of Sushil Finance Charts Add Scrip Remove Scrip Order Entry Order Entry pane is used to submit the buy/sell order entries. 13 | P a g e of the selected scrip/contrac
t in the Market Watch. Click to display Graphical representati
on/Chart view of the selected scrip. Click to invoke the Symbol Look up option. To remove scrips from the Market Watch, select the scrip you want to remove. Right‐click on the selected scrip. Select Remove from the various right‐
click options available. Alternatively
, select the scrip you want to remove, press Delete key. SWIFT TRADE SAVASHARE An E‐Broking Initiative of Sushil Finance Submitting a Buy/Sell Order Entry 1. Click the toolbar icon (
)/(
), to place buy/sell order. The respective Order Entry pane is displayed. Alternatively, press F1 or (+) to invoke the Buy Order Entry pane and F2 or (‐) to invoke the Sell Order Entry pane. By default, a Red background indicates that it is a Sell Order Entry pane and a Blue background indicates that it’s a Buy Order Entry pane. 2. Select Buy or Sell in the Buy/Sell list in the Order Entry pane. By default, a Blue background indicates that a Buy Order Entry is being placed and a Red background indicates a Sell Order Entry. 3. Select the Exchange. 4. Select an Instrument type. 5. Enter Symbol. 6. Enter Series. 7. Select an Order Type. 8. Based on exchange and instrument type you select, following order details are to be typed/ selected: Field Name NSE Instrument Type EQUITIES FUTIDX and FUTSTK OPTIDX and OPTSTK EQUITIES BSE 14 | P a g e FUTIDX and FUTSTK OPTIDX and Fields to be Typed/Selected Symbol, Scrip Series, Order Type, Quantity, Price, Disc.Quantity, Product Type, Validity. Symbol, Expiry Date, Order Type, Quantity, Price, Disc.Quantity, Product Type, Validity. Symbol, Expiry Date, Strike Price, Option Type, Order Type, Quantity, Price, Disc.Quantity, Product Type, Validity. Symbol, Scrip Series, Order Type, Quantity, Price, Disc.Quantity (Disclosed Quantity), Protection %, Product Type, Validity. Symbol, Expiry Date, Order Type, Quantity, Price, Disc. Qty (Disclosed Quantity), Protection %, Product Type, Validity. Symbol, Expiry Date, Strike Price, Option Type, Order Type, SWIFT TRADE SAVASHARE An E‐Broking Initiative of Sushil Finance OPTSTK Quantity, Price, Disc. Quantity, Protection %, Product Type, Validity. 9. Select Validity. You can select from the following: a. Day signifies the order is valid for one day. This is the default value. b. IOC signifies the order is valid for immediate execution, else it is canceled. 10. Click Clear to clear the field details, if required. 11. Click Submit. The Order Entry pane is displayed for confirmation. 12. Click Confirm. On confirmation a new Buy/Sell order is added to the Order Book pane and the order status and confirmation messages are displayed at the bottom of the order‐entry pane. Order Book Order Book provides information regarding all the orders placed for a particular security and contract across all markets segments. The Order Book pane is used to view, modify, and cancel buy/sell orders. This topic provides reference about: •
View Order Book Details •
View the Order Details Using Filter option •
Modifying a Buy/Sell Order •
Canceling a Buy/Sell Order View Order Book Details Click Trading à Order Book. Alternatively, press F3. The Order Book page is displayed with following details. Modify Exchange Exchange Order No. Symbol Series Instrument Client Order No. Buy or Sell Total Quantity/Pending Quantity Disclose Quantity Price Trigger Price Validity Error Order Status 15 | P a g e SWIFT TRADE SAVASHARE An E‐Broking Initiative of Sushil Finance Days Time Gateway Order No. Expiry Date Strike Price Option Type Product Type AMO ID Order Type To arrange the column data in ascending or descending order, click the respective column heading. To customize order book, refer Column profile. View the Order Details Using Filter option 1. The Order Book page is displayed by either clicking Trading à Order Book menu or by pressing F3 key. 2. Select the Exchange (ALL, NSE CASH, NSE DERIVATIVES, BSE CASH, BSE DERIVATIVES or NCDEX FUTURES). 3. Select Status from the drop‐down list. Options available are ALL, Trading, Pending, AMO. 4. Select Product Type from the drop‐down list. Options available are ALL, Margin, Delivery, AMO Margin, AMO Delivery, MTF, PTST & Margin Plus. 5. Click Submit. Based on the selected conditions the Order Book page is displayed with details. Modify a Buy/Sell Order 1. Click Trading à Order Book. Alternatively, press F3. The Order Book page is displayed. 2. Select Modify link record of the particular security you want to modify in the Order Book. The Order Entry page is displayed in edit mode. 3. Modify the data, as required. The editable data values are Order type, Quantity, Price, Disclosed Quantity and Validity. 4. Click Modify. The Order Entry pane is displayed for confirmation. 5. Click Confirm. On confirmation a new Buy/Sell order is added to the Order Book pane. The order status and modification confirmation messages are displayed at the bottom of the order‐entry pane. Cancel a Buy/Sell Order 1. Click Trading à Order Book. Alternatively, press F3. The Order Book page is displayed. 16 | P a g e SWIFT TRADE SAVASHARE An E‐Broking Initiative of Sushil Finance 2. Select the check box against the particular security you want to cancel and click Cancel Selected Orders. 3. For canceling all orders, select the Select All check box. 4. Click Cancel Selected Orders. On confirmation, the selected orders are canceled.
Trade Book Trade Book provides details of the orders executed at the Exchange along with the execution details such as traded quantity and traded price. The buy orders are displayed in blue color and the sell orders are displayed in red color. This topic provides reference about: •
View Trade Details •
View Trade Details based on filter conditions View Trade Details Click Trading à Trade Book. Alternatively, press F8. The Trade Book is displayed with following details: Exchange Ex.Order No. Trade No. Symbol Series Instrument BuyorSell Total Quantity/Pending Quantity Price Gateway Order No. Product Type Time View Trade Details based on filter conditions 1. Click Trading à Trade Book. Alternatively, press F8. The Trade Book is displayed with details. 2. Select Exchange. 3. Select Product Type. Select Product type from drop‐down as ALL, Margin, Delivery, AMO Margin, AMO Delivery, MTF, PTST & Margin Plus. 4. Click Submit. Based on the selected conditions the Trade Book page is displayed with details. To customize Trade book, refer Column profile. 17 | P a g e SWIFT TRADE SAVASHARE An E‐Broking Initiative of Sushil Finance Net Position Net position tracks complete position details for various market segments. It also allows viewing position details, squaring off positions and converting positions from one product type to another product type. This topic provides reference about: •
View Net Position Details •
Square off the Outstanding Position of a Security •
Convert Position from Margin to Delivery •
Convert Position from Delivery to Margin View Net Position Details 1. Click Trading à Net Position menu. Alternatively, press Alt +F6. The Net Position page is displayed with following details: Exchange Buy Quantity Symbol Series Expiry Date Strike Price Product Type Instrument Last Traded Price Square Off Buy Value Average Buy Price Option Type Sell Quantity Refresh Sell 2. Select Position as Daily or Expiry. 3. Select Product Type as Margin, Delivery, AMO Margin, AMO Delivery, MTF, PTST, Margin Plus. 4. Click Submit. Based on the selected conditions Net Position page is displayed. 5. Click Refresh, to refresh the net position details in the Net Position page. Square off the Outstanding Position of a Security 1. The Net Position page is displayed with following details on Clicking Trading à Net Position menu or by pressing Alt +F6 key. 18 | P a g e SWIFT TRADE SAVASHARE An E‐Broking Initiative of Sushil Finance 2. Click the Square Off link to square off the open position in the market for that particular trading day. Notice that the focus changes to the price field in the Order Entry pane. You need to type in the quantity and price to submit the order. 3. Accordingly, the Net position is squared‐off. For Buy positions, sell order entry pane will be displayed; and for Sell positions buy order entry pane will be displayed. To arrange the column data in ascending or descending order, click the respective column heading. To customize Net Position book, refer Column profile. Tip: When you position the cursor over the Square Off link, a tool tip is displayed. This indicates the square off option. Convert Position from Margin to Delivery 1. Click Trading à Net Position. The Net Position page is displayed with details of the executed transactions. 2. Select Position. 3. Select Product Type as Delivery. 4. Click Quantity, to convert position. The Position Conversion page is displayed. 5. Type Quantity. 6. Click Submit. On authentication, the position is converted from Buy/Sell Margin to Buy/Sell Delivery. 7. If required, click Clear to clear the details. Tip: When you position the cursor over the Quantity link, a tool tip is displayed. This indicates the convert position option. Convert Position from Delivery to Margin 1. Click Trading à Net Position. Alternatively, press Alt +F6. The Net Position page is displayed with details of the executed transactions. 2. Select Position. 19 | P a g e SWIFT TRADE SAVASHARE An E‐Broking Initiative of Sushil Finance 3. Select Product Type as Margin. 4. Click Quantity, to convert position. The Position Conversion page is displayed. 5. Type Quantity. 6. Click Submit. On authentication, the position is converted from Buy/Sell Delivery to Buy/Sell Margin. 7. If required, click Clear to clear the details. Tip: When you position the cursor over the Quantity link, a tool tip is displayed. This indicates the convert position option. Stock View Stock View provides the details of client holdings with various entities like DP and Broker. Valuation of the stocks gets updated against Last Traded Price on refresh. Stocks can be directly sold from the Stock View page. View Stock View 1. Click Trading à Stock View. The Stock View page is displayed with following details: 2. Select Sell Off Stock as Sell Off Today's Stock or Sell Off Receivables Stock or Sell Off DP Stock. 20 | P a g e Scrip Name Today Free Today Value Total Available Total Block Total Free Total Value DP Collateral Quantity Collateral Price DP Collateral Hair Cut % DP Security Collateral Credit For Sale SAR Collateral Quantity SAR Security Collateral Available with POOL Value With Pool Blocked With Pool Pool Collateral Quantity Pool Collateral Hair Cut % Short Sell Qty Last Traded Price SAR Collateral Hair Cut % Close Prc DP Available Total Security Collateral Free With Pool Pool Security Collateral CFS Hair Cut % Today Available Today Block ISIN Receivable Available Pool + SAR Holding SWIFT TRADE SAVASHARE An E‐Broking Initiative of Sushil Finance Total Collateral Quantity 3. Enter ISIN Code, Symbol. 4. Click Submit. Based on the selected conditions Stock View page is displayed. 5. Click Refresh, to view most recent updated details. 6. Click Scrip Name hyperlink. The scrip details are displayed in Stock View page. 7. Click Scrip Name hyperlink, in the lower pane to place a sell order for selling the stock. The Sell Order Entry pane is displayed. 8. Click Submit. The Order Entry pane is displayed for confirmation. 9. Click Confirm. On confirmation a new Sell order is added to the Order Book. 10. To view the status of the order submitted, click the Order Book link. The Order book page is displayed. 11. Stock View details can be printed by clicking Print symbol (
). 12. Stock View details can be viewed in an Excel sheet by clicking the Excel sheet symbol (
). Funds View Funds View provides the details pertaining to funds available and funds utilized by the client.
View Funds View 1. Click Trading Æ Funds View. The Funds View page is displayed with following
details:
3. Select Periodicity All Equities & Derivatives Combined..
4. Click Submit. Based on the selected conditions Funds View page is displayed.
5. Funds View details can be printed by clicking Print symbol (
).
6. Funds View details can be viewed in an Excel sheet by clicking the Excel sheet symbol (
).
21 | P a g e SWIFT TRADE SAVASHARE An E‐Broking Initiative of Sushil Finance If the trading limit set for client in ODIN is Rs. 10,000/-, then the client can only
trade to the extent of Rs.10,000/-.
Limits Set Limits Set keeps a track and displays the limits specified by the broker to individual users. The broker sets the limits for all the users and securities on daily and settlement basis for all the market segments. View Limits Set View 1. Click Trading à Limits Set. The Limits Set page is displayed with following details: 2. Click Refresh, to view most recent updated details. 3. Limits Set details can be printed by clicking Print symbol (
). 4. Limits Set details can be viewed in an Excel sheet by clicking the Excel sheet symbol (
). Span Margin View Span Margin View allows the user to gauge the margin requirements of contracts across F&O segments, Currency segment and Commodity segments. View Span Margin View 1. Click Trading à Span Margin View. The Span Margin page is displayed with following details: Market Segment Symbol Instrument Type Expiry Date Lot Size Initial Margin Long 22 | P a g e SWIFT TRADE SAVASHARE An E‐Broking Initiative of Sushil Finance Initial Margin Short Initial Margin % Long Initial Margin % Short Initial Margin % Long Exposure Margin Exposure Margin % Total Margin % Long Total Margin Short Total Margin % Short Total Future Value Long Total Margin Long Total Future Value Short 2. Select Market Segment. 3. Click Submit. Based on the selected conditions Span Margin View page is displayed. 4. To print Span Margin View details, click Print symbol MARKET ENQUIRY Most Active Securities Most Active Securities page is used to view the most active securities sorted in the order of volume or value. The security details are updated on‐line. View Most Active Securities 1. Click Market Inquiry à Most Active Securities. Alternatively, press Shift + F10. The Most Active Securities page is displayed. 2. Select the Exchange (NSE, BSE, MCX, NCDEX or MCXSX) and the Instrument type in the list. When you select the Exchange as BSE, you need to type the Group. 3. Select Volume or Value. 4. Click Submit. Based on the selected conditions the following details are displayed.
Scrip Code
Scrip Details
Value (in Lacs)
Last Traded Price
Volume (in 000s)
Top Gainers Losers Top Gainers Losers page is used to view the top ten gainers and losers sorted in the order of the percentage change with respect to LTP for various instrument types. The security details are updated on‐line. View Top Gainers Losers 1. Click Market Inquiry à Top Gainers Losers. Alternatively, press Ctrl + F10. The Top Gainers Losers page is displayed. 23 | P a g e SWIFT TRADE SAVASHARE An E‐Broking Initiative of Sushil Finance 2. Select the Exchange (NSE, BSE) and the Instrument type. When you select the Exchange as BSE, you need to type the Group. 3. In the LTP Between, type the minimum and maximum range of the required last traded price. 4. Select Gainers or Losers. 5. Click Submit. Top Gainers for the scrips with the last traded price entered in range are displayed. Scrip Code Scrip Details Close Price Last Traded Price % Change Index Details Index Details provides details of indices across all market segments. View Index Details 1. Click Market Inquiry à Index Details. The Index Details page is displayed. 2. Select Exchange. 3. Click Submit. Based on the selected conditions, the following details are displayed in the Index Details page. Index Name Current % Change Open High Low Previous Close Capitalization in (lacs) Market Movement Market Movement displays hourly movement of a particular scrip or contract during a trading session. View Market Movement 1. Click Market Inquiry à Market Movement. Alternatively, click the tool bar icon (
). The Market Movement page is displayed with following details. Time Open High Low Close Average Traded Price Total Traded Quantity Total Traded Value 24 | P a g e SWIFT TRADE SAVASHARE An E‐Broking Initiative of Sushil Finance 2. Select scrip through symbol Look Up. Refer Symbol Look Up. 3. Select a scrip link from the list. The details of the selected scrip are populated in the Market Movement page. 4. Click Refresh, to view most recent updated details. 5. Market Movement details can be printed by clicking Print symbol (
). 6. Market Movement details can be viewed in an Excel sheet by clicking the Excel symbol (
). Security Info Security Info is used to view the security information details. View Security Information 1. Click Market Inquiry à Security Info. Alternatively, click the tool bar icon (
F7. The Security Information page is displayed with following details. Security Name ISIN Market Lot Price Tick (Rs.) Issued Capital Face Value Quantity Freeze Margin % Exposure Multiplier Start Date End Date Expiry Date Purpose ) or press Shift + 2. Select scrip through symbol Look Up. Refer Symbol Look Up. 3. Select a scrip link from the list. The details of the selected scrip are populated in the Security Information page. 4. Click Refresh, to view most recent updated details Contract Info Contract Info is used to view contract information for all contracts in the futures and options segment. View Contract Information 1. Click Market Inquiry à Contract Info. Alternatively, click the tool bar icon (
F8. The Contract Information page is displayed with following details. 25 | P a g e ) or press Shift + SWIFT TRADE SAVASHARE An E‐Broking Initiative of Sushil Finance Contract Name Market Lot Price Tick (Rs.) Maturity U/L Asset IP Date Ex. Date Price Quote Margin % Exposure Multiplier Contract Start Date Contract End Date Tender Start Date Delivery End Date Tender End Date Other Long Margin Delivery Start Date Initial Long Margin Other Short Margin Initial Short Margin Exposure Margin Additional Pre Expiry Margin Additional Long Margin Additional Short Margin Special Long Cash Margin Applicable Long Margin Applicable Short Margin Special Short Cash Margin 2. Select scrip through symbol Look Up. Refer Symbol Look Up. 3. Select a scrip link from the list. The details of the selected scrip are populated in the Contract Information page. Market Status Market Status displays the status of various market types for the Equities, Derivatives, FAO, Commodities and Currency market segments. •
Open ‐ signifies market is available for trading •
Close ‐ signifies market is not available for trading View Market Status Click Market Inquiry à Market Status. The Market Status page is displayed. Market status Link is also available on the main application page.
Best Five Best Five pages provide information about the best five buyers and sellers for a security, at a particular point of time for different instrument types and exchanges. 26 | P a g e SWIFT TRADE SAVASHARE An E‐Broking Initiative of Sushil Finance View & Place Orders from Best Five 1. Click the tool bar icon (
). The Best Five page is displayed with the market information of the best five buyers and sellers for selected scrip. Alternatively, select a scrip in the Market Watch pane and press F6. The Best Five‐Web Page Dialog is displayed. The left pane shows the Buy details and the right pane shows the Sell details. Buy Price Buy Quantity Sell Price Sell Quantity Open High Close Low 52 Week High Last Traded Quantity 52 Week Low Last Traded Price % Change Volume Traded Buy Quantity Average Traded Price Traded Sell Quantity Last Traded Time Disclosed Price Range Last Updated Time 2. You can place a Buy/Sell order for the selected scrip. Click on the column heading (
)/(
). The Order Entry pane is populated with the scrip details. 3. Type the Quantity and Price in the Order Entry pane. In case of Stop Loss orders, you need to type the Trigger Price and Limit Price to limit your price risk in the corresponding fields respectively. 4. Click Submit. The Buy/Sell order is submitted. Chart Chart is a graphical representation of data represented by symbols such as bars or line charts. View Chart 1. Click the tool bar icon (
). The Charts page is displayed. 2. Select Price Style as Standard or Candle. 3. Select Indicators. Refer Technical Indicators. 4. Select Chart Type as Historic or Intraday. 5. Enter no of tick in minutes in Tick (In minutes). 27 | P a g e SWIFT TRADE SAVASHARE An E‐Broking Initiative of Sushil Finance 6. Click Add. The Simple Moving Average page is displayed. 7. Select Source. 8. Enter Periods. 9. Click (
), to select color. 10. Click Apply. The Historic or Intraday chart is displayed based on the selected conditions. 11. Click Remove All, to remove the applied indicators. 12. To view charts based on different study lines, click on the different study lines available. To view the information related to particular point on the graph, position the mouse cursor over that point in the displayed chart. And to view the information related to successive points on the graph, press the left mouse button and drag the mouse to a range of points. 28 | P a g e SWIFT TRADE SAVASHARE An E‐Broking Initiative of Sushil Finance The following information is displayed for the points: Information Displayed Time Description It is the X‐axis coordinate and it displays the time at the current mouse cursor position. It is the Y‐axis coordinate and it displays the value at the current mouse cursor position. All plots with their values at the position of the mouse cursor are displayed. Value Plot and Value 13. The Chart tool bar contains zoom and print options. Tool Bar Icon Name Description Zoom In Click to get a close‐up view of the chart. Zoom Out Click to decrease the scale of the chart i.e to view a broader area in less detail. Click to enlarge chart view. Magnify Chart Reset Zoom Click to restore chart image to its original size. Print Click to print chart image. TOOLS Options Calculator Options Calculator is used to calculate the premium for different contracts, securities in option segment of the derivatives market. Calculating the Premium for Equity Options 1. Click Tools à Options Calculator. Alternatively, press Ctrl+ Pg Up. The Options Calculator page is displayed. 2. Enter Spot Price. 3. Enter Strike Price. 4. Enter Volatility in %. 5. Enter Interest Rate in %. 29 | P a g e SWIFT TRADE SAVASHARE An E‐Broking Initiative of Sushil Finance 6. Enter Dividend Yield. 7. Enter Days Until Expiration. 8. Select the option type: Call/Put. 9. Select the required calculation method. You need to select the Binomial method in case of the options stock: OPTSTK. For the other options the Black and Scholes Price Model is selected. 10. Click Calculate. The output values are displayed Fair Value Calculator Fair Value Calculator calculates the fair value of the future contract based on the Interest Rate and Maturity Time. Calculate Fair Value 1. Click Tools à Fair Value Calculator. Alternatively, press Ctrl+ Pg Down. The Fair Value Calculator page is displayed. 2. Enter Index Price, Interest Rate, Dividend, Contract Days values. 3. Click Calculate. The Fair value is displayed in the page Set Alerts Set Alerts allows user to set alerts based on alert criteria. 1. Click Tools à Set Alerts. Alternatively, click the tool bar. The Set Alerts page is displayed 2. Click Set Alerts. The Alert Criteria page is displayed. 3. Enter Symbol, Series. Alternatively click icon (
o
o
o
o
o
o
30 | P a g e Select Exchange Select Instrument Enter Symbol. Enter Code Enter Series, Expiry Date, Strike Price Enter Company Description ). The Symbol Lookup page is displayed. SWIFT TRADE SAVASHARE An E‐Broking Initiative of Sushil Finance 4. Alternatively, typing minimum first three characters of the security name populates the list with all securities beginning with the given three characters. For example, FIN and click Submit. It displays a list of securities whose name begins with FIN. Each page displays up to 10 securities. If there are multiple pages generated for a Security, the page links are listed below the list. You can click a page number to view the respective page details. 5. Click the required security link. The symbol name is displayed in Symbol field along with series in Series field. 6. Select Build Your Alert (alert condition) from the drop‐down list. 7. Select Validity check box. 8. Enter Remarks. 9. In Inform Alerts via: Select mode of sending alert message as Message Box or Message Bar or SMS or Email check box. 10. Click Add. The details are displayed in Set Alerts page. 11. Click Export to Excel icon, to export details in an excel sheet. The File Download dialog is displayed. 12. Click Open, to view details in an excel sheet. 13. Click Save. The Save As dialog is displayed. 14. Specify the file name. Click Save. 15. Click Refresh, to view most recent updated details Alerts Log Alerts Log provides details of all alerts created by the client. View Alerts Log 1. Click Tools à Alerts Log. The Alerts Log page is displayed. 2. Click Export to Excel icon, to export details in an excel sheet. The File Download dialog is displayed. 3. Click Open, to view details in an excel sheet. 31 | P a g e SWIFT TRADE SAVASHARE An E‐Broking Initiative of Sushil Finance 4. Click Save. The Save As dialog is displayed. 5. Specify the file name. Click Save
TRANSFER FUNDS To Broker Account To Broker Account in Fund transfer facilitates to increase the Limit/Exposure of trading by online transfer of funds to Broker’s account. Transfer Fund to Broker Account 1. Click Transfer Fund à To Broker Account. The Transfer Fund‐To Broker Account page is displayed. 2. Select a Bank to transfer payment. 3. Select Exchange. 4. Enter Amount to transfer. 5. If required, click Clear to clear the details. 6. Click Submit. The bank’s website is displayed. 7. Type User Name and Password. On completion of transaction, a confirmation note bearing bank’s reference number is received. Follow up with the bank using this number for any queries. To Client Account To Client Account in fund transfer facility is used to make fund withdrawal request from Broker. Transfer Fund to Client Account 1. Click Transfer Fund à To Client Account. The Transfer Fund‐To Client Account page is displayed. 2. Select Exchange. 3. Enter Amount to transfer. 4. Enter Narration details. 5. Disclaimers Notification details is provided by member. 32 | P a g e SWIFT TRADE SAVASHARE An E‐Broking Initiative of Sushil Finance 6. Click Submit. 7. If required, click Clear, to clear the details. On completion of transaction, confirmations note bearing Transaction reference number is received. Follow up with the broker using this number for any queries. Funds Report Funds Report enables to view various transactions executed by client along with Bank details. It also generate online transfer of payment report View Fund Report 1. Click Transfer Fund à Funds Report. The Transfer Fund‐Funds Report page is displayed. 2. Select all, to view all details. 3. Select Date, to view date wise details. 4. Select From and To Date. 5. Select Status as Success, Failure or All. 6. Click Submit. The details based on the selected criteria are displayed in the Fund Report page. Product Name Amount Transaction RefNo. Bank Id Transaction Type Status Date Time 7. Funds Report details can be viewed in an Excel sheet by clicking Excel symbol (
8. Funds Report details can be printed by clicking Print symbol (
). ). MY ACCOUNT My Preferences My Preferences is a customizing feature of Swift Trade. It allows configuring columns, Mail Preference and Product Types options. This topic provides reference about: 33 | P a g e SWIFT TRADE SAVASHARE An E‐Broking Initiative of Sushil Finance •
Configure Column profiles •
Configure Product Type Column Profiles Column Profiles facilitates creating customizable pages ‐ adding, removing, positioning columns and also maintaining an ascending or descending column contents. Column Profile supports following pages: Order Book, Trade Book, Net Position. Swift Trade also supports quick data arrangement. Product Type Product Type enables setting default Product type for placing orders. The Product type selected in My Preferences is considered as default type to be displayed in Order Entry pane on login. Configure Column profiles 1. Click My Account My Preference. Alternatively, press Ctrl+ R. The My Preferences page is displayed. 2. Click Column Profiles link. 3. Select the Report you want to customize: Order Book, Net Position or Trade Book. 4. The page is divided into two columns Unassigned Columns that display the unused columns, Assigned Columns that displays the supported columns for that page. 5. To add a column, select the column you want to add from the Unassigned Columns list to Assigned Columns list. 6. Click Add (
). The selected column moves into Assigned Columns.
7. To remove a column, select the column you want to remove from the Assigned Columns list into Unassigned Columns. 8. Click Remove (
). The selected column is removed. 9. To change the column‐order, select the column from the Assigned Column list. 10. To shift the column upwards, click Up (
the Assigned Columns list. 11. To shift the column downwards, click Down (
one‐position in the Assigned Columns list. 34 | P a g e ). The column is moved up one‐position in ). The column is moved downward SWIFT TRADE SAVASHARE An E‐Broking Initiative of Sushil Finance 12. Click Save. The customized column profile is saved and applied to the page. Configure Product Type Preference 1. Click My Account My Preference. Alternatively, press Ctrl+ R. My Preferences page is displayed. 2. Click Product Type link. The Product Type page is displayed. 3. Select Default Product Type to be displayed in Order Entry pane on login. You can select Margin, Delivery. 4. Click Save. The Product Type saved successfully message is displayed.
Profile Profile is a group of securities/contracts clubbed together and viewed in the Market Watch. Net.Net™ supports creation of well‐diversified profiles. Each profile can contain a maximum of 20 scrips/contracts and can be configured in the market watch based on the user’s preferences. Five such profiles can be viewed in the market watch in tab form. The profile display can also be changed as per required to be viewed in tabs. Also, managing profiles is an easy and quick task in Net.Net™. Default profile selection is configurable that makes the most favorite profile to be displayed each time on Net.Net™ logon. The Profiles created are available in the form of tabs below the market watch. Maximum of five profiles are available in tab form and can be switched on to different profiles as and when required. This topic provides reference about: •
Creating Profile •
Applying Profile •
Modifying Profile •
Removing Profile Creating a New Profile 1. Click My Account à Profile. Alternatively, press Alt + F3. The Profile List page is displayed. 2. Click Add Profile. The Add Profile page is displayed. 3. Enter new profile Name. 35 | P a g e SWIFT TRADE SAVASHARE An E‐Broking Initiative of Sushil Finance 4. Select Default check box to make the newly created profile a default profile. The scrips from the default profile are always previewed on logging on to Net.Net™ application. 5. Select Template, to map the profile. 6. Click Add Scrip. The Symbol Lookup page is displayed. 7. Move in the Symbol Lookup section to add scrips in the new profile. 1. Select the Exchange, Instrument Type. 2. Type in the first few letters/initials of the security in Symbol. For example, TCS and click Submit. It displays a list of securities whose name begins with TCS. Each page displays up to 10 securities. If the list of securities generates more than one page, then you can scroll through multiple pages by selecting the page number. A profile can include only 20 scrips. 3. Select a security link from the list. Accordingly, the selected scrip's details are populated in the Create Profile section. You can select multiple securities from the generated list. Click Close, to close the Symbol Lookup page. 8. After adding the scrips you want, click Save to save the profile. A new Profile is created and displayed in the Profile List. If there is no default profile, an empty market watch is displayed. Applying Profile In the lower portion of the application main page, select a profile from the existing Current Profile list. The details of the selected profile are viewed in the Market Watch. The Market Watch can display a single profile at a time. Modifying Profile At times, you may require editing a profile. Adding scrips or deleting the unwanted scrips is performed using the Profile List page. 1. Click My Account à Profile. The Profile List page is displayed. 2. Click the Edit link against the required profile name you want to modify. The profile details are displayed in the grid. 3. Click Add Scrip to select and add new scrips. The selected security is added in an ascending order of the security name list. 36 | P a g e SWIFT TRADE 4. Click the X (
SAVASHARE An E‐Broking Initiative of Sushil Finance ) in Remove column, to delete unwanted scrips. 5. Click Save, to save the updated changes, if any. The profile is modified. Removing Profile 1. Click My Account à Profile. The Profile List page is displayed. 2. Click the Delete link against the required profile name you want to delete. 3. On confirmation the profile is deleted. Column Template Column Template is one of the features of the Net.Net™ that allows customizing columns of the Market Watch page i.e. add, remove and position the columns. The Column Template when mapped with a particular profile will display the customized Market Watch profile. Create Template 1. Click My Account à Column Template. Alternatively, press Ctrl+ K. The Column Template page is displayed. 2. Click Add New, to add a new template. The Column Template page is displayed. 3. Enter Template Name. 4. Select the Set as Default check box, to assign the new Column Template as default. The newly created Column Template will act as a default column template. The columns as assigned in the default column template will be assigned to the profiles for which no column profile template is selected specifically. 5. The Page is divided in two columns: Unassigned Columns that display the available columns and the Assigned Columns which display the selected columns for the specified column template. 6. To add a column, select the column you want to add from the Unassigned Columns list. 7. Click Add (
). The selected column moves into Assigned Columns. 8. To remove a column, select the column you want to remove from the Assigned Columns list . 9. Click Remove (
list. 37 | P a g e ). The selected column is removed back into Unassigned Columns SWIFT TRADE SAVASHARE An E‐Broking Initiative of Sushil Finance 10. To change the column‐order, select the column from the Assigned Column list. 11. To shift the column upwards, click up button (
position in the Assigned Columns list. ). The column is moved up one‐
12. To shift the column downwards, click down button (
downward one‐position in the Assigned Columns list. ). The column is moved 13. Select Initial Sort By, to display the column you want to appear as the first column in the profile. 14. Profiles Assigned to Templates lists the currently available profiles. Select the check box to map the column template to a particular profile. This profile when selected in the market watch will be displayed in the specified column arrangement. Columns marked with ** are mandatory and cannot be removed from the Assigned Columns. To add all available columns, click Add All (
To remove all columns, click Remove All (
). ) MESSAGES Broker Messages Broker Messages records and maintains log of messages sent by the Member to the Client. View Broker Message Log 1. Click Messages à Broker Messages. The Broker Messages page is displayed with following details. Time Messages 2. Click Refresh, to view most recent updated details. Click Broker Messages tab at the lower portion of the application main page, to view Broker Messages. 38 | P a g e SWIFT TRADE SAVASHARE An E‐Broking Initiative of Sushil Finance Exchange Messages Exchange Messages records and maintains log of messages sent by the Exchange on an hourly basis. By specifying last number of hours in No. of Hours fields, selective messages can be viewed. View Exchange Messages Log 1. Click Messages à Exchange Messages. The Exchange Messages page is displayed with following details. Time Messages 2. Select Exchange. 3. Enter No. of Hours. 4. Click Submit. Based on the selected conditions Exchange Messages page is displayed. 5. Exchange Message log details can be printed by clicking Print symbol (
). 6. Exchange Message log details can be viewed in an Excel sheet by clicking Excel symbol (
Click Exchange Messages tab at the lower portion of the application main page, to view Exchange Messages. Order Messages Order Messages records and maintains the log of order messages sent by the Exchange. View Order Messages Log 1. Click Messages à Order Messages. Alternatively, press F10. The Order Messages page is displayed with following details. Transaction Date Time Client Order No. Message Details 2. Select Exchange. 3. Click Submit. Based on the selected conditions Order Messages page is displayed. 4. Click Refresh, to view most recent updated details. 5. Order Message log details can be printed by clicking Print symbol (
39 | P a g e ). ). SWIFT TRADE SAVASHARE An E‐Broking Initiative of Sushil Finance 6. Order Message log details can be viewed in an Excel sheet by clicking Excel symbol (
). Click Order Messages tab at the lower portion of the application main page, to view Order Messages. LOGOUT Swift Trade session can be called off as required. On logout, the session is closed. To resume work, Click on login link to relogin. Logout from the Swift Trade Application 1. Click logout at the upper‐right side of the application main page. 2. On authentication, you are logged out from Net.Net™. 3. Click this link, to login again. 40 | P a g e