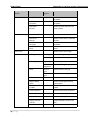
1
POWER TRADE SAVASHARE An E‐Broking Initiative of Sushil Finance POWER TRADE – Software User’s MANUAL How do I get Login thru Power trade software? Login Power Trade 1. Click Start > Programs > Savashare alternatively, double‐click the Savashare icon on the desk0. The Power Trade window is displayed. 2. Click the Login icon. Alternatively, press Ctrl + L. The Login window is displayed. 3. Enter the User Code, Password. 4. If required, change the Password. In the Login window, enter the User Code and Password. 5. Enter the New Password. In the confirmation window, type the New Password again. Click OK. The password is now changed. Click OK. On successful authentication, the Power Trade Main window is displayed 6. If required, select only the security download scrips you want. By default, all the scrips are selected. The new password is applicable from the next time you logon to Power Trade. Renew Configuration Renew Config is used when there are multiple Managers in the back end and the Member is using Single Interface. In the Login screen, select Renew Config check box. If one Manager goes down, then the updated Manager information is downloaded and local information is renewed. Forgot Password In case if you Forgot Password? Follow the procedure given below: 1.
2.
3.
4.
In Login screen, click Forgot Pwd link. The Forgot Password page is displayed. Enter User ID. Enter Email ID. Click Submit. The details are further send to administrator for resetting of password. The password will be provided instantly through Email as per the mode defined by the member. Use of Virtual Keyboard is not mandatory. It is optional. Position of keys will change with each login. 1 | P a g e POWER TRADE SAVASHARE An E‐Broking Initiative of Sushil Finance The Work Environment Power Trade provides a user‐friendly working environment. On successfully logging on, the Power Trade Main window is displayed with various options: the Menu Bar, Tool Bar, Indices Bar, Filter Bar, Message Bar, Status Bar. •
The Menu Bar consists of various options: File: Manages the file operations, enables loading and saving of workspaces. View: Various functionalities are available such as Bhav Copy, Net Position and so on. Market: The market information functionalities are available such as Market watch, Market Picture and so on. Orders: The various Order‐related functions are available here. Ex:The various Exercise‐related functions are available here. Tools: Certain handy tools are also available such as Calculators, Online backup facility and so on. Window: Manages displayed windows. Stocks: Status of the Depository can be viewed Links: Useful web sites links can be directly browsed from here. Help: The detailed Help file can be invoked from here also version detail is available. o
o
o
o
o
o
o
o
o
o
•
The Tool bar consists of various buttons to perform the common tasks quickly. Toolbar Button Description Login Logoff Online Backup Print Message Log Order Entry Order Book Trades Integrated Net Position Market Watch Security Information Modify Order 2 | P a g e Cancel Selected Order (s) POWER TRADE SAVASHARE An E‐Broking Initiative of Sushil Finance Cancel All Orders •
•
•
•
•
The Indices Ticker displays the current Nifty, Sensex values. The Filter Bar enables entering securities/contracts in the Market Watch.‐ Filter Bar displaying various scrip details Various system messages are displayed in the Message Bar. The Status Bar displays the BSE Code, along with various status indicators. Availability of shortcut keys for most common functions Commonly used abbreviations for many widely used terms in Power Trade. This help uses common abbreviations for many widely used terms in the Power Trade application. Abbreviations ATP B/S D. Qty DPR EOS GTC GTD IOC LTP LTQ LTT LUT MTM G/L MTM Pos. OI Own/Cli RL SL OL EOSESS EOTODY EOSTLM EOS Qty. Trig Price UL Vol. 3 | P a g e Full Forms Average Traded Price Buy/Sell Disclose Quantity Daily Price Range End of Session Good Till Cancel Good Till Date Immediate Or Cancel Last Traded Price Last Traded Quantity Last Traded Time Last Updated Time Mark To Market Gain/Loss Mark To Market Position Open Interest Own/Client Regular Lot S0 Loss Odd Lot End of Session End of Today End Of Settlement End Of Session Quantity Trigger Price Underlying Volume POWER TRADE SAVASHARE An E‐Broking Initiative of Sushil Finance Workspace Workspace is view of Power Trade system main window along with all the windows, toolbars, and the status bar in their corresponding size and positions. The Power Trade system provides you a facility of saving a workspace, that is, (the view of the Power Trade system window) as the default window so that the same view can be retrieved when you log on the next time. The advantage of creating a workspace is that you need not open the windows and arrange them every time. For example, open multiple windows and arrange them accordingly. Click File > Save Workspace and save the workspace as a file. In the Save As window, type a new name and click Save. The work environment is captured as seen. To restore from stored workspaces, click File > Load Workspace. Browse the file and click Open. Set the workspace as the default file. On logging to Power Trade, the windows are arranged in the same manner as you saved them. Ticker (Integrated) Ticker (Integrated) displays entire list of securities and contracts from the applied portfolio. View Ticker (Integrated) 1. To view Integrated Ticker, click View > Ticker (Integrated). Alternatively, press Shift + F4; right‐ click the ticker and select and apply the Portfolio. 2. To customize the tickers, click on the Ticker and select the appropriate color, font, layout options from the displayed Customize window Ticker (Conditional) Ticker (Conditional) displays only the contracts included from the applied conditions. View Ticker (Conditional) 1. To view conditional Ticker, click View > Ticker (Conditional); right‐ click the ticker and select and apply the Portfolio. 2. To customize the tickers, click on the Ticker and select the appropriate color, font, layout options from the displayed Customize window Index Index window displays latest calculated indices. It tracks the current trend of the index values on a regular time basis and updates information as the market variations occur. •
Index Graph ‐ graphical representation of the movements 4 | P a g e POWER TRADE SAVASHARE An E‐Broking Initiative of Sushil Finance View Index information graphically 1. Click View > Index > Index Graph. Alternatively, press Shift + Page Up; double‐click an index figure on the Index Ticker. A graphical representation of the selected index is displayed. 2. The graph is plotted on the graph toolbar is available that enables viewing various graph attributes. Toolbar Icon Description 1 Text enables user to write a text on the chart 2 Quadrant lines
3 Tyrone levels 4 Raff Regression 5 Fibonacci arcs
6 Fibonacci Fans
Divide high and low range in to four equal sections and show horizontal lines accordingly. Tirone levels are a series of horizontal lines plotted on trading charts to predict possible support and resistance levels, developed by John Tirone. They are very much similar to Fibonacci retracements and Quadrant lines. Tirone levels are used mainly by short‐term traders, especially day traders; they are also useful for long‐term trading. Developed by Gilbert Raff, the Raff Regression Channel is a linear regression with evenly spaced trendlines above and below. The width of the channel is based on the high or low that is the furthest from the linear regression. The trend is up as long as prices rise within this channel. An uptrend reverses when price breaks below the channel extension. The trend is down as long as prices decline within the channel. Similarly, a downtrend reverses when price breaks above the channel extension Fibonacci Arcs are percentage arcs based on the distance between major price highs and price lows. Therefore, with a major high, major low distance of 100 units, the 31.8% Fibonacci Arc would be a 31.8 unit semi‐circle.
Fibonacci Fans use Fibonacci ratios based on time and price to construct support and resistance trendlines; also, Fibonacci Fans are used to measure the speed of a trend's Sr.No.
5 | P a g e POWER TRADE 6 | P a g e SAVASHARE An E‐Broking Initiative of Sushil Finance 7 Fibonacci Retracements
8 Error Channels
9 Fibonacci time zones 10 Ellipse movement, higher or lower. It is a method of technical analysis for determining support and resistance levels by dividing price high and low levels based on Fibonacci ratios. Errror channels are calculated by plotting parallel lines above and below the Linear Regression Trendline at a distance of standard error. These are vertical lines based on the fibonacci
sequence. These lines extend along the x axis (date axis) as a mechanism to forecast reversals based on elapsed time. Allows to add a circle or ellipse to the chart. 11 Rectangle allows to add a rectangle to the chart. 12 Buy Symbol allows to add a buy symbol. 13 Sell Symbol allows to add a sell symbol. 14 Exit symbol allows to exit symbol 15 Trend line 16 Gann fans 17 Horizontal line
18 Speed resistance lines are used to graphically design trends in data and to analyze problems of prediction. markup a chart with common rise and run ratios. allows to add a horizontal line to your chart for showing support or resistance on price chart. Displays two trend lines and the slope of each line defines a different rate of change. 19 Add bmp objects allows to add bitmap object to charts. 20 Free line 21 Cross hair symbol Allows user to draw any free hand drawing/marking on chart. Curcer changes to cross hair viewng. 22 Darvas box Darvas box is a technical indicator which allows to identify break outs. This button enables and disables darvas boxes viewing on chart. POWER TRADE SAVASHARE An E‐Broking Initiative of Sushil Finance 3. To view index information for a plotted point, click the required point or drag the required area. With the left mouse button pressed, drag the mouse across a range of points and view the details. 4. To display graphically the open, high, low, close price values of the scrip, right‐click inside the window and select OHLC. 5. To view multiple scrips and watch the variations in the same window, select Manage Scrips toolbar icon. Bhav Copy Bhav Copy gives an overview of fluctuations, and the trade volume of all contracts that are published by the Exchange based on the market session. Usually, a Bhav Copy is broadcasted at the end of each trading session. Power Trade provides an exclusive Bhav Copy for each market segment. View Bhav Copy 1. Click View > Bhav Copy > Bhav Copy (Equity)/(Derivatives)/MCX/NCDEX/MCXSX/Spread/NSEDS/NSEL. The respective Bhav Copy window is displayed with OHLC Price details and 52W High/Low values. The displayed details can be saved for future reference. The Bhav Copy can be converted into a Text File Format or downloaded locally. Multiple Bhav Copy windows can be invoked simultaneously. 2. To convert the Bhav copy into text format, right‐click inside the Bhav Copy window; select Save As and specify the location where you want to save. Trades Trade Book provides trade details. Using the Trade Book, you can view the orders, which are executed. For viewing selective transaction output, the Trade Filter window can be used. Applying Filter conditions in Trades 1. Highlight a security in the Market Watch window. 2. Click View> Trades. Alternatively, click the toolbar icon or press F8. The Trades window is displayed for that particular scrip. Press F8 again, will invoke the Trades Book [All} window. 3. Right‐click inside the Trades window and select Filter from the various right‐click options available. The Trade Filter window is displayed. By default, it displays Trades from all Instrument Types. 3. As required, apply the conditions you want in the filter and Click Apply. Accordingly, the conditional output is displayed. 7 | P a g e The All sub‐option displays the entire records POWER TRADE SAVASHARE An E‐Broking Initiative of Sushil Finance of the selected filter option. See an Example Order Entry time stamp feature stamps the order entry time in an added field called Server time in Trade window. This field displays the time when an order is actually placed. To view selective Trade details, right‐click inside the Trade Book window, click Column Profile and customize the window columns as required. Bulk Trade Modification 1. Click View> Trades or press F8. The Trades window is displayed. 2. Select multiple scrips. 3. Right‐click inside the Trades window and click Modify. On confirmation, the Bulk Trade Modification window is displayed. 4. Modify the changes as required. 5. Click Modify. Trades Online Backup 1.
2.
3.
4.
Right‐click inside the Trades window. Click Online Backup. The Online Backup window is displayed to take the Trades backup. If required, click Change... to modify the backup location. Click Generate File. The Trades backup is taken. Net Position Net Position displays the net position details for all instrument types or contracts or commodities. You can view daily net position for all instruments with details like contracts, total buy/sell quantity, buy/sell average, net quantity, net average, net value, net price along with the MTM G/L and MTMV Positions. •
•
•
•
The negative (‐) Net Quantity indicates a Sold position. The positive Net Quantity indicates a Bought position. The negative (‐) Net Value signifies the negative Amount. The positive Net Value signifies the positive Amount. View Net Position Details Based on Product Type 8 | P a g e POWER TRADE SAVASHARE An E‐Broking Initiative of Sushil Finance 1. Click View > Net Position. Alternatively, click the toolbar icon . The Integrated Net Position window is displayed with the position details of the executed transactions. 2. Select Product type as Margin/Delivery/MTF/PTST. The respective Product Type details are displayed in Net Position window. Square off All the Net Position 1. Click View > Net Position. Alternatively, click the toolbar icon . The Integrated Net Position window is displayed with the position details of the executed transactions. 2. Right‐click inside the window and select Square‐off All. The Square Off window is displayed. 3. Double click the order to modify. 4. Click Modify. 5. Click Submit, to Submit the order. Accordingly, the Net position is squared‐off. Position Conversion 1. Click View > Net Position. Alternatively, click the toolbar icon . The Integrated Net Position window is displayed with the position details of the executed transactions. 2. Right‐click inside the window and select Position Conversion options as one of the following: Convert Buy Position, Convert Sell Position, Convert Net Position. The Conversion window is displayed. 3. Type Quantity. 4. Click Convert. On authentication, the position is converted from Margin to Delivery. Message Log Message Log window contains all the messages such as market messages, order confirmations, trade confirmations, auction messages, and system messages. Also the messages modified in Short Message Setting can also be viewed in Message Log window. View Message Log 1. Click View> Message Log. Alternatively, click the toolbar icon or F10. The Message Log window is displayed with details. 2. Right‐click inside the Message Log window. Point to View on the shortcut menu and select the type of message you wish to see, from the message log sub‐menu. The corresponding messages are displayed in the window. The title bar of the message displays the selected type of the message. Security Information Security Information is a detail market information of the selected security updated on real‐time basis. It includes intricate market synopsis specifying the Face Value, AVM Buy and Sell, Qty Freeze percentage. 9 | P a g e POWER TRADE SAVASHARE An E‐Broking Initiative of Sushil Finance 1. Click View > Security Information. Alternatively, Shift + F7 or click the toolbar icon Security Information window is displayed. 2. Select the Exchange and enter the Symbol. The related information is displayed . The Contract Information Contract information displays contracts belonging to the Commodity, spot, future or option segments. Power Trade provides the same on real‐time basis, facilitating quick user‐responses during placing orders. View Contract Information 1. Click View > Contract Information/ press Shift +F8. The Contract Information window is displayed. 2. Select Exchange. Accordingly, specify the Instrument Type, Instrument Name, Symbol and Expiry Date. 3. Alternatively, highlight a Contract in the Market Watch window and invoke the Contract Information window. Simultaneously, the window displays the contract details Indices View Indices View displays all indices of all market segments. This view is available by default on your logon to Power Trade. To view the Indices, click View > Indices View. The Index View window is displayed. Also few more indices provided by the Exchange are available in Indices View. 1. To add an index, right‐click on Index View. The All Indexes window is displayed. 2. Select Exchange. Click Ok Full Screen Full Screen hide all menus and display only the work areas in Power Trade. To do so, click View > Full Screen. To restore, click Close Market Watch Market Watch enables viewing detail market information of equities and derivatives on a continuous basis. Further, it enables displaying a predefined profile by default and browse required market details. Power Trade facilitates creating highly parameterized and customizable market details. A customized column display can be saved for future use or even made as the default display. On applying a Portfolio, placing of orders is also supported from within Market Watch window. Using this window you can do the following: •
•
•
Work with Market Watch Place Orders from within the Market Watch window POWER TRADE Charts 10 | P a g e POWER TRADE SAVASHARE An E‐Broking Initiative of Sushil Finance Features •
•
•
•
•
•
•
•
•
Place Buy and Sell orders Display of real‐time based market intricate details within a self‐adjusting grid Highly integrated Portfolio creation on the fly Selection of Portfolio on real‐time basis Customizable display of market information Subjective market data information at a right‐click One‐click selection of entire (scrip) row Arrange column contents in ascending or descending order Support multiple instances of Market Watch Work with Market Watch 1. Click Market > Market Watch or click the toolbar icon (
Watch window is displayed. ). Alternatively, press F4. The Market By default, the Market Watch window is empty. On setting a default portfolio through Tools > Preferences‐Workspace,the portfolio is made available on invoking the Market Watch. 2. To add contracts from the filter bar, enter the scrip code/symbol; press ENTER. 3. If the contract is a derivatives contract, Highlight the contract in the Market Watch and press Enter. The Derivatives watch window is invoked that lists all the contracts of the underlying. 4. To remove scrip, highlight the contract and press DELETE. 5. To change order of scrips, highlight the scrip and use drag‐n‐drop to a new location. Alternatively, on highlighting use cut‐ paste (right‐click options). 6. To view selective Market details, Right‐click inside the Market Watch. Various options are made available: Scrip Portfolio, Save Portfolio, Title Bar, Column Profile, Save Column Profile, Size to Fit, Customize, Cut, Copy, Paste. 7. Select the required option. Further, specify the data values as required to accomplish the task. 8. You can add a separator and distinctly separate two columns in the Market Watch. In the Column Profile window, from the Available Columns, select Separator; click Add. Only one column separator can be added. Place Orders from within the Market Watch window 1. Select the scrip in the Market Watch. 2. Press F1/(+) for (Buy Order) or F2/(‐) for (Sell Order). 3. Enter the required values and click Submit. 11 | P a g e To view selective market watch details, right‐click inside the Market Watch window, click Column POWER TRADE SAVASHARE An E‐Broking Initiative of Sushil Finance Profile and customize the window columns as required. Chart Features Chart provides graphical representation of scrip prices along with accompanying indicators and Price Styles. POWER TRADE Charts consist of Basic and Advanced Types. Features •
•
•
•
•
•
•
Four Charts windows in Basic Chart and Eight Charts windows in advance charts can be opened at a point of time Charts can be saved along with indicators as templates and same can be loaded later Charts can be printed along with tools and indicators added Back Test of Indicators and Alerts on indicators Facility to create and save new color scheme Facility of Order Entry from Chart with price of mouse cursor Availability of short cut keys for commonly used functions A separate Help file of POWER TRADE Chart Language has been provided for Custom Indicator and Custom Condition builder. 1. Click Market > Market Watch or click the toolbar icon (
). Alternatively, press F4. The Market Watch window is displayed. 2. Select the instrument name and symbol from the filter bar and press ENTER. 3. Right‐click on a contracts in the portfolio and select Historic Chart. 4. To view Intraday charts, Right‐click on a contract in the portfolio and select Intraday. Alternatively, press Ctrl + H for Historical Charts. The Historic Graph window is displayed. 5. Select Price Style by double clicking on current price style. You can select any of the following: Bar Chart, Candle Stick, Line, Mountain, Point & Figure, Renko, Kagi, Three line brake, Equivolume, Equivolume shadow, Candle Volume, Heikin Ashi. 6. Select Drawing tools from Line Toolbar option of Chart Menu or press L shortcut key. The drawing tools can be edited by double‐clicking on the tool. Also all tools can be deleted through right click option provided. 7. Select Indicators from Add Indicator option of right‐click menu or by pressing shortcut key S. Refer Technical Indicators. 8. Click Add. The Simple Moving Average window is displayed. 9. To delete the added indicator, select the indicator by clicking on it. Right‐click and select Delete Series. The selected indicator is deleted. 10. Right‐click inside Intra Day chart and select Show Pivot Level, to view Support, Resistance and Pivot Level. 11. Select Time Periods like Intraday, Daily, Weekly, Monthly, Quarterly and Yearly through shortcut keys as well as option provided in chart itself. 12. Right‐click inside the chart to view more window options. 12 | P a g e POWER TRADE SAVASHARE An E‐Broking Initiative of Sushil Finance Right Click Option Options Sub Options Descriptions Load Load Chart Load Indicator Template Load Color scheme Select to load saved chart template. Select to load saved indicator template. Select to create and save new color scheme. Save Chart Select to save chart details Print Chart Save Chart Bitmap Save Indicator Template Save Chart As Excel Select to save Chart in a Bitmap format. Select to save indicator template. Select to export chart values in excel. Select to print chart image View Scale Type Semi log Select semi log scale type. Linear Select Linear scale type. Scale Alignment Right Align Select to right align chart view Left Alignment Show X grid Show Y grid Select to left align chart view. Save Grids Scale Decimals 13 | P a g e Select to view X axis grid Select to view Y axis grid Select to view Scale Decimals. Right Drawing Space Show Records for X Labels Panel Separators Select to view Right Drawing space option. Select to show record for X Labels Select to view Panel Separators Panel Borders Select to view Panel Borders. Display Titles Select to Display titles. Display Left Click Info box Set Y Scale Select to Display Left click info. Box. Select to set Y scale. POWER TRADE Styles SAVASHARE An E‐Broking Initiative of Sushil Finance Reset Y Scale Select to Reset Y scale. Reset Y Scale for all series 3 D Style Select to Reset Y Scale for all series. Select to add Three D Style. Select to show wide candles. Add Indicator Show Wide Candles Select to invoke Add Modify Indicators Window Change Scrip Zoom Icon Select to change different scrip’s Select to zoom icon. Zoom Reset Select to reset zoom view. Zoom In Select zoom in to get a close‐up view of the chart. Zoom Out Select zoom out, to view more of the chart at a reduce size. Help Indicator Select to invoke indicator help. Title Bar Select to view Title Bar. Zoom (is used to increase or decrease no. of bars) Derivatives Chain Derivatives Chain facilitates explicit viewing of derivative details in Derivatives Watch. This watch is similar to Market Watch in functionality and includes Equity and Derivatives scrips. The Derivatives Watch only previews the contract details and excludes other Equity scrips details. View Derivatives Watch 1. Highlight a Derivatives contract in the Market Watch window. 2. Click Market > Derivatives Chain. The Derivatives Watch window is displayed. Place Orders from within the Derivatives Watch window 1. Select the scrip in the Derivative Watch. 2. Press F1/(+) for (Buy Order) or F2/(‐) for (Sell Order). 3. Enter the required values and click Submit Filtered/ Profile Watch Filtered/ Profile Watch window is used to view specified conditions. When we apply the condition and if that condition is satisfied then data will appear in filtered profile watch for specific time interval. 14 | P a g e POWER TRADE SAVASHARE An E‐Broking Initiative of Sushil Finance View Filtered/ Profile Watch 1. Click Market > Filtered/ Profile Watch. The FILTERED MARKET WATCH window is displayed with the Select Portfolio. 2. Select a Portfolio you want to view. The Select Condition window is displayed. 3. Select the condition. The selected condition is applied on the portfolio viewed in the Filtered/Profile Watch window. 4. If required, to change the applied condition, right‐click inside the Filtered/Profile Watch and select Apply Condition. 5. Select the condition and click Apply. Condition Generator Condition Generator enables creating condition expressions that generate Filtered Market Watch or Tick Watch. These are formed using the given parameters and can include one or more clauses. For example, the Condition Expression can contain more than one condition separated using either the AND or OR operators. The And operator implies the two conditions have to met completely, whereas the OR operator results in an output even if one of the conditions are fulfilled. In addition, if required, the conditional expressions can be modified. Generate Conditions 1.
2.
3.
4.
5.
Click Tools > Condition Generator. The Condition Generator window is displayed. Specify the name of the conditional expression. Enter the expression details. Click End. Click Save Condition. The Condition Generator saves the condition. Manage Conditional Expressions 1.
2.
3.
4.
5.
Click Tools > Condition Generator. The Condition Generator window is displayed. Select the Condition Expression. The expression details are loaded. Edit the expression, as required. Click Save Condition. To delete the expression, click Delete Condition. Example 1. Create an Expression for: the change in price is about 5 % or more and the previous traded price is about or more than 52 weeks high. 2. Select %change in the first column, operator as >= %change from the second column, from the third select >= 5, LTP>=52WK High. The Condition Generator creates the Expression. Tick Watch Tick Watch enables to apply conditions and watch market movement at each tick. Tick Watch specifically provides those scrips that fit into given criteria. It displays change at every tick and introduces a new 15 | P a g e POWER TRADE SAVASHARE An E‐Broking Initiative of Sushil Finance data row of scrip. The rows are appended one after another. The condition expressions are created using Condition Generator. For example, if condition criterion is (% change >= 1), then scrips that have the 1% change in their price are displayed in Tick Watch. With every tick, change is reflected in the window View Tick Watch 1.
2.
3.
4.
Click Market > Tick Watch. The TICK WATCH window is displayed with the Select Portfolio Select a Portfolio you want to view. The Select Condition window is displayed. Select the condition. Selected condition is applied on portfolio viewed in Tick Watch window. If required, to change applied condition, right‐click inside Tick Watch and select Modify Condition. 5. Click Apply. The Tick Watch is displayed applied with the selected criteria. The watch is updated on every tick. The updates can be further controlled by using the Pause/ Continue right‐click options. After closing the window, a confirmation message is displayed to save data. Condition Generator Condition Generator enables creating condition expressions that generate Filtered Market Watch or Tick Watch. These are formed using the given parameters and can include one or more clauses. For example, the Condition Expression can contain more than one condition separated using either the AND or OR operators. The And operator implies the two conditions have to met completely, whereas the OR operator results in an output even if one of the conditions are fulfilled. In addition, if required, the conditional expressions can be modified. Generate Conditions 1.
2.
3.
4.
5.
Click Tools > Condition Generator. The Condition Generator window is displayed. Specify the name of the conditional expression. Enter the expression details. Click End. Click Save Condition. The Condition Generator saves the condition. Manage Conditional Expressions 1.
2.
3.
4.
5.
Click Tools > Condition Generator. The Condition Generator window is displayed. Select the Condition Expression. The expression details are loaded. Edit the expression, as required. Click Save Condition. To delete the expression, click Delete Condition. 16 | P a g e POWER TRADE SAVASHARE An E‐Broking Initiative of Sushil Finance Example 1. Create an Expression for: the change in price is about 5 % or more and the previous traded price is about or more than 52 weeks high. 2. Select %change in the first column, operator as >= %change from the second column, from the third select >= 5, LTP>=52WK High. The Condition Generator creates the Expression. Market Picture Market Picture provides comprehensive market information ‐ Open, High, Low, Close ‐ of a security in real time. The Price, Quantity, and Number of Orders for Buy and Sell side is available. •
•
•
Multiple instances of the window supported Facility to view most recent market changes of security Display of comprehensive market information View Market Picture 1. Click Market > Market Picture. Alternatively, press F5. The Market Picture window is displayed with the cursor blinking in the Symbol field. 2. Enter Symbol and press TAB. The respective market information is displayed. If required, Enter the Scrip Code in previous field and press TAB. 3. Click Refresh to view most recent market picture of the security. 4. On highlighting the security in Market Watch, invoking Market Picture displays the real‐time market information of selected security Extended Market Picture Extended Market Picture is only available for BSE. In this window, you can view No of Orders, Cumulative Quantity, Average Bid Rate and Bid Rate. View Extended Market Picture 1. Click Market > Extended Market Picture. Alternatively, press F9. The Market Picture window is displayed with the cursor blinking in the Symbol field. 2. Enter Symbol and press TAB. The respective market information is displayed. If required, Enter the Scrip Code in previous field and press TAB. 3. Click Refresh to view most recent market picture of the security. 4. On highlighting the security in Market Watch, invoking Market Picture displays the real‐time market information of selected security Data Window Data Window displays indices of various Exchanges showing the real‐time updates. To view the indices, click Market > Data Window > Select the Index. The window lists update Index Trend/Volume Trend with a DN, UP or <‐>. The DN indicates a Down or decreasing index value, UP 17 | P a g e POWER TRADE SAVASHARE An E‐Broking Initiative of Sushil Finance signifies a rising or increasing value and <‐> implies a no change in the index value. The Indices Bar displays the current Nifty, Sensex values. Market Status Market Status indicates about the current status of various market segments segregated into their available market types. Following status are displayed: •
•
Open ‐ the market segment is available for trading. Close ‐ the market segment is unavailable. View Market Status 1. Click Market > Market Status. The Market Status window displays the Market Type and Status for the Market Segment. 2. To view online status details of other market segments, select the segment as required. Most Active Securities [With Filter] Most active securities [With Filter] displays details of market on real‐time basis. The security listing is based either on Value or Volume of securities. A filter facility window helps to view subjective information as required. View Most Active Securities With Filter Option 1. Click Market > Most Active Securities [With Filter]. Alternatively, press Shift+ F10. The Most Active Securities window is displayed. 2. Select the Exchange and the Instrument Type in the list. When you select the Exchange as BSE, you need to type the group. 3. Type the number of securities you want to view in the Sec Cnt. field. 4. Select Volume or Value. 5. Select Filter Between. Type the minimum and maximum range for the percentage change of a scrip and click Refresh. Based on the selected category, the following details are displayed in the window: 1. Scrip Code 2. Scrip Details 3. Volume (in 000’s) 4. Value (in lacs) 5. Last Traded Price 6. Right‐click inside the Most Active Securities window. Click Create Profile. The Most Active Securities profile is displayed in a new window titled:The Most Active Securities. 7. To save the column profile, right‐click inside the window and select Save Column Profile from the shortcut menu. 18 | P a g e You can open only one Most Active Securities with filter window. POWER TRADE SAVASHARE An E‐Broking Initiative of Sushil Finance Gainers Losers [With Filter] 0 Gainers Losers [Filters] window is used to view 0 gainers and losers. The details are sorted in order of percentage change for various instrument types. The security details are updated online. Maximum 200 0 gainers and losers details can be viewed. View 0 Gainers and Losers Using Filter Option 1. Click Market > 0 Gainers Losers [with Filter]. Alternatively, press Ctrl + F10. The 0 Gainer and Losers [Filter] window is displayed. 2. Select the Exch and the Inst Type from the drop‐down list. When you select the Exchange as BSE, you need to type the group. 3. Type the number of securities you want to view in the Sec Cnt. field. 4. Select Gainers or Losers. 5. Click Gainers to view 0 gainers details. 6. Click Losers to view 0 losers details. 7. Select LTP between check box. Type minimum and maximum range of the required last traded price and click Refresh. The scrips with the last traded price between the given values are displayed. Based on the selected category, the following details are displayed in the window: 1. Scrip Code 2. Scrip Details 3. Previous Close Price 4. % Change 5. Last Traded Price You can open only one 0 Gainers and Losers Filter window. Heat Map Heat Map shows percentage change in particular scrip indicated with change in color. Blue shade for scrips that have their prices increased and Red for the scrips that have prices trailed for the day. The intensity of the color depends upon the percentage change in that scrip. It is a quick and better analysis of the scrip information, based on which the trading calls are made. Work with the Heat Map 1. Click Market Watch > Heat Map. The HeatMap window is displayed. 2. Right‐click and click Load Portfolio. 3. Select the portfolio from the existing list and click Apply. The Heat Map for the selected portfolio is shown. 4. Double click on a scrip. It shows the percentage change. 5. Right‐click and click Sort Heat Map to arrange the scrips in their ascending order of their names. 19 | P a g e POWER TRADE SAVASHARE An E‐Broking Initiative of Sushil Finance Combined Best Five In Combined Best Five window user can view Combined depth of NSE and BSE as well as user can place order for its desired quantity in both the exchanges at a single click. To use this feature Scrip Mapping is need to be done from Scrip Mapping View option available in Tools > Combined Best Five. Combined Best Five Buyers and Sellers 1. Click Market > Combined Best Five. Alternatively, press Ctrl + F5. The Combined Best Five window is displayed. 2. Type POWER TRADE Scrip Code. Press Tab. 3. Click (
) to view more options in detail. The combined Best Five Buyers and Sellers is displayed with following details. •
Total Buy •
Total Sell •
Last Trade •
Last Traded Time •
Volume •
Option Type Pivot Point\Support\Resistance Watch Pivot Point/Support/Resistance Watch is used to view Support and Resistance for portfolio added in Pivot Point/Support/Resistance Watch window based on Parameters set in Tools > Default Parameters > Pivot point/support/Resistance Parameters. View the Pivot Point/Support/Resistance Watch 1. To view, click Market > Pivot Point Support Resistance Watch or press Ctrl + Shift + F5. The Pivot Point/Support/Resistance Watch window is displayed with details. •
Exchange •
Market Type •
Instrument Type •
Instrument Name
•
Code •
Symbol •
Ser/Exp •
Strike Price •
Option Type •
Scrip Name 20 | P a g e POWER TRADE SAVASHARE An E‐Broking Initiative of Sushil Finance •
Status •
ND •
Total Buy Back •
CA •
Buy Quantity •
Buy Price •
Sell Price •
Sell Qty •
Last Traded Price •
Trend Indicator •
Last Traded Time •
Disclosed Price Range •
Volume in (000s) •
Value (in lacs) •
% Change •
Avg.Traded Price
•
High •
Low •
Open •
Close •
Total Buy Quantity •
Total Sell Quantity •
Open Interest •
% Open Interest •
Last Update Time •
In the Money •
Net Change in Rs. •
Fair Value •
Last Traded Quantity •
I •
Lend Yield •
Borrow Yield •
Last Traded PriceYield •
High Open Interest •
Low Open Interest •
Price Quotation Unit •
Tender •
Previous Day Open •
Previous Day High •
Previous Day 21 | P a g e POWER TRADE SAVASHARE An E‐Broking Initiative of Sushil Finance Close •
Resistance 4 •
Resistance 3 •
Resistance 1 •
Pivot Point •
Support 1 •
Suppport 2 •
Support 3 •
Support 4 •
S/R PP Calculation Method •
Pivot Point Formula •
Open Interest Previous Close Apply a Portfolio 1. To view, click Market > Pivot Point Support Resistance Watch or press Ctrl + Shift + F5. The Pivot Point/Support/Resistance Watch window is displayed with details. 2. Right‐click inside the window and click Scrip Portfolio on the shortcut menu. The Select Portfolio dialog box is displayed. 3. Select a portfolio name in the list and click Apply. The details of this portfolio can be viewed in the window. Save a Portfolio 1. To view, click Market > Pivot Point Support Resistance Watch or press Ctrl + Shift + F5. The Pivot Point/Support/Resistance Watch window is displayed with details. 2. Add the required scrips. 3. Right‐click inside the window and click Save Portfolio on the shortcut menu. The Save Portfolio dialog box is displayed. 4. Enter a portfolio name. Click OK. Options Watch Options watch is used to view greek values such as Delta, Gamma and theta. View Options Watch To view the Options Watch, click Market > Options Watch. The Options Watch window is displayed 22 | P a g e POWER TRADE SAVASHARE An E‐Broking Initiative of Sushil Finance The trading activity begins by placing orders for the required scrips. Dealing with orders in Power Trade is an easy task and a key‐press activity. Power Trade provides explicit order entry windows for the various market segments invoked using shortcut key combinations. Further, an Order Book displays entire orders placed for the day chronologically along with their current status. The basic methodology of placing orders is simple, quick and easy. Placing of orders can be done within the Market Watch or directly inputting values in order entry pane. Depending on order type ‐ buy/sell ‐ the background of order entry pane is changed. The Blue background implies a Buy Order Entry and a Red background indicates a Sell Order Entry. Power Trade provides separate panes for Cash Order Entry, Derivatives Order Entry and even Fast Order Entry. The pending orders can be modified or canceled, if required and simultaneously the Order book is updated. Place Buy order 1. Highlight a security in the Market Watch window. 2. Click Orders > Place Buy Orders/ press F1. Alternatively, click the toolbar icon .The Order Entry window in the Buy (Blue color) mode is displayed. 3. Select one of various order types and enter appropriate values. 4. Click Submit. 5. If you enter price value as 0.00, then the order is submitted at market price. It is then reflected in Order Book as MKT in Miscellaneous column. In case you specify price other than zero, then order becomes limit order. 6. Based on Exchange and Instrument type you select, following are the order types Place Sell Orders Place Sell orders window submits Sell orders in equity market. For placing orders, select a security in Market Watch or directly enter appropriate values for order in the Order Entry. Place Sell order 1. Highlight a security in the Market Watch window. 2. Click Orders > Place Sell Orders/ press F2. The Order Entry window in the Sell (Red color) mode is displayed. 3. Select one of various order types and enter appropriate values. 4. Click Submit (or press ENTER). 5. If you enter price value as 0.00, then the order is submitted at market price. It is then reflected in Order Book as MKT in Miscellaneous column. In case you specify price other than zero, then order becomes limit order. 6. If you enter price value as 0.00, then the order is submitted at market price. It is then reflected in Order Book as MKT in Miscellaneous column. In case you specify price other than zero, then order becomes limit order. 7. Based on Exchange and Instrument type you select, following are the order types: 23 | P a g e POWER TRADE SAVASHARE An E‐Broking Initiative of Sushil Finance Place Derv Buy Orders: ‐Place Derv Buy Orders submits Buy orders for derivatives market. For placing orders, select a security in Market Watch/ Derivatives Watch. Place Derv Buy orders 1. Highlight a contract in the Market Watch window. . The 2. Click Orders > Place Derv Buy Orders/ Press Ctrl+ F1. Alternatively, click the toolbar icon Derivatives Order Entry window is displayed. 3. Select one of various order types and enter appropriate values. 4. Click Submit (or press ENTER). 5. If you enter price value as 0.00, then the order is submitted at market price. It is then reflected in Order Book as MKT in Miscellaneous column. In case you specify price other than zero, then order becomes limit order. 6. Based on Exchange and Instrument type you select, following are the order types Place Derv Sell Orders:‐Place Derv Sell Orders window submits Sell orders for the derivatives market. For placing orders, select a security in the Market Watch/Derivatives Watch or directly entering the appropriate values for the order. Place Derv Sell Orders 1. Highlight a contract in the Market Watch window. 2. Click Orders > Place Derv Sell Orders/ Press Ctrl + F2. The Derivatives Order Entry window is displayed. 3. Select one of various order types and enter appropriate values. 4. Click Submit (or press ENTER). 5. If you enter price value as 0.00, then the order is submitted at market price. It is then reflected in Order Book as MKT in Miscellaneous column. In case you specify price other than zero, then order becomes limit order. 6. Based on Exchange and Instrument type you select, following are the order types Orders Book:‐Orders Book provides information regarding orders placed and status of the orders for all instruments. Orders Book pane is used for viewing, modifying, and canceling buy/sell orders. Orders Book: •
•
•
•
•
Update list of orders placed for the day Filter facility to view selective order details Availability of intricate order details Manage orders using single window support Customizable look of the Order Book as and when required View Orders Book 1. Highlight a security in the Market Watch window. 24 | P a g e POWER TRADE SAVASHARE An E‐Broking Initiative of Sushil Finance 2. Click Orders > Order Book or click the toolbar icon . Alternatively, press F3. The Orders Book window is displayed for that particular scrip. Press F3 again, will invoke the, Orders book ‐ [ALL] window. 3. Right‐click inside the Orders Book. Select Filter from the various right‐click options available. The Order Filter window is displayed. By default, it displays Orders from all Instrument Types. 4. As required, apply conditions in filter and accordingly, the conditional output is displayed. Order Entry time stamp feature stamps the order entry time in an added field called Server time in Order Book. This field displays the time when an order is actually placed. To view selective Order details, right‐click inside the Order Book window, click Column Profile and customize the window columns as required. AMO (After Market Orders) AMO orders are orders placed after the market sessions are closed. On placing the orders, the next day these are executed when you log on to the Exchange and on receiving the Market open message. The placing of orders is same as normal order entry. Features •
•
Placing of orders can be done directly using the same Order Filter screen. After entering order details you will get an order confirmation details stating that the AMO orders will be submitted in the next trading session. Confirmation of AMO orders can be viewed in the status bar. AMO orders can be cancelled. AMO orders will have an AMO ID and will have no Exchange Order number. •
•
View AMO (After Market Orders) 1. Click Orders > Order Book or click the toolbar icon . Alternatively, press F3. The Orders book ‐ [ALL] window is displayed. 2. Right‐click inside the Orders Book. Select Filter from the various right‐click options available. The Order Filter window is displayed. By default, it displays Orders from all Instrument Types. 3. To view AMO, select AMO; click Apply. Accordingly, the conditional output is displayed. 25 | P a g e AMO facility is available only for licensed users. POWER TRADE SAVASHARE An E‐Broking Initiative of Sushil Finance View the Orders Based on the Status 1. Highlight a security in the Market Watch window. 2. Click Orders > Order Book or click the toolbar icon . Alternatively, press F3. The Orders Book window is displayed for that particular scrip. Press F3 again, will invoke the, Orders book ‐ [ALL] window is displayed. 3. Click Orders > View > Required Status. Based on the selected status, the records are displayed in the Orders Book window. 4. Alternatively, Right‐click inside the Orders Book window. 5. Point to View and select the required status you want to view, from the sub‐menu (for example: All, Pending, Unconfirmed, Executed, Cancelled, Rejected, Admin Pending). Based on the selected status, the records are displayed in the Orders Book window. Modify Orders/Cancel Orders 1. Highlight a security in the Market Watch window. 2. Click Orders > Order Book or click the toolbar icon. Alternatively, press F3. The Orders Book window is displayed for that particular scrip. Press F3 again, will invoke the, Orders book ‐ [ALL] window is displayed. 3. From the options available, select View > Pending. The book shows only pending orders. 4. Highlight the order to modify/cancel. Right‐click and select Modify/Cancel. Alternatively, to modify orders Click Orders > Modify/ Shift + F2. To cancel orders, Click Orders > Cancel/Shift +F1. Alternatively, click the toolbar icon The Order Entry window is displayed enabling only few editable fields. 5. As required, modify/cancel the details. Click OK. 6. To cancel all orders, Click Orders > Cancel All/Shift + F3. Alternatively, click the toolbar icon Online Backup Online backup comes handy for the back office operations. Power Trade even facilitates to backup the daily transactions ‐ the order details, exercise requests and the trades performed. The backup file is in a plain text format and saved locally for future use. Take Online Backup 1. Click Tools > On‐line Backup. Alternatively, press Alt+F7 or click the toolbar icon . The OnlineBackup window is displayed. The backup is performed for Trades, Orders and Exercise transactions. 2. Select the Market Segment for which the backup is required. On selecting the segment, the available transactions are displayed. For example, for NSE Derivative, you can have a backup taken for Trades, Orders, Exercise. 3. Select the transactionfor creating the backing file. 4. If required, click Change... if you want to save the backup file into a different location other than the displayed path. 26 | P a g e POWER TRADE SAVASHARE An E‐Broking Initiative of Sushil Finance 5. If required, select the User Remarks for entering the user comments also in the backup file. 6. Click Generate. The backup is generated for the selected transactions: Order Management Online Backup, Trades Management Online Backup and Exercise Online Backup. The generated text file can be uploaded by back‐office for future use. Order Time and Order Entry time feature is active, when Trades Online Backup is selected. Portfolio Portfolio comprises of group of securities. Power Trade supports creation of well‐diversified profiles. Securities from various market segments ‐ NSE Equity and Derivatives, BSE Equity, MCX, NSEL, MCX SX and so on ‐ can be clubbed together and viewed in the Market Watch. Manage portfolios is an easy and quick task in Power Trade. Default portfolio selection is configurable that makes the most favourite portfolio to be displayed each time on Power Trade logon. •
•
•
•
Facility to search from available scrips from various market segments Highly integrated Portfolio creation on the fly Set up of Default portfolio Updated list of portfolios made available in Market Watch at any instance of time Using Portfolio, you can do the following: •
•
•
Create Portfolios Apply Portfolios Modify/Remove Portfolios Create Portfolios Method I 1. Click Tools > Portfolio. Alternatively, press Alt+F3. The Portfolio window is displayed. 2. Enter a new name of the portfolio you want to create. 3. Search and add securities. You can search securities based on Scrip Code, Symbol, Series, Market Type, Expiry Date, Strike Price, Option Type. Generally, you can employ more than one filter condition and search securities resulting in narrowed and precise search results. Dynamic Portfolio can be created for Futures and Options. For example, once it is created for three consecutive months i.e March, April, May and March month gets over, then it will consider April as current month, May as near month, June as far month. 4. Click Save. The Portfolio is saved with the entire scrips from the selected grid. Method II 1. In a Market Watch window, add securities/ contracts you want to trade with. 2. Right‐click inside the Market Watch window. 27 | P a g e POWER TRADE SAVASHARE An E‐Broking Initiative of Sushil Finance 3. From the available options, select Save Portfolio. 4. Enter a unique name. 5. Click OK. A new portfolio with the added scrips is created. Apply Portfolios 1. Right‐click inside the Market watch window, select Scrip Portfolio. 2. Select a portfolio and click Apply. The details of the selected profile are viewed in the Market Watch. The Market Watch can display multiple portfolios at a time. Modify/Remove Portfolios 1. Click Tools > Portfolio. Alternatively, press Alt + F3.The Portfolio window is displayed. 2. Select the Portfolio to modify/remove. The profile details are displayed in the grid. 3. Select and add new scrips, as required. The selected security is added in an ascending order of the security name list. 4. To remove scrips, select the scrip from the Selected grid, click Remove. 5. Click Save to update the changes. On confirmation, the selected profile is updated. You can open only a single Portfolio window. Calculators Calculators supports six types of calculators: Options Calculator, Fair Value Calculator, Pivot Point/Support/Resistance Calculator, Retracement Calculator and Extension Calculator. The implied volatility calculates the annualized standard deviation of daily change in price of a contract. Various factors effect implied volatility such as Exercise Price, Rate of Return, Maturity Date, and Option Price. Fair Value Calculator calculates the fair value of the future contract based on the Interest Rate and Maturity Time. The following activities are performed using the Calculators: •
•
•
•
•
•
Calculate Output Values using Options Calculator Calculate Implied Volatility using Options Calculator Calculate Fair Value using Fair Value Calculator Configure Pivot Point/Support Resistance Value Configure Retracement Value Configure Extension Value 28 | P a g e POWER TRADE SAVASHARE An E‐Broking Initiative of Sushil Finance Calculate Output Values using Options Calculator 1. Click Tools > Calculators > Options Calculator. Alternatively, press Ctrl + Page + Up. The FT Options Calculator window is displayed. 2. Type Spot Price. 3. Type Strike Price. 4. Type Volatility [%], 5. Type Interest Rate [%]. 6. Type Dividend Yield. 7. Type Days Until Expiration. 8. Select the required calculation method. 9. Click Calculate. The output values are displayed in the window. Calculate Implied Volatility using Options Calculator 1. Click Tools > Calculators > Options Calculator. Alternatively, press CTRL + PAGE UP. The FT Options Calculator window is displayed. 2. Type Spot Price. 3. Type Strike Price. 4. Type Volatility [%]. 5. Type Interest Rate [%]. 6. Type Dividend Yield. 7. Type Days Until Expiration. 8. Select Calculate Implied Volatility. 9. Select Option Type: Call Put. By default, Call option type is selected. 10. Type/modify the actual market value if required. 11. Click Implied Vol. The output values are calculated and displayed in the window. Order Time and Order Entry time feature is active, when Trades Online Backup is selected. Calculate Fair Value 1. Click Tools > Calculators > Fair Value Calculator. The Fair Value Calculator window is displayed. 2. Type Index Price, Interest Rate, Dividend, Contract Days values. 3. Click Calculate. The Fair value is displayed in the window. By default, the Interest Rate that is set in the Derivatives tab page of the Preferences window is displayed. Calculate Pivot Point/Support/Resistance Value 29 | P a g e POWER TRADE SAVASHARE An E‐Broking Initiative of Sushil Finance Pivot Point/Support/Resistance Value is used to calculate pivot point. 1. Click Tools > Calculators > Pivot Point/Support/Resistance Calculator. Alternatively, press CTRL + Shift + PAGE UP. The Pivot Point/Support/Resistance Calculator window is displayed. 2. Enter Open (O), High (H), Low (L), Close (C). 3. Select Support/Resistance/Pivot Point Method as Classic,Woodle, Camarilla, Fibonacci. 4. Select Pivot Point Formula as Default PP or Custom PP. For Custom PP, select the required formulas from the available list. 5. Click Calculate. The Calculated value is displayed in the Pivot Point/Support/Resistance Calculator. 6. Click Reset, to restore the default settings. Calculate Retracement Value Retracement Calculator is used to calculate retracement values. 1. Click Tools > Calculators > Retracement Calculator. Alternatively, press Shift +R. The Retracement Calculator window is displayed. 2. Enter Price 1. 3. Enter Price 2. 4. Click Calc, to calculate the retracement values. Calculate Extension Value Extension Calculator is used to calculate extension values. 1. Click Tools > Calculators > Extension Calculator. Alternatively, press Alt + E. The Extension Calculator window is displayed. 2. Enter Price 1. 3. Enter Price 2. 4. Enter Price 3. 5. Click Calc, to calculate the extension values. Preferences Preferences supports changing preferences commonly employed in the application. These can be configured as required. The Preferences window configures General, Order, Portfolio, Workspace, Derivative, Chart Preferences options. Configure General Preferences 1. Click Tools > Preferences. Alternatively, press Ctrl + R. The Preferences window is displayed with various tabs: General, Order, Portfolio, Workspace, Derivatives, Chart Preferences. By default, the General tab parameters are viewed. You can configure the following general settings: 1. On Event.....Do‐On occurrence of the selected events, the ticked (check mark) actions‐ Beep, Flash Message Bar, Message Box, Play Sound (If the Event is an Exchange Log Off session, a play sound can be set up. Click Browse to locate the file) ‐ are called. For 30 | P a g e POWER TRADE SAVASHARE An E‐Broking Initiative of Sushil Finance example, on Order Confirmation, if you select the Message Box, then on every order confirmation, Power Trade prompts with a message. 2. Data window options ‐Configures the data within the Data window. For example, configure the graph settings. Display each graph in a separate window. 3. Time Format used in Views ‐ Configures using a 12/24‐hour clock time period. 4. Always open the Order Book with ‐ Saves the current order status, as default setting for when you open the Order Book. Select one from All/ Pending/ unconfirmed/ Cancelled / Rejected/ Admin Pending. 5. Close all windows on log‐off ‐ On log off, the displayed windows are closed. 6. Preferred Exchange ‐ The selected Exchange is available as the default Exchange. 7. Allow Trade/Order Confirmation Message‐Only order and trade confirmation messages are displayed in the message bar. 8. Show Grid‐ Displays Market watch with grids. 9. Allow Trade/Order Confirmation Message‐Only order and trade confirmation messages are displayed in the message bar. 10. Enable Tool Tip 2. Configure the settings, as required. 3. Click Apply to make the configured values to act as the new default general value set. 4. Click OK. Configure Order Preferences 1. Click Tools > Preferences. The Preferences window is displayed with various tabs: General, Order, Portfolio, Workspace, Derivatives, Chart Preferences. By default, the General tab parameters are viewed. 2. Click Order tab. You can configure the following order‐related settings: 1. Initially always display the selected market segment. NSE EQ / NSE FO / BSE EQ / MCX FO / NCDEX FO/ MCXSX Futures. 2. Set confirmation message box on placing a Fresh order, confirming an order, placing a market order or canceling an order. Print Order Confirmations/ Trade Confirmations /MTM On‐line Calculation. 1. 1. Specify the minimum order Quantity value to trade with while placing orders in Market Lots. 2. Set alerts on market lot qty, price, value on surpassing the said value. 3. Set the order Quantity based on units or lots for the MCX or NCDEX markets. 4. Retain User Remarks 5. Set alert on surpassing the said value 3. Change the default settings, as required. 4. Click Apply to make the configured values to act as the new default order value set. 5. Click OK. The screen displays some of the configured Order settings. 31 | P a g e POWER TRADE SAVASHARE An E‐Broking Initiative of Sushil Finance Configure Portfolio Preferences 1. Click Tools > Preferences. The Preferences window is displayed with various tabs: General, Order, Portfolio, Workspace, Derivatives, Chart Preferences. By default, the General tab parameters are viewed. 2. Click Portfolio tab. You can configure the following portfolio‐related settings: 1. Select a default portfolio to be displayed in the Market watch. 2. Select Symbol Trend Color On/Off (LTP v/s Prev.Close), Include Underlying, Include Other (FUT/OPT) 3. Select portfolios to be displayed in Market Watch, Equity, Derivatives, and Integrated Tickers. In addition, set the Speed for each of them. 4. Specify time in secs to update index information after fixed interval 3. Click Apply to make the configured values to act as the new default portfolio value set. 4. Click OK. The screen displays some of the configured Portfolio settings. Configure Workspace Preferences 1. Click Tools > Preferences. The Preferences window is displayed with various tabs: General, Order, Portfolio, Workspace, Derivatives, Chart Preferences. By default, the General tab parameters are viewed. 2. Click Workspace tab. You can configure the following parameters: 1. Select the Saved workspace to initially start working with. 2. Display current Date/Time on the main POWER TRADE window. 3. Configure to lock the workstation if idle after a preset time period (in minutes/seconds). 4. Set percentage to freeze Daily Price Range. 5. Configure to set column Profile setting to retain all columns, default profile or last used column profile. 3. Click Apply to make the configured values to act as new default workspace value set. 4. Click OK. The screen displays some of the configured Workspace settings Configure Derivatives Preferences 1. Click Tools > Preferences. The Preferences window is displayed with various tabs: General, Order, Portfolio, Workspace, Derivatives, Chart Preferences. By default, the General tab parameters are viewed. 2. Click Derivatives tab. You can configure the following parameters: 1. Specify Interest Rate in percentage. 2. Specify Dividend in Percentage. 3. Specify Volatility% for Fair Value Calculator. 4. Specify Underlying price for Equities or Futures. 5. Select Use ATM Implied Volatility. 6. Specify Options Pricing Model as Black & Scholes. For Binomial, specify steps. 7. Specify Parameters for Online Volatility Update or Theoretical Price. 8. Select Show Strikes Default as Traded Only or Traded Plus. 9. Specify default Neutralize options from Option, Shares or Futures. 10. Specify Pro, Cli or All. For Cli, specify Client details. 11. Specify Default Symbol to be displayed in Greek Neutralizer. 12. Select Open Chart Payoff. 32 | P a g e POWER TRADE SAVASHARE An E‐Broking Initiative of Sushil Finance 13. Select to Include Realized Profit in Payoff. 3. Click Apply to make the configured values to act as new default Derivatives value set. 4. Click OK. The screen displays some of the configured Derivatives settings Configure Chart Preferences 1. Click Tools > Preferences. The Preferences window is displayed with various tabs: General, Order, Portfolio, Workspace, Derivatives, Chart Preferences. By default, the General tab parameters are viewed. 2. Click Chart Preference tab. You can configure the following parameters: 3. Specify the following: 1. Chart With Title Bar ‐ Select the check box to view chart with title bar. 2. Absolute Time bar Interval ‐ If checked the system will consider absolute time interval. On clearing the check mark the bar will start from the first tick received and next bar will be created after the specified time interval. 3. Plot Volume Chart‐ To view chart with volume. 4. Download Data‐To download intraday chart data. 5. Data Window‐ The chart will open with data window. 6. Tools Auto Save‐ Select to save drawing tool. If checked you can view last saved drawing tool for that particular scrip. 7. Ask For Retracement Parameters‐ On selection, Retracement Parameter window will open, when you select Fibonacci Retracement drawing tool. If not checked you can directly draw Retracement without Fibonacci Retracement Window. 8. Close on ESC ‐ The chart window will close on pressing Escape shortcut key. 9. Select the duration of Historic Chart Type to be viewed on Daily, Weekly, Monthly, Quarterly and Yearly basis. 10. Specify Right Drawing space‐ Specify the value for right drawing space on chart. The right drawing space is the space between the last bar and vertical scale on the chart. 11. Specify Candle Wick Width‐Specify the value to change the width of wick of price styles. 12. Indicator Template‐ On selecting the check box the chart will open with selected indicator template. 13. Color Scheme‐On selecting the check box the chart will open with selected Color Scheme. 14. Intraday Historic Days‐Specify the days in text box. The chart will open with specified days Intraday data. 15. Darvas S0 Percent‐ Specify the Darvas s0 percent in text box. The Darvas boxes will show the selected s0 percent levels on the chart. 16. Default Tool Color‐Selects default color for drawing tools. On drawing tool on chart, the tools will display in selected color. 4. Click Apply to make the configured values to act as new default Chart value set. 5. Click OK. The screen displays some of the configured Chart settings Customize Customize implies changing the appearance of a view (window). The Color, Layout and Font attributes of the same can be changed to suit your work environment. 33 | P a g e POWER TRADE SAVASHARE An E‐Broking Initiative of Sushil Finance The Color change can be applied to the Foreground, Background of selected view. Configure the Size and Position and General settings can be applied in the Layout and the text font‐face and other attributes are changed using the Font. In addition, Power Trade enables customizing as a right‐click option. Customize View 1. Click Tools > Customize. Alternatively, right‐click in an open window/ view and select Customize. The Customize window is displayed with three tabs: 1. Color ‐ Customizes the color attributes for the given views 2. 1. Select the Attribute of the view you want to customize. 2. Select a color for the attribute. The Preview box displays the text after applying the selected attributes. 3. Layout ‐ Customizes the layout attributes for the given views. 4. 1. In Size & Position Settings, select Default to give you the default settings; the Last Saved displays the previously stored window settings. 2. In General Settings, select Title Bar, Status Bar to be displayed in the window. 5. Font ‐ Customizes the Font attributes for the given views. 6. 1. Select a View you want to customize. 2. Click Select Font to change the font attributes. 3. Click Apply. Accordingly, the customized changes are applied to the views. 4. Click OK. Condition Generator Condition Generator enables creating condition expressions that generate Filtered Market Watch or Tick Watch. These are formed using the given parameters and can include one or more clauses. For example, the Condition Expression can contain more than one condition separated using either the AND or OR operators. The And operator implies the two conditions have to met completely, whereas the OR operator results in an output even if one of the conditions are fulfilled. In addition, if required, the conditional expressions can be modified. Generate Conditions 1.
2.
3.
4.
5.
Click Tools > Condition Generator. The Condition Generator window is displayed. Specify the name of the conditional expression. Enter the expression details. Click End. Click Save Condition. The Condition Generator saves the condition. Manage Conditional Expressions 1. Click Tools > Condition Generator. The Condition Generator window is displayed. 34 | P a g e POWER TRADE 2.
3.
4.
5.
SAVASHARE An E‐Broking Initiative of Sushil Finance Select the Condition Expression. The expression details are loaded. Edit the expression, as required. Click Save Condition. To delete the expression, click Delete Condition. Example Create an Expression for: the change in price is about 5 % or more and the previous traded price is about or more than 52 weeks high. Select %change in the first column, operator as >= %change from the second column, from the third select >= 5, LTP>=52WK High. The Condition Generator creates the Expression. Expression Builder Expression Builder is used to create formulas. Create Formula 1.Click Tools > Expression Builder, to create a formula. The Expression Builder window is displayed. 2.Select formula Example: Price [N‐EQ]‐Price [B‐EQ]= 3.Click Save, to add the details. The details successfully saved message is displayed. Click Close. 4.Type Column Name, to see the result. Example:OUTPUT 5.Click Save. Column Profile Column Profile enables customizing the window column display — add, remove, position columns. It is available for all windows. Customize column profile 1. Click Tools > Column Profile. Alternatively, Right‐click inside a displayed windowor press Ctrl + K. A shortcut menu is displayed. Select Column Profile. The respective column selection window is displayed. The Available Columns shows the entire column list in the window. The Selected Columns shows which columns are currently displayed in the window. 2. For adding a column, select the column you want to add from the Available Columns; click Add. 3. For removing a column, select the column you want to remove in the Selected Columns; click Remove. 4. For positioning the order of the columns, select the column in the Selected Columns; click MoveUp to move the selected column up in the list or click MoveDown to move the selected column down in the list. 5. For applying a sort order, select the column in the Selected Columns; click SortBtn. 6. For making the column profile available for future use, click Save. 7. For deleting an existing column profile, select the column profile; click Delete. 8. For making the column profile available each time on invoking the window, click SetAsDefault. 35 | P a g e POWER TRADE SAVASHARE An E‐Broking Initiative of Sushil Finance 9. Click OK. Right‐click inside the window and select Save Column Profile to save the column profile. Filter You can filter and view the records based on the filter conditions given in the Filter dialog box. The filter option is available for commonly used windows of Power Trade : Trades Book, Orders Book, Ex Book..etc. View Filter details 1.
2.
3.
4.
5.
6.
7.
8.
9.
10.
11.
12.
13.
Open any windowthat has filter option. Click EX > Exercise Book. The Exercise Book window is displayed. Click Tools > Filter. The Filter window is displayed. Select Exchange. Select the EX Type in the Filter dialog box. You can select various filter conditions and view selective Ex details. You can select All, to view the details of all the contracts. To view Exercise Details for a Particular Contract, Select Contract and view particular contract details. Type the Instrument Name and Symbol. Select the Expiry Date, Strike Price, and Opt. Type in the list. Click Apply. The exercise details for that particular contract are displayed in the Exercise Book window. Click Cancel, to close the Filter dialog box. To view Exercise Details for a Particular EX No, Select EX No check box; and type the EX NO number. Click Apply. The order details for that particular EX number are displayed in the EX Book window. Click Cancel, to close the Filter dialog box. Lock Workstation Lock Workstation is a lock mechanism that avoids unauthorized access to the workstations. The lock can be invoked (activated) if the workstation is idle for a fixed time‐period or manually as required. The minutes mentioned in the time‐interval in the Preferences > Workspace tab enables the lock mechanism. The two occasions on which the lock is invoked: 1. Click Tools > Lock Workstation. Alternatively, press Ctrl+W. The workstation is locked. The window focuses on the password field. To resume working, enter the Password. 2. The time‐interval mentioned in the Power Trade Preferences is passed that is the workstation remains idle for the said time, the workstation is locked. Further, to release the lock and resume working, enter the Password. 36 | P a g e POWER TRADE SAVASHARE An E‐Broking Initiative of Sushil Finance In addition, the lock is invoked at a predefined time interval mentioned in Preferences. Broadcast Server Reconnect Broadcast Server Reconnect displays Broadcast Server IP, UDP Port, TCP Port with option to connect or disconnect. Broadcast Server Reconnect ‐Click Tools > Broadcast Server Reconnect. The Broadcast Server Reconnect window is displayed. Check Client Facilities Client Facilities are the privileges granted by the Administrator. The facilities include the following: •
•
•
•
•
•
•
•
•
•
•
Data Window Filter Watch View Tick Watch View Graph View Open in Excel View Exercise Delivery View Position Conversion Stock Watch Greek Watch Advanced Chart Chart Pattern Key Board Short Cut Key is used to create and modify user defined short cut keys for different sub menus. Create and Modify Key Board Short Cuts 1. Click Tools > Key Board ShortCut Key/press Alt+ K. The KeyBoard Short Cut Key window is displayed. 2. Enter a Profie Name, to create a new profile. The window is divided into two panes. 3. The left pane displays all menu list. The right pane includes all sub‐menus available in the selected menu in left pane. 4. The shortcut key displays the available short cut key of the selected submenu. You can use the existing one or Create a new one. 5. To create a new one: 6. The submenu will display a blank field on selection in Modifier and key. 7. Enter the modifier and key and Click Add. 6. To modify the existing key, enter the modifier in Modifier. 7. Select the key in key. 8. Click Modify. 37 | P a g e POWER TRADE SAVASHARE An E‐Broking Initiative of Sushil Finance 9. Click Save, to save the created profile. 10. Click Reset, to reset a particular key to a default setting. 11. Click Reset All, to reset all short cut keys to default setting Set Alerts Set Alerts enables user to add and delete Scrip Alert, Options Alerts, and set Events Scanner. The following activities are performed using the Calculators: •
•
•
Add and Delete Scrip Alert Add & Delete Options Alerts Set Events Scanner Add and Delete Scrip Alert 1.Click Tools > Alerts > Set Alerts. Alternatively, press CTRL + A. The Alert window is displayed. By default, Scrip Alert tab is displayed. 2.Select Market Segment. 3.Enter Code. 4.Enter Symbol. 5.Select Alert Conditions from the available drop‐down list. 6.Enter Remarks. (It is mandatory) 7.Select Alert Type as Message Box, Message Bar, Balloon, Beep. 8.Select Goods Till Cancel (GTC) check box. 9.Click Add. 10. In case you require to delete a scrip alert, select the required scrip alerts from the below grid. 11. Click Delete. Add & Delete Options Alerts 1.Click Tools > Alerts > Set Alerts. Alternatively, press CTRL + A. The Alert window is displayed. By default, Scrip Alert tab is displayed. 2.Click Options Alerts tab. 3.Select Exchange, Symbol, Expiry. 4.Select Base Strike. 5.Select Cover Base. 6.Select Calls or puts. 7.Select the required Alert Condition. 8.Enter Remarks.(It is mandatory) 9.Select Message Box, Message Bar, Balloon or Beep. 10. Select GTC check box. 11. Click Add. The details are displayed in the pane. 12. In case you require to delete an options alert, select the required scrip alerts from the below grid. 13. Click Delete. 0 38 | P a g e POWER TRADE SAVASHARE An E‐Broking Initiative of Sushil Finance Set Events Scanner 1.Click Tools > Alerts > Set Alerts. Alternatively, press CTRL + A. The Alert window is displayed. By default, Scrip Alert tab is displayed. 2.Click Events Scanner tab. 3.Select Portfolio. 4.Select the check box against the required Bullish Conditions (Opened Gap Up, Current Rate High of the Day, Grossing Previous Day High Up, 52 Week High, Opened % above Previous Day's Close). 5.Select the check box against the required Bearish Conditions (Opened Gap Down, Current Rate Low of the Day, Grossing Previous Day Low Down, 52 Week Low, Opened % above Previous Day's Close). 6.Select the check box against the required Misc Conditions (Crossing Previous Day High Down, Volume % of Previous Volume, LTO % of Previous volume, Crossing Previous Day Low Up, Totla Volume crossing Previous Days Total Volume). 7.Select the required pivot points check box. 8.Click Start, to start the events scanning process. 9.Click S0, to s0 the process. Alerts Log In Alerts Log window, user can view the History of Alerts triggered today. View Alerts Log Click Tools > Alerts > Alerts Log. Alternatively, press Alt + G. The Alerts Log window is displayed. •
Market Segment •
Scrip Name •
Code •
Alert Condition •
Triggered Time •
Set Time Stock Watch Stock Watch provides the status of the Depository. It includes details such as your current Depository Participant balance at the start of the day. This would be enabled only if the member has availed the DP licence. View Stock Details 1. Click Stocks > Stock Watch. The Stock Watch window is displayed with details such as Available, Blocked, Free DP Holdings, Available, Blocked, Free Broker Holdings, Available, Blocked, Free Today's Positions, Collateral Values and Credit For Sale for the client scrip wise. 39 | P a g e POWER TRADE SAVASHARE An E‐Broking Initiative of Sushil Finance 2. Right‐click inside the Stock Watch Window and select Filter. The Stock Watch Filter window is displayed. 3. Enter Scrip Name, ISIN No. 4. Click OK. Based on the filter conditions Stock Watch window is displayed. 5. Select a particular Scrip. Right‐click inside the window to place sell order; select Today's + Receivable + Demat Stock. The Sell Order Entry window is displayed. 6. Enter appropriate values. 7. Click Submit. Net Position Net Position displays the open positions in Equity and Derivatives markets. POWER TRADE™ Admin also supports squaring off the positions from the Net Position window as and when required. You can also view daily and expiry periodicity. View Net Position (Integrated) 1. To view consolidated position status of the Equity and Derivatives market, click RMS > Net Position. The Net Position Filter window is displayed. Alternatively, press Alt + Shift + F6. 2. Specify the filter conditions as required. 3. Click OK. The Integrated Net Position window is displayed with following details: •
Exchange •
Scrip Code •
Instrument Type •
Instrument Name •
Client Name •
Symbol •
Series/Expiry •
Strike Price •
Option Type •
Scrip Name •
Buy Quantity •
Buy Lot •
Buy Weight •
Buy Value •
Buy Average •
Sell Quantity •
Sell Lot •
Sell Weight •
Sell Value •
Sell Average •
Net Quantity •
Net Lot •
Net Weight •
Net Value •
Net Price •
Market Price •
MTMV Pos •
MTM G/L •
Product Type •
Client 40 | P a g e POWER TRADE SAVASHARE An E‐Broking Initiative of Sushil Finance Links Links enables connecting to important links from the main window itself. You can browse following web sites links: •
•
•
•
•
•
•
•
•
•
•
•
•
Home Page ‐ www.sushilfinance.com SEBI NSE ‐ www.nseindia.com BSE ‐ www.bseindia.com Savashare DISCLAIMER ‐ Company disclaimer URL PRIVACY POLICY‐ Company privacy policy URL CLIENT BROKER NORMS ‐ Client Broker Norms URL BACK OFFICE TRANSFER FUND FUNDS VIEW Span Report Margin Report Span Report Span Report allows the user to gauge the margin requirements of contracts across F&O segments, Currency segment and Commodity segments. View Span Report 1. Click Links à Span Report. The Span Margin page is displayed with details. 2. Select Market Segment. 3. Click Submit 4. To print Span Margin View details, click Print symbol (
). Margin Report Margin Report provides Exchange wise Product wise Scrip wise Utilized Margin and Available / Utilized Margin Summary. Generate Margin Report 1. Click Links à Margin Report. The Margin Report page is displayed. 2. Select Report Type as Exchange wise Product wise Scrip wise Utilized Margin or Available / Utilized Margin Summary. 3. Select Periodicity/Exchange from the drop‐down list. 4. Click Submit. The details based on the selected criteria are displayed in the Margin Report page. 41 | P a g e POWER TRADE SAVASHARE An E‐Broking Initiative of Sushil Finance Collateral Modification Collateral Modification allows user to modify collateral quantity. Manage Collateral 1. Click Links à Collateral Modification. The Collateral Quantity Modification page is displayed. By default, ISIN Code, Scrip Name and Collateral Price details are displayed. 2. Modify the values as required. •
•
In New Collateral Quantity, enter DP, Pool, NSE and BSE. In Summary of Collateral Details of Entire Holding, enter Collateral Value and New Collateral Value. Based on the quantity it calculates collateral value. 3. Click Apply, to modify collateral quantity. 4. Click Refresh, to view most recent updated details Transfer Funds To Broker Account To Broker Account in Fund transfer facilitates to increase the Limit/Exposure of trading by online transfer of payment to Broker. Features •
•
Quicker method to transfer money Increase limit sets for various markets at a same time Transfer Fund to Broker Account 1. Click Links à TRANSFER FUND à To Broker Account. The Transfer Fund to Broker Account window is displayed. 2. Select a Bank to transfer payment. 3. Select Exchange. 4. Type Amount to transfer. 5. If required, click Clear to delete the contents. 6. Click Submit. The bank’s website is displayed. 7. Type User Name and Password. Funds Report Funds Report enables to view various transactions executed by broker and client along with Bank details. Features 42 | P a g e POWER TRADE •
SAVASHARE An E‐Broking Initiative of Sushil Finance Generate online transfer of payment report View Funds Report 1. Click Links à TRANSFER FUND à Funds Report. The Transfer Fund‐Funds Report window is displayed. 2. Click Funds Report in the left pane. The Funds Report page is displayed. 3. Select All, to view all details. 4. Select Date, to view date wise details. 5. Select From and To Date. 6. Select Status as either Success, Failure or All. 7. Click Submit. The details based on the selected criteria are displayed in the Fund Report page. 8. To view the Funds Report details in an Excel sheet, click the Excel sheet symbol (
Funds View Funds View displays the funds allotted for different segments. View Funds View 1. Click Links à Funds View. The Reports‐Funds View window is displayed. 2. Select Periodicity. 3. Click Get. The details based on the selected criteria are displayed in Reports‐Funds View window. 4. To view Funds View details in an Excel sheet, click the Excel sheet symbol (
5. To print Funds View details, click Print symbol (
). ). CHARTS Chart Features Chart provides graphical representation of scrip prices along with accompanying indicators and Price Styles. POWER TRADE Charts consist of Basic and Advanced Types. Features •
•
•
•
•
•
•
Four Charts windows in Basic Chart and Eight Charts windows in advance charts can be opened at a point of time Charts can be saved along with indicators as templates and same can be loaded later Charts can be printed along with tools and indicators added Back Test of Indicators and Alerts on indicators Facility to create and save new color scheme Facility of Order Entry from Chart with price of mouse cursor Availability of short cut keys for commonly used functions 43 | P a g e POWER TRADE SAVASHARE An E‐Broking Initiative of Sushil Finance A separate Help file of POWER TRADE Chart Language has been provided for Custom Indicator and Custom Condition builder. 1. Click Market > Market Watch or click the toolbar icon (
). Alternatively, press F4. The Market Watch window is displayed. 2. Select the instrument name and symbol from the filter bar and press ENTER. 3. Right‐click on a contracts in the portfolio and select Historic Chart. 4. To view Intraday charts, Right‐click on a contract in the portfolio and select Intraday. Alternatively, press Ctrl + H for Historical Charts. The Historic Graph window is displayed. 5. Select Price Style by double clicking on current price style. You can select any of the following: Bar Chart, Candle Stick, Line, Mountain, Point & Figure, Renko, Kagi, Three line brake, Equivolume, Equivolume shadow, Candle Volume, Heikin Ashi. 6. Select Drawing tools from Line Toolbar option of Chart Menu or press L shortcut key. The drawing tools can be edited by double‐clicking on the tool. Also all tools can be deleted through right click option provided. 7. Select Indicators from Add Indicator option of right‐click menu or by pressing shortcut key S. Refer Technical Indicators. 8. Click Add. The Simple Moving Average window is displayed. 9. To delete the added indicator, select the indicator by clicking on it. Right‐click and select Delete Series. The selected indicator is deleted. 10. Right‐click inside Intra Day chart and select Show Pivot Level, to view Support, Resistance and Pivot Level. 11. Select Time Periods like Intraday, Daily, Weekly, Monthly, Quarterly and Yearly through shortcut keys as well as option provided in chart itself. 12. Right‐click inside the chart to view more window options. Right Click Option Options Sub Options Descriptions Load Load Chart Load Indicator Template Load Color scheme Select to load saved chart template. Select to load saved indicator template. Select to create and save new color scheme. Save 44 | P a g e Save Chart Save Chart Bitmap Save Indicator Template Save Chart As Excel Select to save chart details Select to save Chart in a Bitmap format. Select to save indicator template. Select to export chart values in excel. POWER TRADE SAVASHARE An E‐Broking Initiative of Sushil Finance Print Chart Select to print chart image View Scale Type Semi log Select semi log scale type. Linear Select Linear scale type. Scale Alignment Right Align Select to right align chart view Left Alignment Show X grid Show Y grid Select to left align chart view. Grids Scale Decimals Styles Select to view X axis grid Select to view Y axis grid Select to view Scale Decimals. Right Drawing Space Show Records for X Labels Panel Separators Select to view Right Drawing space option. Select to show record for X Labels Select to view Panel Separators Panel Borders Select to view Panel Borders. Display Titles Select to Display titles. Display Left Click Info box Set Y Scale Select to Display Left click info. Box. Select to set Y scale. Reset Y Scale Select to Reset Y scale. Reset Y Scale for all series 3 D Style Select to Reset Y Scale for all series. Select to add Three D Style. Select to show wide candles. Add Indicator Show Wide Candles Select to invoke Add Modify Indicators Window Change Scrip Zoom Icon Select to change different scrip’s Select to zoom icon. Zoom Reset Select to reset zoom view. Zoom In Select zoom in to get a close‐up view of the chart. Zoom (is used to increase or decrease no. of bars) 45 | P a g e POWER TRADE SAVASHARE An E‐Broking Initiative of Sushil Finance Zoom Out Select zoom out, to view more of the chart at a reduce size. Help Indicator Select to invoke indicator help. Title Bar Select to view Title Bar. Data Window Data window is used to display data window on the charts. Data window contains Cursor Value, Scrip Name, Open, High, Low, Close, Volume and details of indicators (If any). View Data Window To view, Click Chart > Data Window. Alternatively press CTRL + D. The Data window is displayed Line Tool Bar Line tool bar is used to display line tool bar on the chart. Line Tool Bar contains drawing tools. View Line Tool Bar To view, Click Chart > Line Tool Bar. Alternatively, press L. The Line Tool Bar is displayed. Custom Indicator Custom Indicator is used to create custom indicators. You can enter vector programming language and make condition with your own formula. A multiple line text box is provided for this purpose. The POWER TRADE Chart Language help file has been provided in the Custom Indicator Builder Window. Test & Save Custom Indicator 1. Click Chart > Custom Indicator Builder. The Custom Indicator Builder is displayed. 2. Use vector programming language and make indicator with your own formula in multi line text box provided. Click Help, to invoke POWER TRADE Chart Language help file. 3. Click Test & Save. 4. Enter File Name. 5. Click Save, to save the Custom Indicator. 6. To directly load already saved Custom Indicator,Click Load. The Open Window is displayed. 7. Select the required file of already saved Custom Indicator from the Open dialog box, and click Open. The Custom Indicator Builder displays the details. 8. Click Cancel, to close the window. 46 | P a g e POWER TRADE SAVASHARE An E‐Broking Initiative of Sushil Finance Custom Condition Builder Condition Builder window is used to create custom conditions. You can enter vector programming language and make condition with your own formula. A multiple line text box is provided for this purpose. The POWER TRADE Chart Language help file has been provided in the Custom Condition Builder Window. Test & Save Custom Condition 1. Click Chart > Custom Condition Builder. The Custom Condition Builder is displayed. 2. Use vector programming language and make indicator with your own formula in multi line text box provided. Click Help, to invoke POWER TRADE Chart Language help file. 3. Click Test & Save. 4. Enter File Name. 5. Click Save, to save the Custom Condition. 6. To directly load already saved Custom Condition,Click Load. The Open Window is displayed. 7. Select the required file of already saved Custom Condition from the Open dialog box, and click Open. The Custom Condition Builder displays the details. 8. Click Cancel, to close the window Technical Alert Builder Technical Alert Builder allows to set alerts based on Technical Indicators. You can select group of scrips, the indicator of your choice and input parameters. Using these parameters the software monitors the group of scrip's specified and generate alert's in Technical Alert Tracker (If live query is selected), or In Technical Report (If Report Query is selected). Along with the technical conditions you can also select conditions from Condition Generator. Add Technical Alert Builder 1. To view, Click Chart > Technical Alert Builder. The Technical Alert Builder is displayed. 2. Select Portfolio. 3. In Alert Condition, select the On Indicator option to activate indicator option. Accordingly select the required indicators. 4. Enter Periods. 5. Select Source. 6. Select Period.(If intraday option is selected then enter value in Min Text box) 7. Select the required color from the Color drop‐down list. 8. To create condition, select combination from three drop‐down list provided. 9. Click Add condition, to add condition. The details are displayed in the grid below. 10. Instead of On indicator option you can select Custom option. 11. Click Custom radio button. 12. Select already saved custom condition from the drop‐down list provided Or Click Custom Condition Builder to create new custom condition. 13. The condition list is available. You can add these conditions with above mention both options i.e. with On Indicator or Custom. The list is the list of conditions available in Condition Generator. You need to select the check box to add condition. 47 | P a g e POWER TRADE SAVASHARE An E‐Broking Initiative of Sushil Finance 14.
15.
16.
17.
18.
Click Save, to save the condition. Enter File Name. Click Load. The Open Window is displayed. Select the required file of already saved condition from the Open dialog box, and click Open. Click Live > Click Run. ( Technical tracker window will open and update online with satisfied conditions) 19. Click S0, to s0 the process. 20. Click Report > Click Run ( Technical Report window will open with satisfied conditions Technical Alert Tracker Technical Alert Tracker Window displays the alerts generated in Technical Alert Builder. The Alerts are updated online. The values can be saved in excel. You can view chart from Technical Alert Tracker window through the right‐click option available. View Technical Alert Tracker Details 1. To view, Click Chart > Technical Alert Tracker. The Technical Alert Tracker window is displayed. 2. Right‐click inside the window to view more options (Such as View Graph, Save To Excel, Alerts etc). Technical Report Technical Report window enables viewing reports of alerts generated in Technical Alert Builder. The reports are available in sortable columns showing if condition set in Strategy Maker is satisfied by the scrip in the portfolio or not. The report can be saved in Excel. View Technical Report 1. To view, Click Chart > Technical Report. The Technical Report window is displayed with details. 2. Right‐click inside the window to view more options (Such as View Graph, Save To Excel, Alerts etc). Indicator Back Test Indicator Back Test enables to back test strategy (custom or indicator based) on the historical data available with the user. An option is provided to run back test on single scrip, or on user defined portfolio. The back test can be run for a particular period or for all data. Different settings are available for entry and exit positions. Indicator Back Test facilitates viewing back test report in Last Viewed Report window. Run Indicator Back Test 1. To view, Click Chart > Indicator Back Test. The Technical Indicator Back Test window is displayed. 2. Select On Group and then select portfolio name from the drop‐down list. OR 48 | P a g e POWER TRADE SAVASHARE An E‐Broking Initiative of Sushil Finance 3. Select Single Scrip and Click (
), to select single scrip from change scrip window. The Open window is displayed. 4. Select Period. If you selects intraday option then enter value in Min Text box 5. Select All Data to back test on all data or Select Period, to select From and To Date. 7. In Setting for Entry and Exit Position, Select Long Setting or Short Setting from drop‐down list provided. 8. Select Indicators. Select indicator from the drop‐down list. Specify Periods and select Source. 9. To create condition, select combination from provided drop‐down list. OR 10. Select Custom radio button. 11. Select already saved custom condition from the provided drop‐down list or click Custom Condition Builder to create new custom condition. 12. In Setting for Exit Position, select Indicators form the drop‐down list. 13. Specify Periods. 14. Select Source. 15. To create conditions, Select combination from the drop‐down list. OR 16. Select Custom radio button to select already saved custom condition from the drop‐down list provided. 17. Enter Slip %. 18. Select Maximum Days Open check box and accordingly select number of days. 19. Click Save. 20. Enter file name. Save the back test file. 21. To load the already saved back test file, Click Load. The Open window is displayed. 22. Select the required file of already saved Back Test from the Open dialog box, and click Open. 23. Click Run Back Test, to run Back Test process. The Last Viewed Report window will open with back test details. Last Viewed Report Last Viewed Report window opens with back test details when back test is complete. You can also view Last viewed report at anytime from this option. If there is no previous report, then the report will be blank. View Last Viewed Report 1. To view, Click Chart > Last Viewed Report. The Last Viewed Report window is displayed. 2. Right‐click inside the window to view more options (Such as Show Chart and Trade Log). Technical Indicators •
Accumulation Swing Index‐ Accumulation Swing Index (Wilder) is a cumulative total of the Swing Index. Interpretation 49 | P a g e POWER TRADE SAVASHARE An E‐Broking Initiative of Sushil Finance The Accumulation Swing Index may be analyzed using technical indicators, line studies, and chart patterns, as an alternative view of price action. •
•
Aroon Index and Oscillator ‐ Aroon indicator is often used to determine whether a stock is trending or not and how stable the trend is. Interpretation Trends are determined by extreme values (above 80) of both lines (Aroon up and Aroon down), whereas unstable prices are determined when both lines are low (less than 20). Bollinger Bands Bollinger Bands are similar in comparison to moving average envelopes. Bollinger Bands are calculated using standard deviations instead of shifting bands by a fixed percentage. Interpretation Bollinger Bands (as with most bands) can be imposed over an actual price or another indicator. When prices rise above the upper band or fall below the lower band, a change in direction may occur when the price penetrates the band after a small reversal from the opposite direction. •
Fractal Chaos Bands The chaotic nature of stock market movements explains why it is sometimes difficult to distinguish hourly charts from monthly charts if the time scale is not given. The patterns are similar regardless of the time resolution. Like the chambers of the nautilus, each level is like the one before it, but the size is different. To determine what is happening in the current level of resolution, the fractal chaos band indicator can be used to examine these patterns. •
Chaikin Money Flow The Chaikin Money Flow oscillator is a momentum indicator that spots buying and selling by calculating price and volume together. This indicator is based upon Chaikin Accumulation/Distribution, which is in turn based upon the premise that if a stock closes above its midpoint [(high+low)/2] for the day then there was accumulation that day, and if it closes below its midpoint, then there was distribution that day. •
Chaikin Volatility Oscillator The Chaikin Volatility Oscillator is a moving average derivative of the Accumulation/Distribution index. Interpretation The Chaikin Volatility Oscillator adjusts with respect to volatility, independent of long‐term price action. 50 | P a g e POWER TRADE •
SAVASHARE An E‐Broking Initiative of Sushil Finance Chande Momentum Oscillator (CMO) The Chande Momentum Oscillator (Chande) is an advanced momentum oscillator derived from linear regression. Interpretation Increasingly high values of CMO may indicate that prices are trending strongly upwards. Conversely, increasingly low values of CMO may indicate that prices are trending strongly downwards. CMO is related to MACD and Price Rate of Change (ROC). •
Commodity Channel Index The CCI was developed by Donald Lambert. The purpose of this indicator is to identify cyclical turns in commodities. This indicator oscillates between an overbought and oversold condition and works best in a sideways market. •
Comparative Relative Strength The Comparative Relative Strength index divides one price field by another price field. Interpretation The base security is outperforming the other security when the Comparative RSI is trending upwards. •
Detrended Price Oscillator The Detrended Price Oscillator is used when long‐term trends or outliers must be removed from prices or index indicators. Interpretation This indicator is often used to supplement a standard price chart. Other indicators can be plotted over the Detrended Price Oscillator. •
Directional Movement System The Welles Wilder's Directional Movement System contains five indicators; ADX, DI+, DI‐, DX, and ADXR. The ADX (Average Directional Movement Index) is an indicator of how much the market is trending, either up or down: the higher the ADX line, the more the market is trending and the more suitable it becomes for a trend‐following system. This indicator consists of two lines: DI+ and DI‐, the first one being a measure of uptrend and the second one a measure of downtrend. Detailed information about this indicator and formulas can be found in Welles Wilder's book, "New Concepts in Technical Trading Systems". The standard Directional Movement System draws a 14 period DI+ and a 14 period DI‐ in the same chart panel. ADX is also sometimes shown in the same chart panel. Interpretation A buy signal is given when DI+ crosses over DI‐, a sell signal is given when DI‐ crosses over DI+. 51 | P a g e POWER TRADE •
SAVASHARE An E‐Broking Initiative of Sushil Finance Ease of MovementThe Ease of Movement oscillator shows a unique relationship between price change and volume. InterpretationThe Ease of Movement oscillator rises when prices are trending upwards under low volume, and likewise, the Ease of Movement oscillator falls when prices are trending downwards under low volume. •
Exponential Moving Average An Exponential Moving Average is similar to a Simple Moving Average. An EMA is calculated by applying a small percentage of the current value to the previous value. An EMA applies more weight to recent values. Interpretation A Moving Average is most often used to average values for a smoother representation of the underlying price or indicator. •
High Low Bands High Low Bands consist of triangular moving averages calculated from the underling price, shifted up and down by a fixed percentage, and include a median value. Interpretation When prices rise above the upper band or fall below the lower band, a change in direction may occur when the price penetrates the band after a small reversal from the opposite direction. •
High Minus Low Returns the high price minus the low price. •
Historical Volatility Index Historical volatility is the log‐normal standard deviation. The Historical Volatility Index is based on the book by Don Fishback, "Odds: The Key to 90% Winners". This formula will output a 30‐day historical volatility index between 1 and 0: Stdev(Log(Close / Close Yesterday), 30) * Sqrt(365) Note that some traders use 252 instead of 365 for the bar history that is used in the square root calculation. 52 | P a g e POWER TRADE SAVASHARE An E‐Broking Initiative of Sushil Finance The Log value is a natural log (ie Log10). Interpretation Similar to the coefficient of determination, the higher the value is, the more volatile the stock is •
Linear Regression Linear regression is a common statistical method used to forecast values using least squares fit. •
Moving Average Convergence / Divergence (MACD) The MACD is a moving average oscillator that shows potential overbought/oversold phases of market fluctuation. The MACD is a calculation of two moving averages of the underlying price/indicator. Interpretation Buy/Sell interpretations may be derived from crossovers (calculated from the Signal Periods parameter), overbought/oversold levels of the MACD and divergences between MACD and actual price. •
Moving Average Convergence / Divergence (MACD) Histogram The MACD is a moving average oscillator that shows potential overbought/oversold phases of market fluctuation. The MACD is a calculation of two moving averages of the underlying price/indicator. The histogram is simply a bar graph of the MACD minus the MACD Signal line. Interpretation Buy/Sell interpretations may be derived from crossovers (calculated from the Signal Periods parameter), overbought/oversold levels of the MACD and divergences between MACD and actual price. •
Mass Index The Mass Index identifies price changes by indexing the narrowing and widening change between high and low prices. Interpretation According to the inventor of the Mass Index, reversals may occur when a 25‐period Mass Index rises above 27 or falls below 26.5. •
Median Price A Median Price is simply an average of one period’s high and low values. Interpretation A Median Price is often used as an alternative way of viewing price action, and also as a component for calculating other indicators. 53 | P a g e POWER TRADE •
SAVASHARE An E‐Broking Initiative of Sushil Finance Momentum The momentum indicator calculates change of over a specified length of time as a ratio. Interpretation Increasingly high values of the momentum oscillator may indicate that prices are trending strongly upwards. The momentum oscillator is closely related to MACD and Price Rate of Change (ROC). •
Money Flow Index The Money Flow Index measures money flow of a security, using volume and price for calculations. Interpretation Market bottoms below 20 and 0s above 80. Divergence of price and Money Flow Index are also used. •
Moving Average Envelope Moving Average Envelopes consist of moving averages calculated from the underling price, shifted up and down by a fixed percentage. Interpretation Moving Average Envelopes (or trading bands) can be imposed over an actual price or another indicator. When prices rise above the upper band or fall below the lower band, a change in direction may occur when the price penetrates the band after a small reversal from the opposite direction. Shift is a double value specifying the percentage of shift for each moving average from the actual values. •
Negative Volume Index The Negative Volume Index shows focus on periods when volume decreases from the previous period. Interpretation The interpretation of the Negative Volume Index is that well‐informed investors are buying when the index falls and uninformed investors are buying when the index rises. •
On Balance Volume The On Balance Volume indicator shows a relationship of price and volume as a momentum index. 54 | P a g e POWER TRADE SAVASHARE An E‐Broking Initiative of Sushil Finance Interpretation On Balance Volume index generally precedes actual price movements. The premise is that well‐
informed investors are buying when the index rises and uninformed investors are buying when the index falls. •
Parabolic SAR The Parabolic SAR was developed by Welles Wilder. This indicator is always in the market (whenever a position is closed, an opposing position is taken). The Parabolic SAR indicator is most often used to set trailing price s0s. A s0 and reversal (SAR) occurs when the price penetrates a Parabolic SAR level. •
Performance The Performance indicator calculates price performance as a normalized value or percentage. Interpretation A Performance indicator shows the price of a security as a normalized value. If the Performance indicator shows 50, then the price of the underlying security has increased 50% since the start of the Performance indicator calculations. Conversely, if the indictor shows –50, then the price of the underlying security has decreased 50% since the start of the Performance indicator calculations. •
Positive Volume Index The Positive Volume Index shows focus on periods when volume increases from the previous period. Interpretation The interpretation of the Positive Volume Index is that many investors are buying when the index rises, and selling when the index falls. •
Price Oscillator The Price Oscillator shows a spread of two moving averages. Interpretation The Price Oscillator is basically a moving average spread. Buying usually occurs when the oscillator rises, and conversely, selling usually occurs when the oscillator falls. •
Price Rate of Change The Price ROC shows the difference between the current price and the price one or more periods in the past. Interpretation A 12‐day Price ROC is most often used as an overbought/oversold indicator. 55 | P a g e POWER TRADE •
SAVASHARE An E‐Broking Initiative of Sushil Finance Price and Volume Trend The Price and Volume Trend index is closely related to the On Balance Volume index. Interpretation The Price and Volume Trend index generally precedes actual price movements. The premise is that well‐informed investors are buying when the index rises and uninformed investors are buying when the index falls. •
Rainbow Oscillator The Rainbow Oscillator is based upon multiple time frames of a moving average. Interpretation When values stay above 80 or below 20, the trend may reverse suddenly. •
Relative Strength Index (RSI) The RSI (Wilder) is a popular indicator that shows comparative price strength within a single security. Interpretation 9, 14 and 25 period RSI calculations are most popular. The most widely used method for interpreting the RSI is price/RSI divergence, support/resistance levels and RSI chart formations. •
Simple Moving Average The Simple Moving Average is simply an average of values over a specified period of time Interpretation A Moving Average is most often used to average values for a smoother representation of the underlying price or indicator. •
Prime Numbers Oscillator This indicator finds the nearest prime number from either the 0 or bottom of the series, and plots the difference between that prime number and the series itself. Interpretation This indicator can be used to spot market turning points. When the oscillator remains at the same high point for two consecutive periods in the positive range, consider selling. Conversely, when the oscillator remains at a low point for two consecutive periods in the negative range, consider buying. •
Prime Numbers Bands This indicator finds the nearest prime number for the high and low, and plots the two series as bands. Interpretation this indicator can be used to spot market trading ranges. •
Standard Deviations 56 | P a g e POWER TRADE SAVASHARE An E‐Broking Initiative of Sushil Finance Standard Deviation is a common statistical calculation that measures volatility. Other technical indicators are often calculated using standard deviations. Interpretation Major highs and lows often accompany extreme volatility. High values of standard deviations indicate that the price or indicator is more volatile than usual. •
Stochastic Oscillator The Stochastic Oscillator is a popular indicator that shows where a security’s price has closed in proportion to its closing price range over a specified period of time. Interpretation The Stochastic Oscillator has two components: %K and %D. %K is most often displayed as a solid line and %D is often shown as a dotted line. The most widely used method for interpreting the Stochastic Oscillator is to buy when either component rises above 80 or sell when either component falls below 20. Another way to interpret the Stochastic Oscillator is to buy when %K rises above %D, and conversely, sell when %K falls below %D. The most commonly used arguments are 9 for %K periods, 3 for %K slowing periods and 3 for %D smoothing. •
Fractal Chaos Oscillator The chaotic nature of stock market movements explains why it is sometimes difficult to distinguish hourly charts from monthly charts if the time scale is not given. The patterns are similar regardless of the time resolution. Like the chambers of the nautilus, each level is like the one before it, but the size is different. To determine what is happening in the current level of resolution, the fractal chaos oscillator can be used to examine these patterns. •
Swing Index The Swing Index (Wilder) is a popular indicator that shows comparative price strength within a single security by comparing the current open, high, low and close prices with previous prices. Interpretation The Swing Index is a component of the Accumulation Swing Index •
Time Series Moving Average A Time Series Moving Average is similar to a Simple Moving Average, except that values are derived from linear regression forecast values instead of raw values. Interpretation A Moving Average is most often used to average values for a smoother representation of the underlying price or indicator. 57 | P a g e POWER TRADE •
SAVASHARE An E‐Broking Initiative of Sushil Finance Trade Volume Index The Trade Volume index shows whether a security is being accumulated or distribute (similar to the Accumulation/Distribution index). Interpretation When the indicator is rising, the security is said to be accumulating. Conversely, when the indicator is falling, the security is said to being distributing. Prices may reverse when the indicator converges with price. •
Triangular Moving Average The Triangular Moving Average is similar to a Simple Moving Average, except that more weight is given to the price in the middle of the moving average periods. Interpretation A Moving Average is most often used to average values for a smoother representation of the underlying price or indicator. •
TRIX TRIX is a momentum oscillator that shows the rate of change of an exponentially averaged closing price. Interpretation The most common interpretation of the TRIX oscillator is to buy when the oscillator rises and sell when the oscillator falls. 3, 8 and 14 period moving averages are often used to smooth the TRIX oscillator. •
Stochastic Momentum Index The Stochastic Momentum Index, developed by William Blau, first appeared in the January 1993 issue of Stocks & Commodities magazine. This indicator plots the closeness relative to the midpoint of the recent high/low range. Interpretation The Stochastic Momentum Index has two components: %K and %D. %K is most often displayed as a solid line and %D is often shown as a dotted line. The most widely used method for interpreting the Stochastic Momentum Index is to buy when either component rises above 40 or sell when either component falls below 40. Another way to interpret the Stochastic Momentum Index is to buy when %K rises above %D, and conversely, sell when %K falls below %D. The most commonly used arguments are 13 for %K periods, 25 for %K smoothing, 2 for %K double smoothing, and 9 for %D periods. •
Average True Range The Average True Range (Wilder) measures market volatility. 58 | P a g e POWER TRADE SAVASHARE An E‐Broking Initiative of Sushil Finance Interpretation High ATR values may signal market bottoms, and low ATR values may signal neutral markets. •
Typical Price A Typical Price is simply an average of one period’s high, low and close values. Interpretation A Typical Price is often used as an alternative way of viewing price action, and also as a component for calculating other indicators. •
Ultimate Oscillator The Ultimate Oscillator compares prices with three oscillators, using three different periods for calculations. Interpretation The most popular interpretation of the Ultimate Oscillator is price/indicator divergence. •
Variable Moving Average A Variable Moving Average is an exponential moving average that adjusts to volatility. Interpretation A Moving Average is most often used to average values for a smoother representation of the underlying price or indicator. •
Vertical Horizontal Filter The Vertical Horizontal Filter (VHF) identifies whether a market is in a trending or choppy movement phase. Interpretation The VHF indicator is most commonly used as an indicator of market volatility. It is also frequently used as a component for other technical indicators. •
VIDYA VIDYA (Volatility Index Dynamic Average), developed by Chande, is a moving average derived from linear regression R2. Interpretation A Moving Average is most often used to average values for a smoother representation of the underlying price or indicator. Because VIDYA is a derivative of linear regression, it quickly adapts to volatility. R2Scale is a double value specifying the R‐Squared scale to use in the linear regression calculations. 59 | P a g e POWER TRADE SAVASHARE An E‐Broking Initiative of Sushil Finance Chande recommends a value between 0.5 and 0.8 (default value is 0.65). •
Volume Oscillator The Volume Oscillator shows a spread of two different moving averages of volume over a specified period of time. Interpretation Volume Oscillator offers a clear view of whether or not volume is increasing or decreasing. •
Volume Rate of Change (ROC) The Volume Rate of Change indicator shows clearly whether or not volume is trending in one direction or another. Interpretation Sharp Volume ROC increases may signal price breakouts. •
Weighted Close Weighted Close is an average of each day’s open, high, low, and close, where more weight is placed on the close. Interpretation The Weighted Close indicator is a simple method that offers a simplistic view of market prices. •
Weighted Moving Average A Weighted Moving Average places more weight on recent values and less weight on older values. Interpretation A Moving Average is most often used to average values for a smoother representation of the underlying price or indicator. •
Welles Wilder's Smoothing The Welles Wilder's Smoothing indicator is similar to an exponential moving average. The indicator does not use the standard exponential moving average formula. Welles Wilder described 1/14 of today's data + 13/14 of yesterday's average as a 14‐day exponential moving average. Interpretation This indicator is used in a the manner that any other moving average would be used. •
Williams’ Accumulation/Distribution The Accumulation/Distribution indicator shows a relationship of price and volume. 60 | P a g e POWER TRADE SAVASHARE An E‐Broking Initiative of Sushil Finance Interpretation When the indicator is rising, the security is said to be accumulating. Conversely, when the indicator is falling, the security is said to being distributing. Prices may reverse when the indicator converges with price. •
Williams’ %R Williams’ %R measures overbought/oversold levels. Interpretation The most widely used method for interpreting Williams’ %R is to buy when the indicator rises above 80 or sell when the indicator falls below 20. Exiting Power Trade 1. Click the Logoff icon. Alternatively, click Ctrl + O. 2. On confirmation, the Power Trade current session ends. 3. Close the window to exit. 61 | P a g e