1
Dartfish
User Guide
07/07/2011
© Dartfish. All rights reserved.
Table of contents
I
Table of contents
1
2
Introduction
1.1 Support
...................................................................................................................................
and help to use your software
3
2
Getting familiar with Dartfish
6
2.1 The...................................................................................................................................
Dartfish workspace
6
2.1.1
2.1.2
2.1.3
2.1.4
The Start Page
......................................................................................................................................................... 7
Displaying.........................................................................................................................................................
Dartfish Modules
8
The Library
......................................................................................................................................................... 8
Resizing w.........................................................................................................................................................
indow s
9
2.2 Video
...................................................................................................................................
playback
10
2.2.1
2.2.2
2.2.3
2.2.4
The Tim eline
......................................................................................................................................................... 10
Trim m ing.........................................................................................................................................................
video clips
10
Video panel
.........................................................................................................................................................
controls
11
Repeat m.........................................................................................................................................................
ode
12
2.3 Saving
...................................................................................................................................
projects and videos
12
2.3.1 Saving a project
......................................................................................................................................................... 12
2.3.2 Saving a new
.........................................................................................................................................................
video
13
2.4 Sharing
...................................................................................................................................
video files
14
2.4.1 Video Sharing
.........................................................................................................................................................
Wizard
14
2.4.2 Converting
.........................................................................................................................................................
video
15
2.5 Remote
...................................................................................................................................
controlling Dartfish
18
2.5.1 Installing.........................................................................................................................................................
the rem ote control
18
2.5.2 Using the.........................................................................................................................................................
Stream Zap rem ote
19
2.6 The
...................................................................................................................................
next steps
20
3
22
Video Library
3.1 Defining
...................................................................................................................................
your library
22
3.2 The
...................................................................................................................................
Library workspace
23
3.2.1
3.2.2
3.2.3
3.2.4
The Library
.........................................................................................................................................................
Toolbar
24
The Item s.........................................................................................................................................................
List
25
Item Properties
......................................................................................................................................................... 26
The Tray ......................................................................................................................................................... 28
3.3 Organizing
...................................................................................................................................
your library
29
3.3.1
3.3.2
3.3.3
3.3.4
3.3.5
3.3.6
3.3.7
3.3.8
Understanding
.........................................................................................................................................................
Keyw ords
29
Defining your
.........................................................................................................................................................
categories
30
Editing categories
......................................................................................................................................................... 30
Editing keyw
.........................................................................................................................................................
ords
31
Classifying
.........................................................................................................................................................
video clips
31
Rem oving.........................................................................................................................................................
keyw ords from video clips
32
Im porting/exporting
.........................................................................................................................................................
keyw ord sets
33
Exporting.........................................................................................................................................................
keyw ord data
33
3.4 Importing
...................................................................................................................................
files to the library
35
3.4.1 Using the.........................................................................................................................................................
Video File Im porter
36
Video File Importer
..................................................................................................................................................
- selecting files
36
Video File Importer
..................................................................................................................................................
- naming and filing videos
37
- Version 6 -
© Dartfish. All rights reserved.
II
Dartfish User Guide
Notes on the
..................................................................................................................................................
Video File Importer
38
3.4.2 Video Recorder:
.........................................................................................................................................................
get video from DV tape cam corders
38
Setting up ..................................................................................................................................................
capture
39
Setting Clip..................................................................................................................................................
Properties
40
Using Recording
..................................................................................................................................................
options
42
Selecting a..................................................................................................................................................
recording location
43
Using an encoding
..................................................................................................................................................
profile
44
The background
..................................................................................................................................................
task manager
44
Capturing video
..................................................................................................................................................
to Library
46
3.5 Locating
...................................................................................................................................
video files
46
3.5.1 Using Keyw
.........................................................................................................................................................
ords
46
3.5.2 Using Search
......................................................................................................................................................... 47
3.5.3 Using Folders
......................................................................................................................................................... 48
3.6 Saving
...................................................................................................................................
the tray's content
49
3.6.1 Creating a
.........................................................................................................................................................
playlist
49
3.6.2 Reusing a.........................................................................................................................................................
playlist
50
3.6.3 Modifying.........................................................................................................................................................
a playlist
50
3.7 Sharing
...................................................................................................................................
video files
50
3.8 Converting
...................................................................................................................................
video clips
50
3.9 Video
...................................................................................................................................
Formats and Dartfish
51
3.10 Correcting
...................................................................................................................................
video property errors
52
3.11 The
...................................................................................................................................
next steps
53
4
Live capture & instant replay during training
56
4.1 Preparing
...................................................................................................................................
InTheAction for use
56
4.1.1
4.1.2
4.1.3
4.1.4
4.1.5
4.1.6
4.1.7
Selecting.........................................................................................................................................................
capture device
56
Using m ore
.........................................................................................................................................................
than one cam era
57
Defining recording
.........................................................................................................................................................
folder
58
Defining clip
.........................................................................................................................................................
properties
58
Defining pre-record
.........................................................................................................................................................
& clip durations
59
Defining a.........................................................................................................................................................
replay sequence
60
About pre-record
.........................................................................................................................................................
buffer
61
4.2 Instant
...................................................................................................................................
visual feedback during training
62
4.2.1
4.2.2
4.2.3
4.2.4
Capturing.........................................................................................................................................................
and replaying
62
Controlling
.........................................................................................................................................................
the replay
63
Rem ote controlling
.........................................................................................................................................................
InTheAction
63
Using a sound
.........................................................................................................................................................
trigger
64
4.3 Comparing
...................................................................................................................................
clips during training
65
4.3.1 Setting reference
......................................................................................................................................................... 66
4.3.2 Working w
.........................................................................................................................................................
ith com parison view
66
4.3.3 Synchronizing
.........................................................................................................................................................
clips in InTheAction
67
4.4 Using
...................................................................................................................................
drawings in InTheAction
67
4.4.1 Draw ing Library
......................................................................................................................................................... 67
4.5 Self
...................................................................................................................................
coaching with live delay
68
4.5.1 Live delay.........................................................................................................................................................
settings
68
4.6 Next
...................................................................................................................................
steps
69
5
72
Analyzing Performance
5.1 Analyzer
...................................................................................................................................
workspace
73
5.2 An...................................................................................................................................
analyzer project - the Storyboard
74
© Dartfish. All rights reserved.
- Version 6 -
Table of contents
III
5.2.1 Loading clips
......................................................................................................................................................... 74
5.2.2 Playing clips
......................................................................................................................................................... 75
5.2.3 Saving an.........................................................................................................................................................
analyzer project
76
5.3 Analyze
...................................................................................................................................
a performance
76
5.3.1 Enhancing
.........................................................................................................................................................
im ages
76
5.3.2 Draw ing on
.........................................................................................................................................................
the video
77
Adding and..................................................................................................................................................
modifying draw ings
78
Draw ing properties
.................................................................................................................................................. 79
Clone rectangle
.................................................................................................................................................. 80
Picture
.................................................................................................................................................. 80
Measuring..................................................................................................................................................
angles
81
Measuring..................................................................................................................................................
distances
82
Using stopw
..................................................................................................................................................
atches
83
Tracking objects
..................................................................................................................................................
manually
84
Tracking objects
..................................................................................................................................................
automatically
85
Fading draw
..................................................................................................................................................
ings in and out
86
Using data..................................................................................................................................................
tables
87
5.3.3 Adding com
.........................................................................................................................................................
m ents
87
Written comments
.................................................................................................................................................. 88
Audio commentary
.................................................................................................................................................. 88
5.3.4 Analyzing.........................................................................................................................................................
key positions
88
Adding key..................................................................................................................................................
positions
89
Editing key..................................................................................................................................................
positions
90
Analyzing ..................................................................................................................................................
a key position
90
Importing key
..................................................................................................................................................
positions
91
Adding key..................................................................................................................................................
positions at a fixed interval
92
5.4 Comparing
...................................................................................................................................
performances
92
5.4.1
5.4.2
5.4.3
5.4.4
5.4.5
5.4.6
Loading m
.........................................................................................................................................................
ultiple clips
93
Display m.........................................................................................................................................................
odes
94
Synchronizing
.........................................................................................................................................................
video clips
94
Synchronizing
.........................................................................................................................................................
at key postions
95
Setting default
.........................................................................................................................................................
synchronization
96
Analyzing.........................................................................................................................................................
in split-screen m ode
96
5.5 Key
...................................................................................................................................
position mosaic
97
5.5.1 Activating.........................................................................................................................................................
the m osaic
98
5.5.2 Draw ing on
.........................................................................................................................................................
the m osaic
98
5.6 Next
...................................................................................................................................
steps
98
6
Dartfish outputs - publishing & sharing
102
6.1 Destinations
................................................................................................................................... 102
6.2 Sharing
...................................................................................................................................
video files
106
6.2.1 Video sharing
.........................................................................................................................................................
w izard
106
6.2.2 Sharing .........................................................................................................................................................
video by Dartfish TV
107
6.3 Producing
...................................................................................................................................
MediaBooks
108
6.3.1
6.3.2
6.3.3
6.3.4
6.3.5
6.3.6
6.3.7
Step1 - Select
.........................................................................................................................................................
destination
110
Step2 - Mediabook
.........................................................................................................................................................
settings
111
Step3 - Video
.........................................................................................................................................................
settings
112
Step3 - Preview
......................................................................................................................................................... 113
Step4 - Publishing
......................................................................................................................................................... 113
Mediabooks
.........................................................................................................................................................
on Dartfish TV
114
Publishing
.........................................................................................................................................................
to Dartfish TV
115
6.4 Saving
...................................................................................................................................
movies from the Analyzer
116
6.4.1 Step1 - Video
.........................................................................................................................................................
settings
117
- Version 6 -
© Dartfish. All rights reserved.
IV
Dartfish User Guide
6.4.2 Step2 - File
.........................................................................................................................................................
inform ation
117
6.5 Creating
...................................................................................................................................
still images
118
6.5.1
6.5.2
6.5.3
6.5.4
Saving pictures
.........................................................................................................................................................
to 'My Com puter'
118
Attaching
.........................................................................................................................................................
pictures to em ail
119
Printing .........................................................................................................................................................
Pictures
119
Snapshot
.........................................................................................................................................................
im ages
120
6.6 Recording
...................................................................................................................................
analysis
121
6.6.1
6.6.2
6.6.3
6.6.4
6.6.5
7
Enabling.........................................................................................................................................................
the Analysis Recorder
121
Setting clip
.........................................................................................................................................................
properties
121
Other clip
.........................................................................................................................................................
properties
122
Setting recording
.........................................................................................................................................................
device
122
Using the
.........................................................................................................................................................
Analysis Recorder
123
Unique ways to view sport - SimulCam &
StroMotion
126
7.1 Compare
...................................................................................................................................
with SimulCam
126
7.1.1 Getting good
.........................................................................................................................................................
Sim ulCam results
127
7.1.2 Step 1 - .........................................................................................................................................................
clip selection and synchronization
128
Loading video
..................................................................................................................................................
clips
128
Synchronizing
..................................................................................................................................................
video clips
128
Trimming ..................................................................................................................................................
the clips
129
7.1.3 Step 2 - cam
.........................................................................................................................................................
era m ovem ent calculation
129
Drag & zoom
..................................................................................................................................................
alignment method
130
Checking..................................................................................................................................................
alignment
132
Matched alignment
..................................................................................................................................................
points method
133
Adding new
..................................................................................................................................................
alignment frames
134
7.1.4 Step 3 - blending,
.........................................................................................................................................................
preview and saving
135
Blending mode
.................................................................................................................................................. 135
Preview ing
..................................................................................................................................................
your clip
135
Saving SimulCam
..................................................................................................................................................
results
136
7.1.5 Publishing
.........................................................................................................................................................
new video clips
136
Choosing..................................................................................................................................................
video settings
136
Assigning..................................................................................................................................................
file name, destination and categories
137
Video creation
.................................................................................................................................................. 137
7.1.6 Next steps
......................................................................................................................................................... 137
7.2 Dissect
...................................................................................................................................
motion with StroMotion
138
7.2.1
7.2.2
7.2.3
7.2.4
Step 1 - Load
.........................................................................................................................................................
& trim the video clip
139
Step 2 - Cam
.........................................................................................................................................................
era m ovem ent com putation
140
Step 3 - Panoram
.........................................................................................................................................................
a reconstruction
141
Step 4 - Draw
.........................................................................................................................................................
clones & save results
141
Identifying..................................................................................................................................................
key frames
141
Draw ing clone
..................................................................................................................................................
objects
142
Publishing..................................................................................................................................................
StroMotion
143
Saving StroMotion
.................................................................................................................................................. 144
7.2.5 Next steps
......................................................................................................................................................... 144
8
148
Tagging Video
8.1 What
...................................................................................................................................
is Tagging?
149
8.2 The
...................................................................................................................................
Tagging Workspace
150
8.2.1
8.2.2
8.2.3
8.2.4
The
The
The
The
Library
......................................................................................................................................................... 150
Video
.........................................................................................................................................................
Panel
151
Tagging
.........................................................................................................................................................
Panel
152
Events
.........................................................................................................................................................
List
154
© Dartfish. All rights reserved.
- Version 6 -
Table of contents
V
8.3 Creating
...................................................................................................................................
Tagging panels
155
8.3.1 Adding/deleting/m
.........................................................................................................................................................
oving/copying tools
156
8.3.2 Modifying
.........................................................................................................................................................
properties
157
8.3.3 Planning.........................................................................................................................................................
a tagging panel
158
8.3.4 Panel layout
.........................................................................................................................................................
tools
160
8.3.5 Event creation
.........................................................................................................................................................
buttons
162
8.3.6 Keyw ord.........................................................................................................................................................
addition tools
163
8.3.7 The Zone
.........................................................................................................................................................
Tool
165
8.3.8 Team Manager
.........................................................................................................................................................
tool
166
8.3.9 Team Group
.........................................................................................................................................................
Box and Player List Selector
167
8.3.10 The Filenam
.........................................................................................................................................................
e Tem plate tool
169
8.3.11 Properties
.........................................................................................................................................................
list
169
8.3.12 Autom ating
.........................................................................................................................................................
tagging
171
8.3.13 Using variable
.........................................................................................................................................................
keyw ords
173
8.3.14 Saving Tagging
.........................................................................................................................................................
Panels
174
8.4 Tagging
...................................................................................................................................
video
175
8.4.1
8.4.2
8.4.3
8.4.4
8.4.5
8.4.6
Using tagging
.........................................................................................................................................................
panels
175
Tag Video
.........................................................................................................................................................
Clip m ode
177
Tag Live.........................................................................................................................................................
m ode
178
Using the
.........................................................................................................................................................
Team Manager
179
Using keyboard
.........................................................................................................................................................
shortcuts
179
Manual tagging
......................................................................................................................................................... 179
8.5 Importing
...................................................................................................................................
events
180
8.5.1 Synchronizing
.........................................................................................................................................................
im ported events
182
8.5.2 Quick Im.........................................................................................................................................................
port
184
8.6 Review
...................................................................................................................................
& edit events
184
8.6.1
8.6.2
8.6.3
8.6.4
8.6.5
Selecting
.........................................................................................................................................................
events from the Events List
184
Editing the
.........................................................................................................................................................
event
185
Editing event
.........................................................................................................................................................
tim ings
185
Hiding unused
.........................................................................................................................................................
categories
186
Review ing
.........................................................................................................................................................
events and video during live tagging
187
8.7 Filtering
...................................................................................................................................
and viewing statistics
187
8.7.1 The table
.........................................................................................................................................................
search
189
8.7.2 Undo searches
......................................................................................................................................................... 189
8.8 Producing
...................................................................................................................................
& sharing tagging resources
190
8.8.1
8.8.2
8.8.3
8.8.4
8.8.5
9
Sharing .........................................................................................................................................................
gam e video
190
Publishing
.........................................................................................................................................................
events
193
Adding notes
.........................................................................................................................................................
to events
196
Storyboard
......................................................................................................................................................... 196
Exporting
.........................................................................................................................................................
events
197
Displaying metadata from external devices
200
9.1 Support
...................................................................................................................................
for metadata in Dartfish Software
200
9.2 Setting
...................................................................................................................................
Advanced Options
201
9.2.1 Analyzer.........................................................................................................................................................
Advanced Options
202
9.2.2 InTheAction
.........................................................................................................................................................
Advanced Options
202
9.2.3 Section sum
.........................................................................................................................................................
m ary
202
9.3 Capturing
...................................................................................................................................
& displaying Metadata with the InTheAction
202
9.3.1 Checking
.........................................................................................................................................................
that Metadata is received
203
9.3.2 Displaying
.........................................................................................................................................................
Metadata in Live Mode
204
9.3.3 Section sum
.........................................................................................................................................................
m ary
206
9.4 Using
...................................................................................................................................
Metadata in the Analyzer
206
9.4.1 Displaying
.........................................................................................................................................................
Metadata diagram s
207
- Version 6 -
© Dartfish. All rights reserved.
VI
Dartfish User Guide
9.4.2 Displaying
.........................................................................................................................................................
Metadata on the Video
209
9.5 Using
...................................................................................................................................
the Drawing Library
209
9.5.1 Managing
.........................................................................................................................................................
Overlay Tem plates
209
9.5.2 Selecting
.........................................................................................................................................................
the current Tem plate
210
214
10 Dartfish Readers
10.1 Dartfish
...................................................................................................................................
CSV Reader
214
10.1.1 Requirem
.........................................................................................................................................................
ents and installation
214
10.1.2 About CSV
.........................................................................................................................................................
data
215
10.1.3 Linking Data
......................................................................................................................................................... 216
Linking Data
.................................................................................................................................................. 216
CSV document
..................................................................................................................................................
properties
220
Time Stamp
.................................................................................................................................................. 221
Selecting..................................................................................................................................................
columns as Data Streams
222
Managing..................................................................................................................................................
links
223
10.1.4 View ing.........................................................................................................................................................
data
224
Synchronization
.................................................................................................................................................. 225
Draw ings.................................................................................................................................................. 225
10.1.5 Sharing .........................................................................................................................................................
linked data
227
Publishing.................................................................................................................................................. 227
Sharing data
.................................................................................................................................................. 227
10.2 Dartfish
...................................................................................................................................
SRM Reader
228
10.2.1 Requirem
.........................................................................................................................................................
ents and installation
229
10.2.2 SRM data
......................................................................................................................................................... 230
10.2.3 Linking Data
......................................................................................................................................................... 230
Linking Data
.................................................................................................................................................. 231
Managing..................................................................................................................................................
links
233
10.2.4 View ing.........................................................................................................................................................
data
234
Synchronization
.................................................................................................................................................. 235
Draw ings.................................................................................................................................................. 236
10.2.5 Sharing .........................................................................................................................................................
linked data
237
Publishing.................................................................................................................................................. 238
Sharing data
.................................................................................................................................................. 238
© Dartfish. All rights reserved.
- Version 6 -
Chapter
I
Introduction
2
1
Dartfish User Guide
Introduction
Dartfish software provides advanced video tools to enhance your training programs and
improve athletic performance. The system works both during workout and afterward when
time allows for a more in-depth analysis of a performance.
During the workout
Using Dartfish In Th eAction * , you will be able to provide instant visual feedback to your
athletes. This feedback will supplement your personal coaching and allow you to maximize
the benefits of using the muscle memory (proprioceptive) of your athletes and students.
Thanks to a wide variety of customizable play modes, the use of video can be fully
integrated into your usual activities with athletes on the field.
After the workout
Dartfish software's set of video analysis features allow you to create new perspectives and
innovative views of your athletes' performances:
You are able to compare and view performances as never before to highlight areas
needing improvement.
You can annotate video with text and drawings to aid and communicate analysis
Dartfish's video management system helps you manage all your training videos with ease
and efficiency.
Share your analysis
You can share your analysis with anyone, anywhere to continue the communication and
learning experience. You can send video clips via e-mail, create enhanced CD/DVDs or even
publish interactive analysis on the Internet.
Make sense of competition footage
Taggin g* is Dartfish's notational analysis tool. Use it to create a descriptive index of the key
events in a game or other long video. Tagging has tools to turn your index into a focussed
team feedback presentation and also display frequency statistics of each event. Tags are
created by clicking a set of fully customizable buttons, or by import from your sports own
statistical tools, or even from the Dartfish E as ytag app for iPhone or iPad, available from the
Apple App Store.
Display data on video
For those working quantitatively, measurements of time, distance and angle can be made
on video and recorded in a Data Table. The Data Table can even record changes in
measurement or changes in position of tracked* objects.
Using the Data Reader add-ons*, you can import data from any device or software that can
create a CSV (character separated value) file and relate the output to what the video
shows.
Dartfish is also capable of simultaneously recording video and data using In Th eAction * . This
allows data to be displayed or graphed on video immediately after capture. Dartfish has
developed links to several force platforms but also makes its SDK (software developer kit)
available to you to develop your own links.
Use Dartfish special effects for unique analysis opportunities
Strom otion * and Sim u lcam * are tools used by sports broadcasters world-wide to analyze
and explain movement to their audience. Users of Dartfish can also benefit from these
tools. Simulcam is the only way to get a realistic comparison of video when the camcorder
is panning. Stromotion and ball tails * give an understanding of how performers and objects
move from one position to another.
© Dartfish. All rights reserved.
- Version 6 -
Introduction
3
*Asterisked features are not available in all Dartfish editions
1.1
Support and help to use your software
This manual provides help to learn the range of Dartfish software features but it isn't the
only source of help available to you.
Start with the video demonstrations on the Start page, which guide you through getting
started with the basic features. Then, increase your understanding by reading these help
chapters or using the more comprehensive video based tutorials available online.
The Dartfish Customer Care Portal
In addition to this help, a wide range of support is available to you and the easiest way to
access all of this is by following the links on the Start Page of your Dartfish software. This is
your gateway to:
Train in g Res ou rces : Learn at your own pace with tutorials, comprehensive guides,
instructor-led online seminars or arrange tailored training courses.
Tech n ical Su pport: Search the Dartfish knowledge base and find answers to your questions
or contact our experienced team directly.
Dow n load Section : Get your products, updates, drivers and release notes online.
Produ ct In form ation : Get an overview of your previously registered products, retrieve your
license key at any time or register another product.
An alternative way to access the Customer Care Portal is to use your Browser to
take you to http://support.dartfish.com
Registering your software
Your first step in getting support is to register your software because the possibilities
available to you vary according to the support package supplied with your software. In the
case where you have multiple users of the same software, each user can register and
create their own login because the support package is linked to the software and not to its
users.
Note that registering your software is not the same as providing the licence key during
installation or activating it after installation. Registration is the process that identifies you
as a user of your software and it is highly recommended that all users should register in
order to benefit from Dartfish support.
Talk to us
Dartfish has evolved and developed thanks to a continuous dialogue with users, we look
forward to your comments and suggestions to help enhance future versions. Our continuing
goal is to make every software release better to fit the needs of our users.
- Version 6 -
© Dartfish. All rights reserved.
Chapter
II
Getting familiar with
Dartfish
Dartfish User Guide
6
2
Getting familiar with Dartfish
Whether you are new to Dartfish or looking to improve your knowledge, this chapter is
essential reading. It covers all the basic information and skills that you will need in order to
be able to use Dartfish effectively.
You will become familiar with
The Dartfish workspace and the Start Page
Video playback
The basics of the Video Library
Saving projects and videos
Sharing video clips between Dartfish's different modules and with other athletes or
coaches.
Remote controlling Dartfish software.
After "getting familiar with Dartfish" you will be well on your way to using the broad range
of analysis, instructional and video sharing features that comprise this complete Sports
coaching tool.
2.1
The Dartfish workspace
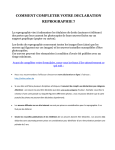
Dartfish workspace is designed so you can navigate through the video analysis and sharing
processes easily. Following, is an illustration of the Dartfish workspace.
1.
The M e n u bar to access different Dartfish views and functions. Click a menu at the top
of the program window to see the related menu commands.
2.
The Toolbar buttons control what appears on the workspace such as the library and
each module (e.g. An alyzer)
© Dartfish. All rights reserved.
- Version 6 -
Getting familiar with Dartfish
3.
7
The L ibrary allows you to manage, locate and share video clips and Dartfish projects.
The library includes:
the Folder View and Keyw ord View (on the left) to locate the files.
the Item s L is t (on the right) which lists the located files.
the Tray (at the bottom) is a working area for storing video clips that you want to
work with.
4.
The M odu le window is to carry out your tasks such as video capture, replay,
comparison and drawings.
Context menus are also available throughout the program. Place the mouse pointer in
the pane in which you want to work. Press the right mouse button, and select a command
from the menu.
2.1.1
The Start Page
The first time you launch Dartfish, the workspace is occupied by the Start Page.
The Start Page is divided into 4 areas:
1.
Con tin u e las t s es s ion - click on Con tin u e to continue your last work session (this link will
not show the very fist time you launch the software).
2.
Start a n ew tas k - use these links to configure the workspace for the selected task.
3.
Gettin g s tarted tu torials - click on a link to launch a video tutorial to help you get
started with a specific task.
4.
Acces s to cu s tom er care - the start page is the best route to getting the training and
support available to you. By using these links, information about your software and
- Version 6 -
© Dartfish. All rights reserved.
Dartfish User Guide
8
your support history are automatically communicated to the support team, allowing
them to best advise you. Links to tutorials and training take you to where you can
access free training or arrange for a local instructor to contact you.
Check for updates
The Dartfish team is constantly working to improve the software and many of the updates
are free. Information found here will advise you when a new update is available.
Closing the Start Page
If you wish, you can disable the Start Page when you launch your Dartfish software by
"unchecking" Alw ays dis play th e Start Page at s tartu p which is at the bottom left hand side of
the Start Page.
It is possible to re-start the Start Page at any time by selecting Tools > Start Page in the
M en u bar. The Start Page is closed by selecting any other Dartfish module from the Toolbar
or Tools m en u .
2.1.2
Displaying Dartfish Modules
Dartfish is composed of M odu les - each with individual functions for analysis, instruction,
sharing etc. A module is displayed in two ways:
1.
by clicking the appropriate Toolbar button.
2.
by selecting the module from the Tools menu in the M en u bar
You do not need to close a module to open a new one - clicking on a module button
automatically replaces the old one with your selection. Only the L ibrary can be
simultaneously displayed next to a module.
The core modules are listed below. More modules can be available based on the Dartfish
software edition you purchased. Read the relevant help chapters to learn how to use them.
Im porter - import video files from a range of video devices and drives.
Player - playback and trimming of video clips
An alyzer - comparison of clips, drawing tools, key position analysis and publishing.
2.1.3
The Library
The L ibrary allows you to locate, load, manage and share video clips. It is displayed and
hidden using the L ibrary button on Dartfish's toolbar.
F8 keyboard shortcut - closes/opens the library; it has the same function as clicking the
library button.
© Dartfish. All rights reserved.
- Version 6 -
Getting familiar with Dartfish
9
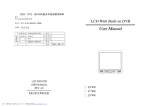
The library module is shown below with its four main parts labeled:
2.1.4
1.
The L ibrary Toolbar contains buttons used to control the appearance and content of the
Item s L is t.
2.
The Keyw ords View is used to locate video clips matching categories and values
selected (see link). When this area displays its Folders View , the content of selected
windows folders will be displayed in the Item s L is t.
3.
The Item s L is t is a list of video, image and project files that can be used by Dartfish.
4.
The Tray is a working area for storing video clips that you want to work with. It is used
to share video clips between Dartfish modules and also share by email, CD ROM and
Internet.
Resizing windows
You can resize windows in the workspace as follows:
1.
Place your cursor near the boundary between two windows.
2.
Once the cursor changes into a bar with two small arrows on either side, click and hold
down the left button of your mouse. Then you can move the cursor until the window is
at your desired size.
The windows can be resized both vertically or horizontally.
- Version 6 -
© Dartfish. All rights reserved.
Dartfish User Guide
10
When you close the software, the new layout is saved.
2.2
Video playback
The ability to control playback (play, pause, play frame-by-frame, modifying playback speed,
etc.) is one of the simplest benefits of using video analysis software.
To visualize a video clip, first open it by:
Double clicking the corresponding file name in the Item s L is t of the L ibrary OR
Drag & drop your chosen clip onto the video panel of the module.
2.2.1
The Timeline
The Tim elin e is a visual representation of the video clip(s) currently loaded in a module.
The overall length of the video clip is represented by the bar along the bottom of the
Tim elin e. The part of the clip that will actually play is represented by the pale blue area
between the cue in point (
(the Playh ead) is marked by
playhead's current position.
2.2.2
) and the cue out point (
). The current playing position
. The image displayed in a module screen corresponds to the
Trimming video clips
Trimming video clips, that is setting new cue in/out points, is often necessary. Perhaps
because unnecessary footage has been captured at the start or end of the clip. Perhaps
because you can analyze or coach more effectively if the clip is shortened to show only
specific actions.
Setting cue in/out points
1.
Point the mouse at the cue in/out marker (
/
).
2.
Click and drag to the chosen start/end point. The video display will show the selected
start/end frame as you drag.
3.
Release the mouse button.
You can also click in the Tim elin e to position the Playhead, right-click and select Set In or Set
Ou t.
Once the new in and out points are set, you have the choice of saving the trimmed video
© Dartfish. All rights reserved.
- Version 6 -
Getting familiar with Dartfish
11
clip (see Saving a new video to learn how to do this).
Reset cue in/out points
1.
Right-click on either the cue in/out markers or the Playhead.
2.
Select Res et in /ou t Poin ts from the context menu (see illustration above).
You can also select Con trol>Res et u s er's in /ou t valu es from the M en u bar.
2.2.3
Video panel controls
All the different modules have some control over how video is played. The video panel
controls for the Player module are shown below. Most modules will have some of these
features although not all controls will always be available according to that module's
specific needs.
The buttons have the following functions (from left to right):
Play/pau s e - becomes a pause button when the video is playing (keyboard shortcut:
Space bar)
Stop - also returns to the start of the clip ([Shift] + S)
Step previou s - back one frame ([Ctrl] + [left arrow])
Step n ext ([Ctrl] + [right arrow])
Previou s clip - play the previous clip in the Tray ([Ctrl] + P).
N ext clip ([Ctrl] + N).
Hit F11 on your keyboard to display the video in full screen. Use the keyboard shortcuts
listed above to control the video playback.
Controlling speed
A wide variety of playback speeds can be selected using the speed control, shown below.
Clicking a number will position the speed cursor accordingly (e.g. 0.5). You can also click and
drag the cursor to select a precise speed (e.g. 0.35 as illustrated above).
Moving the Playhead
You can directly move the Playhead to a new position. To do this:
1.
Stop or pause the video, if it is playing.
2.
Click anywhere in the pale blue area of the Tim elin e (or click and drag the Playhead left
or right).
- Version 6 -
© Dartfish. All rights reserved.
12
2.2.4
Dartfish User Guide
Repeat mode
What do you want to happen when the clip(s) you have loaded finish playing? The Repeat
button found in many Dartfish modules )located on the left of the speed control) offers a
number of choices as shown below.
Play current clip once.
Repeat current clip.
Play all (clips loaded into the tray) once.
Play all then repeat.
To change the repeat mode
Click the repeat mode button. Each time it is clicked, the mode (and the button icon) will
change.
The tooltip (the yellow box which appears when you point your mouse at a button or
control) shows both the mode that will be activated when the repeat mode button is clicked
and the current mode in parenthesis.
2.3
Saving projects and videos
When working with many Dartfish modules you will have the choice of saving a "project" or
saving the video file resulting from the project.
Saving a project
When you save a project you are saving all the information that relates to the creation of
that project; the video files used, the settings chosen etc. Generally you will save projects if
you wish to make changes to the project to get a better result or because you wish to
base a new project on the settings used previously.
It is important to note that projects do not actually include the video files used by the
project. For example, saving a project using two 5Mb video clips will not end up in a project
file somewhere over 10Mb. It also means that if sharing projects with other Dartfish users,
you will also need to give them the video files used by that project.
Saving a video clip
When you save a video clip you are creating a new video file that can be used by other
Dartfish modules or shared with others - even those who do not have the Dartfish software
will be able to play back video clips on their own computers.
2.3.1
Saving a project
Select File>Save (or File>Save As ...) from the M en u bar to save a project. The type of project
(and project file icon) depends on the module currently in use when saving:
- Analyzer project
© Dartfish. All rights reserved.
- Version 6 -
Getting familiar with Dartfish
13
- SimulCam project
- StroMotion project
If a project is saved in a M on itored folder of your L ibrary (see section Defining your library
in the Library chapter), it will be displayed in the Item s L is t.
If you did not save a project when changing modules, you will be prompted to do so.
Select Yes to save a project.
To open a saved project
Double-click on the project icon in the Item s L is t
Select File>Open from the M en u Bar.
To start a new project
Select File>N ew from the M en u Bar. If you did not save the current project, you will be
prompted to do so (see above). Starting a new project will also empty the Storyboard of
the An alyzer.
2.3.2
Saving a new video
Select File>Save M ovie... from the M en u bar to save a new video. A wizard will guide you
through the saving steps. Different wizards are shown based on the module currently
opened.
Video Trimming Wizard
The Video Trimming Wizard will launch when the Player module is open. Complete the
wizard to save a trimmed version of the clip currently loaded in the Player (see Trimming
video clips to learn how to set the cue in/out values).
There are two options:
Replace th e origin al video clip by th e trim m ed video clip - Used to delete unnecessary
footage at the beginning and end of a captured clip.
Create n ew video clip in to th e follow in g folder - Used to extract video clips from a longer
footage.
Video Saving Wizard
- Version 6 -
© Dartfish. All rights reserved.
Dartfish User Guide
14
The Video Saving Wizard will launch when the An alyzer module is open. Complete the
wizard to save a montage of the analysis contained in the Storyboard (read the chapter on
the An alyzer). The main steps of the wizard are:
2.4
1.
Selecting the video settings (see Converting video)
2.
Entering the file information, i.e. a file name and the category/values to classify the
new video (see Organizing your library to learn more about the file name and
categories)
3.
Selecting the destination folder
Sharing video files
Dartfish offers many ways of sharing videos with athletes or other coaches. The Video
Sh arin g W izard guides you through the process of selecting and compressing video before
exporting it to the appropriate media. The choices of sharing destination are:
M y Com pu ter - copy your video to a folder, to an external drive or to a network server.
E m ail - the video clip is compressed and attached to an email in your default email
program (see note below).
Recordable CD or DVD - burn video to CD or data DVD directly from Dartfish.
E n h an ced Recordable CD or DVD - creates a CD with an easy-to-use interface customized
with your branding and contact information.
In tern et - send video to a FTP location.
Dartfis h TV - Dartfish's online media sharing platform.
The share by email option works for any MAPI email software such as MS Outlook or
Outlook Express. For other email software or web-based email like Hotmail you will have to
attach video files through the software or website itself.
2.4.1
Video Sharing Wizard
Loading clips for sharing
The Video Sh arin g W izard is a feature of the Tray. Start by loading the video clips you wish to
share into the Tray. To do this, drag-and-drop video files from the Item s L is t to the Tray.
Hold down the [Ctrl] key while clicking on the files to select multiple files.
Once video clips are loaded, click the tray's Sh are button.
© Dartfish. All rights reserved.
- Version 6 -
Getting familiar with Dartfish
15
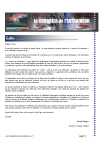
The Video Sharing Wizard
The process of sharing is guided by the Video Sh arin g W izard. Three steps are common to
all sharing destinations.
1.
Selecting the sharing Des tin ation - Click on a destination then on the N ext> button (at
the bottom of the window) to proceed.
2.
Selecting which videos you wish to share. "Check" those to be shared as shown below
or click the Select All button:
3.
Choose the video settings (encoding profile) appropriate for the selected destination
(see Video settings for information on the different encoding profiles).
Specific additional information may be entered according to the selected destination. Read
the information displayed in the wizard to complete these information (also see the
Outputs from Dartfish - Publishing & Sharing chapter).
2.4.2
Converting video
When sharing or storing video, there are two important considerations:
File Size: video file sizes can be very large which can be a problem when storage space or
the distribution method have limited capacity.
Video s tream in g: unless video files will be played from a local drive there are likely to be
limits on the rate at which data can be streamed. The amount of video data streamed per
second is expressed as its bit rate. Most obviously, video played from the internet needs
- Version 6 -
© Dartfish. All rights reserved.
16
Dartfish User Guide
to have a lower bit rate than that produced by a typical video camcorder. Networks and
optical drives also impose limits on the maximum bit rate of video which can be played from
them.
These considerations are addressed by compressing video by means of encoding and any
Dartfish process which results in the creation of new video offers a range of suitable
encoding profiles.
About video encoding
The subject of video encoding is a difficult one involving many variables but to enable the
best choice for encoding video with Dartfish it is useful to have a basic understanding of the
following:
Im age qu ality: Compression results in a loss of image quality – for any video format, the
greater the compression the lower the image quality. Direct comparison between formats
based purely on bit-rate is difficult because more recent codecs such as Windows Media 9
and H.264 achieve greater compression (smaller file size and a lower bit rate) for the same
perceived image quality as older codecs such as MPEG-2 and AVI (DV).
H D vers u s SD: High definition (HD) video images appear sharper than standard definition
(SD) because they have higher resolution (more pixels). When Dartfish encodes video it
almost always retains the resolution of the source video; so when an encoding profile
name refers to HD or SD this is a reflection of the resulting bit-rate and perceived image
quality and does not indicate a change in resolution.
In ten ded u s e: This, more than any other factor, will influence the encoding profile chosen.
For Dartfish analysis one of the Windows Media profiles is generally the best choice but if
the video is being created for playback on an iPhone or upload to Dartfish.tv, one of those
specific profiles might be used. If video is being created for use on the internet your web
master may have a preferred video format.
E n codin g vers u s re-en codin g: Dartfish processes such as Save M ovie (Player), Con vert, Sh are
and Pu blis h E ven ts (taggin g) re-encode the source video using the selected profile.
Changing the video format can result in a loss of quality, although this won't be noticeable
unless repeated. This is not an issue for Dartfish processes which create new video; Save
M ovie (An alyzer), Sim u lcam /Strom otion , An alys is recorder.
Dartfish encoding profiles
A complete list of Dartfish encoding profiles, their bit rates and suggested use can be found
in the Options ( Tools menu > Option s > E n codin g Profiles ). The different formats available
are summarized below
Form at
In ten ded u s e
Windows Media
Windows media encoding offers a good quality to compression
ratio and is the preferred option for producing video from Dartfish
when the output will be played on a computer's media player or
in Dartfish.
Windows media video can also be used for internet but your
website administrator may prefer another format.
Windows Media for
Analysis Recorder
Highly compressed and reduced frame rate WMV used by the
Dartfish An alys is Recorder to encode video (Pro and TeamPro
editions)
MPEG-2
MPEG-2 video is produced by many camcorders and is also the
encoding used for DVDs.
These profiles will be the preferred encoding for users who wish
to maintain a library of MPEG-2 video or who produce DVDs.
To carry out analysis tasks Dartfish needs to create an index for
each MPEG-2 file. Encoding by Dartfish creates the index but if
the file is moved or shared with other Dartfish users the index
needs to recreated, which delays access to the file. This may be
a reason for some users to avoid MPEG-2.
© Dartfish. All rights reserved.
- Version 6 -
Getting familiar with Dartfish
17
MPEG-4 (H.264)
The MPEG-4 encoding profiles are used to produce H.264
encoded video for playback on mobile devices and YouTube.
AVI (DV)
AVI (DV) is the video format created from camcorders using DV
tape. AVI (DV) is an old format which is less compressed than
WMV or MPEG and this encoding will be primarily used by tape
camcorder users who wish to maintain a library of DV video.
Dartfish.tv encoding
profiles
Contributors to Dartfish.tv can download the encoding profiles
used to produce video for their channel. Use of these profiles
offers the possibility to create video which is already encoded,
thereby speeding up the publication process.
These profiles can be exported/imported to distribute within an
organization.
SWF (Flash)
Flash encoding is only used by Dartfish to create video for
Analyzer Mediabooks.
Video Settings in the Sharing Wizard
The Video Sharing Wizard includes a Video Settin gs step in which you can choose to share
the original video, or re-encode it.
Video Conversion Wizard
Existing Video files on your hard drive can be converted to a range of other video formats
with the Video Con vers ion W izard. The process is as follows:
1.
Select files from the Item s L is t or from the Tray. Multiple files can be selected by
holding down the ctrl key and clicking each file.
2.
Point at one of the selected files and click the right hand mouse button
3.
Select Con vert from the context menu that appears.
The subsequent process of choosing file format and location is the same as that for saving
new movies but you are reminded to pay special attention to whether you want to replace
the existing file or create a new file with a different name.
- Version 6 -
© Dartfish. All rights reserved.
Dartfish User Guide
18
2.5
Remote controlling Dartfish
Many of Dartfish's buttons and controls can be activated by the remote control which is
issued with all Dartfish editions except Connect and Classroom. During coaching sessions
you are free to move and interact with your athletes and not your keyboard or mouse. In
fact, it is one of the many features that the Dartfish team have put in place to help video
analysis work in the real world.
The remote control works with an infra-red receiver which connects to a USB port. The
range of use depends on weather conditions, other sources of infra red interference and
how fresh the batteries in the remote control are. You can typically expect around 25
meters.
2.5.1
Installing the remote control
The infrared remote control receiver must be connected and software drivers installed.
Software for the remote control is optionally installed from the Dartfish software installer
but is not automatically installed with the software. The remote control will not function if
its software is not installed.
To install the remote control drivers:
1.
Insert the software installation disk and wait for the list of options to be displayed.
2.
Choose Drivers from the list of choices
3.
Choose Streamzap remote
Full instructions are given in the help documentation available with the installer.
When the receiver is connected for first time use, Windows will detect the new hardware
and install the drivers for that USB port. Depending on your Windows setup this is a two
step process:
1.
In the first step, Windows asks whether you want to go online to search for drivers.
The answer to this is No, not this time. Driver software is already available as part of
the Dartfish installation.
2.
In the second step you are asked if you want to install manually or automatically. The
answer is Automatic [Recommended]. This is the recommended and default option.
Now Windows should successfully install drivers software for the infra red receiver.
© Dartfish. All rights reserved.
- Version 6 -
Getting familiar with Dartfish
19
If you do not have administration rights to install software on your computer you will
need to get the administration login or find an administrator to help you. Drivers need to
be installed for each USB port to which the IR receiver will be connected.
Trouble shooting installation
Look for the Dartfish Remote icon in the system tray area of the Windows taskbar:
If it is red:
The remote control is installed and functional. Ensure that the receiver is
pointed towards the remote control, batteries are fresh, the receiver is within range and
there aren't other sources of infra red interference - the flashing red light on the receiver
confirms when an IR signal is received but not whether it is strong enough or from which
source.
If it is grey:
The remote control software is installed but the IR receiver is not connected.
If it is connected to a USB port the likelihood is that drivers are not installed for that USB
port correctly. Try removing the receiver and connecting it to a different USB port.
If it is not present: In a small number of cases the Streamzap software does not
automatically start after installation. In this case you can force it to start by restarting the
computer or manually activating its executable file at /program files/Streamzap/Remote/
zremote.exe.
2.5.2
Using the StreamZap remote
The Streamzap remote controls many of the functions in different Dartfish modules.
Remotes issued after summer 2005 now have the function of each button printed on the
control. We recommend that you become familiar with these buttons and how they can
help you coach more effectively. For older Streamzap remotes you can use the following
guide to the equivalent buttons on your control.
If this looks like too much to remember how about starting with the group of 6 buttons
under Play and Pau s e. Next use one of the 2 buttons to Start captu re. You can learn the
rest as you find you need them.
- Version 6 -
© Dartfish. All rights reserved.
20
Dartfish User Guide
Now that you can use Dartfish remotely you should be able to display video in full
screen. Type [F11] or look for the Fu ll Screen bu tton on the remote.
2.6
The next steps
In this chapter, you learned the basics of Dartfish software.
Your next step is to learn how to get video from your digital camera onto your computer so
that you can experiment with your own video straight away. Read the Capturing Video
chapter.
You can learn more about how Dartfish can help you find relevant video files with the
Organizing your library chapter. It will explain in detail the advantages of using categories
to classify and find your video clips.
© Dartfish. All rights reserved.
- Version 6 -
Chapter
III
Video Library
Dartfish User Guide
22
3
Video Library
The Video Library is a complete set of features used to locate and manage the files you
wish to analyze or share:
The video library is "built" from the Windows folders containing those files that are
relevant for use with Dartfish.
Because you are likely to analyze many video files, Dartfish helps you locate relevant
content using a flexible video content management system called Keyw ords w h ich allow
you to describe the content of video clips more comprehensively than relying on
organizing video into different Windows folders.
Dartfish uses a L ibrary module which offers rapid access to your content as well as a
variety of tools to help you locate relevant video files.
The L ibrary module has a powerful sharing feature called the Tray. It provides a
workspace containing files which are being worked with. This not only makes them
readily accessible for use in Dartfish but also allows you to both archive on CD/DVD and
share its content by a variety of media including email, Internet and CD ROM.
In this chapter you will learn how to:
Define your library. Learn how to include the content you wish to see in the Dartfish
L ibrary.
Organize your library using Dartfish's Keyw ords .
Import files to the library - either by capturing new video files from a video camera or
using files given to you by other coaches or athletes.
Locate video files using Dartfish's array of search tools.
Create Playlists from the contents of the library.
Share video files by email, CD/DVD or Internet.
Convert video clips.
3.1
Defining your library
The library is the collection of ALL the video files that you want to use with Dartfish. These
files can be stored on several folders on your hard drive.
To define the library you must tell Dartfish which folders to monitor. Only the video clips
found in these folders will show in the L ibrary module. The default monitored folder is the
windows Videos folder
To add the contents of a folder to the library
1.
From the menu bar, select Tools > Option s (or type F3)
2.
Click on the L ibrary option
© Dartfish. All rights reserved.
- Version 6 -
Video Library
3.2
23
3.
Click on the Add... button. A browser window will open.
4.
Chose a folder and click on OK. The sub folders of this folder will also be included in the
library.
5.
Repeat steps 3 and 4 to add additional folders.
6.
To remove a folder from the list, click the folder in the list and click on the Rem ove
button.
The Library workspace
The L ibrary module is your route to accessing the content of the library. It is displayed and
hidden using the L ibrary button on Dartfish's toolbar.
The library module is shown below with its four main parts labeled:
- Version 6 -
© Dartfish. All rights reserved.
Dartfish User Guide
24
3.2.1
1.
The L ibrary Toolbar contains buttons used to control the appearance and content of the
Item s L is t.
2.
The Keyw ords view is used to filter the Item s L is t for video clips matching categories
and keywords selected. When this area displays its Folders view , the content of
selected windows folders will be displayed in the Item s L is t.
3.
The Item s L is t is a list of video, image and project files that can be used by Dartfish.
4.
The Tray contains thumbnails of recently created or opened videos. Think of it as giving
you quick access to the files you are currently using.
The Library Toolbar
The function of the L ibrary Toolbar's buttons is to help you locate the items you wish to use
from the Item s L is t. These buttons have the following functions:
Keywords button - to display a list of categories and values by which the Item s L is t can
be filtered. To learn more about doing this see the topic Locating video files.
Folders button - this displays a list of Windows folders. The Item s L is t will show the
contents of the folder selected from this list.
© Dartfish. All rights reserved.
- Version 6 -
Video Library
25
View Type button - to control how items are represented in the Item s L is t. Items can be
displayed in a simple list or showing details such as file size and category/values used.
The thumbnail views show an image of the first frame of video.
Back/forw ard navigation buttons - As different categories and folders are selected from
the Folders view or Categories view the Back and forw ard buttons become available to
navigate between them.
3.2.2
The Items List
The Item s L is t is a list of items that Dartfish is able to use. This includes video clips, images
and Dartfish projects, each represented by its own icon examples of which are shown
below:
- Video clips
- Picture files
- Analyzer projects
- SimulCam projects
- StroMotion projects
File management using the Ite m s L ist
File management functions such as file renaming, deletion and copying can be carried out
from the Item s L is t. Display the range of options as follows:
1.
Point the mouse at the item(s) you wish to edit.
2.
Click the right mouse button. A context based "Quick menu" appears.
3.
Left click the function you wish to use.
The use of the Con vert function is explained in the topic Converting video clips.
- Version 6 -
© Dartfish. All rights reserved.
Dartfish User Guide
26
Opening video clips
There are three methods of opening a video file from the Item s L is t:
1.
Point at the item and double click the mouse.
2.
Drag and drop the item from the Item s L is t on to the video display. This method offers
more flexibility when there is more than one video display to choose from.
3.
Drag and drop the item onto the Tray section of the L ibrary module. From here it can be
added to the video display as needed.
Opening Projects
Projects must be opened using the relevant Dartfish module. Either the appropriate module
is opened first or, if a project item is double clicked (method 1 above), the appropriate
module will start, closing the current module if necessary.
Opening Images
Image files can be opened by double clicking them however they will not be opened into
Dartfish, instead the default image viewing software on your computer will be used.
3.2.3
Item Properties
Further information about items can be revealed by using the Details view or the properties
window.
Details View
Details view is selected by clicking the View Type button on the L ibrary Toolbar. The details
view reveals additional file and categorization information about each item as shown
below.
These details can be exported as a CSV file see the topic Exporting keyword data.
The Properties window
To display an item's properties:
1.
Point the mouse at the item.
2.
Click the right mouse button. A context based "Quick menu" appears.
© Dartfish. All rights reserved.
- Version 6 -
Video Library
3.
27
Select the Properties ... option. The properties window appears for the selected item as
shown below.
Although much of the properties information is similar to that displayed in Details view,
there are two useful pieces of additional information:
File location - the folder on your hard drive where this file is located. The Open
Con tain in g Folder button allows you to open this location to see other content of this
folder.
Comment - comments can be edited in the properties window and can be used to
provide additional information about the file. This is particularly useful if you intend to
share the file (see Sharing video files) as your comments will form part of the content of
an E n h an ced CD.
The Properties window - source info tab
The properties window also shows information about the video source. Some of these
properties can be modified to correct errors in the video. See Correcting video property
errors
- Version 6 -
© Dartfish. All rights reserved.
Dartfish User Guide
28
3.2.4
The Tray
The Tray is a working area for the collection of video files currently being used. It allows you
rapid access to files you want to analyze and provides a method for taking files from one
module to another.
Additionally, organizing items into the Tray is the first step for:
Sharing video files (see Sharing video files).
Adding clips to the Tray
Items will appear in the Tray when:
Video clips are opened from the Item s L is t.
New clips are captured from a video camera.
Video clips are added by drag & drop from the Item s L is t.
Clearing the Tray
Selected items are removed from the Tray by clicking the Clear button.
If no files are selected the entire content of the Tray is cleared.
File management using the Tray
The items appearing in the Tray are a representation of the original file so unsurprisingly,
the file management functions available to items in the Item s L is t (see The Items List) are
also available to items in the Tray.
1.
Point the mouse at the item(s) you wish to edit.
2.
Click the right mouse button. A context based "Quick menu" appears.
© Dartfish. All rights reserved.
- Version 6 -
Video Library
3.
3.3
29
Left click the function you wish to use.
Organizing your library
Your Dartfish software includes a versatile video management system called Keyw ords . The
Keyw ords are used to describe the contents of your video clips in a simple and clear
manner. For example, you can define categories such as the name of the athlete, discipline,
location of the filming, assessment of performance etc and each video clip can be classified
and easily located by using Keywords in any or all of these categories.
Continuing this example, it becomes very easy to locate videos containing "John Smith"
doing "Bench press", "Incorrectly" and distinguish these from video of other athletes or
even of "John Smith" throwing the "Javelin".
3.3.1
Understanding Keywords
To understand the Keywords system, you must be able to distinguish between the
following elements:
The File N am e that is defined for each video clip physically stored on your hard drive. A
video clip is identified with the icon illustrated below, with the file name displayed
underneath (as you can see in Windows Explorer).
The Keywords that represent the details of each clip. For example "Swing" and "Front"
can be used to describe a video clip containing a swing filmed from the front in golf.
The process of classifying consists of assigning keywords to your video clips, i.e.
labeling them.
The Categories that group the Keywords of the same kind.
- Version 6 -
© Dartfish. All rights reserved.
Dartfish User Guide
30
3.3.2
Defining your categories
To help you decide what categories and keywords you need, imagine you have several
hundred video clips on your computer. How would you label each one to identify it? When
you look for these video clips one year from now, what might you be looking for?
Perhaps you film different sports or different disciplines within a sport. For this create
a Sport category or a Dis ciplin e category with values for each sport or discipline that you
work with.
Perhaps you will want to compare video clips filmed from the same angle. That will be
much easier if you are able to distinguish clips filmed from the front and ignore those
filmed from the side. In this case, you may use the category Cam era An gle.
So, what else might you look for? Age grou p perhaps if you want to compare athletes of
a similar age; An As s es s m en t category if you want to be able to distinguish video
where a skill is performed well from where it is performed badly.
Once you have replied to these questions, you can create the nomenclature that will allow
you to classify and locate your video clips.
3.3.3
Editing categories
To create a new Category
1.
Click on the N ew button at the top of the library and select N ew category... from the
menu that appears.
2.
Enter the name of your new category (e.g. Camera angle) and click OK.
© Dartfish. All rights reserved.
- Version 6 -
Video Library
31
The new category will appear in the Categories list.
To rename a category:
1.
Right-click on a category label and select E dit... from the context menu
2.
Type the new name and press the enter key on the keyboard.
To delete a category:
1.
Click your mouse on a category to select it.
2.
Click on the Delete category or valu e button in the category tool bar
3.
Confirm the action by clicking OK. The category will disappear from the Categories list.
.
When a category is deleted all keywords within that category are also deleted. Video
clips using those keywords are not deleted but they will lose the deleted values.
3.3.4
Editing keywords
Keywords appear beneath the category headings. If needed, click on the arrow sign to the
left of a category to expand its list of corresponding keywords. In the example below
"Event" is the category and "highjump", "javelin"... etc are the keywords used to describe
the video clips.
Creating, deleting and renaming keywords is done in the same way as for categories
(see Editing categories) except that you start by selecting the category which contain the
keyword.
3.3.5
Classifying video clips
Once your categories and keywords have been defined, you can classify your video clips.
This process consists of assigning keywords to your video clips, i.e. labeling them, in the
same way as you would label your suitcase to help you recognize it.
It is not just video clips that can be classified; any item that Dartfish lists in it's Item s L is t
can be categorized to make it easier to locate.
- Version 6 -
© Dartfish. All rights reserved.
Dartfish User Guide
32
To add a keyword to an item:
1.
Select the item(s).
2.
Drag the item on to the desired keyword.
Remember that you are not limited to adding a single keyword. You can repeat this process
as often as you like BUT only one keyword from each category can be added to each item.
You can classify several video clips at once. To do this, press on the Shift or Ctrl button
on your keyboard while left clicking with your mouse on the clips you wish to classify. Then
drag and drop the files to a keyword as described above.
To change the keyword attached to an item:
1.
Select the item(s).
2.
Drag the item to a different keyword within the same category.
It is often better to add keyword to your video clips as they are captured from your
camera. To find out how to do, see the topic Setting Clip Properties
3.3.6
Removing keywords from video clips
As seen in the Editing categories topic, deleting a keyword from the categories list will also
remove that keyword from any items which hold it. However it is also possible to remove a
keyword from a video clip.
To remove a keyword
1.
Click the View Type button at the top of the L ibrary module
2.
Select Details .
3.
Alter the width of the Item s L is t so that you are able to see the headings for each
category (these are only visible in Details or Th u m bn ail Details views). To do this you will
click and drag the right hand border of the Item s L is t.
4.
Find the keyword you want to remove. To do this you may have to make the Item s L is t
wider still or use the scroll bar at the bottom of the Item s L is t.
5.
Right click on the value and choose Ren am e from the context menu. The keyword will
enter an editing mode as shown below:
© Dartfish. All rights reserved.
- Version 6 -
Video Library
6.
3.3.7
33
Delete the existing keyword ( Backs pace key on your keyboard).
Importing/exporting keyword sets
The category and keyword information for each video clips is stored in a small extra
M etadata file (with a ".dartclip" file extension). Although this is not visible in Dartfish's Item s
L is t you can see it using Windows Explorer as shown below.
When your video clips are shared, the recipient will also inherit a new set of categories and
keywords provided the metadata file was also shared. All Dartfish's sharing processes
include metadata.
What happens when inherited categories match existing categories?
Provided that the spelling and capitalization is identical, the new video clips will fit neatly
into the existing keyword system. But if, for example, the new video clip has a value of "F
ront View" and you use a value "front view" then both keywords will now appear in your
"View direction" category.
When you and your fellow coaches will use the same categorization system (or you have
more than one computer) you can export a set of Category/keywords from one computer to
another.
Exporting Categories/keywords
1.
Click the Add a n ew category or keyw ord button
2.
Select the E xport keyw ord s et... option.
3.
Save the export file.
.
Make sure you know where the export file has been saved as it will be passed (by disk,
network or email) to the other coach or computer.
Importing Categories/keywords
3.3.8
1.
Click the Add a n ew category or keyw ord button
2.
Select the Im port keyw ord s et... option.
3.
Locate and open the file to be imported. The new categories and keywords are now
visible in the Keyw ords view .
.
Exporting keyword data
Dartfish allows the export of the video library's keyword data in a CSV file that allows the
data to be stored and analyzed in databases and spreadsheets.
keywords associated with video files contain a lot of information that may be of more
benefit than assisting with finding and identifying the content of video files. For example,
- Version 6 -
© Dartfish. All rights reserved.
Dartfish User Guide
34
specialist shoe shops gather information about the shoes that customers buy as a result of
video analysis; researchers making observations from video may record that information
using keywords.
To export Category/keyword data as a CSV file
1.
2.
3.
Use the search and filter tools to isolate the video clips with data to be exported.
Point the mouse anywhere on the Item s L is t and click the right mouse button.
Choose E xport L is t from the context menu that appears.
4.
Save the CSV file. It can be reopened by spreadsheet software such as MS Excel.
It is not necessary, but it may help, to change the library view to one of the details views.
This will allow you to see what data is held for each file prior to export. To do this:
1.
Click the View button at the top of the library.
2.
Select details or th u m bn ail details view.
© Dartfish. All rights reserved.
- Version 6 -
Video Library
3.4
35
Importing files to the library
Dartfish imports files to its library by one of two processes; Video Recorder or Video file
Im porter. Access to these tools is via the Im porter button on the toolbar which allows you
to select one of these tools by accessing its drop-down menu.
If you are not sure which tool is best for you, click the Im porter button itself and choose
from a list of video devices and sources. Dartfish will then start the correct tool according to
your choice.
Video File Importer
Copies files from any disks or folders internal to, or connected to, your computer. This
includes:
Camcorders recording to hard-drive or internal memory
DVD camcorders
DVDs or CDs in your computer's optical drive
Card readers
Folders on your computer, network or external drive.
Video recorder
Records a live feed from a device capable of delivering a video stream; this is recorded by
Dartfish to create new video files. The most common instance of this being the replay of
recordings on the tape or the live stream from a DV or HDV camcorder (uses DV tape
cassettes). This method also applies to any device providing a live video stream, for
example:
DV and HDV camcorders as described above
Video converter devices (analog to digital, HDMI to DV etc). These devices are used to
convert the video output from devices which don't provide a digital stream
Webcams
The video feed from webcams is often of low quality and frame rate making them
unsuitable for effective analysis. Those using them should also be aware that the images
are uncompressed and therefore require greater processing by your computer.
Other ways of adding files to your library
For the sake of completeness, there are 3 further ways in which files can be added to your
library:
1. A new folder is added to the list of folders monitored by Dartfish (see Defining your
library).
2. The results of a Dartfish project are saved.
3. Video files are copied or saved into the library by a process external to Dartfish, for
example by using MS Windows file management tools or by using the import software
supplied with many camcorders.
When new files are added to a monitored folder by an external process they won't
automatically appear in the Library - you must remember to refresh. From the menu bar
- Version 6 -
© Dartfish. All rights reserved.
Dartfish User Guide
36
choose View > Refres h .
3.4.1
Using the Video File Importer
The Video File Im porter copies files from any device on which Windows is able to recognize a
file structure (for a fuller description see Importing files to the library). To import video files
into the library:
1. Connect the external device or insert media into the appropriate drive. If the device
doesn't simply plug and play you may need to refer to the device's documentation to learn
how to do this. For example, many camcorders require that you select a connection mode.
3.4.1.1
2.
Select Video File Im porter from the drop down menu on the Im porter button.
3.
A step-by-step Wizard is launched to guide you through the process of selecting,
copying and categorizing video files. The steps of the wizard are covered in the
following topics.
Video File Importer - selecting files
In the first step of the importer you choose the source of your files and then can select or
deselect which files you wish to import.
Select source drive
Select a device or select the Brow s e... option to select a specific folder.
Even if you made a specific choice of video source from the importer, all connected sources
are listed. When selecting the source remember it may not always be obvious how your
computer identifies your device; in the example below the camcorder is simply identified as
"Removable Disk (G:)"
Dartfish automatically recognizes the file structure on certain devices and displays the
videos from that device. On other devices it will be necessary to browse and select the
appropriate folder.
Select Files
Files are selected by placing a tick in the check box at the top right of the thumbnail.
Proceed to the next step by clicking the N ext button at the bottom of the Importer
© Dartfish. All rights reserved.
- Version 6 -
Video Library
3.4.1.2
37
Video File Importer - naming and filing videos
In the final 2 steps of the wizard you will define file name, assign keywords and select a
folder for the imported files.
File name
The title has two roles depending on the source device type:
For sources which Dartfish will join concurrent files (AVCHD camcorders and DVD), the
title represents the name of the new file that will be created.
For other sources, the file name allows you to rename the often meaningless name
assigned by the camcorder. The same filename will be used for all imported files but
suffixed with an index number e.g. filename(1)
Add keywords to video clips
Dartfish keywords can be added to video clips as they are imported. As discussed in the
Organizing your library topic, keywords are a highly effective way of cataloging video
content.
To add a keyword:
1. Click the Add Keyw ord Category button
2. Select a keyword category, if the category doesn't yet exist in your library, type the
new category name to create it.
3. Select or type the keyword to be assigned
4. Repeat as often as required to fully describe the video content
The keyword form is retained for future imports
Previous versions of Dartfish automatically added the keyword "Import session dd-mmyy" to imported files. Now there is flexibility to add any keywords but it may still be
useful to add a keyword representing the name of the session in order to be able to
easily locate all the clips from a single session.
Select destination folder
The final step before import allows you to choose the destination for imported files. This is
the Windows folder where your files will be stored.
Even if you use keywords to organize your library, your files are still stored using the
Windows folder system. It is perhaps best to import to one of your library's monitored
folders but any folder you choose will automatically be monitored by Dartfish.
It is recommended that you choose a folder on a local drive, rather than on a network;
this will ensure rapid copying and smooth playback and analysis
The folder structure of the removable media will be maintained after import. For example if
my memory stick contains a file K:\Videos\file.mpg it will be imported as ..\destination
folder\Videos\file.mpg.
- Version 6 -
© Dartfish. All rights reserved.
Dartfish User Guide
38
Finish
Your final choice is whether you wish the imported media to be included in the Tray.
Regardless of the choice made, of course all media can be located in the Library Item s lis t.
Categories can be used to help locate clips from a specific import session.
3.4.1.3
Notes on the Video File Importer
Importing files from Camcorders
Many camcorders permit a maximum file size so when you make long recordings several
video clips are created. For certain types of device (currently AVCHD camcorders and DVD)
Dartfish automatically detects sequential files and creates a single video clip.
Indexing video
MPEG-2 (and some other video formats) do not have an index, preventing accurate
identification of video time position. Tasks which rely on this, such as stepping through the
video and synchronizing multiple clips, become unreliable. Dartfish creates an index when
these videos are imported or opened. Access to the video is delayed during indexing, but
the index is retained allowing immediate subsequent access.
Importing from DVD
In addition to importing files from data CDs/DVDs and importing from DVD camcorders via a
USB connection, Video File Import copies video files from a video DVD in a form that can be
used in Dartfish software : the DVD's VOB files will be renamed with an MPG file extension
to allow them to be played by Dartfish.
DVD import is not designed to captu re video images from a DVD player. In order to
import DVDs your computer must have a disc drive capable of reading DVDs or import is
direct from the DVD camcorder connected by USB.
If your computer's DVD player automatically plays the disc after insertion, stop it and
close the player to allow Dartfish to access the disc.
Many commercial DVDs are copy protected. Dartfish will be unable to import video files
from copy protected DVDs. Video DVDs that have been created by a home DVD Video
Recorder or a DVD camcorder are usually not copy protected.
3.4.2
Video Recorder: get video from DV tape camcorders
Video Recorder is the Dartfish module which is used to record video from DV tape camcorders
and other devices providing a video stream. In this topic we focus on the process for DV
tape camcorders: other devices will follow similar steps but the connection process will
vary.
Its use is very simple - three steps to set it up and three steps to capture each clip. These
steps are shown below but for further details, read the rest of this topic.
To activate DV import
1.
Select Video Recorder from the drop down menu on the Im porter button.
© Dartfish. All rights reserved.
- Version 6 -
Video Library
39
To setup DV Import
1.
Connect camera to computer via Firewire
2.
Switch camera ON to "Camera" or "VCR" mode.
3.
Set capture settings if needed.
To capture video
3.4.2.1
1.
Play video tape to find relevant footage
2.
Start capture
3.
Stop capture
Setting up capture
Connecting a camera
A DV camera is connected to a computer via a firewire cable (also known as IEEE 1394 or
i-link).
In general, your camcorder will have a 4 pin connector. Your computer can either have a 4
or a 6 pin connector. The cables are called 4 to 4 or 4 to 6.
"4" pin connector
"6" pin connector
- Version 6 -
© Dartfish. All rights reserved.
40
Dartfish User Guide
Switching the camera on
To capture images from tape, switch on your camera to "Play" or "VCR".
If this is the first time that a DV camera has been connected, it may take some moments
for Windows to install the new hardware. Watch for progress in the Windows system Tray.
Selecting a C aptu re D e v ice
The lower part of the DV import module contains several settings. Clicking the headings
expands each setting to view the details.
In the Captu re Device section the video (and optionally audio) devices are selected: Select
your camera from the Select captu re device drop-down list. When a successful connection to
a camcorder is established the Record button will be active (red) and when the tape is
played an image should appear in the DV im port video display .
If the device or camera that you are using does not appear in the capture device list, it is
possibly because of one of the following reasons:
Camera not switched on. (Remember cameras auto switch off after a short time if
unused)
Correct cable not present or disconnected ( a firewire can easily work loose).
Camera not properly installed and recognised by Windows.
Hardware fault with firewire cable or camera or capture card.
Camera not capable of exporting video to a computer.
3.4.2.2
Setting Clip Properties
Use the Clip Properties to set the File N am e, Categories and Keyw ords for newly captured
clips. This information defines a so-called Captu re Form that will be used to categorize the
video clips during capture.
Read the section Organizing your library to learn more about categories and keywords.
Defining the C aptu re F orm
© Dartfish. All rights reserved.
- Version 6 -
Video Library
41
1.
Click the Add a category link . The Add Category dialog will appear.
2.
Select a category from the list or create a new one.
3.
Click OK. A new category box will appear on your Captu re Form .
4.
Repeat steps 1-3 until boxes for all the categories you want to use are displayed on
your form.
Using the C aptu re F orm
1.
Type a file name in the file name text box.
Each file captured using this file name will be numbered sequentially. For example if
you type "Training Apr10", each captured clip will be named Train in g Apr1 0 (1 ), Train in g
Apr1 0 (2 ) etc.
The filename you use must follow MS Windows file naming rules: Max length 256
characters; use of ":", ";", "/" or "\" is not possible.
If no file name is specified a generic name of U n titled(1 ) etc will be given.
2.
Select the keywords you wish to give the clip by selecting them from the drop down list
for each category box. For example, you might intend to capture all of the men's Giant
Slalom competitors in Chamonix. Your form should look like this:
- Version 6 -
© Dartfish. All rights reserved.
Dartfish User Guide
42
If a keyword does not already exist, for example a new competitor, you can type that
value into the appropriate box. This new keyword will only appear in the L ibrary
module's categories list after clips have been captured.
If a category is to remain with no keyword, for example if the name of a competitor is
unknown, the value may be deleted from that category box (select it and use the
Backs pace key on your keyboard). Do not use the Clear bu tton
as it will remove the
category box from the form.
3.4.2.3
Using Recording options
A difficulty when capturing from tape is to guess when the action that is to recorded starts.
It is common to start recording too early and create a file that is longer than neccessary or
needs to be trimmed. Worse still, recording is started too late and the only option is to
delete the file and try again. Recording options are intended to prevent this. There are
two recording options:
Pre-record - constantly stores a defined number of seconds of video in the computer's
memory. When recording is started the stored video is included in the video file created.
Setting one or two seconds of Pre-record compensates for user and computer reaction
time.
Recordin g Du ration - it is possible to define how long the captured clip will be. Recording will
automatically finish at the end of the defined duration. This simplifies recording to the
single button press that initiates it but it is especially valuable when longer videos are to
be recorded; for example, start recording a game and return one hour later when it has
finished.
To set Recording options
1.
2.
3.
Expand the Recording options section
Select the setting (tick box)
Set the value by editing the time directly or by using the Up-Down buttons. Note that
time is displayed in Hour:Minute:Second format.
In the example shown here a 2 second pre-record is being used but the 5 second
© Dartfish. All rights reserved.
- Version 6 -
Video Library
43
recording duration is not and recording will be stopped manually.
Recording after the action has completed
The tape may show many actions which are of no value to you. How can you efficiently
select which of these you want to record for use in Dartfish? By setting a larger Pre-record
it is possible to make an assessment of which actions are worthwhile. In the example
below, recording is only started AFTER the jump has completed: A pre-record of 4 seconds
allows for decision making time and by also setting the recordin g du ration to 4 seconds we
ensure that it is always the previous 4 seconds that are recorded.
3.4.2.4
Selecting a recording location
The Recordin g folder setting both displays the current Windows folder where video will be
stored and allows you to select a different location.The recording location default is the
"Videos" folder on your computer. To change recording location:
1.
Click the Ch an ge recordin g location link. The following dialog box appears:
2.
Select a folder from the list or click the M ake N ew Folder button to create a new folder in
the currently selected folder.
Choosing a recording folder
- Version 6 -
© Dartfish. All rights reserved.
44
Dartfish User Guide
Apart from organizing your files where it is convenient to find them in the future you must
choose a drive with sufficiently fast write-speed.
Video files are large and data-rich so attempting to save to a location where the file writing
speed is too slow is akin to quickly pouring a lot of water down a narrow pipe! The result is
dropped frames and jerky playback. Typically, data transfer to a network location is too
slow to successfully create video files.
Record to a local drive and then use the Sh are function of the Library's Tray to copy
the files to other locations.
3.4.2.5
Using an encoding profile
Dartfish can re-encode video during capture. When no encoding is used, video is recorded
in an AVI file format which is relatively uncompressed. Selecting an encoding profiles for
capture is used to:
Reduce video file size.
Prepare the video for its final destination e.g. sharing by internet and CD
Make files compatibile with media storage systems and document management systems
that require video in a specific file type.
About the encoding types
See Converting video for further information on the different encoding profiles.
Convert in Background
To both record a video file and simultaneously convert it requires a lot of computing power.
If the Con vert in Backgrou n d option is selected Dartfish will prioritize the recording of the file
as AVI but convert it when resources are available. Creation of the encoded file may finish
some time after recording has completed.
Keep the original recording file
Because the Con vert in th e Backgrou n d option effectively creates 2 files, you can choose to
retain the full quality AVI file in addition to the encoded copy.
Although encoding during capture offers the convenience of a video file already suitably
encoded/compressed for its final purpose, it is possible to re-encode any video file in the
library simply by right-clicking it and selecting Con vert from the context menu.
3.4.2.6
The background task manager
When the Con vert in backgrou n d option is used to encode (convert) video as it is captured,
the full quality video is stored by the computer until sufficient resources are available to
complete the conversion. This may not happen until some time after the capture.
The Backgrou n d tas k m an ager helps you keep track of the progress of creation of encoded
clips and if neccessary allows cancellation of the process.
To view the background task manager
© Dartfish. All rights reserved.
- Version 6 -
Video Library
1.
From the Tray section of the L ibrary, click on the Tray button.
2.
Select Backgrou n d Tas k M an ager from the menu.
45
To cancel tasks
If the progress indicator for a task shows that it is not yet complete
then
the task can be cancelled by clicking its close button
. Clicking the same button on
completed tasks does not undo the process, it simply removes the item from the list. All
complete tasks can be removed by clicking the C lear button. This may help in identifying
which tasks are still incomplete.
- Version 6 -
© Dartfish. All rights reserved.
Dartfish User Guide
46
3.4.2.7
Capturing video to Library
Once setup, the process of capturing video is a simple one; you have to locate the position
on the tape where the footage of interest is recorded and then click a single button to start
and then stop capture at the beginning and end.
Finding footage on tape
The DV Import module has a set of controls that you can use to control the camera.
Alternatively, you can use the equivalent controls on the camera itself.
Capture video
Click the record button
at the start and end of the clip.
The pause recording button
allows you to pause capture while the tape continues to
run. This allows you to create a single clip when the action is split. For example, coach
intervention in the middle of a trampoline routine or a fall while skiing can be ignored.
Replaying captured clips
The clips you have captured will now be listed in both the Tray and Item s L is t of the L ibrary
module. Load the video by double clicking on it. The video clip will open in the Player
module.
3.5
Locating video files
Dartfish's L ibrary module offers three methods for helping you to locate specific video files
from the Item s L is t.
Keywords view - displays a list of categories and keywords. The Item s L is t is filtered to
reflect files matching categories and keywords selected.
Search - the search box allows a text based search of filenames, categories and
keywords of the contents of the library.
Folders view - the typical way of locating files using MS Windows folders. The Item s L is t
displays the content of the selected folder.
3.5.1
Using Keywords
When using the Keywords system all video clips (and other Dartfish projects) in the L ibrary
will be listed in the Item s L is t. That could amount to a lot of files! You can filter the Item s
L is t to show only relevant clips by selecting the categories or keywords for those clips.
Filtering the Ite m s L ist by category
1.
Display the Library module
2.
In the Categories L is t, click the box next to the category of video you want to search
© Dartfish. All rights reserved.
- Version 6 -
Video Library
47
for. A binocular symbol appears in the box and all values within that category will also
be selected
3.
The Item s L is t will display all clips which are labeled with keywords from that category.
Filtering the Ite m s L ist by keyword
1.
In the Categories list, click the [+] symbol next to the category containing the keyword
you want to filter by. An expanded list of keyword is displayed.
2.
Click the box next to the keyword of video you want to search for. A binocular symbol
appears in the box. The Item s L is t will display all clips which are labeled with keywords
from that category.
You can select multiple keywords to refine your search
Removing filters
3.5.2
1.
EITHER: Click the box next to each category or keyword that you want to exclude from
the filter such that the binocular symbol disappears.
2.
OR: Click the Sh ow All button
above the Item s L is t.
Using Search
When using the Categories view, a search box can be found above the Item s L is t. This can
be used to search for all or part of the text in the file name, keywords and categories of a
video clip. For example a search for "Golf" could yield the following results:
- Version 6 -
© Dartfish. All rights reserved.
Dartfish User Guide
48
To use the Se arch :
1.
Type search text.
2.
Click the Search button or press the ENTER key.
Combining Se arch and keyword filters
When keywords are used to filter the Item s L is t, search results are based around the
selections made as follows:
Search first - subsequent category/keyword selections filter the search results only.
Filter first - subsequent searches are based on filtered results only.
3.5.3
Using Folders
The Folder view creates a way of searching drives and folders on your computer for items.
Although we recommend the use of keywords as a more versatile method for cataloguing
your video library there may be occasions where you prefer to identify video clips by the
folder where they are located. For example if you want to examine the contents of a CD or
networked drive (including these types of location in your video library is not
recommended).
Filtering the Ite m s L ist by folder content
1.
Display the Folders view by clicking the button at the top of the library.
2.
In the Folders view, click the folder you want to examine.
3.
The Item s L is t will display all clips in the selected folder.
© Dartfish. All rights reserved.
- Version 6 -
Video Library
3.6
49
Saving the tray's content
The contents of the Tray can be saved as a Playlis t which can be reopened in the future.
This is useful for any situation where you will want to work with a collection of clips;
creating a Playlist will be more efficient than locating the same clips in the items list for
example:
A set of clips illustrating techniques to be practiced in a coaching session.
Clips captured during training which you want to keep together for later feedback or
editing.
All video sources used while Tagging a game (Team Pro).
3.6.1
Creating a playlist
A Playlist is created by saving the tray, to do this:
1.
Click the Tray button found to the left hand side of the Tray itself.
2.
Select the Save Playlis t... option.
3.
Enter a file name and select a folder location for the Playlist.
Playlists can be saved into any folder you like but if you select one of the library folders
(see Defining your library) your Playlist will appear in the items list with the following icon:
This allows you to categorize, search for and open clips in the same way as you would with
- Version 6 -
© Dartfish. All rights reserved.
Dartfish User Guide
50
video clips.
3.6.2
Reusing a playlist
A Playlist is used by opening it, to do this either double-click its icon in the Item s L is t or
proceed as follows:
1.
Click the Tray button found to the left hand side of the Tray itself.
2.
Select the Open Playlis t... option.
3.
Locate the file on your computer and click the Open button.
When a Playlist is created it does not duplicate the video clips it contains but simply
instructs Dartfish where the original clips can be found. If a clip contained in a Playlist is
moved to another folder, deleted, or the folder containing it is unavailable (for example, a
disconnected network folder or external hard-drive) then Dartfish will be unable to find it.
When the Playlist is opened you will be offered the opportunity to find the clip.
If the N o button is clicked the Playlist will continue to open the remaining clips (and continue
to warn you if the files are not found). Remember to save the Playlist if you wish the
changes to be permanent (see Modifying a playlist).
3.6.3
Modifying a playlist
Once the Tray's content has been saved as a Playlist, changes made by adding or removing
clips from it are not automatically saved. These modifications must be saved using the
same procedure as creating the original Playlist (see Creating a playlist) You have the
choice of saving a new Playlist with a new name or overwriting the original.
3.7
Sharing video files
The Tray is used to share video to a variety of destinations including network drives, email,
CD and internet. To learn more about all the outputs from Dartfish see the Dartfish outputs
- publishing & sharing chapter
3.8
Converting video clips
The video which comes from your camera is in a DV (.avi) format. It is possible to use
Dartfish to convert DV video files into other, more compressed formats to reduce the space
they occupy on your hard drive.
Conversion is guided by the Video Con vers ion W izard.
1.
Step1 - select the files to convert from the Item s L is t or the Tray. To select multiple
files, hold down the [Ctrl] key while clicking on the file names.
2.
Step2 - Display the Tray or Item s L is t context menu by right-clicking on any of the
selected items. Select Con vert to launch the Video Con vers ion W izard.
© Dartfish. All rights reserved.
- Version 6 -
Video Library
51
3.
Step3 - Video Settin gs . Select an encoding profile. The profile chosen affects the video
format and the degree of compression. For more on video encoding profiles see
Converting Video in the Gettin g Fam iliar chapter.
4.
Step4 - Des tin ation . Choose a destination folder for the video. The default is to return
converted video back to the same folder as the original files. Converted clips will not
replace the originals and will have a different file name. For example, "Marathon.avi"
will become "Marathon.wmv". However, you are able to choose what action to take if
there are other files with the same name located in the destination folder. You can
either overwrite the existing files or rename the converted files.
Clicking the N ext button at this stage starts the conversion. When complete, the new files
can be found in the Item s L is t or Tray.
3.9
Video Formats and Dartfish
Dartfish can play a variety of common video formats. This allows the use of video content
from a variety of sources and devices. The following formats are supported.
AVI (DV - PAL, NTSC - Type I & II, uncompressed and DivX)
High Definition (HD) in HDV or AVCHD
Windows Media (WMV)
MPEG (MPEG-1, MPEG-2)
MPEG4 (H.264-AVC)
The file types listed above are a broad guide - some devices and software encode video
files using codecs that cannot be decoded by Dartfish. Others may create files with a
proprietary file extension that is not recognized by Dartfish. Our advice is to try to play it
and you'll soon find out if it works! Check out Dartfish Support for further advice.
HD (high definition) video and Dartfish
The increased resolution of HD video can be highly beneficial for video analysis however it
also has downsides. Four times more pixels can require more storage space and
processing power, although this varies considerably depending on the encoding bit rate
used by your camcorder. The difficulty is not just with image resolution; the complexity of
encoding profiles such as MPEG-4 require five times more processing than standard
definition MPEG-2. The result may be that analysis tasks such as split-screen comparison or
even frame-by-frame playback require above average computer resources.
- Version 6 -
© Dartfish. All rights reserved.
Dartfish User Guide
52
For those using HD it is particularly important to be aware of the recommended computer
specification.
3.10
Correcting video property errors
Some video devices produce video which fails to describe, or describe incorrectly, certain
video features and this can lead to problems with appearance. Dartfish allows you to
manually correct video properties.
To display the video properties:
1.
Right-click the video item in the Library's Item s L is t or Tray
2.
Select Properties from the quick-menu
3.
Select the Sou rce In fo tab
The following errors can be corrected:
Interlacing errors
Interlacing errors occur when the two fields which comprise each frame of interlaced video
are incorrectly displayed. If interlaced video is incorrectly described as progressive then a
characteristic jagged edge is seen on moving objects, such as shown below.
Where the two fields are displayed in the wrong order, the video will appear to jump back
and forwards when played frame by frame or in slow motion.
Aspect ratio errors
When a video is displayed in the wrong aspect ratio the image will appear distorted;
squashed or stretched.
To adjust properties
Only properties with a pencil icon next to them can be edited.
1. Click on the value to edit
2. Select the correct value from the drop down list
3. The corrected value is displayed next to the original value as show below:
© Dartfish. All rights reserved.
- Version 6 -
Video Library
3.11
53
The next steps
This chapter covered the use of the Library and explained how to create a library using
Categories and Keywords to manage video clips. Specifically, you learned to:
Define folders and drives to be contained in the library.
Define appropriate Keywords for your needs.
Describe the content of your video clips by using categorized keywords.
Capture and export video clips from DV tape.
Share video by disk, email or Internet.
Archive and backup video on CD.
We recommend that you take some time now to define the folders and/or drives that you
want in your library, create categories and values suitable for your use of video and then, if
you have existing video clips, assign appropriate values to each.
If continuing your journey through Dartfish Help then you might want to learn how to
capture video 'live' using the In Th eAction Module (read chapter Live capture & instant replay
during training).
Dartfish is also able to share video by producing Media Books from the An alyzer module.
- Version 6 -
© Dartfish. All rights reserved.
Chapter
IV
Live capture & instant
replay during training
56
4
Dartfish User Guide
Live capture & instant replay during training
The InTheAction module is a combination of Dartfish capture, replay, comparison and analysis
features brought together in a way that allows the delivery of video feedback during training sessions.
The aim here has been to make the technology easy to use without the presence of a computer
being disruptive to training itself. Some of the key features which allow this to happen are:
Remote controlled - for complete ease of use, a single button on the remote control can control
both capture and replay.
Simplified video capture - in automatic mode only trigger capture at the start of the action. A
fixed number of seconds is captured from this point.
Automatic instant replay - replay happens automatically as soon as capture is complete.
Pause and set replay speed by remote control.
Comparison - compare captured clips side by side with a reference clip.
Synchronization - synchronization of clips is based around the moment when you trigger
capture making comparison of 2 clips both easy and quick.
Drawing/annotation tools - illustrate coaching points using a range of drawing tools
4.1
Preparing InTheAction for use
At the start of your coaching session using InTheAction you will spend a short time preparing
InTheAction for use. Of course you'll need to connect the camera, perhaps more than one camera,
also in this section you will learn to adapt the recording and play parameters according to your
specific needs.
4.1.1
Selecting capture device
IMPORTANT NOTE: About using video devices with InTheAction
InTheAction works by establishing a link that allows live images to pass directly from
camcorder to computer. For this reason it only works with camcorders and devices capable
of providing a video stream. DV and HDV tape camcorders can do this streaming but the
latest HDD and SD card camcorders do not offer this functionality.
It is still possible to use InTheAction with these camcorders in conjunction with converter
hardware: the camcorder's video output to TV is connected to the converter which creates
a digital video stream which can be used by Dartfish. Converters can be used with analog
© Dartfish. All rights reserved.
- Version 6 -
Live capture & instant replay during training
57
and HDMI video sources.
Webcams offer another solution. They provide streaming digital video but it is often of low
quality and frame rate. Even high quality webcams often lack the basic functionality (zoom,
auto exposure etc) of the cheapest camcorders, making them unsuitable for creating good
images for analysis. Nevertheless, webcam use may be a convenient solution in situations
where the image quality is adequate for the purposes of the analyst. Those using them
should be aware that webcam images are unencoded and therefore require greater
processing by your computer and a faster hard drive writing speed. This can make the use
of webcams problematic on less powerful computers. The latest advice on the use of
camcorders and other imaging devices can be found on the support section of our website.
The information below applies equally to DV camcorders and other video streaming devices.
Setup capture devices
After connecting the camera, the next step is to launch the InTheAction module and select your
camera as its video input. To launch the InTheAction module click on the InTheAction button on the
toolbar:
InTheAction module has two tabs at the top of the module:
Setu p In pu t Devices - to select the capture device(s); choose the appropriate device
from the drop-down list. Once selected, you should see the images transferred from
capture device (camera).
If your device is not listed, make sure that your equipment is correctly connected
(see Video Recorder in the Video L ibrary chapter), switched on and has not
automatically switched off - many cameras do this after a fixed interval. Taking the tape
out of the camera prevents automatic power off every few minutes.
Usually input device selection is only required the first time you connect your camera
to your computer. It is necessary if there is more than one input device or if several
different cameras are used.
In Th eAction - is where the capture and replay features are found. Click on this tab once
you have selected the capture device.
4.1.2
Using more than one camera
If your computer has two firewire inputs, a second camera can be connected, allowing InTheAction
to capture two video clips simultaneously. For example, rear and side shots. InTheAction allows
simultaneous replay of both clips.
Choosing multiple video inputs
Unless you choose to use multiple video inputs when you installed Dartfish you will first
need to activate the option to use tw o cameras. To do this:
- Version 6 -
© Dartfish. All rights reserved.
Dartfish User Guide
58
1.
Open the Dartfish options, select Tools>Options from the Menu bar (F3).
2.
Select the In Th eAction topic
3. Click the 2 (n eed iden tical device type) option
Indentical devices are recommended because it requires much more computing power
to process the video from different hardware.
Setting up multiple video inputs
4.1.3
1.
Launch the InTheAction module.
2.
Select the Setu p In pu t Devices tab.
3.
Select the second camera from the corresponding drop-down list
Defining recording folder
The lower part of the InTheAction module allows you to set the Recordin g Folder, i.e. the
folder where the captured clips will be saved on your hard disk (see Organizing your library
in the Video L ibrary chapter for more info). To do this, use the Ch an ge recordin g folder as
illustrated below:
4.1.4
Defining clip properties
If you intend to keep the video clips in your library you should define the clip properties
which will be assigned to the video files that are saved.
Use the Clip Properties to define:
the File N am e - enter the file name in the text box
the categorization of captured video clips - use the Add a category link to add a
category and/or keyword (see Organizing your library in the Video L ibrary chapter for
more info)
© Dartfish. All rights reserved.
- Version 6 -
Live capture & instant replay during training
59
Once defined, these properties will assigned to all subsequently captured clips, until a
new file name or category/values are specified.
4.1.5
Defining pre-record & clip durations
InTheAction module lets you capture video clips in a single click. To do this, you have to
specify the Clip Du ration and pre-record Du ration values.
What is Re cordin g Duration?
Based on the type and duration of the action that you want to record, you need to define the
approximate Clip Duration of the video you are going to capture. For instance, the duration of a golf
swing is approximately 3 to 4 seconds from the address to the finish of the swing.
What is pre-record Duration?
If you wait until you see the golfer start to swing before starting to record , you may miss the first
moments of the swing. To avoid this you should set a pre-record Du ration value which
corresponds to the second(s) of video footage that took place before you started capture.
Pre-record forces the computer to continually remember the number of seconds you specify. When
you trigger capture it includes these seconds at the beginning of the new clip. Usually just a few
seconds of pre-record are required but the maximum amount is limited by the amount of available
memory (RAM).
When should you start capture?
The moment when you trigger capture also creates a Default Syn ch ron ization poin t on the
captured video. Synchpoints are used to easily synchronize video clips for comparison (see
Synchronizing clips in InTheAction). For this reason it makes sense to trigger capture at an
obvious point for comparison e.g. when the club strikes the ball as shown in the following diagram.
- Version 6 -
© Dartfish. All rights reserved.
Dartfish User Guide
60
To define the pre-record and clip durations.
The current settings for pre-record and clip durations are displayed at the bottom of the InTheAction
module as shown below.
To change these settings:
1.
Tick the box next to the pre-record value if a pre-record is to be used.
2.
Set a value for pre-record du ration according to the advice above. The largest prerecord duration you can set is related to the amount of available RAM memory of your
computer. It is possible to increase the amount of memory dedicated to storing prerecord (see About pre-record buffer).
3.
Tick the box next to the recordin g du ration value if you want recording to automatically
stop after a fixed duration. If this is left unticked you must start and stop recording
manually.
4.
Set a value for recording duration. Remember that the pre-record duration is included
in the total recording duration i.e. for the settings illustrated above a 10 second clip
and NOT a 13 second clip is created.
If the pre-record is set to the same or greater value than the recording duration it is
possible to wait until after the completed action before triggering recording. This allows
you to assess whether a performance is worth recording before deciding whether to record
or not.
4.1.6
Defining a replay sequence
Once you have captured a video clip, the InTheAction module will replay it automatically based on
the criteria defined in the Replay Sequence.
By default, no scenario is used for the replay sequence and replay speed is manually controlled by
© Dartfish. All rights reserved.
- Version 6 -
Live capture & instant replay during training
61
the user. Defining a scenario automates this.
Creating a replay sequence example
In the following example, a 5 second pause allows the athlete to join the coach at the computer
screen, together they then view the clip once at full speed and then in slow motion. To create such a
scenario:
1.
Display the InTheAction options (F3 > InTheAction).
2.
Activate the replay sequence function by clicking the Use a Replay Sequence check box.
3.
Click the Configure Replay Sequence button
4.
Click the Add Pause button and set the Duration.
5.
Click the Add Replay button and set the Speed to x0.5. The Replay Sequence is ready to use
and appears as shown in the following image.
When using a replay sequence it is still possible to control playback (pause, play etc.) by
the other video playback controls and remote control.
4.1.7
About pre-record buffer
By default, Dartfish uses half the available RAM memory to store pre-record. If you are
unable to set enough pre-record it is possible increase the memory bu ffer reserved for prerecord.
To increase Pre-record buffer
1.
Select the Setu p Captu re Devices screen of InTheAction .
2.
Drag the slider to define the size of the buffer.
- Version 6 -
© Dartfish. All rights reserved.
Dartfish User Guide
62
The blue section shows the memory being used by other processes, the green section
shows the memory dedictated to pre-record. The green section turning red is an
indicator that more pre-record buffer than is advisable has been set. This is liable to
affect the performance of Dartfish and other functions of your computer.
4.2
Instant visual feedback during training
Once you have defined the InTheAction settings (see Preparing InTheAction for use ), you can
start using the InTheAction module. These are the steps:
4.2.1
1.
If using the remote control (see Remote controlling InTheAction ), use full-screen view (type
F11). Recommended to give the largest possible video image.
2.
Capture a video clip.
3.
The clip automatically replays.
4.
Repeat for the next action
Capturing and replaying
Trigger Capture
1.
The camera should be in it's camera mode and the video image from the camera should be
visible when using InTheAction's Live view. The choice of views is controlled by the buttons at
the top left of the module; Live, Simple Replay, Blank , Comparison and Reference replay.
L ive view - shows the image from the camera
Sim ple Replay view - shows replay of the last captured clip or any clip opened from
the Tray.
Blank view - blanks the screen (prevents it being a distraction!).
Comparison view - compares the replay clip with the reference clip.
Reference replay view - shows replay of a reference clip.
It is not necessary to be in L ive view to capture but it gives guidance that the camera
is pointing in the right direction.
2.
Click on the red Capture button or use the equivalent remote control button (see Remote
controlling InTheAction ).
The duration of the clip will depend on the Clip Duration property (see Defining pre-record &
Clip durations ).
Viewing:
Once you have captured a clip, the replay sequence will start automatically.
© Dartfish. All rights reserved.
- Version 6 -
Live capture & instant replay during training
63
During replay it is possible use the replay controls or the remote control to pause, change
playback speed, skip to next track etc. At any point you can capture again. It is not
necessary to switch from Replay view to L ive view to initiate capture.
4.2.2
Controlling the replay
Replay of the clip can be controlled by using the playback buttons like on a normal VCR, or by using
the equivalent remote control buttons (see Remote controlling InTheAction ). Read the Getting
familiar chapter to learn the functionality of each button.
You are not restricted to replaying the last captured clip. Any of the previously captured clips will be
found in the Items List of the Library and Tray and may be reopened by dragging them into the
InTheAction video display window.
4.2.3
Remote controlling InTheAction
Because InTheAction is a tool for use during a training session you shouldn't be a slave to
the computer! Now is the time to install the remote control (see Remote controlling Dartfish
in the Gettin g fam iliar chapter) and learn to use its features.
As has been emphasized several times in this chapter already, all commands covered in this
section can be executed by remote control:
- Version 6 -
© Dartfish. All rights reserved.
64
Dartfish User Guide
To use the remote control, its driver must be installed and the infra red receiver
connected. How to do for the different types of remote control as well as guidance on
using their features is covered in the Gettin g fam iliar w ith Dartfis h chapter.
The actual distance at which the remote can be used (max. 20 meters) is dependant on
environmental factors and how fresh the batteries are. Batteries are quick to run down if
you put the remote in a bag where the buttons get pressed by other contents. Add spare
batteries to your Dartfish equipment inventory.
4.2.4
Using a sound trigger
Previous topics have indicated that capture using InTheAction can be triggered by clicking
the Captu re button and by remote control. There is a third method for triggering capture; a
sound trigger that can be configured to react to, for example, a club or bat striking a ball, a
starting klaxon or even a voice command.
When using voice as a trigger, the sound trigger reacts to the volume, not the quality, of
© Dartfish. All rights reserved.
- Version 6 -
Live capture & instant replay during training
65
the sound. Therefore a voice command will only work if louder than other incidental noise.
To use the sound trigger it must be activated and then configured to respond to the correct
volume of sound.
Activating the sound trigger
Before use, the sound trigger must be activated. To do this:
1.
Select Tools > Cu s tom ize... from the M en u bar.
2.
Select the Rem ote Con trol tab.
3.
Tick the box next to sound trigger to activate it.
4.
Close the Customize window. It is not necessary to configure the trigger at this stage.
Configuring the SoundTrigger
1.
From the menus select Tools > Con figu re Sou n dTrigger...
Hardware configuration. The input device will generally be set to "Microphone". It is not
possible to use the video camera as an input device for sound so your computer will
need to be equipped with a built-in or external microphone.
Detection configuration. Select the profile that is a closest match to the type of
sound used as a trigger then adjust the Sen s itivity slider to an appropriate level;
where incidental sounds do not trigger capture but the trigger sound does. Both
the hit counter and the Sound Trigger Server Status will help you assess which
sounds do and do not trigger.
2.
4.3
Close the Con figu re Sou n dTrigger Properties window. The sound trigger is now active
and can be used as a method of triggering InTheAction capture.
Comparing clips during training
It may be beneficial to compare the last captured clip to a reference clip when working
during training. You have the choice to display both clips side by side, blended together or
in a picture-in-picture mode.
- Version 6 -
© Dartfish. All rights reserved.
Dartfish User Guide
66
The steps to compare in InTheAction are to:
4.3.1
1.
Define (set) a reference clip.
2.
Activate the Com paris on view and capture a clip. The captured clip is automatically
compared to the reference clip
3.
If needed, synchronize the last captured clip with the reference
Setting reference
To Set a reference clip, proceed as follows:
1.
Load a clip from the Tray or from the L ibrary items into the InTheAction module
2.
Click the Set Reference button found below InTheAction playback controls.
You can use any other clip already saved on your hard drive as a reference clip.
Viewing the reference clip
The reference clip can be viewed at any time by clicking on the Referen ce replay button.
4.3.2
Working with comparison view
To work with comparison view, click on the Comparison view button on the left edge of the
InTheAction module. Comparison view is
The screen display will be split in two, the reference clip on the right and on the left the last
captured clip. Both clips will be replayed in function of the scenario that you defined (see Defining a
replay sequence ).
To work with the Compare mode :
© Dartfish. All rights reserved.
- Version 6 -
Live capture & instant replay during training
1.
Capture a video clip.
2.
At the end of the capture, the clip is automatically displayed next to the reference clip.
3.
Use the playback buttons to control the replay
67
To select the comparison layout:
Use the following buttons:
Split Screen - where the clips will be displayed side-by-side.
Basic Blend - both clips will be superimposed on top of each other.
Picture-in-Picture - the reference is displayed in the corner of the replay clip.
4.3.3
Synchronizing clips in InTheAction
In order to effectively compare two clips, obviously they must be showing comparable
activities, for example, you can't compare two divers if one is at a different point in the
routine.
Synchronizing clips is often unnecessary with InTheAction because a synchronization point
is set when capture is triggered. Provided that you always trigger at an obvious moment
each time you capture, clips will always be synchronized.
To change or set synchronization points
4.4
1.
Activate the Replay view (see Capturing and replaying).
2.
Find the moment on the clip that is to be the synchronization point. Use the Play/Pau s e
and Fram e-by-Fram e buttons to do this.
3.
Click
4.
Repeat for the reference clip if necessary (use the Referen ce replay button to display
the reference clip).
.
Using drawings in InTheAction
The right-hand side of the InTheAction module has a range of drawing tools which can be
used to annotate video images, assist with analysis or coaching. The use of these tools is
identical to the Analyzer module's drawing tools and is explained in that chapter.
4.4.1
Drawing Library
One unique feature of In Th eAction drawing tools is that it is possible to store up to nine
sets of drawings in the Draw in g L ibrary. This allows you to reuse drawings from one
InTheAction analysis to another.
Displaying the Drawing Library
1.
To use the drawing library it must first be activated. To do this:
2.
Display the Dartfish options (F3 or Tools > Option s menu).
- Version 6 -
© Dartfish. All rights reserved.
Dartfish User Guide
68
3.
Select the Advan ced topics.
4.
From the ITA Settin gs , select the U s e overlay draw in g repos itory option.
5.
After applying the change, the Drawing library control will be displayed on the
InTheAction module as shown below.
Using the Drawing Library
1.
Select an overlay from the list (up to nine overlays are possible)
2.
Add drawings to the video image
3.
As each new video is captured, the drawings from the currently selected overlay will
appear on the video image.
Remember, at any time drawings can be hidden by clicking the Sh ow /H ide drawing
button.
The Drawing library is one of the many features that Dartfish have added in response to
requests from our users but at the current time, this feature continues to be developed. If
the idea of a Draw in g L ibrary is valuable for the way you use Dartfish then you can look
forward to further enhancements to this feature in future releases of Dartfish.
4.5
Self coaching with live delay
L ive delay provides a completely hands-free way of reviewing video during training which
makes it especially useful for self-coaching. It simply delays the display on the computer
screen of the images that the camera continuously observes. It's like a mirror but one that
waits a predefined number of seconds before showing your reflection. Enough time for the
athlete to finish a routine, drill or exercise then assess how he or she performed.
For example, a coach might explain adjustments required using the range of InTheAction
features explained earlier in this chapter and then leave the athlete to practice, using L ive
Delay to confirm the adjustment is being executed correctly.
4.5.1
Live delay settings
Before using live delay the camera should be connected and switched to it's camera mode. The
InTheAction module is activated and video input set up as described previously (see Preparing
InTheAction for use ).
To use L ive Delay, you must determine the duration of the movement that you will review
and then add 1-2 seconds as a margin. For instance a Golf swing takes 3-4 seconds, it
might take a further 5 seconds to get to a position to view the computer display - you
would then set an 11 second live delay (2+4+5).
Setting the amount of delay
1.
From InTheAction's Recordin g Option s ch an ge th e live delay valu e. The largest amount of
seconds you can set is related to the amount of available RAM memory of your
© Dartfish. All rights reserved.
- Version 6 -
Live capture & instant replay during training
69
computer.
2.
Click on the Live Delay view button.
3.
Press F11 on your keyboard to have a full screen view (press F11 again to come back to normal
view).
That's it! No button presses, no files recorded, no comparison, no pause or replay. Just a
simple tool to help with self coaching.
Using live delay doesn't stop the use of other InTheAction features. As soon as the
capture button is pressed/clicked, capture begins according to the pre-record and duration
settings and replay commences straight away. However, to trigger the capture, always
refer to the live action and not to what you seen on the screen.
4.6
Next steps
InTheAction allows you to review and compare performance while training takes place but to review
these performances at a later date you should learn how to load, synchronize and compare clips in
the Analyzer module.
The Analyzer module will also allow you to publish your clips into a media book; a remote coaching
tool complete with audio and text guidance (read the chapter on the Analyzer).
- Version 6 -
© Dartfish. All rights reserved.
Chapter
V
Analyzing Performance
72
5
Dartfish User Guide
Analyzing Performance
Dartfish's Analyzer module is packed full of features to help observation and understanding
of sport. This chapter guides you through these allowing you to:
Compare video.
Up to 4 clips can be compared side by side and 2 clips can be blended. It is quick to
synchronize clips to make the cation contained comparable. You are not limited to just four
clips in your analysis as a project can contain multiple analyses in its Storyboard.
Annotate video
A collection of drawing and text tools help enhance observation, make measurements of
distance, angles and time and add text to video clips. Tools exist to enhance the
effectiveness of drawings such as automatic tracking and fading them in and out at
relevant positions in the vide clip.
Text or audio comments can added to an analysis to create a lasting record of your analysis
and to save time, previous comments can be imported from previous analyses.
Identify important moments
Key Pos ition s can be identified and drawings and comments added to them. Each key
position can also be a synchronization point, allowing more than one synchronization in
each comparison.
© Dartfish. All rights reserved.
- Version 6 -
Analyzing Performance
5.1
73
Analyzer workspace
The An alyzer workspace is illustrated below:
Its main constituents are:
Video Screen - to display the clip(s).
Tim elin e - (underneath the screen), to control the playhead position and set the cu e in /
ou t points to define the playable part of the video.
Play con trols - (underneath the timeline) to control the video playback.
Dis play m ode - (top-left) to change the screen display. You can select among Sin gles creen , Split-s creen , Blen d and M os aic modes. The A, B, C and D buttons show/hide a
clip. In split-screen modes, they are used to select between up to four clips to display
simultaneously.
Im age E n h an cem en t tools - (underneath the C, D buttons) to zoom in/out or flip the
images.
Draw in g tools - (on the right) to draw on the video.
Storyboard - (underneath the play controls) contains the different analysis of an
An alyzer project.
Pu blis h in g - (on the right of the storyboard) to publish your analysis on different media
(CD, e-mail, printer, Internet) or to create a movie of the Storyboard.
- Version 6 -
© Dartfish. All rights reserved.
Dartfish User Guide
74
N otes - (at the bottom) to add written and audio comments. To see this area it may be
necessary to resize the Analyzer views area. This is done by click and dragging its top
border using the mouse shape shown in the following illustration.
You can switch between different views using the following tabs
The Data Graph is used to display external data streams (such as the heartrate, speeds,
etc.) captured by external devices such as radar, heartrate monitors, force platforms etc.
Such streams are synchronized with the video. More information can be downloaded on
http://www.dartfish.com/downloads.
Read the remainder of this chapter to learn about An alyzer functions and about the other
views.
5.2
An analyzer project - the Storyboard
The Storyboard can contain multiple analyses that constitute an An alyzer Project. Each item
in the Storyboard corresponds to one analysis. For example, you could analyse swings of a
students captured during a training session, one from the front, one from the side and one
from the front compared to a reference swing, as illustrated below.
Each analysis may include drawings and audio commentary. All this is saved in your An alyzer
Project along with the videos.
Your project can be:
5.2.1
1.
Re-opened later to modify/add analysis elements (e.g. add a fourth swing, modify a
drawing, etc.)
2.
Publish to different destinations (e-mail, CD, printer, internet) to be handled out to your
student/athlete (see Publishing Analysis).
Loading clips
Clips can be loaded as multiple clips within a single analysis or as a new analysis.
To load a clips into an analysis
1.
Activate a vacant video display screen A, B, C or D in Sin gle-s creen m ode or display the
required number video display screens in Split-s creen m ode.
© Dartfish. All rights reserved.
- Version 6 -
Analyzing Performance
2.
75
Double click each clip in the Item s L is t or the Tray of the L ibrary.
You can also drag & drop a clip onto any video display screen. This offers greater
flexibility over which video display is used. This method can also be used to replace a
previously loaded clip.
To add a new analysis (i.e. a new Story board item)
Drag & drop a video from the Item s L is t or Tray onto a vacant position on the storyboard.
To replace a Storyboard item
You can replace the video clip of a Storyboard item with another one. To do this, drag & drop
the new clip on top of the old one.
To delete an analysis (i.e. delete a Story board item)
Right-click on the Storyboard item and select Delete from the context menu.
Starting a new project ( File>N ew from the menu bar) will empty all items from the
Storyboard.
5.2.2
Playing clips
Once a clip is loaded you have the ability to control the playback (play/pause, stop, frameby-frame, etc.). This can be done by using the playback controls buttons and the timeline
underneath the video screen.
Read the Video Playback section in the Gettin g fam iliar chapter to learn more.
The functions of the buttons are the same as for the Player module except for Play n ext/
previou s clip and the Repeat m ode which applies to items of the Storyboard rather than
items of the Tray.
- Version 6 -
© Dartfish. All rights reserved.
Dartfish User Guide
76
5.2.3
Saving an analyzer project
Select File>Save (or File>Save As ...) from the M en u bar to save a project. An alyzer projects
can be identified by the following icon.
- Analyzer project
If a project is saved in a M on itored folder of your L ibrary (see section Defining your library
in the Library chapter), it will be displayed in the Item s L is t.
To open a saved project
Double-click on the project in the Item s L is t
Select File>Open from the M en u bar.
To start a new project
Select File>N ew from the M en u Bar.
Starting a new project empties the Storyboard.
5.3
Analyze a performance
In this section, you will learn to use the different tools to analyse a performance:
Image transformation tools - such as zoom and flip horizontal or vertical (see
Enhancing images).
Drawing tools - qualitative tools to highlight details and quantitative tools to extract
statistics out of the video (see Drawing on the video).
Comments - audio and written comments (see Adding comments).
Key positions - brake down a movement and analyse its key positions separately (see
Analyzing key positions).
5.3.1
Enhancing images
Dartfish's An alyzer allows you to zoom in or out on an image to better see the details of a
particular moment. There are many ways to zoom in/out:
1.
Use the M axim ize video button at the bottom of the An alyzer screen (3rd button in the
illustration below). When selected, the video is enlarged to occupy the available height
of the display area (to do this the left and right edges of the video may be hidden).
2.
Use the Dis play video fu lls creen button (right-most above). The video is displayed in full
screen (press [ESC] on your keyboard to return to normal view).
3.
Click on the Zoom Tool button, position the mouse cursor over the part of the picture
that you want to zoom on and left click (right click to zoom out).
© Dartfish. All rights reserved.
- Version 6 -
Analyzing Performance
4.
77
Click anywhere in the An alyzer's screen and use your mouse scroll-wheel. The image
will zoom towards the location pointed by your mouse cursor.
Once the image has been zoomed in, you can move the zoom focus in two ways:
1.
Click on the M ove Tool button and drag the mouse cursor until the screen displays the
part of the image you want the zoom to focus on.
2.
Click and drag using the mouse wheel.
You can play the clip(s) once it is zoomed. The zoom perspective is maintained.
Zoom options
Clicking on the Zoom Tool button displays options at the top of the An alyzer's screen:
From left to right, the buttons give access to the following function:
Res et Zoom - resets the zoom factor to 100%
Zoom In - each click increases the zoom factor by 20%
Zoom Ou t - each click decreases the zoom factor by 20%
Zoom Factor - set the zoom factor by selecting it from a predefined list
Qu ick M agn ify - changes the mouse cursor to a magnifier to quickly point to details.
You can change the zoom factor inside the Qu ick m agn ify tool by using your wheel
mouse. [shift] + wheel mouse will modify the radius of the magnifier.
Flip a Clip Horizontally or Vertically
To get a new perspective on a clip, you can flip it horizontally or vertically. To do this, click
the Flip H orizon tal or Flip Vertical bu tton . The button appears as "pushed". You can flip the
image horizontally and vertically at the same time.
5.3.2
Drawing on the video
Dartfish allows you to draw objects and add text on top of a clip's images. Use qualitative
drawings (e.g. lines, circles, rectangles, etc.) to highlight details. Quantitative tools
(angles, measurements, etc.) can be used to extract statistics from the video.
The Drawing Toolbar
Use the following toolbar to draw and write text on the video.
Draw in g m an agem en t tools - to select, show/hide, delete, and undo/redo
drawings.
- Version 6 -
© Dartfish. All rights reserved.
Dartfish User Guide
78
Video Draw in g vs . Screen Draw in g - two modes to draw on clips.
1.
In the Video Draw in g mode, your drawings are associated with the
selected clip.
2.
Use the Screen Draw in g mode to draw across the An alyzer's screen
(see Comparing performances).
Draw in g tools - the various tools to draw on the video. Most of these tools
are self-explained. Read the remaining of this section to learn about the
more advanced tools.
The tiny arrow on the lower-right of a drawing tool indicates that other tools of the same
type can be accessed by a mouse right-click, as illustrated below:
5.3.2.1
Adding and modifying drawings
To add a drawing
1.
Display the frame of video to which you wish to add drawn objects and/or text. To do
this, you can drag the playhead and use the frame-by-frame buttons.
2.
Select a drawing tool
3.
Position the mouse cursor on the image at the point where you want to start drawing
4.
Left click, hold and move the mouse to the end point
5.
Release the mouse button
Although you are drawing on a single frame of video, the drawings will be displayed for
the entire clip. Use the key position analysis (see Analyzing key positions) if you want to
apply different drawings to different frames. It is also possible to fade drawings in and out
so that they only appear for part of the clip (see Fading drawings in and out).
Holding down the [shift] key "constrains" drawing, e.g. to draw a horizontal line, a
square, a circle, a 90 degrees angle, etc...
By default, selecting a drawing tool once let you draw a single object. If you would like
to draw the same object many times in a row (e.g. multiple lines), select the currently
selected tool a second time. A vertical gray mark appears in the tool and indicates that you
© Dartfish. All rights reserved.
- Version 6 -
Analyzing Performance
79
are in a "repeat drawing" mode.
To leave this mode, click the selected tool a third time or select another one.
To modify a drawing
1. Click the Selection button (top-left of the drawing toolbar).
2.
Click on the object you wish to select. White handles appear on the object.
If you wish to select multiple objects, hold down the [Ctrl] key as you select additional
objects.
3. Once the object(s) is selected, you can:
Drag a handle to change the size or shape of the object.
Click and drag the selected object to another location.
To delete drawings
Use the Delete All button
Select a drawing and press the [delete] key or use the Delete button
Use the U n do/Redo buttons to go back to the previous state
5.3.2.2
Drawing properties
You can change the thickness, color, opacity, size and other properties of the drawings.
The draw in g properties bar is displayed at the top-right of the An alyzer screen
To modify a property:
1.
Click on the drawing to select it.
2.
Click the button that corresponds to the property you want to modify.
3.
Select the different value/color/font.
The 1 , 2 and 3 buttons correspond to properties pres ets . Left-click on these buttons to
apply a preset. To change a preset:
1.
Draw an object
- Version 6 -
© Dartfish. All rights reserved.
Dartfish User Guide
80
5.3.2.3
2.
Modify its properties
3.
Right-click one of the 1 , 2 or 3 buttons.
Clone rectangle
The Clon e rectan gle tool allows you to "clone" and magnify an area of the image. Play the
video to visualize both the magnified area and the performance in its whole (picture-inpicture effect).
To use this tool, proceed as follows:
1.
Select the Clon e Rectan gle drawing tool
2.
Click, hold and move the mouse cursor to draw a rectangle around the area you want
to clone.
3.
Click and drag the cloned area to the location you want
4.
Use the white handles to magnify the cloned area
5.
Click anywhere in the image (except the drawing itself) to deselect the cloned area.
For best result, use a tripod and leave the camera fixed (no zoom, pan or tilt). If the
camera moves, you can still use this effect but in conjunction with the au tom atic trackin g
function (see Tracking objects automatically).
5.3.2.4
Picture
You can import a picture and overlay it on top of the video. You can use for example this
function to insert your logo or to compare a key position to a reference image.
© Dartfish. All rights reserved.
- Version 6 -
Analyzing Performance
81
To add a picture
1.
Select the Im age drawing tool. The Open Im age dialog opens.
2.
Browse for the image on your disk and click on the Open button. The image overlays on
top of the video screen.
You can change the size of the picture by dragging the white handles. Hold down the [shift]
key while doing this operation to constrain the proportion of the image. You can also click
and drag the image to a different location.
If the image width is larger than 360 pixels, it will automatically be resized to this value.
If you load an image in Screen Draw in g mode (see Drawing on the video), it will always
be overlayed at the same location in the video. Use this, for example, if you want your logo
to be displayed always at the same location.
5.3.2.5
Measuring angles
The image below illustrates the An gle tool.
To add an angle:
1.
Right-click on the Tim e button and select An gle from the context menu.
2.
Position the cursor on the image exactly where you want the corner of the angle to
be.
3.
Left-click, hold and move the mouse cursor (in the image above, click on the club head
and move horizontally). A line draws as you move the mouse.
4.
When the line extends to where you want the angle to open, release the mouse
button.
5.
Move the cursor up or down to create the desired angle. The number of degrees of the
- Version 6 -
© Dartfish. All rights reserved.
Dartfish User Guide
82
angle is shown as you move the mouse.
6.
Click the mouse when the angle is the desired width.
You can modify the line thickness, colors and font (see Drawings properties).
Hold down the [shift] key while drawing to constrain the angle to 0, 45, 90, ... degrees.
5.3.2.6
Measuring distances
The image below illustrates the Dis tan ce tool.
Distances are only precise in a plane perpendicular to the camera. You first have to
calibrate this plane by defining a reference distance. To do this, put an object of known
length at the position where the movement will be performed (the width of the mat in the
above example).
To measure distances, proceed as follows:
1.
Right-click on the Tim e button and select Dis tan ce from the context menu.
2.
Click, hold and move the mouse cursor to draw the reference distance (the one with
the dashed line in the image above)
3.
Right-click on the reference distance and select Set as referen ce... from the context
menu. The following dialog opens
© Dartfish. All rights reserved.
- Version 6 -
Analyzing Performance
4.
Enter the size of the reference object.
5.
Select the Dis tan ce tool again and draw the distance (vertical line in the example
above). It will be computed based on the line length and the reference value.
83
The measurement precision relies on many factors such as the distance between the
camera and the performer, the camera zooming factor, the precision of the perpendicularity
between the camera axes and the plane in which the movement is performed, etc... Try to
be as precise as possible when setting the reference distance. For example, use a well
defined and distinct marker on the floor and use zoom tools to enlarge the image when
setting the reference distance.
5.3.2.7
Using stopwatches
Dartfish allows you to use multiple stopwatches
to estimate the duration of a performance,
to measure time in different sections of a performance/race,
to estimate/compare different time/speeds.
The stopwatch displays the time in minutes:seconds.frames (mm:ss.fff). Its precision is
function of the number of frames/sec, i.e 2'' of a second in Europe (corresponding to 50
frames/sec in PAL video) or 1.66'' of a second in North America (NTSC video, 60 frames/sec).
To add a stopwatch
1.
Select the Tim e drawing tool
2.
Click anywhere in the image to insert a stopwatch. Use the drawings properties (see
Drawings properties) to modify the color and font.
The stopwatch displays the current position of the playhead at the moment it is inserted in
the image.
To reset a stopwatch
1.
Right-click on a stopwatch (that has already been placed in the image)
2.
Select Set tim ecode to 0 0 :0 0 in the context menu
To start/stop counting
You can start and stop counting in a section of a performance/race. For example, you may
- Version 6 -
© Dartfish. All rights reserved.
Dartfish User Guide
84
want to compute the time from gate 1 to gate 7 in a giant slalom to compare performances
in this particular section. To do this:
1.
Position the playhead at the position you want to start counting
2.
Set tim ecode to 0 0 :0 0 (optional)
3.
Right-click on a stopwatch and select Start cou n tin g
4.
Position the playhead to the end of the section
5.
Right-click on the stopwatch and select Stop cou n tin g
You can change the start and stop position by setting them to a new position. To disable
this feature, simply uncheck the Start and Stop cou n tin g from the drawing context menu.
5.3.2.8
Tracking objects manually
You can draw trajectories by manually tracking object in the video clip. For example, you
could draw the swing plane as illustrated below. The yellow curve represents the up-swing
and the orange one, the down-swing. Dartfish creates the trajectory by joining selected
points while smoothing the curve in between. The trajectory redraws as the video plays
(see image on the right).
To draw a curve, use the Splin e tool and proceed as follows:
1.
Right-click on the L in e button and select Splin e from the context menu.
2.
Position the playhead at the beginning of the performance
3.
Click on the object you want to track. A white square indicates the first point of the
curve.
4.
Use the [ctrl] left/right arrow keys to move the playhead forward a few frames
5.
Repeat steps 2 and 3 as many times as needed.
6.
Right-click and select Fin is h from the context menu to terminate the curve.
To modify the trajectory, select it and move any point you have defined. The curve modifies
accordingly.
© Dartfish. All rights reserved.
- Version 6 -
Analyzing Performance
85
The trajectory draws as illustrated above only if it is deselected (white squares not
visible). To do this, click anywhere in the image but on the curve itself.
The curve can be drawn on a single frame. In this case, no tracking takes place.
The number of points you have to define varies according to the speed of the object.
The faster the object, the more points you have to add to get a smooth curve.
5.3.2.9
Tracking objects automatically
Dartfish offers you a powerful function: the au tom atic trackin g (available in the Team Pro and
ProSu ite editions). The principle is the same as for the manual tracking (see previous
section) except that the computer automatically tracks and optionally draws the trajectory
of an object(s). The au tom atic trackin g function can be used with most of the drawing tools:
e.g. with the rectan gle, oval, clon e rectan gle to highlight the evolution of an object/
performer throughout the video.
e.g. with the m arker tool, to automatically draw the trajectory of a well defined feature.
with the s plin e tool (see Tracking objects manually) to visualize the evolution of the
shape of an object/body over time . In this case, each point of the curve is tracked
separately.
with the an gle (see Measuring angles) and dis tan ce (see Measuring distances) tools to
measure the evolution of such data.
with the Data table (see Using data tables) to automatically extract statistics from the
image and store them in a spreadsheet.
- Version 6 -
© Dartfish. All rights reserved.
Dartfish User Guide
86
Tracking is a complex process; for Dartfish to successfully track objects they must
remain clear and visible. You can help it by tracking clear features with a high contrast. Try
to use markers as illustrated in the pictures above. Use your camera's focus and exposure
features to avoid blurring of moving objects.
To activate the automatic tracking
1.
Position the playhead at the beginning of the performance
2.
Select a drawing tool and draw on the video
3.
Right-click on the drawn object and select Trackin g in the context menu
4.
Select the object speed from the context submenu (this defines how far from the last
position Dartfish will search the video image for similarly colored/shaped objects).
5.
Click the image to deselect the object
Using the automatic tracking
To start tracking, simply play the video. The drawing color changes to green indicating that
Dartfish has started to track the object. At any moment, you can pause playing:
If you observe that the tracking is "lost" (e.g. when the object gets occluded). In this
case, manually reposition the drawing onto the tracked object and continue playing.
If the object disappears from the field of view. In this case, right-click on the drawing
and select Su s pen d trackin g from the context menu. Dartfish stops tracking from this
position (the drawing color changes to red).
To show the trajectory
Once you have activated automatic tracking (see above), right-click on the drawing and
select Sh ow trajectory from the context menu. The trajectory progressively draws as the
video plays.
5.3.2.10 Fading drawings in and out
In most cases, drawings are valid only for a small portion of a movement. You can use the
Fade in /ou t function to display a drawing only during such a portion. To do this, proceed as
follows:
1.
Position the playhead at the desired position.
2.
Draw an object on the video
3.
Step a few frames backward (using the [ctrl] + left and right arrows)
4.
Right-click on the object and select Fade in from the context menu.
5.
Select how quickly the drawing appears from the context submenu.
6.
Step a few frames forward.
© Dartfish. All rights reserved.
- Version 6 -
Analyzing Performance
87
7.
Repeat the steps 4. and 5. to set the Fade ou t.
8.
Deselect the drawing and play the video from the beginning. The drawing will only
show in the defined portion.
Use this function if you want to publish a new video that contains drawings that fade in/
out. If you want to analyse key moments of a performance we recommend you use the key
pos ition s (see Analyzing key positions) which can be printed or published in an interactive
Dartfish M ediabook.
5.3.2.11 Using data tables
The Data Table drawing tool enables you to collect time-dependent data related to the
action in your video. For example, at different time instances you can manually enter the
distance an athlete has run so far, just as you would in an Excel spreadsheet. Then, the
data table tool can compute (and display) automatically the average overall speed or the
interval speed of the athlete. It is also possible to link another drawing tool such as an
angle or a measuring tool to a column of a data table, to display and store the evolution of
the corresponding quantity (angle/length) over time. In the following image you can see a
data table containing heights inferred by a measurement drawing.
An advanced feature is the option to track an object in the video automatically and to
display the corresponding positional data in a data table. Finally, you can export the
collected data in Excel format for further processing and analysis.
A comprehensive guide on how to use this drawing tool can be downloaded on the Dartfish
website (visit http://www.dartfish.com/downloads).
5.3.3
Adding comments
The An alyzer allows you to "produce" enriched multimedia content. It gives you the ability to
combine your coaching expertise with images to generate powerful presentations (see
Publish Analysis) that you can share with your athletes/students for use with their daily
practice. You already learned how to add drawings on the video to highlight details or to
extract statistics from the images (see Drawing on the video). In this section you will learn
how to add verbal and written comments which can be used to analyze:
1.
a performance in its whole ( global comment). In this case, use the lower part of the
Storyboard tab.
2.
key positions (or key moments) of a performance ( key pos ition s pecific comment). In this
case, use the lower part of the Key pos ition s tab (see Analyzing key positions).
- Version 6 -
© Dartfish. All rights reserved.
Dartfish User Guide
88
5.3.3.1
Written comments
To add written comments, simply enter your text in the N otes box, as illustrated below:
This box is located on the lower-left of the An alyzer module (in the Storyboard or Key
pos ition s tabs).
5.3.3.2
Audio commentary
To add an audio commentary:
1.
Select the audio recording device from the drop-down list of the Recordin g Device pane.
This pane is located on the lower-right of the An alyzer module (in the Storyboard or Key
pos ition s tabs).
Use the microphone of your camera to record audio (the camera has to be
connected to the computer through the Firewire cable). Alternatively, you can use a
microphone and select your sound card as the audio device.
2.
If needed select the input. If you have plugged a microphone in your sound card, select
"Microphone".
3.
Click on the Record button it will begin to record your audio input.
4.
Click on Stop when you are finished.
To play back the recorded audio comment, use the Play button .
Recording a new audio comment overwrites the last recorded one.
To be more fluent and comfortable recording an audio comment, you can first write your
comment in the N otes box and read it simultaneously as you record audio.
5.3.4
Analyzing key positions
Key position analysis allows you to break down a movement and to analyze its important
moments by using drawings, audio and written comments. Key positions allow you to
display specific moments quickly. You'll also have the ability to publish the key positions in
two formats:
1.
The M ediabook - an interactive multimedia analysis that you can save to a CD-ROM,
© Dartfish. All rights reserved.
- Version 6 -
Analyzing Performance
89
send via e-mail, or publish on the Internet (see Producing mediabooks).
2.
A printed report - the collection of key position images printed in different layouts (see
Creating still images).
To use key positions analysis, select the corresponding tab in the lower part of the An alyzer
.
5.3.4.1
Adding key positions
To add a key position, proceed as follows:
1.
Move the Playh ead to the position you wish to highlight. Use the Fram e buttons (or the
[ctrl] left and right arrows to refine the position).
2.
Click on the Add key pos ition button.
A new key position appears with its default label underneath.
To add other key positions, repeat the two steps above.
Key positions can be added in any order. Say you analyze a long jump, you can first
create the key position of the landing followed by the one when the jumper hits the board.
The default labels are integers (1, 2, 3, etc.)
Try to make a consistent use of the labels. You will see in section Synchronizing video
clips that clips can be easily synchronized by matching key positions with the same label.
Read next section to learn how to edit the label.
- Version 6 -
© Dartfish. All rights reserved.
Dartfish User Guide
90
5.3.4.2
Editing key positions
To edit one key position, select it by clicking the corresponding thumbnail...
... and do one of the following operations:
rename the label - type the new label in the L abel box (e.g. back s w in g in the illustration
above)
change the video position - use the left and right arrows next to the Pos ition box.
change the order - key position do not need to be listed in a chronological order. You
can change the order by using the M ove th e keypos ition backw ard/forw ard buttons.
The key positions will be published in the order you defined.
delete - use the Delete key pos ition button or right-click on a thumbnail and select
Delete from the context menu
You can delete all key positions by clicking on the Dis play Key Pos ition s Option s button and
selecting Delete All Key Pos ition s .
5.3.4.3
Analyzing a key position
To analyze a key position:
1.
Select the key position by clicking on the corresponding thumbnail (or create a new
one, see Adding key positions). The selected key position is highlighted and the screen
displays the corresponding video position ( top in the illustration below).
2.
Add your analysis by using:
drawings (see Drawing on the video)
written comments (see Written comments)
audio comments (see Audio commentary)
© Dartfish. All rights reserved.
- Version 6 -
Analyzing Performance
91
Your analysis is automatically attached to the selected key position and saved with the
clip.
If you add a global drawing (when the Storyboard view is selected), all new key positions
will "inherit" this drawing. This can be used if you want a drawing to be positioned exactly
at the same place in all key positions. You still can delete the drawing in a particular key
position if not needed.
5.3.4.4
Importing key positions
You can import an analysis that was performed on a clip and use it as a basis for a new
one. Your library can thus contain a set of "reference" clips that you already have analysed.
Select the one that could best be used to automatically create the key positions and import
the existing annotations. Once imported, you'll only have to slightly adapt the video
position of the key positions and edit the drawings/text.
To import key positions:
1.
Load the clip to analyze.
2.
Position the playhead (e.g. at the impact of the golf club with the ball).
3.
Find a "reference" clip in your library.
4.
If needed, switch to the Key Pos ition s view.
5.
Drag and drop the reference clip from the Item s L is t onto the key positions (see the
paragraph below to learn about a different method of loading the reference clip).
The In s ert Key Pos ition s dialog opens.
6.
The list of key positions of the reference clip is contained in a drop-down list. Select the
one that best synchronizes to the current playhead position (e.g. impact).
Another way to select the reference clip:
1.
Select Add Key Pos ition s Au tom atically... from the key positions options
2.
In the In s ert Key Pos ition s dialog, select Im port key pos ition s from an oth er clip.
- Version 6 -
© Dartfish. All rights reserved.
Dartfish User Guide
92
3.
If the reference clip is already loaded in the An alyzer, it will be listed in the 2nd drop
down list (see illustration above). If it is not listed, you can use the Brow s e for clip link
and locate the reference clip on your hard disk.
To edit key positions:
Simply navigate through the imported key positions by clicking them. If needed, modify their
position by using the M ove th e key pos ition backw ard/forw ard in tim e buttons:
You may have to edit imported drawings and comments (see Adding and modifying
drawings).
5.3.4.5
Adding key positions at a fixed interval
You can automatically create key positions at a fixed interval. To do this:
1.
Position the playhead where the first key position will be added.
2.
From the Key Pos ition s Option s , select Add Key Pos ition s Au tom atically...
3.
In the In s ert Key Pos ition s dialog, select Add key pos ition s at fixed in tervals , and set the
interval (as a fraction of a second)
The minimum interval is 0.1 sec.
5.4
Comparing performances
A performance can be analyzed by comparing it to another one, for example to see how an
athlete evolves over time, or to a "reference" to highlight how a movement should be
performed. You can also analyse a performance viewed from different angles at the same
time.
© Dartfish. All rights reserved.
- Version 6 -
Analyzing Performance
93
Performances can be compared in Split-s creen or in Blen d mode (overlayed on top of each
other). Most of the tools described in section Analyze a performance can be used when
comparing performances.
5.4.1
Loading multiple clips
You can analyze clips individually or in groups of up to 4 clips at a time. The clip selection
buttons - A, B, C and D - correspond to the multiple clips that you can load into the An alyzer.
In other words, you can compare a performance (loaded in A) with up to 3 other
performances in the following ways:
separately - A vs. B, A vs. C or A vs. D (2-way split, or blend mode).
simultaneously - A vs. B vs. C (3-way split) or A vs. B vs. C vs. D (4-way split).
To load a clip:
1.
Click on one of the selection buttons (A, B, C or D). The button appears to be pushed
in.
2.
Drag & drop (or double-click) the clip from the Item s L is t (or the Tray) onto the An alyzer
's screen. The clip's first frame is displayed, and its name appears in the timeline
underneath the screen.
To load additional clips, repeat step 2 and 3 above but make sure to select a letter for
which no clip has been already loaded.
To change a clip (A, B, C or D)
Drag & drop the new clip from the Item s L is t to the desired A, B, C or D area.
Double-clicking on a new clip will not replace an existing clip but will create a new
Storyboard item. Use the drag & drop method to change a clip.
- Version 6 -
© Dartfish. All rights reserved.
Dartfish User Guide
94
5.4.2
Display modes
The display mode of each Storyboard item can be changed to Split-Screen or Blen d to
compare performances side-by-side or overlayed on top of each other. To change the
display mode:
1.
Select the storyboard item you wish to analyse in split-screen or in blend mode.
2.
Activate the desired mode:
Split-Screen m ode, or
Blen d m ode
The storyboard item display changes accordingly. In the illustration below, the second
Storyboard item has been selected and the split-screen mode activated.
3.
Select the clips to analyze by clicking the corresponding buttons - A, B, C or D. The
buttons appear as "pushed". To de-select a clip, click on the corresponding button.
To load or change a clip in split-screen or blend modes
Split-Screen mode: drag & drop the new clip from the Item s L is t onto the appropriate
screen area (A, B, C, or D). If needed, click on the A, B, C or D buttons first.
Blen d mode:
5.4.3
1.
Click the corresponding clip button - A, B, C or D. The letter is highlighted in white.
2.
Drag & drop the new clip in the An alyzer screen.
Synchronizing video clips
To make the images in the different clips comparable, you need to synchronize their action
so that you are comparing relatively similar action within the performances. You can
synchronize video clips by using the key positions (see next section) or by using the
timeline(s).
Method A
1.
Load two clips in split-screen (see sections Loading multiple clips and Display modes)
2.
Click anywhere in the clip displayed on the left of the screen (most likely clip A). A blue
timeline shows underneath the screen. Note that timelines are color-coded according
to the display screen; blue corresponds to letter A.
3.
Drag the Playh ead to the position where the clip should be synchronized (e.g. at the
impact)
4.
Click the clip on the right of the screen (most likely clip B). A yellow timeline replaces the
blue one.
5.
Click and drag the yellow timeline forward or backward (NOT the playhead) until the
two clips are synchronized (e.g. when both clips are at the impact).
© Dartfish. All rights reserved.
- Version 6 -
Analyzing Performance
95
Use the [shift] + [left] (or [shift] + [right]) arrow to fine tune the synchronization.
This moves the timeline one frame backward or forward.
To play the synchronized clips, click on the Stop button to move the Playh ead to the
beginning of the play range and click the Play button.
Method B
You can use the Tim elin e view to synchronize clips. Click on the corresponding tab to display
this view.
The synchronization process is the same as described above except that you do not need
to click a clip to select the blue or yellow timeline. You can directly click on a timeline to
select it. This view also allows for quick re-synchronization. Simply move the playhead to a
new position and adjust the timelines to re-synchronize at the new position.
5.4.4
Synchronizing at key postions
If you have added key positions to the clip(s) (see Adding key positions), you can
synchronize performances at every key position for which the labels match. For example, if
you consistently use the label "impact" when the club hits the ball and "top" for the
position that corresponds to the end of the back swing, it will be very simple to resynchronize two clips at "impact" or at "top".
You can synchronize clips by matching key positions with the same label. To do this:
1.
Load two clips in split-screen.
2.
Switch to the Key Pos ition s view. Say that both clips contain a key position with the
label "impact" at the position where the club hits the ball. Labels must exactly match
(see Editing key positions to find out how to edit key position labels).
3.
Double-click on the key postion "impact".
This method allows very fast re-synchronization at every matching key position.
If you add key positions to a clip by importing them from a reference clip (see Importing
key positions), it will be very easy to synchronize both clips because labels are imported
from the reference clip and so exactly match.
If the clips contain multiple key positions, you can synchronize them at a particular
position by a double click and navigate through the other key positions by a single-click
and observe the relative position of the performers. For example, if you have a key position
at every gate of a giant slalom it will be easy to see the distance gained or lost by a skier
between each gate.
- Version 6 -
© Dartfish. All rights reserved.
Dartfish User Guide
96
5.4.5
Setting default synchronization
In the previous topics in this section you have learned that it is possible to synchronize
clips at various positions. It is also possible to set a default synchronization position. This
is a single Key Pos ition at which clips will automatically be synchronized when the clips are
loaded into Analyzer's s plit-s creen mode.
This saves time resynchronizing clips that are repeatedly compared.
To set default synchronization
5.4.6
1.
Add a key position at the chosen video position.
2.
Right-click while pointing at the key position and select s et as defau lt s yn ch ron ization
from the quick menu.
3.
The default synchronization key position which shows the is marked with a yellow dot
as shown below.
Analyzing in split-screen mode
Analyzing in split-screen is very similar to analyzing in single-screen. However, there are
minor differences that you should know about.
Drawings
Select the appropriate drawing mode (in the drawing toolbar)
Video Draw in g - drawings will be applied to either clip A, B, C or D. Simply select a
drawing tool and apply it on A, B, C or D.
Screen Draw in g - drawings are applied onto the whole An alyzer screen.
This means that the drawings can go across the A, B, C or D boundaries. In the
example below, the Clon e Rectan gle drawing tool and the Screen Draw in g mode have
been used.
© Dartfish. All rights reserved.
- Version 6 -
Analyzing Performance
97
Zoom in/out
You can apply the Zoom Tool in any of the A, B, C or D clips. Simply click on the
corresponding area to zoom it.
Flip horizontal or vertical
To use this function (see Enhancing images) in split-screen, you first have to select the
video (A, B, C, or D) by clicking on the corresponding area. The timeline changes to the A, B,
C or D color. Then, use the Flip H orizon tal or Flip Vertical buttons to apply the effect.
5.5
Key position mosaic
Analyzer's M os aic view offers a method of displaying Key Position images on the video
display screen. This offers the following benefits:
Have an at-a-glance view of a performance key moments
Analyse a performance in between key positions. Key Positions can be displayed beside
the video image as it plays. In the example below the video is displayed in the middle
of two key positions. Playing the video shows how the performer reached the key
position on the right starting from the one on the left.
- Version 6 -
© Dartfish. All rights reserved.
Dartfish User Guide
98
Analyzer's drawing tools can be used to annotate and illustrate the M os aic.
5.5.1
Activating the mosaic
Activate the Mosaic by clicking on the M os aic button towards the top left of the Analyzer
module.
Once activated, there are several Mosaic layouts to choose from. Click the N ext/previou s
M os aic L ayou t button to navigate between layouts.
The Mosaic mode is used in conjunction with the other Analyzer display modes; Sin gle/Splits creen and Blen d (see display modes in the Comparing performances topic) . Different
mosaic content will be displayed depending on which one of these is selected.
Not all Mosaic layouts include the video clip.
If there are more key positions than can be displayed with the selected Mosaic layout,
the key positions will display dynamically, this means that as the Playh ead moves along
the Tim elin e, the closest set of key positions to the current video position will be
displayed.
5.5.2
Drawing on the mosaic
The Drawing tools can be used to annotate the Mosaic, however it is important to note that
although the Video Draw in g tools may be used to draw on the video clip, only the Screen
Draw in g tools may be used to draw on the Key Position images. Drawings extending from
the video to a key position or from one key position to another must also be made with the
Screen Draw in g tools.
To learn more about using drawing tools see Drawing on the video and Analyzing in splitscreen mode.
Saving Mosaic Images
The Mosaic layout and any drawings that it contains can be saved as a still image (BMP or
JPEG) using the Sn aps h ot button found immediately below the video display
.
5.6
Next steps
The analysis contained in the Storyboard can be published in 3 formats:
1.
The M ediabook - an interactive multimedia analysis that you can save to a CD-ROM,
send via e-mail, or publish on the Internet
2.
A printed report - the collection of key position images which can be printed in different
layout
3.
A new video clip
© Dartfish. All rights reserved.
- Version 6 -
Analyzing Performance
99
Read the chapter Publishing analysis to learn more about publishing.
StroMotion & Simulcam are Dartfish's special effects allowing you to view movement in
unique ways:
Read the topic SimulCam to learn how to place two performers together in the same
place and time.
Read the topic StroMotion to learn how to brake down motion of a performer in a
panoramic still image or a video clip.
InTheAction is a tool that is designed to make analysis possible during training.
InTheAction shares Analyzer features such as split-screen and blended comparison of video
and the ability to add drawings. Read the Chapter Live capture & instant replay during
training to learn more about InTheAction.
- Version 6 -
© Dartfish. All rights reserved.
Chapter
VI
Dartfish outputs publishing & sharing
102
6
Dartfish User Guide
Dartfish outputs - publishing & sharing
Although this chapter is primarily concerned about how to publish video based resources, it
is worth considering the full range of possible outputs:
The Player (Save Movie function) can create video clips trimmed from longer clips. It can
also create still images (snapshots) based on the current frame of video.
The An alyzer can also create snapshots. Key pos ition s too can be turned into still
images and printed or saved. Here the Save M ovie function is more advanced allowing
you to render the contents of the storyboard as movie complete with any drawings
added or comparisons made. All Analyzer features can be packaged up into a
Mediabook. In this format, others can benefit from your complete analysis. The
complete Storyboard can also be shared with other Dartfish users. Users of the Pro
edition also have an An alys is Recorder; this creates a movie showing screen and voice
recording of all the actions you go through to explain your analysis.
The M ediabook is an output from the An alyzer but it is also able to print its key pos ition s
as still images complete with notes and drawing annotations.
Strom otion (Pro and TeamPro only) outputs a movie or a panoramic still image made
from each frame of the movie and cloned objects superimposed.
Sim u lCam (Pro and TeamPro only) creates a movie by overlaying two videos and
matching the backgrounds.
Taggin g (TeamPro) users can output match video comprised of separate video files.
Video clips can also be created from events but events can also be exported to the
An alyzer Storyboard where the full range of An alyzer producing, publishing and sharing
options becomes available. The events list itself can be exported and published either
independently or with the video. The tagging player has the same snapshot tool as the
Player.
In Th eAction has no direct outputs but when video recorded by InTheAction is loaded
into the Analyzer, drawings added and the key position created at the trigger point are
retained.
6.1
Destinations
The range of destinations for shared and published outputs varies depending on the type
of output and the software edition. Below there is a summary of the options that require
further explanation.
© Dartfish. All rights reserved.
- Version 6 -
Dartfish outputs - publishing & sharing
103
Dartfish TV
Dartfis h TV is an online content platform for the sharing of video clips and An alyzer
Storyboards . Where video clips have key positions or tagged events (TeamPro edition) this
information can also be uploaded and shared. It is even possible to attach other files such
as spreadsheets, images or documents to be associated with video content.
Your profile defines what access you have to specific files so Dartfish TV is both a
convenient and secure way to share video and analysis.
Dartfish TV is a subscription service for those who want to upload content but there is also
publicly accessible content available to view or download. See www.dartfish.tv
- Version 6 -
© Dartfish. All rights reserved.
104
Dartfish User Guide
My Computer
This allows you to copy files or publish outputs not only to folders on your own hard drive
but also all locations accessible from it. These include network drives, external hard drives,
memory sticks etc.
Email
Compresses video clips and attaches them to an email using your default email software.
The Dartclip file containing category/value information for each file is included.
Dartfish is only able to attach to email software like Outlook and Outlook Express. If you
use web based email like Hotmail, GoogleMail etc then you should convert the videos you
want to send (see Converting video clips) and attach them using the email software or
website.
Recordable CD/DVD
This choice of destination "burns" video files to recordable CD-R, CD-RW or data DVD disks
including metadata. Burning to DVD does not create DVDs that will play on a DVD player but
a data DVD holds a lot more data than a CD:
© Dartfish. All rights reserved.
- Version 6 -
Dartfish outputs - publishing & sharing
105
CD - 700Mb approx
DVD - 4.7Gb
Double layer DVD - 8.5Gb
Enhanced CD/DVD
A second method of burning video clips to CD or DVD is to produce an Enhanced CD/DVD.
This has the following advantages:
The resulting CD autoruns - the user simply has to insert it into their computer's CD
drive.
Customizable interface which can be personalized with your own contact details (see
image below).
Comments can be included to describe explain the content of video clips.
FTP
This sharing option is used to send (ftp) files to an internet destination. To do so, you will
need to create an FTP Profile using the connection information for your FTP server. This
information can be provided by your network administrator or the Internet service provider
which hosts your website.
Publish a M ediabook by FTP from the Analyzer to create a fully functional multimedia
webpage that can be viewed in any browser.
- Version 6 -
© Dartfish. All rights reserved.
Dartfish User Guide
106
6.2
Sharing video files
Sharing video is a function of the Tray. All Dartfish features which create or import video
clips add them to the Tray but video files can also be loaded by drag-and-drop from the
Item s L is t to the Tray.
Remember that multiple files can be selected for loading by holding down the [Ctrl] key
while clicking on the files.
Once video clips are loaded, click the Tray's Sh are button.
Sharing Dartfish Assets with video
Dartfish creates a small 'Dartclip' file for each video clip.
This contains information about key positions, notes, cue in and out settings etc - all the
value added features that Dartfish brings to the video clip. The Sharing process also
ensures that the Dartclip file is shared with the video file. If the receiver of the video clip is
a Dartfish user and chooses to retain the Dartclip file they will benefit from all the additional
information added to the video clip.
6.2.1
Video sharing wizard
The Vide o Sh arin g W izard
The process of sharing is guided by the Video Sh arin g W izard. Three steps are common to all
sharing destinations.
1.
Selecting the sharing Des tin ation - Click on a destination then on the N ext> button (at
the bottom of the window) to proceed.
2.
Selecting which videos you wish to share. "Check" those to be shared as shown below
or click the Select All button:
3.
Choose the video settings (encoding profile) appropriate for the selected destination
(see Video settings in the Gettin g fam iliar chapter).
Specific additional information may be entered according to the selected destination. Read
the information displayed in the wizard to complete this information.
© Dartfish. All rights reserved.
- Version 6 -
Dartfish outputs - publishing & sharing
6.2.2
107
Sharing video by Dartfish TV
Sharing video using Dartfish TV has some key differences from the other sharing media:
1.
No Dartclip data shared: Only video and no Dartclip is passed to Dartfish TV.
Category\Value is used to create searchable keywords on the platform. Key positions
can only be shared by publishing a Mediabook.
2.
Playable online AND offline? Video clips can be played online by anyone with access
to the channel. Optionally video can be made available for offline viewing - this is
defined at the creation of the channel.
3.
Inclusion of attachments: Any file can be attached to video clips during the sharing
process.
4.
2 Videos uploaded: An encoded version suitable for online viewing and a version for
offline viewing which can be higher quality
The video sharing wizard
1.
Sharing Des tin ation - Click Dartfish TV then the N ext> button.
2.
Login - after providing your login name and password select the channel and collection
within that channel to which the video files will be added.
3.
Selecting which videos you wish to share. "Check" those to be shared as shown below
or click the Select All button:
4.
Dartfish TV categorisation. Mandatory keywords and optional (uncategorised) key
words can be added. These make it easier to find specific videos by filtering by
keyword. It is also possible to add notes to describe the video content. If more than
one file is uploaded this step is omitted and notes must be added at step 3.
- Version 6 -
© Dartfish. All rights reserved.
Dartfish User Guide
108
5. Select Publishing Options.
For online viewing select whether the full video is shown or a shorter trailer that will
assist viewers to decide whether to download the full video for off-line viewing. For
offline viewing decide what quality of video to make available for download: the
original quality, a high quality compressed version or re-use the same video that is
displayed on Dartfish TV. File attachments can be added at this step (not available
when doing bulk upload).
6.
6.3
The final step encodes the video and posts it online.
Producing MediaBooks
A M ediaBook allows you to share your analysis by packaging video, key positions, text and
audio comments, and drawings together. Share M ediaBooks using the Internet, CD or
sending them by email. A Mediabook offers an electronic output (as shown below) or a
paper printout of key positions and keyposition annotations.
© Dartfish. All rights reserved.
- Version 6 -
Dartfish outputs - publishing & sharing
109
The image above shows a M ediaBook displayed as a web page in an Internet browser. It
contains the following features:
An alys is Selection : More than one analysis can feature in a M ediaBook. Each item in
the Storyboard is included (read the Analyze Performance chapter to learn more about
the Storyboard).
Video Player: Video clips are saved in Macromedia Flash format which can be viewed on
most Windows computers. One video is generated for each Storyboard item. The player
controls allow clips to be played frame by frame and to play in a loop. For a larger
image, it is also possible to play the clip full-screen using your Windows default Media
Player.
Key Pos ition s Selection : Click on a Key positions thumbnail to display the corresponding
key position.
The key positions of all the clips in the An alyzer at publish time are included in the
M ediaBook. Select "A", "B", "C" etc. to display the corresponding list for each clip.
The "Analysis" key positions choice, as in the illustration above, varies according to the
display mode selected at publish time:
1.
Sin gle-s creen mode: image transformation (such as zoom or mirroring) and global
drawings are reflected in the key positions.
2.
Split-s creen (or Blen d) mode: key positions are split-screen pictures of every key
position for which the labels match. Video clips are automatically re-synchronized at
every key position. If no labels match, no An alys is key positions are created.
- Version 6 -
© Dartfish. All rights reserved.
110
Dartfish User Guide
Com m en ts : The Analyzer allows you to type or record comments for each item in the
Storyboard and to do the same for each key position. These are included in the
M ediaBook.
this Analyzer comment...
...becomes this MediaBook comment
Slides h ow View : The Slides h ow View displays the key positions as larger images and
includes printing options for them.
Pers on alization : The M ediaBook can be personalized with your organization's logo or
perhaps a photograph of yourself. This can also be a link to your website.
6.3.1
Step1 - Select destination
Start the creation of a M ediaBook by clicking the button to the right of the An alyzer
s toryboard.
This displays the first step of the M ediaBook wizard where the choice of publishing
destinations is made. The choice of destinations varies according the edition of software
used but the full list of choices is shown below.
© Dartfish. All rights reserved.
- Version 6 -
Dartfish outputs - publishing & sharing
111
After making your choice of destination, click the N ext button.
6.3.2
Step2 - Mediabook settings
The M ediaBook settings step is used to:
Assign a File n am e: This will be used to name the M ediaBook file(s).
Personalize the M ediaBook: The M ediaBook can optionally be personalized with your
logo and website address. You will also want to include a title that will appear at the
top of the M ediaBook.
Add h igh qu ality fu lls creen video: It is possible to include an external Windows Media
video with the M ediaBook; these will be played using Windows Media Player and not
the M ediaBook. This function may not be desirable if the size of the M ediaBook is
important, for example if being sent by email.
- Version 6 -
© Dartfish. All rights reserved.
112
Dartfish User Guide
Choose File Option s : These choice of file option is only available if the M ediaBook is
being published to the "My Computer" option, otherwise the most appropriate option
will be used according to the destination selected in the first step of the wizard.
If the M ediaBook is saved for u s e w ith Dartview er, all files are packaged together into a
single file which can be read and displayed by the Dartviewer freeware software.
Dartviewer is automatically installed on all computers with Dartfish but for non-Dartfish
users, Dartviewer can be included with the M ediaBook or downloaded from the Dartfish
website. This option is automatically used for CD/DVD and emailed M ediaBooks.
If the M ediaBook is saved for u s e w ith an In tern et brow s er, an HTML file is created with
the additional files required to create the page also added into a separate folder. This
option is automatically used with M ediaBooks for the internet.
6.3.3
Step3 - Video settings
This step allows you to select a Flash encoding profile for the M ediaBook and, if the "include
high-quality, fullscreen video option" was selected in the previous step, you can also select
a Windows Media encoding profile for those videos.
Encoding profiles compress the original video files substantially from the original AVI
video that is captured from your video camera. The amount of compression depends on
the profile chosen. Click the E dit th e profiles link to get information on the relative file sizes.
© Dartfish. All rights reserved.
- Version 6 -
Dartfish outputs - publishing & sharing
6.3.4
113
Step3 - Preview
Step 3 of the wizard also allows you to preview the choices you have made in the previous
steps, including your personalization's and the quality of compressed video files.
To see a preview, click the Preview button. The preview will be displayed in your Browser or
in Dartviewer depending on the choices made.
6.3.5
Step4 - Publishing
The publishing step will depend on the destination.
My Computer
Choose or browse for the file location where the M ediaBook will be saved.
Email
There are no further choices. The files will be processed and a message displayed when
this has completed.
You may choose to attach the Dartviewer freeware to the email if it is being sent to
recipients who has not previously installed Dartviewer. They will receive instructions on
how to install Dartviewer.
CD/DVD
Final information about the CD/DVD burner to be used and a disc label are provided.
Clicking the N ext button will "burn" the CD or DVD.
FTP
An FTP profile is selected in this step and, if necessary, a password is entered. Clicking the
N ext button will publish the M ediaBook files to the selected FTP site so you should establish
- Version 6 -
© Dartfish. All rights reserved.
Dartfish User Guide
114
a connection to the internet before doing so. Click the N ew button to create a new FTP
profile. Your network administrator or website host must provide you with this information.
6.3.6
Mediabooks on Dartfish TV
Whereas other Mediabook formats almost have the same behaviours as the original
Analyzer project on which they are based, Mediabooks published on Dartfish TV are very
different:
1.
Video assets can be downloaded. Key positions won't be included in the download
though
2.
Inclusion of attachments: Any file can be attached to video clips during the sharing
process.
3.
Different storyboard elements presented as segments on a single timeline. It is also
possible to select and play individual segments.
4.
Key positions from individual split-screen or blended video clips cannot be selected
for individual clips. Instead only the Keypositions with matching labels are published
as a single marker. When this marker is selected the videos are synchronised at this
point.
6.
2 Videos uploaded: An encoded version suitable for online viewing and a version for
offline viewing which can be higher quality
The Mediabook above has the following features: m arkers and m arker com m en ts (written &
audio), Keyw ords allow filtering for other video sharing the same keywords, print options
for m arkers , download of video, audio comment and attachment.
© Dartfish. All rights reserved.
- Version 6 -
Dartfish outputs - publishing & sharing
6.3.7
115
Publishing to Dartfish TV
The video sharing wizard has the following steps
1.
Sharing Des tin ation - Click Dartfish TV then the N ext> button.
2.
Login - after providing your login name and password select the channel and collection
within that channel to which the Mediabook will be added.
3.
Selecting which Storyboard items to be included in the Mediabook. "Check" those to be
shared as shown below or click the Select All button:
4.
Dartfish TV categorisation. Mandatory keywords and optional (uncategorised) key
words can be added. These make it easier to find specific videos by filtering by
keyword. It is also possible to add notes to describe the Mediabook content.
5. Select Publishing Options.
- Version 6 -
© Dartfish. All rights reserved.
Dartfish User Guide
116
For offline viewing decide what quality of video to make available for download: a high
quality compressed version or re-use the same video that is displayed on Dartfish TV.
File attachments can be added at this step.
6.
6.4
The final step encodes the video and posts it online.
Saving movies from the Analyzer
New movies can be produced featuring all the contents of the Analyzer Storyboard. The
movie saved will reflect the content of that analysis including:
Drawings
Split screen or blended comparisons
Cue in/cue out positions
Click the M ovie button to turn the storyboard into a movie.
With this functionality, Dartfish is in effect video editing software in that it is being used to
join separate clips together, however while it does not include transition effects or allow
inclusion of still images, it is capable of creating movies with features that are not possible
with other software such as:
Split screen or blended comparisons
© Dartfish. All rights reserved.
- Version 6 -
Dartfish outputs - publishing & sharing
117
Specialist text captions such as timers
Specialised drawings such as angles and data display and also including drawing
effects such as fade in/fade out and tracking
6.4.1
Step1 - Video settings
The first step is to choose an encoding profile. If this is changed from DV, the resulting
video will be compressed but will loose some image quality.
Find out more about encoding profiles in the topic Converting video
The encoding profiles include half and quarter speed profiles which allow you to produce
video which will play back in slow motion.
6.4.2
Step2 - File information
In this step, a File n am e and Des tin ation folder is assigned to the new video clip. The
Con flictin g file option s choice defines whether existing files with the same name should be
replaced or whether the new file will be renamed. If a file does get renamed it will be
suffixed with a number. In the example above the new video clip would be called "Bobs
drive hole 5(2)"
Categorization of new video clips
Users of the Category/keyword file management system will be please to see that video
files can be categorized as they are saved. The method of building and using a form is
identical to that used for capturing video files with the Video recorder or InTheAction
modules. Refer to those chapters for further information.
- Version 6 -
© Dartfish. All rights reserved.
118
6.5
Dartfish User Guide
Creating still images
Key positions can be printed or saved as still images.
Click the Pictu res button to the right hand side of the Analyzer Storyboard to publish Key
Pos ition s as still images.
You can publish pictures to the following destinations:
Printer. Dartfish offers a choice of layout templates to print images. Some include the
notes and title information.
My Computer. Save images as image files to a location on your computer.
Email. Images will be attached to a new email using your default email program.
Select a destination and click the N ext button.
6.5.1
Saving pictures to 'My Computer'
Similar to other Dartfish processes where files are saved, you will assign a File n am e and
Des tin ation folder to the images and optionally the images can be categorized (see below).
Click the net button to save the image files. By default they will be 720x576 pixel JPEG
images (or 720x480 for NTSC video).
Categorization of images
Your pictures can be categorized as they are saved. In the example below the file is
named but can also be filed under values in the categories of Sport, Player and Club. The
method of building and using a form is identical to that used for capturing video files with
the DV Import or InTheAction modules. Refer to those chapters for further information.
© Dartfish. All rights reserved.
- Version 6 -
Dartfish outputs - publishing & sharing
6.5.2
119
Attaching pictures to email
There are no further steps to attaching pictures to email
Only email software like Outlook and Outlook Express can be used. If you use another
type of email such as AOL or web based email like Hotmail, YahooMail etc then you should
save the pictures using the 'My Computer' option and attach them through the software or
website itself.
6.5.3
Printing Pictures
Two steps are required to print your pictures. In the first, the printer you wish to use will
be selected. select
The printing preferences button opens the print settings button for the type of printer you
use. The choices available depend on your printer and you should refer to your printer's
documentation if further explanation is required. You will be able to use these preferences
to choose a print quality and a paper type; these are especially important choices if photoquality paper is being used.
- Version 6 -
© Dartfish. All rights reserved.
120
Dartfish User Guide
Click the N ext button to continue...
Before printing, choose from one of a number of layouts. The preview gives an indication of
the layout but not the quality of the printed page. Note that both the label and notes
information for each picture can be included on the page.
Clicking the Prin t button will print the images according to the chosen layout.
6.5.4
Snapshot images
All Dartfish modules with video playing capability offer a Sn aps h ot tool which can be found
below the video display.
The Snapshot tool is used to create a still image from the current video display. Use it in
the following ways:
Click the button to save the current image as a BMP (or JPEG) file to your computer.
Click while holding the control key (ctrl) on the keyboard to copy the image to the MS
Windows clipboard. Now it can be pasted into any other application supporting copy/
paste of images. For example, you could use this to insert an image onto a MS
PowerPoint slide.
© Dartfish. All rights reserved.
- Version 6 -
Dartfish outputs - publishing & sharing
6.6
121
Recording analysis
The other publish tools covered in this chapter provide various methods of sharing analysis
with others. Of course, the actual process of using the Analyzer can itself be an invaluable
feedback tool when its tools are used to illustrate and compare performance. This is the
reason behind the An alys is Recorder; it is a method of making a real time recording of your
use of the Analyzer and including your voice as a sound track to the resulting WMV video.
To appreciate the value of analysis recording, imagine sitting with an athlete and using the
Analyzer's features to explain the latest skill he/she is attempting to master. If you imagine
that you could film your use of the Analyzer and include a commentary of your coaching
then you would be very close to the functionality of the An alys is Recorder.
The analysis recorder is only available in the Prosuite and Team Pro editions of Dartfish
6.6.1
Enabling the Analysis Recorder
Start by selecting the An alys is Recorder tab and selecting the E n able Recorder option.
This results in new controls, Record and Pau s e Recordin g appearing in the Analyzer's video
playback controls.
6.6.2
Setting clip properties
Because, the Analysis Recorder creates a new video clip, a file name should be provided for
it. If left blank, the file will be given the name "Untitled(x)".
Setting clip properties also allows you to create a form that will let you categorize the new
video using Dartfish's Keyword video management system. The use and creation of the
Analysis Recorder's Clip Properties form is identical to that used for all Dartfish's Capture
tools (see Video recorder in the Video L ibrary chapter). A form such as that shown below is
used to "label" the clip appropriately making it easy to find in the Item s L is t by selecting
any combination of the values entered.
- Version 6 -
© Dartfish. All rights reserved.
122
6.6.3
Dartfish User Guide
Other clip properties
In addition to file name and category/keyword for each clip you will also want to define the
quality of the final video by choosing an appropriate encoding profile and the file location
for the end result.
Encoding profile
The encoding profile selected defines how much the video will be compressed. Selecting an
appropriate encoding profile is a trade off between the size of the resulting file and its
image quality, for example, you are unlikely to want to send extremely large files by email.
There are three profiles, high, medium and low quality, specifically created for the Analysis
Recorder. The principal difference between these is in the number of frames per second.
Capture Location
The capture location defines where the Analysis recorder video will be saved in the
Windows folder system. Remember that this should be included Library if this file is to be
visible when using the Category/Value video management system.
The links provided allow you to select a new capture location and to open that location.
6.6.4
Setting recording device
In this case, the recording device is being used to record an audio commentary and NOT to
capture new video from a camera. Select a sound recording device from the list.
It may be possible to choose between more than one device, for example a built-in or
external microphone on your computer or, if it is connected and switched on, your video
camera.
© Dartfish. All rights reserved.
- Version 6 -
Dartfish outputs - publishing & sharing
123
If you select your computer's sound card from the list you will be offered a further choice of
audio inputs that connect to the sound card. The link to "Configure the device" allows you
to set recording levels for that device.
6.6.5
Using the Analysis Recorder
Start recording using the Record button.
Then, imagining that the athlete(s) you are analyzing are sitting next to you (perhaps they
are), use the Analyzer's comparison and drawing tools to explain and illustrate your
analysis while recording your comments and advice. Everything you do on the video screen
and everything you say will be recorded as a new video clip.
If you need to pause recording to exclude anything that you don't want to include on the
final recording, click the Pau s e button.
When your analysis is complete, remember to stop recording by clicking the Stop Recordin g
button.
The resulting video clip be saved on your computer and will appear in the Tray ready to be
played or shared.
You should remember that lengthy analyses will create large video files. Here are some
preparation ideas to help you make your presentation efficient and succinct:
Open the video clips to be used in the analysis into the Story Board or the Tray.
Trim video clips to show the relevant part. You could also zoom and flip and
synchronize them in advance as appropriate.
Create key positions complete with drawings.
- Version 6 -
© Dartfish. All rights reserved.
Chapter
VII
Unique ways to view sport
- SimulCam & StroMotion
126
7
Dartfish User Guide
Unique ways to view sport - SimulCam & StroMotion
With SimulCam and StroMotion, Dartfish offers uniquely creative ways of observing,
analyzing and understanding sport.
Each creates images that can never be seen in real life; StroMotion allowing the athlete to
leave a clone of him/herself behind as he moves; SimulCam allowing two athletes to
virtually "compete" against each other when in reality their performances took place at
different times.
You may have already seen these techniques in use because Dartfish provides this
technology to television broadcast companies around the world. They use it to illustrate
and give their audiences a better understanding of sport and now you can benefit in the
same way:
Perhaps SimulCam or StroMotion will be the only way that you can compare the tiny
differences between competitors; the tenths of seconds separating competitive skiers
for example, or subtle differences in a tennis serve.
Perhaps the images will help teach technique to your development squad in a way that
they will have never seen before.
Or perhaps you will use the technology to inspire athletes by having them compete
alongside the great names of your sport!
7.1
Compare with SimulCam
The SimulCam technology provides you with a unique analysis capability for comparing two
athletes' performances blended onto a single background. This enables you to view and
analyze often imperceptible differences between these performances, and discover
precisely what made one performance stronger than the other.
To compare performances, SimulCam matches the backgrounds of 2 video images so that
even if the camcorder pans, zooms or tilts it continues to track the background features.
Using this information, the two backgrounds can be blended into a single one.
In essence, SimulCam has a similar purpose to using the Analyzer module's Bas ic blen d
view, however the end result is vastly superior: Basic blend is unable to track the relative
movements of the background features, making comparison near impossible if the camera
zooms or pans during filming. Basic blend results in ghostly, semi-transparent figures
whereas SimulCam creates a more realistic picture.
Required to use SimulCam:
© Dartfish. All rights reserved.
- Version 6 -
Unique ways to view sport - SimulCam & StroMotion
127
Camera on tripod
Pan, tilt and zoom allowed during filming.
Video clips can be recorded at different times but must be taken by a camera in exactly
the same position.
The steps in using it are to:
7.1.1
1.
Step 1 - clip selection and synchronization. Two video clips are loaded. To be
comparable the two clips should then be synchronized.
2.
Step 2 - camera movement calculation. Background features are matched and the
amount of camera pan and zoom is calculated.
3.
Step 3 - blending, preview and saving the clips. You can also save the SimulCam
project if you wish to make changes to any of these steps later.
Getting good SimulCam results
Remember, the SimulCam technology matches backgrounds of two video clips; it will have
difficulty doing this under the following conditions:
Insufficient number of background objects
For example; snow. Imagine trying to identify the same point on a white background from
frame to frame. Your brain is still better than a computer's so "what the eyes cannot see,
the computer cannot!".
Avoid this by not zooming too closely on the subject. Even on snow, shadows, rocks,
slalom gates etc can still be used but only if enough of these distinguishable objects
appear in each frame of video.
Background is blurred
Its the same problem, if background objects become blurred or out of focus, SimulCam is
unable to calculate where they have moved to.
Use a tripod or another solid object to mount the camera.
Zoom and pan smoothly and slowly.
Backgrounds are different
SimulCam can only compare if the content of the background is similar in each video clip.
Always film from the same position. If it helps you remember, mark the spot!
It does not matter if a different zoom has been used for each clip - the backgrounds
only have to contain similar objects filmed from the same direction. SimulCam will
calculate the difference in zoom.
- Version 6 -
© Dartfish. All rights reserved.
Dartfish User Guide
128
7.1.2
Step 1 - clip selection and synchronization
Step 1 of the SimulCam clip creation process consists of:
Loading two video clips containing the performances to analyze.
Synchronizing the clips for optimum comparison.
Trimming the video by selecting appropriate cue in & out points.
7.1.2.1
Loading video clips
SimulCam compares two clips. Drag & drop each clip you wish to compare from the items
list on to SimulCam's left and right video display windows.
At this point, you can exchange either clip for another clip by simply dragging and
dropping a different clip from the Item s lis t or Tray.
The video format must be DV (.avi), for example it is not possible to create SimulCam
images from Windows media (.wmv) video or MPEG (.mpg). Also, the two clips cannot be of
different formats (for example, NTSC and PAL).
7.1.2.2
Synchronizing video clips
SimulCam has a set of easy-to-use tools to help you synchronize the two video clips. These
tools are located at the bottom of the SimulCam window.
To synchronize the video clips:
1.
Click and drag the timeline cursor
until you see an easily identifiable moment in
the first video clip. For example, find the instant where a long jumper's foot hits the
board, when a skier passes a gate, when a golfer hits the ball etc.
2.
Click and drag the yellow timeline (this represents the second clip) left or right until you
see the same image in the second video clip.
Fine-tune the video frame selected using the left and right cursor movement keys of
your keyboard
© Dartfish. All rights reserved.
- Version 6 -
Unique ways to view sport - SimulCam & StroMotion
129
It is important that you choose a starting frame with clear static elements that appear in
both backgrounds. This will help you align the backgrounds in the next step.
A "perfect" synchronization does not always yield a perfect analysis. The overlap
between both performers may be too high, hiding important details. In this case, try to add
one or two frame shift between both video clips.
If the video clips contain synchronization points, they are automatically synchronized
when loaded.
7.1.2.3
Trimming the clips
This means selecting the portion of the video clips you want to analyze. This is done by
setting cue in and cue out points.
To set cue in & out points
1.
Position the red cursor at the beginning of the portion and click on the Set In button (
2.
).
Position the cursor at the end of the portion and click on the Set Ou t button (
).
It is worth taking time to trim the clip to the section of the video you wish to compare as
this considerably reduces the time taken to produce the final result clip. Also, experienced
SimulCam users will be able to avoid sections of video where SimulCam is not able to make
comparisons.
7.1.3
Step 2 - camera movement calculation
In this step, calculation of the camera movements is initiated. This is required by SimulCam
to blend the two performances onto a single background.
In this process, similar features in the backgrounds of the two video clips are manually
aligned by one of two methods:
1.
Drag & zoom align m en t - Backgrounds are aligned by blending the first frame of each
clip then zooming and dragging one frame above the other until backgrounds match.
2.
M atch ed align m en t poin ts - Several matching static background features are marked
with alignment points on the first frame of each clip.
Which method is best?
We recommend that you try both methods to decide which one is most comfortable for you.
By default, your software uses the Drag & zoom align m en t method. Use the following notes
as a guide.
In general, manual alignment by the Drag & zoom align m en t method is quicker.
Drag & zoom align m en t requires you to zoom using scroll function of your mouse or the
[+] and [-] keys of your numeric keypad (refer to your laptop documentation). If
neither of these are convenient for you then M atch ed align m en t poin ts might be a better
choice.
The M atch ed align m en t poin ts method is sometimes a better choice when the video
- Version 6 -
© Dartfish. All rights reserved.
Dartfish User Guide
130
images do not match well.
To select the calculation method
The calculation method can be changed at any time before or during SimulCam.
7.1.3.1
1.
Select Tools >Option s from the menu bar (or press F3).
2.
Select the Sim u lCam topic from the list on the left.
3.
Select the mode. Note that you can Set as defau lt your choice of calculation method.
Drag & zoom alignment method
The Drag & zoom align m en t method consists of dragging and resizing the image of the first
video clip on top of the other clip until the two backgrounds match perfectly. Step 2 using
Drag & zoom alignment looks like this:
Images from both videos are blended but the backgrounds still have to be aligned for each
of the 3 pairs of images displayed on the left hand side of the module.
Adjusting Zoom
© Dartfish. All rights reserved.
- Version 6 -
Unique ways to view sport - SimulCam & StroMotion
131
If the camera used different zoom while filming the two video images this can be
compensated for by resizing the top video image.
1.
Click the blended video images.
2.
Adjust the size by using the mouse scroll function.
If your mouse has no scroll function or it does not operate zoom then use the [+] and [-]
keys on the numeric key pad of your keyboard. Different laptops use different methods of
activating and operating the numeric keypad; refer to your laptop's manual to find out.
Aligning backgrounds
When images are a similar size, they can be aligned - although you may have to align then
zoom again to get a perfect match.
1.
Click & drag anywhere on the blended video images, the top image will move over the
image below it.
2.
Focus on one or more objects in the background; the stands, objects on the field,
posts, equipment, etc. and align those objects.
Repeat Alignment for the other pairs of images
The first pair of images show the background of the two different video clips. The
alignment process needs to be repeated for the two remaining pairs of images. These
pairs are used to calculate movement from one frame to the next in each clip so if
movement is slight this will be much quicker than aligning the different video clips.
1.
Click the second pair of images listed on the left hand side of the SimulCam module.
2.
Align them.
3.
Click the second pair of images listed on the left hand side of the SimulCam module.
4.
Align them.
The end result of step two is illustrated below. Click the N ext button to proceed.
- Version 6 -
© Dartfish. All rights reserved.
132
7.1.3.2
Dartfish User Guide
Checking alignment
Check the alignment quality using the transparency cursor.
Drag the cursor to the left and to the right. If you feel that the background is moving, it
means you need to keep aligning the two backgrounds.
If you still cannot align the background, after repeated zooming and alignment, this
could mean that the camcorder tripod moved during your recording session. In this case, it
is not possible to create SimulCam video clips. You still can compare performances but you
will need to use the split screen functionality of the An alyzer module.
© Dartfish. All rights reserved.
- Version 6 -
Unique ways to view sport - SimulCam & StroMotion
7.1.3.3
133
Matched alignment points method
The M atch ed align m en t poin t method is a process of placing markers on similar features in
the background of both video clips. The alignment point window is illustrated below:
Selecting background alignment points.
In this method, at least two points are set on objects in the background of the first image
and then set on the same objects on the second background. This is repeated for all three
pairs of images listed on the left hand side of the SimulCam module. It is best to use
obvious points of high contrast as illustrated in the following pictures:
Also it is essential that these background points are fixed objects: People or the top of
the slalom gate in the above clip would not be good choices because they move!
To define alignment points.
1.
Click on the first clip's title above the video display. A frame of the first clip is displayed
in the main screen. (Ski 1 in the illustration below)
2.
Click the left mouse button on a static background feature. The feature is marked as
shown below.
3.
Now click a second and perhaps a third object. They will be labeled similarly; you must
set a minimum of two alignment points but defining more may improve the background
- Version 6 -
© Dartfish. All rights reserved.
Dartfish User Guide
134
alignment.
4.
Click on the second clip's title above the video display. A frame of the second clip is
displayed.
5.
On the second clip, click the same background objects that you selected on the first
clip in th e s am e order s o th at th e n u m bers m atch ; the thumbnail on the left displays the
previous selections and can act as a guide.
6.
Click on Vis u al Ch eck on the process bar. A combined image of both frames is displayed.
The backgrounds should appear aligned.
If you need to delete a numbered mark because the elements are not in the second
image or are not positioned correctly, right-click on the mark you wish to delete. Then
left-click in the correct position and a marker with the same number appears again.
If the backgrounds do not match in the Vis u al Ch eck, make sure that the alignment
points are placed correctly and that point 1 matches point 1 in each image etc. If
backgrounds still do not match then adding further points will improve accuracy.
7.
Select the second pair of images from the thumbnails on the left of the SimulCam
module. These images compare camera movement form one frame to the next in the
same video clip.
8.
This time feature points are already set but you need to check they are positioned
correctly. Use the techniques described in step 6 to remove and reposition feature
points as required.
9.
Repeat for the third pair of images.
10. When complete proceed to the next step by clicking on the N ext button.
7.1.3.4
Adding new alignment frames
Both methods to complete step 2 require that you match the backgrounds in the starting
frame of your clips. However, if the backgrounds in this frame are too different, they do not
include clear common background elements or the objects are blurred you will need to set a
different start frame.
To set a new start frame.
1.
Go back to step 1 by clicking the back button.
2.
Set a new cue in at a start frame that is more appropriate.
3.
Repeat step 2.
Setting new alignment frames.
It is essential that the start frames match but additional frames can be set where
backgrounds can be realigned. This might be necessary for clips that "jump" because of a
change of camera angle, or because the images have become blurred during panning or
the clip does not include part of the action in a particular frame.
New alignment frames are represented by flags in the timeline. Once you add a flag, you
will be able to realign the backgrounds in that particular frame as described previously.
© Dartfish. All rights reserved.
- Version 6 -
Unique ways to view sport - SimulCam & StroMotion
135
To add a flag.
1.
2.
Go back to step 1 by clicking the back bu tton .
Drag the current position indicator
along the timeline to the new alignment frame.
3.
Click on the Add flag bu tton
. A new flag is added to the timeline. A red flag
indicates that the background alignment still needs to be performed for this particular
moment
4.
Other icons allow you to jump to the next or previous flag and to delete a flag.
5. Repeat step 2 for each flag added.
7.1.4
Step 3 - blending, preview and saving
Step 3 enables you to:
Select the blending mode
Start the calculation of the SimulCam clip and watch a preview
Save the SimulCam video clip
7.1.4.1
Blending mode
The SimulCam image quality may vary depending on the blending mode. You can choose
from three modes and use the preview to experiment with what works best for your sport.
1.
M otion -bas ed: In most cases, this is the best mode to use for generating a blend. It is
based on the camera movement.
2.
Color-bas ed: Use this mode when your clip features a lighter colored background than
the performer. For example, snow, sand, concrete. Light colors are "pushed" into the
background.
3.
Con s tan t: This is the fastest blend calculation mode, however, the resulting quality is
poorer than the other modes. Use this mode when you want to get a rapid result.
Use the drop-down list to select the blending mode
7.1.4.2
Previewing your clip
It is not necessary to use the preview function but it will help you decide the best blending
mode and whether additional alignment is needed.
To preview, click on the Start preview button. The SimulCam clip will be displayed in the main
screen as the calculation progresses. At any moment, you can decide to stop the calculation
by pressing the Stop preview button. You can now experiment with different blend modes to
compare which gives the best result.
If the SimulCam can be improved, go Back to the previous steps and redo cue in, alignment,
- Version 6 -
© Dartfish. All rights reserved.
Dartfish User Guide
136
blend mode etc.
This done, it may be that there is still a progressive misalignment of the backgrounds. If
this happens, stop the preview and try one of the following.
1.
Add an alignment flag to the frame where the background misalignment begins (see
Addin g n ew align m en t fram es ).
2.
Select a different first frame - as described in Step 1.
It is much quicker to preview using Con s tan t Blen din g m ode. When satisfied that
alignment is correct switch blending mode to M otion -bas ed or color-bas ed for a better quality
result.
7.1.4.3
Saving SimulCam results
There are two potential end results of a SimulCam project:
the creation of a new video clip using the Pu blis h process
the SimulCam project itself.
Saving the SimulCam project
To do this select the Save... option from the File menu. Saving the project is not always
necessary but may be useful if you wish to return to the project to make changes in the
future. SimulCam projects appear in the Item s L is t represented by the following icon:
Starting a new SimulCam project
To initiate a new project select the N ew option from the File menu.
7.1.5
Publishing new video clips
The publish process uses a wizard to guide you through creating new video clips resulting
from SimulCam, SimulCam Fixed, Stromotion and Stromotion fixed. It is used to:
Save and name the video clip.
Categorize the new clip using categories.
Initiate the Pu blis h process by clicking the Publish button at the bottom right of each
module.
7.1.5.1
Choosing video settings
The first step is to select which encoding profile you wish to use for the clip. A range of
encoding profiles exist to allow you to select an appropriate format for the eventual use
and location for the video. For example, if the video clip is lengthy or needs to be sent by
email, you may decide to use an encoding profile which compresses the result into a file of
smaller size (see Converting video in the Getting Familiar chapter to learn more about video
settings).
© Dartfish. All rights reserved.
- Version 6 -
Unique ways to view sport - SimulCam & StroMotion
137
After selecting a profile, click the N ext button to continue.
7.1.5.2
Assigning file name, destination and categories
File name
Type a name for the video clip in the File N am e text box. If this box is left blank the generic
filename of "Untitled" will be applied.
Categorize clips while saving
If you use Dartfish's Keyword video management system (see Organizing your library in the
Video Library chapter) then you can benefit from categorizing new video clips as they are
saved. The method for doing this is to create a form listing a box each category that you
wish to use then selecting existing keywords from these categories or entering new ones.
An example is shown below. The same method is used for categorizing captured video.
Destination folder
This is the physical location on the computer (drive and folder) where the new clip will be
stored. Type the location or click the Brow s e button to search and select a folder.
Conflicting file options
If the file name matches that of another file in the destination folder the con flictin g file
option s setting allows a choice of overwriting the original file or renaming the saved file. If
the latter option is chosen, the new video file will be suffixed with a number. For example,
if "World cup" already exists a new file would be called "World cup(1)".
7.1.5.3
Video creation
The final step automatically initiates the creation of the new video file according to the
settings chosen in the wizard's previous steps. The time taken to render the new video will
depend on the power of the computer and the size of the new file; progress of creation is
indicated.
You will be notified when the publishing process is complete and, by default, the new video
clip will be added to the Tray, allowing convenient access to replaying it in the Player or
An alyzer modules.
7.1.6
Next steps
SimulCam & SimulCam Fixed are unique analysis capabilities for comparing two athletes'
performances blended onto a single background. You may also be interested in the
following topics:
Read the topic StroMotion for another Dartfish special effect enabling you to dissect
- Version 6 -
© Dartfish. All rights reserved.
138
Dartfish User Guide
motion of a performer in a panoramic still image or a video clip.
The Analyzer module offers another way of highlighting key frames and uses them to
bookmark these moments and turn them into still images (read the chapter about the
Analyzer to learn more).
Having created these unique images, you may want to share them by CD, email or
internet (see Sharing video files in the Video Library chapter).
7.2
Dissect motion with StroMotion
Images produced by StroMotion give an athlete and coach unique insights to how an action
develops. It produces a panoramic still image or a video clip that contains collections of
frozen images, revealing how rapid technical changes are made.
To imagine how this might help you, think of times when it might be useful to show your
athlete their position on one frame of video then show it's consequences in another frame.
How about educating your junior team about the correct sequence of actions to use? Sure
you could print out some still pictures but StroMotion offers a juxtaposition of images which
truly reveals how one action leads to the next.
© Dartfish. All rights reserved.
- Version 6 -
Unique ways to view sport - SimulCam & StroMotion
139
The process of creating a StroMotion clip involves 4 steps:
Step 1 - Load & trim the video clip
Step 2 - Camera movement computation
Step 3 - Panorama reconstruction
Step 4 - Draw clones & save results
7.2.1
Step 1 - Load & trim the video clip
Loading the video clip
Open the clip of your choice from the items list or tray.
The chosen clip may be changed by simply loading a different clip.
Trimming the clip (set cue in & out points)
The clip should be trimmed at the beginning and end of the movement that is to be
turned into a StroMotion image.
Choose a start position with clear background features. This will help you match
background features in step 2.
Click the N ext button at the bottom right of the StroM otion module to proceed to the
next step.
- Version 6 -
© Dartfish. All rights reserved.
Dartfish User Guide
140
7.2.2
Step 2 - Camera movement computation
In step 2 camera movement is calculated. This is initiated by matching at least two
background features in successive frames of the video clip by setting alignment points.
StroMotion then computes the movement of the camera throughout the clip.
The points set as alignment points should be static, people are not a good choice of
alignment point! They should also be obvious points in the background as StroMotion can't
track the objects if they are blurred or similar in colour to the surrounding background.
To set alignment points
Click the left mouse button while pointing at an object (a flag, center line, pole, goal,
etc.) that is present on both frames
The red alignment point which appears is labelled with a number. The same marker will
appear on both images.
To exactly position alignment points on features, zoom in on that feature. To do this click
the mouse on the feature while holding down the [ctrl] key on the keyboard (Left-click to
zoom in and right-click to zoom out)
To adjust alignment points
In the image above the feature point labelled "2" is not marking the same place in both
images. To correct this:
1.
Right click on the incorrectly positioned alignment point to delete it.
2.
Then left click the position where the alignment point should be.
© Dartfish. All rights reserved.
- Version 6 -
Unique ways to view sport - SimulCam & StroMotion
141
Repeat this setting and adjusting operation until you have selected at least two alignment
points
You can check how well the alignment points match by clicking the Vis u al Ch eck button. A
window opens showing the athlete moving against a static background. If the background
appears to move or shift, you should check your alignment points or add further points until
the background is relatively stationary.
Calculate camera movement
Click the Start button. Shading inside the timeline shows how much of the process is
complete.
When the calculation is complete, you are ready to click the N ext button to go to the
next step.
The Sh ow w arpin g button allows you to check the result while the clip is being processed.
If the background appears discontinuous as it is constructed , stop the computation and
make further adjustments to the alignment points. This may also be caused by the tripod
moving during filming.
7.2.3
Step 3 - Panorama reconstruction
Usually no action is required in step 3 as the panorama reconstruction begins immediately.
7.2.4
1.
If it doesn't start then click the Start button. As before, timeline shading will show
progress.
2.
Click the N ext button to proceed to the next step.
Step 4 - Draw clones & save results
This step is where you select the parts of the image which will stay fixed on the
subsequent frames of video and will appear as "clones" on the panorama image. To do
this you will:
7.2.4.1
1.
Identify key frames in the video clip where the performer or object is in a position of
interest.
2.
Draw around the "clone" object using a range of clone drawing tools.
3.
Repeat the above for all key frames.
4.
Save the project, result clip or panorama image
Identifying key frames
Your task here is to find frames of video showing the athlete (or another object) in a key
position of interest. This is the moment of action that you wish to freeze.
You should already be familiar with how to use the timeline to move through a video clip. It
is worth remembering to use keyboard shortcuts [ctrl] + [left/right] cursor keys that will
play one frame at a time and fine-tune your selection (read the Gettin g Fam iliar chapter to
learn more).
- Version 6 -
© Dartfish. All rights reserved.
Dartfish User Guide
142
to insert clones at a fixed interval use the Ju m ps ize control illustrated below to define the
size of the "jump" and move backward and forward through the clip by this interval.
7.2.4.2
Drawing clone objects
Having found a key frame of video - one in which an athlete or object is in a position of
interest, that athlete or object now must be cloned. You are not restricted to cloning a
single object, so select all objects of interest in each key frame.
The objects or athletes that you want to clone are drawn, selected and manipulated using
the tools on the right of the StroMotion module.
Select tool - select clones or move selection.
Rectan gu lar clon e tool - clone creation tool.
Freeh an d clon e tool - freehand clone creation.
Delete s election - deletes the performer/object selected by the select tool.
Delete all - deletes all performers/objects on this frame.
Zoom in /ou t - zooms in on the point on the image that is clicked (right click to zoom
out).
To create clones
Use the Rectan gu lar clon e tool or the Freeh an d clon e tool tools to "draw" around the
performer/object to be cloned.
To use the Rectan gu lar clon e tool
1.
Click the Rectan gu lar clon e tool button.
2.
Then point the mouse above and to the left of the object to be cloned.
3.
Click & drag downwards and to the right until the selection box encompass the object
while including as little background as possible.
To use the Freeh an d clon e tool
1.
Click the Freeh an d clon e tool button
2.
Click & drag around the object staying as close to the edge as possible.
© Dartfish. All rights reserved.
- Version 6 -
Unique ways to view sport - SimulCam & StroMotion
143
If you miss part of an object during selection,
don't delete the clone and start again, simply
include the missed part as a new selection. More
than one tool can be used and more than one
selection can be made to create a clone as shown in
the image below.
Which selection tool is best?
To answer that, remember that whichever tool you use, the selected area will stay fixed on
the video image. If there is overlap between clones, the later clones will obscure the
earlier ones.
Use the freehand tool when there will be a lot of overlap between the clones. For
example in a gymnastic rings routine or high jump.
Use the rectangle tool when the clones will be spread out - the performer moves some
distance between the key frames. For example in long jump.
To edit clones
1.
Select the clone to edit by using the Select tool
of the cloned area.
2.
Selected clones can be deleted
, moved by click & drag, or reshaped by dragging
the "handles" at each edge or corner, see these illustrated below. All clones in a frame
can be deleted using the
. Click the tool then click the outline
tool, it is not necessary to select clones first to use this.
By zooming in on the image
more careful selection is possible. Click the left mouse
button to zoom in and the right mouse button to zoom out.
7.2.4.3
Publishing StroMotion
Creating StroMotion results is done using a Publishing wizard almost identical to that used
by SimulCam. It is initiated by clicking the Pu blis h button in the final step of StroMotion and
StroMotion Fixed projects.
Publishing can produce a choice of two results described below. After selecting an output
type and clicking the N ext button, the remaining steps are described fully in the SimulCam
chapter (see Publishing new video clips in the Simulcam chapter).
- Version 6 -
© Dartfish. All rights reserved.
144
Dartfish User Guide
StroMotion still image
A bitmap (.bmp) picture of all clones superimposed on the background. If a panning camera
was used, clones are superimposed on a panoramic background image. An example of this
is shown below.
Although bitmap and jpeg images will appear in the Item s L is t, no Dartfish modules are
used to display them; if opened from the Item s L is t they will actually be opened using
default Windows image display/editing software on your computer.
StroMotion video
The original video has each clone appear and remain on the video image as the movement
develops.
7.2.4.4
Saving StroMotion
It is possible to save a Stromotion project if you wish to return to it to make adjustments or
publish it's results later. StroMotion projects are represented by the following icon in the
Item s L is t.
Save the settings used to create the project by selecting Save as ... from the File menu.
7.2.5
Next steps
StroMotion & StroMotion Fixed are one of Dartfish's special effects allowing you to view
movement in unique ways. You may also be interested in the following topics:
Read the topic SimulCam for another Dartfish special effect enabling you to place two
performers together in the same place and time.
The spline drawing tool (see chapter on An alyzer) is another way of tracking and
illustrating movement.
© Dartfish. All rights reserved.
- Version 6 -
Unique ways to view sport - SimulCam & StroMotion
145
The Analyzer module offers another way of identifying key positions and uses them to
bookmark these moments and turn them into still images.
Having created these unique images, you may want to share them by CD, email or
internet (see Sharing video files in the Video L ibrary chapter).
- Version 6 -
© Dartfish. All rights reserved.
Chapter
VIII
Tagging Video
148
8
Dartfish User Guide
Tagging Video
Traditionally, reviewing sporting performance on video is a linear process – you rewind the
tape, press play and observe the action as it takes place. Of course your camcorder's fast
forward button saves time but finding and replaying important moments in the game or
competition essentially remains linear – and slow.
Imagine how useful it would be to be able to mark and label these events on the tape as
you are filming because you could later jump between these marks in any order you
choose. You could review only the events of interest and choose to see related events:
"Let me look at all the times our opposition scored" ceases to be a lengthy process of fast
forward and play.
Dartfish's Tagging module doesn't physically mark a tape but instead brings digital video
onto the computer and allows you to create a searchable index of the video content. Each
event is tagged with not just one label but a set of keywords that really identify what is
happening. This process not only lets you search and review these events but compiles
match statistics: "Which shot does my opponent most often score with?" is not only a
question that can be easily answered, but the relevant shots can be replayed and
analyzed.
A short history of tagging
If all this sounds familiar, that is because Dartfish Tagging is a combination of long-used
tactical analysis methods:
Notational analysis - the coach or analyst sits on the sideline with pen & paper ticking off or
coding events as they take place in a game. Tagging does this using buttons which are
clicked to code events.
Video indexing - even before digital video, coaches attempted to make it easier to find
useful moments in the video of the game by noting the time that they took place. This made
it easier to fast forward to that point on the tape but it's easier still with Tagging; the
events you code are listed in an index which can be searched and displayed nonsequentially.
Is Tagging just for Team sports?
No. While other Dartfish modules are used for technical analysis of isolated events. Tagging
is more about a tactical analysis of the game as a whole while being able to focus on
© Dartfish. All rights reserved.
- Version 6 -
Tagging Video
149
specific moments of choice. It is therefore useful for any sport where these qualities are of
interest: Team sports, racket sports, combat sports, skating/gymnastic routines etc.
8.1
What is Tagging?
Taggin g is the action of creating a video index, a list of E ven ts that occur in the video.
Consider for example a video that contains a soccer game; the video index could look like
this:
Index
Position
Duration
Event Type
Player
Team
Event #1
23 s
7s
Pass
Defender
Team A
Event #2
1 min 13s
7s
Free kick
Striker
Team B
...
...
...
...
...
The Pos ition corresponds to the time in the video when the event occurred.
The Du ration is a portion of the video when the events take place.
Event type, Pass and Team are Categories . Pass, Defender and Team A are the
keyw ords in each category.
An event is fully defined by the Pos ition , Du ration and the categories' Keyw ords . It can
be illustrated as follows:
Once you have created your index, you will be able to retrieve particular events. For
example, you may want to retrieve events that match the following criteria:
Team = Team A, i.e. all events of Team A
E ven t Type = Pas s and Team = Team A, i.e. all the passes of Team A
It is important to be aware that the Tagging module doesn't just tag instantaneous events
such as these examples, lengthy sections of video such as a team's ball possession can be
tagged at the same time as the passes and free-kicks taking place during that possession.
- Version 6 -
© Dartfish. All rights reserved.
Dartfish User Guide
150
8.2
The Tagging Workspace
To launch the Taggin g module, click on the Taggin g icon in the icon bar, or select Tools >
Taggin g from the menu bar.
The module workspace is illustrated below:
It is composed of four different elements (clockwise from top left):
1.
The L ibrary (more precisely the Tray of the library), which opens a collection of video
clips to be tagged or reviewed.
2.
The Video Pan el, which contains the video display and the different video controls which
let you capture and replay video. This also has controls to display and hide the other
panels and select the video source.
3.
The Taggin g Pan el, which contains a set of buttons and other tools; some of which
create a timestamp for each event and others which describe the event with values.
4.
The E ven ts L is t, which contains the list of events, i.e. your video index. It also has
features related to the management of events; editing, searching and import/export
functions.
These elements are described in more detail in the remainder of this section.
When you launch the Taggin g module for the first time, the workspace may not look like
the one illustrated above. If any of the four elements are not visible they may be displayed
by using the View s Bar buttons at the top right corner of the video panel (see The Video
Panel).
8.2.1
The Library
It is likely that your tagging analysis will based on more than one file. Perhaps different
periods of the game were recorded as separate video files or perhaps you are reviewing
the video of an entire season. Dartfish offers you a simple way of working with as many
video clips as you require.
© Dartfish. All rights reserved.
- Version 6 -
Tagging Video
151
Loading all the clips you wish to analyze into the Tray section of the library allows you to:
See events from of all clips contained in the Tray; allowing the events of many videos to
be analyzed together.
Search for events from all video clips within the Tray.
View or tag multiple video files as if they were a single clip.
When working with multiple clips, it is useful to know that the video clip highlighted with a
green triangle is the one currently being played or tagged and that the Player's repeat
options can be used to play each clip continuously as a single movie (See Video playback in
the Gettin g Fam iliar w ith Dartfis h chapter)
8.2.2
The Video Panel
The Video pan el is illustrated below.
Mode bar
- Version 6 -
© Dartfish. All rights reserved.
152
Dartfish User Guide
The Mode Bar at the top left of the video display enables you to choose between two
tagging modes and a video player mode.
Tag L ive mode records a video stream, at the same time as allowing you to tag during
capture. The screen and the different settings are identical to the Video Recorder
module (see Video Recorder: get video from DV tape camcorders in the Video L ibrary
chapter)
In the Tag Video Clip mode allows you to play entire video files that exist on your hard
disk. The clips can be tagged during playback
The Play E ven ts mode allows you to play back the selected events from the Events list
These last two modes use the video playback controls illustrated above. Read the section
Video Playback of the Gettin g fam iliar w ith Dartfis h chapter to learn about the different
controls.
Views bar
The View s bar is found at the top right of the video display. Its buttons show and hide the
different parts of the Taggin g module. The buttons' functionalities are:
show/hide the Taggin g Pan el
show/hide the E ven ts list
show/hide the L ibrary
Use the maximized workspace view (keyboard shortcut = F9 to simplify the screen
layout then show or hide these features as you need them.
8.2.3
The Tagging Panel
The Taggin g Pan el contains the tools to tag (or create the events index) of a video. It is
also used to
Access the tagging panels provided with Dartfish
Open panels created by you, sent to you or downloaded from www.dartfish.com;
Create or edit new panels.
© Dartfish. All rights reserved.
- Version 6 -
Tagging Video
153
The Select button
The s elect bu tton is used to open tagging panels which you have created or those which
you have been given. Select also gives access to the built-in panels and to create new
panels to meet your specific needs (see Creating Tagging Panels).
Tagging panels are saved as files just like Word documents or Excel spreadsheets. In
other words, they exist independently of Dartfish software, they can be saved and
organized using Windows file management, and can be attached to emails to be shared
with others.
The Edit button
Opens the tagging panel editor. A tagging panel must already be open before the edit
button can be used.
The tagging panel
- Version 6 -
© Dartfish. All rights reserved.
154
Dartfish User Guide
Although Dartfish tagging panels allow great flexibility and creativity in how they can be
used, the tools on them principally have one of three functions:
1. Event tools - used to create events by time stamping the event and assigning it a
descriptive value
2. Keyword tools - used to add additional keywords to events
3. Grouping tools - used to organize other tools into groups; either to improve the layout
visually or ergonomically or to confer shared features on the group
Tagging panels can consist of one or more pages, accessed by tabs. Buttons and tools for
use at different times in the tagging process are placed on different pages to improve the
ergonomics of the panel.
8.2.4
The Events List
The E ven ts L is t contains the list of all events for all video clips in the current Tray:
Events are selected by clicking on the row containing them. The video playh ead moves to
the start of the event. Double-clicking an event both plays it and places Dartfish tagging in
its Play E ven ts mode.
Selected events may also be:
Deleted using the Delete button
Analyzed in Dartfish's An alyzer module ( Storyboard button)
Exported as . cs v files using the Im port/E xport button
Published as new video clips that can be stored on your hard drive (e.g. to make a
highlights movie using video editing software) or directly burned onto a CD or data DVD
(e.g. to give to team players or coaches), or uploaded to your dartfish.tv channel using
the Pu blis h E ven ts button.
Sorted by clicking on the column heading you wish to sort.
© Dartfish. All rights reserved.
- Version 6 -
Tagging Video
155
Searched and filtered. See Search to retrieve specific events for more details.
8.3
Creating Tagging panels
To create a new tagging panel, proceed as follows:
1.
Click on the Select button and choose N ew from the context menu.
2.
Click on the N ew Pan el icon
3.
Select from the list of new project types. Create a new Blan k Pan el if you wish to start
with an empty panel OR base a new panel on one of the built-in tagging panels.
This displays the Taggin g E ditor window as shown below
We recommend starting by using one of the Dartfish built-in tagging panels. Change
labels and add/delete buttons as necessary for your sport.
The Tagging Panel Editor
The tagging panel editor has 3 sections, (left to right as displayed above):
1. The ToolBox contains buttons and other tools used to create and describe events. They
are added to your tagging panel by drag and drop.
- Version 6 -
© Dartfish. All rights reserved.
156
Dartfish User Guide
2. The Taggin g pan el editor. This is where the content and layout of a tagging panel is
defined. A new blank tagging panel already contains a tab group box allowing you to
create a multi-page panel if required.
3. The Properties pan e. Properties are used to define the appearance and actions of
tagging panel tools
8.3.1
Adding/deleting/moving/copying tools
To add a tool to a tagging panel
Items are placed onto the tagging panel editor by dragging and dropping them from from
the Toolbox.
New panels always have a tabbed grou p box with a single page, as show below. In order
to place the tool on that page, it should be placed in the area denoted by the red line
shown here:
Adding subsequent items also requires care, in the image below, new tools should be
placed on the gray shaded area if they are to appear on the same page as the other
buttons.
If placed below the page then that tool will be visible from all pages.
© Dartfish. All rights reserved.
- Version 6 -
Tagging Video
157
To move an item
Drag and drop the item you want to move to the new position.
To move a panel layout tool (group boxes etc)
1. Click within the panel layout tool (but not on any button or other tool)
2. A red outline surrounds your selection - use this to identify that you have the correct
tool selected
3. Click and drag the panel layout tool to a new location
It is not possible to move a group box to between other group boxes. Instead it should
be moved above or below the other group boxes which can then be shuffled further to
achieve the desired position.
To delete an item
Right-click on the item and select Delete from the context menu.
To copy an item
Drag and drop the item while holding down the [ctrl] key on the keyboard. Release the
item before releasing the [ctrl] key.
Many tools will have similar properties so creating one button, defining its properties
and then copying it can be a very efficient way of creating a tagging panel.
8.3.2
Modifying properties
Items which have been added to the Taggin g E ditor have their appearance and function
modified by changing properties in the Properties pan el. There are two types of properties;
properties which can take any value and properties which must take one or more fixed
values. The methods for modifying these two types of property are described below:
A complete description of properties can be found in the topic Properties list
Modifying 'any' value properties.
1.
Click on the tool. This will display the properties for that item.
2.
Click and type in the second column of the properties list to add or modify values.
Modifying 'fixed' value properties.
1.
Click on the tool. This will display the properties for that item.
2.
Clicking in the second column of the properties list will allow you to select a value using
the buttons that appear. It is not possible to type values. One of two types of button
are used:
- selects or creates property values from a dialog box e.g. shortcut key property
- selects property values from a drop down list e.g. style property
In the example shown below these buttons are shown as they would appear in the
properties panel. Properties such as Sh ortcu t Key, Preroll and Trigger are selected using
.
Properties such as Style are selected using
, and properties such as Category, Valu e and
L abel are typed.
- Version 6 -
© Dartfish. All rights reserved.
158
Dartfish User Guide
Double clicking the property heading in the column on the left is a shortcut to editing
properties.
8.3.3
Planning a tagging panel
Example of a basic Taggin g Pan el:
Which events do you want to tag in your sport?
Creating tagging panels requires a clear idea of what you want to tag and how you want
to define the events' durations and the keywords which describe them.
One definition of an event could be "a segment of video". You need to decide what are the
different types of video segments that you want to denote. Those events are likely to be
key moments or highlights within the video.
© Dartfish. All rights reserved.
- Version 6 -
Tagging Video
159
Many events in your sport or activity are easy to define but perhaps others are less easy,
consider this example:
In soccer, ball possession in the opponent's half is a key moment that might be tagged as
an "attacking possession". That possession might end in an attempt to score. So do you
want to tag two events (attacking possession and attempt) or one (attacking possession;
outcome = attempt)?
There is no right or wrong answer to this; your decision will be based on what you want to
review; tagging this as two events gives you the capacity to choose whether to review
attempts separately from attacking possessions.
From this example it should also be clear that Dartfish allows you to tag events which
coincide or overlap.
Which of these events have a fixed duration (e.g. actions) and which are of variable
duration (e.g. game phases)?
Dartfish can create 2 types of event.
1. Those where the duration can be predicted so only require a single button click to
create an event with fixed duration.
2. Those where the duration of is not predictable and is defined by clicking a button on
and then off.
Regardless of how the event duration is defined, it is editable after creation.
How will your events be categorized?
The events list is a table made up of rows and columns. Each row contains the keywords
which describe the event and at the top of each column there is a heading which describes
the category of information displayed in that column.
When categorizing events you may choose to simply list all events under a single heading
such as 'Action' in the example below:
Or you may decide that your events fall into different categories such as 'Set piece plays',
'Open play', 'Phases', 'Possessions' etc.
Placing all events into a single category keeps things simple, but using different categories
offers flexibility when it comes to filtering the events list and creating statistics.
It is not possible to simultaneously create multiple variable duration events (i.e. those
created using the continuous event tool) with the same category. If this is required, it is
essential that different categories are used. For example, Team A might have possession
but if there are to be different phases of play within that possession then these events
should be categorized differently e.g. 'Phase' and 'Possession'.
How will you describe these events? Events are described by assigning keywords to
them.
- Version 6 -
© Dartfish. All rights reserved.
160
Dartfish User Guide
Creating an event automatically adds 3 keywords; the video position, the duration of the
event plus one user-defined keyword. Further keywords can be added to more completely
describe the event so you need to consider what additional categories of information are
needed. For example: 'Player' and 'Outcome' might be categories of keywords need to fully
describe an 'Attempt' event.
What Keywords are required for all events?
It is very common that you will be tagging or reviewing the tags from more than one video
file as described in the topic The Library. In this case the same keyword should be added to
all the events of each file to allow you to easily distinguish which events belong to which
file.
For example, if you create 2 video files for the first and second half of the soccer game, it
would be a good idea to have a category in your events list headed 'Game period',
containing the keywords '1st Half' and '2nd Half' to allow you to distinguish between events
which took place in the first video file and the second.
Ready to start creating a tagging panel?
Having thought carefully about the questions above, you will have a list of events and a list
of keyword categories. No doubt you have also have some ideas about the keywords
which should go into each category. Now you are ready to turn those ideas into a tagging
panel.
8.3.4
Panel layout tools
Group boxes
These tools organize the layout of a panel by grouping buttons together. So unless you
have a very simple tagging panel, group boxes are likely to be the first tools that you will
add to a new tagging panel. They have two functions:
1. To organize the layout of buttons on a tagging panel.
2. To set the category property of many buttons simultaneously i.e. tools placed into a
group box inherit their category from it.
This is an efficient way of ensuring the category property of buttons is not omitted or
inconsistently applied. However it is possible to over-rule the inherited category simply by
setting the property of the individual tools.
If you have already read the topic Planning a tagging panel, you should have a good
idea of what categories your events list requires. Start your new tagging panel by
adding a group box for each category and set the category property of each to each one
of your categories.
Nesting group boxes
It is possible to place group boxes inside another group box. In the example below, group
boxes have been used to organize the layout of players on a soccer pitch.
© Dartfish. All rights reserved.
- Version 6 -
Tagging Video
161
In this image, 'Players' is the selected group box and the red line indicates that it contains
the other group boxes. Its category property is set to 'Players' therefore the other group
boxes and any buttons placed in them inherit this.
Tab group boxes
The pages of a tab group box each behave like a group box, the contents of which are only
seen when the tab of that page is selected.
The advantages of a tabbed group box are:
They are a very space efficient way of including many buttons on a tagging panel.
Panels can be created to only show buttons which are relevant to the current event;
simplifying the panel and guiding the user to appropriate tools.
Use the trigger property of a button to automatically select a tabbed group box page.
Examples of this method to display relevant buttons as they are required can be seen
in most of the built-in tagging panels.
Adding tabs to a tabbed group box
In the tagging panel editor, new pages are added to a tab group box by clicking the last
tab showing the new page icon. The new page displays the label [...] until an alternative
label property has been set.
Panel layout tool properties
Property
Des cription
Label
The text which is displayed on the tab.
Visibility
The visibility property is a way of concealing tagging tools when the
user is not required to use them directly. Other tools can be used to
trigger the contents of a hidden group box even when not visible.
Orientation
Defines whether the contents of a group box are stacked vertically or
placed horizontally within a group box.
Image
An image can be placed as a visual label for the group box. It will be
- Version 6 -
© Dartfish. All rights reserved.
162
Dartfish User Guide
resized to fit next to any text label
Category
8.3.5
The category of a layout tool sets the category of any other tool it
contains. Inheritance can be over-ruled by setting the category of
individual tools
Event creation buttons
E ven t creation bu tton s are used to add events to the E ven ts L is t. The action of these tools
is to create an event described by:
Position - the timestamp of the start of the event in the video clip
Duration - how long the event last for
Keyword - the event is described by a single user-defined keyword. The event can be
more fully described using Keyword addition tools after the event is created
Name - the filename that will be used if the event is exported as a video clip. This will
be the based on the event keyword but can be modified.
Event buttons
The difference between E ven t bu tton s and con tin u ou s even t bu tton s is how they define the
duration. Event buttons are used to create events with a fixed duration e.g. a tennis serve
might take around 5 seconds to prepare, deliver then witness the outcome. A single click on
this type of event button records the event.
Continuous event buttons
Continuous Event buttons are used to create events where the duration cannot be
predicted, e.g. a whole point in a tennis game or an attacking phase in soccer. This button
is clicked "on" and "off" as the event starts and ends.
Continuous events are also switched off by activating other continuous events with the
same category property. For example, this allows you to define the change in possession
from one team to another with a single click. This improves the ergonomics of tagging but it
makes the categorization of continuous event buttons important: if two continuous events
are to run concurrently then they must have different categories.
Important event creation tool properties
© Dartfish. All rights reserved.
- Version 6 -
Tagging Video
163
Property
Des cription
Label / keyword
properties
These properties define the keyword to be recorded in the
events list. Where the keyword property is not set, the label on
the button will be used as the keyword. By setting these
properties to different values, it is possible to tag a different
keyword to the text displayed on the button.
Category property
Defines the column of the events list where the keyword will be
added. Without a category property the button won't record its
keyword.
Duration
For event buttons only; this is the fixed duration of the event
Preroll
Defines the number of seconds before the button click that will
be included in the event.
For example when a shot is made, the button is clicked but you
want to define the start of the event 10 seconds prior to this in
order to see the action leading up to the shot.
An event button with a 10 second preroll and a 15 second
duration would define an event starting 10 seconds before the
button click and ending 5 seconds after.
Offset start
For continuous event buttons only; the equivalent of preroll.
A negative value defines the event start prior to the button click
and a positive value defines the event start after the button
click.
Offset end
For continuous event buttons only; defines the end of the event
before or after the button click.
These are the essential event button properties. Other properties are described in the
Properties list topic.
Other event creation tools
The team grou p box tool and the Zon e tool can be used to create events by setting their
Action property = event. However, their default action is as keyword addition tools.
8.3.6
Keyword addition tools
Keyword addition tools are used to add keywords to an event. They do not create events.
Keyword addition tools can be one of two types:
Keyw ord tools - are used after an event has been created to add a keyword to that
event only
Pers is ten t keyw ord tools - are activated before an event and add their keyword as the
event is created. They remain active until deactivated and so can be used to add their
keyword to many events.
Keyword button
A Keyw ord bu tton assigns an addition keyword value to the last tagged event (or to the
selected event in the Events List).
Persistent keyword button
The p pers is ten t keyw ord bu tton applies its value to all events which are tagged while it is
active ("pressed").
- Version 6 -
© Dartfish. All rights reserved.
164
Dartfish User Guide
For example, in tennis the name of the server could be assigned to a persistent value
button. All events created while that button is active will be tagged with the server's
name.
Persistent values can be very useful when the analysis consists of more than one
video file. For example to allow you to differentiate between an event which takes
place one minute into the "first half" and another which takes place one minute into the
"second half". First and second half are the persistent value buttons in this example.
Text box
The text box tool is a persistent keyword tool that assigns a variable keyword based on
text typed into the box. For example you might use this to include the name and date of
the competition or information about the conditions, as illustrated below:
Score panel
The score panel is a persistent keyword tool that lets you record the current score of the
game.
Zone tool
The zone tool is used to record where an event takes place based on where an image is
clicked. The recorded keyword is the coordinates of the clicked position. The zone tool is
further described in the Zone tool topic
Important keyword addition tool properties
© Dartfish. All rights reserved.
- Version 6 -
Tagging Video
165
Property
Des cription
Label / keyword
properties
These properties define the keyword to be recorded in the
events list. Where the keyword property is not set, the label on
the button will be used as the keyword. By setting these
properties to different values, it is possible to tag a different
keyword to the text displayed on the button.
In the case of the textbox tool, the keyword property can be
used to define a default text box entry.
Category property
Defines the column of the events list where the keyword will be
added. Without a category property the tool won't record its
keyword.
These are the essential properties. Other properties are described in the Properties list
topic.
Other keyword addition tools
The Team Manager, Team Group Box and Player List Selector can also be used to add
keywords to events. Their use is described in the topicsTeam Manager tool and Team
Group Box and Player List Selector
8.3.7
The Zone Tool
The zone tool is used to record where an event takes place based on where an image is
clicked. The keyword it adds is the coordinates of the clicked position on a grid.
Using the zone tool
1. Set the image property: Any image can be used but it is not resized by Dartfish, so it
should be created and edited at appropriate dimensions with image editing software
before addition to the panel.
2. Define the grid: Field h eigh t and field w idth properties are used to define a grid e.g. a
field width value of 3 would split a soccer pitch into three vertical sections or a field
width = 100 would split an American football field into 1 yard sections.
3. Define the center of the grid: Field center X and field center Y properties are used to
define the center square of the grid. When the zone tool is clicked, zones to the left or
above the central zone record a negative coordinate, zones below and to the right
record a positive coordinate.
4. Set the category: as with all tagging tools, the zone tool requires a category in order to
be able to record its keyword in the events list.
The image below shows the coordinates which are recorded when a zone tool with field
height and width=3 and Field center X and Y=2:
- Version 6 -
© Dartfish. All rights reserved.
166
Dartfish User Guide
Each zone has equal dimensions. For sports with playing areas where the zones are not
equal it will be necessary to create a zone tool image which distorts the zones to equal
sizes.
The grid is invisible. If it is required, it should be defined on the image itself using image
editing software.
Event creation tool or keyword addition tool?
By default, the zone tool is a keyword addition tool. It can alternatively be used to create
events. To do this set the action property to even t and define preroll and du ration
properties as for an event button.
8.3.8
Team Manager tool
If you have many players or several different teams to tag, you can use the Team M an ager
to store all teams and player names but then select only those players taking part in the
game. The selected players can be represented on the panel by:
A Team Grou p Box tool - can be linked to the Team Manager and displays buttons
representing each selected player.
A Player L is t Selector - can be used to select a single team and player from those stored
in the Team Manager's database
See the topic Team Group Box and Player List Selector to learn how to link these tools to a
team manager.
The Team Manager tool
Very little needs to be done with the team manager during tagging panel creation. Simply
add it to your panel; teams and players will be added after closing the editor.
Setting the category property for the team manger is optional. If it is set then a keyword
representing the selected team will be recorded when a player button is clicked.
Team Manager databases
The teams and players that you add to a Team M an ager tool are stored in a database file
which is created automatically in the same folder as the tagging panel. However, you may
want to use a database previously created by you or another Dartfish user.
Use the Databas e E ditor tab of the tagging panel editor to select the database file that you
wish to use.
Each tagging panel can have only one database but have many team managers enabling
© Dartfish. All rights reserved.
- Version 6 -
Tagging Video
167
selection from different teams and players.
Adding teams and players
Teams and players are added outside the editor as described in the topic Using the Team
Manager
Important Team manager properties
Property
Des cription
Label
Using a label helps to identify a team manger. This is useful
when linking it to a team grou p box or when more than one team
manger is being used.
Category property
The category property is not an essential property for a team
manager. If used then a keyword representing the selected
team will be added to the events list.
These are the main properties to consider. Other properties are described in the Properties
list topic.
8.3.9
Team Group Box and Player List Selector
Team Group box
A team grou p box is a group box to which buttons are added by selecting players from a
linked Team M an ager as illustrated below.
To simplify the layout of a tagging panel it is usually best to put a team manager on
a separate page of your tagging panel from the team group box and other tagging
buttons. During tagging most activities will not require frequent access to the team
manager; perhaps only before the start of the game.
Team group box buttons can add keywords or create events
Team group box buttons are Keyw ord bu tton s by default. Set the Action property to define
whether the buttons function as keyword buttons, pers is ten t keyw ord bu tton s , even t
bu tton s or con tin u ou s even t bu tton s .
- Version 6 -
© Dartfish. All rights reserved.
168
Dartfish User Guide
For example, a pers is ten t keyw ord bu tton might be used to tag the 'Server' to all the events
created in a tennis game. Or player possession might require the creation of an even t or
con tin u ou s even t.
Player List Selector
This tool allows you to select a single player from a linked Team Manager's database of
teams and players. The selections you make are pers is ten t keyw ords : the keyword is
added to all events created after a selection is made.
A player list selector can add up to two keywords to the events list:
A keyword representing the player added to the category set for the player list
selector.
A keyword representing the team added to the category set for the team manager.
If the team manager has no category property set then only one keyword is added by
this tool.
Linking to a Team Manager
A Team M an ager tool must be linked to a Team Grou p Box or a Player L is t s elector tool which
will display the buttons. To do this, proceed as follows:
1. Select the team group box or Player List Selector.
2. Double click the Team M an ager L in k property to display the property editor window (as
shown below).
3. Select the Team Manager to be linked; it is identified by its label and Id.
4. Click the Add button. The Team manager on the right is that linked to the team group
box.
Important team group box properties
© Dartfish. All rights reserved.
- Version 6 -
Tagging Video
169
Property
Des cription
Team manager link
Establishes a link to a team manager and its database of teams
and players.
Category property
Defines the column of the events list where the keyword will be
added. Without a category property the tool won't record its
keyword.
Action
Defines the button type used in a team group box. The default
setting is keyword button but buttons can also be event
buttons, continuous event buttons or persistent keyword
buttons.
Duration/Preroll
If buttons are event buttons, duration and preroll properties
should be set to define these features of the event. See the
topic Event creation buttons to learn more about these button
types.
These are the essential properties. Other properties are described in the Properties list
topic.
8.3.10 The Filename Template tool
The Filen am e tem plate tool enables tagging panel creators to control the file name used to
save recordings made when using live tagging. When the user clicks the button it sets the
file name for the next video recording.
To use a filename template:
1. Add a filename template tool to the tagging panel
2. Set the label property to indicate the function of the button
3. Set the File N am e Tem plate property to the desired file name
The file name template property can be set to a variable value based on the selection
from a Player L is t Selector tool. See the topic Using variable keywords to learn more.
8.3.11 Properties list
By clicking on any item on the tagging panel workspace, its properties are displayed in the
Properties pan e. The properties of each tagging panel element are used to alter their
appearance and behavior.
Most tools have 3 crucial properties which you should set:
1.
L abel – the text that identifies what this tool does.
2.
Keyw ord – the keyword that will be assigned to the event.
3.
Category – the category to which the keyword will be assigned. Think of the category
as being the column heading of the E ven ts L is t in which keywords will appear. (see
Planning a tagging panel for help to plan the categories that you need).
Properties which alter appearance:
P rope rty
W h at it doe s…
Applie s to…
L abel
Sets the text that is displayed on the item
All
Tooltip
The tooltip is the explanatory text that appears
All event creation and
- Version 6 -
© Dartfish. All rights reserved.
170
Dartfish User Guide
when the mouse cursor is pointed at a button. Use
this to explain the function of each button.
Im age
keyword addition tools
An image can be displayed on a tool to help identify Buttons, group boxes,
the event or value that it represents.
zone tool
As the Zone tool is based on clicking an image, this
property is essential.
Orien tation
For a button this defines whether the image is
displayed above or to the side of the label.
Buttons, group boxes
For a group box this controls whether buttons are
laid out vertically or horizontally.
Style
Sets the color of a button
All Buttons
Properties which affect behavior:
Category
The category property defines the events list column All
into which a tagging tool's keyword will be placed.
Each tool inherits its category property from the
group box in which it is placed. It is therefore an
efficient way to categorize buttons of the same
category by placing them in the same group box.
Override the inherited category by setting the
category property for individual tools.
Keyw ord
Defines the keyword which will be used to describe All event creation and
the event in the events list. For buttons, the
keyword addition tools
keyword will automatically set to the same value as
the label property, however it is possible to record a
different keyword if desired. For example, the label
might be an abbreviation of the keyword.
Preroll
Defines the time before an event creation tool is
clicked that will be included in the event. Preroll
ensures that you don't miss the start of the action.
All event creation tools
Du ration
Duration is the duration of the event that will be
tagged when this button is clicked. This time
includes any preroll that has been set. If the event
is not of fixed duration then a con tin u ou s even t
button should be used to manually mark the
beginning and end of an event.
All fixed duration event
creation tools
Offs et Start
Offset Start - the amount of video before or after a Continuous Event
con tin u ou s even t button being clicked on that will be Buttons
included in the event. This ensures that you don't
miss the start of the action. If a negative number is
used, the start of the event is set before the tool is
triggered, if positive it will be afterwards
Offs et E n d
Offset End – the amount of video before or after a
Continuous Event
con tin u ou s even t button being clicked off that will be Buttons
excluded at the end of an event. If a negative
number is used, the end of the event is set before
the tool is triggered, if positive it will be afterwards
Target
Defines where the keyword typed into a text box
will be applied:
Event category - the keyword is added to the
events list
Video clip category - the keyword is added to video
clips captured with live tagging and appears in the
Dartfish library
© Dartfish. All rights reserved.
- Version 6 -
Text box
Tagging Video
Action
Defines the button type of a team group box.
171
Team group box
The default is for a team group box to contain
keyword buttons but this property can be used to
select any button type.
Team
Used to link a Team Group Box to a Team Manager
M an ager L in k tool.
Team group box, Player
list selector
Field w idth ,
Used by the zone tool to define the layout and
field h eigh t,
coordinate map of the zone grid.
field cen ter X, See The Zone Tool
field cen ter Y
Zone tool
Properties used to automate tagging (see Automating tagging )
Sh ortcu t Key Rather than clicking buttons on a tagging panel,
All event and value
using the keyboard Shortcut Key property for event tools
or value buttons can be much more efficient. Note
that these shortcuts are displayed in parentheses in
each button
Res et
Category
Tools with a reset category property can be used to All buttons
deactivate other continuous event or persistent
value tools. When this tool is clicked, all other
buttons using the category specified are reset.
Trigger
The trigger property is a list of one or more tools
that can be activated when this button is clicked.
Vis ibility
This property is used to hide a group box and all its Group boxes
contents.
All buttons
Used when the action of the hidden tools will be
defined by the tagging panel creator and shouldn't
be modified by the user or when it will be triggered
by other buttons.
Clicking on a property title in the properties panel displays a description of that
property. Double clicking on the property title allows you to change that property.
8.3.12 Automating tagging
Large tagging panels with many buttons present two problems to the user:
1. Many mouse clicks might be required to record an event, making it hard to keep up with
a fast moving game
2. It becomes more difficult to locate the buttons you want to use.
This topic explains properties and features which assist with these problems
Re se t C ate gory property
Tools with a reset category property can be used to deactivate other continuous event or
persistent keyword buttons. When the tool is clicked, all other buttons with the specified
category are reset.
This behavior is equivalent to that of continuous event buttons (see the topic Event
creation buttons) which automatically deactivate all other continuous event buttons sharing
the same category, except that the reset category property will deactivate buttons from
any other category that you specify.
Be careful with spelling and use of spaces - the reset category you specify must match
the category of the tools that you wish to reset. However the case used is unimportant.
- Version 6 -
© Dartfish. All rights reserved.
Dartfish User Guide
172
Trigge r property
The trigger property is used to activate or deactivate other tools. This property specifically
identifies which tools will be triggered by selecting them from a list selected from a list.
Examples of the use of the trigger property can be seen in some of Dartfish's built-in
tagging panels where clicking an event button triggers a page of a tab group box revealing
keyword buttons associated with that event.
For example, when a scoring event is tagged the trigger property could be used to activate
the tab group box which contains a score tool.
To set a trigger property:
1. Select the tool which will trigger other tools.
2. In the properties panel, double-click the property heading Trigger
3. In the trigger dialog (see below) select the tool which will be triggered. Tools are
identified by both their label and Id; be careful to select the correct tool in the case
where more than one tool has the same label
4. Click the Add button
5. Repeat as often as required to create a list of tools which will be triggered
6. Use the U p and Dow n buttons to specify the order in which tools will be triggered
Shortcut key property
Shortcut keys are used to trigger buttons without having to use a mouse. This can be
useful because once you know which keys to press tagging can be much quicker.
To set a shortcut key:
1.
In the properties panel, double-click the property heading Sh ortcu t key
2.
Type a shortcut key
3.
Click the As s ign button. This must be done before clicking OK
© Dartfish. All rights reserved.
- Version 6 -
Tagging Video
173
As you can see here; more than one shortcut key can be assigned; and any combination
of keys can be used e.g. 'S' might be used for a home team shot and 'ctrl+S' might be used
for an opposition shot.
8.3.13 Using variable keywords
A simple macro can be used to generate a variable keyword or category for a tagging tool.
Syntax
$(Item_ID.property)
Limitations
Only keyw ord and category properties can be set with a macro. The exception to this is
the Filen am e Tem plate Bu tton which can also have its Filen am e tem plate property set.
Only a Player L is t Selector can be the source and only its category or keyword can be
referenced.
Example 1 - Personalized event buttons
In the following example, a macro is used to personalize the keyword recorded by the
event buttons:
- Version 6 -
© Dartfish. All rights reserved.
174
Dartfish User Guide
The macro used to record these keywords in the above events list is, for example: Winner
$(TeamListSelector1.Keyword)
Example 2 - Filename Template tool
Continuing the example above, if a filen am e tem plate tool (see the topic The Filename
Template tool) has the following macro for its Filen am e tem plate property:
Semi-final $(TeamListSelector1.Keyword) versus $(TeamListSelector0.Keyword)
New files created by live tagging would be named 'Semi-final Pascal Bingelli versus Serge
Ayer'
8.3.14 Saving Tagging Panels
To save your tagging panel:
Select File>Save (or File>Save As ...) from the menu bar of the Taggin g E ditor panel.
It can be seen from this process that tagging panels are saved as files, stored
independently of Dartfish software and the video file(s) being tagged. Therefore the
important factor in choosing a file name and location for a tagging panel is simply that the
user knows where to locate it.
Because a panel is saved as a file it can be easily distributed to other tagging users,
however the following items should also be distributed if they have been used in a panel:
1. The tagging database - if a team manager tool has been used a database file will have
been created with the same name and in the same location as your tagging panel. It
will have the following icon:
2. Image files - any images included on your tagging panel are referenced as external files
© Dartfish. All rights reserved.
- Version 6 -
Tagging Video
8.4
175
Tagging video
In essence, the basic tagging process is simple; you see an event, you click an even t button
then you click keyw ord buttons to add further details. The features that you might find on a
tagging panel are described in this section (see Using tagging panels)
Tagging can be applied in the following ways:
1.
Tag L ive - use this mode if you want to tag the action directly from a video stream,
either as it happens or from a tape recording (play back mode). In either case you will
be tagging and capturing video to your hard drive simultaneously.
2.
Tag Video Clip - use this method if the video clip is already on your computer. In this
case, your task is to playback the video clip, locate an event and tag.
3.
M ixed taggin g - you do not always have time to fully and accurately define events as
they happen, or you may miss events. In this case, you are able to combine Tag live
and Tag Video Clip by playing back the video clip and editing/adding events after the
game.
The result is a list of E ven ts (displayed in the E ven ts L is t, see The Events List) which can be
played individually or in sequence.
Events can also be "automatically" created by importing them from "character separated
value" (csv) files created by other applications, e.g. sport specific statistical tools or the
Dartfish Easytag App for iPhone and iPad (see Importing events ).
8.4.1
Using tagging panels
Opening panels
Access to tagging panels is described in the topic The Tagging Panel.
Tagging tool and feature summary
Below is a summary of tagging tools that may be found on a tagging panel. However,
Dartfish tagging panels are highly variable and versatile, if the use of the tagging panel you
use is not obvious it may be necessary to ask for instruction from its creator.
E ven t bu tton - clicked once to create an event with a fixed duration. Default color red.
Con tin u ou s even t bu tton - appearance identical to event buttons but when clicked, it
remains activated until clicked a second time. Used to tag events of unknown duration such
as possession or phases of play.
Keyw ord bu tton - keyword buttons add addition keyword to events. They are not used to
create events. Default color blue.
- Version 6 -
© Dartfish. All rights reserved.
176
Dartfish User Guide
Pers is ten t keyw ord bu tton - appearance identical to keyword buttons but when clicked, it
remains activated until clicked a second time. Used to add a keyword to many events. Must
be activated before events are created and remains active until clicked a second time.
Text box - a persistent keyword tool which adds of a variable keyword to events as they
are created.
Score pan els - a persistent keyword tool which adds the current score to events as they are
created.
Team m an ager - Displays a variable set of tagging buttons in a Team Group Box according
to which team and players are selected. Has buttons to enable addition of teams and
players.
Player L is t Selector - adds a persistent keyword based on the player selected.
Tab grou p box - used to simplify the layout of a panel by grouping related buttons together.
Click the tab to see the buttons; often selection of a tab is automated by the action of
another button.
Zon e tool - records the coordinates of where the image is clicked. Can be either used for
© Dartfish. All rights reserved.
- Version 6 -
Tagging Video
177
event creation or keyword addition.
File name template tool - used to set the filename of recordings made during live tagging.
8.4.2
Tag Video Clip mode
Use this mode to tag video file already existing in the library - it has been imported from the
camcorder or other storage media. Tag video clip mode is selected by clicking the button at
the top left of the video display.
Tagging a video clip principally consists of these steps:
1. Loading all the video clips to be tagged into the Tray (see the topic The Library in the
Tagging workspace section)
2. Selecting Tag Video Clip mode
3. Finding the relevant position on the video clip (see below).
4. Tagging an event in the video clip by clicking on an event button on the tagging panel.
5. Adding further keywords to that event by clicking on keyword buttons.
Finding the relevant position
Compared with L ive taggin g where events must be created in real time and in order,
tagging a video clip allows the user greater flexibility. There are many ways to quickly
navigate the video clip find the positions where events take place:
Drag the playh ead to quickly position the video clip. Watch the time information next to
the playhead as you drag it. It can help you position the video if you approximately
know when an event took place.
Use the s peed con trol to fast-forward and/or fast-rewind the video. To do this, set the
speed to values greater than 1 (or -1 for fast-rewind) and play the video. Whenever
you see an event, either click on an event button or pause the video first, and then
select the appropriate buttons to tag the event.
Position the playhead to a previously tagged event and continue tagging from there.
- Version 6 -
© Dartfish. All rights reserved.
Dartfish User Guide
178
The way to do this depends on the tagging mode being used:
In Tag Video Clip mode, click the event once to move the playhead to the start of that event
In Play Events mode, double click the event then switch back to Tag Video Clip mode to
continue tagging. The playhead remains at the position of the selected tagged event.
When the action is too fast to tag as the video plays, the video can be quickly paused
by tapping the space bar on the keyboard. Now add tags before tapping the space bar a
second time to resume playback.
8.4.3
Tag Live mode
Tag live mode allows you to tag while recording video from a live video stream. This allows
tagging to take place during the game and be ready for analysis immediately afterward.
Tag live mode is selected by clicking the button at the top left of the video display (see The
Video Panel).
The Tag live interface
The interface is identical to the Video Recorder interface: Read the section Video Recorder:
get video from DV tape camcorders in the Video L ibrary chapter to learn how to use it.
Tag live process:
1.
Click the Record button. The video clip starts being captured to your hard disk.
The live feed is displayed in the Video Panel. Use the tagging panel buttons to tag
events as they happen. In tag live mode it is not possible to tag without firs starting to
record.
2. Tag an event by clicking an event button on the tagging panel.
3. Add further keywords to that event by clicking on keyword buttons.
4.
Click Pause Recording (optional). You may wish to use this during parts of the
competition of no interest to you; half time, injury stoppage, gaps between competitors
etc.
5.
Click Resume Recording (optional), to continue recording. Note that the pause/
resume recording does not create a new video clip.
6.
Click Stop Recording at the end of the game. A new clip is saved on your hard
drive and a thumbnail appears in the Tray.
It takes practice before you are able to accurately tag all events as they happen.
Start simply by tagging "important" events without adding too many additional values.
Read the section Review & edit events to see how you can edit and/or add events after
they have taken place.
If tagging from the replay of a tape, a set of controls allowing control of the video camera
appear on the video display.
© Dartfish. All rights reserved.
- Version 6 -
Tagging Video
8.4.4
179
Using the Team Manager
Adding teams and players
Adding players and teams to the Team M an ager is not completed in the tagging panel E ditor
but after the tagging panel has been created and saved. Buttons at the bottom of the
Team M an ager allow you to (left to right) add/remove teams and players from the team
manager.
You may want to create more than one team if you tag several teams or squads but at
least one team must be created before adding players. After adding teams and players,
their properties (such as team/player name) may be altered by clicking the
to the item to be edited.
button next
Selecting players
Players are selected/deselected by 'ticking' the box next to their name. If the box is ticked,
a button representing the player will appear in the team group box linked to this player
manager control.
Philippe has been ticked, so…
… a button representing him appears in the team group box
8.4.5
Using keyboard shortcuts
Using the keyboard to activate tagging tools can be much more efficient than using the
mouse. Buttons which have a keyboard shortcut display it below the label; it is used simply
by pressing the keys indicated.
Keyboard shortcuts only work when the tagging panel is active. Look for a green line at
the top of the panel and if the line is red, click anywhere on the panel to activate it.
Score panels can also have keyboard shortcuts but they are not displayed - the tagging
panel's creator can advise you.
8.4.6
Manual tagging
Manual tagging is used to divide a video clip into a series of sequential s egm en ts ; the start
of each new s egm en t defines the end of the previous one.
E ven ts can be added to segments to identify moments within them. Markers belong to the
event in which they are situated and inherit keywords and duration from it. In effect, there
is a hierarchy where videos are tagged with segments and segments are tagged with
- Version 6 -
© Dartfish. All rights reserved.
Dartfish User Guide
180
events.
Typical use
Manual Tagging can be useful to anyone who needs to divide a video into sequential
segments. It is particularly intended for those who require a hierarchy of video content on
dartfish.tv.
To understand its intended use it may help to know its origins: Basic Tagging was created
for The City of Lausanne Council to distribute video of council meetings on dartfish.tv. The
segments are of each session and events are used to identify minuted details. However,
Basic Tagging has obvious applications as a simple tagging tool for many other situations.
Creating Events
1. Click the tagging panel's Select button and choose M an u al Taggin g from the menu
2. Click the N ew Segm en t tab of the tagging panel
3. Enter a label and a description. This information is used to describe the event when
published to dartfish.tv
4. Events are defined by adding categories and keywords to the table. One event can be
defined by many keywords.
5. When the event is fully described, click the Add button to create the event in the E ven ts
lis t.
6. Repeat steps 3-5 to add further events. Each event added alters the previous event's
duration so that each event ends as the next begins.
Creating Markers
1. Click the N ew M arker tab of the scene tagging panel
2. Enter a label and a description. This information is used to describe the marker when
published to dartfish.tv
3. Markers are defined by adding categories and keywords.
4. When the marker is fully described, click the Add button to create the marker in the
E ven ts lis t.
8.5
Importing events
You can create events by importing them from a .csv (character separated value) file
provided that, when imported, the data contains a column of time-stamps representing the
position of each event.
This will be useful to the following groups:
Those using the Dartfish EasyTag App for the iphone, iPad and iPod. EasyTag allows
you to create events using a similar tagging panel to those in Dartfish software, then
export the results as a .csv file.
Those sports that already use data logging software which creates statistics but does
not relate the event to video or allow visual analysis. If this software can create a CSV
file then the results can be imported into Dartfish.
To import events
1.
Pause the video or set the cue in to an easily distinguishable moment in the video.
Doing so will simplify the synchronization of data and video. This can be one of the
following possibilities:
© Dartfish. All rights reserved.
- Version 6 -
Tagging Video
181
The moment representing zero time on your imported data. For example, if you
started your EasyTag timer at the start of the game, pause the video or set the
cue in at that point.
An easily identifiable tagged event
2.
Select Im port E ven ts ... from the Im port/E xport button located in the E ven ts lis t toolbar.
3.
Locate and open the .csv file. The Import Events wizard then opens.
4.
Choose the delimiters which separate each column of data in the imported file. If
unsure, experiment with the various choices remembering that more than one delimiter
might be used. The data preview will reveal when your data is successfully separated
into columns.
5.
Select which column in your data corresponds to Pos ition . Optionally, columns
representing the du ration and n am e category can also be selected if the data contains
them.
6.
Select the time format used in the imported data. The preview shows the original data
in brackets next to the time interpreted by Dartfish according to the selected time
format. For example, EasyTag creates timestamps in the format hh:mm:ss; if this
format is not selected the times shown in the position and duration columns will be "0"
or appear very obviously wrong.
7.
Decide which categories and events to import by ticking or unticking the headings at
the top of each column and side of each event.
- Version 6 -
© Dartfish. All rights reserved.
Dartfish User Guide
182
8.
8.5.1
Select how the imported data is to be synchronized with video. The method depends
on the choices made in step 1 and are described below.
Synchronizing imported events
Imported data is synchronized with video by specifying a time in the timeline of the
imported data and then offsetting that to a matching position in the video denoted by one
of the following: the start of the video clip, the Playh ead position, the Cu e-in m arker
position. Consider the following examples:
Synchronizing the zero time of data with video
The simplest case to synchronize is when the timer of Easytag or your data logging
software is started at an easily identifiable moment that is shown in the video. For
example, the kick-off in a soccer game as illustrated below:
To synchronize data in this case:
1. Before import set the Playh ead or Cu e-in marker to the video position where the timer
started (unless video recording started synchronously with the timer).
2. During import leave the data position at 00:00:00 and select which video position that
corresponds to.
© Dartfish. All rights reserved.
- Version 6 -
Tagging Video
183
Synchronizing an imported event with video
In the case that time zero for the imported data is unknown or otherwise not possible to
identify on the video, you can synchronize the position of an event with video. To import
synchronized events:
To synchronize data in this case:
1. Before import set the Playh ead to the position of the event that you will use for
synchronization.
2. During import select the event in the data
3. Select data offset of the selected event from the drop down list (see below)
4. Select the Playh ead option for video position.
Synchronizing events after import
Synchronizing events, or adjusting synchronization, after import can offer more versatility
than synchronizing during import. For example, it is possible to give a different offset to
different types of event.
How to adjust position and duration of events is described in the topic Editing event timings
Synchronizing modifies the time stamp for all events. It is therefore important that the
time coding on your data remains comparable with that of the video. This means that if you
- Version 6 -
© Dartfish. All rights reserved.
184
Dartfish User Guide
pause the Easytag or data logger timer during time-outs you also have to simultaneously
pause video recording or vice versa. If you record the game as multiple video files you will
have to import the events of each file as separate imports. For convenience it is best to
record both video and the timing of events continuously and for as long as reasonably
possible during the game.
8.5.2
Quick Import
Qu ick Im port is a tool allowing you to quickly repeat an import using exactly the same
settings as previous imports.
To use Quick Import, proceed as follows:
1. Set the Playhead or Cue-in marker to an offset position. Remember that the same
offset settings will be used as previous imports.
2. Select Quick Import... from the Import/Export menu located in the Events list toolbar.
3. Locate and open the .csv file.
4. The data is imported.
If Quick Import is used when no previous imports have been made then the full Im port
E ven ts options will be displayed (see the topic Importing events).
8.6
Review & edit events
Play E ven ts mode is used to review and edit tagged events. To use play events mode you
click the Play E ven ts button on the m ode bar above the video display.
If it is not already displayed you also need to open the E ven ts L is t by clicking the E ven ts
L is t button
8.6.1
on the view s bar above the video display .
Selecting events from the Events List
Selecting and playing events
Sin gle click selects the clip - use the playback controls to play it.
Dou ble click selects and plays the clip.
Sorting events
Events may be sorted by clicking any of the category headings.
List Overlapping
Remember that events can overlap. For example, in soccer a shot at goal event will overlap
© Dartfish. All rights reserved.
- Version 6 -
Tagging Video
185
with a goalkeeping event. This button displays events that overlap with the currently
selected event.
Selecting multiple events
By selecting more than one event you can indicate which events in your events list you
want to play, edit or delete. Selecting several events is possible by the following methods:
8.6.2
1.
Select several isolated events – hold down the control [ctrl] key on the keyboard and
click each event in turn.
2.
Select a group of sequential events – click the first event in the group then hold down
the shift key and select the last event in the group.
3.
Select all events – click any event and then use the keyboard shortcut ctrl + A
Editing the event
Editing keywords
An event's keyword information can be added to or changed in 2 ways:
Method 1: Use the tagging panel – when an event is selected in the events list, its
keywords may be changed using the tagging panel's keyword addition tools.
Method 2: Click the right mouse button while pointing at the keyword to be changed and
choosing E dit from the quick menu. A new keyword may be typed or selected from a list.
Selections of multiple events can be edited simultaneously using either of these
methods
8.6.3
Editing event timings
To edit position and duration using the time line
The following method allows you to make modifications by selecting a start and finish point
for the event in reference to the video.
1.
Activate the M axim ize play ran ge function in the Timeline to zoom in on the event.
2.
Click on an event in the E ven ts lis t. The event corresponds to the play ran ge; the pale
blue area between the Cu e In and Cu e Ou t point.
- Version 6 -
© Dartfish. All rights reserved.
Dartfish User Guide
186
Drag the Cu e In and Cu e Ou t points to modify the event's position and duration.
M axim ize Play Ran ge view immediately readjusts making it appear that nothing has
changed but note the new position or duration displayed in the E ven ts lis t.
To edit position and duration using the events list
1. Select the events to be modified.
2. Click the right mouse button while pointing at the duration of one of the selected
events and choosing E dit from the quick menu.
3. Edit the existing time or type a new one.
4. Press the enter key to confirm the change
It is not necessary to enter a new duration in the full time format displayed. Simply
entering the value '10' would set the duration to 10 seconds.
To adjust timings using the events list
The video position of a single event can be modified as described above but when timing of
position or duration require adjustment it is possible to add or subtract time in the following
way:
1. Select and edit events as described previously
2. Key a + or - in front of the new value depending on whether time is to be added or
subtracted
For example, entering +5 would add 5 seconds to the selected times; entering -1:30 would
remove 1 minute 30 seconds; and entering +1:25:00 would add one hour and twenty-five
minutes.
If unsure about how to apply the correct time format, simply edit the existing value
and place a + or - in front.
8.6.4
Hiding unused categories
The E ven ts L is t continues to display categories used by previous tagging projects even if
they are not used by the current tagging session. The categories may be removed from the
events list by:
1.
Right clicking any column heading, and
2.
Choosing Res et colu m n s from the quick menu that appears.
© Dartfish. All rights reserved.
- Version 6 -
Tagging Video
8.6.5
187
Reviewing events and video during live tagging
When using Tag Live mode it is possible to replay video while continuing to record. This will
allow you to:
Tag events that were missed and edit incorrectly tagged events
Review the action to make informed coaching decisions during the game
To review video
1.Click and drag the Playh ead to the position on the time line you wish to review.
2.The recorded video plays from this point but the video display controls can be used to
control playback frame-by-frame etc
To review an event
1. Click the event in the Events List to select it
2. The Playhead jumps to the start position of the event on the Timeline
It is not possible to enter Play E ven ts m ode while continuing to record
Returning to viewing live
The Live tagging video display controls has a Live button which returns the playhead to the
end of the timeline i.e. the live view
8.7
Filtering and viewing statistics
Tagging will typically result in a long list of events. Locating particular events or analyzing
their frequency using the events list alone would be a difficult task. There are three
methods for searching for events:
Table filter
The table filter cross-references two keyword categories resulting in a matrix of
frequencies. This can be used both to filter and to generate statistics. The table search is
described in the following topic.
- Version 6 -
© Dartfish. All rights reserved.
188
Dartfish User Guide
Simple filter
The events list toolbar has a simple filtering tool which displays events based on an
inputted value.
The results of the simple filter can be further refined using the Keyw ord filter.
Keyword filter
The search pane is located on the left side of the E ven ts lis t and gives access to both the
keyword search and the table search. To execute a keyword filter
1. Select the Keyword tab of the search pane
2. Click a keyword to select it. The events list immediately displays events matching the
selection.
3. Select additional keywords by holding down the ctrl key as keywords are clicked.
When keywords within the same category are selected they behave as an AND search but
when selected from different categories an OR search is the result. The following example
would show shots off goal and on goal by player Lemma.
Combined filter
The results of the simple filter and the keyword filter combine.
For example, the keyword search above could also be carried out in the following way:
© Dartfish. All rights reserved.
- Version 6 -
Tagging Video
8.7.1
189
The table search
The search pane is located on the left side of the E ven ts lis t and gives access to both the
keyword search and the table search. To create a table search:
1. Select the Table tab of the search pane
2. From the drop down lists at the top of the pane, choose the two categories to cross
reference.
3. A frequency matrix is created as shown below.
Filtering using a table search
Clicking each figure and heading of the resulting table filters the events list to match your
selection
8.7.2
Undo searches
Searches reduce the event list to displaying only search results. To see all events, click the
s h ow all button above the events list.
- Version 6 -
© Dartfish. All rights reserved.
Dartfish User Guide
190
8.8
Producing & sharing tagging resources
Having tagged a video you may want to share that work with others. It is easily possible
to share:
Game video complete with tags
Individual events - as separate video clips or as a compiled highlights video.
The even ts lis t - can be exported as a .CSV file
The taggin g pan el - tagging panels are saved as files. To give others access to your
tagging panel, simply give them the file. They use the Create E ven ts pane to open the
tagging panel.
Dartfish offers the possibility to publish to a range of outputs including CD/data DVD and
online to your own FTP site or to Dartfish TV; our own media sharing platform (see www.
dartfish.tv). To get a more comprehensive view of publishing from Dartfish see the Dartfish
outputs - publishing & sharing chapter.
8.8.1
Sharing game video
There are two possibilities depending on whether you want to share tagged or untagged
video
1.
Share Video Clips from the Tray the .dartclip file for each clip. The dartclip contains
events list data so this is the best method to share video with other Dartfish users. Of
course you can also Sh are match video with non-Dartfish users but if you want them to
see tagged events it would be better to use the method below. Learn more about
sharing video clips from the Tray and all the possible output destinations in the
Publishing and Sharing chapter.
When dartfish.tv is chosen as a sharing destination, video but not events are
shared.
2.
Publish from the E ven ts L is t - send video and events to Dartfish TV where it can be
viewed by all who have access to your channel.
© Dartfish. All rights reserved.
- Version 6 -
Tagging Video
191
To publish game video to Dartfish TV
1.
Load game video(s) into the Tray.
2.
Filter for and/or select the events to be published with the game video (optional).
3.
Click the Pu blis h bu tton on the E ven ts L is t toolbar.
4.
Select Pu blis h gam e... The Publishing Wizard opens.
5.
Publishing Wizard step 1 - select dartfish.tv as the publishing destination.
6.
Publishing Wizard step 2 - login to dartfish.tv and select the channel and collection.
Collections are defined by your channel administrator and cannot be created or
modified from Dartfish software.
7.
Publishing Wizard step 3 - video selection
Choose which of the Tray's contents are to be shared.
8.
Publishing Wizard step 4 - select which events are to be displayed with the published
video. Filtering or selecting in step 2 may make this easier.
9.
Publishing Wizard step 5 - content categorization
Some categorization will be done based on the keywords assigned to video (see
Organizing your Library in the Library chapter). In this step you can add further
keywords to help others find videos that you publish. Some information is mandatory
as defined by the channel administrator.
- Version 6 -
© Dartfish. All rights reserved.
192
Dartfish User Guide
10. Publishing Wizard step 5 - define publishing options:
© Dartfish. All rights reserved.
- Version 6 -
Tagging Video
193
Here you can define:
What is viewed on the Dartfish TV platform - rather than the full video a shorter
trailer can be played to help viewers decide what to download.
What quality of video is available for download - it is possible to define a higher
quality for offline viewing.
Attachments - the tagging panel, a statistics analysis spreadsheet or any file can
be attached and downloaded with the video.
To use tagged video downloads from dartfish.tv (dartfish users)
Dartfish users can use tagged video from Dartfish.tv. To do this:
1. Download the video clip from dartfish.tv from the downloads section of the video
document
2. Download the .dartclip data file from the attachments section to the same folder as the
video.
3. When the video is opened in Dartfish tagging, the events will appear in the events list
To use tagged video downloads from dartfish.tv (non-dartfish users)
Non-dartfish users can download tagged video but should use the download to Dartfish
Player option to be able to view events off-line.
8.8.2
Publishing events
Events can be shared independently of the entire game video in 3 ways:
1. Publish them as individual video clips - a selection of events can be directly burned to
CD or published as new video clips. Then you might insert the newly created video clips
into video editing software to create motivation video with transition effects and music.
Or they can be loaded in the Tray, saved as a Playlis t and are ready to be presented to
your team. The presenter only needs to know the basic playback functions of the Player.
2. Publish a highlights movie to Dartfish TV - a compilation movie of selected events which
can be viewed by all who have access to your channel.
3.
Export them to the Analyzer Storyboard - here they can be annotated and published
using the powerful tools of the Analyzer. This is explained in detail in the topic
Storyboard.
To Publish events as new files
1.
Select events in the E ven ts list and click the Pu blis h E ven ts button. Multiple selections
can be made by holding down the CTRL key while clicking each event.
2.
Select Pu blis h E ven ts ...
Video clips can be published to three different destinations, as illustrated below:
- Version 6 -
© Dartfish. All rights reserved.
Dartfish User Guide
194
1.
M y Com pu ter - a new video clip of each selected event is created. Video quality can be
left unchanged (applies to .wmv, .avi and .mpeg video settings).
In the last step of the wizard, you have the option of generating a Playlist of the
newly created video clips. Select a destination directory, enter the name of the Playlist
and click on the Save button. A Playlist with the file extension *.playerproject is
created. It contains links to the new video clips. You can open this Playlist in the Tray
and present it to your team using the Player.
2.
Recordable CD or DVD or E n h an ced Recordable CD or DVD - selected clips are burned on a
CD. Read Sharing video files in the Video L ibrary chapter to learn about these two
destinations.
To publish a highlights movie on Dartfish TV
1.
Perform a search to Select events in the E ven ts list and click the Pu blis h E ven ts button.
Multiple selections can be made by holding down the CTRL key while clicking each
event.
2.
Select Pu blis h H igh ligh ts ... to launch the H igh ligh ts Pu blis h in g W izard.
3.
Wizard step 2 - Select which videos you wish to share. "Check" those to be shared as
shown below or click the Select All button:
4.
Wizard Step 3 - provide additional information to aid those browsing your channel or
performing keyword searches for similar movies:
© Dartfish. All rights reserved.
- Version 6 -
Tagging Video
195
Keywords are searchable terms that link movies of similar types on your channel. The
tagged keywords for each event are used as keywords so it is only required to provide
additional keywords.
5.
Wizard step 4 - Attach related documents and define offline viewing preferences.
Some channels allow download of video for viewing offline. Set what quality of video is
to be used remembering that higher quality will take additional storage space and
encoding time.
- Version 6 -
© Dartfish. All rights reserved.
Dartfish User Guide
196
Attached documents can be any file you wish to be associated with the video. They
are downloaded with video files.
This is the final step before processing and upload of files to Dartfish TV.
8.8.3
Adding notes to events
Text notes can be added to events. To do this, proceed as follows:
1. Click the event with the right mouse button
2. Select Properties from the quick menu
3. Edit the notes section of the general tab
Using event notes will be principally of interest to contributors to dartfish.tv where notes
will be easily viewable as event marker notes.
8.8.4
Storyboard
Storyboard - selected events can be "transferred" to the An alyzer module and analyzed as
any other Storyboard item. In many ways the Analyzer's Storyboard is the best
presentation and publishing tool for the following reasons:
Analyzer zoom and drawing tools can be used to help illustrate and explain.
The Storyboard can be presented using the remote control in the same way as the
events list. But with the advantage that a selection of many events from different
searches can be compiled in the storyboard.
The Analyzer offers additional outputs such as the Mediabook and Analysis Recorder.
To add events to the Storyboard:
1. Select events in the E ven ts list and click the Storyboard button .
.
2.
Select the range of events to be exported.
Each selected event creates a new storyboard item. The process of selection and adding
events can be repeated until the Storyboard contains all the events to be presented. See
An analyzer project - the Storyboard in the An alyze perform an ce chapter to learn more.
© Dartfish. All rights reserved.
- Version 6 -
Tagging Video
197
Remember that a storyboard's contents can be saved to allow recall at a later date.
8.8.5
Exporting events
To export events:
1. Select events in the E ven ts list
2. Click the E xport E ven ts ... option of the Im port/E xport button
3. Select the range of events to be exported.
Your selection is exported in a CSV file which can be opened in spreadsheets and
databases to analyze statistics and create graphs. You can also use such files as backup
copy of your tagging work. Such a file can be imported later and re-synchronized to the
video (see Importing events).
- Version 6 -
© Dartfish. All rights reserved.
Chapter
IX
Displaying metadata from
external devices
200
9
Dartfish User Guide
Displaying metadata from external devices
Dartfish's Analyzer and InTheAction modules support the display of data from other
software applications. For example, timing devices, heartrate monitors or power
measurement devices that use sensors linked to software can use Dartfish's Metadata
toolkit to send the processed data to Dartfish Software. Such metadata adds to the
interpretation of video images by relating them to the effort of the performer.
Throughout this tutorial, the term "metadata" will refer to data (in a broad sense)
generated by entities external to Dartfish Software and captured by Dartfish Software
while capturing a video clip. Examples of such metadata are heart rate, speed, etc.
It is assumed here that you are already familiar with the use of InTheAction (see xxx)
and the Analyzer (see xxx).
To display metadata on Dartfish video images need to:
Activate advanced options supporting metadata capture and display.
Use the InTheAction module to capture metadata streams while capturing related
video images.
Link drawings superimposed on video displays to metadata values.
Use the Analyzer module to replay previously captured video with related
metadata.
This tutorial covers how to do this and additionally how the Drawing Libraries can be
used to make the display of metadata. You will also learn how to display metadata
values graphically next to video images.
9.1
Support for metadata in Dartfish Software
For data from external software and devices to be displayed in Dartfish it is obviously
not as straightforward as connecting the device
Metadata can be captured and displayed. These tasks are performed using 2 modules:
InTheAction module, for capturing video clips and metadata synchronously.
Analyzer module, for displaying metadata and performing some analysis.
Apart from these 2 modules, there is no support for metadata. For example, it is not
possible to display metadata with the Player.
In these 2 modules, the metadata features are enabled by advanced settings that are
available in the "Options" dialog (Advanced Options).
© Dartfish. All rights reserved.
- Version 6 -
Displaying metadata from external devices
9.2
201
Setting Advanced Options
To use (capture and display) metadata in Dartfish Software, 5 advanced options can
be enabled. These 5 options are devided into 3 groups:
Metadata group - Capturing, saving and displaying metadata (not in the video).
Metadata overlay group - Using overlays on the video to display metadata on the
video.
Overlay drawing repository - Enabling Drawing Library for defining several video
overlays that can be selected during video capture.
In Dartfish Software, these different options are accessed in the "Advanced" tab under
"Options" menu item in "Tools" menu ("Options" dialog can also be directly accessed by
depressing the "F3" key). These options are shared amongst the "Analyzer" and the
"InTheAction" modules.
The figure below depicts the different options as they are displayed in the "Options"
dialog (they have been highlighted in the picture):
- Version 6 -
© Dartfish. All rights reserved.
202
9.2.1
Dartfish User Guide
Analyzer Advanced Options
Load embedded drawings - this option allows the analyzer to load the drawings (if
any) that have been saved with a video clip during its capture. If this option is
disabled, the Analyzer will only load the video (and possibly the metadata if the
"Display metadata viewer..." option is enabled). In order to save drawings with a video
clip, the advanced option "Save currently selected overlay drawing with the video clip"
must have been enabled in the InTheAction (ITA Advanced Options) prior to saving
the clip.
Display metadata viewer for allowing metadata analysis – this option belongs to
"Metadata group" and must be enabled for the Analyzer module to display the
metadata graph under the videos.
9.2.2
InTheAction Advanced Options
Receive, record, and save metadata - this option enables the InTheAction module
to receive, record, and save metadata with the video clip.
Save currently selected overlay drawing with the video clip – when enabled, the
drawing that is currently displayed in Live or Replay mode is saved with the video clip
at the end of the capture when the user saves the video clip. The drawing can later
be automatically loaded and displayed in the Analyzer (if the "Load embedded
drawings" option is enabled).
Use Drawing Library – the Drawing Library stores up to nine different collections of
clip drawings (see specific section later in this document). When this option is
enabled, the library is used for managing the drawings in the InTheAction module. T his
opt ion a lso displa y s a ddit iona l t ools on t he InT he Ac t ion le ft t oolba r.
9.2.3
Section summary
In this section you have learned which options you need to activate to be able to
display metadata. You are now ready to capture metadata and video images
simultaneously using DartFish's InTheAction module.
9.3
Capturing & displaying Metadata with the InTheAction
The InTheAction module is used for recording Metadata (it is currently not possible to
use the DVImport module to record Metadata). The "Receive, record and save
metadata" advanced option must be enabled (Advanced Options).
When receiving external data, the InTheAction module automatically creates a data
source stream for each received data stream. These data source streams are created
automatically as the data is received. This has the following important consequence:
no da t a sourc e st re a m s a re a v a ila ble unt il Da rt fish Soft w a re ha s re c e iv e d som e da t a.
The current values of the metadata streams can be displayed in InTheAction's Live
© Dartfish. All rights reserved.
- Version 6 -
Displaying metadata from external devices
203
mode (see Displaying Metadata in Live Mode). Even if the metadata is not displayed on
the video in Live mode, the metadata streams are nevertheless recorded with the
captured video clip but only if t he a dv a nc e d opt ions for re c ording t he m e t a da t a ha v e
be e n e na ble d for the InTheAction module (ITA Advanced Options).
9.3.1
Checking that Metadata is received
The list of data source streams and their properties can be displayed in InTheAction.
Select the "Manage metadata repository" menu item in the left ITA toolbar as
follows:
Note: if this menu is not displayed in the left toolbar, you have to enable it in the
advanced options (see InTheAction Advanced Options).
The following data source list dialog is displayed showing the different data sources
and their metadata streams.
The content of this dialog content is not automatically refreshed. When this dialog is
left opened and new metadata streams are detected by Dartfish Software, you must
depress "Refresh" button to update the dialog list view (or close the dialog and
reopen it).
In this example, 2 data source streams have been received: "Heart Rate" and "Spin
Amount". The "Heart Rate" data stream has integer values (e.g. 123, 150). The "Spin
Amount" data stream has float values (e.g. 12.34, 0.34E-2).
- Version 6 -
© Dartfish. All rights reserved.
204
Dartfish User Guide
All data source streams that are displayed in the DataSource List dialog are recorded
with the video clip. Currently, it is not possible to select which data source stream will
be recorded with the video.
If no data source streams are displayed this indicates that the Dartfish Software has
not received any data yet.
The list of received metadata streams is not saved when quitting Dartfish Software.
9.3.2
Displaying Metadata in Live Mode
Metadata stream values in the InTheAction module are displayed with overlay drawings
that are drawn on the video image.
First check that data source streams have been detected (as explained in Checking
that Metadata are received in InTheAction).
Switch the InTheAction module to Live mode.
Select the Source drawing (usually this is the default setting):
Depending on the type of data contained by the data source stream, you must
select the appropriate drawing tool. For integer values, select the "Text" drawing
tool. For float values, select the "Text" or "Graph" drawing tools. For vectors with
origin (Vector6) data type, select the "Force Meter" drawing tool:
Note: if this menu is not displayed in the left toolbar, you have to enable it in the
advanced options (see Advanced Options).
Note: drawings can be resized on the screen using different handles that depend on
© Dartfish. All rights reserved.
- Version 6 -
Displaying metadata from external devices
205
the type of drawing. "Force Meter" drawings also offer a yellow handle for resizing
the length of the displayed moving arrows.
Draw on the video using one of the drawing shapes selected in the previous step.
Select the shape and right click on it to display a popup menu.
Select the menu item "Metadata Properties..." as below:
If this menu item is grayed, no data source streams are available or no compatible
data source streams are available.
The following dialog is then displayed:
To assign a data source stream to the current drawing, click on "Linked to the
following Metadata source" option button and select the targeted data source
stream using the 3 list boxes. If the "Linked to the following metadata source" option
button is disabled (grayed) then it is not possible to assign a data source stream to
the drawing (there are no compatible data source streams currently available).
- Version 6 -
© Dartfish. All rights reserved.
206
Dartfish User Guide
The drawing shape displays the value of the linked metadata stream. For example, a
"Text" drawing displays a value and a graph drawing displays a graph.
9.3.3
Section summary
In this section you learned how to capture metadata with a video clip. This metadata
can be displayed in the Live mode by linking drawings to the metadata stream.
The next section will cover how to use the Analyser module to display metadata on
previously captured video and display metadata graphically.
9.4
Using Metadata in the Analyzer
The Analyzer module is used for observing and comparing stored video clips and their
recorded metadata. When a clip is opened in the Analyzer, any recorded metadata can
be displayed in a graphic view as below:
The tree view on the left side of the graphic view and its associated small tool bar are
described in the following chapters.
When multiple clips containing metadata are opened, the metadata corresponding to
each clip is displayed in the graphic view. Each graph is color-coded with the
corresponding color of each clip's timeline. For example, the yellow graph corresponds
to the yellow clip in the timeline.
© Dartfish. All rights reserved.
- Version 6 -
Displaying metadata from external devices
207
The graph part of a video clip is synchronized with its timeline. For example, in the
graphic view above, shifting the yellow timeline to the left will also move the yellow
graph.
9.4.1
Displaying Metadata diagrams
Metadata stream values can be displayed in the Analyzer module as a graph
synchronized with the timeline:
Proceed as follows to display metadata graphs in the Analyzer:
Enable the "Display metadata viewer for allowing metadata analysis" advanced option
(Analyzer Advanced Options).
Display the graph part by clicking on the graph button on the Analyzer left toolbar
(by default the graph part is hidden):
Note: if this button is not displayed in the Analyzer left toolbar, you must enable
some advanced options (Analyzer Advanced Options).
Open a video clip in the analyzer. Any metadata previously captured with the
InTheAction module is displayed in the graph part of the analyzer under the timeline.
The different buttons in the graph toolbar alter the way the graph is displayed.
The
button displays simple statistics such as min, max and average values. The
In and Out points act as delimiters for these calculations.
The
button displays the data value corresponding to the value at the cursor
position in the timeline on the top right corner of the graph. (e.g. –9.72 and –2.00 in
the picture above).
- Version 6 -
© Dartfish. All rights reserved.
208
Dartfish User Guide
The
button displays the name of the currently displayed metadata stream in the
top left corner of the graph (e.g. "Channel 1" in the picture above).
The
button toggles between single or multiple clip display. When multiple clips
are simultaneously opened in the Analyzer, the graph can display the metadata from
a single clip or from multiple clips. In this latter case, the each clip's metadata curve
is the color of the corresponding clip's timeline. . For example, the data curve
corresponding to the clip that has the yellow timeline is displayed in yellow. In single
clip mode, the user can switch between the different graphs for each clip by
selecting the clip in the Analyzer (usually done by clicking directly on the targeted
clip video).
The
button switches between "superimposed" or "separate" mode when multiple
clip curves are displayed. This feature is only useful when graphs from several clips
are simultaneously displayed. In the "superimposed" mode, the graphs of the
different clips are superimposed on each other.
In the "separate" mode, the graphs are displayed as separate graphs, each in its
own display area.
The
button toggles between the "all clip" and "single clip" data stream browse
mode. These 2 modes alter the way data source streams are selected in the tree
view to the left of the graph.
The graph is fully synchronized with the timeline. So, if one of the clip is moved on
the left by dragging its timeline on the left (by click and dragging the yellow
© Dartfish. All rights reserved.
- Version 6 -
Displaying metadata from external devices
209
timeline), the corresponding graph is also moved accordingly. The graph is also
zoomed in and out as the timeline is zoomed in and out.
9.4.2
Displaying Metadata on the Video
Proceed as previously explained for the InTheAction - Displaying Metadata in Live
Mode.
9.5
Using the Drawing Library
The Drawing library is a source for different collections of drawings that can be
displayed on video clips. To use it, it must be enabled in the InTheAction advanced
Options. It is used to store and recall different sets of drawings which can be used to
assist with analysis and removes the need to redraw. Strictly speaking, the library is
not linked to any metadata features but it can be used to memorize the position of
drawings that can be later linked to metadata streams.
The Drawing Library allows the following features:
Define sets of drawings that are saved (persisted) between each session in Dartfish
Software - All the drawings in the Drawing Library are saved when the user quits
Dartfish Software. The next time the user launches Dartfish all the drawings in the
library are immediately available as soon as the InTheAction module is enabled.
Switch between the different collections of drawings --- a collection of drawings
can be directly selected using the list box in the InTheAction left toolbar. It is also
possible to map a remote control key for switching between the different groups of
drawings.
Manage the different groups of drawings by creating or deleting them. In future
versions of Dartfish Software it will also be possible to export or import the groups of
drawings between different Dartfish computers.
The Drawing Library can contain up to 9 different templates.
9.5.1
Managing Overlay Templates
The Drawing Library content is displayed by selecting the submenu item "Manage
Drawing Library" as follows:
The following dialog is then displayed:
- Version 6 -
© Dartfish. All rights reserved.
210
Dartfish User Guide
All the currently available overlay templates are displayed in a list. The currently
displayed overlay template is marked with the red/yellow icon on its left side ("Overlay
#1" in the example above). The name of each overlay template is displayed in the
"Name" column. With the current version of Dartfish Software, it is not possible to
rename an overlay template.
Clicking the "New" button creates new empty overlay templates. At most 9 of these
overlay templates can be created. The name of the newly created overlay is
generated automatically.
Clicking the "Delete" button deletes the currently selected overlay template(s).
Multiple selection of overlay templates is possible using the usual methods (clicking
template names while combining shift and control keys). The currently displayed
overlay template cannot be deleted.
9.5.2
Selecting the current Template
When the overlay template library is enabled (InTheAction Advanced Options), the
drawings that are displayed in InTheAction's Live mode are saved to the currently
selected overlay template. This will be the template indicated in a list box on the left
toolbar as shown below:
The currently selected overlay template can be changed by selecting an alternative
from the list box as follows:
© Dartfish. All rights reserved.
- Version 6 -
Displaying metadata from external devices
- Version 6 -
211
© Dartfish. All rights reserved.
Chapter
X
Dartfish Readers
Dartfish User Guide
214
10
Dartfish Readers
A Reader translates external device data into a format that can be "understood" by Dartfish
software. Each different device requires a custom reader which is used to link/unlink video
files to data files generated by external devices. Once linked, you'll be able to synchronize
the data stre am s and video in the Analyzer and to view both simultaneously using the
Data Graph . Drawing tools can be used to display data on the video image itself.
The following sections give you more information based on the Reader product you have
installed on your computer.
Useful links:
Dartfish info : www.dartfish.com
Support : [email protected]
10.1
Dartfish CSV Reader
D artfish C SV Re ade r is an add-on product to the TeamPro and ProSuite Dartfish editions.
It is used to link/unlink video files to data in ch aracter s eparated valu e (CSV) text files. More
information about the file types supported can be found here.
Once linked, you'll be able to synchronize the data stre am s and video in the Analyzer and
to view both simultaneously using the Data Graph . Drawing tools can be used to overlay
data on the video image itself.
The CSV Reader reads a data sou rce file. You can link several data sources to one video.
For example, d ata files from a heart rate monitor and a force transducer could be linked
to the same video clip.
Useful links:
[email protected] - for questions related to the Dartfish CSV Reader.
10.1.1 Requirements and installation
To use the CSV Reader, you will need:
Dartfish TeamPro or ProSuite version 4.5 or higher.
Microsoft .NET framework 2.0 (automatically installed during the installation).
Installation from CD
To install the Dartfis h CSV Reader, proceed as follows:
1.
Insert the Dartfis h Data Reader installation CD into your CD or DVD drive.
2.
Wait for the installation window to launch. If the installation window does not launch
automatically, open Windows Explorer and locate the drive. Once you have selected
the CD, double-click on the setup.exe file. For example, if your CD/DVD drive is classified
under the letter E: you will double-click on E:\setup.exe.
© Dartfish. All rights reserved.
- Version 6 -
Dartfish Readers
3.
215
Follow the instructions on the screen. When prompted, you must accept the licence
agreement before the installation can proceed.
Activating a Data Reader
After installation each Data Reader must be activated. It is possible to use a Data
Reader for a trial period then activate it at a later date.
To activate a Data Reader, proceed as follows:
1.
Right click a video file in the Tray or in the Item s L is t and select Link External Data from
the context menu. All readers awaiting activation are listed.
3.
Select the reader to be activated.
4.
Click the Activate button.
5.
Follow the instructions on screen. The reader can be activated immediately and
automatically using an internet connection. When this is not practical you can manually
apply for an activation code: The process will generate a page of information that you
can email or fax to Dartfish. You will be sent an activation code that you must manually
enter.
The activate process requires that you provide your licence code. This will have
been provided with your software purchase and is different from the code for your
Dartfish Software or any other readers you have purchased.
Updating Data Readers
Data Readers are not automatically updated by the same process as Dartfish software. If
and when updates become available, those who have purchased a Reader will be notified
by email. Alternatively, updates can be dowloaded from the Dartfish website.
Video tutorials will give you useful guidance on how to use your CSV Reader. They can
be accessed from the Start > Program s > Dartfis h > CSV Reader menu.
10.1.2 About CSV data
The Dartfish CSV Reader can read a wide range of text file formats provided the following
conditions are met:
1.
The data can be separated (parsed) into columns which are delimited by a text
character (tab, comma, semi colon, space etc)
2.
The resulting table has no more than one row of column headers.
Where condition 2 is not met, it is usually possible to open, parse and edit a text file in a
spreadsheet program such as Microsoft Excel. By this method data can be rearranged and
extra headings removed. The edited data should be saved as a .csv file rather than a
spreadsheet file.
The source
This Reader names the source by the file name of the CSV file. Optionally you can input a
source name of your choice.
The streams
The CSV Reader parses character separated data into columns, each of which
represents a different da t a st re a m . You are able to select which of these columns
- Version 6 -
© Dartfish. All rights reserved.
216
Dartfish User Guide
you wish to link to Dartfish.
10.1.3 Linking Data
A Reader "translates" data from a file. Such a file is called a Data Sou rce and is created by
or exported from a device external to Dartfish (refer to the manufact urer's documentation to
learn how to do this). A Data Source may contain multiple Data Stream s as illustrated in the
following figure. The data streams are listed under the headings of their data sources:
Caden ce, H eart rate, Pow er, Speed and Tim e are Data Stream s
10.1.3.1 Linking Data
You can create links between one video clip and more than one data s ou rce. To establish a
link, right-click a video file in the Tray or in the Item s L is t and select Link Data Streams
from the context menu.
© Dartfish. All rights reserved.
- Version 6 -
Dartfish Readers
217
A Wizard first prompts you select a Reader from a list of installed readers.
- Version 6 -
© Dartfish. All rights reserved.
218
Dartfish User Guide
In the second step you will browse for the data file.
© Dartfish. All rights reserved.
- Version 6 -
Dartfish Readers
219
A standard Open File... window pops up. Search for the Data Sou rce file in your hard drive
and click Open.
In the next step you parse the Data Sou rce and define how the Data Stream s are linked.
This is described in the rest of this chapter.
- Version 6 -
© Dartfish. All rights reserved.
220
Dartfish User Guide
10.1.3.2 CSV document properties
In the Configuration step of the wizard you will define the parameters of the Data Sou rce
and set which columns are to be linked as Data s tream s . The first part of the Configuration
step defines the properties of the Data Sou rce.
Data Source name - This is the name used to identify the Data Sou rce when using linked
© Dartfish. All rights reserved.
- Version 6 -
Dartfish Readers
221
data in Dartfish or managing Data Sources etc. By default the file name of the Data Sou rce
File is used but you can enter your own name or select a name which combines the file
name with the current date.
Separator - It is essential that your data is successfully parsed before continuing. To do
this, select the character used to delimit the columns of your Data Sou rce. A range of
commonly used separator characters is offered but it is also possible to type any character
or combinations of multiple characters. If you are not sure which character has been used,
experiment by selecting different characters; when successful you will see your data
divided into separate columns as shown below:
Use first row as headers - where data has a header row you must tick this option to
prevent the headers being treated as data. If your Data Sou rce has more than one row of
headers you must delete or merge the extra rows. You can do this by editing the file with
text editor software or a spreadsheet such as Microsoft Excel.
Hide comments starting with - the Data Source may contain text comments. Often these
are marked by a specific delimiter. Exclude such comments by typing the delimiter character
used.
Manually set the file encoding - Dartfish automatically selects the file encoding used but if
necessary you can manually choose from a selection of text encoding types.
10.1.3.3 Time Stamp
The CSV reader must be able to relate each piece of data in a Data Stream to a position in
the video. There may be a column of time stamp data in the Data Source but where this is
not the case, a time stamp can be added at a fixed interval.
Using data from the Data Source as the time stamp
1.
Select the option "Data Source" from the Select th e tim e s tam p s ou rce list box.
2.
From the Select th e tim e colu m n list box, select the column from the Data Sou rce that
contains time values.
3.
Select the Tim e Form at or units used. It is essential that the reader understands how
to interpret time stamp data. For example, if the time stamp is "100" does this
- Version 6 -
© Dartfish. All rights reserved.
222
Dartfish User Guide
represent 100 seconds or 100 milliseconds?
Using Interval or Frequency as the time stamp
The reader can create a time stamp at a fixed interval (seconds or fractions of a second) or
at a fixed frequency (Hertz). This is useful if time stamps do not exist in the data source or
are not in a time format recognisable by the reader. The use Interval or Frequency time
stamp sources, Data Stream samples must be at regular, fixed intervals.
10.1.3.4 Selecting columns as Data Streams
The Data Sou rce may contain many columns of data that you will not wish to link to video.
You must indicate those that you want to link by selecting them as shown below:
Dis tan ce an d s peed are th e s elected s tream s
When you select a column, you will be prompted to set attributes for the data stream.
Name - This is the name used to identify the Data Stream when using linked data in
Dartfish. By default the column heading from the data source is used but it can be changed
to a value of your choice. In the example above "xdist [ m]" will be replaced by "Distance".
It is particularly important to set a name property for the Data Stream when no meaningful
header is present in the Data Sou rce
Type - Select either Number or Text. By selecting "Text", numbers will be treated as text
and Dartfish will not attempt to plot them on the Data Graph.
Unit name - This is a descriptor of the values of data in this data stream. It is displayed in
the video clip Properties or in the E xtern al Data M an ager.
© Dartfish. All rights reserved.
- Version 6 -
Dartfish Readers
223
After setting these attributes they can be changed by right-clicking the column heading.
10.1.3.5 Managing links
To manage links between video files and Data Sou rces , right click the video file in the L ibrary
. Select M an age th e data s tream s ... from the context menu.
Removing the link
You can remove the link between the data source(s) and the video file. To do this, select
the data s ou rce and click on the U n lin k button.
It is not possible to remove a single stream of a data source.
Broken links
A link can be broken when the external data source file has changed location on the disk or
has been renamed. It also happens when the video clip is shared and opened on a
different machine. As a result, the data cannot be displayed in the Analyzer any longer.
To check for broken links right click the video file. Select M an age th e data s tream s from the
context menu. Select the data source and its properties are visible on the right hand panel.
If the link is broken the Availability property will read Sou rce M is s in g.
- Version 6 -
© Dartfish. All rights reserved.
Dartfish User Guide
224
To correct a broken link, click the Relin k button then browse for the new location of the data
source. Synchronisation of data and video is retained provided that the Dartclip metadata
file has also been moved to the new location of the video file (see Sharing Data for further
information about Dartclip files).
10.1.4 Viewing data
Dartfish's An alyzer M odu le is capable of displaying Data Stream data in 2 ways:
1.
Text drawings, graph drawings and other specialist data drawings can be linked to
data streams such that values can be displayed on the video image. Numerical data
can be displayed with the Text and the Graph drawing tools, while text can only be
displayed with the Text drawing tool. Below is an example of what it might look like.
Notice the symbols left to the data: These symbols are letters of the Dartfis h Sym bol
font (see Drawings for more information).
2.
Using the Data Graph panel each n u m be r data s tream is represented as a different
curve. The curves can be synchronized with the video.
The Data Graph and Graph drawings can only display integer and floating point
numbers. For example, times in the format hh:mm:ss etc will be treated as text and cannot
be displayed. If you wish to graph times (e.g. split times) then you must first edit the Data
Source to represent times as numbers.
© Dartfish. All rights reserved.
- Version 6 -
Dartfish Readers
225
10.1.4.1 Synchronization
You can quickly synchronize the data streams and the video in the Data Graph pane of the
An alyzer, as illustrated below:
To synchronize, proceed as follows:
1.
Move to an appropriate position in the video clip.
2.
Activate the synchronization mode by clicking on the Res yn ch button
3.
Align the streams to the playhead (green arrow in the illustration) by click & drag of the
streams to the left or to right.
4.
Click a second time on the Res yn ch button once done.
To synchronize precisely, you should position the video to a distinct instant where you
might expect to see an obvious change in the data graph e.g. when the athlete starts
pedaling. This can be easily matched, for example, to the cadence stream (see illustration
above).
10.1.4.2 Drawings
The data can be directly overlayed on the video image in the An alyzer. This is done by
linking drawings to data from a Data Stream . The following is a representative but not
comprehensive list of drawing tools that can be linked to data. Different devices will
produce data which can be best represented by different types of drawing:
Text tool: Use to display any value from a Data Stream. Using the Dartfish symbol font,
the text tool can also be used to display data specific icons to label values (see below).
Graph tool: Use to represent numerical data as a graph.
Force Meter: Use to represent the magnitude and direction of a force (typically for
devices producing this type of data).
To link a drawing to a data stream (example using Te xt drawing):
1.
Use the Text drawing tool to create a small text drawing. The text you type to create
the drawing is not important e.g. "xxx". Be sure to finish editing the text before
proceeding to the next step; to do this click on the video display outside the drawing.
- Version 6 -
© Dartfish. All rights reserved.
Dartfish User Guide
226
2.
Right click on the drawing to display the context menu.
3.
Select the E xtern al Data Dis play... option.
4.
Select the Data Sou rce and Data Stream then click the OK button.
5.
The text box now displays the value of the selected data stream.
Don't forget to synchronise to make sure the displayed values have proper meaning.
Displaying Dartfish explanatory symbols
The Dartfis h CSV Reader provides the Dartfis h Sym bol font which you can use with the Text
tool of the An alyzer or In th e Action modules. Using this you can substitute long names with
self-descriptive symbols. See the Table 1 for the key mapping.
Key
© Dartfish. All rights reserved.
Symbol (character)
Description
- Version 6 -
Dartfish Readers
S or s
Speed
P or p
Power
C or c
Cadence (pedals)
H or h
Heart rate
227
The Dartfis h Sym bol font is automatically installed with the Dartfis h CSV Reader.
10.1.5 Sharing linked data
In order for others to see linked data you have two options:
1.
You can publish a movie from the Analyzer. This will include drawings that have been
added to the video clip - including those displaying Data Streams.
2.
You can share the video file and the Data Sou rce with other Dartfish users. Although
the recipient will need to re-establish the link using their own CSV reader,
synchronization is retained.
10.1.5.1 Publishing
You can publish the video with overlayed data from the An alyzer (see Saving movies from
the Analyzer to learn how to do this) as illustrated below:
In this case, the result is a video that can be shared in your team. It does not require
Dartfish to play it.
You cannot embed the data in the video file (i.e. in the .dartclip metadata file associated
with the video clip). The Dartfis h CSV Reader only creates a "live" link between both the
data and video files.
10.1.5.2 Sharing data
The Dartfis h CSV Reader does not embed data in the video file (i.e. in the .dartclip file
associated with the video clip). It only creates a "live" link between the data and video
files. Therefore if you wish to share video and linked data with other Dartfish users the
following are required:
The recipient must have Dartfish Software
- Version 6 -
© Dartfish. All rights reserved.
228
Dartfish User Guide
The recipient must have the Dartfish CSV Reader add-on.
You must provide the video clip, the Data Source file and (optionally) the Dartclip file as
shown below.
The recipient establishes a link using the Relin k function described in Managing links.
Dartclip files store all additions made to video by Dartfish. These include details of
external data links and synchronisation. If the Dartclip file has not been shared then the
recipient must create a new link between the video clip and Data Sou rce.
10.2
Dartfish SRM Reader
D artfish SRM Re ade r is an add-on product to the TeamPro and ProSuite Dartfish editions.
It is used to link/unlink video files to data files generated by the SRM training system. Once
linked, you'll be able to synchronize the data stre am s and video in the Analyzer and to
view both simultaneously using the Data Graph . Drawing tools can be used to display data
on the video image itself.
The SRM Reader reads a data sou rce from the *.srm files generated by the SRM training
system. You can link and synchronize several data sources to one video. For example, you
could film two cyclists in the same video and synchronize the data recorded with two SRM
systems (mounted on both bicycles).
Useful links:
www.srm.de - for more information on SRM.
[email protected] - for questions related to the Dartfish SRM Reader.
© Dartfish. All rights reserved.
- Version 6 -
Dartfish Readers
229
10.2.1 Requirements and installation
To use the SRM Reader, you will need:
Dartfish TeamPro or ProSuite version 4.5 or higher.
Microsoft .NET framework 2.0 (automatically installed during the installation).
Installation from CD
To install Dartfis h SRM Reader, proceed as follows:
1.
Insert the Dartfis h Data Reader installation CD into your CD or DVD drive.
2.
Wait for the installation window to launch. If the installation window does not launch
automatically, open Windows Explorer and locate the drive. Once you have selected
the CD, double-click on the setup.exe file. For example, if your CD/DVD drive is classified
under the letter E: you will double-click on E:\setup.exe.
3.
Follow the instructions on the screen. When prompted, you must accept the licence
agreement before the installation can proceed.
Activating a Data Reader
After installation each Data Reader must be activated. It is possible to use a Data
Reader for a trial period then activate it at a later date.
To activate a Data Reader, proceed as follows:
1.
Right click a video file in the Tray or in the Item s L is t and select Link External Data from
the context menu. All readers awaiting activation are listed.
3.
Select the reader to be activated.
4.
Click the Activate button.
5.
Follow the instructions on screen. The reader can be activated immediately and
automatically using an internet connection. When this is not practical you can manually
apply for an activation code: The process will generate a page of information that you
can email or fax to Dartfish. You will be sent an activation code that you must manually
enter.
The activate process requires that you provide your licence code. This will have
been provided with your software purchase and is different from the code for your
Dartfish Software or any other readers you have purchased.
Updating Data Readers
Data Readers are not automatically updated by the same process as Dartfish software. If
and when updates become available, those who have purchased a Reader will be notified
by email. Alternatively, updates can be dowloaded from the Dartfish website.
Video tutorials will give you usefull guidance on how to use your SRM Reader. They can
be accessed from the Start>Program s >Dartfis h >SRM Reader menu.
- Version 6 -
© Dartfish. All rights reserved.
230
Dartfish User Guide
10.2.2 SRM data
Dartfis h SRM Reader retrieves the data from SRM files. The SRM training system includes a
Powermeter and a Powercontrol to record biodata held in SRM files (*.srm). Thanks to this
system, cyclists can record the power, the heart rate, the cadence, the speed and other
data deriving from them.
The source
This Reader names the source by the initials of the person set in the Powermeter and the
date of the training.
The streams
Five streams are fed:
the Pow er developed on the crank in [watts]
the Caden ce of the crank [rpm]
the Speed of the cycle [km/h]
the H eart rate of the athlete [bpm]
the Tim e of the day at which the training session happened [hh:mm:ss.xxxx]
10.2.3 Linking Data
The SRM reader establishes a link between a video file in your Dartfish L ibrary and an SRM
file. This D ata Sou rce file is created by SRM software. A Data Sou rce typically contains
multiple Data Stream s as illustrated in the following figure. The data streams are listed
under the headings of their data sources:
Caden ce, H eart rate, Pow er, Speed and Tim e are Data Stream s delivered by an SRM
training system.
© Dartfish. All rights reserved.
- Version 6 -
Dartfish Readers
231
The link cannot be established if one of these components is missing, i.e.
Dartfish SRM Reader has to be installed.
You already have imported your video clips into your Dartfish Library
You have exported a data file from your SRM device to your hard drive (refer to the manufact
urer's documentation to learn how to do this).
10.2.3.1 Linking Data
You can create links between one video clip and more than one data s ou rce. To establish a
link, right-click a video file in the Tray or in the Item s L is t and select Link External Data
from the context menu.
A Wizard first prompts you select the SRM Reader from a list of installed readers.
- Version 6 -
© Dartfish. All rights reserved.
232
Dartfish User Guide
In the second step you will browse for the data file.
© Dartfish. All rights reserved.
- Version 6 -
Dartfish Readers
233
A standard Open File... window pops up. Search for the data file in your hard drive and click
Open.
Before completing the Wizard you have the option to link other files to act as Data Sources
for this video.
10.2.3.2 Managing links
To manage links between video files and data sources, right click the video file in the L ibrary
. Select M an age E xtern al Data... from the context menu.
Removing the link
You can remove the link between the data source(s) and the video file. To do this, data
source and click on the U n lin k button.
It is not possible to remove a single stream of a data source.
Broken links
A link can be broken when the external data source file has changed location on the disk or
has been renamed. It also happens when the video clip is shared and opened on a
different machine. As a result, the data cannot be displayed in the Analyzer any longer.
To check for broken links right click the video file. Select M an age E xtern al Data from the
context menu. Select the data source and its properties are visible on the right hand panel.
If the link is broken the Availability property will read Sou rce M is s in g as shown below.
- Version 6 -
© Dartfish. All rights reserved.
Dartfish User Guide
234
To correct a broken link, click the Relin k button then browse for the new location of the data
source. Synchronisation of data and video is retained provided that the Dartclip metadata
file has also been moved to the new location of the video file (see Sharing data for further
information about Dartclip files).
10.2.4 Viewing data
Dartfish's An alyzer M odu le is capable of displaying Data Stream data in 2 ways:
1.
Text drawings, graph drawings and other specialist data drawings can be linked to
data streams such that values can be displayed on the video image. The power, the
cadence, the speed and the heart rate can be displayed with the Text and the Graph
drawing tools, while the time can only be displayed with the Text drawing tool. Below is
an example of what it might look like.
Notice the symbols left to the data: These symbols are letters of the Dartfis h Sym bol
font (see Drawings for more information).
© Dartfish. All rights reserved.
- Version 6 -
Dartfish Readers
2.
235
Using the Data Graph panel each stream is represented as a different curve. The
curves can be synchronized with the video. Since the data graph can display integers
and floating points but not text, only the power, the cadence, the speed and the heart
rate are displayed.
10.2.4.1 Synchronization
You can quickly synchronize the data streams and the video in the Data Graph pane of the
An alyzer, as illustrated below:
To synchronize, proceed as follows:
1.
Move to an appropriate position in the video clip.
2.
Activate the synchronization mode by clicking on the Res yn ch button
3.
Align the streams to the playhead (green arrow in the illustration) by click & drag of the
streams to the left or to right.
4.
Click a second time on the Res yn ch button once done.
To synchronize precisely, you should position the video to a distinct instant where you
might expect to see an obvious change in the data graph e.g. when the athlete starts
pedaling. This can be easily matched, for example, to the cadence stream (see illustration
above).
- Version 6 -
© Dartfish. All rights reserved.
Dartfish User Guide
236
10.2.4.2 Drawings
The data can be directly overlayed on the video image in the An alyzer. This is done by
linking drawings to data from a Data Stream . The following is a representative but not
comprehensive list of drawing tools that can be linked to data. Different devices will
produce data which can be best represented by different types of drawing:
Text tool: Use to display any value from a Data Stream. Using the Dartfish symbol font,
the text tool can also be used to display data specific icons to label values (see below).
Graph tool: Use to represent numerical data as a graph.
Force Meter: Use to represent the magnitude and direction of a force (typically for
devices producing this type of data).
To link a drawing to a data stream (example using Te xt drawing):
1.
Use the Text drawing tool to create a small text drawing. The text is not important e.g.
"xxx". Be sure to finish editing the text before proceeding to the next step; to do this
click on the video display outside the drawing.
2.
Right click on the drawing to display the context menu.
3.
Select the E xtern al Data Dis play... option.
4.
Select the Data Sou rce and Data Stream then click the OK button.
© Dartfish. All rights reserved.
- Version 6 -
Dartfish Readers
5.
237
The text box now displays the value of the selected data stream.
Don't forget to synchronise to make sure the displayed values have proper meaning.
Displaying Dartfish explanatory symbols
The Dartfis h SRM Reader provides the Dartfis h Sym bol font which you can use with the Text
tool of the An alyzer or In th e Action modules. Using this you can substitute long names with
self-descriptive symbols. See the Table 1 for the key mapping.
Key
Symbol (character)
Description
S or s
Speed
P or p
Power
C or c
Cadence (pedals)
H or h
Heart rate
The Dartfis h Sym bol font is automatically installed with the Dartfis h SRM Reader.
10.2.5 Sharing linked data
In order for others to see linked data you have two options:
1.
You can publish a movie from the Analyzer. This will include drawings that have been
added to the video clip - including those displaying Data Streams.
2.
You can share the video file and the Data Source with other Dartfish users. Although
the recipient will need to re-establish the link using their own SRM Reader,
synchronization is retained.
- Version 6 -
© Dartfish. All rights reserved.
238
Dartfish User Guide
10.2.5.1 Publishing
You can publish the video with overlayed data from the An alyzer (see Saving movies from
the Analyzer to learn how to do this) as illustrated below:
In this case, the result is a video that can be shared in your team. It does not require
Dartfish to play it.
You cannot embed the data in the video file (i.e. in the .dartclip file associated to the
video clip). The Dartfis h SRM Reader only creates a "live" link between both the data and
video files.
10.2.5.2 Sharing data
The Dartfis h SRM Reader does not embed data in the video file (i.e. in the .dartclip file
associated with the video clip). It only creates a "live" link between the data and video
files. Therefore if you wish to share video and linked data with other Dartfish users the
following are required:
The recipient must have Dartfish Software
The recipient must have the Dartfish SRM Reader add-on.
You must provide the video clip, the Data Source file and the Dartclip file as shown
below.
© Dartfish. All rights reserved.
- Version 6 -
Dartfish Readers
239
The recipient establishes a link using the Relin k function described in Managing links.
Dartclip files store all additions made to video by Dartfish. These include details of
external data links and synchronisation. If the Dartclip file has not been shared then the
recipient must create a new link between the video clip and Data Sou rce.
- Version 6 -
© Dartfish. All rights reserved.
Index
Index
Convert video
Analysis Recorder
121, 122
capture location
122
clip properties
121
enabling
121
recording device
122
using
123
video settings
122
Analyze performance
72
Analyzer
72
comments
73, 87
display modes
73, 94
drawings
73
play controls
73, 75
playing clips
75
screen
73
storyboard
73, 74
timeline
73
workspace
73
Analyzer project
74
new
76
open...
76
save
76
save as...
76
Aspect ratio
correcting errors
52
-BBackground task manager
44
94
-D-
-C-
Dartfish TV
mediabook publishing
115
Mediabooks
114
publish tagging highlights
193
publishing game video
190
tagging event notes
196
Comments
87
audio
88
written
88
Comparing clips
92
analyzing
96
default synchronization
96
display modes
94
loading
93
synchronizing
94
synchronizing at key positions
Convert
15
Convert in background
© Dartfish. All rights reserved.
50
CSV Reader
214
.Net
214
csv documnent properties
220
Dartfish symbol font
225
data graph
224
drawings
225
external data link
216
force meter
225
graph
224
graph tool
225
hide coments beginning with
220
installation
214
link data streams
216
linking data
216
managing links
223
manually set the file encoding
220
publishing
227
requirements
214
save movie
227
selecting columns
222
selecting data streams
222
sharing data
227
sharing linked data
227
stream attributes
222
synchronization
225
text data
215
text drawing
224
text tool
225
time stamp
221
use first row as headers
220
viewing data
224
-A-
Blend mode
44
Converting clips
converting files in the Library
44
95
Drawing tools
angles
81
automatic tracking
85
clone rectangle
80
data table
87
distances
82
manual tracking
84
picture
80
241
242
Dartfish User Guide
replaying
63
self coaching
68
sound trigger
64
Drawing tools
spline
84
time
83
InTheAction comparing clips
comparing
66
setting reference
66
synchronizing
67
Drawings
adding
78
editing
78
fading in/out
86
properties
79
toolbar
77
InTheAction drawings
67
drawing library
67
-EEasytag
importing events from
180
quick import
184
synchronising imported events
Encoding profile
background task manager
44
encoding during capture
44
Encoding profiles
Export list
33
Keep the original recording file
Filename template tool
Flip horizontally
169
Keyword buttons
76
76
Getting familiar with Dartfish
6
160
-IImporting events
organising data
180
quick import
184
synchronising
182
Interlacing
correcting errors
163
Keywords
29
classifying video clips
31
defining keywords and keyword categories
30
editing categories
30
editing keywords
31
exporting data as CSV
33
importing/exporting keyword sets
33
removing keywords
32
understanding keywords
29
-LLibrary
8, 22
adding folders
importing video
Use for tagging
52
InTheAction
56
capturing
62
instant visual feedback
live delay
68
remote controlling
63
44
Key Positions
88
adding
89
analyzing
90
editing
90
fixed interval
92
importing
91
Mosaic
97
-GGroup box
2
-K-
12
new
12
open...
12
save
12
save as...
12
save movie...
13
Flip vertically
182
InTheAction Settings
56
capture device
56
clip duration
59
clip properties
58
Pre-record buffer
61
pre-record duration
59
recording folder
58
replay sequence
60
two cameras
57
Introduction
15
-FFile
65
62
22
35
150
Library workspace
23
items list
25
items properties
26
© Dartfish. All rights reserved.
Index
Library workspace
toolbar
24
tray
28
save movie
116
tagging video
190
23
-R-
Live tagging
naming files
169
Recording Duration
Video Recorder settings
Locating files
46
by keyword
46
in folders
48
search
47
Recording location
choosing
43
Remote control
18
installing
18
StreamZap
19
-MManual tagging
179
-S-
Mediabook
108
destination
110
preview
113
publishing
113
settings
111
video settings
112
Mediabooks
Dartfish TV
Modules
Save movie
video settings
Score panel
Mosaic
97
activating
98
Drawing
98
Snapshot
98
12
163
Sharing
destinations
8
102
Sharing video
14, 50, 106
Dartfish TV
107
wizard
106
MPEG
encoding during capture
SimulCam
126
conditions
127
44
SimulCam Fixed
126
SimulCam publishing
136
creation
137
destination
137
video settings
136
-PPictures
118
emailing
119
printing
119
saving
118
snapshot
120
SimulCam step 1
128
loading clips
128
synchronizing
128
trimming
129
167
Playlist
49
creating
49
modifying
50
opening
50
Pre-Record
Video Recorder settings
Pre-record buffer
117
Saving files
12
Dartfish projects
new video
13
114
Player list selector
42
61
Publishing
102
analysis recorder
121
destinations
102
game video
190
highlights movies
193
mediabook
108
pictures
118
© Dartfish. All rights reserved.
SimulCam step 2
129
adding alignement frames
checking alignement
132
drag & zoom
130
matched alignement points
42
SimulCam step 3
135
blending mode
135
previewing
135
saving
136
Software registration
Split-screen mode
SRM Data
230
SRM Reader
228
drawings
236
94
3
134
133
243
244
Dartfish User Guide
process of
175
publishing
190
publishing game video
190
publishing highlights movies
193
reviewing video during live tagging
sharing panels
190
sharing video
190
tag live
175
tag live mode
178
tag video clip
175
tag video clip mode
177
team presentation
196
using keyboard shortcuts
179
using tagging panels
175
SRM Reader
228
installation
229
linking data
230, 231
managing links
233
publishing
238
requirements
229
sharing
238
sharing linked data
237
synchronization
235
viewing data
234
Start Page
7
Statistics matrix
189
Storyboard
74
analyzing tagging events
loading clips
74
playing clips
75
saving project
76
StroMotion
196
Tagging database
distribution
174
138
StroMotion Fixed
138
StroMotion step 1
loading clip
139
trimming clip
139
StroMotion step 2
alignment points
140
computing camera movement
StroMotion step 3
panorama reconstruction
140
141
StroMotion step 4
141
clones - creating
142
clones - editing
142
identifying key frames
141
publishing
143
saving
144
Support
3
Synchronizing
94
default synchronization
key positions
95
96
-TTab group box
adding pages
187
160
Tagging
additional analysis
196
automating tagging
171
Definition of tagging
148, 149
export to storyboard
196
importing events
180, 182, 184
manual tagging
179
play events mode
184
Tagging editor
adding tools
156
copying tools
156
deleting tools
156
Event buttons
162
group box
160
keyword buttons
163
keyword macros
173
modifying properties
157
moving tools
156
player list selector
167
properties
169
reset category property
171
score panel
163
tab group box
160
team group box
166, 167
team manager
166
team manager database
166
text box
163
trigger property
171
variable keywords
173
zone tool
163, 165
Tagging events list
adding notes to events
196
analyzing events in a spreadsheet
editing keywords
185
editing position and duration
185
export events
197
features
154
introduction
154
reset columns
186
selecting events
184
sorting events
184
Tagging multiple files
197
150
© Dartfish. All rights reserved.
Index
Tagging panels
creating
155
editing
155
feature summary
175
introduction
152
introduction to
155
manual tagging panel
179
opening
152
planning layout
158
saving
174
selecting
152
use of
175
Tagging search events
show all
189
table search
189
187
Tagging video in real time
178
Tagging workspace
150
Using Tray to load video
150
video panel features
151
Team group box
166, 167
Team manager
166
use of
179
Text box
163
Timeline
10
Tracking
automatic
85
manual
84
Tray
28
Trimming video clips
10
-VVideo Conversion Wizard
Video error correction
52
Video file importer
36
DVD import
38
file destination
37
indexing
38
joining video clips
38
naming files
37
notes
38
Selecting files
36
Video playback
10, 11
controls
11
repeat mode
12
speed
11
Video properties
source info
52
Video Recorder
38, 42
clip properties
40
© Dartfish. All rights reserved.
15
Pre-record
42
recording options
42
recording video
46
setting up capture
39
Video settings
15
Video Sharing Wizard
Video types
usable by Dartfish
14
51
-WWindows Media
encoding during capture
Workspace
resizing
6
9
-ZZone tool
Zoom
options
163, 165
76
44
245