1
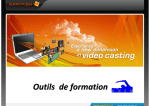
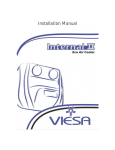
IP CAMERAS & DARTFISH
INTRODUCTION
An IP camera streams video across a network using internet protocols (IP). There are many types of IP cameras offering
a wide range of features and although designed for security or other monitoring purposes, they can offer a practical
solution for live video capture needs with Dartfish. The purpose of this document is to give an overview of the use and
configuration of IP cameras. It is in three parts, the first part to help you to understand the solution, the second part
detailing specifics on the configuration and the third part of further information and troubleshooting
IP CAMERAS & DARTFISH .............................................................................................................................................. 1
Introduction .................................................................................................................................................................... 1
Dartfish support for IP cameras ...................................................................................................................................... 2
IP camera setup SUMMARY ............................................................................................................................................ 3
Power supply to an ip camera ........................................................................................................................................ 4
CAMERA CONFIGURATION ............................................................................................................................................ 5
Configure Dartfish ........................................................................................................................................................... 6
Remote control of pan-tilt-Zoom (PTZ) ........................................................................................................................ 10
TROUBLE SHOOTING ................................................................................................................................................... 12
INSTALLATION / CONFIGURATION FOR AXIS CAMERAS .............................................................................................. 13
Camera access .............................................................................................................................................................. 13
Mandatory steps ........................................................................................................................................................... 13
APPENDIX 1 - DEVICES TESTED BY DARTFISH............................................................................................................... 16
devices tested by Dartfish ............................................................................................................................................ 16
APPENDIX 2 – USEFUL LINKS ....................................................................................................................................... 17
APPENDIX 3 – UPDATES TO THIS DOCUMENT ............................................................................................................. 18
Who is the customer for this solution?
IP cameras are ideal for fixed installations: Stadiums, sports halls, tennis courts, golf driving ranges, classroom
monitoring etc. The camera and cable infrastructure is fixed and all the user has to do is connect his computer to the
network. Because that network might even be a wireless network, one can imagine possibilities that this offers to
Dartfish users. Furthermore, multiple cameras can be connected to the network and the user can pick which he wants
to view/record. Using InTheAction, it is feasible to record from two IP cameras simultaneously because the video
stream is already encoded by the camera.
WHAT IS AN IP CAMERA? It is essentially a box containing a video camera, (optionally) a microphone, and a computer. This
functions as a web server which encodes and delivers a live AV stream using RTP/RTSP protocols and also web pages for
configuration and monitoring using HTTP/HTTPS. You communicate with an IP camera by entering its IP address, e.g.
192.168.0.90, into a browser. Certain models have a motorized mounting which enables remote control over field of view
this is referred to as PTZ (pan-tilt-zoom).
1
Version: September 4, 2013 | ©Dartfish
Simpler use cases such as bike fitting or gait analysis are also candidates, but only where the benefits listed above plus
better lenses and better zoom capabilities, outweigh the low cost and easy connection advantages of other solutions
such as the Microsoft Lifecam webcam.
DARTFISH SUPPORT FOR IP CAMERAS
DARTFISH 7: Cameras complying with the ONVIF standard are supported. Where PTZ is needed the device must comply
with ONVIF version 2.
DARTFISH 6: Axis cameras supported but with limits to functionality (no audio or PTZ). This document only covers use
of ONVIF compliant cameras with Dartfish 7.
WHAT IS ONVIF? The aim of the Open Network Video Interface Forum is to create a global, open source standard which
defines how IP video products are accessed and controlled across a network. The organization was started in 2008 by Axis,
Bosch and Sony. ONVIF is not a video format nor is it a protocol for transporting video across a network.
In theory, Dartfish should be able to record from any ONVIF compliant device. In practice, the implementation of the
standard is variable between manufacturers and we are continuing to learn how to make all function optimally with
Dartfish. All Axis, Bosch and Sony cameras that have been tested work but tweaks to the software were required for
each manufacturer. It can be expected that other manufacturers’ products may also require software updates. It is also
possible that other products from Axis, Bosch and Sony where the firmware has not been tests may also require an
update to Dartfish. As we learn more about how ONVIF is implemented, we can expect a wide range of cameras to
function without any need for software updates.
Dartfish technical support service for IP camera users
Due to the varied and technical nature of networked cameras, Dartfish, regrettably, sets restrictions on the technical
support we can offer:
We can only help with issues related to Axis, Bosch and Sony cameras where the firmware has been tested by
Dartfish (see Appendix 1).
Dartfish cannot support issues around network setup or the ONVIF compatibility of the camera chosen, so we will
only provide support after the user has successfully configured the camera on the network; as checked by ensuring
that the ONVIF device manager can automatically receive a video stream without the need to manually add a
device.
We will only provide support to users who have purchased a DARTFISH PREMIUM SUPPORT PACKAGE. In the case
of a third party vendor or installer seeking help on behalf of a customer who does not have premium support, we
will charge the third party €85/$100 PER HOUR.
2
Version: September 4, 2013 | ©Dartfish
IP CAMERA SETUP SUMMARY
Here is a summary of the process required to setup an IP camera. As the specifics for different devices vary, it is
intended to be indicative rather than a comprehensive checklist. The various steps are explained further in subsequent
sections.
Figure 1: Summary of steps to use IP cameras with Dartfish
3
Version: September 4, 2013 | ©Dartfish
CONNECTING IP CAMERAS TO NETWORKS
The connection to your
computer can be as simple
as a direct cable
connection to your
computer’s ethernet port.
That direct connection can
even be wireless if the
camera is equipped with
Wi-Fi capability.
The connection can be via a
hub (wired or Wi-Fi).
Enabling the possibility to
have more than one
computer connected to
more than one camera
Cameras can be located anywhere on a much
larger network. Remember that if an IP camera
shares a network with other computers or
devices, the bandwidth of the network will be
shared with those devices. That may force
compromises in the video quality or disrupt the
connection. When IP cameras are used for
security purposes, they will often be set up on a
dedicated network to avoid these problems.
Figure 2: IP cameras can be networked in various ways
Creating a simple router based network is within the capabilities of a computer enthusiast. Larger infrastructures, use
of an existing network, or security protection of data are, for obvious reasons, the jobs for a professional.
POWER SUPPLY TO AN IP CAMERA
An IP camera requires a power supply:
A direct power supply is often inconvenient, so it will more usually receive power via its ethernet connection by one of
these alternatives:
Power injector – hardware that connects between the camera and the rest of the network. It is connected to a power
supply. One power injector per camera is required and consideration must be given to the wattage required by the
camera.
4
Version: September 4, 2013 | ©Dartfish
Power over Ethernet (POE) – the camera receives its power from the router or hub to which it is connected. The router
is connected to a power supply. A POE hub which is capable of supplying the wattage demanded by the camera must
be used.
CAMERA CONFIGURATION
Typically, the initial setup of the camera is done by its web page (see Figure 3), but a dedicated utility may be provided
by the camera manufacturer. Consult the camera user manual on how to access and configure the device.
Figure 3: an example of a configuration page viewed in a browser.
Among the other settings, pay particular attention to the following:
Update firmware
There may be a button or link to do this on the configuration page. Otherwise, the manufacturer’s support website
should be checked to discover if there is an update. Interoperability with Dartfish may depend on this.
Set date and time of camera
This may be important to ensure correct communication between the camera and computer.
Version: September 4, 2013 | ©Dartfish
5
Set sensor base frame rate
The sensor frame rate must be set to the frequency of the AC power supply of your country e.g. 60 Hz for the US and 50
Hz for Europe. Failure to do this may result in poor image quality and flickering video.
FRAME RATE v BASE FRAME RATE: Frame rate is a potentially confusing topic because we must differentiate between the
base frame rate at which the sensor captures images and the frame rate of the video output. Even if the base frame rate is set
to 50 or 60 Hz, it is possible to define a different effective frame rate for the video by modifying or creating a media profile.
CONFIGURE DARTFISH
Enable network camera
01 From the Dartfish Tools menu > Options > Network cameras
02 Select the ONVIF IP Camera then select enable plugin
03 Enter user name and password (if user profiles defined for camera)
Figure 4: enable ONVIF and provide login details in Dartfish settings
The login relates to user profiles created on the camera. Dartfish does not allow the user to login to individual cameras
but instead offers a global login which gives the user access to all the cameras with user profiles with those login
credentials. Of course, setting a login is not required but doing so will enable:
CONTROL OVER WHICH CAMERAS ARE VISIBLE: Imagine several cameras on a network and several Dartfish users.
To restrict an individual user to, say, two of these, set those two cameras with identical login credentials
CONTROL WHO CAN SET VIDEO PROFILES: User profiles with admin rights can use Dartfish to modify the camera’s
video and audio settings using Dartfish. To prevent this, give the user profile viewing rights only.
HTTPS or HTTP?
Selecting the ‘Use HTTPS when available’ option ensures that communication between camera and computer is secure.
However, be aware that:
Not all devices offer HTTPS encryption. Ticking the box here has no effect.
HTTPS does not encrypt video, it only provides secure communication between camera and computer of
information such as login. For those interested, video streaming uses the RTP protocol.
The feature principally exists to facilitate error logging when contacting Dartfish Technical Support
Version: September 4, 2013 | ©Dartfish
6
Selecting a camera to record from
In the Dartfish video recording tool of choice (Importer/Video Recorder, InTheAction, Tag Live). Any available camera
can be selected in the Capture device section of the module. After selecting a camera, buttons to configure video, audio
and (if available) PTZ settings will be displayed next to the selected device.
Figure 5: select device as seen in Dartfish video recorder
NOTE: When using an IP camera, it is not possible to use a different audio source other than the camera. It is possible
to have no audio recorded:
01 Click the CONFIGURE AUDIO button
02 Select the profile that you want to use according to your video requirement (see below)
03 Click the edit button
04 Choose (NONE) for the AUDIO SOURCE property as shown in Figure 6
Figure 6: switching off audio
REMEMBER that audio is switched off on this media profile for ALL users of the camera and not just for the software
where the choice was made so the change may affect other users.
Version: September 4, 2013 | ©Dartfish
7
Configure video properties
In Figure 3 it can be seen how the camera’s configuration page can be used to set video and audio properties. You can
also configure image properties such as shutter speed, exposure time, white balance, etc.
It is also possible to set some common properties from Dartfish software. To configure video properties using Dartfish,
click the configure format icon shown next to the selected device:
Figure 7: video properties selection in Dartfish
This is a generic set of properties defined by the ONVIF standard. Some cameras may not allow certain properties to be
modified by the user e.g. in Figure 7, encoding interval cannot be set.
The optimal/easiest way to define video settings is to choose one of the camera’s pre-defined PROFILES, however, to
meet the bandwidth requirements of your network or particular analysis needs, you may want to create or customise a
profile.
Other video settings (where available) can be modified on the camera’s configuration page
Some or all settings may be unavailable to you if your user profile does not have administration rights
Creating and modifying media profiles affects all other users of the camera
MEDIA PROFILES: Let’s remember that the job of a security camera is different to the needs of video analysis: The provided
media profiles might optimise video encoding for recording for days or months or to allow a property owner to get a live
video feed to their mobile phone when they receive an intruder alert. Neither of these profiles are likely to be suitable for
video analysis. Editing a media profile is a job for someone who understands both the needs of analysis and the implications
for the network because all the various properties work together to influence the bit rate of the video.
ENCODER: H.264 and MJPEG are supported. MPEG-4 is not supported
H.264 offers better image quality/compression ratio but may introduce latency (delay in the ‘live’ image appearing
on the screen).
MJPEG generally provides lower latency but for any given quality, file sizes will be larger
8
Version: September 4, 2013 | ©Dartfish
FRAME RATE/ENCODING INTERVAL: For technical analysis we often want the highest possible frame rate so you should
be aware that media profiles can use both these properties to define the effective frame rate i.e. the frame rate at
which the device is encoding and delivering frames to Dartfish. In actual fact, effective frame rate is determined by
three parameters:
01 The capture or base frame rate is the frame rate at which the device sensor is capturing frames. This frame rate
must be configured to the frequency of the power network (50Hz or 60Hz)
02 The frame rate property of the video stream
03 The encoding interval property which determines the frequency at which frames are sent to the encoder. e.g. If the
base frame rate = 60 fps and encoding interval = 2, 30 frames will be encoded per second.
To configure the effective frame rate, some devices use the frame rate parameter, others the encoding interval and
others use both in combination. In the latter case the encoding interval parameter influences the frame rate parameter
e.g. base frame rate = 60, frame rate parameter = 30, encoding interval = 2, effective frame rate = 15 fps.
RESOLUTION: Choose a resolution which allows the level of detail required for analysis. Of course the network
infrastructure which you build must also support the resolution requirement of the video.
QUALITY: Set between 80 and 100%. Quality below 80% is usually not suitable for video analysis.
I WANT THE BEST! Say you want HD video at the highest possible frame rate but this creates video at a bitrate which is too
high. Is there anything that you can do? You could reduce the quality parameter in Dartfish or you could reduce the iFrame
interval parameter in the camera configuration. The principal of iFrame based video encoding is that a GOP (group of
pictures) are encoded based on changes from the iFrame. Since every detail of every frame does not have to be encoded,
the amount of data and hence the bit rate, is reduced. The larger the GOP, the lower the bit rate.
BITRATE: The bit rate property sets a bit rate limit so it is best to configure it to something that is supported by the
network e.g. 5 Mbps for SD video and 8-12 for HD video, then adapt the other settings to provide the best image
quality within the specified bitrate constraint. Frames are dropped if the bitrate property is exceeded.
Configure audio properties
AUDIO ENCODER: G.711 and G.726 codecs are currently not supported. The audio encoder must be AAC.
Edit the media profile to turn audio recording on/off
How to check if the video configuration is appropriate
Just because a video image is seen in Dartfish does not mean that it is a correct video image! The frames per second
(fps) indication shown in the Dartfish status bar (see Figure 8) provides a good indication when there are problems with
the configuration. Here are some examples:
FRAME RATE RECEIVED NOT MATCHING THE FRAME RATE SET: We have discovered that some devices allow you to
configure a frame rate of up to 30 fps, but the camera sensor only provides a maximum of 25 fps. In this case, the user
must configure the frame rate to no more than 25 fps to prevent recording problems.
VIDEO BIT RATE EXCEDING THE CAPACITY OF THE NETWORK: In Figure 8 you can see that the video stream being sent
by the camera is 60 fps but video is being displayed at 32.6 fps. Clearly something is wrong!
9
Version: September 4, 2013 | ©Dartfish
Figure 8: The status bar indicates a disparity between the expected fps and the actual fps
REMOTE CONTROL OF PAN-TILT-ZOOM (PTZ)
Some IP cameras allow remote control of the direction and zoom of the camera. Dartfish provides a PTZ control and a
new tagging panel button which triggers the camera to move to a PTZ preset position. PTZ can also be remote
controlled by hardware controllers provided by the manufacturer.
Figure 9: PTZ button and PTZ control panel
Using the Dartfish PTZ control
01 Modify the media profile to turn PTZ control on.
02 To display the PTZ control, click the PTZ icon next to the selected device.
On the left of the PTZ control (see Figure 9) you see buttons to remote control pan, tilt and zoom and on the right you
can see preset positions. You can create a preset by:
01 Pointing and zooming the camera
02 Click the Save button
03 Enter a name for the preset
The PTZ control can also be displayed by right-clicking the video display.
It is not possible to use the PTZ control while recording with InTheAction – a PTZ preset should be selected in the
‘Setup Capture devices’ screen before proceeding.
10
Version: September 4, 2013 | ©Dartfish
Using a tagging panel to select PTZ presets
This may be useful to quickly point the camera to a particular area of the court, field or pitch. To do this:
01 Create PTZ presets as described above
02 Add a PTZ button to your tagging panel
03 Set the PTZ PRESET NAME property to one of the presets
Figure 10: PTZ presets can be selected using a PTZ move button and defining its PTZ preset name property
You can see from the properties in Figure 10 that a PTZ button can have a keyboard short cut assigned and it can trigger
other tagging panel tools and vice versa. For example, clicking the ‘corner’ button might trigger the PTZ move button
which selects the ‘goal mouth’ preset.
11
Version: September 4, 2013 | ©Dartfish
TROUBLE SHOOTING
Using the ONVIF device manager
The ONVIF device manager is used to verify that your computer is receiving an ONVIF compatible video stream. When it
is launched it should be able to automatically detect the video stream. If a camera has to be manually configured using
the device manager Dartfish will not be able to detect it. Dartfish technical support is not available to any user where
this check has not been successful.
My camera is not listed in Dartfish
First, establish whether the camera is visible on the network. Check the network connection from camera to
computer, that the camera is correctly connected to the network and has an adequate power supply according to
the manufacturer’s recommendations
Download and install the ONVIF Device Manager tool to validate ONVIF compatibility of your device
Check the camera configuration from the device configuration page (refer to the camera user manual)
Check that the login used corresponds to a user profile on the camera
Dartfish displays “E_NOT_AUTH” error
From the device configuration or ONVIF Device Manager, resynchronize the date and time of the device.
Specific info for SONY cameras
Specific advice added as available
Specific info for BOSCH cameras
Specific advice added as available
Specific info for AXIS cameras
See below
12
Version: September 4, 2013 | ©Dartfish
INSTALLATION / CONFIGURATION FOR AXIS CAMERAS
CAMERA ACCESS
Use your internet browser or the Onvif utility and enter your admin login information in order to gain access to the
camera.
MANDATORY STEPS
Synchronize Date & Time
01 Setup -> Basic Setup -> Date & Time
02 Select Synchronize with computer time and click Save.
Define Onvif user
It is mandatory for the Axis camera to have at least one onvif user defined (admin, operator, media user) in order to
access the camera from the Dartfish Software.
03 Setup -> System Options -> Security -> ONVIF
04 To define a new user select Add.
05 Now enter a User name, the Password and define the role. Click Ok to confirm (see image below)
13
Version: September 4, 2013 | ©Dartfish
Firmware update
06 First check the version of your firmware: Setup -> About
07 Now go to the Axis firmware page to check whether there is an updated firmware available.
http://www.axis.com/techsup/firmware.php
Version: September 4, 2013 | ©Dartfish
14
08 Find your camera and download if necessary the corresponding firmware to a folder of your choice (Registration
for Axis might be required).
09 Setup -> System Options -> Maintenance
010 Click Browse and select the previously downloaded file. Hit Upgrade to start the process.
15
Version: September 4, 2013 | ©Dartfish
APPENDIX 1 - DEVICES TESTED BY DARTFISH
DEVICES TESTED BY DARTFISH
Camera
manufacturer
and model
PTZ
Zoom
Max
resolution
Frame
rate
Notes & features
Axis P1344
-
Yes
720p
25/30
5.40.9.5
Axis P1346
-
Yes
1080p
25/30
5.40.9.4
Axis P1354
-
Yes
720p
23/30
5.40.19
Axis P5534
Yes
18x
optical
12x
digital
720p
23/30
5.40.9.2
Axis M5014
Yes
No optical
zoom, 3x
digital
720p
25/30
5.40.11.2
Bosch DINION
HD 720p IVA
-
Yes
720p
50/60
Sony SNCVB600*
-
Yes
720p
50/60
Basler BIP2640c
-
Yes
480p
100**
The Bosch DINION camera delivers 60 Hz in a very
stable and low latency way. This makes this camera a
very good candidate for situations where previously a
firewire DV/HDV camera would be used
firmware
version
39500570
1.5.0
100Hz not effective over IP. Dartfish tests have
shown this camera to operate effectively at 50/60 Hz.
At higher frequencies frame drops occur.
3.11.1
16
Version: September 4, 2013 | ©Dartfish
APPENDIX 2 – USEFUL LINKS
About ONVIF
http://en.wikipedia.org/wiki/Open_Network_Video_Interface_Forum
http://www.onvif.org
http://en.wikipedia.org/wiki/Real-time_Transport_Protocol
http://en.wikipedia.org/wiki/Power_over_Ethernet
About ONVIF profile S
http://www.onvif.org/Portals/0/documents/op/20984_11763r01ONVIF_Members-Profile_S_Specification.pdf
List of profile S compliant products on the market:
http://www.onvif.org/ConformantProducts/ProfileS.aspx
Axis Cameras
http://www.axis.com/fr/products/video/camera/index.htm
Sony IPELA
http://www.sony.net/Products/IPELA/
BOSCH Dinion and Flexidome
http://video.boschsecurity.com/category/video-solutions/1
17
Version: September 4, 2013 | ©Dartfish
APPENDIX 3 – UPDATES TO THIS DOCUMENT
Date
Updated by
Summary of update
23 May 2013
Neil Melville
First release
20 June 2013
Valentin Wegman
Updated list of tested cameras
21 June 2013
Valentin Wegman
Added Basler camera to tested devices list
Added Axis specific setup info
21 June 213
Serge Ayer
Product notes added to tested devices list
04 Sept 2013
Neil Melville
Update to Onvif Device manager test
18
Version: September 4, 2013 | ©Dartfish