1
Exhibio™ Software User Manual
Software Version 3.0.0
December 21st, 2007
Exhibio, LLC
8207 Main St.
Suite 1
Williamsville, NY 14221
Phone: (716) 799-0410
Fax: (716) 210-1053
www.exhibio.com
Exhibio, LLC
Exhibio™ User Manual: Version 3.0.0 Exhibio, LLC Exhibio, LLC
TABLE OF CONTENTS EXHIBIO SETUP ........................................................................................................................................ 1 Initializing ..................................................................................................................................................................................... 1 The Setup Utility ........................................................................................................................................................................... 1 Adding Fonts............................................................................................................................................................................... 10 Future Access to Exhibio Setup .................................................................................................................................................. 11 EXHIBIO MANAGER ................................................................................................................................ 12 Accessing the Exhibio Manager .................................................................................................................................................. 12 System Requirements ................................................................................................................................................................ 12 Hardware .................................................................................................................................................................................... 12 Logging In ................................................................................................................................................................................... 13 Scenes, Panes, Pages .................................................................................................................................................................. 13 Main Page ................................................................................................................................................................................... 15 MANAGE USERS .................................................................................................................................... 16 User Roles ................................................................................................................................................................................... 16 Adding a New User ..................................................................................................................................................................... 16 Edit an Existing User ................................................................................................................................................................... 17 MANAGING SCENES ................................................................................................................................ 18 Adding a New Scene ................................................................................................................................................................... 18 Cloning an Existing Scene ........................................................................................................................................................... 20 Editing an Existing Scene ............................................................................................................................................................ 20 Deleting an Existing Scene .......................................................................................................................................................... 20 MANAGE PAGES .................................................................................................................................... 21 Scene Selection .......................................................................................................................................................................... 21 Design Mode .............................................................................................................................................................................. 22 HTML Mode ................................................................................................................................................................................ 35 SCHEDULING SCENE PLAYBACK .................................................................................................................. 36 The Schedule .............................................................................................................................................................................. 36 Scheduling a Scene ..................................................................................................................................................................... 36 Delete Scheduled Item ............................................................................................................................................................... 37 MANAGE CAMPAIGNS ............................................................................................................................. 38 Campaigns .................................................................................................................................................................................. 38 Accounts ..................................................................................................................................................................................... 39 Add Advertisement to Campaign ............................................................................................................................................... 39 View Campaign Reports ............................................................................................................................................................. 40 MANAGE PANE LAYOUTS ......................................................................................................................... 42 Create New Pane Layouts ........................................................................................................................................................... 42 Edit Existing Pane Layout ............................................................................................................................................................ 44 UPDATE EXHIBIO .................................................................................................................................... 45 APPENDIX A. TROUBLESHOOTING .............................................................................................................. 46 APPENDIX B. END USER LICENSE AGREEMENT .............................................................................................. 48 Exhibio, LLC Exhibio, LLC
EXHIBIO SETUP EXHIBIO SETUP Upon powering up the Exhibio Unit, the Setup Wizard and ‘Exhibio Setup Login’ will appear. You will need to have plugged a keyboard and mouse into the Exhibio unit to continue. Initializing 1.
Enter the Administrator password and click ‘Login’. The factory‐set default password is on a sheet of paper labeled “Read Me First” inside the Exhibio shipping box. 2.
Agree to the End User License Agreement.
The Setup Utility The Setup Utility allows you to manage the Display Resolution, Users & Passwords, Sign Grouping, Date & Time, and Preferences. It also displays the System Information for the Exhibio Unit. Note Altering the Sign Grouping, viewing the System Information, changing the Date & Time, and editing Preferences are optional. After you have selected the Display Resolution, and changed the Administrator User Password you may click the ‘Finished’ button at any time to complete the setup process. Exhibio, LLC 1|Pa g e
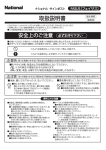
EXHIBIO SETUP Display Resolution 1.
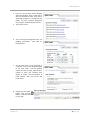
Select the appropriate resolution for your display, and then click ‘Next’. Consult your display’s owners manual to determine the optimal resolution, color bit depth, refresh rate, and aspect ratio. You will typically want to choose a resolution with the same aspect ratio as your display to avoid having your content appear stretched out. Tip 16:9 aspect ratio is also known as ‘Widescreen’ and is used by all plasmas, most HDTV’s and most LCD displays. Important Selecting a resolution lower than 800x600 will trigger a Windows error message. DO NOT allow Windows to change the displays resolution outside of the Exhibio Setup Utility. Users & Passwords 1.
Change the Administrator and Exhibio User Passwords. Important These user accounts should ONLY be changed from the Setup Utility and NEVER changed by using Windows built‐in tools and wizards. If any changes are made outside of the Setup Utility, the Exhibio unit may not function properly. 2 | P a g e Exhibio, LLC
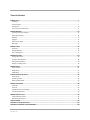
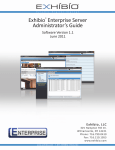
EXHIBIO SETUP Sign Grouping This section describes how to group two or more Exhibio Units together. Signs need to be grouped if you wish to clone Exhibio Scenes between them. Find Signs 1.
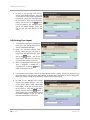
Begin by clicking the ‘Find Signs’ button. A dialog box will appear allowing you to scan the network and find other Exhibio Units. Click the ‘Start Scanning’ button. When all of the systems are found, click ‘Stop Scanning’. Select each unit you want to add to the group and click on the ‘Add Checked’ button. 2.
Once you have added your groups, you can edit the name of each Exhibio Unit by highlighting the sign, and then selecting the ‘Edit’ button. Exhibio, LLC 3|Pa g e
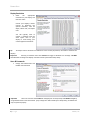
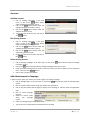
EXHIBIO SETUP Add Signs 1.
If you already own an Exhibio Unit and want to add it directly, click on the ‘Add…’ button. You will need to type in the sign’s name and URL. Important By default, your Exhibio IS NOT accessible over the Internet. It is only accessible from within your LAN (Local Area Network). Making the unit accessible from the Internet requires a specific modification to your network configuration by your network administrator or consultant. For grouping functionality to work outside of your LAN, your network must be configured to allow access to the Exhibio’s web server from the Internet. 2. Then click on the ‘Verify URL’ button. This will verify that the location is an Exhibio Unit and can be grouped. 4 | P a g e Exhibio, LLC
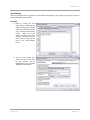
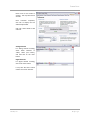
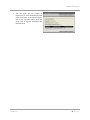
EXHIBIO SETUP System Information Write down the network IP address of your unit. This is the address you will input into your web browser to access the Exhibio Manager. Date & Time Set your time zone, the current date and time. Exhibio, LLC 5|Pa g e
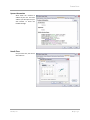
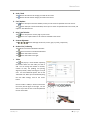
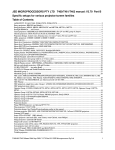
EXHIBIO SETUP Preferences From the Preferences section, you can enable Automatic Logon to avoid having to type the Exhibio user password at system startup. For troubleshooting purposes, you may also check ‘Enable Detailed Error Messages’. If you would like to see thumbnail images of your scenes in the Exhibio Manager, keep the ‘Enable Preview Thumbnails’ checked. Enabling Live Video To enable the Live Video feature, please ensure that you have installed the Live Video hardware (instructions found in your Exhibio Hardware Manual or Live Video Setup Guide). Click on the ‘OK’ button once your device is installed. 6 | P a g e Exhibio, LLC
EXHIBIO SETUP Please wait for Live Video to activate. This may take several seconds. Once activation completes, click ‘OK’ to display the Live Video Setup window. Click ‘OK’ when asked to add channels. Analog Channels For analog channel scanning, select either ‘Antenna’ or ‘Cable’, select your country, and then click on the ‘Scan’ button. Digital Channels For digital channel scanning, click on the ‘Scan’ button. It may take the tuner several minutes to scan for channels. Exhibio, LLC 7|Pa g e
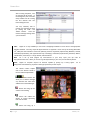
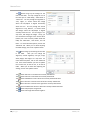
EXHIBIO SETUP After scanning completes, a list of channels will be shown. In the background, the Live Video Setup window will be running the first channel that was found during the scan. You may manually add or remove any channels you wish by clicking the ‘Add…’ and ‘Delete’ buttons. Close the Channel Manager dialog when you are finished. Note Digital TV is only available for users with a Hauppauge HVR‐950 TV Tuner device and appropriate decoders installed. Currently, only ATSC digital television is supported. At the time of this writing (November 19th, 2007) the ATSC standard is used in the following countries: Argentina (experimental), Bahamas, Canada, Columbia (experimental), Chile (experimental only in Santiago), Guatemala (experimental), Honduras, Mexico, United States, Puerto Rico, U.S. Virgin Islands, and South Korea. Note For a list of ATSC (Digital TV) transmissions in your area, input your Zip code at http://www.titantv.com. When you see the TV guide information for your area, click the HD only button. Note Digital TV reception requires an antenna capable of picking up a strong signal. Go to http://www.antennaweb.org to find out what type of antenna you will require. The sections below explain each of the buttons found in the Live Video Setup Window: The up and down buttons will allow you to advance through any channels that have been added in the Channel Manager. This button will bring up the volume control dialog. This button will enable the display of Closed Captioning text over the video. This button will bring up a 8 | P a g e Exhibio, LLC
EXHIBIO SETUP dialog allowing you to change the aspect ratio. You may also test changing the overscan to remove ay visual artifacts from the edges of the video source. These buttons will allow you to switch between Digital TV, Analog TV, Composite, or S‐
Video inputs. This button will display a dialog with more information about the currently selected video input and/or channel. For Digital TV, it will also show the ‘Signal Quality’ data. We recommend that you not use digital channels that consistently show a signal quality of less than 70%. Note Exhibio, LLC Any changes made in this area will not remain. Use this only as an area for testing different settings.
9|Pa g e
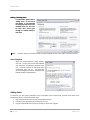
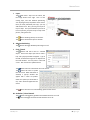
EXHIBIO SETUP Adding / Deleting Fonts For instructions, please refer to ‘Adding Fonts’ at the end of this chapter. If you would like to install fonts that aren’t in the ‘Available Fonts’ list, this must be done after you’ve gone through the Exhibio Setup at least once. Note Any fonts which you would like to add must first be placed into the ‘Fonts’ folder in the Control Panel.
Setup Complete When the ‘Setup Complete’ dialog appears, click ‘OK’. You may now remove the keyboard and mouse that you previously attached to the unit. You’ll only need to use the Setup Utility occasionally from now on. All day‐to‐day content management tasks are handled by the Exhibio Manager web application. Adding Fonts To add fonts, you first need to add them to the Fonts folder of the Control Panel, and then select them in the Exhibio Setup Utility. Please follow these steps: 1. Plug a keyboard and mouse directly into the Exhibio System. 2. Stop the current sign display by pressing the ‘Esc’ key. 3. Log out of the Exhibio User account by clicking on ‘Start’ then ‘Log Off’. 10 | P a g e Exhibio, LLC
EXHIBIO SETUP 4.
5.
6.
7.
8.
9.
Log in as the Exhibio Administrator user. Once logged in, open the ‘Control Panel’, and open the ‘Fonts’ folder. Copy your fonts into this directory, and then close out of the ‘Fonts’ folder and ‘Control Panel’. Double click the Exhibio Setup icon on the Desktop. The Setup Utility will launch. Log into the Setup Utility with the Windows Administrator Password. Click on the ‘Preferences’ tab at the top of the menu. 10. Click on the ‘Add’ button under the ‘Available Fonts’ section. 11. Use the scroll bar under the ‘Font’ section to find the font you wish to add. You can use the ‘Font Style’ and ‘Size’ settings to preview how your font will look. Press the ‘OK’ button when you’re done. 12. To add more fonts, repeat step 11. 13. Once you have added all of your fonts, click on the ‘OK’ button in the Exhibio Setup Utility. Future Access to Exhibio Setup If you need to change any of these settings in the future, you can access the Setup Utility from the Windows Desktop on the unit. 1. Plug a keyboard and mouse directly into the Exhibio System. 2. Stop the current sign display by pressing the ‘Esc’ key. 3. Double click the Exhibio Setup icon on the Desktop. The Setup Utility will launch. 4. Log into the Setup Utility with the Exhibio Administrator Password. Exhibio, LLC 11 | P a g e
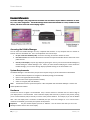
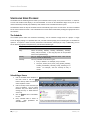
EXHIBIO MANAGER EXHIBIO MANAGER The Exhibio Manager is fully integrated into the Exhibio Unit and doesn’t require additional installation on other PCs, or any other configuration. The Exhibio Manager allows authorized individuals to create, schedule and edit content, and also to create and review campaign reports. Accessing the Exhibio Manager You can access the Exhibio Manager from any compatible web browser on any computer that has network or internet access to the Exhibio Unit. This is accomplished in one of three ways: 1. On your Local Area Network (LAN): Access the unit using an internal IP address or name. 2. Over the Internet: Your network administrator will need to expose the Exhibio’s built‐in web server to the public internet. 3. Directly on the display: Stop the sign display by pressing the ‘Esc’ key, and access the Exhibio Manager by double‐clicking the ‘Exhibio Manager’ icon. When you have finished modifying the content within the Exhibio Manager, you can restart the sign display by double‐clicking on the ‘Start Exhibio’ icon. System Requirements The Exhibio Manager is accessible from your personal computer using any of the web browsers listed below. • Microsoft Internet Explorer 6.0 or higher for Windows (Strongly recommended) • Opera 9.2 or higher (Windows and Mac) • Mozilla Firefox 2.0 or higher (Windows and Mac) • Safari 3.0 or higher (Mac and Windows) Note The Macintosh version of Internet Explorer is NOT compatible with the Exhibio Manager. Cookies and JavaScript MUST be enabled. Hardware A Pentium 4 class PC or higher is recommended. Also, a monitor that has a resolution that is at least as high as your display device is recommended. Lower resolution displays will show only a portion of the preview, forcing you to scroll horizontally and/or vertically to see the entire preview window. For example, if you use the Exhibio with a 40” LCD display with a resolution of 1366x768, and you access the manager via a 17” monitor with a resolution of 1024x768, you will only see a portion of the preview. Important Set your Internet Explorer font size to ‘Medium’. This will ensure that what you see in the Manager matches what is seen on the display. 12 | P a g e Exhibio, LLC
EXHIBIO MANAGER Logging In Enter your Exhibio username and password.
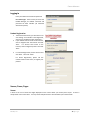
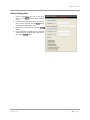
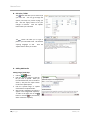
First Time Login: The first time you access the Exhibio Manager, the default username and password are both “exhibio” (all lowercase without the quotes). Product Registration 1.
2.
3.
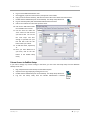
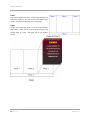
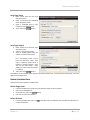
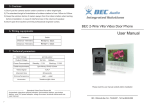
Towards the bottom left, you will notice a red area stating “Your Exhibio is Not Registered, click here to complete product registration.” If your Exhibio Unit has access to the Internet, click on ‘Register Over The Internet’ and click ‘Next’. If it doesn’t have access to the Internet, click on ‘Register by Phone’ and click ‘Next’. For Internet Registration, fill out the form and click ‘Next’. Then click ‘Finish’. For Phone Registration, please call the number shown on the screen, to register your product. Scenes, Panes, Pages Scenes A Scene is the sum of Panes and Pages displayed on the screen within your chosen pane Layout. A scene is comprised of one or more Panes. You may create multiple Scenes to accommodate your content needs. Exhibio, LLC 13 | P a g e
EXHIBIO MANAGER Panes Each scene is divided into Panes. You can choose among the many Pane Layouts to find the one that best displays your content. Panes are comprised of one or more pages. Pages A Page is the actual sign content. You can create different Pages within a Pane, and the system will continuously cycle through them in a loop. Each page has its own distinct content. 14 | P a g e Exhibio, LLC
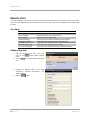
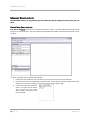
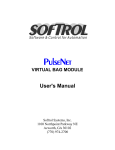
EXHIBIO MANAGER Main Page The first screen to appear after logging into the Exhibio Manager is shown below. This is the Main Page of the Exhibio Manager, where everything can be controlled. The very left portion of the page contains a static menu which is shown in most windows. The menu allows you to easily navigate from area to area. The center section is the dynamic section which changes based on your task. Towards the top, ‘Choose scene to preview….’ is always available for you to preview your scene. The button will bring up a small drop down menu, as illustrated to the right. If you click on ‘Manuals & Guides’, you will have access to the Exhibio Software Manual, Exhibio Hardware Manual, and the Adding ASP Scripts Guide. These are all in Adobe Reader Format (PDF). The ‘Support’ option will direct you to the Exhibio Website for Support Contact Information. The ‘Suggestions’ option will direct you to the Exhibio Website Suggestion area. If you have a feature suggestion for the Exhibio Digital Signage System, we would love to hear about it. Exhibio, LLC 15 | P a g e
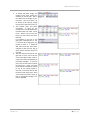
MANAGE USERS MANAGE USERS The Exhibio Manager may include any number of authorized users who have access to parts or all of the system. Each user has an individual username and password as well as up to seven ‘roles’, which define what actions they can take. User Roles Listed Role User Manager Scenes Manager Pages Manager Schedule Manager Campaigns Manager Campaign Reports Viewer Can Stop and Start Sign Pane Layouts Manager Allowed Functionality
May add, edit, and delete users and their roles May add, edit, clone, and delete scenes
May add, edit, and delete pages
May add, edit, and delete scheduled scenes or playlists May add, edit, and delete accounts and campaigns May view reports generated by the Exhibio Campaign Recorder
May stop or start the sign display remotely
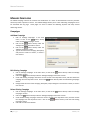
May create new, download existing, or upload new panes Adding a New User 1.
2.
3.
4.
Click the ‘Manage Users’ link in the main menu, or click directly below ‘Manage Users’. button directly below ‘Add New Click the User’. Complete all required fields in the ‘Login Credentials,’ ‘Personal Information,’ and ‘Roles’ field sets. button. Click the 16 | P a g e Exhibio, LLC
MANAGE USERS Edit an Existing User 1.
2.
3.
4.
Click the ‘Manage Users’ link on the main menu, or click directly below ‘Manage Users’. From the drop‐down menu, select the user you button wish to edit, and then click the directly below ‘Edit Existing User’. Edit the user’s information and click the button. If you would like to delete the user you have selected instead of editing their information, button. click on the Exhibio, LLC 17 | P a g e
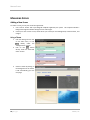
MANAGE SCENES MANAGING SCENES Adding a New Scene To create a scene, you may use one of two approaches: 1. Use a built‐in ‘Theme’ with a pre‐designed template supplied by the system. This template includes a background image and default settings for fonts and margins. 2. Create your own ‘Custom’ scene, which allows you to add your own backgrounds, customize fonts, and margins. Using a Theme 1.
2.
3.
Click the ‘Manage Scenes’ link on the main menu, or click directly under the ‘Manage Scenes’ section. Click on the button directly under the ‘Add New Scene’ section. Choose a theme by clicking on the background of the theme. It will automatically go to the next page. 18 | P a g e Exhibio, LLC
MANAGE SCENES 4.
Select a pane layout by clicking on the one you wish to use. It will automatically go to the next page. 5.
Give your scene a name, and then click on the button. If you don’t want to add this scene, click on the button. Using a Custom Scene 1.
2.
3.
4.
Click the ‘Manage Scenes’ link on the main menu, or click directly under the ‘Manage Scenes’ section. Click on the button directly under the ‘Add New Scene’ section. Click the button underneath ‘Add New Scene’. Select a pane layout by clicking on the one you wish to use. It will automatically go to the next page. 5.
Specify a default page setup for each pane within the layout. You can select a custom background color, background image and position, default font (family, size, color, and style), margins, page duration, page scroll, and page transition for each page in your pane layout. Once you have finished selecting all the options you’d like in your button at pages, click the the top or bottom of the ‘Add New Scene’ content on the right. Exhibio, LLC 19 | P a g e
MANAGE SCENES Tip If you use a custom background, the easiest way to make it look ‘seamless’ is to create a single image that is the exact pixel dimensions of your entire sign’s resolution setting. Then, upload that same image into each pane and use the ‘Background Image Position’ menus to ‘push’ the image into the corners. For example, for a pane which is aligned upper‐left, align your background image ‘Top’ and ‘Left’. Keep uploading the same background image into each pane and set the position appropriately for the pane’s position. Cloning an Existing Scene 1.
2.
3.
Either click on the ‘Manage Scenes’ link on the main menu on the left, or click on the button directly below the ‘Manage Scenes’ section. Select the scene that you want to clone from the drop‐down menu, and then click on the button directly below the ‘Clone Existing Scene’ section of the ‘Manage Scenes’ content on the right. Give your cloned scene a name and click the button. Important Scenes that have been created in a different resolution or orientation can NOT be cloned.
Note The drop‐down menu contains a list of all Scenes on all Exhibios in the group. Though you can clone a scene from any Exhibio, the cloned Scene will be saved on the Exhibio System you are currently logged into. Editing an Existing Scene 1.
2.
3.
4.
5.
Click the ‘Manage Scenes’ link in the main menu, or click the button directly below the ‘Manage Scenes’ section. Select the scene you want to edit from the drop‐down selection box, and then click the button directly below ‘Edit Existing Scenes’. Select your pane layout by clicking on the layout you wish to use. It will automatically go to the next page. If you choose a pane layout other than the highlighted one, the content in all the pages of your scene will be deleted. Specify a default page setup for each pane within the layout you just chose. You can select a custom background color, background image and position, default font (family, size, color, and style), margins, page duration, page scroll, and page transition for each page in your pane layout. Then click on the button. These changes will only apply to new pages that you create after editing your scene. Give your edited scene a name and click the button. Important Scenes that have been created in a different resolution or orientation can NOT be edited.
Deleting an Existing Scene 1.
2.
3.
Click on ‘Manage Scenes’ link in the main menu, or click on directly below ‘Manage Scenes’. Select the scene that you want to delete from the drop‐down selection box, and then click on the button. Press ‘OK’ if you are sure that you want to delete the selected scene. If you are not sure, press ‘Cancel’. 20 | P a g e Exhibio, LLC
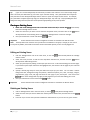
MANAGE PAGES MANAGE PAGES Scene Selection 1.
2.
3.
Click on ‘Manage Pages’ link in the main menu or click on the button directly below ‘Manage Pages’. Each page will load a thumbnail index of scenes, 10 scenes listed per page. You will initially see blue clockwise animated circles which eventually change to thumbnail screenshots of the scenes (it takes a couple seconds to snap the screenshots). Browse through your scenes until you find the one you wish to change the content of. Choose the scene you want to work on by clicking on its thumbnail or name. If you know the name of your scene, you can use the ‘Quick Jump Scene Select’ combo box towards the top right. The scenes will be listed in alphabetical order, and will be listed on sequential pages if you have more than ten (10) scenes. 4.
Choose the pane you want to work on by clicking inside its boundaries in the pane layout diagram (shown on the right). Exhibio, LLC 21 | P a g e
MANAGE PAGES Design Mode Page Tools By default, the Page Tools are visible. To hide the page tools, click on ‘Hide Page Tools’. Add a Page To add page to this pane, click on the button. This will add a new page to this pane using the ‘Page Defaults’ and ‘Background Image’ specified when you first created or last edited the scene. Delete a Page To delete a page from this pane, first select the page you wish to delete from the ‘Select page’ drop‐down menu. Then click on the button. Select a Page To select a page to work on, choose the page from the ‘Select Page’ drop‐down menu or click on its thumbnail image. The canvas area below will change to the page you wish to work on. Reorder Page To change the order in which the pages are displayed in the pane, use the to move it before by one, or use the to move it after by one. Campaign Settings The procedure for adding a Campaign and Account is shown on page 39. Page Setup By default, the Page Setup will be hidden. To show the Page Setup options, click on ‘Show Page Setup’. 22 | P a g e Exhibio, LLC
MANAGE PAGES Background Background color, image position, and tiling are controlled by their corresponding drop‐down menus. Changing the Background Image Unless you have created a custom scene, you scene will have a background image already in place on the page. Its name will be displayed immediately after the ‘Background Image:’ label. Changing or adding a background image is accomplished by clicking on button or the either the button. You will then see the current background image repository, and the image browsing and uploading utility. If the image you want to add is not in the current image repository, click the ‘Browse’ button and select it from its current location. Once the location of the image appears in the textbox to the left of the ‘Browse’ button, click on the ‘Upload Image’ button. To use an image listed in the repository as the page background, click the If you want to delete an image from the repository, click the button. button. Font The default font, color, and style (typeface) settings are controlled by their corresponding drop‐down menus. To change the font size, click in the textbox and type in the number of points. Margin Each of the margin attributes are controlled by selecting the textbox next to the margin title and typing in the number of pixels. Page Scroll All page scrolling attributes are controlled by their corresponding drop‐down menus. Page Transition Selecting a different page transition will change the ‘bring in’ transition of the current page. Exhibio, LLC 23 | P a g e
MANAGE PAGES Applying your changes Apply your changes to the current page or to all the pages in the pane by clicking or . If you apply the changes to all pages within the pane, ALL current attributes will be copied onto all of the pages. Individual attributes cannot be applied to all pages. Editing Tools By Default, the Editing Tools are visible. To hide the Editing Tools, click on ‘Hide Editing Tools’. A. Font Toolbar Add text by placing your cursor into the page canvas area and start typing. To format a block of text, select it and use the Font section of the ‘Editing Toolbar’ to change its attributes. When text is selected for editing, the toolbar items will change to reflect its current attributes. The text highlighting tool puts a background color floor behind a selection of text. To remove the background color, click the ‘Remove Formatting’ toolbar item. This will allow you to change your text color. Clicking on the small arrow gives you a popup list of colors to choose from. B. Clear Formatting / Clear Content The button will remove all content from the canvas. The button will remove all formatting that exists on the canvas. To use this, highlight the item or object you wish to remove the associated formatting, and click on the button. It will then reset that highlighted object back to the default format. C. Cut / Paste / Copy The button will select all content/objects in the canvas. The button will cut a highlighted object, or set of highlighted objects, for instance, text, images, or any other object that you have highlighted in the canvas. The button will copy a highlighted object, or set of highlighted objects, for instance, text, images, or any other object that you have highlighted in the canvas. The button will paste any content you have placed in the Editor Clipboard by cutting or copying content from within the Exhibio Canvas. The button will paste in any plain text from any source. This will not work with rich text editors, such as Microsoft Word, or Word Pad. If you copy text in from those sources, the styling of the content will be stripped, and it will be inserted as plain text. The 24 | P a g e button will paste in any rich text, for instance, from Microsoft Word or Word Pad. Exhibio, LLC
MANAGE PAGES D. Undo / Redo The button will undo the last change you made to the canvas. The button will redo the last change you made to the canvas. E. Find / Replace The button will open a small new window, where you can search for specified text in the canvas. The button will open a small new window, where you can search for specified text in the canvas, and replace it with different text. F. Print / Spell Checker The The button will print the current page on your screen. button runs a spell checker on all of the text available in the canvas. G. Content Alignment The buttons will align content left, center, right, or justify, respectively. H. Ordered List / Indenting The button will create a bulleted ordered list. I.
The button will create a numbered ordered list. The button will indent to the left. The button will indent to the right. Tables The will pop up a small window requesting information about the new table you wish to add. You can change the number of columns, number of rows, cell padding, cell spacing, alignment, border, width, and assign it to a style class. For more advanced options, click on the ‘Advanced’ tab. When you are finished adjusting the new table settings, click on the ‘Insert’ button. Once the table is added, it will be inserted into the canvas, like the figure to the right. You can click on any of the corners to increase/decrease the size of the table. Exhibio, LLC 25 | P a g e
MANAGE PAGES The button brings up the settings for the rows of the table. You may change the row in the table part to ‘Table Body’, ‘Table Head’ or ‘Table Foot’. You may change the alignment to ‘Left’, ‘Right’, or ‘Center’ which will change where the text/object is aligned horizontally within the row. You may change the vertical alignment to ‘Top’, ‘Bottom’, or ‘Center’ which will change where the text/object is aligned vertically within the row. You can assign it to a style class, and change the height. Lastly, you can commit these changes to the ‘Current Row’ (where your cursor currently resides inside the table) the ‘Odd Rows’, ‘Even Rows’, and ‘All Rows’. For more advanced options, click on the ‘Advanced’ tab. When you are done adjusting the table settings, click on the ‘Update’ button. The button brings up the settings for the cells in the table. Here you can change the alignment, vertical alignment, cell type, scope, width, height, and assign it to a style class. For more advanced options, click on the ‘Advanced’ tab. Then choose whether you want to update the ‘current Cell’, ‘all cells in row’, or ‘all cells in table’. When you are done with adjusting the settings, click on the ‘Update’ button. The button will insert a row above the currently selected cell. The The button will insert a row below the currently selected cell. button will delete the row in which the currently selected cell exists. The button will insert a column to the left of the currently selected cell. The button will insert a column to the right of the currently selected cell. The button will delete the column in which the currently selected cell exists. The button will split apart merged cells. The button will merge selected cells together. 26 | P a g e Exhibio, LLC
MANAGE PAGES J.
Layers The will insert a layer into the canvas, like the image shown to the right. This is a free moving layer, and uses absolute positioning. You may drag this layer anywhere on the canvas. Once you have positioned your layer, you may add content into it. Also, you may put a layer on top of a layer. So if you would like to put text in front of a picture, just place a layer on top of the picture, and type the text. The button will bring the layer to the front. The button will send the layer to the back. K. Absolute Positioning The button will toggle absolute positioning on or off. L. Links / Breaks The button will add a link to a selected object. Click on the object you wish to make a link, and a pop‐up window will appear. Type in the URL, and leave the Target set to ‘Open link in the same window’. You may enter in a title and a class. Then click on the ‘Update’ button. The button will insert a horizontal rule in the canvas. The button will insert a symbol into the canvas. When this button is selected, a pop‐up window will appear with a table of symbols. Select the symbol you would like to use, and it will be dropped into the canvas. The button will insert a non‐line breaking space into the canvas. M. Guidelines / Visual Controls The button will toggle the guidelines and insivible elements on or off. The button will toggle the visual control characters on or off. Exhibio, LLC 27 | P a g e
MANAGE PAGES N. CSS Styles / HTML The button will allow you to custom style your own CSS. You may go through the options, and setup any custom styling you like. Click the ‘Apply’ button to see your changes in real‐time. Click the ‘Update’ button when you’re finished. The button will allow you to type or paste in your own HTML code. This includes scripting languages as well. Click the ‘Update’ button when you’re done. O. Adding Multimedia Adding Images/Audio Clips 1.
2.
3.
4.
Click the or button. Click the ‘Browse’ button to find the file you want to upload. When you have located the file, click on the file to select it, and press the ‘Open’ button to add it the upload queue. Click the ‘Upload Image’ or ‘Upload Sound’ button to upload the file. After the file is uploaded, you will see it appear in the image/audio repository. To add it to the page, click on the button or click the to permanently delete it from the repository. 28 | P a g e Exhibio, LLC
MANAGE PAGES Adding Movies/Flash Animations Click the or button. The process for adding Movies and Flash animations is the same as adding images and Audio Clips; however, you may also specify the height and width of the movie or animation. Adding a Web Page 1.
2.
3.
4.
Click on the button. Type the URL of the web page you would like to add in the text field. Enter the width and height that you want the web page to display at on the page. When you are ready to add it to the page, click on the button. Adding Power Point 1.
2.
3.
4.
To add Power Point, click on the button. Click the ‘Browse’ button to find the file you want to upload. When you have located the file, click on the file to select it, and press the ‘Open’ button to add it the upload queue. Click the ‘Upload Presentation’ button to upload the file. After the file is uploaded, you will see it appear in the PowerPoint repository. To add it to the page, click on the button or click on the to delete it. Adding Live TV, External Video, and DVD Playback Before using Live Video, you need to setup your TV Tuner hardware (shown in the Exhibio Hardware Manual or Live Video Setup Guide) and enable Live Video in the Exhibio Setup Utility (shown at the beginning of this manual). Note Digital TV is only available if you have the Hauppauge HVR‐950 tuner device and live video decoders installed. Playback from the internal DVD player requires installing special DVD decoders (in addition to an internal DVD drive). Exhibio, LLC 29 | P a g e
MANAGE PAGES 1.
2.
3.
4.
5.
6.
2.
3.
4.
5.
6.
To add external video, click on the button. Here you can select between the following video sources: Analog TV, Digital TV, Composite Video Input, S‐Video Input, or Internal DVD Player. Analog Television Provided you’ve scanned for channels in the Exhibio Setup Wizard, you can select from a drop down of Preset channels. Also, you can type in the channel number in the provided text box. Further, you can adjust the Brightness, Contrast, Hue, Saturation, and Sharpness. The default set is 128 for each. You can change the aspect ratio to a custom configuration, or select Automatic. Also, you can change the overscan amount. Change the volume on the bar. Zero (all the way to the right) is the loudest, and scrolling it to your left will reduce the volume. You can mute the Audio and enable Closed Captioning. Change the width and height that you would like the video to display in the page. If you plan on having a mouse normally plugged into your Exhibio, you can opt to show a toolbar on the TV for direct control of the channel. Also, you can allow a contextual menu, where you can right click on the TV feed (only visible on the digital sign) and change all of the attributes discussed above. Digital Television Provided you’ve scanned for channels in the Exhibio Setup Wizard, you can select from a drop down of Preset channels. Also, you can type in the channel numbers in the provided text boxes. You can change the aspect ratio to a custom configuration, or select Automatic. Also, you can change the overscan amount. Change the volume on the bar. Zero (all the way to the right) is the loudest, and scrolling it to your left will reduce the volume. You can mute the Audio and enable Closed Captioning. Change the width and height that you would like the video to display in the page. If you plan on having a mouse normally plugged into your Exhibio, you can opt to show a toolbar on the TV for direct control of the channel. Also, you can allow a contextual menu, where you can right click on the TV feed (only visible on the digital sign) and change all of the attributes discussed above. 30 | P a g e Exhibio, LLC
MANAGE PAGES 2.
3.
4.
5.
6.
2.
3.
4.
Composite or S‐Video Input Adjust the Brightness, Contrast, Hue, Saturation, and Sharpness. The default set is 128 for each. You can change the aspect ratio to a custom configuration, or select Automatic. Also, you can change the overscan amount. Change the volume on the bar. Zero (all the way to the right) is the loudest, and scrolling it to your left will reduce the volume. You can mute the Audio and enable Closed Captioning. Change the width and height that you would like the video to display in the page. If you plan on having a mouse normally plugged into your computer, you can opt to show a Live Video toolbar. Also, you can allow a contextual menu, where you can right click on the Video feed (only visible on the digital sign) and change all of the attributes discussed above. Internal DVD Player Insert a DVD into the Exhibio Hardware Unit’s DVD drive. Enter the title and chapter that you would like the DVD playback to start at. If you are planning on placing in more than one page into the pane, and would like to have the DVD start, pause, and then start again when the page comes up, check ‘Restore Bookmark’. If you are planning on displaying the DVD in the page in its entirety, then make sure you know the duration of the DVD, and change the page duration respectively. Exhibio, LLC 31 | P a g e
MANAGE PAGES Adding RS232 Commands 1.
2.
3.
4.
To add an RS232 Command, you can use one of the commands in the ‘Preset’ drop down menu. Alternately you can create your own command from scratch. First type in the Description of the new command. Then fill in the form with each attribute of the command. Click on ‘Test Command’ to see if it works on your display(s). Then click on the ‘Add Command’ button to add it to the page. Each time this page displayed on the sign, it will run this RS232 command. Tip If you would like to add your own preset RS232 commands, you can do so by editing the following file: ‘C:\Program Files\Exhibio\ExhibioSettings\rs232Commands.xml’. Adding RSS/XML Feed 1.
2.
3.
To add an RSS feed, click on the button. Enter in a name and URL for your RSS feed. If you are looking for RSS feeds on the Internet, then you can just search the Internet for “Free RSS Feeds” or something related to free RSS feeds. Then select a ‘Theme’, and click on ‘Add Feed’. If you would like to make more advanced changes to the formatting of the text, speed of scroll, formatting of the background, and what will be displayed, click on the ‘Advanced…’ button at the top. If you want to add the feed as it is, click on the ‘Add Feed’ button at the top right, and skip to step 8. 32 | P a g e Exhibio, LLC
MANAGE PAGES 4.
5.
Here you can limit what will be displayed within the RSS feed. Place a check next to what you would like to show. Also, click on ‘Show/hide properties’ to change the font (family, size, color, typeface), background color, margins, border thickness and color. Then, click on ‘Next’. 6.
You can change the background color, cell padding, and borders. Click ‘Next’ for further options. 7.
Set the feed layout to be paragraph or condensed. You can also change the speed of the scroll, when it will be updated, number of items per page, page duration, number of items, max character limit, display of images, and the presence of HTML markup. Then, click on the ‘Add Feed’ button. 8.
Change the feed width and height. Then click the button to add the RSS feed to your page. Exhibio, LLC 33 | P a g e
MANAGE PAGES Canvas Editing The Canvas is embedded with many right click features, making editing or changing properties quick and easy. Canvas Options If you right click anywhere on the canvas, you will receive the following contextual menu. From here, you can ‘Cut’, ‘Copy’, ‘Paste’, and ‘Insert a new table’. Image Options If you right click anywhere on an image, you will receive the following contextual menu. From here, you can ‘Cut’, ‘Copy’, Paste’, ‘Insert/edit link’, ‘Unlink’, and pull up advanced image properties. Table Options If you right click anywhere on a table, you will receive the following contextual menu. From here, you can ‘Cut’, ‘Copy’, Paste’, ‘Cut table row’, ‘Copy Table Row’, ‘Paste table row before’, ‘Paste table row after’, ‘Insert a new table’, adjust ‘Table Properties’, adjust ‘Table cell properties’, ‘Delete table’, adjust ‘Table row properties’, ‘Insert row before’, ‘Insert row after’, ‘Delete row’, ‘Insert column before’, ‘Insert column after’, ‘Remove column’, ‘Split merged table cells’, and ‘Merge table cells.’ Every attribute of editing the table properties may be managed by right clicking right on the table. 34 | P a g e Exhibio, LLC
MANAGE PAGES HTML Mode The Page Editor can also be used in ‘HTML Mode’ allowing you to insert your own custom HTML code. From the top of the Page Management Area, you can click on the ‘HTML Mode’ tab. This will remove all of the editing tools, and replace the editing canvas with a large text area. Here you can copy and paste in your own code. You can also type your own code directly into this text area. Exhibio, LLC 35 | P a g e
SCHEDULE SCENE PLAYBACK SCHEDULING SCENE PLAYBACK The Exhibio built‐in scheduling feature allows you to schedule scenes to play at any time in the future. In order for a scene to be visible on the display, it must be scheduled. A scene can be scheduled to begin at any time (in one minute increments) and will play indefinitely until another scene is scheduled to take its place. The Scheduler shows the days of the week and will automatically open to the current week. All scenes scheduled for the current week are shown. Each scheduled event can be edited or deleted by clicking the appropriate link in the schedule. The Schedule The schedule system offers two methods of scheduling. You can schedule a single scene or a playlist. A single scene will begin playing at a specified start time, and will continue playing until something else is scheduled to replace it. A Playlist is a series of scenes, each with its own duration, which play in a loop. Additionally, you can set the following repetition frequencies for your selected schedule type. Frequency One Time Only Daily Weekly Monthly Description
Schedules the scene once, as a ‘one time only’ event. Check off Sunday, Monday, Tuesday, Wednesday, Thursday, Friday, and/or Saturday. It will only play back at the specified time on the specified day(s). Every ‘X’ week on whatever day within the week. Thus, you can do every 2 weeks on Wednesday. You may schedule one of the two types:
• Every ‘X’ Months. For example, every 4 months. • The (First, Second, Third, Forth, Last), (Sunday, Monday, Tuesday, Wednesday, Thursday, Friday, Saturday) of ‘X’ month. For example, ‘The First Tuesday of every 1 month’. Scheduling a Scene 1.
2.
3.
4.
Click on ‘Schedule Scene Playback’ in the main menu or click the button directly under the ‘Schedule Scene Playback’ section. Click on the day of the week that you want to schedule. You can switch between ‘Day’ and ‘Week’ view by clicking the ‘Day’ or ‘Week’ buttons at the top. Click on ‘Add Item To Schedule’ to start. Next, schedule either a ‘Scene’ or ‘Playlist’. Both procedures are described below. 36 | P a g e Exhibio, LLC
SCHEDULE SCENE PLAYBACK Item Type: Scene 5.
6.
7.
8.
Select ‘Scene’ from the Item Type drop‐down menu. Select a scene from the ‘Scheduled Scene’ drop‐down menu. Select a scheduled time to start, frequency, and scheduled date. button. Then, click on the Item Type: Playlist 5.
Select ‘Playlist’ from the Item Type drop‐down menu. 6. Type in a name for the playlist. 7. Clone an existing playlist from the system, or Create a New Playlist. For a new playlist, select a scene from the drop‐down menu, then type in a duration (minimum of 2 minutes, in minute intervals). Then click on the ‘Add’ button. Keep adding you scenes until your playlist is complete. button. 8. Then, click on the Your addition to the schedule will be placed in the main schedule area. It will be placed under the day, and to the right of the scheduled time. Delete Scheduled Item There are two ways to delete a scheduled item. Delete Single Scene 1.
2.
3.
4.
From the schedule day or week view, find the item which you want to delete. Click on the scheduled item. On the bottom, click on the button. Click ‘OK’ to confirm the deletion. Delete All Items 1.
From the schedule view, click on the confirm the deletion.
Exhibio, LLC ‘Clear All Items From Schedule’ icon and click the ‘OK’ button to 37 | P a g e
MANAGE CAMPAIGNS MANAGE CAMPAIGNS An Exhibio Campaign involves the creation and coordination of a series of advertisements around a particular theme to promote a product or service. The Exhibio Manager allows you to create advertising campaigns that can be associated with any page. These pages can serve as vehicles for delivering dynamic and easily created advertising content. Campaigns Add New Campaign 1.
2.
3.
4.
Click on ‘Manage Campaigns’ in the main menu, or click on the button directly under the ‘Manage Campaigns’ section. button directly under the Click on the ‘Manage Campaign Information’ section. Click on the button directly under the ‘Add New Campaign’ section. Type in the name of the campaign, description, and place this under an account, or create a new account. Edit Existing Campaign 1.
2.
3.
4.
Click on ‘Manage Campaigns’ in the main menu, or click on the button directly under the ‘Manage Campaigns’ section. button directly under the ‘Manage Campaign Information’ section. Click on the Under ‘Edit Existing Campaign’ choose the correct account in the drop‐down menu, and then choose the campaign from the drop‐down menu. Click on the button directly under the ‘Edit Existing Campaign’ section. Change either the name of the campaign, description, and/or change the account this is under, or create a new account. Delete Existing Campaign 1.
2.
3.
4.
Click on ‘Manage Campaigns’ in the main menu, or click on the button directly under the ‘Manage Campaigns’ section. Click on the button directly under the ‘Manage Campaign Information’ section. Under ‘Delete Existing Campaign’ choose the correct account in the drop‐down menu, and then choose button directly under the ‘Edit Existing the campaign from the drop‐down menu. Click on the Campaign’ section. Click ‘OK’ to confirm the deletion. 38 | P a g e Exhibio, LLC
MANAGE CAMPAIGNS Accounts Add New Account 1.
2.
3.
4.
Click on ‘Manage Campaigns’ in the main button directly menu, or click on the under the ‘Manage Campaigns’ section. Click on the button directly under the ‘Manage Campaign Information’ section. Click on the button directly under the ‘Add New Account’ section. Type in the name of the account, and click on button. the Edit Existing Account 1.
2.
3.
4.
Click on ‘Manage Campaigns’ in the main menu, or click on the button directly under the ‘Manage Campaigns’ section. button directly under the Click on the ‘Manage Campaign Information’ section. Click on the button directly under the ‘Edit Existing Account’ section. Change the name of the account, and click on button. the Delete Existing Account 1.
2.
3.
4.
Click on ‘Manage Campaigns’ in the main menu, or click on the button directly under the ‘Manage Campaigns’ section. Click on the button directly under the ‘Manage Campaign Information’ section. Under the ‘Delete Existing Account’ section, select the account you wish to delete from the drop‐down menu. Then click on the button. Click on ‘OK’ to confirm the deletion. Add Advertisement to Campaign In order to setup reports, you need to first commit a page to an existing campaign. 1. Click on ‘Manage Pages’ on the main menu, or click on the button directly under the ‘Manage Pages’ section. 2. Click on the Scene which holds the page you need to start reporting on. 3. Click on the pane which holds the page you need to start reporting on, and then select the appropriate page. 4. Click on ‘Show Campaign Settings’. 5. Select the account under which your campaign resides. 6.
7.
Select the campaign from the drop‐down menu. Type in the name you would like the advertisement to be called. Exhibio, LLC 39 | P a g e
MANAGE CAMPAIGNS 8.
Click on the button to add the campaign to this page. View Campaign Reports With the Exhibio Campaign Reports, you can review reports by a campaign or by an account. Also, you can export the full log files as a comma separated value (.csv) file and open them directly into Microsoft Excel. View Reports by Campaign 1.
2.
3.
4.
5.
Click on ‘Manage Campaigns’ in the main menu, or click on the button directly under the ‘Manage Campaigns’ section. Click on the button directly under the ‘View Campaign Reports’ section. Select the account from the drop‐down menu, and then select the campaign in the drop‐down menu. Select the start date and the end date. Click on the button within the ‘View Reports by Campaign’ section. Here it will show you the number of impressions that campaign made. If you require a log file, click on the ‘Log Files’ button, which will show a list of log files compatible with Microsoft Excel. View Reports by Account 1.
2.
3.
4.
Click on ‘Manage Campaigns’ in the main menu, or click on the button directly under the ‘Manage Campaigns’ section. Click on the button directly under the ‘View Campaign Reports’ section. Select the account from the drop‐down menu, and select the start date and the end date. Click on the button within the ‘View Reports by Account’ section. 40 | P a g e Exhibio, LLC
MANAGE CAMPAIGNS 5.
This will show you the number of impressions for each advertisement listed under the account. If you require a log file, click on the ‘Log Files’ button, which will show a list of log files compatible with Microsoft Excel. Exhibio, LLC 41 | P a g e
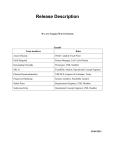
MANAGE PANE LAYOUTS MANAGE PANE LAYOUTS With the Exhibio System, you can generate your own custom pane layouts, cutting the screen up into your own panes. Create New Pane Layouts First, click on the button under the ‘Create Pane Layouts’ section. You must download the Exhibio Layout Creator to your local computer. Once the software is downloaded and installed, it will automatically lauch on your computer. To create a new pane layout, please do the following: 1. Provide an ID and a Name for your pane layout. Ensure that you use no spaces in the ID field. 2. Select the resolution from the Resolution drop‐down Box. You will want to select the resolution that your Exhibio Unit is currently running on to ensure it will fill the screen, edge to edge. 3. Click on the ‘Add’ button which will place a new pane into the editor. This will show you the current width, height, and position from the top and left. 42 | P a g e Exhibio, LLC
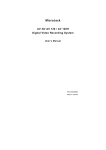
MANAGE PANE LAYOUTS 4.
5.
6.
To change the width, height, and position of the pane; change the attributes on the left side. Type in the width and the height of your new pane. Then, if you want it to be exactly at the top left, change the Top to 0 as well as the Left to 0. Add another pane, and adjust accordingly. If there are any overlaps, errors will be displayed in the bottom left area, under ‘Layout Errors’. Before you can save your layout, you must correct any errors that exist. For example, in the case to the right, Pane 3 overlaps Pane 2. This is corrected be changing the top position of Pane 3. It should be 400, rather than 300. Once that’s changed to 400, the error will go away, and the new pane layout can be saved. The pane layout illustrated on the right has no errors, and it fills the screen from edge to edge. Now it’s ready to be saved, and uploaded to the Exhibio Manager. To save the pane, click on Save button towards the top (or File ‐> Save). The pane layout will be automatically named by the ID you initially typed in. Save this in a location that you will be able to easily access later. Once you’ve saved your Pane Layout, go back to the Exhibio Manager so it may be uploaded. Exhibio, LLC 43 | P a g e
MANAGE PANE LAYOUTS 7.
Go back to the ‘Manage Pane Layouts’ section of the Exhibio Manager. Then, click on the ‘Browse’ button under ‘Upload New Pane Layout’, locate your new pane layout file and select it. Then click on the ‘Open’ button. Button, and then click on the It will be added to the ‘Manage Scenes’ area of the Exhibio Manager, so you can now use that new pane layout in a new scene. Edit Existing Pane Layout 1.
2.
3.
To change the layout of an existing pane layout, go to the ‘Manage Pane Layout’ section of the Exhibio Manager. Under the ‘Download Existing Pane Layout’, select the pane you wish to change from the drop down box. Then click on the button. Click on the ‘Save’ button, and save it to a directory you will be able to easily access later. When it completed the download, go to ‘Start’ ‐> ‘Programs’ ‐> ‘Exhibio LLC’ –> ‘Layout Creator’ or click the button under ‘Create Pane Layouts’. 4.
In the Exhibio Layout Creator, click on the ‘Open’ Button (or File ‐> Open). Browse for the file that you just saved, select it, and click on the ‘Open’ Button. It will then pull in the layout you wish to change/edit. Make your changes, change the ID and Name, and then save your pane layout. 5.
Go back to the ‘Manage Pane Layouts’ section of the Exhibio Manager. Then, click on the ‘Browse’ button under ‘Upload New Pane Layout’, locate your new pane layout file and select it. Then click on the ‘Open’ button. It Button, and then click on the will be added to the ‘Manage Scenes’ area of the Exhibio Manager, so you can now use that new pane layout in a new scene. 44 | P a g e Exhibio, LLC
UPDATE EXHIBIO UPDATE EXHIBIO It’s recommended you check your system for updates every 4 months. Exhibio, LLC generally releases small updates to keep your system up to date. There is an update utility directly on the Exhibio Desktop which facilitates installing all major and minor updates. 1. Plug a keyboard and mouse directly into the Exhibio System. 2. Stop the current sign display by pressing the ‘Esc’ key. 3. Double click the Exhibio Update icon on the Desktop. 4.
Log into the Exhibio Update Utility with the Exhibio Administrator Password. 5.
Click on ‘Find Updates’ and allow some time for the system to check for updates. If there is an update available, it show up in the white area. Check the update, and click on ‘Install Checked’. If there are no updates, then click on Finished. Exhibio, LLC 45 | P a g e
TROUBLESHOOTING APPENDIX A. TROUBLESHOOTING My web browser displays a ‘Server Cannot be Found’ message. First, check your network connection. If you are not connected to the network or cannot access the domain name server you will be prevented from accessing the display. Please consult with your Network Administrator. There a noticeable lag when I start up and/or when I'm using the Exhibio Manager, especially in the ‘Manage Scenes’ section. This may occur if you have multiple Exhibios and have set up a Sign Grouping and one of the other units in the group is unavailable. The Exhibio unit that you are working on is attempting to establish communication with the missing unit(s) in the group. After several seconds of trying, it will display a message indicating the failure to establish communication. The error message will provide information on which units are unavailable. When updating the display remotely, the preview doesn't look right. Your computer must access Exhibio's web server in order to display the content in your browser. It needs to access the server and transfer all of the displayed items over your network connection to your web browser. If there is a temporary slowdown in that connection, the preview window might temporarily display an incomplete layout. I changed the background image for a scene, but my pages still have the old background. Changes made in the scene setup take effect in NEW pages you create within the scene. To change the background of existing pages, you'll need go to ‘Page Setup’ in the Page Editor and specify the new background image. Images seem to come in very slowly in the preview window. Is this happening on the live display too? Because your computer needs to download all of the images in order to show them in the preview window, if the images are larger than 100 kilobytes, they will take a few seconds or more to download and display. This effect is less noticeable on the live display since the system is retrieving images directly from its own hard disk. I dragged an image into the Page Editor window and it looks fine on my preview, but the live display doesn't show the image, just a little box with an ‘X’ in it. The Administration System does not support drag‐and‐drop. You must upload your images to the display and insert them using the tools built into the Page Editor. Some of my images have suddenly disappeared! What happened? Chances are, you copied and pasted them from one scene to another, then deleted the scene in which you originally placed the images. Images are stored on the Exhibio's file system in folders organized by scenes (this allows the cloning feature to work). When you copy and paste, the reference to the image will remain as long as the scene exists. Deleting a scene removes all of the folders and content associated with that scene, however, including any images referenced in other scenes. 46 | P a g e Exhibio, LLC
TROUBLESHOOTING My ‘Insert Images’, ‘Insert Movies’, ‘Insert Audio Clips’, ‘Insert Flash Animations’, and ‘Insert Web Page’ buttons on the page editor generate an error. This issue is a result of having recently installed Windows Server 2003 Service Pack One on the Exhibio unit (All units shipped after May 1, 2005 come with Service Pack One pre‐installed.). The following procedure will fix the problems that you are having. You will need to run this procedure directly on your Exhibio unit with a keyboard and mouse attached. 1. Go to ‘Start/Administrative Tools’ and right click on ‘Internet Information Services (IIS) Manager’. 2. Click ‘Run as...’. 3. Check the ‘The following user:’ radio button. 4. Make sure that your ‘Administrator’ user is in the box next to ‘User name:’. 5. Type your ‘Administrator’ user password in the box next to ‘Password:’. 6. Click ‘OK’. 7. Expand the (local computer) node on the left. 8. Under the ‘Web Sites’ expand the ‘Exhibio Manager’ website. 9. Expand the ‘aspnet_client’ folder and highlight the ‘FreeTextBox’ folder. 10. Click the ‘Properties’ button in the toolbar (the one that looks like a hand pointing at a piece of paper). 11. Select the ‘Directory’ tab. 12. Towards the bottom, next to ‘Execute Permissions’, select ‘Scripts only’. 13. Click ‘OK’. 14. Close the ‘Internet Information Services (IIS) Manager’ window. The live video window is just a black box. Check your cable connections. Change channels to see if a television picture shows up. If these two techniques don't solve the problem, you may have placed two live TV/Video windows into your scene (on the same page or in different panes) and they were set to show simultaneously on the screen. Only ONE live TV/video image can appear on the running sign display. If multiple live video windows are set to appear on the display, they will both ‘go blank’ and show only a black box. To correct this, delete any extra video windows and re‐start the scene by scheduling it in the ‘Schedule Scene Playback’ section. I removed a scene with live video from the schedule and the audio is still playing. To make the audio stop, put a scene with live video back on the schedule, and then add a separate scene without live video to the schedule. Next, delete the scene with live video. The current sign will revert to the scene you added to the Schedule. In portrait mode, live video looks ‘jerky.’ Live video will display at a lower frame rate due to the extra video processing requirements of the video card to display portrait mode. The higher the resolution, the lower the frame rate. Try using a lower resolution to reduce the ‘jerkiness’ of the video.
Exhibio, LLC 47 | P a g e
END USER LICENSE AGREEMENT APPENDIX B. END USER LICENSE AGREEMENT YOU SHOULD CAREFULLY READ THE FOLLOWING AGREEMENT BEFORE USING THIS DIGITAL SIGNAGE
APPLIANCE SOFTWARE ("EXHIBIO™ SOFTWARE") AND ITS RELATED MATERIALS INCLUDING THE
ACCOMPANYING MICROPROCESSOR. USING THE EXHIBIO™ SOFTWARE INDICATES YOUR ACCEPTANCE OF
THIS AGREEMENT. IF YOU DO NOT AGREE WITH IT, YOU ARE NOT AUTHORIZED TO USE THE
EXHIBIO™ SOFTWARE AND MUST UNINSTALL IT.
IMPORTANT-READ CAREFULLY: This End-User License Agreement ("EULA") is a legal
agreement between you and Exhibio LLC ("EXHIBIO"), the licensor of the EXHIBIO™
SOFTWARE. This EULA covers the EXHIBIO™ SOFTWARE. The EXHIBIO™ SOFTWARE includes
computer software, whether stored on any media or downloaded from the designated site
of EXHIBIO for EXHIBIO™ SOFTWARE users – www.exhibio.com ("EXHIBIO Site"), the
associated media, any printed materials, and any “on-line” or electronic documentation
and all updates and upgrades thereto. You may install and use the EXHIBIO™ SOFTWARE
only on the EXHIBIO microprocessor ("EXHIBIO Microprocessor"). By installing, copying
or otherwise using the EXHIBIO™ SOFTWARE, you agree to be bound by the terms of this
EULA. If you do not agree to the terms of this EULA, EXHIBIO is unwilling to license
the EXHIBIO™ SOFTWARE to you. In such event, you should not use or copy the EXHIBIO™
SOFTWARE. By selecting the “AGREE” button and using the EXHIBIO™ SOFTWARE and the
EXHIBIO microprocessor, you represent that you are an authorized user and you agree to
be bound by the terms of this EULA.
EXHIBIO SOFTWARE LICENSE
The EXHIBIO™ SOFTWARE is protected by copyright laws and international copyright
treaties, as well as other intellectual property laws and treaties. The EXHIBIO™
SOFTWARE is licensed, not sold.
GRANT OF LICENSE
This License grants you the following right:
Software - You may install and use the EXHIBIO™ SOFTWARE only on a single EXHIBIO
microprocessor in compliance with the terms and conditions of this EULA.
DESCRIPTION OF REQUIREMENTS, RESTRICTIONS, RIGHTS AND LIMITATIONS
Limitation on Reverse Engineering, Decompilation and Disassembly.
You may not modify, reverse engineer, decompile, disassemble or attempt to create the
source code from the object code of the EXHIBIO™ SOFTWARE in whole or in part. You
agree not to export the EXHIBIO™ SOFTWARE, either directly or indirectly to any
country that is the subject of U.S. export restrictions.
Separation of Components
The EXHIBIO™ SOFTWARE is licensed as single product. Its component parts may not be
separated for use on more than one computer, microprocessor, microcontroller, or other
similar device or machine.
Rental
You may not rent or lease the EXHIBIO™ SOFTWARE.
48 | P a g e Exhibio, LLC
END USER LICENSE AGREEMENT Transfer
You may permanently transfer all of your rights under this EULA only as part of a
transfer of the EXHIBIO™ SOFTWARE, provided that you transfer all of the EXHIBIO™
SOFTWARE (including all copies, component parts, the media and printed materials, all
versions and any upgrades of the EXHIBIO™ SOFTWARE and this EULA), the EXHIBIO
microprocessor, and the recipient agrees to the terms of this EULA.
Termination
Without prejudice to any other rights, EXHIBIO may terminate this EULA if you fail to
comply with the terms and conditions of this EULA. In such event, you must destroy all
copies of the EXHIBIO™ SOFTWARE and all of its component parts.
You may terminate this EULA at any time by destroying the software and related
documentation or by sending it to EXHIBIO LLC, 8207 Main Street, Suite 1,
Williamsville, NY 14221.
Notice and Assistance
You agree to reasonably notify and assist EXHIBIO in case you learn of illegitimate
use or any violation of the title or copyright with respect to the EXHIBIO™ SOFTWARE
below. Such notice may be directed either to the Exhibio Help Desk (716-799-0410) or
to the customer service link on the EXHIBIO Site.
INTELLECTUAL PROPERTY
All title and copyright in and to the EXHIBIO™ SOFTWARE (including but not limited to
any images, photographs, animation, video, audio, music, text and "applets",
incorporated into the EXHIBIO™ SOFTWARE), and any copies of the EXHIBIO™ SOFTWARE, are
owned by EXHIBIO or its suppliers. All rights not specifically granted under this EULA
are reserved by EXHIBIO.
HIGH RISK ACTIVITIES
The EXHIBIO™ SOFTWARE is not fault-tolerant and is not designed, manufactured or
intended for use or resale as on-line control equipment in hazardous environments
requiring fail-safe performance, such as in the operation of nuclear facilities,
aircraft navigation or communication systems, air traffic control, direct life support
machines, or weapons systems, in which the failure of the EXHIBIO™ SOFTWARE could lead
to death, personal injury, or severe physical or environmental damage ("High Risk
Activities"). EXHIBIO and its suppliers specifically disclaim any express or implied
warranty of fitness for High Risk Activities.
PRODUCT MANUALS/INSTRUCTIONAL VIDEOS
You warrant that you have read the manuals for your EXHIBIO™ SOFTWARE and EXHIBIO
Microprocessor system and are familiar with their warnings and instructions. Before
any installation or setup, you should carefully review all relevant product manuals.
For all other questions concerning product installation and network setup, please
contact Exhibio LLC by phone (716-799-0410) or by email ([email protected]).
EXCLUSION OF WARRANTY ON EXHIBIO™ SOFTWARE
You expressly acknowledge and agree that use of the EXHIBIO™ SOFTWARE is at your sole
risk. The EXHIBIO™ SOFTWARE is provided "AS IS" and without warranty of any kind and
Exhibio, LLC 49 | P a g e
END USER LICENSE AGREEMENT EXHIBIO, its vendors and EXHIBIO's licensors (hereinafter, EXHIBIO, its vendors and
EXHIBIO's licensors shall be collectively referred to as "EXHIBIO") EXPRESSLY DISCLAIM
ALL WARRANTIES, EXPRESS OR IMPLIED, INCLUDING, BUT NOT LIMITED TO, THE IMPLIED
WARRANTIES OF MERCHANTABILITY AND FITNESS FOR A PARTICULAR PURPOSE. EXHIBIO DOES NOT
WARRANT THAT THE FUNCTIONS CONTAINED IN THE EXHIBIO™ SOFTWARE WILL MEET YOUR
REQUIREMENTS, OR THAT THE OPERATION OF THE EXHIBIO™ SOFTWARE WILL BE CORRECTED.
FURTHERMORE, EXHIBIO DOES NOT WARRANT OR MAKE ANY REPRESENTATIONS REGARDING THE USE OR
THE RESULTS OF THE USE OF THE EXHIBIO™ SOFTWARE IN TERMS OF ITS CORRECTNESS, ACCURACY,
RELIABILITY, OR OTHERWISE. NO ORAL OR WRITTEN INFORMATION OR ADVICE GIVEN BY EXHIBIO
OR A EXHIBIO AUTHORIZED REPRESENTATIVE SHALL CREATE A WARRANTY OR IN ANY WAY INCREASE
THE SCOPE OF THIS WARRANTY.
LIMITATION OF LIABILITY
EXHIBIO SHALL NOT BE LIABLE FOR ANY INCIDENTAL OR CONSEQUENTIAL DAMAGES FOR BREACH OF
ANY EXPRESS OR IMPLIED WARRANTY, BREACH OF CONTRACT, NEGLIGENCE, STRICT LIABILITY OR
ANY OTHER LEGAL THEORY RELATED TO THE EXHIBIO™ SOFTWARE AND THE EXHIBIO
MICROPROCESSOR. SUCH DAMAGES INCLUDE, BUT ARE NOT LIMITED TO, LOSS OF PROFITS, LOSS OF
REVENUE, LOSS OF DATA, LOSS OF USE OF THE PRODUCT OR ANY ASSOCIATED EQUIPMENT, DOWN
TIME AND USER'S TIME, EVEN IF EXHIBIO HAS BEEN ADVISED OF THE POSSIBILITY OF SUCH
DAMAGES.
COPYRIGHT
You agree to comply with all applicable copyright protection laws in connection with
your use of the EXHIBIO™ SOFTWARE and the EXHIBIO microprocessor. In addition to the
terms provided in this EULA, EXHIBIO and/or its affiliates may take appropriate
measures to protect copyright of the contents played by the EXHIBIO™ SOFTWARE. Exhibio
LLC reserves the right to amend this EULA at its sole discretion by indicating the
amendment at the EXHIBIO Site or taking other appropriate measures.
SEVERABILITY
If any part of this EULA is held invalid or unenforceable, the other parts will remain
valid.
IF YOU DO NOT AGREE TO THE TERMS OF THIS EULA, YOU MUST UNINSTALL THE EXHIBIO™
SOFTWARE, TOGETHER WITH ANY SOFTWARE YOU OBTAINED FROM THE EXHIBIO WEBSITE.
Should you have any questions concerning this EULA or this limited warranty, you may
contact EXHIBIO and/or its affiliates by writing to them at Exhibio LLC, 8207 Main
Street, Suite 1, Williamsville, NY 14221.
NETSPELL SPELL CHECKING ENGINE
BSD License
Copyright (c) 2003, Paul Welter
All rights reserved.
Redistribution and use in source and binary forms, with or without modification, are
permitted provided that the following conditions are met:
1) Redistributions of source code must retain the above copyright notice, this list of
conditions and the following disclaimer.
50 | P a g e Exhibio, LLC
END USER LICENSE AGREEMENT 2) Redistributions in binary form must reproduce the above copyright notice, this list
of conditions and the following disclaimer in the documentation and/or other materials
provided with the distribution.
3) Neither the name of the ORGANIZATION nor the names of its contributors may be used
to endorse or promote products derived from this software without specific prior
written permission.
THIS SOFTWARE IS PROVIDED BY THE COPYRIGHT HOLDERS AND CONTRIBUTORS "AS IS" AND ANY
EXPRESS OR IMPLIED WARRANTIES, INCLUDING, BUT NOT LIMITED TO, THE IMPLIED WARRANTIES
OF MERCHANTABILITY AND FITNESS FOR A PARTICULAR PURPOSE ARE DISCLAIMED. IN NO EVENT
SHALL THE COPYRIGHT OWNER OR CONTRIBUTORS BE LIABLE FOR ANY DIRECT, INDIRECT,
INCIDENTAL, SPECIAL, EXEMPLARY, OR CONSEQUENTIAL DAMAGES (INCLUDING, BUT NOT LIMITED
TO, PROCUREMENT OF SUBSTITUTE GOODS OR SERVICES; LOSS OF USE, DATA, OR PROFITS; OR
BUSINESS INTERRUPTION) HOWEVER CAUSED AND ON ANY THEORY OF LIABILITY, WHETHER IN
CONTRACT, STRICT LIABILITY, OR TORT (INCLUDING NEGLIGENCE OR OTHERWISE) ARISING IN ANY
WAY OUT OF THE USE OF THIS SOFTWARE, EVEN IF ADVISED OF THE POSSIBILITY OF SUCH
DAMAGE.
NEATUPLOAD FILE UPLOAD COMPONENT
This application uses NeatUpload which is covered by the Lesser General Public
License.
The source code for NeatUpload is included in the following location:
C:\Program Files\Exhibio\BundledSource\NeatUpload.zip.
TINYMCE WYSIWYG HTML EDITOR
This application uses TinyMCE which is covered by the Lesser General Public License.
The source code for TinyMCE is included in the following location: C:\Program
Files\Exhibio\ExhibioManager\tiny_mce.
RSS.NET RSS FEEDS CLASS LIBRARY
Copyright © 2002-2005 ToolButton Inc.. All Rights Reserved.
Permission is hereby granted, free of charge, to any person obtaining a copy of this
software and associated documentation files (the "Software"), to deal in the Software
without restriction, including without limitation the rights to use, copy, modify,
merge, publish, distribute, sublicense, and/or sell copies of the Software, and to
permit persons to whom the Software is furnished to do so, subject to the following
conditions:
The above copyright notice and this permission notice shall be included in all copies
or substantial portions of the Software.
THE SOFTWARE IS PROVIDED "AS IS", WITHOUT WARRANTY OF ANY KIND, EXPRESS OR IMPLIED,
INCLUDING BUT NOT LIMITED TO THE WARRANTIES OF MERCHANTABILITY, FITNESS FOR A
PARTICULAR PURPOSE AND NONINFRINGEMENT. IN NO EVENT SHALL THE AUTHORS OR COPYRIGHT
HOLDERS BE LIABLE FOR ANY CLAIM, DAMAGES OR OTHER LIABILITY, WHETHER IN AN ACTION OF
CONTRACT, TORT OR OTHERWISE, ARISING FROM, OUT OF OR IN CONNECTION WITH THE SOFTWARE
OR THE USE OR OTHER DEALINGS IN THE SOFTWARE.
MONO.DATA.SQLITECLIENT SQLITE CLASS LIBRARY
Exhibio, LLC 51 | P a g e
END USER LICENSE AGREEMENT The MIT License
Copyright (c) 200x-2006 Novell & Contributors
Permission is hereby granted, free of charge, to any person obtaining a copy of this
software and associated documentation files (the "Software"), to deal in the Software
without restriction, including without limitation the rights to use, copy, modify,
merge, publish, distribute, sublicense, and/or sell copies of the Software, and to
permit persons to whom the Software is furnished to do so, subject to the following
conditions:
The above copyright notice and this permission notice shall be included in all copies
or substantial portions of the Software.
THE SOFTWARE IS PROVIDED "AS IS", WITHOUT WARRANTY OF ANY KIND, EXPRESS OR IMPLIED,
INCLUDING BUT NOT LIMITED TO THE WARRANTIES OF MERCHANTABILITY, FITNESS FOR A
PARTICULAR PURPOSE AND NONINFRINGEMENT. IN NO EVENT SHALL THE AUTHORS OR COPYRIGHT
HOLDERS BE LIABLE FOR ANY CLAIM, DAMAGES OR OTHER LIABILITY, WHETHER IN AN ACTION OF
CONTRACT, TORT OR OTHERWISE, ARISING FROM, OUT OF OR IN CONNECTION WITH THE SOFTWARE
OR THE USE OR OTHER DEALINGS IN THE SOFTWARE.
52 | P a g e Exhibio, LLC