1
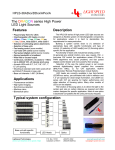
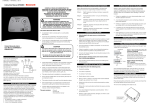
Advanced Intellus Controller Manual
Table of Contents
Introduction......................................................................................................................... 1
How to Use the Keys and Display ...................................................................................... 1
Intellus Basic Operation...................................................................................................... 3
Setting Time........................................................................................................................ 3
Help ..................................................................................................................................... 3
Status Menu......................................................................................................................... 3
Lighting............................................................................................................................... 4
Temperature Menu .............................................................................................................. 4
Menu Entry ..................................................................................................................... 5
Menu Navigation............................................................................................................. 5
Modifying Settings.......................................................................................................... 5
Exiting Menu................................................................................................................... 5
Manual Temperature Set Point ....................................................................................... 5
Temperature High Safety Setting.................................................................................... 5
Temperature Low Safety Setting .................................................................................... 5
Day Temperature Calibration Offset ............................................................................... 6
Night Temperature Calibration Offset ............................................................................ 6
Number Of Defrosts........................................................................................................ 6
Defrost Duration ............................................................................................................. 6
Defrost X Start................................................................................................................ 6
Lights Menu........................................................................................................................ 6
Menu Entry ..................................................................................................................... 7
Menu Navigation............................................................................................................. 7
Modifying Settings.......................................................................................................... 7
Exiting Menu................................................................................................................... 7
Lighting Settings ............................................................................................................. 7
Light Lifetime Display.................................................................................................... 8
Light Lifetime Reset ....................................................................................................... 8
%RH Menu ......................................................................................................................... 8
Menu Entry ..................................................................................................................... 8
Menu Navigation............................................................................................................. 8
Modifying Settings.......................................................................................................... 8
Exiting Menu................................................................................................................... 8
Manual %RH Set Point................................................................................................... 9
Enable Humidify Setting................................................................................................. 9
Enable Dehumidify Setting ............................................................................................. 9
Day %RH Calibration Offset .......................................................................................... 9
Night %RH Calibration Offset........................................................................................ 9
CO2 /Aux Menu ................................................................................................................... 9
Menu Entry ................................................................................................................... 10
Menu Navigation........................................................................................................... 10
Modifying Settings........................................................................................................ 10
Exiting Menu................................................................................................................. 10
Manual CO2 /AUX Set Point ......................................................................................... 10
Enable CO2 /Aux Output 1 Setting ................................................................................ 10
Enable CO2 /Aux Output 2 Setting ................................................................................ 10
Table of Contents
Day CO 2 /Aux Calibration Offset .................................................................................. 10
Night CO2/Aux Calibration Offset................................................................................ 11
Alarms ............................................................................................................................... 11
Using Auxiliary Channel For Temperature Safeties (optional) ........................................ 11
Using Auxiliary Channel For Dimmable Lighting (optional) .......................................... 12
Defrost Programming (optional) ....................................................................................... 13
Condensing Unit Shutdown Feature (optional) ................................................................ 13
Running Manual Settings.................................................................................................. 14
Programming..................................................................................................................... 14
Creating a New Program................................................................................................... 14
Editing a Program............................................................................................................. 16
Deleting a Program........................................................................................................... 17
Copying a Program........................................................................................................... 17
Creating a Sequence of Programs ..................................................................................... 17
Running Programs / Sequence of Programs ..................................................................... 19
Setting Program Operation Mode ..................................................................................... 20
Calibration Offsets ............................................................................................................ 22
Sample Program................................................................................................................ 23
Configuring Security (optional) ........................................................................................ 26
Level 4........................................................................................................................... 27
Level 3........................................................................................................................... 27
Level 2........................................................................................................................... 27
Level 1........................................................................................................................... 27
Security Level ............................................................................................................... 27
Logging In/Out.................................................................................................................. 28
Disabling Security............................................................................................................. 29
Program Entry Table ......................................................................................................... 30
Introduction
Please feel free to contact Percival Scientific with any questions you may have
about this manual or using the Intellus controller by calling 1-800-695-2743 or 515-4659363 or by sending e- mail to [email protected].
How to Use the Keys and Display
Figure 1 – Intellus Display and Key Reference
(A) Main Display, (B) Time Key, (C) Temp/Alarm Key, (D) Lights Key, (E) %RH Key, (F)
CO2 /Aux Key, (G) Prog Key, (H) Help Key, (I) Decrement Key, (J) Increment Key, (K)
Enter Key, (L) LEDs
Refer to Figure 1:
Main Display (A)
The main display shows all status and programming information.
Time Key (B)
The Time key is used to set the system time and is also used when programming.
When programming, it is used to set the time parameter of each step. Refer to the
“Programming” section for more information.
Temp/Alarm Key (C)
The Temp/Alarm key is used to enter the Temp/Alarm Menu. The Temp/Alarm
Menu contains entries for the manual temperature setting, high and low safety settings,
calibration offset settings and defrost settings (if applicable). It is also used when
programming to set the temperature parameter of each step.
1
Advanced Intellus Manual Revision 4
Lights Key (D)
This key is only active if a lighting option was ordered for the chamber. The
Lights key is used to enter the Lights Menu. The Lights Menu contains entries for light
settings and light lifetime information. It is also used when programming to set the
lighting parameters of each step.
%RH Key (E)
This key is only active if a humidity option was ordered for the chamber. The
%RH key is used to enter the %RH Menu. The %RH Menu contains entries for the
manual humidity setting, humidify/dehumidify activation settings and calibration offset
settings. It is also used when programming to set the %RH parameter of each step.
CO2 /Aux Key (F)
This key is only active if a CO2 /Aux option was ordered for the chamber. The
CO2 /Aux key is used to enter the CO2/Aux Menu. The CO2 /Aux Menu contains entries
for the manual CO2 /Aux setting, CO2 /Aux output activation settings and calibration offset
settings. It is also used when programming to set the CO2/Aux parameter of each step.
Prog Key (G)
This key is used to enter the Program Menu. The Program Menu contains
selections used to enter/edit programs, run programs or run manual settings. Refer to the
section titled “Programming” for more information.
Help Key (H)
This key is used to display help information.
Decrement (I) / Increment (J) Keys
These keys are used to scroll through available menu options and to decrease or
increase values.
Enter Key (K)
This key is used to begin editing values and to accept changes of values.
Status LEDs (L)
•
•
•
The Heat LED illuminates when the controller calls for chamber heating.
The Cool LED illuminates when the controller calls for chamber cooling.
The Humidify LED illuminates when the controller calls for the level of humidity
to increase in the chamber.
2
Advanced Intellus Manual Revision 4
•
•
•
•
The Dehumidify LED illuminates when the controller calls for the level of
humidity to decrease in the chamber.
The CO 2 /Auxiliary LED illuminates when the controller calls for the level of
CO 2 /auxiliary to increase in the chamber.
The Program LED illuminates when the controller is running a program. The
LED is off when the controller is running manual settings. The LED flashes
when entering/editing a program. Refer to the sections titled “Running Manual
Settings” and “Programming” for more information.
The Defrost LED illuminates when the controller is running a defrost period.
Refer to the section titled “Defrost Programming” for more information.
Note : Only the appropriate LEDs for the options ordered will function.
Intellus Basic Operation
When power is applied to the Intellus controller the display shows the current
process values inside the chamber. This display will be referred to as the “main display”
throughout this manual.
After one minute with no key activation, the controller will always revert to the
main display.
Setting Time
To set the time use the following steps:
1. Press the TIME key.
2. Press the ENTER key.
3. Use the • and ‚ keys as necessary to set the current time and then press
ENTER.
4. Press the TIME key to return to the main menu.
Help
Help is available at any time by pressing the HELP key. The appropriate help
informatio n will be displayed for the current display or prompt. Use the • and ‚ keys
as necessary to review help information. Press the HELP key again to exit help.
Status Menu
The Status Menu displays the following information:
•
•
•
Current process values in the chamber (main display). Refer to Figure 2.
Current set points.
Alarm information.
3
Advanced Intellus Manual Revision 4
•
•
Lighting status (displays only if lighting option was ordered with
chamber).
Program sequence status (if a program sequence is running).
To navigate through the Status Menu, use the • and ‚ keys as necessary.
3:30PM
LT:110
24.0C
75%RH
800PPM
Figure 2 – Main Display
The main display shows the following information:
•
•
•
•
•
Current time (3:30PM in Figure 2).
Current temperature (24.0C in Figure 2).
Current %RH (75% in Figure 2). Note: Only displays if a humidity
option was ordered.
Current light settings (110 in Figure 2). Note: Only displays if a lighting
option was ordered. If a non- feedback dimmable lighting option was
ordered each output is displayed as a graphical block.
Current CO2 /Aux level (800PPM in Figure 2). Note: Only displays if a
CO2 /Aux option was ordered.
Lighting
The advanced Intellus controller is capable of programming/displaying up to
sixteen separate light outputs. Not all of these outputs will be utilized in every chamber.
The standard number of outputs utilized is two. The controller only displays the total
number of light outputs utilized.
Lights are normally displayed and programmed using a ‘1’ to represent on and a
‘0’ to represent off. Refer to Figure 2. According to this display, light outputs #1 and #2
are on and light output #3 is off. If a non- feedback dimmable lighting option was
ordered, lights are displayed as graphical blocks. Please refer to the sections titled
“Lights Menu” and “Programming” for more information on using the controller to
program chamber lighting.
Temperature Menu
The Temperature Menu contains the following settings:
•
•
•
•
•
Manual temperature set point.
Temperature high safety setting.
Temperature low safety setting.
Day temperature calibration offset.
Night temperature calibration offset.
4
Advanced Intellus Manual Revision 4
•
•
•
Number of defrosts (only appears if low temperature option was
ordered)
Defrost Duration (only appears if low temperature option was ordered)
Defrost X Start (only appears if low temperature option was ordered)
Menu Entry
To enter the Temperature Menu, press the TEMP/ALARM key.
Menu Navigation
To navigate through the menu, use the • and ‚ keys as necessary.
Modifying Settings
To change any setting, press the ENTER key, use the • and ‚ keys as necessary
to change the setting and then press the ENTER key again to accept the change.
Exiting Menu
To exit the Temperature Menu, press the TEMP/ALARM key.
Manual Temperature Set Point
This set point is used when running manual settings. Refer to the section titled
“Running Manual Settings” for more information.
Temperature High Safety Setting
This setting determines the process value at which the controller will trigger a
high safety alarm. When a safety ala rm occurs, the chamber will shut down its control
functions. It is recommended that you set the high safety at least 3°C above your highest
programmed temperature. When programming, be sure to note the highest temperature
programmed. Use this temperatur e as the reference point for setting the high safety.
Refer to the section titled “Alarms” for more information regarding alarms. This setting
appears under the CO2 /Aux menu when the auxiliary channel is used to control
temperature safeties.
Temperature Low Safety Setting
This setting determines the process value at which the controller will trigger a low
safety alarm. When a safety alarm occurs, the chamber will shut down its control
functions. It is recommended that you set the low safety at least 3°C below your lowest
programmed temperature. When programming, be sure to note the lowest temperature
programmed. Use this temperature as the reference point for setting the low safety.
Refer to the section titled “Alarms” for more information regarding alarms. This setting
5
Advanced Intellus Manual Revision 4
appears under the CO2 /Aux menu when the auxiliary channel is used to control
temperature safeties.
Day Temperature Calibration Offset
This setting determines the offset the controller will use when one or more of the
light outputs are on. The value chosen is added to the temperature input value and the
new value is displayed and used for control. Refer to the section titled “Calibration
Offsets” for more information.
Night Temperature Calibration Offset
This setting determines the offset the controller will use when all of the light
outputs are off. The value chosen is added to the temperature input value and the new
value is displayed and used for control. Refer to the section titled “Calibration Offsets”
for more information.
Number Of Defrosts (only appears if it is determined that chamber may need
defrost periods)
This setting determines the number of defrost periods that will occur over a
twenty-four hour period. A maximum number of six periods can be programmed. When
constantly running at low temperatures, Percival Scientific recommends a setting of two
defrost periods set twelve hours apart. The necessity for programming defrost periods
can be gauged by observing the inability of the chamber to hold the set point at low
temperatures.
Defrost Duration (only appears if it is determined that chamber may need defrost
periods)
This setting determines the length that each defrost period will last. The duration
can be set between one and 999 minutes. Percival Scientific recommends seven minutes
for each defrost period. Refer to the section titled “Defrost Programming” for more
information.
Defrost X Start (only appears if it is determined that chamber may need defrost
periods)
A prompt will appear to enter the start time for each defrost period. The number
of periods is selected under the ‘Number Of Defrosts’ prompt. Refer to the section titled
“Defrost Programming” for more information.
Lights Menu
The Lights Menu is only visible if a lighting option was ordered.
The Lights Menu contains the following settings:
6
Advanced Intellus Manual Revision 4
•
•
•
Lighting settings for lighting outputs 1-16.
Light lifetime display for lighting outputs 1-16
Light lifetime reset for lighting outputs 1-16
Changing light settings in this menu when running a program will override the
programmed light settings for the current executing step.
Note : Not all of the lighting outputs will be utilized in every chamber. The standard
number of outputs utilized is two. The controller only displays the total number of light
outputs utilized.
Menu Entry
To enter the Lights Menu, press the LIGHTS key.
Menu Navigation
To navigate through the menu, use the • and ‚ keys as necessary.
Modifying Settings
To change any setting, press the ENTER key, use the • and ‚ keys as necessary
to change the setting and then press the ENTER key again to accept the change.
Exiting Menu
To exit the Lights Menu, press the LIGHTS key.
Lighting Settings
These settings are used to manually change the lighting settings. When standard
lighting is provided a setting of ‘On’ will turn the lights connected to the output on. A
setting of ‘Off’ will turn the lights connected to the output off. When dimmable lighting
is provided each output can be set for a level between off and 100%. Changing light
settings in this menu when running a program will override the programmed light settings
for the current executing step.
Note (dimmable lighting): The lights will be off when the lighting level is set between
0 and a factory preset threshold value. This limit is based on the minimum output level
required to provide stable lighting. Please refer to the operation manual or the
supplemental information provided with the operation manual for the threshold value.
Any LED model is an exception. A setting of 0 in these models will turn the LEDs off.
Any setting greater than 0 will turn the LEDs on.
7
Advanced Intellus Manual Revision 4
Light Lifetime Display
The amount of time that each light output has been on is displayed individually
for each output. This information can be used for light maintenance. Percival Scientific
recommends that fluorescent lights be changed at 5000 hour intervals. When the light
lifetime for an output reaches 5000 hours, change the bulbs that are powered by that
output. Once this has been completed, reset the light lifetime for the output.
Light Lifetime Reset
Light lifetime reset allows you to reset the accumulated time that a light output
has been on. To reset the time, select the output you wish to reset. Press the ENTER
key, use the • and ‚ keys as necessary to change the setting to ‘Yes’ and then press the
ENTER key again. The accumulated time will reset to 0 hours.
%RH Menu
The %RH Menu is only accessible if a humidity option was ordered.
The %RH Menu contains the following settings:
•
•
•
•
•
Manual humidity (%RH) set point.
Enable Humidification
Enable Dehumidification
Day humidity calibration offset.
Night humidity calibration offset.
Menu Entry
To enter the %RH Menu, press the %RH key.
Menu Navigation
To navigate through the menu, use the • and ‚ keys as necessary.
Modifying Settings
To change any setting, press the ENTER key, use the • and ‚ keys as necessary
to change the setting to your requirement and then press the ENTER key again to accept
the change.
Exiting Menu
To exit the %RH Menu, press the %RH key.
8
Advanced Intellus Manual Revision 4
Manual %RH Set Point
This set point is used when running manual settings. Refer to the section titled
“Running Manual Settings” for more information.
Enable Humidify Setting
This setting is used to turn the humidification system of the chamber on or off. A
setting of ‘On’ will activate the humidification system as necessary. When an extreme
low level of humidity is required, it is recommended that the ‘Enable Humidify” setting
be set to ‘Off’.
Enable Dehumi dify Setting
This setting is used to turn the dehumidification system of the chamber on or off.
A setting of ‘On’ will activate the dehumidification system as necessary. When an
extreme high level of humidity is required, it is recommended that the ‘Enable
Dehumidify” setting be set to ‘Off’.
Day %RH Calibration Offset
This setting determines the offset the controller will use when one or more of the
light outputs are on. The value chosen is added to the %RH input value and the new
value is displayed and used for control. Refer to the section titled “Calibration Offsets”
for more information.
Night %RH Calibration Offset
This setting determines the offset the controller will use when all of the light
outputs are off. The value chosen is added to the %RH input value and the new value is
displayed and used for control. Refer to the section titled “Calibration Offsets” for more
information.
CO2/Aux Menu
The CO 2 /Aux Menu is only accessible if a CO2 or auxiliary option was ordered.
The CO 2 /Aux Menu contains the following settings:
•
•
•
•
•
Manual CO 2 /Aux set point.
Enable CO 2 /Aux output 1
Enable CO 2 /Aux output 2
Day CO2/Aux calibration offset.
Night CO2 /Aux calibration offset.
9
Advanced Intellus Manual Revision 4
Menu Entry
To enter the CO2 /Aux Menu, press the CO2 /AUX key.
Menu Navigation
To navigate through the menu, use the • and ‚ keys as necessary.
Modifying Settings
To change any setting, press the ENTER key, use the • and ‚ keys as necessary
to change the setting to your requirement and then press the ENTER key again to accept
the change.
Exiting Menu
To exit the CO2/Aux Menu, press the CO2 /AUX key.
Manual CO2/AUX Set Point
This set point is used when running manual settings. Refer to the section titled
“Running Manual Settings” for more information.
Enable CO2 /Aux Output 1 Setting
This setting is used to turn the CO2 or auxiliary output 1 of the chamber on or off.
A setting of ‘On’ will activate the output as necessary.
Note: When the auxiliary channel is used for dimmable lighting this setting should
always be set to ‘On’.
Enable CO2 /Aux Output 2 Setting
This setting is used to turn the CO2 or auxiliary output 2 of the chamber on or off.
A setting of ‘On’ will activate the output as necessary.
Day CO2 /Aux Calibration Offset
This setting determines the offset the controller will use when one or more of the
light outputs are on. The value chosen is added to the CO2 /Aux input value and the new
value is displayed and used for control. Refer to the section titled “Calibration Offsets”
for more information.
10
Advanced Intellus Manual Revision 4
Night CO 2 /Aux Calibration Offset
This setting determines the offset the controller will use when all of the light
outputs are off. The value chosen is added to the CO2 /Aux input value and the new value
is displayed and used for control. Refer to the section titled “Calibration Offsets” for
more information.
Alarms
The Intellus controller will alert you to controller errors and to temperature safety
alarms. An example controller error would be if a sensor were not correctly connected to
the controller. Alarms cannot be set while programming.
High and low temperature safety alarms can be set in the Temperature Menu.
To adjust the temperature safety alarms use the following steps:
1. Press the TEMP/ALARM key.
2. Use the • and ‚ keys as necessary to select ‘Safety High Alarm’ and
then press ENTER.
3. Use the • and ‚ keys as necessary to change the high safety alarm and
then press ENTER.
4. Press the ‚ key. You will be prompted to enter the ‘Safety Low Alarm’.
Press the ENTER key.
5. Use the • and ‚ keys as necessary to change the low safety alarm and
then press ENTER.
6. Press the TEMP/ALARM key to return to the main display.
When a temperature safety alarm occurs, the controller shuts down all chamber
control components. This protects your experiment from overheating or overcooling. A
message indicating the type of safety alarm will be displayed and a buzzer will activate.
To stop the buzzer, press any key. To clear the safety message, you will need to change
the high or low safety alarm settings beyond the current temperature in the chamber.
When a controller alarm occurs a message indicating the type of alarm will be
displayed and a buzzer will activate. To stop the buzzer, press any key. To clear the
alarm, you will need to correct the cause of the alarm.
Using Auxiliary Channel For Temperature Safeties (optional)
If the option was ordered to utilize a separate sensor for the temperature safeties
then the auxiliary channel has been configured to monitor the temperature in the
chamber. The temperature that the auxiliary sensor reads is displayed in the lower righthand corner of the display. This is the temperature that is used to determine when a
safety occurs.
11
Advanced Intellus Manual Revision 4
The high and low safety settings appear under the auxiliary menu instead of the
temperature menu.
To set the high and low safety settings, use the following steps:
1. Press the CO2 /AUX key.
2. You will be prompted to enter the ‘Safety High Alarm’. Press the ENTER
key. Use the • and ‚ keys as necessary to change the high safety alarm and
then press ENTER.
3. Press the ‚ key. You will be prompted to enter the ‘Safety Low Alarm’.
Press the ENTER key. Use the • and ‚ keys as necessary to change the low
safety alarm and then press ENTER.
4. Press the CO2 /AUX key to exit the menu.
If the auxiliary temperature reading disagrees with the normal temperature
reading then the auxiliary calibration offsets will need to be adjusted. Adjust both offsets
to agree with the normal temperature reading.
To adjust the auxiliary calibration offsets, use the following steps:
1. Press the CO2 /AUX key.
2. Use the • and ‚ keys as necessary to select ‘Day Aux Offset’.
3. Press the ENTER key. Use the • and ‚ keys as necessary to change the day
aux offset and then press ENTER.
4. Press the ‚ key. You will be prompted to enter the ‘Night Aux Offset’.
5. Press the ENTER key. Use the • and ‚ keys as necessary to change the
night aux offset and then press ENTER.
6. Press the CO2 /AUX key to exit the CO 2 /Aux menu.
Using Auxiliary Channel For Dimmable Lighting (optional)
If the option was ordered to control the level of lighting via feedback from a light
sensor then the auxiliary channel has been configured for this purpose. The current level
of lighting read by the light sensor is displayed in the lower right hand corner of the
display. The CO2/Aux menu is used to set the level of lighting required. Refer to the
‘CO2 /Aux Menu’ section of this manual for information on using this menu to control the
lighting. Please note that the CO2 /Aux key on the controller overlay may have been
renamed ‘Light Dimm’ when dimmable lamps are utilized.
Dimmable ballasts have a minimum output level that they can produce. The
controller has been configured to turn off the lights at a set point below this level. Please
refer to the operation manual or supplemental information that has been provided with
the operation manual for information on the threshold value at which the dimmable lamps
will turn off.
Note: When this option is provided, the ‘Enable Aux Output 1’ option should always be
set to ‘On’.
12
Advanced Intellus Manual Revision 4
Defrost Programming (optional)
When a low temperature option is ordered or it is determined that the chamber
may need defrost periods the controller will be configured to allow the defrosting of the
chamber’s cooling coil(s). Up to six defrost periods can be programmed over a twentyfour hour period. When constantly running low temperatures, Percival Scientific
recommends that two seven minute periods be programmed twelve hours apart. The
number of and/or duration of periods may need to be adjusted. The necessity for
programming defrost periods can be gauged by observing the inability of the chamber to
hold the set point at low temperatures.
To program defrost periods, use the following steps:
1. Press the TEMP/ALARM key.
2. Use the • and ‚ keys as necessary to select ‘Number Of Defrosts’.
3. Press the ENTER key. Use the • and ‚ keys as necessary to select the
number of defrost periods required and then press the ENTER key.
4. Press the ‚ key. You will be prompted to enter the ‘Defrost Duration’.
5. Press the ENTER key. Use the • and ‚ keys as necessary to set the
duration of each defrost period and then press the ENTER key.
6. Press the ‚ key. You will be prompted to enter the ‘Defrost 1 Start’.
This is the time that the first defrost period will start.
7. Press the ENTER key. Use the • and ‚ keys as necessary to set the start
time of the first defrost period and then press the ENTER key.
If you programmed to have more than one defrost period then you will need to set
the remaining start times. To set the remaining times:
1. Press the ‚ key to advance to the next period.
2. Press the ENTER key. Use the • and ‚ keys as necessary to set the start
time of the defrost period and then press the ENTER key.
Once you have set the start times for each period, press the TEMP/ALARM key
to exit the temperature menu.
Condensing Unit Shutdown Feature (optional)
On chambers ordered with a high temperature range (generally over 44°C), the
condensing unit will shut down at a pre-determined temperature. The temperature that
the condensing unit will shut off at in your chamber is approximately 40.0 °C. The
condensing unit will remain off above this temperature. This design protects the
condensing unit from overheating.
13
Advanced Intellus Manual Revision 4
Running Manual Settings
Static set points for temperature, humidity and CO2 /Aux can be run as necessary
via manual settings. To run manual settings, enter manual set points for temperature,
humidity and CO2/Aux in their respective menus. Once the set points have been entered,
press the PROG key to enter the Program Menu. Use the • and ‚ keys as necessary to
select ‘Run Manual’ and then press ENTER. The controller will now run the manual set
points continuously.
Programming
The advanced controller allows for the entry of up to 50 different programs. A
total of 500 different program steps can be entered. These steps can be spread across any
number of programs. Each program can be given a unique eight-character name. The
“Program Sequence” feature can be used to sequence multiple programs. This feature is
used to extend the effective program length.
It is important to remember to set the temperature safety alarms accordingly after
programming. Set the high alarm above the highest temperature set in the program. Set
the low alarm below the lowest temperature set in the program.
Creating a New Program
To create a new program, use the following steps:
1. Press the PROG key.
2. Use the • and ‚ keys as necessary to select ‘Create Program’ and then
press ENTER. Note: The Program LED flashes when programming.
3. You will now be asked to enter the program name. The default program
name is the current month followed by the current day followed by the
current year followed by the current program number. For example, if the
date is October 3, 2001 and you are creating the second program of the
day the default name is ‘10030102’. Use the • and ‚ keys as necessary
to change characters. Press the PROG key to advance to the next
character. You may repeatedly press the PROG key to scroll through and
review the program name. Press the ENTER key when you have finished
entering the program name.
4. A step with default data will be entered into the program.
12:00AM
LT:110
24.0C
70%RH
800PPM
Note : The above display assumes that the chamber was ordered with
optional humidity and CO2 packages.
14
Advanced Intellus Manual Revision 4
The time entry of this step is the time at which the step will begin to run.
In the above step example, the chamber will run the temperature set point of
24.0°C, humidity set point of 70%, CO2 set point of 800PPM and light settings of
light outputs 1 and 2 on at 12:00AM.
5. To change the time setting for a step, press the TIME key. Use the • and
‚ keys as necessary to change the time, then press ENTER to accept.
6. To change the temperature setting for a step, press the TEMP/ALARM
key. Use the • and ‚ keys as necessary to change the temperature, then
press ENTER to accept.
7. To change the humidity setting for a step, press the %RH key. Use the •
and ‚ keys as necessary to change the humidity setting, then press
ENTER to accept.
8. To change the lighting settings for a step, press the LIGHTS key.
Repeatedly pressing the LIGHTS key cycles through the available light
outputs. If your controller is configured with more than eight light outputs
there will be a second set of outputs that you can cycle through. Only
eight outputs can be shown on the display at one time. The first set is
displayed as ‘L1’ and the second set is displayed as ‘L2’.
Use the • and ‚ keys as necessary to change each light setting. For
standard lighting use a ‘0’ for off and a ‘1’ for on. When dimmable
lighting is provided, set the desired level for each output. When you are
finished changing the outputs to your requirements, press the ENTER
key.
Note (dimmable lighting): The lights will be off when the lighting level
is set between 0 and a factory preset threshold value. This limit is based
on the minimum output level required to provide stable lighting. Please
refer to the operation manual or the supplemental information provided
with the operation manual for the threshold value. Any LED model is an
exception. A setting of 0 in these models will turn the LEDs off. Any
setting greater than 0 will turn the LEDs on.
9. To change the CO2 /Aux setting for a step, press the CO2 /AUX key. Use
the • and ‚ keys as necessary to change the CO2 /Aux setting, then press
ENTER to accept.
•
To add additional steps to the program, press the PROG key. Use the •
and ‚ keys as necessary to select ’Add Step’ and then press ENTER.
Repeat steps 5-9 to edit each step added.
•
To review the current steps in the program, use the • and ‚ keys as
necessary when no settings are being edited. Note: When editing, a
parameter will be flashing. If no step parameters are flashing then you are
not editing.
15
Advanced Intellus Manual Revision 4
•
To delete a step, use the • and ‚ keys as necessary to select the step you
wish to delete. Once the step is selected, press the PROG key. Use the •
and ‚ keys as necessary to select ’Delete Step’ and then press ENTER.
•
To quit programming, press the PROG key. Use the • and ‚ keys as
necessary to select ’Quit’ and then press ENTER. You will return to the
main display.
•
Refer to the section titled ‘Running Programs’ for information on running
a program.
Editing a Program
Note: This option does not appear when running a sequence. You must either be
running manual settings or an individual program in order for this option to appear.
To edit a program use the following steps:
1. Press the PROG key.
2. Use the • and ‚ keys as necessary to select ‘Edit Program’ and then
press ENTER.
3. Use the • and ‚ keys as necessary to select the program you wish to edit
and then press ENTER.
4. You will be prompted to edit the program name. If you wish to leave the
name the same, press the ENTER key. If you wish to change the name,
use the • and ‚ keys as necessary to change characters. Press the PROG
key to advance to the next character. You may repeatedly press the
PROG key to scroll through and review the program name. Press the
ENTER key when you have finished editing the program name.
5. Use the • and ‚ keys as necessary to review each step.
6. If any setting needs to be changed, press the appropriate key. For
example, if the temperature setting needs to be changed for a step, press
the TEMP/ALARM key. Use the • and ‚ keys as necessary to change
the setting and then press ENTER to accept.
7. Remember that when any setting is flashing you are editing that particular
step. To navigate through the program, use the • and ‚ keys as
necessary when no settings are flashing.
8. You may add and delete steps by pressing the PROG key and selecting
the appropriate prompt.
9. When you have finished editing, press the PROG key. Use the • and ‚
keys as necessary to select ’Quit’ and then press ENTER. You will return
to the main display.
16
Advanced Intellus Manual Revision 4
Deleting a Program
Note: This option does not appear when running a sequence. You must either be
running manual settings or an individual program in order for this option to appear.
To delete a program use the following steps:
1. Press the PROG key.
2. Use the • and ‚ keys as necessary to select ‘Delete Program’ and then
press ENTER.
3. Use the • and ‚ keys as necessary to select the program you wish to
delete and then press ENTER.
4. When prompted to confirm deletion, use the • and ‚ keys as necessary to
select ‘Yes’ and then press ENTER.
5. Press the PROG key to return to normal operation.
Important! Deleting a program that appears in a sequence of programs will
cause the entire sequence to be deleted.
Copying a Program
To copy a program use the following steps:
1. Press the PROG key.
2. Use the • and ‚ keys as necessary to select ‘Copy Program’ and then
press ENTER.
3. Use the • and ‚ keys as necessary to select the program you wish to
copy and then press ENTER.
4. You will be prompted to edit the new program name. If you wish to leave
the name the same as the default, press the ENTER key. If you wish to
change the name, use the • and ‚ keys as necessary to change characters.
Press the PROG key to advance to the next character. You may
repeatedly press the PROG key to scroll through and review the program
name. Press the ENTER key when you have finished editing the program
name.
5. You will now enter the program edit mode. You may change/add/delete
steps as necessary to the copied program.
6. When you have finished editing the copied program, press the PROG key.
Use the • and ‚ keys as necessary to select ’Quit’ and then press
ENTER. You will return to the main display.
Creating a Sequence of Programs
17
Advanced Intellus Manual Revision 4
Note: This option does not appear when running a sequence. You must either be
running manual settings or an individual program in order for this option to appear.
You can create a sequence of programs to run by selecting to program a sequence.
A sequence of programs consists of a list of programs that you choose to run. Any
program that you have created in the controller can be added to the sequence.
When adding programs to the sequence you also enter the number of iterations for
the program to run. This allows you to run any program in the sequence more than one
time in a row. Each program runs over a 24- hour period. Once a program finishes
running over the 24-hour period it will either repeat again based on the number of
iterations entered or will continue to the next program in the sequence.
An example of a sequence of programs appears below. This program runs a
different program each day of the week except for Saturday and Sunday. On Saturday
and Sunday the sequence runs the same program, ‘Weekend’.
Program Name
Monday
Tuesday
Wednesday
Thursday
Friday
Weekend
Iterations
1
1
1
1
1
2
Important! Deleting a program that appears in a sequence of programs will cause the
entire sequence to be deleted.
To create a sequence of programs use the following steps:
1. Press the PROG key.
2. Use the • and ‚ keys as necessary to select ‘Program Sequence’ and then
press ENTER.
3. If no sequence currently exists you will be prompted to ‘Create Sequence’.
Press ENTER to create a sequence.
4. Use the • and ‚ keys as necessary to select the program you wish to add
to the sequence and then press ENTER.
5. Use the • and ‚ keys as necessary to select the number of iterations you
wish the added program to run and then press ENTER.
•
•
To add more programs to the sequence, select ‘Add Program’ and press
the ENTER key. Follow steps 4 & 5 above to add the new program.
To delete a program from the sequence, use the • and ‚ keys as
necessary to select ‘Delete Program’ and then press ENTER. When
prompted to select the program, use the • and ‚ keys as necessary to
select the program you wish to delete from the sequence and then press
ENTER.
18
Advanced Intellus Manual Revision 4
•
•
To insert a program into the sequence, use the • and ‚ keys as necessary
to select ‘Insert Program’ and then press ENTER. When prompted to
select the program, use the • and ‚ keys as necessary to select the
program you wish to insert into the sequence and then press ENTER.
When prompted to select the program to insert after, use the • and ‚
keys as necessary to select the program you wish to insert the program
after and then press ENTER.
When you are finished programming the sequence, use the • and ‚ keys
as necessary to select ‘Quit’ and then press ENTER. Refer to the section
titled “Running Programs/Sequence of Programs” for information on
running the sequence.
IMPORTANT! – The following information is provided to make sequence
programming easier. Please read and be aware of this information before attempting to
enter a sequence.
•
•
Write the sequence of programs and number of iterations for each program down
before attempting to enter a sequence.
Each program in the sequence runs over a 24-hour period. Programs are entered
with 12:00AM being the earliest possible step and 11:59PM being the latest
possible step. When changing from one program to another in a running sequence
the last step of the current program and the first step in the next program are used
to determine the set point. In other words, if the last step programmed in the
current running program is at 10:00PM and the first step in the next program is at
6:00AM the controller will use these two times as the basis for the set point. If
the controller is set to ramp set points, the set point will ramp between the set
points at 10:00PM and 6:00AM. It is suggested (not required) that any program
used in a sequence have a step entered at 12:00AM. This way you will always
know the set point the new program will start at when the controller switches
from the current running program to the next program in the sequence. If you do
not set the first step of each program to 12:00AM, unpredictable results may
occur when running the sequence.
Running Programs / Sequence of Programs
To run a single program use the following steps:
1. Press the PROG key.
2. Use the • and ‚ keys as necessary to select ‘Run Program’ and then
press ENTER.
3. Use the • and ‚ keys as necessary to select the program you wish to run
and then press ENTER.
4. The Program LED illuminates indicating that the program is running.
To run a sequence of programs use the following steps:
19
Advanced Intellus Manual Revision 4
1. Press the PROG key.
2. Use the • and ‚ keys as necessary to select ‘Run Sequence’ and then
press ENTER.
3. Use the • and ‚ keys as necessary to select the program you wish to start
the sequence from and then press ENTER. This is normally the first
program you added to the sequence.
4. Use the • and ‚ keys as necessary to select the iteration of the program
selected to start the sequence from and then press ENTER. This is
normally the first iteration.
5. The Program LED illuminates indicating that the sequence is running.
When viewing the status menu, you can view the current point in the sequence
that is running. To do this, use the • and ‚ keys as necessary to scroll to the
display resembling Figure 3 below.
Step: 1
Iteration: 1
Program1
Figure 3 – Program Sequence Status
Note: The following options are not available when running a sequence:
•
•
•
Editing a program
Deleting a program
Programming a sequence
Setting Program Operation Mode
Programs can run either in a non-ramping or ramping mode. The default mode is
ramping. When programs run in ramping mode the controller will ramp the set point as
necessary between each set point. For example, if you have a step programmed at
6:00AM for 10°C and a step programmed at 10:00AM for 30°C the set point will ramp
between 10°C and 30°C over four hours. Figure 4 illustrates this example. Between
6:00AM and 10:00AM the set point (and subsequently process value) will increase
approximately .08°C per minute.
You can add non-ramping steps to a ramping program. Using the previous
example, to hold the temperature at 10°C between 6:00AM and 10:00AM you simply add
a step at 9:59AM with a temperature set point of 10°C. The controller will maintain the
temperature at 10°C between 6:00AM and 9:59AM and at 10:00AM will immediately
change the set point to 30°C.
20
Advanced Intellus Manual Revision 4
Figure 4 – Ramping Program Example
If you do not wish to use this programming method you can change the default
ramping mode to non-ramping. To do this, use the following steps:
1. Hold both the ENTER and • keys simultaneously for approximately four
seconds. The controller will prompt you to enter the security level
password. The default password is ‘1111’. If this password does not
work then security may have been configured. If this is the case, contact
the person responsible for securing the controller and have them enter the
password. If the first character of the password is not flashing, press the
ENTER key. Use the • and ‚ keys as necessary to change characters.
Press the PROG key to advance to the next character. You may
repeatedly press the PROG key to scroll through and review the
password. Pressing the PROG key at the last character will cause the
character selection to wrap around. Press the ENTER key when the
security level password has been successfully entered.
2. Use the • and ‚ keys as necessary unt il “Control Type” appears in the
upper display and then press ENTER.
3. Use the • and ‚ keys as necessary to select “Non-Ramping” and then
press ENTER.
4. Hold both the ENTER and • keys simultaneously for approximately four
seconds. You will return to the status menu. The controller is now set to
run programs in the non-ramping mode.
You can change the method back to ramping by following the same steps and
selecting “Ramping” instead of “Non-Ramping” in step #3.
21
Advanced Intellus Manual Revision 4
Calibration Offsets
If the current temperature, humidity or CO 2 /Aux displayed disagrees with your
measurement device(s) adjust the calibration offsets. Day and night offsets are available
for temperature, humidity (if ordered) and CO 2 /Aux (if ordered). The Day Offset will be
used when any light output is on. The Night Offset will be used when all light outputs
are off. The value entered for each offset is added to the input value as required and the
new value is displayed and used for control. Calibration offsets cannot be set while
programming.
To adjust the temperature offsets use the following steps:
1. Press the TEMP/ALARM key.
2. Use the • and ‚ keys as necessary to select “Day Temp Offset” and then
press ENTER.
3. Use the • and ‚ keys as necessary to change the offset and then press
ENTER.
4. Use the • and ‚ keys as necessary to select “Night Temp Offset” and
then press ENTER.
5. Use the • and ‚ keys as necessary to change the offset and then press
ENTER.
6. Press the TEMP/ALARM key to return to the main display.
To adjust the humidity offsets use the following steps:
1. Press the %RH key.
2. Use the • and ‚ keys as necessary to select “Day RH Offset” and then
press ENTER.
3. Use the • and ‚ keys as necessary to change the offset and then press
ENTER.
4. Use the • and ‚ keys as necessary to select “Night RH Offset” and then
press ENTER.
5. Use the • and ‚ keys as necessary to change the offset and then press
ENTER.
6. Press the %RH key to return to the main display.
To adjust the CO 2 /Aux offsets use the following steps:
1. Press the CO2 /AUX key.
2. Use the • and ‚ keys as necessary to select “Day CO 2 /Aux Offset” and
then press ENTER.
3. Use the • and ‚ keys as necessary to change the offset and then press
ENTER.
4. Use the • and ‚ keys as necessary to select “Night CO 2 /Aux Offset” and
then press ENTER.
22
Advanced Intellus Manual Revision 4
5. Use the • and ‚ keys as necessary to change the offset and then press
ENTER.
6. Press the CO2 /AUX key to return to the main display.
Sample Program
6:00AM – 15.0°C, 60% humidity, one half lights on.
10:00AM - 17.0°C, 65% humidity, all lights on.
2:00PM – 21.0°C, 70% humidity, all lights on.
6:00PM – 24.0°C, 70% humidity, one half lights on.
10:00PM – 21.0°C, 60% humidity, all lights off.
2:00AM – 12.0°C, 50% humidity, all lights off.
Note : The sample program assumes the chamber was ordered with a humidity
option and two light outputs. The steps necessary to complete an actual program in your
chamber may be different. If your chamber has less or additional options the displays
presented in the sample program will not exactly reflect the displays you are presented
with.
Use the following steps as a guide to entering the sample program:
•
•
•
•
Press the PROG key.
Use the • and ‚ keys as necessary to select ‘Create Program’ and then
press ENTER.
When prompted to “Edit Program Name”, press ENTER to accept the
default name.
The display reads as follows.
12:00AM
L1:00
•
•
•
•
•
•
•
•
•
24.0C
70%RH
Press the TIME key. The step time flashes indicating that you can change
the time.
Use the • and ‚ keys as necessary to change the time to 6:00AM.
Press the TEMP/ALARM key. The step temperature value flashes
indicating that you can change the temperature value.
Use the • and ‚ keys as necessary to change the temperature to 15.0°C.
Press the %RH key. The step humidity value flashes indicating that you
can change the humidity value.
Use the • and ‚ keys as necessary to change the %RH to 60%.
Press the LIGHTS key. The step lighting output #1 value flashes
indicating that you can change the lighting output #1 value.
Use the • and ‚ keys as necessary to change the first light output to 1
(on).
Press ENTER. Verify that no settings are flashing. The display should
read as follows.
23
Advanced Intellus Manual Revision 4
6:00AM
L1:10
•
•
•
60%RH
17.0C
65%RH
Press the PROG key.
Use the • and ‚ keys as necessary to select “Add Step” and then press
ENTER. The display reads as follows.
10:01AM
L1:11
•
•
•
•
•
•
•
15.0C
Press the TIME key.
Use the • and ‚ keys as necessary to change the time to 10:00AM.
Press the TEMP/ALARM key.
Use the • and ‚ keys as necessary to change the temperature to 17.0°C.
Press the %RH key.
Use the • and ‚ keys as necessary to change the %RH to 65%.
Repeatedly press the LIGHTS key until the second output flashes.
Use the • and ‚ keys as necessary to change the second light output to 1
(on).
Press ENTER. Verify that no settings are flashing. The display should
read as follows.
10:00AM
L1:11
•
•
60%RH
Press the PROG key.
Use the • and ‚ keys as necessary to select “Add Step” and then press
ENTER. The display reads as follows.
6:01AM
L1:10
•
•
•
•
•
•
•
•
15.0C
17.0C
65%RH
Press the TIME key.
Use the • and ‚ keys as necessary to change the time to 2:00PM.
Press the TEMP/ALARM key.
Use the • and ‚ keys as necessary to change the temperature to 21.0°C.
Press the %RH key.
Use the • and ‚ keys as necessary to change the %RH to 70%.
Press ENTER. Verify that no settings are flashing. The display should
read as follows.
2:00PM
L1:11
21.0C
70%RH
24
Advanced Intellus Manual Revision 4
•
•
Press the PROG key.
Use the • and ‚ keys as necessary to select “Add Step” and then press
ENTER. The display reads as follows.
2:01PM
LT:11
•
•
•
•
•
•
•
•
70%RH
24.0C
70%RH
Press the TIME key.
Use the • and ‚ keys as necessary to change the time to 10:00PM.
Press the TEMP/ALARM key.
Use the • and ‚ keys as necessary to change the temperature to 21.0°C.
Press the %RH key.
Use the • and ‚ keys as necessary to change the %RH to 60%.
Press the LIGHTS key.
Use the • and ‚ keys as necessary to change the first light output to 0
(off).
Press ENTER. Verify that no settings are flashing. The display should
read as follows.
10:00PM
LT:00
•
•
24.0C
Press the PROG key.
Use the • and ‚ keys as necessary to select “Add Step” and then press
ENTER. The display reads as follows.
6:01PM
LT:10
•
•
•
•
•
•
•
•
70%RH
Press the TIME key.
Use the • and ‚ keys as necessary to change the time to 6:00PM.
Press the TEMP/ALARM key.
Use the • and ‚ keys as necessary to change the temperature to 24.0°C.
Repeatedly press the LIGHTS key until the second output flashes.
Use the • and ‚ keys as necessary to change the second light output to 0
(off).
Press ENTER. Verify that no settings are flashing. The display should
read as follows.
6:00PM
LT:10
•
•
21.0C
21.0C
60%RH
Press the PROG key.
Use the • and ‚ keys as necessary to select “Add Step” and then press
ENTER. The display reads as follows.
25
Advanced Intellus Manual Revision 4
10:01PM
LT:00
•
•
•
•
•
•
•
21.0C
60%RH
Press the TIME key.
Use the • and ‚ keys as necessary to change the time to 2:00AM.
Press the TEMP/ALARM key.
Use the • and ‚ keys as necessary to change the temperature to 12.0°C.
Press the %RH key.
Use the • and ‚ keys as necessary to change the %RH to 50%.
Press ENTER. Verify that no settings are flashing. The display should
read as follows.
2:00AM
LT:00
12.0C
50%RH
Verify that no settings are flashing. Use the • and ‚ keys as necessary to review
the program. Remember, when reviewing the program that you may change any
incorrect settings as necessary by pressing the appropriate keys. Refer to the section
titled “Running Programs” for information on running the sample program.
Configuring Security (optional)
IMPORTANT! : Please be aware of the following points before configuring security.
•
•
•
Security is optional. If you do not need to secure your controller then do not
configure security.
If you are unsure about how to configure security, please contact Percival
Scientific. If configuration is not done properly it can result in the controller
becoming password locked. If this happens it will need to be returned to
Percival Scientific and unlocked at your expense.
Always write down passwords as you change them. This will prevent you
from inadvertently restricting access to the controller. Keep the passwords in
a safe place that is readily accessible by those you trust with full access to the
controller.
Four levels of security are available with the Intellus controller. Levels one
through three can be assigned a password up to four characters. When the cont roller
leaves Percival Scientific security is disabled. To activate security you must change only
one of the default passwords. A description of what is accessible via each level follows:
26
Advanced Intellus Manual Revision 4
Level 4
Level 4 is the most secure level and only allows access to the display loop. No password
exists for this level. When logging off or if the controller senses no keypad activity for
five minutes the controller will revert to this level.
Level 3
Level 3 allows level 4 access plus access to changing the temperature alarms (if
activated), humidity alarms (if activated) and CO2/Auxilary alarms (if activated). Level
3 also allows the user to change the system time. When logging in to the controller the
Level 3 password must be entered to gain access to this level.
Level 2
Level 2 allows level 3 access plus full access to the temperature, lights, %RH and
CO2 /Aux menus. Level 2 also allows the running of program files. A password must be
entered to gain access to this level. When logging in to the controller the Level 2
password must be entered to gain access to this level.
Level 1
Level 1 allows full access to the controller. When logging in to the controller the Level
1 password must be entered to gain access to this level.
Security Level
The Secur ity Level password is used to gain entry to the menu that allows the
changing of passwords. You cannot use the security password to log in and out of the
controller.
Security is configured by holding both the ENTER and • keys simultaneously
for approximately four seconds. The controller will prompt you to enter the security
level password, which is ‘1111’. If the first character of the password is not flashing,
press the ENTER key. Use the • and ‚ keys as necessary to change characters. Press
the PROG key to advance to the next character. You may repeatedly press the PROG
key to scroll through and review the password. Pressing the PROG key at the last
character will cause the character selection to wrap around. Press the ENTER key when
the password ‘1111’ has been successfully entered.
You will now be prompted to change the Level 1 (Lvl1) password. The default
password is ‘0001’. If you do not wish to change the password, press the ‚ key and
continue reading at the next paragraph. To change the password, press ENTER, use the
• or ‚ key to change the flashing prompt to ‘Yes’ and then press ENTER. Next, press
the ‚ key. You will be prompted to enter a new password for level 1. To enter the
password, press ENTER. The first character will begin flashing. Use the • and ‚ keys
as necessary to change characters. Press the PROG key to advance to the next character.
27
Advanced Intellus Manual Revision 4
You may repeatedly press the PROG key to scroll through and review the password.
Press the ENTER key when the password has been successfully changed.
You will now be prompted to change the Level 2 (Lvl2) password. The default
password is ‘0002’. If you do not wish to change the password, press the ‚ key and
continue reading at the next paragraph. To change the password, press ENTER, use the
• or ‚ key to change the flashing prompt to ‘Yes’ and then press ENTER. Next, press
the ‚ key. You will be prompted to enter a new password for level 2. To enter the
password, press ENTER. The first character will begin flashing. Use the • and ‚ keys
as necessary to change characters. Press the PROG key to advance to the next character.
You may repeatedly press the PROG key to scroll through and review the password.
Press the ENTER key when the password has been successfully changed.
You will now be prompted to change the Level 3 (Lvl3) password. The default
password is ‘0003’. If you do not wish to change the password, press the ‚ key and
continue reading at the next paragraph. To change the password, press ENTER, use the
• or ‚ key to change the flashing prompt to ‘Yes’ and then press ENTER. Next, press
the ‚ key. You will be prompted to enter a new password for level 3. To enter the
password, press ENTER. The first character will begin flashing. Use the • and ‚ keys
as necessary to change characters. Press the PROG key to advance to the next character.
You may repeatedly press the PROG key to scroll through and review the password.
Press the ENTER key when the password has been successfully changed.
You will now be prompted to change the Security Level (Slvl) password. The
default password is ‘1111’. To change the password, press ENTER, use the • or ‚ key
to change the flashing prompt to ‘Yes’ and then press ENTER. Next, press the ‚ key.
You will be prompted to enter a new password for the security level. To enter the
password, press ENTER. The first character will begin flashing. Use the • and ‚ keys
as necessary to change characters. Press the PROG key to advance to the next character.
You may repeatedly press the PROG key to scroll through and review the password.
Press the ENTER key when the password has been successfully changed.
IMPORTANT!!: It is necessary to change the security level password when
implementing security. The security level password is used to enter the menu that allows
the changing of passwords. If this password is not changed, anyone could use the default
‘1111’ password and override password settings. NOTE: It is extremely important that
you remember the security level password after it is changed. If it is forgotten, the
controller will need to be returned to Percival Scientific at your expense in order to
restore it to its password defaults.
To exit the security menu, press and hold both the ENTER and • keys simultaneously
for approximately two seconds.
Logging In/Out
Once security is configured each user that accesses the controller will need to log
in and out.
To log in, use the following procedure
28
Advanced Intellus Manual Revision 4
Press and hold both the HELP and ‚ keys until you are prompted to enter your
password. Use the • and ‚ keys as necessary to change characters. Press the PROG
key to advance to the next character. You may repeatedly press the PROG key to scroll
through and review the password. Pressing the PROG key at the last character will cause
the character selection to wrap around. Press the ENTER key when the password has
been successfully entered.
To log out, use the following procedure:
Press and hold both the HELP and ‚ keys until the “Logout Successful” message
appears.
IMPORTANT: Remember to log out when you are finished using the controller. The
controller will automatically log you out if there is no keypad activity for five minutes.
Disabling Security
To disable security you must reset each password to its default. See the
‘Configuring Security’ section for information on settings passwords.
•
•
•
•
Level 1 Default Password : ‘0001’
Level 2 Default Password : ‘0002’
Level 3 Default Password : ‘0003’
Security Level Default Password : ‘1111’
29
Advanced Intellus Manual Revision 4
Program Entry Table
Time
Temperature
%RH
Lights
CO2 /Aux
30
Advanced Intellus Manual Revision 4