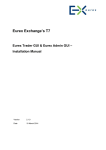
1
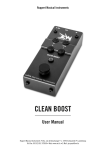
Little Lehle II www.lehle.com Operating instructions Lehle GmbH • Grenzstr. 153 • D-46562 Voerde • Germany • Tel +49 (0) 2855 850070 Dear Musician! Thank you for purchasing the Little Lehle II! I have been building units that switch, split and route signals with no technical compromises and with maximum musical fidelity since 1999. Your new Little Lehle II comprises only the very best components. Every assembly of your Little Lehle II has been made and tested in Germany. Your Little Lehle II is of extremely robust design and construction, to make sure that you get absolutely years and years of enjoyment from it. If you should nonetheless have a problem, or simply a question, just mail me or a member of the Lehle team at: [email protected] I wish you the very greatest pleasure and success using your Little Lehle II! Burkhard Georg Lehle Contents Introduction................................................................................................................................ 2 Technical data............................................................................................................................ 3 General description.................................................................................................................... 4 Typical uses - Little Lehle II as an effects loop switcher........................................................................... 8 - Little Lehle II as an effects loop switcher for Inserts between Send and Return of an amplifier... 9 - Little Lehle II as an A/B switcher between two amplifiers................................................. 10 - Little Lehle II as an A/B switcher between two instruments............................................... 12 - Little Lehle II as a tuner-mute switcher............................................................................ 13 - Little Lehle II as an effects loop switcher for microphones................................................ 14 Troubleshooting........................................................................................................................ 15 Little Lehle II signal flow diagram........................................................................................... 18 1 The Little Lehle II - the universal Lehle switching and looping tool. The Little Lehle II removes effects pedals from the signal path at the press of its button. A signal can be picked off at any point in the signal chain, to switch to an instrument tuner, for example. The Little Lehle II can also be used to switch between two instruments on one amp or, vice versa, between two amps with one instrument. Extremely diverse sound sources are possible - signals from pickups, microphones and keyboard line-out sockets are routed loss-free to the target amplifier or recorders, and all jack plugs are stereo. Switches with gold-plated contacts assure True Bypass. As on this unit’s “big brother”, the Lehle D.Loop SGoS, not only the stereo signal, but also the signal ground, is switched – so hum loops just can’t happen any more when switching between two amps or looping effects. The easy-action mushroom-shaped button characteristic of Lehle products is mounted in the cover, so that your foot pressure is transmitted indirectly, via only a spring, to the slide switch with its gold- 2 plated contacts. The printed circuit board with the electronics on it is thus not exposed to mechanical loads, making the Little Lehle II virtually indestructible and guaranteeing years of trouble-free switching. Technical data Weight: 360 g Length: 9 cm (3.5”) Width: 9.2 cm (3.6”) Overall height: 5 cm (2”) Voltage range: 8 - 20V DC or AC Max. power take-up: 20 mA Max. level: 36 dBU (40 mA) 3 General description 4 1. Input socket Connect your instrument to this socket. The input signal enters via this socket. Like all the jack plugs on the Little Lehle II, the socket is of stereo type. The Little Lehle II thus switches stereo signals (such as stereo effects or keyboards) and balanced signals (like those from microphones, for instance) and, of course, simple mono signals, like that of an electric guitar. The LED (6) shows green when the signal is present on the output (4) together with the ground (earth) connection. Press the True Bypass switch (7) and the stereo signal and ground connection are routed to the S socket (2). The LED (6) will now show red. Switching of the ground connections eliminates the possibility of hum loops. 2. Send socket Connect the input of your effects unit or amplifier to this socket. Depending on the mode selected, this socket is either connected to the input of one or more effects units, to a second amplifier or, for example, to a tuner. 3. Return socket Connect the output of your effects unit or a second instrument to this socket. This socket can be used for connection to the output of an effects unit, to the last output of a complete effect chain or, for example, can also be used for a second instrument. It has no function if the Little Lehle II is used as an A/B box for operation with two amplifiers. 4. Output socket Connect your amplifier to this socket. The output signal is routed out of the Little Lehle II via this socket. The LED (6) shows green when the input signal together with the ground connection is directly present here. Pressing the True Bypass switch (7) routes the R(eturn) socket signal (3) together with the ground connection to the output socket. 5. External power supply Connect a power pack for a voltage of 8 to 20 V to this socket, when needed. The Little Lehle II switches all audio signals completely without electricity. To detect the switch- 5 ing status, it requires an 8 to 20V power supply for operation of the LEDs. Polarity is of no importance. The supply voltage is internally rectified and stabilized in order to guarantee trouble-free operation. A thermal cut-out automatically trips and switches the unit off if a short circuit occurs. A correctly fitting plug connector for the powersupply socket is supplied with the Little Lehle II. This can be soldered to the required power unit if necessary. It is advisable to use a separate power adapter or an outlet on a multiple outlet power adapter with electrically isolated outlets for the Little Lehle II, but with no other loads connected to it, to avoid interference noise during operation or when switching. 6. LEDs for switching status If the LED shows green, the Input (1) is directly connected to the Output (4). The high-intensity LEDs clearly indicate the current switching status - even under bright spotlights. When you use the Little Lehle II as an effects loop switcher and the LED shows green, the effects are in Bypass, when red they are in the signal path. 6 7. True Bypass switch Here you can switch. Two parallel slide switches with gold-plated contacts, which switch the stereo signal together with the ground connections, are actuated inside the switcher by means of a practically indestructible switching mechanism. The slide switches switch virtually silently, since they function completely bounce-free. Do you hear nevertheless unpleasant sounds like a loud cracking while switching, please read chapter “Troubleshooting” on page 15. 8. Base and fixing You can use the fixing screws supplied with the Little Lehle II to fix it to a base plate (or a pedal board, for example). Tip: in case you prefer a velcro solution for your pedalboard we recommend to write down the serial number of the pedal before covering it for eventual support matters. Thanks to its ready-to-go fixing system, the Little Lehle II can be mounted without difficulty on a base plate. To do this, undo the four housing screws and detach the cover. Then fix the device base to a base plate using the two screws, the washers and the spacers supplied. Replace the cover and tighten the four housing screws - done! 7 Typical uses The Little Lehle II as an effects loop switcher You can use the Little Lehle II as a loop switcher for individual effects units, and also for complete pedal boards. Not all effects pedals feature True Bypass, and those that don’t can cause signal losses when deactivated. The Little Lehle II makes it possible to eliminate them from the signal path completely in just one step. 8 Device connection Input (1) Instrument Send (2) Input effects unit(s) Return (3) Output effects unit(s) Output (4) Amp plug, since the signal on the ring of the jack plug would be muted by a mono jack plug. The Little Lehle II as an effects loop switcher for Inserts between Send and Return of an amplifier What to do: 1. Connect your instrument to the Input socket (1) of the Little Lehle II. 2. Connect the input of the effects unit with the Send (2) of the Little Lehle II. 3. Connect the output socket of the effects unit with the Return socket (3) of the Little Lehle II. 4. Connect the amplifier with the Output socket (4). 5. There you go! Note: This works equally well with both mono and stereo effects. If you are using stereo effects via a mono input, make sure that all the jack plugs connected to the Little Lehle II are stereo. Where a mono signal is present, the mono-signal conductor must be soldered to both the tip and the ring of the The Little Lehle II can also be excellently used in FX loops of amplifiers to loop in 19”-effects or even pedals. Low-impedance signals with high level the Little Lehle II easily switches without loss of signal. 9 Device connection Input (1) Amp Send Send (2) Input effects unit(s) Return (3) Output effects unit(s) Output (4) Amp Return The Little Lehle II as an A/B switcher between two amplifiers What to do: 1. Connect the Send of your amplifier to the Input socket (1) of the Little Lehle II. 2. Connect the input of the effects unit with the Send socket (2) of the Little Lehle II. 3. Connect the output socket of the effects unit with the Return socket (3) of the Little Lehle II. 4. Connect the Return of your amplifier with the Output socket (4). 5. There you go! The Little Lehle II can be extremely useful for switching, when playing live with two amps, for instance, between the clean sound of amp A and the distorted sound of amp B. It also enables you to switch quickly between familiar sounds, or to 10 compare A and B, when you are in the studio or the rehearsal room. Device connection Input (1) Instrument Send (2) Amp 1 Return (3) Output (4) Amp 2 reasons, never be removed, taped off or disconnected! Because of the grounding and the signal ground of the guitar, two amplifiers connected to one guitar can generate background noise. This background noise is called “ground loop”. You are guaranteed not to have ground loops when you use the Little Lehle II, because it switches not only the signal back and forth between the amplifiers, but also, simultaneously, the signal ground. What to do: 1. Connect your instrument to the Input socket (1) of the Little Lehle II. 2. Connect the first amplifier to the Send socket (2) of the Little Lehle II. 3. Do not use socket R (3). 4. Connect the second amplifier to the Output socket (4) of the Little Lehle II. 5. There you go! Note: Most amplifiers are connected to a power supply using a three-core cable: two cores supply the power, while the third core is the equipment grounding conductor which grounds the amplifier. If this ground core is installed, it must, for safety 11 The Little Lehle II as an A/B switcher between two instruments channel, and just pulling out the plug can cause nasty popping from the speakers. To do it in just one step: Device connection Input (1) Instrument 1 Send (2) Return (3) Instrument 2 Output (4) Amp What to do: 1. Connect your first instrument to the Input socket (1) of the Little Lehle II. 2. Do not use socket S (2). 3. Connect your second instrument to the Return socket (3) of the Little Lehle II. 4. Connect the amplifier to the Output socket (4) of the Little Lehle II. 5. There you go! In order to swap between two instruments quickly and easily, you can install the Little Lehle II between the instruments and the rest of your setup. It is not always possible to mute your amplifier or PA 12 The Little Lehle II as a tuner-mute switcher Device connection Input (1) Instrument Send (2) Tuner Return (3) Output (4) Amp What to do: 1. Connect your instrument to the Input socket (1) of the Little Lehle II. 2. Connect your tuner to the Send socket (2) of the Little Lehle II. 3. Do not use the R socket (3). 4. Connect your amplifier to the Output socket (4) of the Little Lehle II. 5. There you go! Even in smaller setups with only one guitar and one amplifier, the Little Lehle II can help by muting the signal while you are tuning up, so that your audience and your bandmates do not hear you. 13 The Little Lehle II as an effects loop switcher for microphones Device connection Input (1) Microphone (balanced) Send (2) Input effects unit (balanced) Return (3) Output effects unit (balanced) Output (4) Input mixer (balanced) What to do: 1. Connect your microphone to the Input socket (1) of the Little Lehle II. 2. Connect the input of the effects unit to the Send socket (2) of the Little Lehle II. 3. Connect the output of the effects unit to the Return socket (3) of the Little Lehle II. 4. Connect the input of your mixer to the Output socket (4) of the Little Lehle II. 5. There you go! More and more vocalists are using effects units to modify the sound of their voices. The Little Lehle II is optimally suitable for this function, too, since it can also switch balanced signals. It does not have to be a microphone, of course - the Little Lehle II also switches other balanced signal sources. 14 Balanced signal lines are fitted with XLR connectors or TRS (Tip Ring Sleeve) jack plugs. In a balanced signal line, the signal is present in phase at the tip, as in the case of an unbalanced signal line (XLR Pin 2). The second signal conductor carries the same signal, but with the opposite polarity or mirror-image phase (Ring, XLR Pin 3). The third conductor is the screening, and again constitutes the signal ground (Sleeve, XLR Pin 1). Ground Signal in mirrored phase Signal in phase JackXLR Sleeve Pin 1 Ring Pin 3 Tip Pin 2 Note: Signals from microphones that require phantom power cannot be switched this way, since this would mean that the phantom power would be switched off and on. Switching phantom power off and on generally causes a loud noise! Troubleshooting Something is rattling inside my unit If you should happen to shake the Little Lehle II, you will hear a slight metallic rattling from inside. This is a mechanical noise caused by a flat spring which diverts the force of the True Bypass switch button on to the horizontal slide switch inside the Little Lehle II. So it is not a defect, not a problem, just a healthy indication that the spring is not jammed. Audible clicking during switching Two things, generally, can cause switching noise: the power supply unit used, or a DC voltage component in the audio signal, a so-called “DC offset”. The first thing to do, in order to determine whether the switching noise is caused by the Little Lehle II itself, is to remove all other factors, if possible, from the signal path. To do this, remove the Little Lehle II’s power supply (5), then connect the instrument to the input (1) and the amplifier to the output (4) of the Little Lehle II. Use a patch cable and plug it into the Send (2) and the Return socket (3), Send 15 and Return are now bridged. The switching noise should now be significantly less, or have disappeared completely; if not, test out other instruments and/or other amplifier combinations. If, contrary to expectations, the switching noise does not disappear, then please contact our support team at [email protected]. Power supply unit Switching noise is frequently the result of using non-electrically isolated or severely interferencegenerating digital / switched-mode power supply units. The only solution here is to use a better power supply unit. DC offset So-called DC offset, i.e., a DC voltage component in the audio signal, is a frequent problem, and causes loud switching noises which are heard as popping or clicking. The Lehle DC Filter is useful in filtering out this DC voltage from the signal, and should be connected as shown in the following example. 16 Filtering of the DC voltage component at the output of an effects unit The Lehle DC Filter can be used behind the output of the final effects unit to minimize switching noise if you use one or more effects units in the signal path with an effects loop switcher. Device connection DC socket Output effects unit(s) 0DC socket Return effects loop switcher What to do: 1. Connect the output of the effects unit to the DC socket of the Lehle DC Filter. 2. Connect the 0DC socket of the Lehle DC Filter to the return of the effects loop switcher. 3. There you go! Filtering the DC voltage component at the input of an amp Many amplifiers, and older models, in particular including the appreciated vintage amps, of course - also feature DC voltage at the input, which can become noticeable in the form of an unpleasant switching noise. The Lehle DC Filter also provides a remedy here! Device connection DC socket Input amp 0DC socket Output amp switcher What to do: 1. Connect the DC socket of the Lehle DC Filter to the input of the amplifier. 2. Connect the output of the amp switcher to the 0DC socket of the Lehle DC Filter. 3. There you go! 17 Little Lehle II signal flow diagram 18