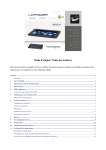
1
Catalogue
Catalogu............................................................................................ 1
User tips .......................................................................................... 2
1. Outlook desciption ...................................................................... 3
2.Power button usage ...................................................................... 3
3. Touch panel .................................................................................. 3
4. Transfer line ................................................................................ 3
5. TF card usage ................................................................................ 4
6. Start to use ................................................................................... 4
Battery charging ........................................................................ 4
Battery management .................................................................. 4
turn off the device ....................................................................... 5
Wi-Fi network settings ............................................................... 5
3G network settings…………………………………………………………………….......……5
7. Desktop ......................................................................................... 6
8. Screen lock interface ..................................................................... 7
9. Progam ......................................................................................... 8
Download and install software ..................................................... 9
10. Desk meue functions .................................................................10
11. Progam .....................................................................................12
program installation ..................................................................12
Download program directly from network .................................12
connect PC to store documents………………………………………………….………..12
uninstall program .......................................................................12
12. Recorder ....................................................................................13
13 .Clock ..........................................................................................13
Alarm clock ...............................................................................13
14. Download and install software ...................................................14
15. Browser .....................................................................................14
16. Calendar .....................................................................................15
New activities .............................................................................15
17. Camera.......................................................................................16
take pictures .............................................................................16
Recard video ............................................................................16
18. calculator ...................................................................................16
19. E-mail .......................................................................................17
20. File browser ..............................................................................18
Copy files between computer and device ....................................19
documents cancel ......................................................................19
21. My music ...................................................................................20
play music .................................................................................20
22. My video ...................................................................................21
23. Photo gallery ............................................................................22
24. Map ...........................................................................................23
25. Local search ..............................................................................24
26. Electronic market ......................................................................24
27. Settings ....................................................................................25
Accessories and model optional advice .
Use tips
When using your equipment please obey the following basic security matters need attention in
order to reduce fire, electric shock and risk of injury.
●
Don't let the product itself get wet in the rain or become damp .
●
Please keep device away from direct sunlight and heat objects
●
Protect power cable. when connect the power cable, please don't let it be stepped
on or above placed items, avoid to be extrusion. Pay special attention to
protection of equipment connector.
●
Please use the original power adapter for charging, using other charger will cause
damage
●
Don't dismantle the equipment or repair yourself.
Cleaning equipment
Touch the screen gently. To clean the fingerprint or dust on the screen , it is better to
use such as camera use soft cloth but not gauze to clear the dust .
2 Power button usage
Starting up:Long press the power button for 3 seconds.
Power off:Long press the power button for 3 seconds →click power off → click
confirm
Screen off and on :Short press power button to turn off or turn on screen
Mandatory shutdown: If the device has no response, long press the power
button for 6 seconds to perform mandatory power off
Notice: In case of no necessary conditions, It's better not use mandatory power
off . Power off should be performed normally according to the standard steps.
Reset button: Press “reset” button to restart the equipment .
3 Touch panel
According to following user guide, and know how to use touch panel (notebook computer).
Click: move mouse pointer to the optional icon by touch panel Click the touch panel.
Longer press: use touch panel chose one icon and press longer, can drag then show the icon
on desktop menu.
.
4 transfer connection
Before using USB device please connect transfer line to computer
USB data line
U Disk
Connect U disk with transfer line →insert USB OTG port with OTG transfer line .When
U disk is ready then can used .
☆ Please don't push U disk frequently ,or will damage the U disk
5
TF card Usage
☆Support 32GB memory card
Insert the memory into the card slot then the screen will
display “ SD card is in readying
now “, when the words disappear ,it means the TF card have been prepared that can
use .
Cancel TF Card
Close all programs or documents in the card .Click
→ setting → TF card and
internal memory → Uninstall TF card,press and popup a half of card then take it
out.
☆ Please don't insert or push the card for more times or will
damage the Card .
☆ Use brand card to avoid incompatible .
6 Start to use
Battery charging
One port of the power adapter insert into socket, another port
connect to
DC interface of device to charge ,when the battery is in charging will display as:
When the battery is fully charged, battery ICONS display as:
.
☆can use a USB cable to connect the PC to charge.
☆Can Use the device when it is in charging ,but have to spend more time
for charging
Battery management
The battery is not fully charged when packaged , advise you to make battery fully charging for
4 hours at least before you use the device.
Rechargeable battery life, generally depend on the times of charging and discharging .
However, you can also play through the following Suggestions to extend the life of battery:
●
To use the device at least once a week
●
Regularly for battery fully charge.
●
Don't let the battery in long time no power
●
Always keep device and battery far away from heat objects
Set-up
Long press the power button for 5 seconds.
Wi-Fi network setting
Since many functions need with Wi-Fi connected, set Wi-Fi network first before using.
1. click
→ setting → Wireless and network setting.
Choose and open Wi-Fi menu to enter Wi-Fi settings
Then all usable Wi-Fi networks can be automatic searched and displayed。If showed
as
among the Wi-Fi networks, then need to input password for connection.
2. Click the Wi-Fi network you need →If need password then input it →Click link.
3. Click
button to back desktop
☆If the Wi-Fi set is hidden ,wont be searched out of itself. Need to click
add Wi -Fi network, then input relevant information to add your Wi Fi.
3G settings
1. Before connect 3G network, please choose the suitable
support
the tablet pc device, this model
only support external USB dongle, the
dongle models can be found in search path
network→ more →3G support model
below :
3G network card to
setting → wireless and
information is shown in the equipment as
2. 3G card loaded with SIM card then connect the 3G USB dongle to the table pc.;
3. After connected 3G dongle,click
setting → wireless & network →more→
mobile network,to set the 3G network。
4. Open mobile network:click data flow started→ data wander to choose “Access Point
Names”, then click “Menu” button, then to set “New APN” Take Chinese WCDMA
mobile operator as example to set the 3G network as below:
Name:3GWAP / APN:3gnet / Proxy:Not set/ Port:80 / Username:Not set/ Password:
Not set/ Server:Not set/
MMSC: Not set / MMS proxy Not set/ MMS port: Not set /
MCC:460/ MNC:01/ Authentication type:Not set/
APN type:Not set/
After setting finished, then 3G network is connected then will display
,if this
logo show as darker state it means it is the searching of network ,if show as blue state
means it has been connected with network , display means the date is under
transmission.
7 Desktop
③
②
①
A
B
④
⑤
⑥
⑦
⑧
A
B
CD
①:Click it to view all applications
②:Searching voice quickly function
③ :Quickly open browser interface
④ :Return to the current operation
⑤ :Back to desktop from app screen
⑥ :Select key for multi-page
⑦ :Menu function shortcut key
⑧ :USB connection
A: TF Card sate of connection
B :Current time
C: 3G/WIFI sate of connection
D: Battery status
☆Click on any program icon to run it.
☆Long press and drag icon, move it to other parts of the screen .。
☆press longer and drag icon to
cleanup.
8 Screen Lock interface
move it from the desktop
Long time no using device or short press power button, the device will access to standby
state. There are two states: first is deep sleeping standby, the device’s screen is turned off,
then need to press power button to enter standby screen, for example the above picture, press
the red unlock
Switch
it will display the point A\B as above picture, press A point for camera
using ,press B for unlocking ,it show as B condition ,press unlock button to B will realize
unlocking function ,press unlock button to A to use Camera function .
9 Program
Recorder
Record outside sounds
Clock
Download
Show time and set time
Quick install the apk downloaded
browser
Connect to Internet browser
Calendar
Set calendar
Camera
Take photos and video
Calculator
For simple calculating
Email
Receive and send email with existed email address
File viewer
Check and manage files, install Android apps and backup
SD files
Music
Play and manage music files.
My video
Play and manage my video files
My gallery
View and manage my photo files
Map
Check your local position when network connected
Places
Connect with internet to check your location and relative
places near your location.
Google
market
Login to download applications ,games etc.
Search
Search tool, search anything you need online.
Setting
Set your system.
☆Long press to drag the icon.
☆Long press icon and drop in
to remove it from menu.
10 Menu
On the desktop, use the menu button
to display the menu
function ,at the same time can
realize commonly used procedures setting in the desktop .The
way of setting is pressing the procedures logo to desktop.
11 Application program
Install applications:
☆A lot of Free and interesting Applications are available on internet, you just need
search by” Android applications” key words.
The Android Applications you downloaded are saved in
,you can install it
easily:
1. Copy the. apk application to SD or USB device →Put the SD card into Tablet or
connect USB device with Tablet.
2. Click
3. Click
.files browser logo .
or
find the file with apk
4. Click the APK application → Install
After install successfully, the new application icon will show in Menu.
5. Click icon to run application or finish to return browser interface .
Download applications from Internet:
User could download any Android application from internet and install it easily and
fast.
1. Click
to search application in internet.
2. Input website address, click the download link to download the application.
3. After download finished, long press the application (saved in download history) →
Click and open → install。
Connect to PC and save files.
1. Connect Tablet with PC by USB cable. One side is USB OTG port , another side
connect PC USB port.
2. After connection, it will display image
,choose
run
it ,then click Turn on USB device then user can exchange files between PC and
Tablet device, as below:
Uninstall application
User can easily to uninstall Android applications as below
1. Click Menu button→ setting → applications→ manage applications
2. Choose the application → uninstall
3. Click Yes to confirm uninstall.
12 Sound Record
Click icon
will display as below:
Click
start to record ,click
to stop record ,click
to view the record
document and the documents will named according to the time you record .Click the record
document to play record ,click
to set the record you made .
13 Clock
Click icon
,User can check current Date and time.
Alarm clock
A few different alarm clock can exist in same Tablet.
☆ When the icon
show in top of Screen, it means at least one alarm clock is
working.
Add new alarm clock.
1. Click icon
。
2. Click menu button→ add clock。
3. Set new alarm clock.
☆ If you didn’t set repeat ,after alarm works on time, system will auto-delete
the information.
☆ Click to start use the new alarm clock.
4. Finish
Disable alarm clock
When the alarm time on, a window with Clock will pops out.
If User need alarm again after 10mins,click Pause.
Click Cancel to stop alarm.
Enable Alarm clock.
Regarding the alarm clock which already set in repeat, Then usually User need
suspense using it not delete it:
1. On interface of Clock,click icon
2. Click
to suspend use this alarm clock.
to resume.
Edit alarm clock.
1. Click
→click
。
2. Entry the clock User need edit → reset.
Delete alarm clock.
1. Click icon
→ click
。
2. Open the alarm clock user need delete.
3.
Choose delete it .
Click
return to desktop.
14 Download applications and install.
1. Click icon
.
2. User can check and install the available applications from PC.
15 Browser
User can reach to internet by browser..
Click icon
to open internet:
①
②
③
④
Search
Forward
Current Website
Refresh
Bookmarks
history
Search
①:Visited web site;②:Current web site;③:Add web sites;④:Menu
16 Calendar
Click
the calendar program icon
First used calendar, need to add an exchange account. Input account email address and
password. Click on next, according to the prompt complete account configuration, after that
the calendar can be used
New activities
1. In the calendar interface, click new event dates you want to build.
2. Choose activity time - input relevant activity details in every field
3. Click finish
☆color display for gray date mean there are agenda on the day.
17 Camera
Click
to open camera then display icon
Take photos
1. Click
to take photos
2. Pictures will be kept
3. Click the thumbnail
4. Click back icon
5. Click
to enter into my album to view pictures
to return back to camera。
to realize camera setting .
Video Recording
1. click
2. Click
switch to Video.
to start recording,click
3. Video will be kept.
to pause recording.
4. Click the thumbnail
to play the video.
5. Click back icon to return back to camera.
6. Click
7. Click
to quit camera and back to UI interface .
to realize vedio recording setting .
Note:You can click
to switch front- camera and back- camera to take photos .
18 Calculator
1.
Click
the calculator program icon.
2.
Click numbers and operational symbol to start calculate.
3.
Click remove to remove all display
19 E-mail
☆ Supports POP3 and SMTP accounts
Add E-mail account
You can enter one or more E-mail address on device to use
1. Click
E-mail program icon。
2. In your account interface, click next.
3. Click E-mail address options, → input your E-mail address.
4. In the password options, → enter your E-mail passwords.
5. Click finish
Manual Setup (Optional):Server setting can full in the E-mail provider (like
gmail.com)according to your E-mail account .If you need to revise the server setting,
you could click "manual setup" to make some change
6. Click "Next Step".
7. Optional:Input account name。
8. Display the account name when send and receive E-mail ,Click "Finish"
☆ After Settings, if you cannot connect to a free email account, please contact with your
email providers to confirm if their server support (POP) and (SMTP) transmission
agreement.
Inbox
1. Click
E-mail program icon。
2. If only added one E-mail account, it will open promptly. If added several E-mail
account, it will display the account list
3. Click the E-mail account you intended to check→ Click "Inbox"
Open E-mail
1. In the inbox, to click E-mail and open it.
2. As for attachment,Click "open" to start related application or click "Save" to
save the attachment to SD card
3. For reply,click "reply or reply all"
4. Click "delete" to delete E-mail
Compose New E-mail
1. Click→ "Compose" icon。
2. Click " To",then
3.
add the addressee's E-mail account
If needed, Click "Menu' to add attachment
3. E-mail finished, then click "send"
Edit E-mail account
1.Click
E-mail program icon
2 Choose "Account Setting" from "Menu"
3.After the completion of setting, then click
Delete E-mail Account
☆ If you have several accounts, and you deleted the default account in settings. The next
E-mail account on the E-mail list will become the default account automatically
1.Click
E-mail program icon
2.In inbox interface, click "Menu "to choose "account"
3.Click and hold the E-mail you intended to delete
4.Then popup "Account options", click "Delete account"
5.Click"Confirm"icon
Sets the default email account
You must always have an account designated as the default account, thus if you have multiple
E-mail account, you can choose any one as the default.
1. Click
E-mail program icon.
2. In your inbox interface click MENU →account Settings.
3. Click the default account to select.
☆ If you delete the setting default account, the list of within next E-mail account will
automatically become the default account.
。
20 File Explorer
Click
the icon "File Explorer" to check files in all storage device (Tablet PC internal
storage, SD card, USB storage device),and you could conveniently and fast install the Android
application to the tablet PC.
The "File Explorer "has following functions:
Setting Internal Storage
Your SD Card
USB Flash Disk (USB cable required)
Return to A last Folder
Create New Folder
Files setting
Pictures
Copy files from computer to tablet PC
You could copy files to File Explorer from external storage device, computer. If you need to copy
files to tablet PC, you are required to copy files to SD card and USB storage device in advance.
Tablet PC internal storage folder named "Local Disk", SD card named "SD card", USB storage
device named "u disk"
Here is the instruction to copy files from SD Card and USB Storage device to tablet PC. You
could use the same method to copy your files to SD card or USB Storage device, then connect
your storage device to computer, then start copy file to the folder you need.
1.click
or
to find the files in your storage device.
2.Click and hold the files or folder you intended to copy
3.Click
→ then click "copy"
to return to tablet PC internal storage → click the target folder
click "Paste"
Delete files
Press the file you need to delete →click delete button →click ok to delete .
→ then
21. Music
support audio format: MP2, MP3, WAV, WMA, and AAC
Play music
1. Click
my music program icon.
2. From all/album/artist/directory/my favorite/custom playlists of select you want to play
music.
3. Click previous song→ suspended →next song
4. To music while playing on an interface, can press Return
returns to the desktop.
icon to play.
or press the HOME
Click on the right lower corner images into the music player, Interface shown below:
22 Video
☆ AVI、WMV、RM、RMVB、 3GP、MKV、MP4、ASF、VOB、MPG、MOV up to 1080P
HD-Definition
1. Click
icon → click on a video group
2. Click the video you want to view
3. Click the screen to video related regulation(include volume ,stop/play and brightness etc)
4. Press return key
to back the vedio player interface.
23 Photo Gallery
JPEG、BMP、GIF、PNG
1.Click the
photo gallery program icon, enter the Gallery.
2. choose photos groups to browse.
3. Press return key to back the photo gallery interface.
4. click
to slideshow .slideshow mode: normal play ,classical, Passion. Romantic and fun
5.click
to sort color for pictures
6.click
to sort time for pictures
7.click
to sort name for pictures
Delete pictures and Dynamic switching wallpaper Settings
1.
multiple choose
2.
delete
3.
Dynamic switching wallpaper Settings
24 MAPS
When Use this function ,it
must be determined computer connection with INTEL network
state,.
After connected network ,please click icon
,can open current position map
automatically ; see below picture ,you can find what you want by setting
25 Local search
Same similar map functions ,can select to store huge amounts of information
26 Android market
To open android market ,can inquiry apps programs download
First run android market , The system will require GMAIL E-mail accounts for landing(if have not
Gmail email account ,please apply it from http://gmail.google.com)
27 Setting
Wi-Fi
Open Wi-Fi
Wireless
Wi-Fi settings
Setup and manage wireless access points
and network
Flight patterns
Disuse all wireless connection
3G network settings
Set 3G network
Ethernet
network
Configure Ethernet network.
Select
Select ADSL for network, input user name and passwords
setting
USB
to connect
Bulk memory
configure USB for bulk memory
ADB
Configure USB for ADB
Except
Silentpatterns
the media and the alarm clock sounds, all are
set to mute
Adjust media volume, alarm clock volume, and inform the
volume
volume. Click and remove
Voice
slider, and then click ok
Inform ringtones
Select
Select the desired inform rings.
operated
sound
When selecting screens broadcasting sound
Prompt screen lock
When locking and unlocking screen to playing sounds
brightness
Click and remove slider
to adjust
screen brightness, and then click ok
Automatic
rotating
screen
Display
System dormant
Screen overtime
When
make
checked,
automatically switch between
the
screen
will
be
screen and vertical
screen according to equipment direction of rotation
Adjustment screen close ,system will delayed time for
automatically dormant
Adjustment a delayed time for
screen
automatically locked
Screen lock setting
Use icon .PIN or passwords to lock screen
passwords visual
Can passwords visual when input
select
device
manager
use
security
certificate
Security
Add or delete device manager
Allow applications programs to visit security certificate
and other certificate
Install cryptographic
install from TF card
passwords setting
delete storage
certificate from TF card
Set or revise certificate storage passwords
Delete all information of certificate storage and reset
passwords
Allow to install the applications from the non-Android
Unknown sources
Management
Applications
application
market
Manage and delete installation applications
Running services
Check and control the currently running services.
development
Setup application development options
Click will remove all the data on device. Click reset
device will be reset, or click
to cancel and return
to a screen
Warning! The following will delete all the data from
equipment:
Privacy
Recoveryfactory
Settings
~ Google account
~ system and the application's data and Settings
~To download applications
The following won't because the reset to be delete:
~ the current system software and bind application
~ SD documents, such as music or photos
Total
TF card and
device
capacity,
capacity available
Uninstall TF card
memory
Format TF card
It will display when you insert TF
When insert TF card ,you can click uninstall TF card to
uninstall
Format(delete) TF card
According to your location select the corresponding
Language
choose Language
and
Android
keyboard
Keyboard
User dictionaries
set date
Date
time
and
language
Screen keyboard Settings
User can add words to user dictionaries
Set date
Select time zone
Select time zone
Set time
Set time
Using 24 hour format
Choose
the
Can choose to use 24 hours format or 12 hour format
date
format
User can choose the date format
Check status messages, and power usage, legal
About
information, model, Android version, kernel version and
tablet PC
the version number
Touch
screen
Touch screen calibration
calibration
Appendix. Suggested optional accessories and model
Accessories description
Accessories model NO
TD-SCDMA
huawei E230, E176G, E160E,
E182G, E1782, E1750
WCDMA
ZTE
MF633BP-1,
MF633,
MF637U.
3G USB dongle list
Huawei
EVDO
E150,
EC122, EC156
ZTE
EC1270,
AC580,ZTE
AC2746.
EC1231,
AC2736,