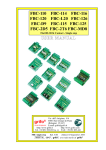
1
SU-PLC User Manual
SU-PLC
User Manual
(Rev. 09092013)
SU-PLC – User Manual
The information contained in this manual are property of Arteco SpA and may not be reproduced or published
in whole or in part without written approval of Arteco. The information contained herein is subject to change
and Arteco does not assume the obligation to notify. This manual is periodically revised and corrected.
Although many efforts have been made to ensure the accuracy and the accuracy of the information contained
herein, Arteco assumes no responsibility for errors and omissions in this document.
A possible critical evaluation by the user will be most welcome and taken in consideration in the preparation of
future documentation.
Reproduction or copy in whole or in part are not allowed.
Revisions :
17-10-2011 First revision of the User Manual .
10-4-2012 Second revision : Chapter 5 has been modified after Emergency Input behaviour change.
09-09-2013 Issue of english manual
II
SU-PLC – User Manual
Index
Chapter 1 – General information ................................................... 1
1.1 - Purpose of the manual and basic concepts........................................................................... 1
1.2 - Transport Packaging and Storage......................................................................................... 1
1.3 – CE Compliance .................................................................................................................... 1
Chapter 2 - INSTALLATION AND POWER SUPPLY ..................... 2
2.1 - Installing SU-PLC.................................................................................................................. 2
2.3 - Back-Up Battery.................................................................................................................... 3
2.3.1 –Back-Up battery features .....................................................................................3
Chapter 3 - CONNECTIONS ............................................................ 4
3.1 – Allowed cables for connections and their insertion ............................................................... 5
3.2 – Power Supply....................................................................................................................... 5
3.3 – Input Connections ............................................................................................................... 6
3.4 – Output Connections ............................................................................................................. 6
3.5 – Emergency input .................................................................................................................. 6
3.6 - Analog Input.......................................................................................................................... 7
3.7 – Incremental Encoder Input .................................................................................................. 7
3.8 – CANBUS............................................................................................................................. 7
3.9 – RS-232................................................................................................................................ 7
3.10 – Connessione RS-422 ........................................................................................................ 7
3.11 – plc-on Output .................................................................................................................... 8
Chapter 4 – Expansions.................................................................. 9
4.1 – Expansions through differential SPI interface ...................................................................... 9
Chapter 5 – Examples of use ....................................................... 10
5.1 – Example of connectivity and usage ................................................................................... 10
5.2 – Example of how to get simple low cost ON/OFF Axis Control............................................ 11
III
SU-PLC User Manual
Chapter 1 – General information
1.1 - Purpose of the manual and basic concepts
This manual provides information to the user relating to the main hardware features of SUPLC and of the procedure for the correct installation of the SU-PLC.
SU-PLC is a highly flexible system that allows control of digital inputs and outputs. It 'also
equipped by an analog input and an incremental encoder input with push-pull 24V voltage
levels. The configuration interventions and repairs must be performed by qualified
personnel. The information contained in this manual cover the installation and operation of
the system, in any case technical regulations relating to the application must be respected.
1.2 - Transport Packaging and Storage
The devices are inserted into antistatic bags and subsequently wrapped in sheets of plastic
"bubble wrap" in order not to be damaged by phenomena due to static electricity and
humidity.
To ship out the devices a cardboard container is used. On the bottom of it Flo-pak or
"Chips" expanded polystyrene are deposited in order to avoid contact between the
equipment and the outer container protecting it from shock and mechanical stress during
transport. The container is always affixed to a sheet on which is printed the name or
business name and address of the recipient. Shown below are the data for the
environmental values permitted by the regulations EN60204-5.
Parameter
Unit
Min.
Max.
Surrounding operating temperature
Gradi Celsius
+5C°
+40C°
Storage Temperature
Humidity (no condensation)
Gradi Celsius
%
-10C°
30
+55C°
90
Take all anti-static precautions if it is necessary to open the enclosureof
SU-PLC
1.3 – CE Compliance
Il sistema SU-PLC ed i suoi moduli sono conformi alle normative per l’applicazione in
ambiente industriale EN50082-2 per la suscettibilità e la EN50081-2 per le emissioni.
SU-PLC – User Manual
Chapter 2 - INSTALLATION AND POWER SUPPLY
2.1 - Installing SU-PLC
The user takes the responsibility that the installation of the unit
meets the criteria and requirements described in this manual.
o The installation, commissioning and maintenance must be performed only by
qualified, technically competent and who is familiar with the safety regulations, the
procedures to be followed and the risks that the use of this device involves.
o .SU-PLC must be installed in a safe environment, free of dust, moisture, corrosive
vapors, gases or liquids.
o SU-PLC is designed to be inserted into a machine or to be assembled with other
parts to build a machine as the Machinery Directive 89/392/EEC.
o The installation must always comply with the safety regulations in force.
o Cabling of SU-PLC to the external field is made by spring-loaded terminals for power
supply and I / O, while, for the serial ports, plug-in connectors 3-pin (RS232) and
RJ45 (RS422) are used.
o The enclosure of SU-PLC is shaped in such a way as to allow mounting on DIN rail
for installation in the control cabinet.
o
Arteco disclaims any liability for any damage to persons or property caused by
incorrect use of the unit SU-PLC.
Do not remove or insert the connectors and / or cable connections when the
system is powered
2
SU-PLC – User Manual
2.3 - Back-Up Battery
•
•
•
Visual indication of power and state of thebattery
Internal supercapacitor to data retention in the absence of the battery
Protection against explosions in case of short circuit or overload reverse
battery
In Ram resides, if not stored in Flash EPROM, the application program, retentive variables
and virtual axis position. Inside the unit there is a supercapacitor that, under normal
conditions, keeps for several hours the data in memory when the unit is turned off.
The duration of the battery is affected by ambient temperature, in fact, the higher the
temperature the lower the retention capacity of the battery.
The replacement of the battery may occur at power on or power is turned off as long as the
time for the replacement is less than 5 minutes.
2.3.1 –Back-Up battery features
Tipo
Not RechargableLi-Mn
Technical features of the battery
Nominal V
Manufacturer
3.0 Volt
VARTA
Model
CR2032
Explosion hazard
The battery must not be short-circuited, subjected to recharge process, exposed
to heat, incineration or mechanical stresses such as opening the housing or
compression of the container. Replace only with Li-Mn 3.0 V VARTA CR2032.
Using other types of batteries may present a risk of fire or explosion.
If it needs to be replaced, refer to the rules laid down by local authorities for disposal of
batteries.
3
SU-PLC – User Manual
Chapter 3 - CONNECTIONS
Led di stato
Led 1 red – discharged battery
Led 2 green - 24 V Power Supply
Led 3 green - 5V Logic Supply
Led 1 Led 2
Led 4 green watchdog
Led 5 green run
Led 6 green can
Led 3
Led 7 green ser
Led 4 Led 5 Led 6 Led 7
The Pin1 of each connector is
Located at the left side of the
connector
The Pin1 of each connector is
Located at the left side of the
connector
Picture. 3.1
Led 1 - discharged battery: it lights up briefly SU-PLC power on to verify operation. After
about, 0.5 seconds it will turn off if the battery voltage is greater than 2.8V, otherwise it is
turned on. In this case it is required the replacement of the battery.
This check is performed only at power on of SU-PLC, but it can also be invoked by a
special software function block to be used in any PLC application.
4
SU-PLC – User Manual
Led 2 - 24 V Power Supply: it lights up if SU-PLC is powered with the correct polarity.
Led 3 - 5V Logic Supply: si accende se l’alimentatore fornisce la tensione dei 5V.
Led 4 - watchdog : flashes slowly (1 Hz) if there is no application program. It flashes in
sync with Led 5 "run" at about 3 Hz if SU-PLC is executing an application. It flashes rapidly
(15 Hz) if a drop in voltage on the 24V took place alerting that SU-PLC has been
consequentely blocked.
Led 5 run : In the absence of application it is turned off. It flashes at about 2 Hz alerting
that a PLC program is being downloaded into the SU-PLC. It blinks In phase with Led 4
(watchdog) when SU-PLC is executing a PLC program
.
Led 6 can It flashes in sync with the Led 5 (run) and Led 4 (watchdog) if the CAN network
is working correctly, otherwise it is off.
Led 7 serial it flashes at the Modbus transmission of a communication frame, only in
RS422 mode.
3.1 – Allowed cables for connections and their insertion
The wire size must be included between 0.5 and 1.5 mm2 (AWG 20-16).
The internal conductor of the wire must be uncovered from the plastic insulator in order to
have a length of 8.5 to 9.5 mm to be correctly inserted into the connector. Termination can
also be plated or letterhead with the appropriate cable lugs. Press the latch using a
screwdriver until the clamp has been pushed about 3 mm down, insert the cable with a 45
° angle and release the latch. Perform in reverse order to extract the conductor.
3.2 – Power Supply
The 24VDC Power Supply must be provided to SU-PLC through the Connector P1 (Power
supply) .The absorption at 24V is about 110 mA. This absorption value refers to the internal
logic circuitery of SU-PLC and does not include the absorption of the field I/Os. Please
refer to Paragraph 3.4
The value of the power supply voltage must be included between 18V and 30V.
The value of optimum voltage is 24V with a tolerance of +/- 20%.
If the power supply voltage drops below 17.3 V, a safety procedure protects the data stored
in the RAM, the PLC program and the retentive variables. SU-PLC interrupts the execution
of the PLC program, it turns off the outputs and it turns off the PLC output.
From this security state SU-PLC can come out only by removing and restoring the power
supply.
5
SU-PLC – User Manual
3.3 – Input Connections
Connectors "User Input P4" and "P5 User Input" are available, each of which allows the
connection of eight digital input devices (eg. Sensors, switches, etc.) for a total of sixteen
Inputs. The inputs voltage level of each input are referred to the common gnd of the device
(pin 2 of P1 ). For each input a Led is available indicating the input logic status.
The absorption of each input when drived by 24VDC is 3.9 mA. The inputs logic level zero
is read by the PLC if the input voltage is included between 0 to 14.6 V.
An hysteresis of 3.2V is active for each input.
3.4 – Output Connections
The Connectors "User Output P7" and "User Output P8 " are available, each of which
allows the connection of eight digital output devices (eg. bulbs, relay, solenoid, etc..) for a
total of sixteen Outputs. For each output there is a LED status indicator. Each output is
electrically referred to the common ground of the device (pin 2 of P1). In order to use the
outputs, the voltage of +24 V must be provided to connector P7. The pin 1,2,3,4 of P7 are
internally connected to each other but they are not electrically referred to the pin1 of P1.
To provide the necessary current to the outputs it is necessary to connect the power supply
voltage of 24VDC to all of the four pins of the connector P7. The state of the outputs
depends on the level of the emergency Emg (pin 4 of P1) (see section 3.5).
3.5 – Emergency input
An emergency input is provided to the SU-PLC. This signal is located at pin 4 of the
connector P1 A LED located in front of the pin od Emg shows its status.
Emg should normally be at logic level one (for voltage levels, see paragraph 3.3.
By this way, the digital outputs are enabled and under control of the application program.
If during operation, this input is brought to logic level zero ( an emergency situation
occurred) all of the outputs are automatically commanded to the OFF state.
To restore the correct operation must restore the logic level one on pin 4 of the connector
P1.
Remark: If the PLC program commands to ON the outputs when the Emg is OFF, the
output will be to OFF until the Emg comes ON, then the output state previously commanded
will be put out correctly. The PLC boolean phisical output variables value are not affected
by the state of emergency, which appear to debug may be running.
6
SU-PLC – User Manual
3.6 - Analog Input
An analog input is available at pin 7 of the connector P6. The input voltages range of this
analog input is from 0 to 10V. The absorption of the analog input at 10V is 4 mA. The
analog input resolution is 10 bit. On pin 8 of connector P6 a voltage of 10V is available
providing a maximum current of 5 mA for the connection of analog sensors or to a 2.5
Kohm potentiometer to use with the analog input. Pin 6 of P6 is the analog Gnd.
3.7 – Incremental Encoder Input
At connector P6 ( pin 1,3,4,5) , a push pull 24V Incremental Encoder input is available. The
signals CLKA and CLKB must be connected to pin 3 and 4, the gnd reference is available at
pin 1. At pin 5, the 24V supply 500mA max is available to power the encoder.
The signal Mrk at pin 2 is not active and should be left free ( It is available for future use).
The maximum counting frequency is 200 kHz.
On request it is available the encoder input push-pull to 5V and 5V power supply.
3.8 – CANBUS
The P3 connector allows the user to connect CANOpen expansions to expand the SU-PLC
to more digital inputs and outputs, Arteco analog axis, Intelligent Servodrivers with builtin
Motion Control and so on. Refer to the printed label on SU-PLC enclosure for the available
Canbus signals (Connector P3).
The termination of the bus is on-board provided.
3.9 – RS-232
On P2 connector RS-232 is available. RS-232 interface can be used to link to the Isagraf
Workbench or HMI devices with Modbus RTU protocol. SU-PLC is a Modbus slave device.
Refer to the printed label on SU-PLC enclosure for the available RS-232 signals
(Connector P2).
Refer to the software manual for using the RS-232 interface in each mode.
3.10 – Connessione RS-422
The connector named "expansion" is available at the lower right side of SU-PLC.
RS-422 available at RJ-45 connector is alternative to RS232 serial of P2.
Pin 1 is adjacent to the connector P9.
The connections of the expansion connector are:
1)
2)
3)
4)
5)
6)
7)
8)
RX+ (serial data + received by SU-PLC)
RX- (serial data - received by SU-PLC)
Reserved. Leave it free.
TX+ (serial data + transmitted by SU-PLC)
TX- (serial data - transmitted by SU-PLC)
Reserved. Leave it free
+5V 200 mA max
GND
Refer to the software manual for the using the RS-422.
7
SU-PLC – User Manual
3.11 – plc-on Output
PLC-ON output (connector P1, pin 3), is available providing 24V - 100 mA max when the
SU-PLC is executing a PLC program. PLC-ON is put to OFF if an emergency OR a block
of the firmware OR a power supply voltage drop below 17.5 V occur. To restore the ON
state of PLC-ON, a restart of SU-PLC is necessary. If SU-PLC does not have a PLC
program, PLC-ON output is put in OFF state. In this case, however, the user must load a
PLC program to SU-PLC to get PLC-ON to ON state.
The output is equipped with LED indicator.
8
SU-PLC – User Manual
Chapter 4 – Expansions
4.1 – Expansions through differential SPI interface
SU-PLC can also be expanded through the differential builtin SPI interface using the
available SPI Expansions. Each module provides two Expansion connectors, one for
connecting to the SU-PLC or to the previous SPI expansion, the other connector for the
connecting to the next SPI expansion. 30 modules can be connected to the SPI expansion
bus. All these I/O can be directly controlled by the user’s program like all the I/O of the SUPLC.
Available Expansions:
I/O-EXP-PLC
Expansion for SU-PLC with the expansion cable l=0,5m included. It provides 8 optoisolated
digital in PNP 24VDC + 4 optoisolated digital out 1A PNP 24VDC protected against
overcurrent. It can be connected also 10meter far from the SU-PLC.
I/O-EXP-16I-16O
EXPANSION providing 16 digital in 0-24VDC PNP + 16 digital out 0-24VDC 1A
protected against overcurrent.
9
SU-PLC – User Manual
Chapter 5 – Examples of use
5.1 – Example of connectivity and usage
10
SU-PLC – User Manual
5.2 – Example of how to get simple low cost ON/OFF Axis Control
11