1
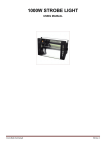
FL - 185
USER MANUAL
FL – 185
INTRODUCTION
Thank you for having chosen a mini barrel beetle. You will see you have acquired a powerful and versatile
device. Unpack your unit. Before you initial start-up, please make sure that there is no damage caused by
transportation. Should there be any, consult your dealer and do not use the device.
SAFETY INSTRUCTIONS
CAUTION!
Be careful with your operations. With a dangerous voltage you can suffer a dangerous
electric shock when touching the wires!
Keep this device away from rain and moisture!
Unplug mains lead before opening the housing!
For your own safety, please read this user manual carefully before you initial start-up.
If the device has been exposed to drastic temperature fluctuation (e.g. after transportation), do not switch it on
immediately. The arising condensation water might damage your device. Leave the device switched off until it
has reached room temperature. Never let the power-cord come into contact with other cables! Handle the
power-cord and all connections with the mains with particular caution! Make sure that the available voltage
is
not higher than stated on the rear panel. During the operation, the housing becomes very hot. Do not switch
the device on and off in short intervals as this would reduce the lamp's life. Never look directly into the light
source, as sensitive persons may suffer an epileptic shock (especially meant for-epileptics)!
www.flash-butrym.pl
1
FL - 185
Keep away from children and amateurs!. This product is designed for indoor use only. This device is
designed for professional use, e.g. on stages, in discotheques, theatres etc. The minimum distance between
light-output and the illuminated surface must be more than 0.5 meters. Always fix the fixture with an
appropriate safety-rope. The maximum ambient temperature of 45° C must never be exceeded. Operate the
device only after having become familiar with its functions.
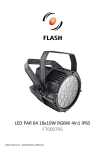
Features
Innovative DJ-scanner with rotating gobos
7 different, dichroic colour-fiitres and white • Rainbow-effect with adjustable speed in both directions • Gobo
wheel with 6 gobos plus 1 glass gobo, open and blackout • Strobe-effect with adjustable speed (1-10Hz) via
shutter * DMX-controlled operation • “Fuzzy-Sound-Control”: program continues automatically
during periods without music or bass-beat • Control-Board with display • Manual focus • Lamp MSD 250 •
DMX-control via every standard DMX-controller • 6 DMX-control channels.
INSTALLATION
Installing/Replacing the lamp
DANGER TO LIFE!
Only install the lamp with the device switched off !!!
Unplug from mains before !!!
Before replacing the lamp, unplug mains lead and let the lamp cool down (approx. 10 minutes).
Procedure:
Step 1: Unscrew the fixation screws of the lamp system and carefully remove it from the housing.
Step 2: If replacing the tamp, remove the old lamp from the lamp holder.
Step 3: Insert the lamp into the lamp holder.
Step 4: After replacing of the lamp screw down the fixation screws
Step 5: Adjust the lamp.
DANG ER OF F IRE!
When installing the device, make sure there is no highly-inflammable
material (decoration articles, etc.) within a distance of min. 0.5 m.
On the back of the mini barrel beetle you can find an XLR-jack (DMX Out) and an XLR-plug (DMX In), which
can be used for connecting several devices. Choose the device which is to control the effects. Connect-the
DMX OUT-jack with the DMX IN-plug of the next device.
DMX-512. connection / connection between fixtures
The wires must not come into contact with each other.
Building a serial DMX-chain:
Connect the DMX-output of the first fixture in the DMX-chain with the DMX-input of the next fixture. Always
connect one output with the input of the next fixture until all fixtures are connected.
www.flash-butrym.pl
2
FL - 185
Caution:
At the last fixture, the DMX-cable has to be terminated with a terminator. Solder a 120 resistor
between Signal (-) and Signal (+) into a 3-pin XLR-plug and plug it in the DMX-output of the last fixture.
Connection with the mains
Connect the device to the mains with the enclosed power supply cable.
OPERATION
1.DMXContro1ling:
The Control Board at the back of the base of the unit allows you to assign the DMX fixture address, which is
defined as the start channel. If the devices should work independently from each other then make sure that
each device has a different start channel. After having addressed all items, you may now start operating these
via your lighting controller. After switching on, the item will automatically detect whether DMX 512 data is received or
not.
DMX channels:
Channel 1 - 0-175 degrees PAN movement
Channel 2 - 0-85 degrees TILT movement
Channel 3 - 7 colors plus white
0 – 16:
WHITE
17 – 33:
VIOLET
34 – 51:
GREEN
52 – 73:
LIGHTBLUE
74 – 90:
PINK
91 – 105:
YELLOW
106 – 124:
DARKRED
125 – 134:
DARKBLUE
135 – 255:
THE CONTINOUS COLOR CHANGE WITH THE POSSIBILITY OF
SPEED AND DIRECTION ADJUSTING
Control channel 4 - GOBO WHEEL WITH ONE GLASS GOBO
0 – 15:
OPEN
16 – 31:
GOBO1
32 – 47:
GOBO 2
48 – 63:
64 – 79:
GOBO 3{GLASS GOBO)
GOBO 4
80 – 96:
97 – 111:
GOBO 5
GOBO 6
112 – 255:
GOBO CHANGE WITH INCREASING SPEED
Control channel 5 - GOBO ROTATION - the possibility of adjusting the speed and direction
Control channel 6 - ON/OFF, STROBE
0 – 5:
Shutter closed
6 – 128:
Dimmer control
129 – 131:
Reset {after 3-5 seconds)\
132 – 139:
No function {Shutter open)
140 – 199:
Strobe-effect with increasing speed
200 – 249:
250 – 255:
Random strobe effect with increasing speed
No function (Shutter open)
www.flash-butrym.pl
3
FL - 185
2.sound active, automatic mode:
Press the menu button till it shows "n" on the display and select "n1n" by pushing the button "up" and "down"
and now the unit at sound mode is active; select "n2n" and the unit will be at automatic mode.
3.master/slave mode
Press the “menu” button till it shows “5” and set the unit at "515" by pushing the button "up" and "down" - unit
works at master/slave mode. In the same way set the other three units respectively at "525","535","545" and
the four units work synchronized - the red led informs about it.
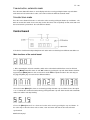
Control board
If the devices should work independently from each other make sure that they have different start addresses.
Main functions of the control board:
1. After connecting the unit to the controller, switch on the unit and wait until the fixture reset has finished.
Press the [Menu] button till it shows "d" and "001" address by pushing the "up" and "down" buttons. Confirm
by pressing the [Menu] button. In this case the unit is under DMX 512 protocol mode. In the same way use
the [Up] and [Down] keys to set the units at different address.
2.Press the button [Menu] till it shows "n" and next by pushing the button "up" and "down" choose the option
“n1n” to activate the sound active mode;"n2n" by pushing the button "up" and "down" and the unit at automatic
mode;"n3n" and the unit stops working.
3.Press the [Menu] button t i l l "5" shows and set the unit at "515" by pushing the "up" and "down". In
the same way set the other three units at "525", "535" and "545" and now the four units will work
synchronized.
www.flash-butrym.pl
4
FL - 185
Cleaning and maintenance
Disconnect from mains before starting maintenance operation!
DANGE R TO LIFE!
We recommend a frequent cleaning of the device. Please use a moist, lint-free cloth. Never use alcohol or
solvents!
The lens has to be replaced when it is obviously damaged, so that its function is impaired, e. g. due to
cracks or deep scratches!
CAUTION!
The objective lens will require weekly cleaning as smoke-fluid lends to building up residues, reducing the
light-output very quickly. The cooling-fans should be cleaned monthly.
The gobos may be cleaned with a soft brush. The interior of the fixture should be cleaned at least annually
using a vacuum-cleaner or an air-jet. The dichroic colour-filters, the gobo-wheel and the internal lenses
should be cleaned monthly. To ensure a proper function of the gobo-wheel, we recommend lubrication in six
month intervals. The quantity of oil must not be excessive in order to avoid that oil runs out when the
gobo-wheel rotates. There are no serviceable parts inside the device except for the lamp and the fuse.
Maintenance and service operations are only to be carried out by authorized dealers. Please refer to the
instructions under "Installing/Replacing the lamp".
Replacing the fuse
If the lamp burns out it is very possible that the fuse might damaged too. Only replace the fuse by a fuse of the
same type and rating.
Before replacing the fuse, unplug mains lead.
Replacing the fuse
Before replacing the fuse, unplug mains lead.
Procedure:
Step 1: Open the fuse holder on the rear panel with a fitting screwdriver.
Step 2: Remove the old fuse from the fuse holder.
Step 3: Install the new fuse in the fuse holder.
Step 4: Close the cover.
TECHNICAL SPECIFICATIONS
Power supply: 230 V AC, AC 50Hz
Power consumption: 300 W
DMX-control-channels: 6
DMX-512-connection: 3-pin XLR
Flash-rate: 10 Hz
Number of colors: 7 dichroic + white
Number of gobos: 7 gobos and open, ONE GLASS GOBOS INCLUDED
Fuse: 250V 5A
Dimensions: 670x 270 x 260mm
Weight: 13,0 kg
www.flash-butrym.pl
5