1
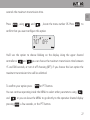
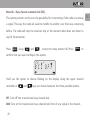
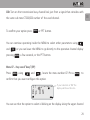
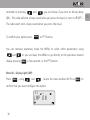
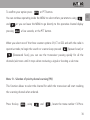
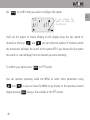
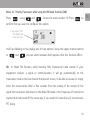
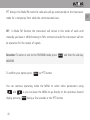
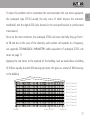
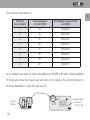
TL 88
TRANSCEIVER PMR 446
PMR
446 Mhz
INSTRUCTION MANUAL
0678
TL 88
We want to appreciate the confidence shown by purchasing this LUTHOR TECNOLOGIES
model TL-88. This transceiver offers an innovative design in terms of technology and
multi-functionality. Its high quality and extensive features make it one of the best
equipments in its field, we trust in your total satisfaction with your expectations and
communication needs.
In the design of the TL-88 it has put on the best efforts, illusion and professionalism,
to finally reach the obtained result, a PROFESSIONAL transceiver for FREE USE
(PMR-446 without need of any license) with VERY EASY MANAGING and RELIABILITY
only at the level of the best manufacturers worldwide.
Its development has benefited from the involvement of a large group of professionals
of the sector, but perhaps the most novel was to have the collaboration of different
user profiles to catch the needs of different groups: Professionals of the installation,
industry, Security Forces, entertainment, etc ... The major concern besides the QUALITY
and the RELIABILITY of the transceiver, was to get an equipment that could be used
1
EN
both by professionals with experience in such devices and by users without any type
of experience , for which brilliantly stands out the FACILITY OF MANAGING of TL-88.
2
EN
Contents Index:
Cautions and practical advices
5-7
General Transceiver Functions
8
Unpacking of the equipment and Content
9
EN
Transceiver Scheme :
General Front View
10
General Side View
11
Display Icons Description
12, 13
Working Modes
14 -18
Scheme / index menu
19
Setting function using MENU
20 - 44
Special Functions
45 - 50
Battery Charge
51 - 53
Advanced Options Index (Soware)
54 - 64
Appendices index :
Table 56 memorized channels
66 - 69
3
factory parameters.
70
Technological parameters, conversion table number / frequency of
4
analogical sub tones CTCSS and DIGITAL DCS "N" and "I".
71 - 73
Use of the transceiver as a PMR-446 basic handheld.
74 - 81
Problems Solution Guide.
82 - 84
Optional Accessories.
85
Technical Specifications.
86
Environment Protection Note.
87
Declaration of Conformity.
88
EN
Cautions and practical advices
Please read carefully the following manual before using the transceiver in order to
guarantee the maximum performances. This manual has important using and safety
instructions, therefore, we recommend you to keep it for future consulting.
!
Any repair must be realized only by qualified personnel.
!
Do not use this transceiver nor recharge it anywhere susceptible flammable
environment (gas presence, smoke ...).
!
Turn off the equipment when being in a gas station.
!
Do not manipulate or attempt to modify the transceiver or the battery.
!
If you want to store the equipment during a long period of time, you have
to extract the battery.
!
When the equipment is in functioning, avoid that the antenna is close or
touching your face or eyes.
!
The equipment will give its maximum performance if the antenna is in vertical
position with the microphone at a distance of 5-10 cm from your mouth.
5
EN
!
Ear Damages! If the receipt is done with headphones... the volume should be
low. Prolonged use at high volume may damage the ear. If aer using the
equipment, you hear a constant sound of a buzzing, reduce the volume or
abandon the use of headphones.
!
DO NOT turn on the equipment with a voltage other than indicated: risk
of damages.
!
DO NOT use the PTT button if is not necessary.
!
DO NOT use the transceiver if you are driving a vehicle. To prevent accidents,
focus only on driving.
!
Avoid exposing the transceiver to the sun for long periods or in Extreme
temperatures below 0 º or above 55 degrees.
!
The excessive overheating can provoke the explosion of the battery.
!
Be careful with the equipment and the battery, a blow might damage them
or even in the worst case, it can do that the battery exploits.
!
Under no concept short-circuit or cross the battery terminals, it could
irreversibly damage the battery and in the worst case could lead to an
6
EN
explosion that could lead to potential physical harm to the user. It is
EN
recommended:
- Transport the equipment of suitable form in order that the terminals
could not cross unintentionally.
- No carry it in your pocket with metallic objects like keys, coins, etc.
- Do not place the equipment with terminals making contact in a metal
surface.
Avoid contact of the equipment and battery to water or conductive liquids.
!
As the transceiver as the elements that comes with it aren’t toys, keep
them always out of reach of children and animals.
7
General Transceiver Functions:
· PMR-446 Transceiver for free use without license.
· Output Power 500mW.
· 128 memory channels
· Analogical CTCSS and Digital DCS Subtones.
· Channel Encryption (Scrambler)
· Saving System of Battery consumption
· Transmission Time Timer (TOT function).
· Busy channel automatic lock.
· Handsfree Function (VOX control).
· End transmission confirmation warning (Roger Beep)
· Channel Search / Channels and Subtones Scanner
· Commercial Radio FM Function 88-108 Mhz
· Programmable by soware
· High Capacity Lithium Battery
8
EN
Unpacking of the equipment and content
Unpack carefully the content of the box of your transceiver. We recommend you to
verify the elements listed in the following table before discarding the packing. If some
element is missing or it had been damaged due to the shipping, please contact your
dealer as soon as possible.
Supplied accessories
MIC
MENU
Transceiver TL-88
Battery pack Li-Ion TLB-405
Desktop charger TLC – 435
User manual
Belt clip TLP-411
Charger TLC-435/1
9
EN
Transceiver Scheme
EN
Upper Channel Controller
UHF Antenna
ON-OFF/VOLUME Controller
TX transmission indicator LED
(Red Colour), RX reception
(Green Colour) and charge.
Speaker
Microphone
MIC
LCD Display
Upper channel/functions key
Menu Key
10
MENU
Lower channel/functions key
General Side View
Side transmission PTT
key (press for transmit
TX, release to receive
RX)
EN
External accessories
connection:
programming cable,
earphone, speaker…
Battery extract Key
(Move it up)
MONITOR Side Key
Battery
11
Display Icons Description
EN
You can see different icons on the screen when the radio is turned on. The following
table will help you to identify the meaning of the icons on the screen.
888
DW
H
SCR
1
S
N
VOX
5
CT
DCS
PRI
9
Key lock on.
888
Sub tones Numbering / Menus Numbering.
Key tone “beep” on.
S
Battery save system on
N
Digital DCS Sub tone on “N” type
CT
DCS
Analogical CTCSS Sub tone on
Digital DCS sub tone on, valid icon for type “N” and “I”
Depending working mode, displays the channel number or the frequency
number.
12
75, 5, 25
In frequency mode, displays the complete frequency.
F
Indicate that the transceiver is inside the MENU.
DW
TX/RX Transceiver Priority in FM Radio Mode ON.
SCR
Voice encryption on.
VOX
Handsfree Function (VOX Control) Turned on.
PRI
Scanning beginning from priority active channel.
EN
Battery charge Indicator..
1
5
9
RX Reception and TX Transmission signal Indicator.
13
Working Modes
The TL-88 is able to work in three ways: A-Channel Mode, B-Frequency Mode, and C-Radio
FM Mode.
A-Channel Mode
It is the most common working mode of the transceivers for FREE USE PMR-446. The
display shows the channel number and the top le the CTCSS tone.
004
CT
ch -- 01
DW
SCR
Selecting and using appropriate channel whether it needs the combination of sub
tones, the TL-88 is compatible and able to communicate with any equipment PMR-446
of free use of the market, in any segment: professional, semi-professional or
economics of the consumer market (we recommend to read attentively the appendix
USE OF THE WALKIE AS PMR-446 BASIC that you will find in the page 74), even this way
the TL-88 is supplied from factory with 56 channels (memories) preprogrammed, these
56 channels / memories are directly compatible with the majority of equipments for
14
EN
free use PMR-446 FREE PROFESSIONALS of the market (see appendix: TABLE 56
EN
MEMORIZED CHANNELS, page 66).
Even if from origin the TL-88 is supplied with 56 channels/memories preprogrammed,
the transceiver is capable of memorizing by means of its easy and free programming
soware up to 128 channels (attention: these 128 channels/memories will be always
combining the 8 authorized frequencies for free use with the sub tones that dispose
the equipment, in this case 38 analogical sub tones (CTCSS) and 208 digital (DCS) ones,
giving a total of more than 1900 different combinations to use or store in its 128
memories. See section advanced options index (soware), page 54).
B - Frequency Mode
The frequency mode is not so common in this type of equipments, but the TL-88 can
operate in it showing the complete number of working frequency (which is what
corresponds to a memorized channel) within the authorized 8 (remember: that
combining the sub tones you also have in this mode over 1900 different combinations).
15
To operate with the frequency mode, with the receiver off, keep pressed the (MENU)
MENU
MENU key until
key and switch it on by the upper control ON/OFF. Keep pressed the (MENU)
the equipment display shows the frequency.
001
4 4 6.0 0 6
DW
SCR
In this case the display changes the configuration, where the numbers of sub tones
were appearing in CHANNELS MODE, now displays the memory numbers/channel
corresponding the frequency showed on the display.
001
4 4 6.0 0 6
DW
SCR
C-Radio FM Mode
In FM Radio mode the transceiver becomes a receiving radio of issuers between 88 and
108 MHz, the traditional commercial FM radio issuers, where the user can listen to
music, news, talk-shows or programs of varied content.
16
EN
To accede to the FM Radio mode, press the key (MENU),
then press the lateral key
MENU
MONITOR and the transceiver will show the number that corresponds to the frequency
of the FM issuer.
9 9.4 0
DW
SCR
1
5
9
Through the upper control button of channels you could change the frequency of the
issuers or realize a search or scan using the keys¬¬____ and _____ -. To search just
hold about 3 seconds the key for the direction you want that the radio realizes the
issuers' scanning of FM, then the display shows:
S C N. U P
DW
SCR
If your choice was to realize
the search in ascending sense
S C N. D N
DW
SCR
If your choice was to realize
the search in descending sense.
In the moment that the radio locates a sign, will stop in the frequency.
17
EN
Inside the FM Radio mode the user has two options:
1 – To listen unique and exclusively commercial FM radio.
2 – To listen FM commercial radio but if it receives a transmission or signal in the last
channel of PMR-446 that was when entered on the FM Radio mode, the transceiver will
immediately leave the FM radio mode to go to the display mode Channels / Frequencies
and be able to listen to the transmission, enclosed to speak if you wish it.
In this case spent a few seconds aer the signal received or transmitted cuts the
transceiver returns to the FM radio mode automatically.
You will obtain more information about this practical function by referring to the MENU
14 (DW function) “Priority Transceiver while using the Radio FM function”, page 41.
To leave the FM radio function and return to the PMR-446 transceiver mode, you must
MENU
realize the same steps to enter: press the key (MENU),
then press the lateral MONITOR
key and the transceiver will pass to the working mode as a transceiver that you
previously had selected : channels or frequencies.
18
EN
Scheme / index Menu
EN
Menu 01 – Analogical CTCSS / Digital DCS (TN) Sub tones
Menu 02 – Channel Encryption (SCR)
Menu 03 – Squelch level or noise filter selection (SQL)
Menu 04 – Battery Save System (SAV)
Menu 05 – Transmission Time Timer (TOT)
Menu 06 – Busy channel automatic lock (BCL)
Menu 07 – Key sound “beep” (BP)
Menu 08 – Display Light (LMP)
Menu 09 – Hands free Function (VOX)
Menu 10 – Roger Beep (EOT)
Menu 11 – Automatic Key Lock (ALK)
Menu 12 – Channel and Sub tones Scanner/Search (SCN)
Menú 13 – Selection of priority channel scanning (PRI)
Menú 14 – Priority Transceiver while using the FM Radio Function (DW)
Menú 15 – RESET / Reinitialize (RESET)
19
Setting function using MENU
EN
Menu 01 – Analogical CTCSS / Digital DCS (TN) Sub tones
Press
MENU
, using
and
, select the menu number 01.
Using the up control for the channel selection you can choose analogical (CTCSS) or
digital (DCS) sub tones.
Upper control
of channels
01
s
TN
CT
CT
F
01
TN
MIC
F
MENU
20
s
CT
DCS
Selected the sub tone type press
MENU
for access to the selection of the number
of sub tone that you want to use or turn it off. To do it press again
check that the numbers or the word OFF are blinking, using
MENU
, you can
and
or the
upper channel control, select the wanted subtone number or the word OFF. Once
selected your desired option you must confirm it pressing
MENU
or the PTT button.
You can continue operating inside the MENU to select other parameters using---------and
pressing
or you can leave the MENU to go directly to the operative channel display
MENU
a few seconds, or the PTT button twice.
Note: See, Technological parameters, conversion table number / frequency of
analogical sub tones CTCSS and digitals DCS "N" and "I", on pages: 71, 72 and 73.
Menu 02 – Channel Encryption (SCR)
The TL-88 has an exceptional feature called ENCRYPTION. This advanced option is only
reserved for the best and more professional equipments of Market.
21
EN
The encryption is a measure of safety and privacy in the conversations, once activated
this option the conversations will be totally unintelligible for any user who has not
another transceiver provided with the same feature. Another user who was in the
same channel, even with the same sub tone and did not have encryption or the same
one that your TL-88, would hear a voice so distorted that it would be totally
incomprehensible for him.
This feature makes the TL-88 LUTHOR an exceptional device, specially indicated for its
use by groups where for security reasons want to keep the maximum of possible
privacy.
Press
MENU
, using
and
, locate the menu number 02. Press
confirm that you want configure this option.
02
22
s
CT
02
s
CT
s c r oFF
s c r on
F
F
MENU
to
EN
You can see that the option to select is blinking on the display. Using the upper channel
control or pressing
and
you can choose if you turn on the channel
encryption (ON) or turn it off (OFF).
To confirm your option press
MENU
or PTT button.
You can continune operating inside the MENU to select other parameters
using--------------and
channel display pressing
or you can leave the MENU to go directly to the operative
MENU
a few seconds, or the PTT button.
Selecting the option ON (encryption enabled) the display shows the icon “SCR”.
021
s
CT
CH - 1
F
DW
SCR
23
EN
Menu 03 – Squelch level or noise filter selection (SQL)
Press
MENU
, using
and
, locate the menu number 03. Press “
MENU
”
to confirm that you want to configure this option.
03
SQL
s
CT
5
F
You’ll see a blinking number between 0 and 9 on the display. Using the upper channel
control or
and
you can choose between 0 (Squelch Off) and 9 (Maximum
level of Squelch) the SQUELCH level (noise filter). The default level is 5.
To confirm your option press
MENU
or PTT button.
You can continue operating inside the MENU to select other parameters using-----------and
pressing
24
or you can leave the MENU to go directly to the operative channel display
MENU
a few seconds, or the PTT button.
EN
IMPORTANT:
"0" is opened squelch and from 1 to 9 you will obtain the different levels of noise
reduction, being "9" the highest level of reduction. If you set the too high level, the
signal that you will receive will be very clean of noise, but it will go to detriment of the
communication, that is, in this case will lose reception distance. On the contrary if the
selection is a too low level or deactivate the squelch will count with an increased
distance but the radio will be object to receive noise or signal of worse quality. The
most recommended level is the intermediate “5”.
Menu 04 – Battery Save System (SAV)
Press
MENU
, using
and
, locate the menu number 04. Press
MENU
to
confirm that you want configure this option.
04
s
SAV on
CT
Remember: This icon
indicates that the
saving system is
activated.
F
25
EN
You’ll see one of the two options blinking on the display. Using the upper channel
controller or
and
you can choose if you turn on (ON) or turn off (OFF) the
battery save system. The advice is keep it active (on).
To confirm your option press
MENU
or PTT button.
You can continue operating inside the MENU to select other parameters using-----------and
pressing
or you can leave the MENU to go directly to the operative channel display
MENU
a few seconds, or the PTT button.
Menu 05 – Transmission Time Timer (TOT)
This useful option allows you to border the maximum transmission time. Very advisable
when working as a group, with this option you can limit the transmission time of
transmitters and avoid the monopoly transmission of one user.
This option allows you to select between 15, 30, 45… (intervals of 15 s.) up to 300
26
EN
seconds the maximum transmission time.
EN
Press
MENU
, using
and
, locate the menu number 05. Press
MENU
to
confirm that you want configure this option.
05
s
CT
TOT OFF
F
You’ll see the option to choose blinking on the display. Using the upper channel
controller or
and
you can choose the maximum transmission time between
15 and 300 seconds, or turn it off choosing (OFF), if you choose this last option the
maximum transmission time will be unlimited.
To confirm your option press
MENU
or PTT button.
You can continue operating inside the MENU to select other parameters using-----------and
pressing
or you can leave the MENU to go directly to the operative channel display
MENU
a few seconds, or the PTT button.
27
Menu 06 – Busy channel automatic lock (BCL)
This option prevents to the user the possibility for transmitting if the radio is receiving
a signal. This way the radio wil avoid to meddle to another user that was conversing
before. The radio will stop the emission only at the moment when does not detect a
sign Or Conversation.
Press
MENU
, using
and
MENU to
, locate the menu number 06. Press ______
confirm that you want configure this option.
06
s
CT
BCL OFF
F
You’ll see the option to choose blinking on the display. Using the upper channel
controller or
and
you can choose between the three possible options.
OFF: Turn off the transmission busy channel lock
WAV: Turn on the transmission busy channel lock from of any signal in the channel.
28
EN
COD: Turn on the transmission busy channel lock just from a signal that coincides with
EN
the same sub tone CTCSS/DCS number of the used channel.
To confirm your option press
MENU
or PTT button.
You can continue operating inside the MENU to select other parameters using---------and
or you can leave the MENU to go directly to the operative channel display
pressing _____
MENU a few seconds, or the PTT button.
Menu 07 – Key sound “beep” (BP)
Press
MENU
, using
and
, locate the menu number 07. Press ______
to
MENU
confirm that you want configure this option.
07
s
Bp ON
CT
If your selection is "ON” the
display will show this icon.
F
You can see that the option to select is blinking on the display. Using the upper channel
29
controller or pressing
and
you can choose if you turn on the key beep
(ON – The radio will emit a beep sound when you press the keys) or turn it off (OFF –
The radio won’t emit a beep sound when you press the keys).
To confirm your option press
MENU
or PTT button.
You can continue operating inside the MENU to select other parameters using
--------- and-- ------ or you can leave the MENU to go directly to the operative channel
MENU
display pressing ______a
few seconds, or the PTT button.
Menu 08 – Display Light (LMP)
Press
MENU
, using
and
, locate the menu number 08. Press
confirm that you want configure this option.
08
s
LMP O N
F
30
CT
MENU
___
to
EN
You’ll see the option to choose blinking on the display. Using the upper channel
controller or
and
you can choose between the three possible options.
OFF: Turn off the display Light.
ON: The display will light when you press any radio button or you receive or transmit
any signal.
KEY: The display will light when you press any radio button, however it will not do it
when it emits or receives a transmission.
To confirm your option press
MENU
or PTT button.
You can continue operating inside the MENU to select other parameters using
-----------and
or you can leave the MENU to go directly to the operative channel
MENU a few seconds, or the PTT button.
display pressing ---------
31
EN
Menu 09 – Hands free Function (VOX)
This function allows the user to be able to transmit automatically without needing to
press the lateral key PTT and being activated only by means of sound. In the moment
that you speak, the radio will start transmitting, if you stop speaking, the radio will
stop transmitting. For it you will have to turn on the function VOX and choose the level
of sensibility between 1 and 9. The Level “1” is the most sensitive; it means that the
radio will be activated and start transmitting in the moment that the microphone
detects sound. By contrast the level "9" is the one of minor sensibility, so to enable the
transmission, the sound level will be very much greater than in any of the other levels.
Bear in mind:
1-
To use the VOX hands free system you need a micro earphone adapted to
this function. Not all accessories have this option, contact your dealer.
2-
The VOX system is very practical but is difficult to use in loud environment,
logically, it can be activated by also the noise. Use the different sensibility
levels to avoid this.
32
EN
Press
MENU
using
and
, locate the menu number 09. Press --------MENU to confirm
EN
that you want configure this option.
09
s
CT
vox 5
F
If your selection is any
one of the levels
between 1-9 the display
will show this icon.
VOX
You’ll see a blinking number between 1 and 9 or OFF word on the display. Using the
upper channel controller or
and
you can choose between 1 (Minimum)
and 9 (Maximum) the sensibility VOX level.
To confirm your option press
MENU
or PTT button.
You can continue operating inside the MENU to select other parameters using---------and
or you can leave the MENU to go directly to the operative channel display
pressing ---------MENU a few seconds, or the PTT button.
NOTE: the use of the VOX function disqualifies the PTT button, so we recommend you
to turn off this option when you don’t use it.
33
Menu 10 – Roger Beep (EOT)
The ROGER BEEP is a practical function that emits a confirmation sound aer every
transmission. It is undoubtedly very useful to confirm that the user has stopped
transmitting. This sound will be heard by both the emitter and the receiver.
Press
MENU
, using
and
MENU to
, locate the menu number 10. Press ----------
confirm that you want configure this option.
10
s
CT
EOT OFF
F
You’ll see the option to choose blinking on the display. Using the upper channel
controller or
and
you can choose between the three possible options:
OFF: Turn off the transmission of the ROGER BEEP sound.
SHB: In the moment you stop transmitting the radio emits a short “Beep” sound.
34
EN
LAB: In the moment you stop transmitting, the radio emits a large “Beep” sound.
EN
To confirm your option press
MENU
or PTT button.
You can continue operating inside the MENU to select other parameters using-----------and
or you can leave the MENU to go directly to the operative channel display
pressing ---------MENU a few seconds, or the PTT button.
Menu 11 – Automatic Key Lock (ALK)
When you active this function (ON) the keys and the upper channel controller will be
automatically locked aer a few seconds from the last operation, this way it avoids to
change the channel accidentally or the involuntary accede to the menu. Only the PTT
and MONITOR keys will be operative.
Press
MENU ,
using
and
MENU to
, locate the menu number 11. Press -----------
confirm that you want configure this option.
35
11
s
CT
ALK OFF
F
You can see that the option to select is blinking on the display. Using the upper channel
controller or pressing
and
you can choose if you turn on the automatic
key lock (ON) or turn it off (OFF).
To confirm your option press
MENU
or PTT button.
You can continue operating inside the MENU to select other parameters using-----------and
pressing
or you can leave the MENU to go directly to the operative channel display
MENU
a few seconds, or the PTT button.
If you select the ON option the display will show on its top le part the padlock icon.
10
s
CT
ch -- 01
F
36
EN
To access the MENU or the upper channel controller, keep MENU key pressed for a few
seconds. The radio will be available to manipulate until will be on the auto-lock, a few
seconds later from the last operation.
Remember: You can lock or unlock the keyboard and the upper channel controller
keeping pressed
MENU
for a few seconds.
Menu 12 – Channel and Sub tones Scanner/Search (SCN)
The Channel and Sub tones Scanner function is one of the more exclusive feature of
this transceiver.
Through this advanced feature the transceiver will locate the channel/frequency where
is receiving the transmission, besides it offers the possibility to identify the sub tone
as the Analogical CTCSS as the Digital DCS sub tones in which the located signal is
operating.
Press
MENU
, using
and
, locate the menu number 12. Press
MENU
to
37
EN
confirm that you want configure this option.
12
SCN
EN
s
CT
CH
F
You’ll see the option to choose blinking on the display. Using the upper channel
controller or
and
you can choose between the four possible scanner op-
tions:
OFF: Turn off the scanner.
CH: Realize the channels/frequencies scan and stops where receiving a signal.
CT: Realize the analogical sub tones scanner and stops where receiving a signal with
that type of sub tone, to identify and show on display the analogical CTCSS sub tone
number.
DCS: Realize the digital sub tones scanner and stops where receiving a signal with that
type of sub tone, to identify and show on display the digital DCS sub tone number.
Note: See, Technological parameters, conversion table number / frequency of ana
-logical CTCSS and digital DCS subtones "N" and "I", on pages: 71, 72 and 73.
38
To confirm your option press
MENU
or PTT button.
You can continue operating inside the MENU to select others parameters using-----------and
or you can leave the MENU to go directly to the operative channel display
MENU a few seconds, or the PTT button.
pressing ----------
When you select one of the three scanner options: CH, CT or DCS and with the radio in
operative mode, to begin the search or scanner keep pressed
(Upward scan) or
-__-----_(Downward Scan), you can see the transceiver passing quickly for all the
channels/sub tones until it stops when receiveing a signal or locating a sub tone.
Menu 13 - Selection of priority channel scanning (PRI)
This function allows to select the channel for which the transceiver will start realizing
the scanning channel when ordered.
Press the key
MENU
, using
and
, locate the menu number 13. Press
39
EN
the
MENU
to confirm that you want to configure this option.
13
pri
F
s
CT
off
If you activate this
option the display will
show this icon.
PRI
You’ll see the option to choose blinking on the display. Using the top control of
channels or the keys
and
you can select the number of channel in which
the transceiver will begin the search or the option OFF. If you choose this last option
the search or scan will begin from the channel you were operating.
To confirm your option press
MENU
or PTT button.
You can continue operating inside the MENU to select other parameters using
----------and
display pressing
40
or you can leave the MENU to go directly to the operative channel
MENU
during a few seconds or the PTT button.
EN
Menu 14 - Priority Transceiver while using the FM Radio function (DW)
Press
MENU
, using
and
, locate the menu number 14. Press
MENU
to
confirm that you want to configure this option.
If you select “ON”
the display will
show this icon.
14
s
CT
DW ON
F
DW
You’ll see blinking on the display one of two options. Using the upper channel control
or
ON:
and
you can select between both options that this function offers:
In Radio FM function, while listening FM's Commercial radio station if your
equipment receives a signal or communication, it will go automatically to the
transceiver mode in the last channel that had on screen, to be able to answer or simply
listen the conversation. Aer a few seconds from the ending of the receipt of the
signal the transceiver will return to the Radio FM mode in the frequency of commercial
station that had tuned. Of the same way, if you touch the lateral key of transmission
PTT being
41
EN
PTT being in the Radio FM mode the radio also will go automatically to the transceiver
EN
mode for a temporary form while the communication lasts.
OFF:
In Radio FM function the transceiver will remain in this mode of work until
manually you leave it. While listening to FM's commercial radio the transceiver will not
be operative for the receipt of signals.
Remember: To enter or exit to the FM RADIO mode: press
MENU
and then the side key
MONITOR.
To confirm your option press
MENU
or PTT button.
You can continue operating inside the MENU to select other parameters using
-----------and ----------or you can leave the MENU to go directly to the operative channel
display pressing
42
MENU
during a few seconds or the PTT button.
Menu 15 - Reset / To re-initialize (RESET)
EN
WARNING: Read carefully what we indicate below.
The RESET function returns the transceiver to the initial programming. This means that
any settings you had changed or programmed will be removed from the equipment's
memory, being again the origin parameters and preset channels that the equipment
had when you bought it. For this reason we recommend you that before making this
operation please make sure of this decision.
Press
MENU
, using
and
, locate the menu number 15. Press ----------MENU
to confirm that you want to configure this option.
15
s
CT
RESET
F
You will see blinking on the display the word “RESET”
43
ATTENTION: If now you press the lateral key PTT you will confirm your decision to do a
RESET to the equipment in which case you will lose all the memories, configurations or
parameters that you may had personalized then the equipment will reinitialize with the
Factory parameters (see appendix “FACTORY PARAMETERS" in the page 70).
Once pressing the PTT lateral key the equipment will be locked during 5 seconds
approximately. Aer this time, the display will show all the segments that has:
888
DW
S
SCR
N
VOX
CT
PRI
5
1
DCS
9
And aerwards it will reset with the parameters established of origin.
010
S
CT
ch -- 01
DW
44
EN
Special Functions
EN
The MONITOR lateral key
The MONITOR lateral key has as principal mission to open the squelch or noise filter.
Keeping this key pressed you will be able to hear the annoying noise that the
transceiver would have if it does not have squelch or noise filter, said differently, it
would be the equivalent to selecting OFF in the squelch function of the Menu 03 (Page
24).
When the MONITOR lateral key keeps pressed the reception CTCSS and DCS sub tones
stay also without effect temporarily. In the moment in which you release the key, the
sub tones return to be active.
The MONITOR lateral key is also used for the activation of the Radio FM mode function
and the CLONING function that are described aerwards.
45
FM Radio
The LUTHOR TL-88 besides being a high performance transceiver in PMR-446 is a
magnificent FM Radio receiver for commercial stations. Music, talk shows, news, etc.
They are at the reach of the user by simply pressing the key (
MENU
) and continuously
the lateral key MONITOR, with this simple operation you will be able to enjoy the wide
range of radio programs emitted in FM. To exit the FM Radio mode repeat the same
operation.
You will find more information about this topic in paragraph C - Radio FM Mode on
page 16.
CLONING function
The CLONING function as its name indicates, has its objective to copy exactly all the
information parameters and channels from a transceiver to another one. Undoubtedly
it is a very practical function in order to program all the necessary equipments with
the same information in a very simple and fast way, without using a PC.
46
EN
To realize the cloning operation you must have the optional cable TLCLON (consult the
EN
paragraph of optional accessories, page: 85 and request it from your dealer).
With the equipments switched off connect the cloning cable TLCLON to both TL-88 as
shown below:
Master equipment”A
Equipment to clone “B”
47
The MASTER equipment must be the one that contains all the information that you
want to copy on the equipment to clone. Follow next steps:
1. Switch on the equipment to clone "B".
2. Keeping pressed
MENU
and the MONITOR lateral key turn on the MASTER equipment
"A". The display will show:
CLONE
Prepared for the cloning.
3. In the MASTER equipment "A" press again the MONITOR lateral key. The display will
show:
CL OU
Performing the cloning operation
4. Aerwards the cloning will begin and will last a few seconds, if finally the cloning has
been realized successfully the display of the MASTER equipment "A" will indicate that
the cloning has finished:
END
48
Cloning successfully completed.
EN
If the cloning could not conclude successfully, the MASTER equipment "A" will indicate
EN
that an error has been produced:
ERR
Cloning failed.
In the last supposition, repeat the operation again making sure that the cable is
properly connected to the pins on the equipments and follow the steps previously
described. If aer repeating the operation, the cloning fails again, it is possible that the
cable TLCLON or one of the equipments could be damaged for which you will have to
contact your dealer for advice.
Manual Lock/Unlock of buttons and keys
To avoid manipulating the transceiver accidentally, the TL-88 offers the possibility to
lock the buttons of control and the keyboard manually.
To realize the blockade, keep pressed
MENU
during approximately 3 seconds, passed
this time the equipment will not respond to any key nor the upper control of channels.
49
Only the PTT lateral key will be active to be able to transmit and the control
EN
ON-OFF/VOLUME control.
Keyboard and upper
channels control locked.
004
CT
ch -- 01
DW
To unlock the transceiver keep pressed
SCR
during
MENU
approximately 3 seconds, passed this
time the equipment will allow its manipulation.
Note: the manual unlock of the keyboard is also used in the case when the AUTOMATIC
BLOCKADE OF THE KEYBOARD function is activated (ALK menu 11, page 35).
50
Battery Charge
The TL-88 is equipped with a Lithium Ion battery (also known as Li-ion or simply Lithium
battery). The main characteristics of these batteries are lightness, no memory effect
and high energetic capacity in a reduced size. The majority of the Lithium batteries
have more advantages than Ni-Mh batteries or the older and obsolete ones of Ni-Cad
(the cadmium is a very pollutant element), thought it is necessary to take some
cautions with the lithium batteries, therefore we recommend you to read attentively
the warnings indicated on the subject of lithium batteries in the paragraph located in
the pages 5, 6 and 7 of the CAUTIONS AND PRACTICAL ADVICES.
To realize the charge of the batteries; the equipment is supplied with the LUTHOR
charger TL-435, it is an intelligent one that identify the charge that has the battery to
recharge it only in the time that it needs up to having its complete capacity. In the case
that the battery is totally flat, the full capacity can be reached in about 5 hours.
WARNING: It is not at all advisable to recharge the battery with another charger
than the original TLC-435 and don’t try to charge another battery different than
51
EN
than the provided by the brand for this charger.
EN
Under the charger you will observe on the labeling its characteristics and some icons
that indicate the state of the battery, we indicate its meaning below:
INPUT: It indicates
that the entry of
voltage for this
charger is of 13,8
volts of continued
tension
OUTPUT: It indicates that the exit
of voltage and
the battery charge is 8,6 volts
continuous with a
current of between 400 and
450 mAh.
RED SYMBOL: Top Led turned
on in red color indicates that
the battery is loading
52
Charge contacts.
TLC-435
INPUT:
OUTPUT:
DC 13.8 V
DC 86 V
Charger
400 450 mAh
Made in China
CHARGING
COMPLETED
GREEN SYMBOL: Top
Led turned on in
green color indicates
that the battery has
completed its charge.
Indicator LED of functioning
and status of charge.
Guide slots for the
introduction of the
battery. They allow
the charge of the
battery alone or
with the
transceiver.
Note: In the case
of realizing the
charge of the
battery with the
transceiver is
advisable to do it
with the handheld
switched off.
The supply of the charger can be made from its own transformer which reference is
LUTHOR TLC-435/1 supplied with the equipment or by means of the connection known
as " lighter " of a vehicle, which optional reference is LUTHOR TLC-PLUG (consult
paragraph OPTIONALS ACCESORIES page 85).
FEEDER
TLC-435/1
1
AC ADAPTOP
INPUT. 220V 50Hz
OUTPUT. 12V-300mA
AC ADAPTOP
INPUT. 220V 50Hz
OUTPUT. 12V-300mA
!
3
TLC-435/1
Made in China
!
CHARGER
TLC-435
TLC-435/1
Made in China
INDOOR ONLY
INDOOR ONLY
6
2
4
1
The power supply connects to 220v/50Hz.
2
12 volt output. 300 mA.
3
For exclusive use indoors.
4
Connection:
+ positive external contact.
negative external contact.
5
Connection type "lighter" from 12 to 13.8 volts.
6
Back connection, input from 12 to 13.8 volts
max.
5
FEEDER
TLC-PLUG
Optional accessory
53
EN
s
e
.
r
o
Advanced Options (Soware)
h
t
u
l
.
w
w
54
w
ESP
Advanced Options (Soware)
The LUTHOR TL-88, thanks to its advanced technology, allows the programming of a
total of 128 memories with its respective frequencies and configurable parameters by
the user. As it is commented in other points of this manual, the 128 memories are
synonymous of channels, therefore combining 8 frequencies for free use of PMR-446
and the available sub tones, we can say that the user will have to his service up to 128
channels (the receiver is supplied factory default with 56 memories / channels
programmed).
To access to the programming of the LUTHOR TL-88 you must purchase the
programming cable TL-USB (see OPTIONAL ACCESORIES section on page 85) and install
the programming soware TL-SOFT88 on your PC.
When you execute the soware the main window will open showing the following
configuration:
55
EN
EN
The first step is to select the communication port in order that the transceiver and PC
can understand each other. Simply select the top menu "Setup"
56
You will observe, as on the previous image, that a window is opened by the submenu
EN
"Communication Port"
the numbers of the different ports of communication.
Select the appropiate port of communication.
Once realized the correct selection of the port the first step will be to verify that
communication exists, for it turn on your transceiver and realize a reading of the
memory of the TL-88.
57
You can execute this action by means of the top menu or by the menu of icons placed
EN
below.
Top Menu
Icons Menu
1. Select “Program”.
1. Le-click on the icon that shows a
2. Le-click on “Read from Radio”.
computer.
The display of the computer will show a bar of state while it executes the reading of
the memory.
(ATTENTION: do not abort any of the actions to read or to programme the
transceiver while they are realizing, it might seriously harm the memory of your
TL-88).
58
Once realized the reading, the display of your PC will show 56 channels memorized with
its different parameters. At this point you will be able to change so much as the
frequencies of the channels as some of the parameters by channel. Aerwards we
indicate the different selections that you can realize
1
2
3
4
5
6
1- " Channel No. ": Number of channel or memory, as you prefer naming it.
2- " RX/TX Frequency ": Frequency of the channel. You can select 1 of the 8 frequencies
for free use. Doing click in the combo box you will see the number of frequency and
the number of corresponding channel.
3- " Tone": By means of the combo box you will be able to select the number of sub
tone of the channel or to deactivate the sub tones.
4- " Scan": To add (Add) this channel to the list of channels of scanning or to delete a
channel (Del) of the search when the transceiver is realizing a scan.
5- " BCL": It activates or deactivates the blockade of busy channel for the channel.
6- " Scrambler": It activates or deactivates the encryption in the selected channel.
59
EN
Then you can access to the configuration of optional parameters "Optional
Features". To enter on that screen, le-click on the top menu "Program" and le-click
on "Optional Features" and the below screen will be opened for the configuration of
special options.
Block A
Block B
Block C
60
EN
Aerwards we realize a description of blocks:
EN
• Block A: "General Function": By means of the options and its combo boxes the user
can configure a number of general functions such as selecting the level of squelch,
activate / deactivate autolock, excess transmission time, etc... Basically there are
functions that can also be configured using the transceiver menus and its keyboard.
• Block B: "VOX": in this option we can select:
- VOX Gain Level: VOX sensitivity level or deactivate it.
- VOX Delay Time (s): This option is only configurable through software of the
TL-88 and indicates the time in which the equipment will continue in TX transmission
once the conversation is finished. This configuration is important if the user is using a
communication and makes breaks, normally the logical pauses to breathe for example.
If the configuration is the minimum of 0.3 seconds, a short pause for breath would cut
the transmission, if on the contrary the configuration was the maximum of 2.0
seconds from the moment you stop talking the transceiver will wait 2 seconds up to
cutting the transmission TX and to enter in receive mode RX.
• Block C: "Enable Menus" Menus enabled. This selection allows you to enable or disable
the manipulation of those functions. Clicking on the selection box of each function the
user locks or unlocks the possibility to configure the menu using the keyboard of the
61
transceiver. When the symbol
is on the selection box of the function, it indicates
that this function can be manipulated by the user via the keyboard of the transceiver;
evidently if the window is not marked it will mean that the user can not accede to
these settings from the keypad of your LUTHOR TL-88.
Once realized all the configurations of frequencies, channels, parameters, etc ... to be
effective in the transceiver you must transmit them, for it you will have to use the
function to write “Write to Radio ". To realize this operation you can use the top menu
le-clicking in "Program" and then select “Write to Radio" or use the menu icons by
le-clicking on the icon that represents a handheld.
Top Menu
Icons Menu
As when you realized the reading of the memory of the transceiver a screen will
reappear with the progress of the writing. (ATTENTION: do not abort any of the
actions of reading or programming the transceiver while they are being realized,
it might harm seriously the memory of your TL-88.
62
EN
Once realized the transmission of information to the TL-88, if it has concluded
EN
successfully the display of the PC will show a window indicating it.
Writing completed
Press to agree. The TL-88 will have in its memory the entire configured on PC.
Finally you can save the file edited in order to use it again. For it do a le-click on the
“File” option of the top menu and aerwards select “Save” or “Save As”, also you can
realize this operation by means of the icons menu le-clicking the icon representing a
diskette.
63
EN
Top Menu
Icons Menu
Save As
Rewrite file used
Save
You can accede to the files previously saved le-clicking on the option “File” of the top
menu and aerwards selecting “Open”, also by means the icons menu using the icon
representing an open folder.
64
Top Menu
Icons Menu
Open
Browse archives
s
e
.
r
o
Appendices
Appendices index
Table 56 memorized channels
h
t
u
Factory Parameters.
66
70
Technological parameters, conversion table number / frequency of analogical
l
.
w
w
subtones CTCSS and digitals DCS "N" and "I".
71
Use of the transceiver as a PMR-446 basic handheld.
74
Problems Solution Guide.
82
Optional Accessories.
Technical Specifications.
Environment Protection Note.
w
Declaration of Conformity.
85
86
87
88
65
ESP
Table 56 memorized channels
66
EN
Channel
Number
Frequency (MHz)
Sub tones
Type
Tone
Number
Sub tones Frequency
1
446,00625
CTCSS
10
94,8 Hz
2
446,09375
CTCSS
08
88,5 Hz
3
446,03125
CTCSS
13
103,5 Hz
4
446,06875
CTCSS
05
79,7 Hz
5
446,04375
CTCSS
17
118,8 Hz
6
446,01875
CTCSS
18
123,0 Hz
7
446,08125
CTCSS
19
127,3 Hz
8
446,05625
CTCSS
07
85,4 Hz
9
446,00625
CTCSS
14
107,2 Hz
10
446,09375
CTCSS
15
110,9 Hz
11
446,03125
CTCSS
16
114,8 Hz
12
446,06875
CTCSS
06
82,5 Hz
13
446,04375
DCS
23
D132N
14
446,01875
DCS
28
D155N
15
446,05625
DCS
24
D134N
16
446,08125
DCS
39
D243N
Table 56 memorized channels
EN
Channel
Number
Frequency (MHz)
Sub tones
Type
Tone
Number
Sub tones Frequency
17
446,00625
DCS
17
D114N
18
446,01875
DCS
18
D115N
19
446,03125
DCS
01
D023N
20
446,04375
DCS
02
D025N
21
446,05625
DCS
03
D026N
22
446,06875
DCS
13
D071N
23
446,08125
DCS
14
D072N
24
446,09375
DCS
15
D073N
25
446,00625
DCS
27
D152N
26
446,01875
DCS
28
D155N
27
446,03125
DCS
29
D156N
28
446,04375
DCS
30
D162N
29
446,05625
DCS
31
D165N
30
446,06875
DCS
34
D205N
31
446,08125
DCS
35
D212N
32
446,09375
DCS
36
D223N
67
Table 56 memorized channels
Channel
Number
68
EN
Frequency (MHz)
Sub tones
Type
Tone
Number
Sub tones Frequency
33
446,00625
-
OFF
OFF
34
446,01875
-
OFF
OFF
35
446,03125
-
OFF
OFF
36
446,04375
-
OFF
OFF
37
446,05625
-
OFF
OFF
38
446,06875
-
OFF
OFF
39
446,08125
-
OFF
OFF
40
446,09375
-
OFF
OFF
41
446,00625
CTCSS
01
67,0 Hz
42
446,01875
CTCSS
02
71,9 Hz
43
446,03125
CTCSS
03
74,4 Hz
44
446,04375
CTCSS
04
77,0 Hz
45
446,05625
CTCSS
05
79,7 Hz
46
446,06875
CTCSS
06
82,5 Hz
47
446,08125
CTCSS
07
85,4 Hz
48
446,09375
CTCSS
08
88,5 Hz
Table 56 memorized channels
EN
Channel
Number
Frequency (MHz)
Sub tones
Type
Tone
Number
Sub tones Frequency
49
446,00625
DCS
02
D025N / Encrypted
50
446,01875
DCS
03
D026N / Encrypted
51
446,03125
DCS
04
D031N / Encrypted
52
446,04375
DCS
07
D043N / Encrypted
53
446,05625
DCS
08
D047N / Encrypted
54
446,06875
DCS
09
D051N / Encrypted
55
446,08125
DCS
10
D053N / Encrypted
56
446,09375
DCS
11
D054N / Encrypted
ATTENTION: The channels from 49 to 56 have been encrypted to provide a major
privacy in the conversations. These channels are of exclusive use of the transceivers
LUTHOR TL-88 due to the encryption with which they are provided, for that as the
transceiver is supplied from origin only another TL-88 would be capable to decrypt the
conversation.
69
Factory parameters
70
EN
Menu
Number
Function
Parameter
Factory Default
01
TN DCS / CT
Sub tones
See table of
programmed channels
02
SCR
Encryption
OFF
03
SQL
Squelch
LEVEL 5
04
SAV
Battery save
ON
05
TOT
Time timer TX
OFF
06
BCL
Busy Channel Blockade
OFF
07
BP
Keyboard sound
ON
08
LMP
Display light
ON
09
VOX
Free hands
OFF
10
EOT
Roger Beep
OFF
11
ALK
Keyboard auto blockade
OFF
12
SCN
Scanner
CH
13
PRI
Scan priority
OFF
14
DW
FM Radio, TX/RX priority
ON
15
RESET
Equipment reset
RESET option active
Technological parameters, conversion table number / frequency of
analogical sub tones CTCSS and digitals DCS "N" and "I"
CTCSS (analogical sub tones) Table of correspondence number - frequency.
Tone
Frequency
Tone
Frequency
Tone
Frequency
Tone
Frequency
Tone
Frequency
01
67,0 Hz
09
91,5 Hz
17
118,8 Hz
25
156,7 Hz
33
210.7 Hz
02
71,9 Hz
10
94,8 Hz
18
123,0 Hz
26
162,2 Hz
34
218,1 Hz
03
74,4 Hz
11
97,4 Hz
19
127,3 Hz
27
167,9 Hz
35
225,7 Hz
04
77,0 Hz
12
100,0 Hz
20
131,8 Hz
28
173,8 Hz
36
233,6 Hz
05
79,7 Hz
13
103,5 Hz
21
136,5 Hz
29
179,9 Hz
37
241,8 Hz
06
82,5 Hz
14
107,2 Hz
22
141,3 Hz
30
186,2 Hz
38
250,3 Hz
07
85,4 Hz
15
110,9 Hz
23
146,2 Hz
31
192,8 Hz
08
88,5 Hz
16
114,8 Hz
24
151,4 Hz
32
203,5 Hz
71
EN
Technological parameters, conversion table number / frequency of
analogical sub tones CTCSS and digitals DCS "N" and "I"
DCS N (digital sub tones N) Table of correspondence number - frequency.
DCS
Freq. DCS
Freq. DCS
Freq. DCS
Freq. DCS
Freq. DCS
Freq. DCS
Freq. DCS
Freq. DCS
Freq.
001 23 N 013 71 N 025 143 N 037 225 N 049 266 N 061 356 N 073 452 N 085 532 N 097 703 N
002 25 N 014 72 N 026 145 N 038 226 N 050 271 N 062 364 N 074 454 N 086 546 N 098 712 N
003 26 N 015 73 N 027 152 N 039 243 N 051 274 N 063 365 N 075 455 N 087 565 N 099 723 N
004 31 N 016 74 N 028 155 N 040 244 N 052 306 N 064 371 N 076 462 N 088 606 N 100 731 N
005 32 N 017 114 N 029 156 N 041 245 N 053 311 N 065 411 N 077 464 N 089 612 N 101 732 N
006 36 N 018 115 N 030 162 N 042 246 N 054 315 N 066 421 N 078 465 N 090 624 N 102 734 N
007 43 N 019 116 N 031 165 N 043 251 N 055 325 N 067 413 N 079 466 N 091 627 N 103 743 N
008 47 N 020 122 N 032 172 N 044 252 N 056 331 N 068 423 N 080 503 N 092 631 N 104 754 N
009 51 N 021 125 N 033 174 N 045 255 N 057 332 N 069 431 N 081 506 N 093 632 N
010 53 N 022 131 N 034 205 N 046 261 N 058 343 N 070 432 N 082 516 N 094 654 N
011 54 N 023 132 N 035 212 N 047 263 N 059 346 N 071 445 N 083 523 N 095 662 N
012 65 N 024 134 N 036 223 N 048 265 N 060 351 N 072 446 N 084 526 N 096 664 N
72
EN
Technological parameters, conversion table number / frequency of
analogical sub tones CTCSS and digitals DCS "N" and "I"
DCS I (digital sub tones I) Table of correspondence number - frequency.
DCS
Freq. DCS
Freq. DCS
Freq. DCS
Freq. DCS
Freq. DCS
Freq. DCS
Freq. DCS
Freq.
105
23 i
117
71 i
129 143 i
Freq. DCS
141 225 i 153
266 i 165
356 i
177
452 i
189
532 i
201
703 i
106
25 i
118
72 i
130 145 i
142 226 i 154
271 i 166
364 i
178
454 i
190
546 i
202
712 i
107
26 i
119
73 i
131 152 i
143 243 i 155
274 i 167
365 i
179
455 i
191
565 i
203
723 i
108
31 i
120
74 i
132 155 i
144 244 i 156
306 i 168
371 i
180
462 i
192
606 i
204
731 i
109
32 i
121 114 i 133 156 i
145 245 i 157
311 i 169
411 i
181
464 i
193
612 i
205
732 i
110
36 i
122 115 i 134 162 i
146 246 i 158
315 i 170
421 i
182
465 i
194
624 i
206
734 i
111
43 i
123 116 i 135 165 i
147 251 i 159
325 i 171
413 i
183
466 i
195
627 i
207
743 i
112
47 i
124 122 i 136 172 i
148 252 i 160
331 i 172
423 i
184
503 i
196
631 I
208
754 I
113
51 i
125 125 i 137 174 i
149 255 i 161
332 i 173
431 i
185
506 i
197
632 I
114
53 i
126 131 i 138 205 i
150 261 i 162
343 i 174
432 i
186
516 i
198
654 I
115
54 i
127 132 i 139 212 i
151 263 i 163
346 i 175
445 i
187
523 i
199
662 I
116
65 i
128 134 i 140 223 i
152 265 i 164
351 i 176
446 i
188
526 i
200
664 I
73
EN
Use of the transceiver as a PMR-446 basic handheld.
The main characteristic of the TL-88 is its double personality, it has the ability to work
as the best of the PROFESSIONAL transceivers and simultaneously do as the typical low
cost handhelds that are supplied normally in pairs and be easily located in any Shopping
center. The TL-88 is actually the most polyvalent transceiver of the market.
Next we are going to give you some practical advices to match the TL-88 with any
device of free use PMR-446.
The most common in the basic handhelds is to find a display similar to the below image:
25
Without taking account of other functions icons of the different displays it may be, we
focus exclusively on the number of channel and the number of sub tone.
These handhelds have 8 channels, corresponding with the legal frequencies for
PMR-446 free use and are:
74
EN
Table of equivalence, channel number - Frequency free use
Channel Nº
on display
EN
Frequency in Megahertz (MHz)
1
446,00625
2
446,01875
3
446,03125
4
446,04375
5
446,05625
6
446,06875
7
446,08125
8
446,09375
At first, with the introduction of the free use normative, these handhelds walkies had
only 8 channels without sub tones.
To understand it more easily we are going to use an example and we will talk about a
building, each channel will be a number of floor so, the building consists of:
75
Floor 8 - Channel 8
Floor 7 - Channel 7
Floor 6 - Channel 6
Floor 5 - Channel 5
Floor 4 - Channel 4
Floor 3 - Channel 3
Floor 2 - Channel 2
Floor 1 - Channel 1
Each floor of the building, a total of 8 floors, has a single housing, so the building
consists of 8 housings. To the question "How many families could live on every floor?
The answer is obvious: 1 single family because there is only one housing per plant.
What happen if we tried to introduce in each house 4, 7 or 12 families? The answer is
obvious again: the coexistence would be very difficult or impossible.
Extrapolating this to the world of the radio, with only 8 channels, trying to talk on
them in certain moments becomes very complicated, for the numerous interferences
of another people speaking on them.
76
EN
To solve this problem and to rationalize the communication the sub tones appeared,
the analogical type CTCSS (usually the only ones of which dispose the economic
handhelds) and the digital DCS (only located in the semi-professional or professional
transceivers).
Focus on the most commons, the analogical CTCSS sub tones. Normally they go from 1
to 38 and also in the case of the channels; each number corresponds to a frequency,
see appendix TECHNOLOGICAL PARAMETERS table equivalent of analogical CTCSS sub
tones on page 71.
Applying the sub tones to the example of the building, now we would have a building
of 8 floors equally, but with 38 housings per plant, this gives us a total of 304 housings
in the building.
Floor 8 (Channel 8)
Floor 7 (Channel 7)
Floor 6 (Channel 6)
Floor 5 (Channel 5)
Floor 4 (Channel 4)
Floor 3 (Channel 3)
Floor 2 (Channel 2)
Floor 1 (Channel 1)
Housing 1
Housing 25 Floor 1
Housing 38
77
EN
We have that in the floor 1; can be inhabit housing ranging from 1 to 38. The same
thing happens with other plants. So if you want to live in the housing 25 floor 1 your
neighbors may live with you in the same plant with different number of housing, the
housing floor 1, 24 may be occupied and also the floor 1, 26 without bother each other
neither you nor your neighbors.
Extrapolating again the example of the building to the field of radio communication,
we would have a transceiver with 8 channels and 38 sub tones, where you select the
channel in witch you want to operate and the number of sub tones among a total of
304 different combinations.
If in the combination of channel and sub tone selected by you or your group detect
that it is being used by others, you will have only to change channels or sub tones or
both if you wish.
In the concrete case of the LUTHOR TL-88 the number of combinations is even greater
because it has 38 analogical sub tones plus 208 digital sub tones that multiplied by 8
channels will give the equipment more than 1,900 different combinations. Also in the
78
EN
combinations. Moreover in the case of TL-88 LUTHOR is equipped with encryption
function, which distorts your voice so that it becomes incomprehensible for another
user who does not have another TL-88. It is certainly one of the few existing item
equipped with this high level of confidentiality.
Explained the concept of channels and sub tones, next we will explain the procedure
to match the LUTHOR TL-88 by means of keyboard with any basic handheld showing on
display the number of channel and of sub tone.
The TL-88 is supplied with 56 memorized channels (these 56 channels come from the
combination of 8 legal channels/frequencies for free use with the different available
sub tones). Of these 56 memorized channels, the ranged between the channel 33 to
40 have stored the frequencies of free use without any activated sub tone, so these
will be the ones we will use for this casuistry.
79
EN
The resultant equivalence is:
EN
Channel in
basic handheld
Channel equivalent
in TL-88 LUTHOR
Corresponding frequency in both
cases (MHz)
1
33
446,00625
2
34
446,01875
3
35
446,03125
4
36
446,04375
5
37
446,05625
6
38
446,06875
7
39
446,08125
8
40
446,09375
As an example, we want to make compatible the LUTHOR TL-88 with a basic handheld
of those who show the channel and sub tone on the display. The selected channel in
the basic handheld is 1 with the sub tone 25:
CTCSS Subtones
Channel
Number
80
25
025
s
CT
ch 0033
Channel number
equivalent
to the TL-88
In the TL-88 we will have to go to channel 33 and following the steps of menu 01
selecting the analogical sub tone CTCSS number 25. If the channel of the basic
equipment was 5, in the TL-88 would have to locate the channel 37 and thus depending
on the channel on which it is intended to operate.
To operate with the equipment, if the easier way for you is the display settings of a
basic handheld, you can convert the TL-88 to the basic format of visualization and use
of channels and for it we refer you to the INDEX OF ADVANCED OPTIONS (SOFTWARE)
placed in the page 54.
Among other many options with the programming soware you can simplify the use
of TL-88, erasing channels/memories scheduled originally and programming channels
from 1 to 8 with equivalent frequency. To do this, use the "Table equivalence channel
number - free use” (located on page 75). In this format will be showed on the display
only the numbers from 1 to 8, then you could select whether you want the sub tone
number by accessing the menu 01.
81
EN
Problems Solution Guide
Problems
The transceiver
does not turnon.
The battery is
not charging.
Keyboard and
key of channels
do not answer.
The led of receipt
lights and the PTT
does not work.
82
Posible cause
Possible solution
1- The battery is not properly adjusted.
1 - Check the correct positioning of the
battery.
2 - Charge the battery.
3 - Replace the battery of the transceiver.
4 - Contact your technical service.
2- The battery is exhausted.
3- The battery is damaged.
4- The transceiver is damaged.
1 - The battery is damaged.
2 - The Desktop Charger is damaged.
3 - The wall feeder of the charger is
damaged.
4 - The battery does not make good.
contact with the charger.
1 - Replace the battery of the tr.ansceiver.
2 - Contact the technical service.
1- Keyboard locked manually.
1-Manual unblock keeping pressed the
"MENU" key.
2- Unlock manually and deactivate
autoblock function.
2- keyboard locked by the autoblock
function.
The transceiver is configured with the
option BUSY CHANNEL activated and does
not let transmit because it is receiving a
signal
3 - Contact the technical service.
4 - Check the correct anchorage of the
battery in the guides.
Turn off busy channel lockout
EN
Problems Solution Guide
Problems
The green LED
lights but hear no
sound from the
speaker.
Posible cause
1 - The top button of volume is not well
adjusted.
2- The equipment has enabled some sub
tone CTCSS / DCS.
3 - The squelch is set too high.
4 - The speaker is damaged.
EN
Possible solution
1 - Increase the volume level by turning
the knob clockwise.
2 - Does not match the received signal,
check sub tones.
3 - Set the squelch or noise filter to an
appropriate level.
4- Press MONI side key, if you don’t hear
the noise it will confirm it.
During the
The channel or the frequency used
communication you coincide with that of another group, may
listen to another
also coincide with the same sub tone.
conversation that
is not of your group.
Change the channel and activate the CTCSS
or DCS sub tones not to be interfered nor
interfere nobody. Verify that in your entire
group they have the same parameters
configured. If the maximum level of privacy is
desired activate the encryption.
You receive a
conversation and
cannot understand
anything, is
unintelligible.
The conversation you are receiving is
encrypted.
1 - Enable encryption on your TL-88
2 - Might even have encryption enabled
can not understand the conversation, it is
possible that the signal comes from
another transceiver other than your TL-88
and the encryption is not the same.
VOX (hands free) function is activated.
Deactivate the VOX function.
The transmission
side PTT button
does not respond
when pressed.
83
Problems Solution Guide
Problems
When transmitting,
the communication
is cut automatically.
84
Posible cause
TOT function is activated so the radio has
a maximum transmission time established,
spent this time the communication is cut
off automatically.
Possible solution
Deactivate the TOT function or raise the
maximum transmission time of your
transceiver giving more seconds to this
function.
EN
Optional Accessories
EN
"lighter" type adapter
ref. TLC-PLUG
Micro-loudspeaker
ref. MIA-115-K
Micro-earphone
ref. PIN-29-K
Programming cable.
ref. TL-USB
Cloning cable
ref. TL-CLON
Battery Eliminator
ref.TLB-428-EL.
Leather cover
ref. TLF-465
Programming Soware
ref. TL-SOFT88
Inserting it in the place
of the battery, it can
feed directly the transceiver
of a power supply or
vehicle (maximum entry 13, 8 volts).
To use with a belt
clip or to hang
of the shoulder
To accede to the
configuration of
parameters and
memorization of channels
85
General technical specifications
Equipment Reference
LUTHOR TECHNOLOGIES TL-88
Range of Frequencies
UHF PMR-446 (446,00625 to 446,09375 Mhz TX/RX.)
FM commercial (only reception RX 88-108 Mhz.)
Channels memories
128 memories/channels
Tension supply
7,4 volts
Power output
500 mW (0,5 watts)
Type of antenna
Fixed flexible
Operative temperature
Min. - 20º / Max. + 55º
Canalization
12,5 Khz
Mode
F3E (FM) simplex or semi-duplex
Maximum deviation frec.
< 2,5 Khz.
Adjacent channel
< -60 dB
Sensibility
Min. 21dBµV / Max. 26dBµV
Audio power
> 500 mW
Weigh
200 grams (including battery)
Size
115mm H. ( 250mm until antenna’s final) x 59mm W. x 35mm L.
ATTENTION: Some of these specifications can be subject to modification without previous notice.
86
EN
We have done everything possible to obtain the maximum of detail in this manual, but we are not
responsible for any possible omission as well as printing errors or translation. All the
specifications are subject to change without previous notice.
Note on environmental protection:
This symbol on the product or its packaging indicates that at the end of the useful life of this product the user
is legally obligated to fulfil the European directive 2002/96/EU in the legislative national system (RD 208/2005),
which applies the following: The electrical and electronic equipment, as well as batteries and rechargeable
batteries, can not be treated as normal household waste, but must be delivered to the corresponding collection
point. By ensuring that this product is rejected correctly, you help with this action to prevent
negative consequences for the environment and human health which could be caused by its
inappropriate management. The recycling of materials helps to preserve natural resources. To
receive detailed information about the recycling of this product, please contact the city office, the
most nearby waste disposal service or the establishment where you purchased the product.
87
Declaration of Conformity
0678
La abajo firmante, en nombre y representación de:
Compañía:
Dirección:
Teléfono:
Fax:
Correo electrónico:
LOCURA DIGITAL S.L.
Avda. Sant Juliá, 154, Nave 2
08403 Granollers – Barcelona (España)
93 861 63 72
93 846 89 87
[email protected]
Certifica y declara bajo nuestra responsabilidad que el siguiente equipo:
Tipo de equipo:
Marca:
Modelo:
Fabricante:
Lugar de fabricación:
Transceptor portátil UHF PMR-446 para uso libre.
LUTHOR TECHNOLOGIES
TL-88 (PMR-446)
Q.T.E. CO., LTD.
China
Es conforme con las siguientes normativas:
- EN 60950-1: 2006+A11:2009
- EN 301 489-1 V1.8.1:2008
- EN 301 489-5 V1.3.1:2002
Seguridad de los equipos de tecnología de la información. Requisitos generales.
Compatibilidad electromagnética y cuestiones de espectro de radiofrecuencia (ERM); compatibilidad electromagnética
(EMC) estándar para equipos radio y servicios; parte 1: Requisitos técnicos comunes, parte 5: Condiciones específicas para
radio móvil privada terrestre (PMR) y equipos auxiliares (voz y no voz)
- EN 300 341-1 V 1.3.1:2000/12
- EN 300 341-2 V 1.1.1:2000/12 Compatibilidad electromagnética y cuestiones de espectro de radiofrecuencia (ERM); servicio móvil terrestre (RP 02); equipos
radio con antena incorporada transmitiendo señales para el inicio de respuesta especifica en el receptor; parte 2: En armonizada
cubriendo los requisitos esenciales según el artículo 3.2 de la Directiva de R& TTE
- EN 300 296-1 V 1.2.1:2009-02
- EN 300 296-2 V 1.2.1:2009-02 Norma referida a equipos portátiles, para el servicio móvil terrestre, destinados a ser utilizados en redes de radio móviles
privadas en la banda de frecuencias de 446 (PMR446).
En cumplimiento con los requerimientos de la Directiva 99/05/EC del Parlamento Europeo y del consejo del 9 de Marzo de 1999 y transpuesta a la
legislación española según el Real Decreto 1890/2000 del 20 de Noviembre de 2000.
Granollers 20 de Enero de 2011
Josefa Paredes Martínez
Administradora
88
Locura Digital S.L.
Avda. Sant Juliá, 154, Nave 2
08403 Granollers – Barcelona (España) Telf: 93 861 63 72 / Fax: 93 846 89 87
C.I.F.: B-97151369
Importador/Imported by
Importé Par
L.D. SL.
CIF. ESB 97151369