1
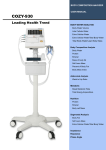
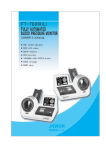
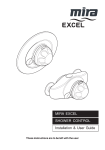
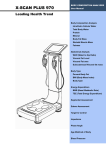
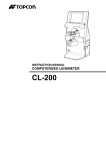
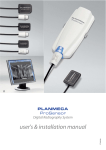
24 HOUR AMBULATORY
BLOOD PRESSURE MONITOR
FA 48
User Manual
Leading Health Trend
SYSTOLIC BLOOD PRESSURE
DIASTOLIC BLOOD PRESSURE
MEAN BLOOD PRESSURE
PULSE
PULSE PRESSURE
MOTION STATE
FA 48 Hardware Manual
The device bears the CE label in accordance with the provisions of Medical Device Directive
93/42/EEC.
THE PERSONS RESPONSIBLE FOR PLACING DEVICES ON THE EC MARKET UNDER MDD
93/42/EEC
JAWON MEDICAL CO.,LTD.
1208-12, SHINSANG-RI, JINRYANG-EUP, KYUNGSAN-CITY,
KYUNGSANG BUKDO, 712-837, KOREA
TEL: 82-53-856-0993, FAX: 82-53-856-0995
VITAKO Sp. z o.o.
UL. MALEJ SYRENKI 2 71-790 SZCZECIN, POLAND
TEL: 91 8522900 / 901, FAX: 91 8522910
2/38
FA 48 Hardware Manual
CONTENTS
• INTRODUCTION···································································································
1.
2.
3.
4.
5.
6.
4
OVER VIEW ·······························································································
WORD DEFINITION ··························································································
CLASSIFICATION AND COMPLIANCE ·································································
SAFETY PRECAUTIONS ···················································································
SAFETY SYMBOLS AND INFORMATION ······························································
GUIDANCE FOR ELECTROMAGNETIC COMPATIBILITY (EMC) ······························
4
5
5
6
8
9
• TERMS OF EACH PART AND FUNCTION ·····························································
13
1. DISPLAY ·········································································································
2. FRONT AND REAR PART ···················································································
13
14
3. SIDE PART ······································································································
4. ACCESSORIES ································································································
15
16
5. OPTIONS ········································································································
16
• INSTALLATION ····································································································
17
1. HOW TO PUT BATTERY·····················································································
17
2. HOW TO CONNECT COMMUNICATION PORT······················································
18
3. SETTING ·········································································································
19
• MEASUREMENT ··································································································
23
1. WRAPPING THE CUFF ······················································································
23
2. MEASUREMENT PREPARATION ········································································
24
3. MEASUREMENT ······························································································
25
4. MEASUREMENT RESULT ··················································································
26
• STORAGE AND MAINTENANCE ··········································································
• SAFETY PRECAUTION ························································································
• TROUBLE SHOOTING ·························································································
27
28
29
1. MEASUREMENT ERROR AND SOLUTION ····························································
29
2. TROUBLE SHOOTING ························································································
30
3. AFTER SERVICE ································································································
31
4. PACKING AND TRANSPORT ················································································
31
• SPECIFICATION ··································································································
• WARRANTY and REPAIR·····················································································
32
3/38
33
FA 48 Hardware Manual
INTRODUCTION
1. OVER VIEW
The FA 48 is a compact, non-invasive Ambulatory Blood Pressure Monitoring (ABPM) system.
The appropriate use is 24-hour blood pressure monitoring and pulse wave analysis (PWA). The
FA 48 should be used only under medical supervision.
INDICATION FOR USE
The FA 48 Ambulatory Blood Pressure Monitor is designed to measure systolic and diastolic blood
pressure and pulse rate of adults who are eighteen (18) years and older using the oscillometric
method on a cuffed arm.
INCORRECT USE
----------------------------------------------------------------------------------------------------------------------------Because of the risk of strangulation from the tube and cuff, the FA 48 may not be used for
patients who are legally incompetent.
The FA 48 must not be used for blood pressure monitoring during surgeries. It has not
been designed for alarm-giving monitoring in intensive care units.
It is not recommended for people with serious arrhythmia to use this Wireless Blood Pressure
Monitor.
----------------------------------------------------------------------------------------------------------------------------------PROPER USE OF THE FA 48
1. The FA 48 ABPM is intended for use by a trained medical practitioner. Interpretation of blood
pressure measurements should always be performed by a physician.
2. The reliability of the monitor and the software depend upon conformance with the operation and
maintenance instructions in this manual.
3. The FA 48 ABPM is designed for use with patients with normal sinus rhythms.
4. Measurement accuracy for the FA 48 ABPM may be affected by position of the subject, physical
conditions, movement, and use outside of the operating instructions contained in this manual.
USER RESPONSIBILITY
This product is designed to perform in conformity with the description thereof contained in this manual
and accompanying labels and inserts, when assembled, operated, maintained and repaired in
accordance with the instructions provided. A defective product should not be used. Parts that are
broken, plainly worn, missing or incomplete, distorted or contaminated should be replaced immediately.
Should any repair or replacement become necessary, we recommend that service be performed at the
nearest approved service center. The user of the product shall have the sole responsibility for any
malfunction, which results from improper use, faulty maintenance, improper repair, damage or
alteration by anyone other than Jawon Medical Co., Ltd. or their authorized service personnel.
The FA 48 System
The FA 48 ABPM system is lightweight, quiet, comfortable, and does not interfere with daily activities.
It is easily configured and individually-fitted for each patient by a physician or nurse. The 24-hour
measurements for systolic and diastolic blood pressure, the mean arterial pressure, and the pulse rate
are automatically obtained without medical supervision, and later downloaded to a computer for
analysis and interpretation.
4/38
FA 48 Hardware Manual
Blood pressure measurements determined with this device are equivalent to those obtained by a
trained observer using the cuff/stethoscope auscultation method, within the limits prescribed by the
ISO 81060-2.
SAFETY and EFFECTIVENESS WARNINGS
Make sure that you are familiar with all Safety and Effectiveness considerations before using the
ABPM (model - FA 48).
ACCESSORIES
The Jawon Medical Co., Ltd. warranty can only be honored if you use Jawon Medical Co., Ltd.
approved accessories and replacement parts.
Caution
Use of accessories other than those recommended by Jawon Medical Co., Ltd. may
compromise product performance.
2. WORD DEFINITIONS
SYS
DIA
Exhaust
Systolic Blood Pressure
Diastolic Blood Pressure
This means "releasing the cuff air as soon as possible".
3. CLASSIFICATION AND COMPLIANCE
1) This device is classified as;
- Battery powered and the type-BF against electric shock
- Ordinary equipment without protection against ingress of water
- Equipment not suitable for use in presence of a flammable anesthetic mixture by standard of IEC
60601-1:2005(Safety of Medical Electrical Equipment)
2) This device is in compliance with Class A for Noise-Emission, Level B for Noise-immunity, by
standard of IEC 60601-1-2:2007(Electromagnetic Compatibility Requirements).
3) This device complies with:
- IEC 60601-1:2005 Medical electrical equipment – Part 1: General requirements for basic
safety and essential performance
- IEC 60601-2-30 Medical electrical equipment -- Part 2-30: Particular requirements for basic
safety and essential performance of automated non-invasive sphygmomanometers
- ISO 81060-1: 2007 Non-invasive sphygmomanometers — Part 1: Requirements and test
methods for non-automated measurement type
- ISO 81060-2:2009 Non-invasive sphygmomanometers -- Part 2: Clinical validation of
automated measurement type
- ISO 10993-1: Biological evaluation of medical devices
4. SAFETY PRECAUTIONS
This device is designed and manufactured with consideration of safety of the operator and
patient and also to the reliability of the unit.
The following precautions must be observed for additional safety;
1) The unit must be operated only by, or under supervision of a qualified person.
2) The operator and patient must not touch or handle inner side of the equipment at any time.
3) Do not modify the unit. If any modification is needed, ask our company or its authorized dealer for
service.
5/38
FA 48 Hardware Manual
4) The unit has previously been adjusted in the factory for optimum performance.
Do not attempt to adjust switches or any other things except those specified in this manual for
operation.
5) If you have experienced any trouble with the unit, switch it off immediately, and contact our
company or its authorized dealer for assistance.
6) Continuous cuff pressure due to connection tubing kinking can cause the blood flow interference
and resulting harmful injury to the patient.
7) Too frequent measurements can cause injury to the PATIENT due to blood flow interference.
8) The application of the CUFF over a wound can cause further injury.
9) The application of the CUFF and its pressurization on any limb where intravascular access or
therapy, or an arterio-venous (A-V) shunt, is present because of temporary interference to blood
flow and could result in injury to the patient;
10) CUFF and its pressurization on the arm on the side of a mastectomy should not be applied.
11) The pressurization of the CUFF can temporarily cause loss of function of simultaneously used
monitoring ME EQUIPMENT on the same limb;
12) It is necessary to check that operation of the automated sphygmomanometer does not result in
prolonged impairment of PATIENT blood circulation
13) If you plan to connect any device of other manufacturers electrically or mechanically to the unit,
contact our company or its authorized dealer for instructions before doing so.
When you connect computer or other system to the unit (RS-232C), the attached systems should
be those certified by IEC 950 or equivalent standards for data processing equipment.
Configurations shall comply with the system standard IEC 60601-1:2005.
Everybody who connects additional equipment to the signal input part or signal output part
configures a medical system standard IEC 60601-1:2005.
If in doubt, consult the A/S department of local distributor.
14) Avoid the following environments for storage;
- Where the ambient temperature falls -20°C or exceeds 60°C.
- Where the atmospheric pressure falls below 70kPa (700mbar) or exceeds 106kPa (1060mbar).
- Where the humidity is over 95% non-condensing.
- Where the unit is exposed to spray or splashing water.
- Where the unit is exposed to dust.
- Where the unit is exposed to water vapor.
- Where the unit is exposed to salty atmosphere.
- Where the unit is exposed to explosive gas.
- Where the unit is exposed to excessive shocks or vibrations.
- Where the angle of inclination of mounting surface exceeds 10 degrees.
- Where the AC power line voltage heavily fluctuates.
- Where the AC power line voltage changes heavily when this unit is in operation.
- Where the unit is exposed to direct sunlight.
15) This equipment has been tested and found to comply with the limits for medical devices to the
IEC 60601-1-2:2007. These limits are designed to provide reasonable protection against harmful
interference in a typical medical installation. This equipment generates, uses and can radiate
radio frequency energy and, if not installed and used in accordance with the instructions, may
6/38
FA 48 Hardware Manual
cause harmful interference to other devices in the vicinity. However, there is no guarantee that
interference will not occur in a particular installation. If this equipment does cause harmful
interference to other devices, which can be determined by turning the equipment off and on, the
user is encouraged to try to correct the interference by one or more of the following measures:
- Reorient or relocate the receiving device.
- Increase the separation between the equipment.
- Connect the equipment into an outlet on a circuit different from that to which the other device(s)
are connected.
- Consult the manufacturer or field service technician for help.
16) Do not to touch signal input, signal output or other connectors, and the patient simultaneously.
17) a statement that MEDICAL ELECTRICAL EQUIPMENT needs special precautions regarding
EMC and needs to be installed and put into service according to the EMC information provided in
the ACCOMPANYING DOCUMENTS;
18) a statement that portable and mobile RF communication equipment can affect MEDICAL
ELECTRICAL EQUIPMENT.
19) Please consult a physician or a trained health professional for interpretation of measurement
results.
20) No phthalates are used for this product and its container.
21) The cuff is not made with natural rubber latex
5. SAFETY SYMBOLS AND INFORMATION
The International Electrotechnical Commission (IEC) has established a set of symbols for medical
electrical equipment which classifies a connection or warning of any potential hazard.
The classifications and symbols are shown below. Save these instructions for your safety.
DEFIBRILLATION-PROOF TYPE BF APPLIED PART
General Warning Sign. Failure to turn off the power before you begin this
procedure can lead to product damage and result in serious injury or death.
Caution. Failure to follow instructions could result in damage to product or minor
injury
General mandatory action sign. Important to follow instructions. Not a caution.
Waste Electrical and Electronic Equipment (WEEE)
The device could be sent back to the manufacturer for recycling or proper
disposal after their useful lives. Alternatively the device shall be disposed in
accordance with national laws after their useful lives.
7/38
FA 48 Hardware Manual
identifies the battery
Turning on the recorder
Turning off the recorder
Date of manufacture
Manufacturer
Non-ionizing radiation
CE mark
Serial No
Refer to instruction manual/ booklet.
Authorized representative in the European community.
Keep dry
RoHS2
8/38
FA 48 Hardware Manual
6. Guidance for Electromagnetic compatibility (EMC)
Details about the electromagnetic compatibility (EMC) of the FA 48 are given below. Before using the
FA 48, be sure to read and understand the following information.
1) Guidance and manufacturer’s declaration – electromagnetic emissions
The FA 48 is intended for use in the electromagnetic environment specified below. The customer or
the user of the FA 48 should assure that it is used in such an environment.
Emissions test
Compliance
RF emissions
CISPR 11
Group 1
RF emissions
CISPR 11
Harmonic emissions
IEC 61000-3-2
Voltage fluctuations/
flicker emissions
IEC 61000-3-3
Electromagnetic environment – guidance
The FA 48 uses RF energy only for its internal function.
Therefore, its RF emissions are very low and are not likely
to cause any interference in nearby electronic equipment.
Class B
Class A
Compliance
The FA 48 is suitable for use in all establishments, including
domestic establishments and those directly connected to the
public low-voltage power supply network that supplies
buildings used for domestic purposes.
2) Guidance and manufacturer’s declaration – electromagnetic immunity
The FA 48 is intended for use in the electromagnetic environment specified below. The customer or
the user of the FA 48 should assure that it is used in such an environment.
Immunity test
IEC 60601
test level
Compliance level
Electrostatic
±6kV: Contact
discharge(ESD)
±8kV: Air
IEC 61000-4-2
±6kV: Contact
±8kV: Air
±2kV:
Power
Electrical fast
supply lines
transition/burst
±1kV:
IEC 61000-4-4
Input/output lines
±1 kV differential
Surge
mode
IEC 61000-4-5 ±2kV common
mode
<5 % UT
Voltage drops, (>95 % dip in UT)
dips, and
for 0,5 cycle
40 % UT
fluctuations of
(60 % dip in UT)
input power
supply line IEC for 5 cycles
70 % UT
61000-4-11
(30 % dip in UT)
±2kV: Power
supply lines
±1kV:
Input/output lines
±1 kV differential
mode
±2kVcommon
mode
<5 % UT
(>95 % dip in UT)
for 0,5 cycle
40 % UT
(60 % dip in UT)
for 5 cycles
70 % UT
(30 % dip in UT)
9/38
Electromagnetic
environmentguidance
Floors should be wood, concrete or
ceramic tile. If floors are covered with
synthetic
material,
the
relative
humidity should be at least 30 %.
Mains power quality should be that of
a typical commercial or hospital
environment.
Mains power quality should be that of
a typical commercial or hospital
environment.
Mains power quality should be that of
a typical commercial or hospital
environment. If the user of the FA 48
requires continued operation during
power mains interruptions, it is
recommended that the FA 48 be
powered from an uninterruptible
power supply or a battery.
FA 48 Hardware Manual
for 25 cycles
<5 % UT
(>95 % dip in UT)
for 5 sec
Magnetic field
of commercial
frequency
3 A/m
(50/60Hz)
IEC 61000-4-8
for 25 cycles
<5 % UT
(>95 % dip in UT)
for 5 sec
3 A/m
Power frequency magnetic fields
should be at levels characteristic of a
typical location in a typical commercial
or hospital environment.
Note
UT is the a.c. mains voltage prior to application of the test level.
3) Guidance and manufacturer’s declaration – electromagnetic immunity 2
The FA 48 is intended for use in the electromagnetic environment specified below. The customer or
the user of the FA 48 should assure that it is used in such an environment.
Immunity test
IEC 60601
level
test Compliance
level
Electromagnetic environment-guidance
Portable and mobile RF communications
equipment should be used no closer to any
part of the FA 48, including cables, than the
recommended separation distance calculated
from the equation applicable to the frequency
of the transmitter.
Recommended separation distance
Conducted RF
IEC 61000-4-6
3 Vrms
150 kHz to 80 MHz
3 Vrms
Radiated RF
IEC 61000-4-3
3 V/m
80 MHz to 2,5 GHz
3 V/m
d =1.2
d =1.2
d =2.3
80 MHz to 900 MHz
900 MHz to 2,5 GHz
where P is the maximum output power rating
of the transmitter in watts (W) according to
the transmitter manufacturer and d is the
recommended separation distance in meters
(m).
Field strengths from fixed RF transmitters, as
determined by an electromagnetic site
survey,a should be less than the compliance
level in each frequency range.b
Interference may occur in the vicinity of
equipment marked with the following symbol:
10/38
FA 48 Hardware Manual
Note
1. At 80 MHz and 900 MHz, the higher frequency range applies.
2 These guidelines may not apply in all situations. Electromagnetic propagation is
affected by absorption and reflection from structures, objects and people.
a
Field strengths from fixed transmitters, such as base stations for radio
(cellular/cordless) telephones and land mobile radios, amateur radio, AM and
FM radio broadcast and TV broadcast cannot be predicted theoretically with
accuracy. To assess the electromagnetic environment due to fixed RF
transmitters, an electromagnetic site survey should be considered. If the
measured field strength in the location in which the FA 48 is used exceeds the
applicable RF compliance level above, the FA 48 should be observed to verify
normal operation. If abnormal performance is observed, additional measures
may be necessary, such as reorienting or relocating the FA 48.
b
Over the frequency range 150 kHz to 80 MHz, field strengths should be less than
3 V/m.
4) Recommended separation distances between portable and mobile RF communications
equipment and the FA 48
The FA 48 is intended for use in an electromagnetic environment in which radiated RF disturbances
are controlled. The customer or the user of the FA 48 can help prevent electromagnetic interference by
maintaining a minimum distance between portable and mobile RF communications equipment
(transmitters) and the FA 48 as recommended below, according to the maximum output power of the
communications equipment.
Rated maximum Separation distance according to frequency of transmitter m
output power
150 kHz to 80 MHz
80 MHz to 900 MHz
900 MHz to 2,5 GHz
of transmitter W d =1.2
d =1.2
d =1.2
0.01
0.12
0.12
0.23
0.1
0.38
0.38
0.73
1
1.2
1.2
2.3
10
3.8
3.8
7.3
100
12
12
23
For transmitters rated at a maximum output power not listed above, the recommended
separation distance d in meters (m) can be estimated using the equation applicable to the
frequency of the transmitter, where P is the maximum output power rating of the transmitter in
watts (W) according to the transmitter manufacturer.
Note
11/38
1. At 80 MHz and 900 MHz, the separation distance for the higher frequency range
applies.
2. These guidelines may not apply in all situations. Electromagnetic propagation is
affected by absorption and reflection from structures, objects and people.
FA 48 Hardware Manual
TERMS OF EACH PART AND FUNCTION
1. DISPLAY
①
LCD (Display)
It displays time, battery status and measurement process.
Also, systolic blood pressure, diastolic blood pressure and pulse result will be indicated after
measurement.
②
Connecting part of cuff
It connects main unit and connecting hose which connected on cuff.
③
START / STOP button
If measurement is set with MANUAL mode, measurement can be started with START / STOP
button.
① LCD
② Cuff connecting
part
③ START/STOP
button
: Systolic blood pressure
: Diastolic blood pressure
: Pulse
: Battery remains
: Data transmitting
12/38
: This icon will be indicated when wake-up
time is set.
: This icon will be indicated when wake-up
time automatic measurement is set.
: This icon will be indicated when bed-time is
set.
: This icon will be indicated when bed-time
automatic measurement is set.
: Time
Pressure value will be indicated when
measuring and systolic/diastolic will be
indicated after measuring.
FA 48 Hardware Manual
2. FRONT AND REAR PART
①
MENU button
This button is for setting the device such as time, measurement interval and etc.
②
UP button
Number is going up when setting the device.
③
DOWN button
Number is going down when setting the device.
④
Battery cover
It is a cover for protecting battery inlet.
When replace the battery, replace 4 batteries each 2 batteries on front and rear part.
② UP button
③ DOWN button
① MENU button
④ Battery cover
13/38
④ Battery cover
FA 48 Hardware Manual
3. SIDE PART
①
USB Port
This port is for transmitting data to data managing program on PC.
① USB Port
14/38
FA 48 Hardware Manual
4. Accessories
①
User manual (CD)
② Cuff and connecting hose(Standard)
③
Battery (AAA X 4)
④
USB cable
⑤
Carrying bag and strap
⑥
Data managing program
① User manual
② Cuff and connecting hose
③ Battery (AAA X 4)
④ USB cable
⑤ Carrying bag and strap
⑥ Data managing program
5. Options
①
Cuff (For small adult)
①
Cuff (For small adult)
15/38
② Cuff (For large adult)
② Cuff (For large adult)
FA 48 Hardware Manual
INSTALLATION
1. How to put battery
Put batteries on front and rear part on the device for turning on the device.
Open the battery cover and put each 2 batteries (AAA type battery) on front and rear part.
[Front Part]
[Rear Part]
After putting batteries on rear part, turn on the ON/OFF switch as shown in the picture.
Note
Replace all batteries (4 batteries) when replacing battery.
When renting the device, please be sure to put new batteries.
16/38
FA 48 Hardware Manual
2. How to connect communication port
Connect the USB port which located on side part of main unit and computer USB port by USB
cable.
17/38
FA 48 Hardware Manual
3. Setting
Time will be blinked when turning off the power and you can set up in this state.
If you want to change the setting, press MENU button for 5 seconds then system will enter to setting
mode.
①
Date / Time setting
Setting sequence is hour/minute → month/day → year.
Hour/minute setting
When you turn ON the power or press the MENU button for few
seconds while using, time will be blinked. Set the hour by UP and
DOWN button.
When you press the MENU button once again, system moves to
minute setting. Press UP and DOWN button for setting minute.
Month/day setting
After setting minute, press MENU button once again for entering
month setting mode. Press UP and DOWN button for setting month.
Press MENU button once again for entering date setting mode. Press
UP and DOWN button for setting day.
Year setting.
After setting day, press MENU button once again for entering year
setting mode. Press UP and DOWN button for setting year. After
setting day, press MENU button for few seconds for entering ‘Alarm
setting’ mode.
Note
18/38
If you want to discontinue the date and time setting, press STOP switch. Then,
device will be turning to measurable state. Hour, minute, month, day, year needs to
be set together. If you discontinue the process in the middle of setting, time display
will be returned to the state before you started setting.
FA 48 Hardware Manual
②
Alarm setting
Ring the alarm when measured systolic blood pressure is higher or lower than setting value.
Setting maximal blood pressure alarm
After setting the year, press and hold the MENU button, and the
device will show ‘SYS’ and ‘H’ on the LCD screen. You may set the
maximal blood pressure alarm. Set the desired value using the UP
and DOWN buttons. When the measured blood pressure is higher
than the preset value, the alarm will go off for 90 seconds and the
SYS icon will blink.
Setting minimal blood pressure alarm
After setting the maximal value, press the MENU button once again,
and the device will show ‘SYS’ and ‘L’ on the LCD screen. You may
also set the minimal blood pressure alarm. Set the desired value
using the UP and DOWN buttons. When the measured blood
pressure is lower than the preset value, the alarm will go off for 90
seconds and the SYS icon will blink.
Alarm ON/OFF setting
After setting the minimal blood pressure alarm, press the MENU
button once again, and the device will show a bell icon on the top
right corner, and the screen will shift to the alarm ON/OFF setting.
Adjust alarm on or off using the UP and DOWN buttons. When the
alarm is set off, the device does not ring any alarms regardless of the
measured value.
19/38
FA 48 Hardware Manual
③
Pressure value setting
It is required to set the initial pressure for blood pressure measurement. Once the initial pressure
is set, repeated pressurization is prevented for hypertension patients.
Setting initial pressure
After setting the alarm function, press the MENU button and the LCD
screen will display ‘PULSE’ and enters the initial pressure setting
menu. Set the desired value using the UP and DOWN buttons.
④
Wake-up time setting
Set the measuring intervals at wake-up and after wake-up times.
Setting wake-up time
After setting the desired initial pressure, press and hold the MENU
button, and the LCD screen will display ‘M’ and enter the wake-up
time setting menu. Set desired wake-up time using UP and DOWN
buttons.
Once the wake-up time is set, press the MENU button again and the
minute will blink, and enter the minute setting menu. Set the desired
wake-up time (minute) using the UP and DOWN buttons.
Setting measuring intervals after wake-up time
After setting desired wake-up time, press the MENU button again,
and the LCD screen will display ‘M’ and ‘A’, and enters measuring
intervals menu. Set desired interval using UP and DOWN button. The
device automatically measures blood pressure at every preset
interval, and the device operates manually when the value is set as
‘0’.
20/38
FA 48 Hardware Manual
⑤
Bed-time setting
Setting the measuring intervals at bed-time and after bed-time
Setting bed-time
After setting the desired measuring intervals, press and hold the
MENU button, and the LCD screen will display ‘P’, and enter the bedtime setting menu. Set the desired bed-time using the UP and DOWN
button.
Once the bed-time is set, press the MENU button again and the
minute will blink, and enter the minute setting menu. Set the desired
bed-time (minute) using the UP and DOWN buttons.
Setting measuring intervals after bed-time
After setting the desired bed-time, press the MENU button again, and
the LCD screen will display ‘P’ and ‘T’, and enter measuring intervals
menu. Set the desired interval using the UP and DOWN button. The
device will automatically measure the blood pressure at every preset
interval, and the device operates manually when the value is set at
‘0’.
Note
It is recommended to set the bed-time measuring interval wider than that of wakeup time.
21/38
FA 48 Hardware Manual
MEASUREMENT
1. Wrapping the cuff
① Wrap the cuff around your upper arm with palm facing up.
Following the directions which are printed directly on the cuff as it should be applied brachial artery.
(inside forearm)
② Position the lower edge of the cuff is 2~3cm above the elbow joint as shown in the picture.
③ Strain the cuff with 1~2 finger space between the cuff and the arm.
Note
This device is only for adult.
22/38
FA 48 Hardware Manual
2. Measurement preparation
①
②
③
④
⑤
Insert the cuff-end into the ring so it can be put around the upper arm.
Align the arrow-head (▼) at the upper arm artery (brachial artery), and make the lower-end of the
cuff positioned 2-3cm above the elbow joint.
Put the cuff around the arm, two-finger loose, and make sure the cuff is not folded or misplaced.
Hang the air-hose around the neck, and put the belt on the flank so that the device is placed on the
other side of the cuff.
Place the device in the bag, and make sure the LCD screen is visible from above.
⑥
Insert the hose that is connected to the cuff into the cuff-insertion hole, and turn it clock-wise to
lock.
⑦
Adjust the shoulder and waist straps comfortable for the users.
23/38
FA 48 Hardware Manual
3. Measurement
①
Turn the power on.
②
When the device is turned on, the LCD screen will show the current time, and will be ready for
measurements.
③
If measuring intervals are preset, the device automatically measures blood pressure according
to the preset value. If not, press the START button on the device to begin measuring.
Note
If the cuff pressure is too high and it causes pain, press the STOP button and take
the cuff off immediately.
Caution
24/38
If the zipper is not completely zipped, the internal robber bag might come out
during pressurization, and it may cause damage or rupture the bag.
FA 48 Hardware Manual
Note
• If the measuring pressure goes too high when the air-hose is blocked;
☞ The device will display ‘E1’ on the screen.
If the same message is repeatedly displayed, please request for a repair
service.
• If the air-hose leaks, the connection to the cuff is defected, or the pressure does
not go up;
☞ The device will display ‘E2’ on the screen.
If the same message is repeatedly displayed, please request for a repair
service.
• If the patient moves or talks during the measurement;
☞ The device will display ‘E3’ on the screen.
Please take a rest, and redo the measurement with accurate measuring
techniques.
If the same message is repeatedly displayed even with correct measuring
conditions, request for a repair service.
• When an error is detected, the device will make a buzzing sound, and turn back
to the measurement-ready status.
4. Measurement result
Display systolic / diastolic blood pressure and pulse on LCD.
Reply 3 times.
If you need more detail information about measurement result (Graph, list of 24 hour measured
data), Use the data management program FA 48 manager. (Program version: FAMN.E.1.0.00)
Reference the manager’s user manual about detail contents of data manage program FA 48
manager. (Rev 1.1)
25/38
FA 48 Hardware Manual
STORAGE AND MAINTENACE
● Do not operate or store the device with below environments.
- Store where the ambient temperature falls -20°C or exceeds 60°C.
- Operate where the ambient temperature falls under 10℃ or exceeds 40℃.
- Where the atmospheric pressure falls below 70kPa (700 mbar) or exceeds 106kPa (1060 mbar).
- Operate where the humidity is over 30~75% non-condensing.
- Store where the humidity is over 95%.
- Where the unit is exposed to vapor or water.
- Where the unit is exposed to dust.
- Where the unit is exposed to high concentration of oil vapor.
- Where the unit is exposed to salty atmosphere.
- Where the unit is exposed to explosive gas or dust.
- Where the unit is exposed to excessive shocks or vibrations.
● Clean the recorder, cuff and accessories for the next use.
● The recorder is a precision instrument. Please check all functions (every year) periodically. Contact
your nearest A/S center for this inspection.
● If this unit is not being used for a long period of time, please remove the batteries.
● Do not drop the unit.
● Do not disassemble the main body or the cuff.
● Do not fold or bend the cuff forcibly.
● Do not wash or dip the cuff in the water.
26/38
FA 48 Hardware Manual
SAFETY PRECAUTION
● The recorder should be operated by a physician who knows it well.
● Confirm that the recorder works correctly and measurement values are proper.
● Clear the old data before starting a new measurement.
● Cover the USB port using the rubber cap, to avoid dust.
● Do not mix new and used batteries in the recorder.
● Use the recorder only during the time of diagnosis or medical treatment.
● Confirm that the cuff and air hose are connected properly.
● Confirm parts of contact with patient directly. Keep clean for these parts.
● Instruct the patient on how to stop operation if there is an abnormal measurement, and how to
remove the cuff if there is excessive arm pain.
● The recorder may not make a measurement when a patient has continuous arrhythmia or the
recorder senses noise due to the patients movement.
● Please check measurement values by other methods, if you suspect an value.
● Do not use this recorder on a person who is using a heat lung machine and a defibrillator.
● Avoid strong magnetic field and static electricity.
● Please transfer the data as soon as possible.
27/38
FA 48 Hardware Manual
TROUBLE SHOOTING
1. Measurement error and solution
ERROR
CAUSE
SOLUTION
Err 0
• When inflation lever is not
sufficient.
• Please set higher inflation level.
• When air hose is not connected
• Check if there is any ‘CAUSE’.
well.
• After settle it, monitor again.
• When air leaks from the cuff.
• When battery power is low.
Err 1
• When a cuff is not connected to
a monitor.
• When a cuff is positioned
incorrectly
• Please check if the cuff is connected well to
the unit and monitor again.
Err 2
• When the pressurization is over
than 300㎜Hg.
• Please turn the power off then on and
monitor again.
Err 3
• When monitoring is carried out
the wrong way.
• When a readed data is not
output as a result lf noise or
movement detected.
• Please read ‘wrapping the cuff’ and ‘correct
measuring posture’ in ‘Measurement’ part.
• Monitor again following the way instructed.
Err 4
• When moving or speaking is
sensed during monitoring.
• Please do not move or speak during
monitoring.
Err 5
• When battery is not fixed well.
• When the polarities are
positioned incorrectly.
• Check if the polarities of the batteries are
positioned correctly.
• After disconnecting batteries in unit and press
[I/O] button, then replace them.
28/38
FA 48 Hardware Manual
2. Trouble shooting
SYMPTOM
CAUSE
COUNTERMEASURE
• The battery power is low.
• Replace all four “AA” type batteries at the
(When
batteries
are
same time.
exhausted completely, the
Before change transmit the data to your
mark does not appear on the
computer first.
LCD any more.)
The blood
pressure value
seems too low.
• When your arm
positioned higher than your
heart during monitoring.
The blood
pressure value
seems too high
• When your arm
positioned lower than your
heart during monitoring.
Repressurization
• In case of insufficient
inflation.
• The movement of the arm or
body during inflation is
• Relax for a few minutes then monitor it again
sensed.
with correct posture.
(In
case
of
excessive
• Do not move during monitoring.
hypertension or a feeble
pulse,
it is possible to occur repressurization over 2 times.)
The unit does
not start monitor
again after error
occurs.
• The cuff may not be
positioned incorrectly.
29/38
• Make sure that your arm position at the same
level as your heart, then monitor it again.
• Monitor it again after wearing the
cuff correctly and positioning your arm as
your heart level.
FA 48 Hardware Manual
3. After service
If there is any problem with the unit, please follow the steps below;
※ Contact our company’s Overseas Service Department immediately.
After gathering the model name, Serial Number, date of purchase and description of the problem,
contact our company with information shown below.
※ Try to solve the problem over the phone with the personnel of local service department.
If the problem cannot be solved over the phone, just return to service department directly.
※ Our company or local distributor will make available on-request circuit diagrams, component part
list, descriptions, calibration or other information which will assist your appropriately qualified
technical personnel to repair those parts of unit which are designated by our company as
repairable.
※ Calibration interval for this device is 2 years.
To ensure the device’s proper and sage operation, please contact our company or distributor
periodically for calibration.
How to contact our company
Write us at:
JAWON MEDICAL CO., LTD
29, Gongdan 4-ro, Jillyang-eup, Gyeongsan-si, Gyeongsangbuk-do, Korea
TEL : 82-53-856-0993
FAX L 82-53-856-0995
(You can also contact the following representative or your local distributor)
4. Packing and transport
Our company wraps this device up with the most suitable method to protect it from any impact or
damage during shipping and transporting. This device can be damaged during delivery if it is packed
with other ways except the one our company uses. Please handle this device carefully without any
impact in packing and delivering it.
If this device needs to be transported wrap this device up again and transport it as follows.
① Turn off the power of this device.
② If peripherals are connected, turn off the power of them and then disconnect each device.
③ Disassemble this device in reverse order to assembly.
④ Wrap up this device with original packing materials.
⑤ Transport it carefully in order not to give a shock to this device.
30/38
FA 48 Hardware Manual
SPECIFICATION
Model
FA 48
Measuring method
Oscillometric
Display mode
TN LCD display
Result Contents
Systolic / Diastolic / Mean Blood Pressure, Pulse,
Pulse Pressure
Measuring range
Pressure: 30~300mmHg, Pulse: 30~240bpm
Accuracy
Pressure: ±3mmHg, Pulse: ±3%
Resolving Power
1mmHg
Pressurizing method
DC Motor
Cuff type
Belt type
Pressurizing time
Approx. 10 seconds
Measuring time
Approx. 1 minute
Power
DC 6V (AAA type 1.5V X 4)
Memory
576 memory
Ambience for operation Temperature: 10~40℃, Homidity: 30~75%
Ambience for storage
Temperature: -20~60℃, Humidity: Less than 95%
Data transmission
USB
Dimension
Main unit: 72(W) × 28(D) × 101(H) mm
Cuff: standard - 140(W) X 611(H) mm (±2mm)
Small adult - 135(W) X 535(H) mm (±2mm)
Large adult - 160(W) X 795(H) mm (±2mm)
Cuff Range: standard - 200~310 mm
Small adult - 150~220 mm
Large adult - < 450 mm
Air bag: standard - 120(W) X 240(H) mm
Small adult - 110(W) X 210(H) mm
Large adult - 140(W) X 350(H) mm
Weight
Approx. 155g (Main + Battery)
31/38
FA 48 Hardware Manual
WARRANTY and REPAIR
WARRANTY
Item
Model
Serial NO.
Date of purchase
Customer
Dealer
Date
Ambulatory Blood Pressure Monitor
FA 48
Month
Name:
Address:
Name:
Address:
Warranty period
1year (main unit only)
Day
Year
TEL:
TEL:
Defection
Confirmation
All repairs on products under warranty must be performed or approved by Jawon Medical Co., Ltd.
Unauthorized repairs will void the warranty. In addition, whether or not covered under warranty, any
product repair shall exclusively be performed by Jawon Medical Co., Ltd. certified service personnel.
Repairs
If your product requires warranty, extended warranty, or non-warranty repair service, please call first
the nearest Jawon Medical Technical Support Center. A representative will assist you troubleshooting
the problem and will make every effort to solve it over the phone, avoiding potential unnecessary
return. In case the return cannot be avoided, the Customer Service Representative will guide you
through the Return Authorization process.
Limited Warranty Statement
Jawon Medical Co., Ltd. warrants that the FA 48 you have purchased meets the labeled specifications
of the Product and will be free from defects in materials and workmanship that occur within 1 year
after the date of purchase. Accessories used with the Product are warranted for 90 days after the date
of purchase.
The date of purchase is: 1) the date specified in our records, if you purchased the product directly from
us, 2) the date specified in the warranty registration card that we ask you to send to us, or 3) if you
don’t return the warranty registration card, 120 days after the date on which the Product was sold to
the dealer from whom you bought the product, as documented in our records.
This warranty does not cover damage caused by: 1) handling during shipping, 2) use or maintenance
contrary to labeled instructions, 3) alteration or repair by anyone not authorized by Jawon Medical,
and 4) accidents.
If a Product or accessory covered by this warranty is determined to be defective because of defective
materials, components, or workmanship, and the warranty claim is made within the warranty period
described above, Jawon Medical Co., Ltd. will, at its discretion, repair or replace the defective product
or accessory free of charge.
You must obtain a return authorization from Jawon Medical Co., Ltd. to return your product before you
send it to Jawon’s designated service center for repair.
This warranty is in lieu of all other warranties, express or implied, including but not limited to the
implied warranties of merchantability and fitness for a particular purpose. Jawon’s obligation under
this warranty is limited to repair or replacement of products containing a defect. Jawon Medical Co.,
Ltd. is not responsible for any indirect or consequential damages resulting from a product defect
covered by the warranty.
32/38
FA 48 Hardware Manual
ACTIVITY RECORD (24 Hour Blood Pressure Measurement)
Please read the Instructions and Caution on the back of this sheet.
Address :
Name :
Home TEL. :
Office TEL. :
Patient No :
Doctor :
Hospital :
Recorder I.D.#
Chart No :
Referred By :
Unit :
MEASUREMENT PERIOD
INTERVAL
No.1
No.2
No.3
to
to
to
Date Out :
Date Due In :
From :
To :
(every
(every
(every
ACTIVITY RECORD
TIME
ACTION
:
Starting measurement
:
:
:
:
:
:
:
:
:
:
:
:
:
:
EXAMPLE
TIME
ACTION
11:00 Measurement beginning.
11:40 Lunch is taken.
14:25 I talked standing with the friend.
33/38
min.)
min.)
min.)
No.4
No.5
No.6
to
to
to
(every
(every
(every
SYMPTOMS(CONDITIONS)
SYMPTOMS(CONDITIONS)
I have gotten excited.
min.)
min.)
min.)
FA 48 Hardware Manual
Ambulatory Blood Pressure Monitor FA 48
<Information>
Even for one day, blood pressure is varying depending on the measurer’s position and physical state. Therefore, the data
about measurer’s position, meal, medicine dosage, etc during the measurement is very important for a doctor to analyze
blood pressure data for 24 hours.
Motion detecting sensor is embedded in FA 48 and it detects the patient’s motion without recording it manually. However, the
information of meal, medicine dosage, urination, excretion and how well you sleep and wake/asleep time is as important as
the measurer’s activity status. So record these data attentively.
Also read the safety caution and operation manual carefully as stated below.
<How to operate ABPM FA 48>
Basically, FA 48 automatically measures the patients according to the set measurement period.
However, it is hard to have a measurement when the patients are changing the clothes or taking a shower. In this case,
convert it to manual mode. Please refer to the content mentioned below.
: It is indicated when the awake time is set.
: It is indicated when the measurement period is set for activity period. (Automatic measurement after
awake time.)
Press ‘START/STOP’ button for 2 sec. and LCD will be turned off. It removes the Automatic mode and ‘A’
is not indicated on LCD anymore.
Press ‘START/STOP’ button again and the Automatic measurement starts.
: It is indicated when the asleep time is set.
: It is indicated when the measurement period is set for sleeping period. (Automatic measurement after
asleep time.)
Press ‘START/STOP’ button for 2 sec. and LCD will be turned off. It removes the Automatic mode and
‘T’ is not indicated on LCD anymore.
Press ‘START/STOP’ button again and the Automatic measurement starts.
: It indicates the remaining balance of battery.
START/STOP Button
When you press this button during the manual mode set up, the
measurement starts. During the measurement, press it again to
stop it. Set the measurement mode. (AUTO or MANUAL)
<How to wear cuff>
① Put the ring at the end of the cuff and make it like the shape of arm circumference.
② As shown in the picture at cuff, the mark “ARTERY” has to be on an artery where the inner part
of pulse is beating.
③ As shown in the picture, pull the end of the cuff and wind it around your arm so that cuff stays
2~3cm above your elbow.
④ Check that there’s space for one or two fingers between the cuff and arm.
<Measurement Precautions >
It is an ambulatory blood pressure monitor, but it also measures blood pressure during the rest.
Do not move your arm too much during the measurement.
Try to rest during the measurement. Remove the Automatic mode if you have to concentrate on the exercise or driving.
*Press ‘STOP’ button to cease the measurement and unfasten the cuff if you feel severe pain or the
device doesn’t work properly.
34/38
Periodic Check List
Management No.
Item
Inspection Subject
Requirements
Judgment
No scratch, crack,
Pass/Fail
Visual Check
Mainframe
1 Enclosure
deformation and rust
Accessories
2 Labels and panels
No peeling and dust
Pass/Fail
3 Keys
No damage
Pass/Fail
4 Cuffs
No scratch and damage
Pass/Fail
1 Battery
No scratch and damage
Pass/Fail
2 User manual
Kept in proper place
Pass/Fail
1 Keys
Smooth operation
Pass/Fail
2 Recorder
Smooth operation with no
Pass/Fail
Mechanical Check
Mainframe
abnormal sound
Accessories
3 Cuffs
Smooth operation
Pass/Fail
1 Battery
Smooth operation and
Pass/Fail
removal
Electrical Check
Performance
1 Battery
Screen display upon
Pass/Fail
power-on
2 Display
No abnormality and
Pass/Fail
flickering
3 Connect PC
Connecting possible
Pass/Fail
4 Measurement
Proper measurement
Pass/Fail
General Judgment
Model
Pass/Fail
FA 48
Serial No.
Installation place
Check date
Date of purchase
Checked by
Copy this sheet for use
If repair is required, write down so in the Remarks column.
Approved by
Remarks
Daily Check List
Management No.
Item
Visual Check
Inspection Subject
1 Enclosure
Mainframe
2 Labels and panels
3 Keys
4 Cuffs
1 Battery
Accessories
2 User manual
Mechanical Check
1 Keys
Mainframe
2 Recorder
Accessories
1 Battery
Requirements
Judgment
No
scratch,
crack,
Pass/Fail
deformation and rust
No peeling and dust
Pass/Fail
No damage
Pass/Fail
No scratch and damage
No scratch and damage
Kept in proper place
Pass/Fail
Pass/Fail
Pass/Fail
Smooth operation
Pass/Fail
Smooth operation with no
Pass/Fail
abnormal sound
Smooth operation and
Pass/Fail
removal
Electrical Check
1 Battery
Performance
2 Display
Screen
display
power-on
No
abnormality
flickering
Connecting possible
Proper measurement
Present date/time
3 Connect PC
4 Measurement
Other
1 Clock
General Judgment
Model
FA 48
Installation place
Check date
Checked by
Copy this sheet for use
If repair is required, write down so in the Remarks column.
upon
and
Pass/Fail
Pass/Fail
Pass/Fail
Pass/Fail
Pass/Fail
Pass/Fail
Serial No.
Date of purchase
Approved by
Remarks
FA 48 Hardware Manual
Service center
TEL: 82 - 2 - 587 - 4056
82 - 53 - 856 - 0993
If the problems continue, call the service center. When you ask
for service, the manufacturer’s label, serial number, date of
original purchase and explanation of malfunction will be required.
※ For purpose of improvement, specifications and subject to change
without notice.
※ Our company name will be changed to JANEX MEDICAL.
HEAD OFFICE: 29, Gongdan 4-ro, Jillyang-eup, Gyeongsan-si,
Gyeongsangbuk-do, Korea
TEL: 82-53-856-0993, FAX: 82-53-856-0995
EUROPEAN REPRESENTATIVE: VITAKO Sp. z o.o.
UL. MALEJ SYRENKI 2 71-790
SZCZECIN, POLAND TEL: 91
8522900 / 901 FAX: 91 8522910
JW-FA48E-20151001 Rev 4.0