1
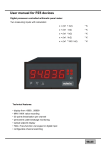
WEIGHT INDICATOR
SMART
User manual
MDK-SMARE-R00-210404
Manual -SMART Rev 01.2006
Vetek AB Box 79, Industriv. 3
e-mail: [email protected]
Utskrift 2006-10-11
760 40 Väddö Sweden
Sida 1
Tel +46 176 208 920
www. vetek.com
Fax +46 176 208929
GENERAL DESCRIPTION
Load cell input
Key
Power, communication, relay
Function
Zeroise display value or go back one level in menu system.
Enable/disable tare function and select/confirm a menu
Navigate (MENU access key)
Manual -SMART Rev 01.2006
Vetek AB Box 79, Industriv. 3
e-mail: [email protected]
Utskrift 2006-10-11
760 40 Väddö Sweden
Sida 2
Tel +46 176 208 920
www. vetek.com
Fax +46 176 208929
ANNOUNCIATORS
No-motion: Lights when there is no
motion on the platform in the range of
±2e within 2seconds. (e: Display
resolution value)
Center of zero: Lights when
displayed weight is zero and the
internal count is less than 1/4d.
Net: Lights when tare function is
enabled.
Minus: Lights when displayed value is
negative and exceeded 3 digits.
Otherwise minus ‘-’ sign
can be monitored on the 4. digit.
INDICATOR CONNECTIONS
On the printed circuit board of the indicator, the connections are shown below assigning the leftmost
terminal with terminal #1. For further information please read ‘Connection and Hardware selections’
section.
Manual -SMART Rev 01.2006
Vetek AB Box 79, Industriv. 3
e-mail: [email protected]
Utskrift 2006-10-11
760 40 Väddö Sweden
Sida 3
Tel +46 176 208 920
www. vetek.com
Fax +46 176 208929
ACTIVATING TARE WITH KEY
Manual tare function could be enabled with
key in no-motion situation. With enabled
tare display would be zeroed and net
announciator will lit on.
To disable the tare function, press
key in a
motionless situation. As a consequence, net
announciator will lit off.
ZEROING THE DISPLAY WITH
KEY
To zero the platform with
key, internal
count would be less than 1/4e and platform
would be motionless.
When
key pressed, display will be zeroed
and center of zero announciator will lit on.
Manual -SMART Rev 01.2006
Vetek AB Box 79, Industriv. 3
e-mail: [email protected]
Utskrift 2006-10-11
760 40 Väddö Sweden
Sida 4
Tel +46 176 208 920
www. vetek.com
Fax +46 176 208929
MENU SYSTEM
key to access and navigate in the menu system.
Press
IDENTITY MENU: To monitor the serial
number and version information
DISPLAY MENU: To adjust display
resolution or step value (e), decimal point
and weighing capacity
CALIBRATION MENU: To perform zero
and load calibrations.
OUTPUT1 (RELAY#1) MENU: Set point,
direction, hysterisis, and time delay for
Relay#1 are entered.
OUTPUT2 (RELAY#2) MENU: Set point,
direction, hysterisis, and time delay for
Relay#2 are entered.
OUTPUT3 (RELAY#3) MENU: Set point,
direction, hysterisis, and time delay for
Relay#3 are entered.
ANALOG OUTPUT (DAC) MENU: DAC
low output, DAC high output and DAC
maximum output value can be set.
COMMUNICATION PARAMETERS
MENU:
Communication mode, scale number, and
communication format can be adjusted.
Manual -SMART Rev 01.2006
Vetek AB Box 79, Industriv. 3
e-mail: [email protected]
Utskrift 2006-10-11
760 40 Väddö Sweden
Sida 5
Tel +46 176 208 920
www. vetek.com
Fax +46 176 208929
Manual -SMART Rev 01.2006
Vetek AB Box 79, Industriv. 3
e-mail: [email protected]
Utskrift 2006-10-11
760 40 Väddö Sweden
Sida 6
Tel +46 176 208 920
www. vetek.com
Fax +46 176 208929
Manual -SMART Rev 01.2006
Vetek AB Box 79, Industriv. 3
e-mail: [email protected]
Utskrift 2006-10-11
760 40 Väddö Sweden
Sida 7
Tel +46 176 208 920
www. vetek.com
Fax +46 176 208929
Manual -SMART Rev 01.2006
Vetek AB Box 79, Industriv. 3
e-mail: [email protected]
Utskrift 2006-10-11
760 40 Väddö Sweden
Sida 8
Tel +46 176 208 920
www. vetek.com
Fax +46 176 208929
Manual -SMART Rev 01.2006
Vetek AB Box 79, Industriv. 3
e-mail: [email protected]
Utskrift 2006-10-11
760 40 Väddö Sweden
Sida 9
Tel +46 176 208 920
www. vetek.com
Fax +46 176 208929
WEIGHT CALIBRATION
ATTENTION: JP13 connection must be open-circuited indicator. Any attempt to confirm the
‘calibration’ code as a consequence.
ZERO CALIBRATION
(1) Press the navigation
menu appears.
(2) Press
key until ‘Calibration’
key to confirm the menu.
(3) ‘Zero calibration’ menu blinks for a short time
and starts to monitor internal count besides
blinking rightmost leds on the display
(4) After the platform is emptied, press
calibrate
to
(5) After ‘Zero Calibration’ is completed, indicator
will automatically go into ‘Load Calibration’ and
‘LOAD’ expression blinks for a short while. Then,
internal count can be displayed with rightmost leds
continuously lighting.
(6) While internal count is monitored, by pressing
Press
key again zero calibration can be performed.
key to quit menu system until normal operation (weighing mode) appears.
Manual -SMART Rev 01.2006
Vetek AB Box 79, Industriv. 3
e-mail: [email protected]
Utskrift 2006-10-11
760 40 Väddö Sweden
Sida 10
Tel +46 176 208 920
www. vetek.com
Fax +46 176 208929
LOAD CALIBRATION
(1) Press the navigation
menu appears.
(2) Press
key until ‘Calibration’
key to confirm the menu.
(3) ‘LOAD’ expression blinks for a short while and
starts to monitor internal count value. However the
leds on the rightmost part of the display not blink
like in zero calibration.
(4) While internal count is monitored, by pressing
key again zero calibration can be performed.
Place reference weight and press
motionless is achieved.
key afterwards
NOTE: IT IS ADVISED TO USE AT LEAST
HALF OF THE WEIGHING CAPACACITY AS A
REFERENCE WEIGTH
(5) The zeros are displayed while thousands’ place
is blinking. Blinking digit value can be incremented
with
key, blinking digit can be changed with
key.
(6) Press
key in order to complete the
calibration and store new calibration value on the
display.
(7) Indicator automatically resets itself and starts in normal
operation according to the new calibration settings.
Manual -SMART Rev 01.2006
Vetek AB Box 79, Industriv. 3
e-mail: [email protected]
Utskrift 2006-10-11
760 40 Väddö Sweden
Sida 11
Tel +46 176 208 920
www. vetek.com
Fax +46 176 208929
RELAY SETTINGS
When relay contacts are closed, the pertaining announciator leds on the indicator (R1, R2 and R3)
will lit on.
The relays can be activated both in ‘+’ and ‘-‘ directions. For example; If 1.relay set point is set to
1000 and direction is implying upper range of 1000, for display values below –1000 relay#1 contacts
will be activated or in other words “closed”
For all menu and submenus related with first relay,
the leftmost leds on the display will lit on as
follows
For all menu and submenus related with second
relay, the leftmost leds on the display will lit on as
follows
For all menu and submenus related with third relay,
the leftmost leds on the display will lit on as
follows
Manual -SMART Rev 01.2006
Vetek AB Box 79, Industriv. 3
e-mail: [email protected]
Utskrift 2006-10-11
760 40 Väddö Sweden
Sida 12
Tel +46 176 208 920
www. vetek.com
Fax +46 176 208929
RELAY #1 SETTINGS
RELAY #1 SET POINT SETTING
(1) Press the navigation
menu appears
(2) Press
key until ‘1. Relay’
key to confirm the menu
(3) Press the navigation
key until
‘First Relay Set Point’ menu appears
(4) Press
key to confirm the menu
(5) The last stored first relay set point is
displayed while thousands’ place is blinking
(6) Blinking digit value can be incremented with
key, blinking digit can be changed with
key
(7) Press
key to store first relay set point
key to quit menu system until normal
(8) Press
operation appears
Manual -SMART Rev 01.2006
Vetek AB Box 79, Industriv. 3
e-mail: [email protected]
Utskrift 2006-10-11
760 40 Väddö Sweden
Sida 13
Tel +46 176 208 920
www. vetek.com
Fax +46 176 208929
RELAY #1 SET DIRECTION SETTING
(1) Press the navigation
appears
(2) Press
key to confirm the menu
(3) Press the navigation
Direction’ menu appears
(4) Press
key until ‘1. Relay’ menu
key until ‘First Relay Set
key to confirm the menu
(5) The last stored first relay set direction is displayed
key until you find
(6) Scroll with the navigation
the set direction you are looking for
Implies Relay contacts are closed under the
set point
Implies Relay contacts are closed above the
set point
(7) Press
(8) Press
key to store first relay set direction
key to quit menu system until normal operation appears
Manual -SMART Rev 01.2006
Vetek AB Box 79, Industriv. 3
e-mail: [email protected]
Utskrift 2006-10-11
760 40 Väddö Sweden
Sida 14
Tel +46 176 208 920
www. vetek.com
Fax +46 176 208929
RELAY #1 HYSTERISIS SETTING
Hyterisis can be defined as the difference between opening and closing thresholds of the relay
contacts.
(1) Press the navigation
menu appears
(2) Press
key until ‘1. Relay’
key to confirm the menu
(3) Press the navigation
key until ‘First Relay
Hysterisis Amount’ menu appears
(4) Press
key to confirm the menu
(5) The last stored first relay hysterisis amount is
displayed while hundreds’ place is blinking
(6) Blinking digit value can be incremented with
key
(7) Press
(8) Press
key, blinking digit can be changed with
key to store first relay hysterisis amount
key to quit menu system until normal operation appears
NOTE: Hysterisis range is from 0 to 255.
Manual -SMART Rev 01.2006
Vetek AB Box 79, Industriv. 3
e-mail: [email protected]
Utskrift 2006-10-11
760 40 Väddö Sweden
Sida 15
Tel +46 176 208 920
www. vetek.com
Fax +46 176 208929
RELAY #1 DELAY TIME SETTING
Setting of relays can be postponed up to 9 seconds. This setting can be performed with ‘delay time’
menu with 1 second intervals from 0 seconds to 9 seconds.
(1) Press the navigation
appears
(2) Press
key to confirm the menu
(3) Press the navigation
Delay Time’ menu appears
(4) Press
key until ‘1. Relay’ menu
key until ‘First Relay
key to confirm the menu
(5) Saved first relay delay time is displayed. Scroll with the navigation
delay time you are looking for.
key until you find the
Implies 0 seconds delay (no delay)
Implies 9 seconds delay
(6) Press
(7) Press
key to store first relay delay time
key to quit menu system until normal operation appears
Manual -SMART Rev 01.2006
Vetek AB Box 79, Industriv. 3
e-mail: [email protected]
Utskrift 2006-10-11
760 40 Väddö Sweden
Sida 16
Tel +46 176 208 920
www. vetek.com
Fax +46 176 208929
ANALOG OUTPUT (DAC) SETTINGS
Manual -SMART Rev 01.2006
Vetek AB Box 79, Industriv. 3
e-mail: [email protected]
Utskrift 2006-10-11
760 40 Väddö Sweden
Sida 17
Tel +46 176 208 920
www. vetek.com
Fax +46 176 208929
Manual -SMART Rev 01.2006
Vetek AB Box 79, Industriv. 3
e-mail: [email protected]
Utskrift 2006-10-11
760 40 Väddö Sweden
Sida 18
Tel +46 176 208 920
www. vetek.com
Fax +46 176 208929
Manual -SMART Rev 01.2006
Vetek AB Box 79, Industriv. 3
e-mail: [email protected]
Utskrift 2006-10-11
760 40 Väddö Sweden
Sida 19
Tel +46 176 208 920
www. vetek.com
Fax +46 176 208929
Manual -SMART Rev 01.2006
Vetek AB Box 79, Industriv. 3
e-mail: [email protected]
Utskrift 2006-10-11
760 40 Väddö Sweden
Sida 20
Tel +46 176 208 920
www. vetek.com
Fax +46 176 208929
Manual -SMART Rev 01.2006
Vetek AB Box 79, Industriv. 3
e-mail: [email protected]
Utskrift 2006-10-11
760 40 Väddö Sweden
Sida 21
Tel +46 176 208 920
www. vetek.com
Fax +46 176 208929
Manual -SMART Rev 01.2006
Vetek AB Box 79, Industriv. 3
e-mail: [email protected]
Utskrift 2006-10-11
760 40 Väddö Sweden
Sida 22
Tel +46 176 208 920
www. vetek.com
Fax +46 176 208929
Manual -SMART Rev 01.2006
Vetek AB Box 79, Industriv. 3
e-mail: [email protected]
Utskrift 2006-10-11
760 40 Väddö Sweden
Sida 23
Tel +46 176 208 920
www. vetek.com
Fax +46 176 208929
Manual -SMART Rev 01.2006
Vetek AB Box 79, Industriv. 3
e-mail: [email protected]
Utskrift 2006-10-11
760 40 Väddö Sweden
Sida 24
Tel +46 176 208 920
www. vetek.com
Fax +46 176 208929
Manual -SMART Rev 01.2006
Vetek AB Box 79, Industriv. 3
e-mail: [email protected]
Utskrift 2006-10-11
760 40 Väddö Sweden
Sida 25
Tel +46 176 208 920
www. vetek.com
Fax +46 176 208929
Manual -SMART Rev 01.2006
Vetek AB Box 79, Industriv. 3
e-mail: [email protected]
Utskrift 2006-10-11
760 40 Väddö Sweden
Sida 26
Tel +46 176 208 920
www. vetek.com
Fax +46 176 208929
CONNECTIONS and HARDWARE SELECTIONS
CALIBRATION KEY (jp13)
To change display settings and to perform calibration, calibration key (jp13) must be
short-circuited.
All settings can be monitored but changes are not saved on ‘display’ menu
although jp13 is open circuited. Attempting to save settings will result with
‘er50’ error code
To attempt to select/confirm on ‘calibration’ menu, while jp13 is open
circuited, will result with ‘er50’ error code
All communication and analog output hardware selections are done by means of
open-circuiting or short-circuiting the specified jp connections.
SERIAL COMMUNICATION hardware selection
RS485 communication mode: jp1 and jp2 must be short circuited; jp6 and jp7 must be
open circuited
RS232 communication mode: jp6 and jp7 must be short circuited; jp1 and jp2 must be
open circuited
Manual -SMART Rev 01.2006
Vetek AB Box 79, Industriv. 3
e-mail: [email protected]
Utskrift 2006-10-11
760 40 Väddö Sweden
Sida 27
Tel +46 176 208 920
www. vetek.com
Fax +46 176 208929
ANALOG OUTPUT hardware selection
0-5V analog output mode: jp8 and jp9 must be short circuited; jp10, jp11 and jp12
must be open circuited
0-5V analog output connection
On the printed circuit board of the indicator, the connections are shown below
assigning the leftmost terminal with terminal #1.
0-20mA analog output mode: jp10, jp11 and jp12 must be short circuited; jp8 and jp9
must be open circuited
0-20mA analog output connection
On the printed circuit board of the indicator, the connections are shown below
assigning the leftmost terminal with terminal #1
Another power supply is required for analog current output. The current flow
direction is as shown in the following figure
Manual -SMART Rev 01.2006
Vetek AB Box 79, Industriv. 3
e-mail: [email protected]
Utskrift 2006-10-11
760 40 Väddö Sweden
Sida 28
Tel +46 176 208 920
www. vetek.com
Fax +46 176 208929
The hardwares specified above are given below in a tabulated form showing only
short circuits.
ATTENTION: Any other modification on the system board (short circuits, open
circuits or component modifications) rather than the specified ones will result
malfunctioning and/or permanent damage on the indicator and out of guarantee.
Manual -SMART Rev 01.2006
Vetek AB Box 79, Industriv. 3
e-mail: [email protected]
Utskrift 2006-10-11
760 40 Väddö Sweden
Sida 29
Tel +46 176 208 920
www. vetek.com
Fax +46 176 208929
Manual -SMART Rev 01.2006
Vetek AB Box 79, Industriv. 3
e-mail: [email protected]
Utskrift 2006-10-11
760 40 Väddö Sweden
Sida 30
Tel +46 176 208 920
www. vetek.com
Fax +46 176 208929