1
U s er’ s M a n u a l
PC Classic
PC Classic Plus
!" #!$ %
&$" '%
!( )%)$
$,+%
+* %*
*!+"% & !* *
* +#
#&,+!(!"
* +% )! $
$( ) +' +
"%
+!*
$( )+ #!$ * $ ! #,( *
* +% - $-& +!$$
*%!"
+.!" !$
*
+ !" /#
)*!" %.$
,+(!"*
* +%
)&+(! *& . (*
* +% %
.$
+0 +!( #!$!" %#!*
% +*
)%$ *
* +%
*
* +% $ #!$. %
#!#
)%
%!*)$-( )&+(! *+
& % *+!* &+/&)& !)&0 % +)* %1.)$%
$*
$*
* +% #!#
)%
%!*(
!
* +% $ ! .+!.#,(
%" *.0(
#!$ #! %
$! ** % ! %
$ , !*
* +%
%*
$* %
.,+%
*
($
),, %
$
* +% +!. $! *+$
+
+!(%" *
$!*
)%
!
!
)&+( !(&+2 #, $ %+.+,*
+* !$ *
* +% %+%
#'
+ ,)%
, $$ % !#,(!"
%+.+,*
+* ! $+! $
$!*+ $
*, !* +)* %1. $ *
* +%
)&)$
*%,%.)# +
#,(
%" *! *#$!* %"!+ * +% !+ #, $ %+.+,*
+* !$ )&+(! *#,(*
* +% !* +!(0) *!0 +%
. %$& +%$
(
$
*&
"
#$
% " %!
)&+(! *.$
+$
$&0 %. #&, *
* +% )! $
$
3,% % %*
*!
#!$!*$ 0*
+! . !$& 4
)%$
.#
* !$
3#!$!*&+(! *0 %5)%. %
.$
+$
$&0( %. #&,+* ! , !%5) $
*( )
,%'.
* %+$!+0(
.*
+ .! %
&+* !%"+%
.!"+!(.$
+$
$&0( %. #&,+* !
)&+(! *. #
%
(
,**
* +% )! $
$. #
%
(
,* ! $+! #$
$
+%
(,+%
* * ,%
+* ! *
* +%
)% #!$
+)*&+*#
+(*%
& !+* ), !+!(*
%
+!$ % *
* +% , !*
%
+!$ %( )
&)$
*. '%*
* +% !#).!"+!(#, $+!.% +*.. #
)& !*
+* ! * * *
%
+!$ %
*
%
+!$ % &)$
*+#
#,** $ #!$ %
&$+$+#!.* !* * *
%
+!$ %
&+(*%
& !+* ( )% #!$ ), !! *# %+)% * #&,( * +!( * $
#!$ %
&$ , !*%
& !+* ! ( )&)$
*&& .+* (. $
*
%(*
* +% *" * % * +
#, $ +.+,*
+* !$+!.& %
" ., %
* !$!+!( %
&
&!
'
(
)&+(! * /
,%
* %%6 /
,%
**
+,,#
+0 + $ %%")+* !$
License Codes:
* +% %+!(#,( %+.+,*
+* ! !' +* !
+!(
%
)
%
+%
%
+!*
$ %+, % .
7
89
%& * .+* * ,)%
#+$ *+**
$ * +% ,%.)#
*
/#
)* *
$,%"%
+&& !" !$
*
%
)#
* !$
!+
$+% ,%, %( !$
*
+ .
. $! * +%
%
+!**+** , %
+* ! * $ * +%
0 )!!*%
%
),*. %
%
%%%
!* '!**+** $$ * +% ,%.)#
*+$* /#
)* *
$,%"%
+&& !" !$
*
%
)#
* !$
.)%!"* +%
%
+!*
(, % . )$
*& %
3
$%& .($+ 0 +% )!. %%,+%
).
0 )!+0 * %,+# * & .+ * !+%+$!+0 +& )!* *&
)$
*& %
3
$
+*%
!+* %& .($+ 0 +% )!. * ,)%
#+$ ,%# ), !%*
)%
! * ,%.)#
*+!.+
#, $
* #$
+
!!$ ,
+%
%
+!*
$* %& '
+0 & .+ $
),, . ), ! # * $,%.)#
*$%#%
..
* 0 % %& . #
*
$!&+*%+$+!. %
2
&+!$ ,)!. %! %
&+ )$ %+, % .
7
89
%& * .+* ,)%
#+$ !* '!** & .+,%'$* 0 . #
*' .)%!"*
+%
%
+!*
(, % . )$
*& %
3
$%& .($+ 0 * %*
)%
!* & .+*
%
%,+#& !*
).
0 )!+0 * %,+# * & .+ * !+%+$!+0
+& )!* *&
)$
*& %
3
$+*%
!+* %& .($+ 0 +% )!. * ,)%
#+$ ,%# ), !
%*
)%
! * ,%.)#
*+!.. $
*
%
)#
* ! + * %! !6%& '
+0 & .+#, $ * $ * +%
,%.)#
*
% $
)$
*& %&)$
*! *(
.+(
$+*%* /
,%
+* ! *
! %*!"
+%
%
+!*
(, % .
+!( +%
%
+!*
(#+& ! *+*%*+!* %
*
(7
:;9
%
&+2$! * % /
,%$
$ +%
%
+!*
(
* % %*
*! % %
+ * %$
,#
** * $
,%.)#
* !( &, . +%
%
+!*
( &%
#+!*
+0 *
( %*
!$
$ %+,+%
*#
)+%,)%
, $ $ & *.*
* !7
89(+%.)%
+* ! * $ %*
*! +%
%
+!*
(
& $
*
+*$ %,%'!#$. ! *+
&*
+* !$ !
!"+! &, . +%
%
+!*
( +$
*
$ $ * +0 ' & *
+* ! % /
#)$ !&+(! *
+,,(* ( )
$ +%
%
+!*
("'$$
, # # "+ %" *
$ +!.( )&+(+$ +' * %%" *
$ #'
+%
( %&
$
*
+* * $
*
+* %,%'!# * ,%'!#
#$%
<
<
3
=
<
<
>
7
9
& $
*
+*$ %,%'!#$. ! *+
*
/
#)$ ! % & *
+* ! !#. !*
+ %#!$5) !*+ .+&+" $ $ * +0 ' & *
+* ! %
/
#)$ !&+(! *+,,(* ( )
#
%
*
+%
%
+!*
($%
'# &+(0 0*
+! .0(#
+ !" ,%& *
%#
$#
)$
*& %$%
'# +*86?;;6@A@6;;;B
7 9
PC Classic/Classic Plus User’s Manual
PC CLASSIC / PC CLASSIC PLUS
USER’S MANUAL
Copyright 2003, 2004
Spirometrics Medical Equipment Company
PO Box 680
22 Shaker Road
Gray, ME 04039 USA
http://www.spirometrics.com
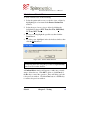
IMPORTANT!
Please send in the attached card to
activate your warranty.
Rev. 06, February 2004
PC Classic/Classic Plus User’s Manual
Table of Contents
Specifications ..........................................i
Models................................................................................ i
General ..............................................................................ii
Electrical............................................................................ iii
Operating .......................................................................... iii
Environmental ................................................................... iii
Chapter 1: Introduction..........................1
1.1 Welcome ..................................................................... 1
1.2 Product Differences: PC Classic vs. PC Classic Plus .. 1
1.3 Warranty ..................................................................... 2
Chapter 2: Safety....................................5
2.1 Intended Use ............................................................... 5
2.2 Warnings and Precautions .......................................... 5
2.3 Disposal ...................................................................... 7
2.4 Symbols and Definitions .............................................. 7
Chapter 3: Equipment Preparation .......9
3.1 Preparing for Installation.............................................. 9
3.1.1 Inventory...........................................................................9
3.1.2 Connecting the Classic Sensor ......................................10
3.2 Software Installation .................................................. 11
3.2.1 Initial Setup Wizard ........................................................12
3.2.2 Welcome Window ..........................................................12
3.2.3 Sensor Found Window...................................................13
3.2.4 Address Window ............................................................14
3.2.5 Ambient Conditions Window ..........................................15
3.2.6 Access Codes Window ..................................................16
3.2.7 Attaching the 3-Liter Syringe ..........................................18
3.2.8 Performance Verification Routine (PC Classic only)......19
3.2.9 Calibration (PC Classic Plus only)..................................23
Chapter 4: Test Preparation ................31
4.1 Processing Patient Data ............................................ 31
4.1.1 Entering a New Patient...................................................31
4.1.2 Retrieving and Modifying Patient Information.................38
PC Classic/Classic Plus User’s Manual
4.1.3 Deleting Patient Information ...........................................40
Chapter 5: Testing................................42
5.1 Optional Pre-Test Training (PC Classic Plus Only).... 42
5.2 FVC Test ................................................................... 45
5.2.1 Warning Messages ........................................................52
5.3 VC Test ..................................................................... 52
5.4 Post-Bronchodilator Testing (PC Classic Plus Only).. 56
5.4.1 Method 1: .......................................................................56
5.4.2 Method 2: .......................................................................59
5.5 MVV Test (PC Classic Plus Only).............................. 61
5.5.1 View or Delete Test ........................................................66
5.6 Summary Report ....................................................... 67
5.7 Trend Analysis........................................................... 72
Chapter 6: Special Features ................77
6.1 Customization............................................................ 77
6.1.1 Software Customization .................................................77
6.1.2 Data Options ..................................................................79
6.1.3 Report Setup ..................................................................81
6.1.4 Report Options ...............................................................83
6.1.5 Methacholine Challenge Options ...................................84
6.1.6 Licensing ........................................................................86
6.1.7 General Customization Buttons......................................87
6.2 Performance Verification & Calibration ...................... 87
6.2.1 Performance Verification Routine (PC Classic only)......88
6.3 Calibration (PC Classic Plus Only) ............................ 91
6.3.1 Calibration Routine .........................................................91
6.4 Printer Selection ........................................................ 96
Chapter 7: Data Management..............99
7.1 Protecting Patient Data.............................................. 99
7.2 Exporting and Importing Files .................................. 101
7.2.1 Exporting Files..............................................................101
7.2.2 Importing Files..............................................................102
7.3 Batch Reports.......................................................... 103
7.4 Calibration Review and Maintenance....................... 104
7.5 Maintaining Users.................................................... 105
7.6 Network Option (PC Classic Plus Only) ................... 107
Chapter 8: Care and Maintenance ....110
PC Classic/Classic Plus User’s Manual
8.1 Maintenance of the PC Classic Flow Sensor ........... 110
8.1.1 Removing the Easy Clean Core ...................................110
8.1.2 Cleaning the Easy Clean Core .....................................111
8.1.3 Installing the Easy Clean Core .....................................111
8.2 Service .................................................................... 113
Appendices ......................................... A-1
Definitions ......................................................................A-1
Normals Tables ..............................................................A-4
Diagnostic Interpretation.................................................A-9
Interpretation Table ............................................................. A-10
References...................................................................A-10
Standards and Guidelines: .................................................. A-10
Additional Resources: ......................................................... A-11
Spirometry Websites: .......................................................... A-12
Product List ..................................................................A-12
Accessories: ........................................................................ A-12
Educational Products .......................................................... A-13
PC Classic/Classic Plus User’s Manual
SPECIFICATIONS
MODELS
The PC Classic and the PC Classic Plus consist of a sensor
handle and the Classic Windows-based software. Together,
these items make up the complete PC Classic system.
PC Classic:
Consists of the Classic sensor handle and
Classic software configured to measure and
compute the following indices at minimum:
FVC, SVC, FEV1, FEV3, FEV6, FEV1/FVC,
FEV1/FEV6, PEF, FEF25-75, FEF75-85, FEF25,
FEF50, FEF75, FEF200-1200, FIVC, PIF, FIF50,
FEF50/FIF50, and ET.
PC Classic Plus: The PC Classic Plus adds PRE/POST to the
standard PC Classic test capabilities and
allows the clinician to purchase MVV and/or
Methacholine Challenge. It also allows
addition of the network option.
NOTE!
The PC Classic can be upgraded to PC Classic Plus without
the addition of new hardware.
The Classic software can be installed in any Windows-based
desktop or laptop computer that meets the minimum
requirements described on the next page.
Feb-04
Specifications
i
PC Classic/Classic Plus User’s Manual
GENERAL
1.1 lbs. (0.5 kg)
Weight / Size
(sensor handle and cord 8” h x 4” d x 2.8” w
only)
• 90 MHz Pentium class processor
Computer hardware
• 8 Mbytes RAM
requirements
• 7 Mbytes available hard disc
(minimum)
•
•
•
Operating System
Hazardous /
Flammable
Environments
Mode of Operation
•
•
space
Compliance to applicable
electromagnetic compatibility
standards
Compliance to applicable
electrical safety standards
SVGA (800X600 screen
resolution or better)
Windows compatible printer
Available serial port
Windows 95 or 98, Windows
NT Work Station 4.0, Windows
ME, Windows 2000
Professional and Windows XP.1
EQUIPMENT not suitable for
use in the presence of a
FLAMMABLE
ANAESTHETIC MIXTURE
WITH AIR or WITH OXYGEN
OR NITROUS OXIDE.
Rated for continuous operation
1
Windows 95/98, Windows NT Workstation 4.0, Windows ME,
Windows 2000 Professional and Windows XP Professional are
registered trademarks of Microsoft Corporation, Redmond,
Washington.
Feb-04
Specifications
ii
PC Classic/Classic Plus User’s Manual
ELECTRICAL
Power
Serial Port
EMC
Derived from the RS-232 port.
RS-232C compliant
Compliant with Standard
60601-0, 1990 of the
Electromagnetic Compatibility
Directive
OPERATING
Meets or exceeds Standards of Spirometry requirements, 1994
update, American Thoracic Society, Medical Section of the
American Lung Association.
Flow Ranges
-14.0 to 14.0 liters/second
ENVIRONMENTAL
Operating
Storage Temperature
Humidity
Feb-04
17°C (63°F) to 40°C (104°F)
0 – 80% Relative Humidity
-18°C (0°F) to 50°C (122°F)
0 – 80% Relative Humidity
Specifications
iii
PC Classic/Classic Plus User’s Manual
NOTES
Feb-04
Specifications
iv
PC Classic/Classic Plus User’s Manual
Chapter 1: INTRODUCTION
1.1 WELCOME
You have purchased a Spirometrics Medical Equipment
Company PC Classic/Classic Plus spirometer for Windows™ 2.
The PC Classic/Classic Plus represents the newest technology in
the medical equipment field. Its ease of operation and durability
will provide years of service.
Spirometrics is committed to designing products that meet the
highest standards of quality instrumentation for pulmonary
function testing. We have designed the PC Classic/Classic Plus
to take advantage of the latest developments in computers and
software.
NOTE!
Federal law restricts this device to use by or on the order of a
physician.
NOTE!
Before setting up, please complete the warranty card,
enclosed at the end of this chapter, to ensure that your
warranty rights are covered.
1.2 PRODUCT DIFFERENCES:
PC CLASSIC VS. PC CLASSIC PLUS
The PC Classic is a monitoring device designed to be used in
screening applications, e.g. early detection of Chronic
Obstructive Pulmonary Disease (COPD). Spirometry is the only
test available on the PC Classic.
2
Windows™ is a registered trademark of Microsoft Corporation,
Redmond, Washington.
Feb-04
Chapter 1: Introduction
1
PC Classic/Classic Plus User’s Manual
The PC Classic Plus is a diagnostic device used in clinical
applications, such as bronchodilator evaluation and provocation
testing, that requires a very high standard of accuracy. The PC
Classic Plus contains routines for calibrating the spirometer that
are not available on the PC Classic. These calibration routines
meet the 1994 American Thoracic Society (ATS)
recommendations. Also, networking is only available with the
PC Classic Plus.
The PC Classic can be upgraded to the Classic Plus at any time.
For more information about the upgrade call our toll-free
number: 1-800-767-0004.
1.3 WARRANTY
The PC Classic/Classic Plus is warranted for one year from
delivery date as validated by the return of the warranty card or,
if the warranty card is not returned, one year from the date of
manufacture.
During the warranty period, any original parts and/or
workmanship proven to be defective will be replaced or repaired
at an authorized service center provided the equipment has been
operated and maintained in accordance with the instructions
contained in this manual. This warranty applies to the original
user only and does not extend to any product or component that
has been repaired or altered by anyone other than personnel
authorized by Spirometrics. This warranty is in lieu of and
excludes any warranty as to merchantability and all other
warranties expressed or implied and do not cover consequential
damages due to improper use or application of the product.
For the device warranty to be in effect, the warranty card
packaged with this product must be returned to Spirometrics
Medical Equipment Company for warranty registration. Please
take this time to fill out the postage-paid warranty card. You
may also register your warranty by calling 1-800-767-0004 or
Feb-04
Chapter 1: Introduction
2
PC Classic/Classic Plus User’s Manual
faxing the information to 207-657-4123. For software license
and warranty information, refer to the first 2 pages of this
manual.
NOTE!
Computers, printers, and products not manufactured by
Spirometrics are not covered under the one-year warranty.
These products are covered under the manufacturers’
warranties, which may vary. Please consult the appropriate
user’s manuals for further details.
Feb-04
Chapter 1: Introduction
3
PC Classic/Classic Plus User’s Manual
NOTES
Feb-04
Chapter 1: Introduction
4
PC Classic/Classic Plus User’s Manual
Chapter 2: SAFETY
!
CAUTION: Federal law restricts this device to sale by or on
the order of a physician.
2.1 INTENDED USE
The PC Classic and PC Classic Plus spirometers are intended for
use with adult and pediatric patients for the diagnosis and
monitoring of pulmonary disorders. The company disclaims
responsibility for all other uses, and the user agrees to assume
liability for damages resulting from non-intended use or operator
error by the user or user’s employees.
The PC Classic is not intended for use as a diagnostic
instrument. Please upgrade to the PC Classic Plus for diagnostic
capability.
The PC Classic is intended for use at a single facility or location.
If the instrument is to be used at a different location other than
its original setup location, the Classic software must be
uninstalled, then re-installed to insure proper operation.
2.2 WARNINGS AND PRECAUTIONS
The following warnings and precautions must be heeded at all
times:
Use a genuine Spirometrics filter/mouthpiece (Spiro-Filter) to
ensure proper accuracy, reduce the risk of patient crosscontamination and to protect the internal sensor element.
Replace the Spiro-Filter after each patient.
Feb-04
Chapter 2: Safety
5
PC Classic/Classic Plus User’s Manual
Clean the Easy Clean Core regularly to insure the long-term
stability and accuracy of the instrument. Please refer to
Chapter 8: CARE AND MAINTENANCE for proper cleaning
procedures. Do not attempt to clean the unit with abrasives or
solvents. Do not autoclave any portion of the unit.
Never immerse any component of the system in water or other
liquids with the exception of the Easy Clean Core.
Use only a desktop or laptop PC that adheres to the
specifications listed in the Specifications section of this
document.
The PC Classic has a built-in operation verification feature to
insure the operation of the system. Establishment of
verification procedures and schedule are the responsibility of
the user. The ATS 1994 spirometry recommendations and the
American Association for Respiratory Care (AARC) 1996
Spirometry Clinical Practice Guideline provide guidance.
The PC Classic Plus has built-in calibration capability. The
1994 ATS standard on spirometry recommends daily
calibration of this instrument or more frequently as
appropriate.
Accurate and effective use of the PC Classic and PC Classic
Plus depends on correct application of well established
spirometry practices.
Do not operate the unit in a flammable or explosive
atmosphere.
Insure that the Easy Clean Core is properly installed as
described in Chapter 8: CARE AND MAINTENANCE.
Do not drop the sensor handle. The PC Classic handle is a
sensitive measurement device. Improper handling could
affect the accuracy of its reported results.
Do not disassemble sensor handle. There are no userserviceable parts inside.
Feb-04
Chapter 2: Safety
6
PC Classic/Classic Plus User’s Manual
2.3 DISPOSAL
This instrument contains electronic circuitry and multiple
plastics. Please dispose of properly at the end of useful life.
Computer recycling facilities are capable of recycling this
instrument.
2.4 SYMBOLS AND DEFINITIONS
Symbol
Definition
Attention, consult
accompanying
documents
Dangerous voltage
Spirometrics Notation
The specific
directions in this
manual and on the PC
Classic handle must
be observed.
The system must not
be modified or
serviced except by
authorized personnel.
Class II Equipment
Type BF Equipment
Feb-04
Chapter 2: Safety
7
PC Classic/Classic Plus User’s Manual
NOTES
Feb-04
Chapter 2: Safety
8
PC Classic/Classic Plus User’s Manual
Chapter 3: EQUIPMENT
PREPARATION
3.1 PREPARING FOR INSTALLATION
NOTE!
The PC Classic/Classic Plus is shipped in a box specifically
designed to protect it during shipment. Keep the shipping
box and packing materials in case you ever need to ship the
unit for service or maintenance.
Common Windows tasks and uses should be familiar to the user
before attempting to operate this program. Consult the
Microsoft® Windows™ user’s manual if this is not the case.3
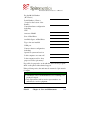
3.1.1 INVENTORY
After unpacking your new PC Classic/Classic Plus, check each
item against the following list:
1
1
1
1
1
Handle Assembly for PC Classic/Classic Plus
Coiled Cable
9-pin Adapter
Program CD
User'
s Manual & Warranty Card
3
®
Windows™ and Microsoft are registered trademarks of
Microsoft Corporation, Redmond, Washington.
Feb-04
Chapter 3: Equipment Preparation
9
PC Classic/Classic Plus User’s Manual
NOTE!
If anything is missing, immediately contact a Spirometrics
inside sales representative:
• Phone: 207-657-6700 or 1-800-767-0004.
• E-mail: [email protected]
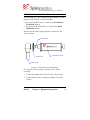
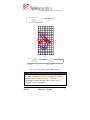
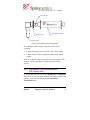
3.1.2 CONNECTING THE CLASSIC SENSOR
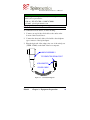
To connect the Classic Sensor, do the following:
1. Connect one end of the coiled cable to the outlet on the
bottom of the Classic Sensor.
2. Connect the other end of the coiled cable to the telephone
type connector of the 9-pin adapter.
3. Plug the 9 pin end of the adaptor into one of the serial ports
(COM1–COM4) on the back of the host computer.
HANDLE ASSEMBLY
TO COMPUTER SERIAL PORT
9 PIN ADAPTER
COILED CABLE
Figure 3-1: Connection Diagram.
Feb-04
Chapter 3: Equipment Preparation
10
PC Classic/Classic Plus User’s Manual
NOTE!
If a 25-pin adapter (PN 15111F) is needed to connect your
sensor to a COM port on your computer, call Inside Sales
(207-657-6700 or 1-800-767-0004) to obtain one or buy a
DB9 to DB25 adapter from a local computer supply house.
The PC Classic/Classic Plus for Windows is automatically set to
the proper COM port by the Startup Wizard. The COM port can
also be manually set by accessing the Customization option.
See Section 6.1 CUSTOMIZATION, for details.
3.2 SOFTWARE INSTALLATION
If you purchased the computer from Spirometrics, the PC
Classic/Classic Plus software will be loaded and configured on
your computer. If you already have a computer or purchase one
from a source other than Spirometrics, you will need to install
the software.
To load the software, insert the CD into the CD drive. The
program should load automatically. If not, do the following:
1. Click the START button.
2. Select RUN.
3. Select, or enter, <CD drive letter>:\setup.exe on the Open
command line and click OK.
4. Follow the instructions in the PC Classic InstallShield
Wizard.
NOTE!
When asked to confirm or change the program Destination
Folder, Spirometrics recommends accepting the default
destination. However if you wish to install this program
software and data on a server or network location, please
consult your network administrator.
Feb-04
Chapter 3: Equipment Preparation
11
PC Classic/Classic Plus User’s Manual
3.2.1 INITIAL SETUP WIZARD
Run PC Classic for the first time by one of the following
methods:
Double click on the newly created PC Classic shortcut icon on
your desktop, or
Select Programs (All Programs), Spirometrics, PC Classic
v2.11, PC Classic under the Windows Start menu.
The PC Classic Wizard takes over to complete the installation.
The entire process takes only a couple of minutes.
The first five windows that you will see during installation serve
three purposes:
• They tell the user what is happening.
• They verify that the sensor is properly connected.
• They allow you to set the report heading and ambient
condition default parameters.
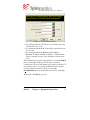
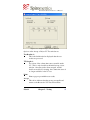
3.2.2 WELCOME WINDOW
The first window is a welcome message. Read the
message, then click Next or press the Enter key to proceed.
Feb-04
Chapter 3: Equipment Preparation
12
PC Classic/Classic Plus User’s Manual
Figure 3-2: Welcome Window.
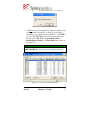
3.2.3 SENSOR FOUND WINDOW
The second window informs you that the sensor has been
properly connected. If the sensor is not connected properly,
check the back of your PC or laptop to make sure that the
connection is okay as described in 3.1.2 Connecting the Classic
Sensor. Follow the instructions in your PC owner’s manual to
ensure that your serial communications port is enabled.
When ready, click Next or press the Enter key to proceed.
Feb-04
Chapter 3: Equipment Preparation
13
PC Classic/Classic Plus User’s Manual
Figure 3-3: Sensor Found Window.
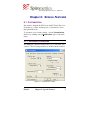
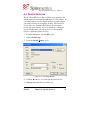
3.2.4 ADDRESS WINDOW
The third window asks you to input the name of the practice,
clinic, or hospital that will be using the spirometer. This
information will appear on all hard copy reports. There are four
lines available for inputting the information. If you wish to
complete or change this information at any time, refer to section
6.1.3 Report Setup in this manual which describes the
appropriate customization procedure.
When ready, click Next to proceed.
Feb-04
Chapter 3: Equipment Preparation
14
PC Classic/Classic Plus User’s Manual
Figure 3-4: Address Window.
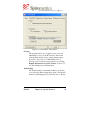
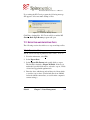
3.2.5 AMBIENT CONDITIONS WINDOW
The fourth window allows you to change the default ambient
conditions. This data is used to calculate a correction factor
called Body Temperature and Pressure Saturated (BTPS) that is
applied to the lung volumes measured during patient testing.
Gas volumes are reduced as they are exhaled from a warm body
into a cooler room. The BTPS adjusts the lung volumes
measured during testing so that they more accurately resemble
conditions in the body. Ambient conditions should be
accurately recorded each day testing is performed. This data can
also be changed at anytime by accessing the Customization
option. (See section 6.1.1 Software Customization.)
When ready, click Next to proceed.
Feb-04
Chapter 3: Equipment Preparation
15
PC Classic/Classic Plus User’s Manual
Figure 3-5: Ambient Conditions Window.
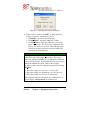
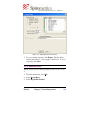
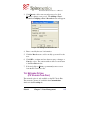
3.2.6 ACCESS CODES WINDOW
Enter unique activation codes in the Access Codes Window for
the modules that you have purchased. You may have up to five
license code entries. Please refer to the first page of this manual
or your PC Classic software CD packaging for a list of license
codes that you have purchased.
Feb-04
Chapter 3: Equipment Preparation
16
PC Classic/Classic Plus User’s Manual
Figure 3-6: Access Codes Window.
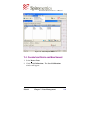
• If you have purchased a PC Classic for screening only, enter
only the first access code.
• If you have purchased the PC Classic Plus, enter the first two
access codes.
• If you have purchased the Methacholine Challenge,
Maximum Voluntary Ventilation (MVV), or Network Data
options, enter those access codes in addition to the first two
codes.
After entering each code in its appropriate box, click the Unlock
button on the right. If the access code has been entered
correctly, the lock icons will change from locked to unlocked. If
at any time you choose to purchase additional license options,
you may enter those license codes by accessing the
Customization option as described in section 6.1.6 Licensing.
When ready, click Next to proceed.
Feb-04
Chapter 3: Equipment Preparation
17
PC Classic/Classic Plus User’s Manual
3.2.7 ATTACHING THE 3-LITER SYRINGE
The next window to appear will depend upon whether you have
purchased a PC Classic or a PC Classic Plus.
• If you have the PC Classic, you will see the Performance
Verification window.
• If you have the PC Classic Plus, you will see the Initial
Calibration window.
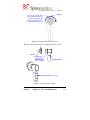
In both cases the 3-liter syringe should be connected to the
sensor as shown.
ADAPTER SEAL
SPIRO-FILTER
CALIBRATION SYRINGE
FLOW SENSOR
Figure 3-7: Flow Sensor and 3-Liter Syringe.
To connect the 3-liter syringe to the flow sensor, do the
following:
1. Connect the adapter seal to the end of the 3-liter syringe.
2. Connect the flow sensor mouthpiece firmly to the 3-liter
syringe.
Feb-04
Chapter 3: Equipment Preparation
18
PC Classic/Classic Plus User’s Manual
Once the syringe is firmly connected, follow the installation
routine for the software you have purchased, as described in the
following sections.
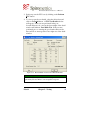
3.2.8 PERFORMANCE VERIFICATION ROUTINE
(PC CLASSIC ONLY)
If you purchased the PC Classic, the Performance Verification
window will open after the correct access codes have been
entered.
Figure 3-8: Performance Verification window.
The following steps describe how to complete the performance
verification sequence:
1. Click the Perform Verification button. The Prepare for
Product Verification window will appear.
Feb-04
Chapter 3: Equipment Preparation
19
PC Classic/Classic Plus User’s Manual
NOTE!
A 3 liter syringe is required to perform initial calibration for
the PC Classic / Classic Plus system.
Figure 3-9: Prepare for Performance Verification Window.
2. Read the instructions carefully.
3. Pull the handle out to its farthest extent.
4. Click Go when ready to proceed.
5. A dialog box will appear instructing you to verify that the
syringe is ready. Click Ready to continue.
Feb-04
Chapter 3: Equipment Preparation
20
PC Classic/Classic Plus User’s Manual
Figure 3-10: Syringe Ready Dialog Box.
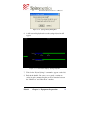
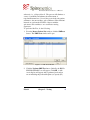
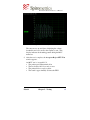
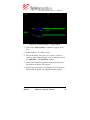
6. A full-screen display that shows the syringe injection will
appear.
Figure 3-11: Full-screen Display –Syringe Injection.
7. Wait for the “Inject Syringe” command to appear on the left.
8. Push in the handle. Be sure to use a steady, continuous
stroke in such a manner that the scroll bar remains between
the “Min Flow” and “Max Flow” markers.
Feb-04
Chapter 3: Equipment Preparation
21
PC Classic/Classic Plus User’s Manual
9. When done, immediately pull the handle back all the way to
prepare for another injection.
10. If your injection was too fast or too slow, you will be given
the opportunity to repeat the injection. If several failed
injection attempts are made, a dialog box will appear
instructing you to “Keep Trying”.
Figure 3-12: Product Verification Dialog Box.
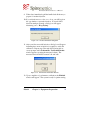
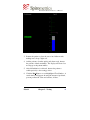
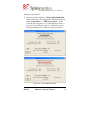
11. After your first successful injection a dialog box will appear
indicating that one more injection is required to verify the
calibration. Repeat steps 5 through 10, following the onscreen prompts until a Performance Verification Results
window appears reporting the measured volume. The
measured result should be between 2.91 and 3.09.
Figure 3-13: Performance Verification Results.
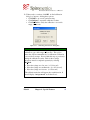
12. Upon completion of performance verification, the Finished
window will appear. The system is ready for patient testing.
Feb-04
Chapter 3: Equipment Preparation
22
PC Classic/Classic Plus User’s Manual
Figure 3-14: Finished Window.
Additional performance verifications may be performed at any
time by selecting the Performance Verification option on the
program window. See section 6.2 Performance Verification.
3.2.9 CALIBRATION (PC CLASSIC PLUS ONLY)
If you purchased the PC Classic Plus, the Initial Calibration
window will open after the correct access codes have been
entered.
Figure 3-15: Initial Calibration Window.
Feb-04
Chapter 3: Equipment Preparation
23
PC Classic/Classic Plus User’s Manual
The following steps describe how to complete the calibration
sequence:
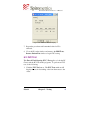
1. Click the Perform Calibration button. The Calibration
dialog box will appear. It displays the syringe volume, set to
a default value of 3 liters.
NOTE!
A 3 liter syringe is required to perform initial calibration for
the PC Classic / Classic Plus system.
Figure 3-16: Calibration Dialog Box.
2. Click OK to proceed or Cancel to abort the calibration
procedure.
3. If you selected OK, a second dialog box will appear with an
instruction to “Hold SENSOR STEADY”.
Figure 3-17: Hold Sensor Steady Dialog Box.
Feb-04
Chapter 3: Equipment Preparation
24
PC Classic/Classic Plus User’s Manual
4. Pull the handle out to its farthest extent.
5. When ready, press ENTER or click OK to proceed. A fullscreen display will appear.
Figure 3-18: Full-screen Display – Syringe Injection.
6. Wait for the “Inject Syringe” command to appear on the left.
7. Push in the handle. Be sure to use a steady, continuous
stroke in such a manner that the scroll bar remains between
the “Min Flow” and “Max Flow” markers.
8. Upon successful injection, a Verify Calibration dialog box
will appear. If your injection was too fast or too slow, the
appropriate dialog box will appear instructing you to repeat
the injection.
Feb-04
Chapter 3: Equipment Preparation
25
PC Classic/Classic Plus User’s Manual
Figure 3-19: Verify Calibration Dialog Box.
9. Pull the handle back out to its farthest extent. Click OK to
proceed.
10. Repeat steps 6 through 7.
11. Upon successful completion, a Flow Calibration Results
window will appear, denoting that the calibration results are
either “in agreement” or “not in agreement.” The measured
ATPS volume will be between 2.91 and 3.09. You may print
a copy of the calibration results or proceed to other
calibration options. Calibration results are also saved in a
data file. Calibration should be repeated if the results are
“not in agreement”.
Feb-04
Chapter 3: Equipment Preparation
26
PC Classic/Classic Plus User’s Manual
Figure 3-20: Flow Calibration Results.
Feb-04
Chapter 3: Equipment Preparation
27
PC Classic/Classic Plus User’s Manual
Figure 3-21: Calibrating Flow Sensor Dialog Box.
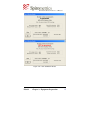
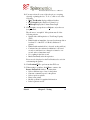
12. When ready to continue, click OK. A final calibration
dialog box appears, offering three options:
• Click Done to proceed to patient testing.
• Click ReStart to repeat the calibration routine.
• Click ReCheck to verify the calibration over a wide
range of flow rates. See Section 6.3 Calibration (PC
Classic Plus Only) for a review of the calibration and
recheck procedures necessary to meet the 1994 ATS
spirometry recommendations.
NOTE!
It is important to select the ReCheck option to verify the
calibration over a wide range of flow rates. This option
meets the ATS recommendations for calibration verification
over a wide flow range. Proceed with this step as previously
during the calibration routine. Each of three syringe
injection routines must be completed separately by selecting
ReCheck.
• Inject the syringe at a slow rate. (< 2 L/second)
• Inject the syringe at a medium rate. (4 to 6 L/second)
• Inject the syringe at a fast rate. (> 8 L/second)
The calibration window will appear after each injection. It
should display “in Agreement” at all three flows.
Feb-04
Chapter 3: Equipment Preparation
28
PC Classic/Classic Plus User’s Manual
13. If Done is selected a Finished window will appear
indicating that the calibration process is complete.
Figure 3-22: Finished Window.
Additional calibrations may be performed at any time by
selecting the Calibration option on the program window. See
section 6.3 Calibration (PC Classic Plus Only).
Feb-04
Chapter 3: Equipment Preparation
29
PC Classic/Classic Plus User’s Manual
NOTES
Feb-04
Chapter 3: Equipment Preparation
30
PC Classic/Classic Plus User’s Manual
Chapter 4: TEST PREPARATION
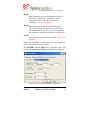
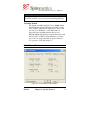
4.1 PROCESSING PATIENT DATA
Patient information must be entered into the software before
testing. Patient data is always accessed via Browse Patient List
window.
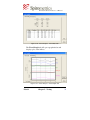
Figure 4-1: Browse Patient List: (Test options will vary depending on
whether you have the Classic or Classic Plus versions.)
The following sections describe how to enter, retrieve, modify,
and delete patient data.
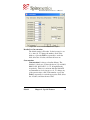
4.1.1 ENTERING A NEW PATIENT
From the Browse Patient List window, select Add. The
following window will appear:
Feb-04
Chapter 4: Test Preparation
31
PC Classic/Classic Plus User’s Manual
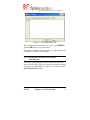
Figure 4-2: Add a Patient: Patient Info.
NOTE!
There are three ways of inputting and changing information
in this software:
• Use the Tab key to move sequentially through each field.
• Use the Enter key to move from one required field to the
next.
• Click the mouse to position the cursor in the desired field.
Enter patient information as follows:
ID#
Type the patient'
s identification number. This ID# may
be any combination of letters and numbers but must be
unique to each patient. The maximum number of
characters is 20. This field is required.
First Name
Type the patient'
s first name. This field is required.
Feb-04
Chapter 4: Test Preparation
32
PC Classic/Classic Plus User’s Manual
Last Name
Type the patient'
s last name. This field is required.
Street
City
Type the patient'
s street address. This field is optional.
Type the city in which the patient lives. This field is
optional.
State/Prov
Type the state in which the patient lives. This field is
optional.
Zip
Type the patient'
s zip code. This field is optional.
Birthdate
Type the patient'
s birth date, in mm/dd/yyyy format.
This field is required.
Location ID
Enter a location ID number in this field. Maximum
number of digits is 12. This field may be used to
identify a specific test site or piece of equipment and is
optional. (It remains optional in network data.)
Ethnic Origin
Access the pull-down menu by clicking the
button.
Highlight one of the following choices: Asian, Black,
Caucasian, Hispanic, and Non-Caucasian. After
highlighting your selection, click the
button. This
field is required.
NOTE!
Selection of ethnic origin may impact the normal predicted
results. Consult the Appendix to review the Normals Tables.
The default reference for spirometry is NHANESIII.
Feb-04
Chapter 4: Test Preparation
33
PC Classic/Classic Plus User’s Manual
Height
Weight
Gender
Enter the patient'
s measured height (without shoes) to
the nearest one-half inch or centimeter: 40–89 is
designated as inches; 90–250 is designated as
centimeters. This field is required
Enter the patient'
s weight in pounds or kilograms.
(Units are set during customization. See Section 6.1
CUSTOMIZATION for specifics.) This field is optional,
but weight may impact the interpretation of the results.
Select the appropriate field for the patient. This field is
required.
Predicted normal values are generally based on age, height, and
gender. Review all entries for accuracy.
Press ENTER or click the OK button to accept the entries. The
patient'
s first Respiratory History tab will then be displayed.
Figure 4-3: Add a Patient: Respiratory History Tab.
Feb-04
Chapter 4: Test Preparation
34
PC Classic/Classic Plus User’s Manual
The Respiratory History tab contains default information. If
the default entries are acceptable, press Enter or click the OK
button to accept them.
If one or more of the default entries is not correct, you will have
to enter information into the following fields:
Reason for Test
Access the pull-down menu by clicking the
button.
Highlight one of the following choices: screening,
asthma, COPD, lung fibrosis, pre-surgery or other.
Cigarettes Ever Smoked
The default setting is no (if the patient has never
smoked). Select yes if the patient has smoked.
# per day
Enter the number of cigarettes the patient smokes each
day.
Years
Enter the number of years that the patient has smoked.
Then Quit
The default setting is no (if the patient has not quit
smoking or has never smoked). Select yes if the patient
has quit smoking.
Years Quit
Enter the number of years since the patient stopped
smoking. If the patient has not quit smoking, leave the
default of 0 (zero).
Short of breath
The default setting is no. If it is not accurate, access the
pull-down menu by clicking the
button. Highlight
one of the following alternate choices: on stairs,
walking, or at rest.
Feb-04
Chapter 4: Test Preparation
35
PC Classic/Classic Plus User’s Manual
Lung surgery
The default setting is no. If it is not accurate, access the
pull-down menu by clicking the
button. Highlight
one of the following alternate choices: one lung
removed, lobectomy, biopsy, or other.
After verifying that the information is correct, press Enter or
click the OK button to accept the entries. The patient'
s Resp.
Hist. (cont.) tab will then be displayed.
Figure 4-4: Add a Patient: Respiratory History (Continued) Tab.
The Resp. Hist. (cont.) tab contains default information. If the
default entries are acceptable, press Enter or click the OK
button to accept them.
Feb-04
Chapter 4: Test Preparation
36
PC Classic/Classic Plus User’s Manual
If one or more of the default entries is not correct, you will have
to enter information into the following fields:
Pain while Breathing
The default setting is no and is appropriate if the patient
does not experience pain while breathing. Select yes if
the patient experiences pain.
Cough [frequently]
The default setting is no and is appropriate if the patient
does not cough frequently. Select yes if the patient
coughs frequently.
[With Sputum]
The default setting is no and is appropriate if the patient
coughs without producing sputum. Select yes if the
patient produces sputum while coughing.
Wheezing
The default setting is no and is appropriate if the patient
does not wheeze. Select yes if the patient wheezes.
History of Heart Disease
The default setting is no and is appropriate if the patient
does not have a history of heart disease. Select yes, or
click on the word yes, if the patient has a history of heart
disease.
Abnormal Chest X-ray
The default setting is no and is appropriate if the patient
has never had an abnormal chest x-ray. Select yes if the
patient has had an abnormal chest x-ray.
The Notes tab contains a blank page to enter additional pre-test
information. An example of information to include is
medications, dose, frequency, time last taken, and delivery
method. Information entered in the Notes tab is NOT printed on
the report summary, but continues to be available in the patient’s
file.
Feb-04
Chapter 4: Test Preparation
37
PC Classic/Classic Plus User’s Manual
Figure 4-5: Add a Patient: Notes Tab.
After verifying that the information is correct, press ENTER or
click the OK button to accept the entries.
The patient record has now been created. To begin testing, refer
to Chapter 5: TESTING, in this manual.
4.1.2 RETRIEVING AND MODIFYING PATIENT
INFORMATION
If you have tested a patient previously and the information is
already stored in the system, you can access the patient’s data by
entering his or her ID number, Last Name, or Location ID at the
Browse Patient List window.
Feb-04
Chapter 4: Test Preparation
38
PC Classic/Classic Plus User’s Manual
Figure 4-6: Browse Patient List: (Test options will vary depending on
whether you have the Classic or Classic Plus version.)
To locate a patient’s file, do one of the following:
• To locate the patient by ID#, click the by Patient ID tab.
Enter the first digit or letter of the patient ID# and use the
scrollbar or the arrow keys to scroll through the patient
listing.
• To locate the patient by Name, click the by Patient Name
tab. Enter the first letter of the patient’s last name and use
the scrollbar or the arrow keys to scroll through the patient
listing.
• To locate a patient by Location ID, click the by Location ID
tab. Enter the first digit or letter of the location and use the
scrollbar or the arrow keys to scroll through the patient
listing.
If you need to change patient information accessed through any
of these methods, do the following:
1. Highlight the specific patient.
Feb-04
Chapter 4: Test Preparation
39
PC Classic/Classic Plus User’s Manual
2. Click Modify.
3. Enter any necessary change(s) in each tab.
4. After all changes are made, press Enter or click the OK
button to save immediately.
The updated information will be stored as part of the patient’s
record.
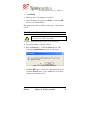
4.1.3 DELETING PATIENT INFORMATION
!
CAUTION: Deleting a patient from the system also deletes all
associated records. This is not reversible.
To delete a patient from the system, do the following:
1. Locate the patient you want to delete.
2. Press the Delete key, or click the Delete button. The
following Confirm Delete dialog box will appear:
Figure 4-7: Confirm Delete Dialog Box.
3. Click the OK button to delete the selected patient record.
Click the Cancel button or press the Esc key to abort the
deletion of the patient record.
Feb-04
Chapter 4: Test Preparation
40
PC Classic/Classic Plus User’s Manual
NOTES
Feb-04
Chapter 4: Test Preparation
41
PC Classic/Classic Plus User’s Manual
Chapter 5: TESTING
This chapter describes how to perform the various tests available
to users of both the PC Classic and the PC Classic Plus.
After entering information for a new patient or selecting an
existing patient, select the test to be preformed by clicking on
the appropriate test button (Pre-Test (for training), FVC Tests,
VC Tests, Post-Bronchodilator Tests, MVV Tests, or
Methacholine Challenge Tests). Each of these menu options is
described in detail in this chapter. Options will vary depending
upon available modules.
NOTE!
In its 1994 update to Standards of Spirometry, the American
Thoracic Society (ATS) recommends that a minimum of
three acceptable Forced Vital Capacity (FVC) tests be
performed. Acceptability criteria are defined in the 1994
update. After three acceptable trials are performed, at least
two trials should meet the reproducibility criteria. The limits
require the two highest acceptable FVC and FEV1
measurements to agree within 200 mLs. To help the
clinician achieve this reproducibility target, we have
included a short routine in the PC Classic Plus called PreTest that can be done prior to the FVC tests.
5.1 OPTIONAL PRE-TEST TRAINING
(PC CLASSIC PLUS ONLY)
For the pre-test, the patient takes several deep breaths through
the spirometer. The results are compared to the patient’s
predicted inspiratory capacity (IC). This procedure provides two
benefits: first, it maximizes and stabilizes the lungs’ resting
position. This is important because many patients, particularly
those with sedentary lifestyles, will exhibit some degree of
Feb-04
Chapter 5: Testing
42
PC Classic/Classic Plus User’s Manual
atelectasis, i.e., collapsed alveoli. The pre-test will eliminate a
source of variability and enhance the achievement of
reproducible maneuvers. Second, the pre-test helps the patient
acclimate to the surroundings, gain confidence in the clinician'
s
instructions, perform the first half of the test with the
spirometer, and contribute to an overall better testing
experience.
To perform a Pre-Test, do the following:
1. From the Browse Patient List window, click the PRE-test
button. The PRE-Tests window will open.
Figure 5-1: PRE-Tests Window.
2. Click the Perform PRE-Test button. Initially, the HOLD
SENSOR STEADY box will appear. Click OK. A fullscreen display will appear with a graduated scale and an
arrow indicating the predicted Inspiratory Capacity (IC).
Feb-04
Chapter 5: Testing
43
PC Classic/Classic Plus User’s Manual
Figure 5-2: Full-screen Display – PRE Test.
3. Instruct the patient to place the sensor into his/her mouth,
making sure to keep a tight seal.
4. Ask the patient to breathe quietly and, when ready, instruct
the patient to inhale maximally. The display will show a bar
moving up as the patient inhales.
5. After full inhalation is achieved, instruct the patient to
exhale passively to the resting position.
6. Click the Detail button on each highlighted Test Number. A
result window will appear showing the measured, predicted,
percent predicted IC value and variance, in liters.
Feb-04
Chapter 5: Testing
44
PC Classic/Classic Plus User’s Manual
Figure 5-3: PRE Test Details Display.
7. Repeat the procedure until a maximal value for IC is
achieved.
8. Close the IC results window and return to the PRE-Tests,
Browse Patient List window to begin FVC testing.
5.2 FVC TEST
This Forced Vital Capacity (FVC) Test applies to both the PC
Classic and the PC Classic Plus programs. To perform an FVC
test, do the following:
1. Click the FVC Test button. The FVC Tests window will
display the tests in descending order from the newest to the
oldest.
Feb-04
Chapter 5: Testing
45
PC Classic/Classic Plus User’s Manual
Figure 5-4: FVC Tests Window.
2. Instruct the patient how to perform the FVC maneuver and
demonstrate the procedure to the patient. Coach the patient
to breathe in as deeply as possible, place the mouthpiece in
their mouth with the tongue placed under the mouthpiece,
blow out as hard and as fast as possible, and breathe in as
deeply as possible. Explain that nose clips will also be used.
NOTE!
Insert a new Spiro-Filter on to the flow sensor if this is a new
patient.
3. Click the Perform FVC button to open the FVC test mode
window.
Figure 5-5: Sensor Steady Warning.
Feb-04
Chapter 5: Testing
46
PC Classic/Classic Plus User’s Manual
4. Hold the sensor steady in the testing position and click the
OK button or press the Enter key when ready.
NOTE!
Clicking the Cancel button returns to the FVC Tests
window.
NOTE!
The sensor’s zero-point is being established and is not ready
until the Begin FVC message is displayed.
5. Although a full loop (both inhalation and exhalation) is
preferred and provides the most complete information,
exhalation only can be obtained:
a. When performing the complete loop, after the patient
has reached a one-second plateau on the exhalation
effort, he/she must forcefully begin the inhalation until
full inspiration is achieved.
b. If the full loop is not desired, the patient should
continue to hold the sensor steady as the computer
detects the end of the test. Moving the sensor may
falsely record as patient effort.
6. The flow volume loop graph will appear on-screen and
testing may begin.
Feb-04
Chapter 5: Testing
47
PC Classic/Classic Plus User’s Manual
Figure 5-6: Sample Flow Volume Loop Graph.
NOTE!
When the necessary predicted normal values are available in
the selected normals table, the graphs will contain a
predicted curve. See the section 6.1.1 Software
Customization and the Normals Tables section of the
Appendix for more information.
7. Place nose clips on the patient and instruct in the following
manner:
a. "Breathe in as deeply as possible; then place your mouth
securely around the mouthpiece with your tongue under
the mouthpiece."
Feb-04
Chapter 5: Testing
48
PC Classic/Classic Plus User’s Manual
b. "Blow out as hard and fast as possible until I ask you to
breathe in as deeply as possible again. Your mouth will
still be on the mouthpiece, when you breathe in deeply
the second time. Even if it feels like you have all the air
out of your lungs, keep squeezing the air out until I ask
you to breathe in deeply."
NOTE!
If only the exhale maneuver is to be performed, the sensor
must be held steady until the end of test is determined (the
software will wait five [5] seconds from the beginning of the
plateau for the beginning of the inhalation to begin). A short
inhale will immediately trigger the end of test.
8. Instruct the patient to begin the procedure whenever he or
she is ready.
As the patient exhales, the effort is being displayed onscreen. This display is used as an incentive for the patient to
blow as hard, fast, and completely as possible and as
feedback to the clinician as to how well the test is being
performed. It is important to observe a sharp immediate
peak at the beginning of the test. (The FV Loop incentive
graph is the default setting. Refer to Section 6.1.1
SOFTWARE CUSTOMIZATION, to change the incentive
display).
Feb-04
Chapter 5: Testing
49
PC Classic/Classic Plus User’s Manual
9. Once the patient has completed the maneuver, the following
message window will appear on-screen:
Figure 5-7: Test Results Tab.
NOTE!
The results in the Var column under the Test Results tab
will appear as n/a if only one test has been performed.
NOTE!
You may print the current test by clicking the Print button,
Accept the test and return to the FVC Test window, or
Reject the test as unacceptable.
Feb-04
Chapter 5: Testing
50
PC Classic/Classic Plus User’s Manual
10. You may review all or any of the tabs prior to accepting,
rejecting or printing the test. To do so, click on one of the
following:
• More Test Results displays additional indices.
• FVC Graph displays the Flow-Volume Loop.
• VT Graph displays the Volume-Time Graph.
11. Click Accept to accept the test or Reject to reject the test
just performed.
The effort was “acceptable” if the patient met all of the
following criteria:
• Started with a full inspiration to Total Lung Capacity
(TLC)
• Exhaled with an immediate, fast start (back extrapolation
less than 5% of the FVC or 150 mL, whichever is
greater)
• Exhaled with maximal effort (observed on the peak flow)
• Continued smooth continuous exhalation for at least 6
seconds or until there is no change in volume for onesecond on the volume-time curve
• No coughing in the first second
• Inhaled maximally after the expiration
Errors are also displayed on the Test Results tab to assist in
re-instructing the patient.
12. Click Perform FVC to perform another FVC test.
13. When testing is complete, click Close to return to the
Browse Patient List window. You may then:
• Select a different type of test for the patient
• Generate a summary report for the patient
• Select a previous patient
• Enter a new patient
• Modify a patient'
s biographical information
• Delete a patient'
s record.
Feb-04
Chapter 5: Testing
51
PC Classic/Classic Plus User’s Manual
5.2.1 WARNING MESSAGES
The following warning messages may appear:
• Test Too Short – Expiratory Time < 6.0 Seconds displays
if the patient exhales for less than six seconds.
• Slow Start – Extrapolated Volume > 5% of FVC displays
if the patient has a slow start to the test.
• Early Termination – No Plateau in VT displays if a onesecond (1) plateau was not reached prior to the conclusion of
the exhalation maneuver.
5.3 VC TEST
This test applies to both the PC Classic as well as the PC Classic
Plus software. In patients with severe obstructive lung disease,
the Forced Vital Capacity (FVC) may be reduced due to
increased airway resistance or a loss of elastic recoil that results
in early closure of the airways and gas trapping. Exhaling at
much slower flow rates may allow the patient to more fully
empty the lungs. A higher value for VC (Slow Vital Capacity)
relative to the FVC may help rule out a combined
obstructive/restrictive disorder, but static lung volumes must be
measured for a definitive answer.
The difference between the FVC and VC measurements may
estimate how much air is trapped in the lungs during a forced
expiration.
To administer the test, perform the following steps:
NOTE!
Insert a new Spiro-Filter on to the flow sensor if this is a new
patient.
1. Click the VC Tests button. The VC Tests window will
display the tests in descending order from the newest to the
oldest.
Feb-04
Chapter 5: Testing
52
PC Classic/Classic Plus User’s Manual
Figure 5-8: VC Tests.
2. The patient should be instructed to breathe in as deeply and
completely as possible and then blow all of the air out
slowly and completely.
3. Click the PerformVC button.
4. When the sensor is in the testing position, click OK.
Feb-04
Chapter 5: Testing
53
PC Classic/Classic Plus User’s Manual
Figure 5-9: Vital Capacity Test Graph.
5. When the message Begin SlowVC... appears on-screen the
zero-point has been established and the system is ready to
begin the test.
6. Place nose clips on the patient and instruct the patient to do
the following:
a. "Breathe in as deeply as possible...place your mouth
tightly around the mouthpiece with your tongue under
the mouthpiece."
b. "Blow all of the air out of your lungs slowly until I ask
you to stop."
7. Once the maneuver is complete, the following window will
appear:
Feb-04
Chapter 5: Testing
54
PC Classic/Classic Plus User’s Manual
Figure 5-10: Accept or Reject VC Test Window.
Options on the Accept or Reject VC Test window are:
Test Results tab
This is the default window displayed after the test
results are processed.
VT Graph tab
For review of the volume time curve created from the
VC. This is only viewable at the initial accept / reject
window. Once the test has been accepted, and the
details are recalled for viewing, the volume time curve is
no longer available for the VC test.
Print:
Accept
Feb-04
Prints a page report with the test results.
This choice indicates that the test was acceptable and
returns to the Browse the VC Tests File window.
Chapter 5: Testing
55
PC Classic/Classic Plus User’s Manual
Reject
This choice indicates that the test was unacceptable.
The VC effort was "acceptable" if the patient:
•
•
•
•
put forth a good effort
inhaled completely
exhaled completely and
exhaled smoothly. (NO COUGHING!)
If you have completed testing this patient for VC, close the VC
Tests window by either clicking the Close button or pressing the
Esc key. This will return you to the Browse Patient List
window.
5.4 POST-BRONCHODILATOR TESTING
(PC CLASSIC PLUS ONLY)
If you would like to perform post-bronchodilator testing, there
are two ways to enter post-bronchodilator testing mode.
NOTE!
The ATS and AARC have established recommendations for
the administration of the bronchodilator and post-testing
procedures.
5.4.1 METHOD 1:
If you have performed FVC tests on a patient and you have not
closed the FVC Tests window for that patient, do the following
from the FVC Tests window:
1. Click Post Mode button. The following window will
appear:
Feb-04
Chapter 5: Testing
56
PC Classic/Classic Plus User’s Manual
Figure 5-11: Setting Post Mode Window.
2. Click Yes if all pre-bronchodilator testing is complete and to
set the patient for Post Mode. A dialog box will appear
instructing you to administer a bronchodilator. Click OK to
proceed. The FVC Tests window will appear with a title
bar that reads: FVC Tests - (patient name) [PostBronchodilator Testing]. The Post Mode button will now
be grayed out.
NOTE!
Once Post Mode is set for a patient on a particular day, it is
NOT POSSIBLE to exit the post mode until the next day.
Figure 5-12: FVC Tests Post Mode Window.
Feb-04
Chapter 5: Testing
57
PC Classic/Classic Plus User’s Manual
3. Perform post mode FVC tests by clicking on the Perform
FVC button.
4. To view post mode test details, select the desired test and
click on the Detail button. A FVC Test Details window
will appear. If the test was performed in the postbronchodilator mode, a note at the bottom right of the detail
window will indicate: Post Mode Test. If the test was
performed prior to entering the post-bronchodilator mode,
there will be no message at the lower right area of the detail
window.
Figure 5-13: Bronchodilator Test Results in Details Window.
NOTE!
The 1991 ATS recommendations for interpretation of
spirometry discuss limits for an acceptable response.
Feb-04
Chapter 5: Testing
58
PC Classic/Classic Plus User’s Manual
5. To view a testing report close the FVC Tests window and
click on the Summary Results button in the Browse
Patient List window. Post-bronchodilator results appear in
a separate column on the test report, and a percent change
from pre-bronchodilator results is also given.
Figure 5-14: Bronchodilator Test Results in Summary Window.
5.4.2 METHOD 2:
After administering a bronchodilator to a particular patient, you
may wish to perform other tests on other patients. If you have
returned to the Browse Patient List window after performing
FVC tests and before you have entered the post mode by
clicking on the Post Mode button, you may enter the post
bronchodilator testing mode by doing the following from the
Browse Patient List window:
1. Highlight the patient'
s name.
Feb-04
Chapter 5: Testing
59
PC Classic/Classic Plus User’s Manual
2. Click the FVC Tests button.
3. If you have already performed testing on this patient earlier
in the day, you will be prompted to set post-bronchodilator
mode, click Yes if all pre-bronchodilator testing is complete.
If all pre-bronchodilator testing is not complete, click No
and complete pre-bronchodilator testing before proceeding
to post-bronchodilator testing.
Figure 5-15: Setting Post-bronchodilator Mode Window.
NOTE!
Once Post Mode is set for a patient on a particular day, it is
NOT POSSIBLE to exit the post mode until the next day.
4. You will not be prompted to administer a bronchodilator
when using this method. Administer the bronchodilator if
you have not already done so.
NOTE!
If you have not done testing on this patient earlier in the day
and you click on the Post Mode button, you will see a dialog
box instructing you to perform pre-bronchodilator testing.
Click OK to return to the FVC Tests window.
5. Perform FVC tests according to steps 3 through 5 in section
5.4.1 Method 1: above.
Feb-04
Chapter 5: Testing
60
PC Classic/Classic Plus User’s Manual
5.5 MVV TEST (PC CLASSIC PLUS ONLY)
The Maximal Voluntary Ventilation (MVV) is a non-specific
indicator of respiratory system dysfunction and provides
information about the patient'
s overall breathing ability. The
MVV is sometimes performed in conjunction with and
following FVC testing.
NOTE!
This test requires considerable effort and motivation on the
part of the patient. It is fatiguing and patient effort
dependent. It may induce gas trapping or bronchospasm. It
is not recommended for routine screening procedures.
The MVV correlates well with a patient’s exercise capacity and
is used as a predictor of the maximum ventilatory capacity.
To perform the MVV test, do the following:
1. Explain the procedure to the patient so that he or she fully
understands what will happen.
s name in the Browse Patient List
2. Highlight the patient'
window.
3. Click the MVV Tests button.
NOTE!
Insert a new Spiro-Filter into the flow sensor for each new
patient.
4. Have the patient breathe in and out as hard and fast as
possible for at least 12 seconds.
5. From the MVV Tests window, click the Perform MVV
button.
Feb-04
Chapter 5: Testing
61
PC Classic/Classic Plus User’s Manual
Figure 5-16: MVV Tests Window.
6. When the Hold SENSOR STEADY window appears click
OK.
7. Place nose clips on the patient and instruct the patient in the
following manner with:
a. "Place your mouth on the mouthpiece with your tongue
under the mouthpiece."
b. "Breathe in and out as hard and fast as possible.
Continue this forced panting until I tell you to stop. It
will be about 12 seconds."
Feb-04
Chapter 5: Testing
62
PC Classic/Classic Plus User’s Manual
Figure 5-17: MVV Graph Window.
The curve moves up and down, displaying the volume
breathed in and out as well as the respiratory rate. This
display indicates the breathing pattern during the MVV
maneuver.
8. After the test is complete, the Accept or Reject MVV Test
window appears.
An MVV test is “acceptable” if:
• The patient put forth maximal effort
• The test lasted a full 12 seconds or more
• The patient did not cough or choke
• The result is approximately 35 times the FEV1
Feb-04
Chapter 5: Testing
63
PC Classic/Classic Plus User’s Manual
Figure 5-18: Accept or Reject MVV Test Results Window.
Options on the MVV Tests window shown in Figure 5-16
are:
Perform MVV:
enters MVV testing mode
Print:
Detail:
Delete:
prints the numeric test results of the highlighted test
when selected later
displays the numeric results window
deletes the currently highlighted test from the data
base. Confirmation is required.
9. Click the Print & Accept button to accept and print the test.
Feb-04
Chapter 5: Testing
64
PC Classic/Classic Plus User’s Manual
NOTE!
If the accepted test is not printed at this time, only the
numeric test data, not the volume-time graph, will be
available for printing later.
10. Both window tabs may be clicked for review before making
the Accept or Reject determination. Once the test is
rejected, the information for that test is no longer available.
11. Click the Detail button to view the MVV Test Details
window.
Figure 5-19: MVV Test Detail Window.
12. Click the OK button to return to the MVV Tests window.
13. If you have completed testing this patient, click Close to
return to the Browse Patient List window.
Feb-04
Chapter 5: Testing
65
PC Classic/Classic Plus User’s Manual
5.5.1 VIEW OR DELETE TEST
To view or delete a test, do the following:
1. Select the patient whose tests you wish to view or delete by
highlighting his or her name in the Browse Patient List
window.
2. Select the type of test to view or delete by clicking the
individual test button (FVC Tests, Pre Test, Meth Chal.,
VC Tests, MVV Tests).
3. To view a test, highlight the specific test, then click the
Detail button.
4. To delete a test, highlight it in the desired test window, then
click the Delete button.
Figure 5-20: Confirm Delete Window.
NOTE!
Completing the delete using this procedure will permanently
remove tests from the database.
A Confirm Delete window will appear to make sure you truly
want to delete the test. Click OK to delete or click Cancel or
the Esc key to cancel the operation. These will bring you back
to the previous window. Click the Close button or the Esc key
to return to the previous window.
Feb-04
Chapter 5: Testing
66
PC Classic/Classic Plus User’s Manual
5.6 SUMMARY REPORT
This option allows you to display the summary of the results,
along with an interpretation, COPD risk indicator, and lung age
estimation.
NOTE!
To learn more about customizing your report summary
printing options, see sections 6.1.3 Report Setup and 6.1.4
Report Options.
To prepare a summary report, highlight the name of the patient
for whom you want a summary and then click the Summary
Results button from the Browse Patient List window. Options
include:
Test Results tab
Displays the test results for testing that day for the
individual selected.
More Test Results tab
Displays the second page of test results.
FVC Graph tab
Displays the flow volume loop graph.
VT Graph tab
Displays the volume time curve.
Print Summary
Formats and prints a summary report.
Comments
Allows the clinician to add text comments about this
patient. The comments are only viewable from the
patient summary window and will not be printed on the
final report.
Feb-04
Chapter 5: Testing
67
PC Classic/Classic Plus User’s Manual
Figure 5-21: Summary Window.
The following examples illustrate one-page and two-page
printed summary reports.
Feb-04
Chapter 5: Testing
68
PC Classic/Classic Plus User’s Manual
Summary Report
Spirometrics Medical Equipment Co
22 Shaker Road
Gray, ME 04039
Best Test is #1 of 3 Tests
Best Post is #5 of 3 Tests
Index
207-657-6700
FVC
l
FEV1
l
FEV6
l
FEV3
l
FEV1/FVC
%
FEV1/FEV6
%
FEF.2-1.2
l/s
FEF25-75
l/s
l/s
FEF75-85
PEF
l/s
FEF25
l/s
l/s
FEF50
FEF75
l/s
FIVC
l
FIF50
l/s
FEF50/FIF50
%
l/s
PIF
MMET
s
s
FET
MVV VOL
l/m
Rate
Brths/m
l
VC
ATI: VC-FVC
l
Patient: Johnny Doe
ID #:
Age:
Sex:
Race:
Height:
Weight:
Smoke:
4516156
29
Male
Caucasian
72 inches
0 lbs
0 cigarettes/day
Normals: Composite
Ambient Conditions:
760
Calibrated: 12/09/2002
mm Hg at 72
Unit
F
Graph legend
Predicted Graph
Pre Test - Best Test is bold
Post Test - Best Test is bold
Pre FEV1 Mark
Post FEV1 Mark
Flow / Volume Loop
Meas
Pred
4.38
3.52 <<
4.32
4.09
80.4
81.5
9.0
3.4
0.8
10.1
8.3
4.3
1.3
3.95
6.5
65.2
6.7
0.65
7.74
5.84
4.75
5.76
5.49
82.1
83.3
8.5
4.7
1.5
10.2
n/a
5.9
n/a
5.84
n/a
n/a
n/a
n/a
n/a
187
n/a
5.8
3/18/2005
3/18/2005
%Pred
75
74
75
74
105
71
53
100
n/a
72
n/a
68
n/a
n/a
n/a
n/a
n/a
0
n/a
0
12:37PM
12:39PM
Post
%Chng
4.52
3.49
4.35
4.07
77.2
80.2
8.7
2.8
0.5
9.4
8.4
3.8
1.0
4.40
7.4
50.7
7.7
0.80
9.40
3.2%
-0.9%
0.7%
-0.5%
-2.8%
-16.4%
-35.9%
-7.2%
1.4%
-10.8%
-23.1%
11.4%
13.3%
-22.2%
14.8%
23.1%
21.4%
16
<< Measured value less than 75% of predicted
12
Interpretation
8
Interpretation: Spirometric Results Appear Normal
4
Volume / Time Curve
0
8
6
-4
4
-8
2
-12
0
0
1
2
PC-Classic Plus
3
4
5
6
7
2.11d
1
2
3
4
5
6
7
8
8
12/30/2002
2:32PM
Page
1
Figure 5-22: One-Page Summary Report.
Feb-04
Chapter 5: Testing
69
PC Classic/Classic Plus User’s Manual
Summary Report
Spirometrics Medical Equipment Co
22 Shaker Road
Gray, ME 04039
Best Test is #1 of 3 Tests
Best Post is #5 of 3 Tests
Index
207-657-6700
4516156
29
Male
Caucasian
72 inches
0 lbs
0 cigarettes/day
Normals: Composite
Ambient Conditions:
760
Calibrated: 12/09/2002
mm Hg at 72
F
Interpretation
Interpretation:
Spirometric Results Appear Normal
Graph legend
Predicted Graph
Pre Test - Best Test is bold
Post Test - Best Test is bold
Pre FEV1 Mark
Post FEV1 Mark
3/18/2005
Meas
FVC
l
l
FEV1
FEV6
l
FEV3
l
FEV1/FVC
%
FEV1/FEV6
%
l/s
FEF.2-1.2
FEF25-75
l/s
l/s
FEF75-85
PEF
l/s
FEF25
l/s
l/s
FEF50
FEF75
l/s
FIVC
l
FIF50
l/s
FEF50/FIF50
%
l/s
PIF
MMET
s
s
FET
MVV VOL
l/m
Rate
Brths/m
l
VC
ATI: VC-FVC
l
Patient: Johnny Doe
ID #:
Age:
Sex:
Race:
Height:
Weight:
Smoke:
Unit
Pred
4.38
3.52 <<
4.32
4.09
80.4
81.5
9.0
3.4
0.8
10.1
8.3
4.3
1.3
3.95
6.5
65.2
6.7
0.65
7.74
5.84
4.75
5.76
5.49
82.1
83.3
8.5
4.7
1.5
10.2
n/a
5.9
n/a
5.84
n/a
n/a
n/a
n/a
n/a
187
n/a
5.8
%Pred
75
74
75
74
105
71
53
100
n/a
72
n/a
68
n/a
n/a
n/a
n/a
n/a
0
n/a
0
12:37PM
Post
%Chng
4.52
3.49
4.35
4.07
77.2
80.2
8.7
2.8
0.5
9.4
8.4
3.8
1.0
4.40
7.4
50.7
7.7
0.80
9.40
3.2%
-0.9%
0.7%
-0.5%
-2.8%
-16.4%
-35.9%
-7.2%
1.4%
-10.8%
-23.1%
11.4%
13.3%
-22.2%
14.8%
23.1%
21.4%
<< Measured value less than 75% of predicted
Volume / Time Curve
8
Volume -- Liters
6
4
2
0
0
1
2
3
4
5
6
7
8
Time -- Seconds
PC-Classic Plus
2.11d
12/30/2002
2:26PM
Page
1
Figure 5-23: Two-Page Summary Report - Page 1.
Feb-04
Chapter 5: Testing
70
PC Classic/Classic Plus User’s Manual
Summary Report
Spirometrics Medical Equipment Co
22 Shaker Road
Gray, ME 04039
207-657-6700
Johnny Doe
ID #
4516156
Test #
1
Flow / Volume Loop
16
Flow -- Liters/Second
12
8
4
0
-4
-8
-12
1
2
3
4
5
6
7
8
Volume -- Liters
Patient History
Cigarettes:
Short of Breath:
Pain while Breathing:
Cough Frequently:
PC-Classic Plus
no
no
no
no
Wheezing:
History of Heart Disease:
Abnormal X-Ray ever:
Lung Surgery:
2.11d
12/30/2002
2:26PM
no
no
no
no
Page
2
Figure 5-24: Two-Page Summary Report-Page 2.
NOTE!
When the necessary predicted normal values are available in
the selected normals table, the report graphs will contain a
predicted curve. See the section 6.1.1 Software
Customization and the Normals Tables section of the
Appendix for more information.
Feb-04
Chapter 5: Testing
71
PC Classic/Classic Plus User’s Manual
5.7 TREND ANALYSIS
The Trend Analysis option, found in both the PC Classic and PC
Classic Plus versions, allows you to choose tests and plot the
values over time. This allows you to view graphically the
change in the patients’ lung function over time.
To prepare a trend analysis, do the following:
1. Click the Trend button in the Browse Patient List window.
Alternatively, click File to access the pull down menu.
Click Trend Analysis to display the Trend Analysis
window.
Figure 5-25: Trend Analysis Window.
2. You may compare individual tests or the best test results,
from All tests, Pre BD Only or Post BD Only
(Bronchodilator).
Feb-04
Chapter 5: Testing
72
PC Classic/Classic Plus User’s Manual
3. Make selections within the Which Kind of Trend Analysis
and Include Which Tests boxes and then highlight the tests
from those displayed in the Select area.
4. Use the scrollbar, press the arrow keys or press the PgUp or
PgDn keys to move within the available tests.
5. Press the Space Bar or double click to tag tests for
trending. Tests are tagged to be trended when the icon to
the left is a . Up to twenty (20) tests maybe selected to
trend.
6. If you have selected a test that you wish to de-select,
highlight it and press the Space Bar or double click the test.
The test is not tagged for trending when the icon to the left
is an .
7. Five indices are trended: FVC, FEV1, FEV1/FVC, FEF 2575, and PEF. Click the Trend button to display the Trend
Analysis window with its two (2) tabs:
The Trend Data tab displays the numeric results, with each
line showing the date the test was performed, the specific
test number for that day, the respective indices, and a
column indicating Pre or Post bronchodilator testing results.
A zero (0) indicates that it was Pre testing; a one (1) shows
it as a Post test.
Feb-04
Chapter 5: Testing
73
PC Classic/Classic Plus User’s Manual
Figure 5-26: Trend Analysis: Trend Data Tab.
The Trend Graph tab will open a graph window and
display a plot of the indices.
Figure 5-27: Trend Analysis: Trend Graph Tab.
Feb-04
Chapter 5: Testing
74
PC Classic/Classic Plus User’s Manual
To print a copy of the trend analysis, click the Print button. To
return to the previous window click the Done button, or press
the Esc key. The test number corresponds to date from the
oldest to most recent record.
Feb-04
Chapter 5: Testing
75
PC Classic/Classic Plus User’s Manual
NOTES
Feb-04
Chapter 5: Testing
76
PC Classic/Classic Plus User’s Manual
Chapter 6: SPECIAL FEATURES
6.1 CUSTOMIZATION
Spirometrics designed the PC Classic and PC Classic Plus to be
as flexible as possible, allowing users to customize it to meet
their particular needs.
To customize your software settings, open the Customization
window, by clicking on the Customization option of the main
menu.
6.1.1 SOFTWARE CUSTOMIZATION
The Setup tab contains fields that allow you to customize your
software. The following variables are included in this window:
Figure 6-1: Customization - Setup.
Feb-04
Chapter 6: Special Features
77
PC Classic/Classic Plus User’s Manual
COM Port setup (Flow Sensor)
To change the COM Port, highlight the number for
COM Port Flow sensor and enter the number of the
COM port to be used. Alternately, use the scrollbar, or
press the up or down arrow keys on the keyboard, to
arrive at the number you desire.
Predicteds
The default setting is Composite. To change it, access
the pull-down menu by clicking the
button. Scroll
through the listed studies, highlight the author you want
to use and click on it. The choices are: Composite,
Crapo, ECCS, Hsu, Knudson-1983, Knudson-1976,
Lam, Morris, NHANES III, and Polgar. Refer to the
REFERENCES section in the Appendix for selection
guidance.
Extrapolation
The default setting is no, indicating that the predicted
will not be extrapolated. By changing this field to yes,
the predicted will be reported even though the height or
age range was not captured in the author’s study. The
predicted will be identified as being extrapolated when
displayed on-screen and in the report(s).
Calibration Settings (Syringe Volume)
The default setting is 3 liters. To change it, use the up
and down arrows on the keyboard or highlight the
existing number and enter the appropriate number.
Feb-04
Chapter 6: Special Features
78
PC Classic/Classic Plus User’s Manual
Gauge readings
Allows you to change the settings for air temperature
and barometric pressure each day of testing. To do so,
highlight the field and enter the appropriate number.
(Temperature values from 10 to 40 are recorded as ° C
and those from 50 to 104 as °F. Barometric pressure
values from 20 to 35 are recorded as inches Hg, and
from 500 to 900 are recorded as mmHg). These values
must be accurate for each individual tested.
FVC Incentive Display
The default setting is Flow Volume loop (FVLoop).
The choices are: FVLoop (Flow-Volume Loop),
VTCurve (Volume-Time Curve), and Balloons.
Weight Units
The default setting is lbs (pounds). To change it, select
kgs (kilograms).
Gain Factor
This variable is set during calibration. It is only
displayed on the Setup window and cannot be changed.
6.1.2 DATA OPTIONS
The Data Options tab allows customization of the security,
backup and data location settings.
Feb-04
Chapter 6: Special Features
79
PC Classic/Classic Plus User’s Manual
Figure 6-2: Customization - Data Options.
Security
The program can be set to require a password for all
individuals to access to the PC-Classic software and
related patient data in order to ensure patient privacy
protection. See section 7.5 Maintaining Users to
develop a user list and set passwords prior to selecting
Require Password to access PC-Classic. Section 7.5
also has default password information.
Auto Backup
The default setting for automatic backup is for all data
to be backed up when exiting the program. The interval
between each backup may be selected from 1 to 30 days.
Feb-04
Chapter 6: Special Features
80
PC Classic/Classic Plus User’s Manual
Data Directory
The data directory is set to the default location during
installation. This setting may be changed by selecting
the Change Dir button and entering the new data
directory location. The Set to Default option resets the
data path to the data subdirectory of the program
directory. Both short and long filenames may be used.
6.1.3 REPORT SETUP
Figure 6-3: Customization - Report Setup.
The Report Setup tab allows customization of the report
printout.
Report Header: Allows four (4) lines of text to identify the
facility performing the testing.
Feb-04
Chapter 6: Special Features
81
PC Classic/Classic Plus User’s Manual
FVC Test Report Option
The default setting is Two page ATS (graph scaling
meets ATS recommendations for hand measurements).
The other option is a One page condensed report.
(Note: condensed graph scaling does not meet ATS
recommendations, but is quick and will print both
graphs on a single page).
Summary Report Options
The default is set to Two page ATS (graph scaling
meets ATS recommendations for hand measurements).
As in the FVC Test Report Options, a single One page
condensed report is also available. Up to 3 graphs
may be included in the pre- and post-bronchodilator
report. The graphs may be placed directly on top of
each other or slightly offset.
Flow / Volume Loop
16
12
8
4
0
-4
-8
-12
1
2
PC-Classic Plus
3
4
5
6
7
8
2.11d
Figure 6-4: Offset Graphs Example.
When Offset Graphs is selected, the graphs will be
offset 0.5 liters at Residual Volume (RV) in the
summary report.
Feb-04
Chapter 6: Special Features
82
PC Classic/Classic Plus User’s Manual
NOTE!
Spirometrics recommends that at least 3 acceptable graphs
should be available for review by the interpreting physician.
Variability Method
The default variability method is set to Actual, which
will display the absolute differences and will note the
FVC or FEV1 differences from the best to the second
best test above 0.20 liters. (ATS 1994 method)
Optionally, the variability method may be set to
Percent, which will display percentage differences and
will note FVC or FEV1 percent differences from the
best to the second best test that are greater than five
(5%) percent. (ATS 1987 method)
6.1.4 REPORT OPTIONS
Figure 6-5: Customization - Report Options.
Feb-04
Chapter 6: Special Features
83
PC Classic/Classic Plus User’s Manual
The Report Options window allows you to customize whether
listed indices or a list of information will appear on the
individual and summary reports.
The window comprises the following fields:
Automatic Test Printout
The default setting is no.
Weight on report
The default setting is yes.
Diagnostic Interpretation
The default setting is no. See the Diagnostic
Interpretation section of the Appendix for more
information.
COPD Risk
The default setting is no.
Respiratory History
The default setting is yes.
Lung Age
The default setting is no.
6.1.5 METHACHOLINE CHALLENGE OPTIONS
!
WARNING: Methacholine is an inhaled agent that may cause
the airways to constrict in susceptible patients. The 1999 ATS
guidelines for methacholine and exercise testing should be
followed. (See the REFERENCES section in the Appendix.)
Users can customize the methacholine challenge settings at the
Challenge tab.
Feb-04
Chapter 6: Special Features
84
PC Classic/Classic Plus User’s Manual
Figure 6-6: Customization - Methacholine Options.
Breaths Per Concentration
The default setting is 5 breaths. Selection range is one
(1) to nine (9). To change the number, click on the
number or press the Tab key repeatedly to reach the
field, delete the old value, and enter the new one.
Concentration
Concentration 1 is always a baseline diluent. The
defaults for levels two (2) through eleven (11) are 0.031,
0.062, 0.125, 0.25, 0.50, 1, 2, 4, 8, 16 mg/ml/breath,
respectively. These are consistent with the 1999 ATS
recommendations for dosing protocols. To change any
of the present values, click on the number or press the
Tab key repeatedly to reach the appropriate field, delete
the old value, and enter the new value.
Feb-04
Chapter 6: Special Features
85
PC Classic/Classic Plus User’s Manual
Lower Limit of Normal
This is used in the interpretation statement. The default
setting is 8.0 mg/ml. To change the number, click on the
number or press the Tab key repeatedly to reach the
appropriate field, delete the old value, and enter the new
value.
6.1.6 LICENSING
Figure 6-7: Customization - Licensing.
The Licensing tab allows entry of a license code for each
module purchased. Spirometrics has provided each of these
codes with the equipment at the time of purchase or upgrade.
For a list of license codes provided when your system was
originally purchased, see the first page of this manual or the PC
Classic CD packaging.
Feb-04
Chapter 6: Special Features
86
PC Classic/Classic Plus User’s Manual
Enter each code and click Unlock. Notice the padlock symbol
turns green when a module is activated.
6.1.7 GENERAL CUSTOMIZATION BUTTONS
The following buttons are located at the bottom of the
Customization window:
• The Print Customization button allows you to print a copy
of the customization settings that you have just made, in case
you share the equipment with others who might change the
settings. The default system printer will be used.
NOTE!
We recommend that you make a copy of your customization
settings and keep it with the user’s manual.
• The OK button allows you to accept all changes that you
have made.
• The Cancel button allows you to cancel the changes that you
have made and abort the customization session.
6.2 PERFORMANCE VERIFICATION &
CALIBRATION
We have included a routine called Performance Verification
for PC Classic users and a Calibration routine for PC Classic
Plus users to test the long-term stability of the system.
Performance verification or calibration was completed as part of
the installation process. These procedures can be repeated at
any time to validate that the spirometer is working properly.
ATS standards require daily calibration. For more information
on the calibration option and ATS requirements see section 6.3
Calibration (PC Classic Plus Only).
Feb-04
Chapter 6: Special Features
87
PC Classic/Classic Plus User’s Manual
ADAPTER SEAL
SPIRO-FILTER
CALIBRATION SYRINGE
FLOW SENSOR
Figure 6-8: Flow Sensor and 3-Liter Syringe.
To connect the 3-liter syringe to the flow sensor, do the
following:
1. Connect the adapter seal to the end of the 3-liter syringe.
2. Connect the flow sensor mouthpiece firmly to the 3-liter
syringe.
Once the syringe is firmly connected, follow the routine for the
software you have purchased, described in the following
sections.
6.2.1 PERFORMANCE VERIFICATION ROUTINE
(PC CLASSIC ONLY)
If you purchased the PC Classic, the Performance Verification
window can be accessed after installation and initial setup of the
software at any time by clicking on the Performance
Verification button.
Feb-04
Chapter 6: Special Features
88
PC Classic/Classic Plus User’s Manual
Figure 6-9: Prepare for Product Verification Window.
The following steps describe how to complete the performance
verification sequence:
1. Click the Perform Verification button. The Prepare for
Product Verification window will appear.
2. Read the instructions carefully.
3. Click Go when ready to proceed. A full-screen display that
shows the syringe injection will appear.
Feb-04
Chapter 6: Special Features
89
PC Classic/Classic Plus User’s Manual
Figure 6-10: Full-screen Display – Syringe Injection.
4. Wait for the “Inject Syringe” command to appear on the
left.
5. Pull the handle to its farthest extent.
6. Push in the handle. Be sure to use a steady, continuous
stroke in such a manner that the scroll bar remains between
the “Min Flow” and “Max Flow” markers.
7. When done, immediately pull the handle back all the way.
The full-screen display will reappear.
8. Repeat steps 4 through 6, following the on-screen prompts,
until a window appears, reporting the measured results.
Feb-04
Chapter 6: Special Features
90
PC Classic/Classic Plus User’s Manual
Figure 6-11: Performance Verification Results.
9. Click OK to complete the verification procedure.
6.3 CALIBRATION (PC CLASSIC PLUS ONLY)
Calibrating your PC Classic Plus ensures accurate test results.
You should calibrate before you use it for the first time, and
recalibrate it at routine intervals. Spirometrics recommends
daily calibrations to insure that the spirometer is working
properly.
NOTE!
For compliance with the American Thoracic Society’s 1994
Standards of Spirometry and good quality control
procedures, it is recommended that the linearity of the flow
sensing pneumotach be checked on a daily basis. This can be
accomplished by injecting your syringe at three different
flow rates during a follow-up injection. As an example,
injecting a 3-liter syringe for 1, 3, and 6 seconds will create
rates of 3 l/s, 1 l/s, and 0.5 l/s, respectively. See the
following section for instructions.
6.3.1 CALIBRATION ROUTINE
The following steps describe how to complete the calibration
sequence:
1. Click the Calibration button. The Calibration dialog box
will appear. It displays the syringe volume.
Feb-04
Chapter 6: Special Features
91
PC Classic/Classic Plus User’s Manual
Figure 6-12: Calibration Dialog Box.
2. Click OK to proceed or Cancel to abort the calibration
procedure.
NOTE!
To change the syringe volume, the user must access the
Customization option from the main menu and change the
syringe volume. Syringe volumes from 1 to 9 liters may be
entered. Using a syringe with volume different from the
display value will result in calibration errors.
3. If you selected OK, a second dialog box will appear with an
instruction to “Hold SENSOR STEADY”.
Figure 6-13: Hold Sensor Steady Dialog Box.
4. Pull the handle to its farthest extent.
5. When ready, click OK to proceed. A full-screen display
will appear.
Feb-04
Chapter 6: Special Features
92
PC Classic/Classic Plus User’s Manual
Figure 6-14: Full-screen Display – Syringe Injection.
6. Wait for the “Inject Syringe” command to appear on the
left.
7. Push in the handle. Be sure to use a steady, continuous
stroke in such a manner that the scroll bar remains between
the “Min Flow” and “Max Flow” markers.
8. Upon successful completion, a Verify Calibration dialog
box will appear.
9. Pull the handle back to its farthest extent. Click OK to
proceed.
Figure 6-15: Verify Calibration Dialog Box.
Feb-04
Chapter 6: Special Features
93
PC Classic/Classic Plus User’s Manual
10. Repeat steps 6 and 7.
11. Upon successful completion, a Flow Calibration Results
window will appear, denoting that the calibration results are
either “in agreement” or “NOT in agreement”. At this
point, the user can print a copy of the calibration results or
proceed to other calibration options. Calibration records
should be maintained for each day testing is performed.
Figure 6-16: Flow Calibration Results.
Feb-04
Chapter 6: Special Features
94
PC Classic/Classic Plus User’s Manual
12. When ready to continue, click OK. A final calibration
dialog box appears, offering three options:
• Click Done to proceed to patient testing.
• Click ReStart to repeat the calibration routine.
• Click ReCheck to verify the calibration over a wide
range of flow rates.
Figure 6-17: Calibrating Flow Sensor Dialog Box.
NOTE!
It is important to select the ReCheck option to verify the
calibration over a wide range of flow rates. This option
meets the ATS recommendations for calibration verification
over a wide flow range. Proceed with this step as previously
during the calibration routine. Each of three syringe
injections must be completed separately by selecting
ReCheck.
• Inject the syringe at a slow rate. (< 2 L/second)
• Inject the syringe at a medium rate. (4 to 6 L/second)
• Inject the syringe at a fast rate. (> 8 L/second)
The calibration window will appear after each injection. It
should display “in Agreement” at all three flows.
Feb-04
Chapter 6: Special Features
95
PC Classic/Classic Plus User’s Manual
6.4 PRINTER SELECTION
The PC Classic/PC Classic Plus for Windows program uses the
default printer selected under Print Manager or Control Panel. If
your default printer does not supply satisfactory results, change
your printer selection by doing the following: PC Classic/PC
Classic Plus only determines the Windows system default
printer at program start-up. If you use Windows to change the
system default printer, you will need to close and restart PC
Classic to update the printer selection.
1. From the main menu, select the File option.
2. Click on Print Setup.
3. Select the Specific Printer option.
Figure 6-18: Print Setup Window.
4. Click the
button to scroll through the printer choices.
5. Highlight the printer that you want to use.
Feb-04
Chapter 6: Special Features
96
PC Classic/Classic Plus User’s Manual
6. Click OK to save the selection to disk.
NOTE!
If the print driver supplied by the printer manufacturer gave
results that were unacceptable, try installing a different
driver from that family, then retry printing. For example, the
BJ-130 driver prints the lines darker on the graphs than does
the native BJC-210 driver to the BJC-210 printer.
Feb-04
Chapter 6: Special Features
97
PC Classic/Classic Plus User’s Manual
NOTES
Feb-04
Chapter 6: Special Features
98
PC Classic/Classic Plus User’s Manual
Chapter 7: DATA MANAGEMENT
7.1 PROTECTING PATIENT DATA
It is recommended that the files located in the DATA directory
be regularly backed up.
Figure 7-1: File Options Window.
To generate a Backup/Restore from the main menu:
1. Select File.
2. Highlight Backup/Restore.
Feb-04
Chapter 7: Data Management
99
PC Classic/Classic Plus User’s Manual
3. A dialog box will appear informing you that the PC Classic
program needs to close in order to perform backup and
restore procedures. Press the Enter key to proceed and PC
Classic will close automatically. The PC Classic - Back Up
& Restore program will open.
Figure 7-2: Backup & Restore Console.
You may BACKUP files, RESTORE files, or review the
backup LOG FILE from this screen. Choose the appropriate
options and follow the on-screen instructions in each subwindow to perform the desired operation.
4. Click BACKUP to back up patient data to floppy or to a
directory of your choice.
5. Click RESTORE to retrieve patient data from the backup
files.
6. Click LOG FILE to review all backup and restore history.
Feb-04
Chapter 7: Data Management
100
PC Classic/Classic Plus User’s Manual
Upon exiting the PC Classic program, the following message
will appear to allow automatic backup of files:
Figure 7-3: Automatic Backup Window.
Click Yes to backup files. PC Classic will close and the PC
Classic - Back Up & Restore program will open.
7.2 EXPORTING AND IMPORTING FILES
The following sections describe how to export and import files.
7.2.1 EXPORTING FILES
The PC Classic can export patient records to a file. To do so:
1. From the main menu, select File.
2. Select Export Data.
3. Select Export File Format and specific fields to export.
The default is checked to Export All Fields. If the box is
unchecked, specific fields may be selected to export. Fields
selected are tagged with a green circle.
4. Enter the dates, which start and end the period from which
you wish to export data. (The default starts from 1/01/80,
and ends with the current date, as read from the computer’s
current settings.)
Feb-04
Chapter 7: Data Management
101
PC Classic/Classic Plus User’s Manual
Figure 7-4: Export Data from PC Classic.
5. To proceed with exporting, click Export. The file will be
created and written to your computer’s hard drive. To abort
exporting, click Close.
7.2.2 IMPORTING FILES
The PC Classic can also import patient records to a file. To do
so:
1. From the main menu, select File.
2. Select Import Data.
3. Select Import File Format.
Feb-04
Chapter 7: Data Management
102
PC Classic/Classic Plus User’s Manual
4. To proceed with importing, click Import. To abort
importing, click Close.
Figure 7-5: Import Data from PC Classic.
7.3 BATCH REPORTS
To generate batch reports from the main menu:
1. Select Batch Reports.
2. Click on the option that best suits your needs – Print
Patients by ID, Print Patients by Name, Print Patients by
Location ID, or Print the Customization.
Feb-04
Chapter 7: Data Management
103
PC Classic/Classic Plus User’s Manual
Figure 7-6: Batch Reports Menu.
7.4 CALIBRATION REVIEW AND MAINTENANCE
1. Select Browse Data.
2. Click on All Calibrations. The Saved Calibrations
window will appear.
Feb-04
Chapter 7: Data Management
104
PC Classic/Classic Plus User’s Manual
Figure 7-7: Calibration Data Detail Review Window.
Date and time are used to sort all calibration data. The data may
be reviewed for trending and for evaluation of concerning
results. The details of a single calibration can also be examined
and printed from this window. The last date of calibration also
prints on each patient report.
7.5 MAINTAINING USERS
A list of all system users as entered by a program administrator
is maintained by the PC Classic/PC Classic Plus program. A
valid username and password is required to run PC Classic/PC
Classic Plus software when the security option is selected in the
Data Options tab of the Customization window. See section
6.1.1 Software Customization.
Feb-04
Chapter 7: Data Management
105
PC Classic/Classic Plus User’s Manual
NOTE!
The user list contains the user name MASTER by default.
The default password for the MASTER user is master. The
username and password are NOT uppercase or lowercase
character sensitive. The MASTER password may be
changed or the MASTER user may be deleted entirely if
desired.
!
WARNING: Store password information in a safe, secure
place. The procedure required to recover lost passwords may
result in data loss.
The steps necessary to add, delete or modify user information
are as follows:
1. Select the Browse Data option in the main menu.
2. Click on Maintain Users and the User List window will
appear.
Figure 7-8: Maintain Users - User List Window.
Feb-04
Chapter 7: Data Management
106
PC Classic/Classic Plus User’s Manual
3. Click Insert to add a new user and password or click
Update to change a user record. The Adding a User’s
Record or Changing a User’s Record window will appear.
Figure 7-9: Adding User Record Window.
4. Enter or modify the user’s information.
5. Click the Reset button to add or modify a password for the
user.
6. Click OK to continue and save the user entry or changes or
Cancel to abort. The current window will close and return
to the User List window.
7. If desired, click on Delete to permanently remove a user
from the PC Classic user list.
7.6 NETWORK OPTION
(PC CLASSIC PLUS ONLY)
The network option is only available on the PC Classic Plus.
The network code may be verified in the Customization
window in the Licensing tab.
Feb-04
Chapter 7: Data Management
107
PC Classic/Classic Plus User’s Manual
Verify that the data directory path is set to your shared location
as desired.
Figure 7-10: Data Directory Path Setting.
Feb-04
Chapter 7: Data Management
108
PC Classic/Classic Plus User’s Manual
NOTES
Feb-04
Chapter 7: Data Management
109
PC Classic/Classic Plus User’s Manual
Chapter 8: CARE AND
MAINTENANCE
8.1 MAINTENANCE OF THE PC CLASSIC FLOW
SENSOR
You must disassemble the flow sensor to clean it. Refer to
Figure 8-1: Flow Sensor Disassembly. below to learn the names
of the different parts of the flow sensor.
!
CAUTION: Do not use alcohol or attempt to autoclave any
part of the PC Classic.
!
WARNING: To reduce the risk of cross contamination, you
must replace the Spiro-Filter after each patient. It is also
recommended that the sensor be cleaned after any testing.
Federal and state regulations for infection control must be
followed.
!
WARNING: Always unplug the PC Classic before cleaning to
avoid electric shock.
8.1.1 REMOVING THE EASY CLEAN CORE
To disassemble the Easy Clean Core, do the following:
1. Unscrew the core by turning it counterclockwise.
2. Continue to turn the core until the threads are disengaged
from the handle assembly.
3. Pull out the entire Easy Clean Core when it is no longer
engaged with the sensor housing.
Feb-04
Chapter 8: Care and Maintenance
110
PC Classic/Classic Plus User’s Manual
!
CAUTION: DO NOT disassemble the Easy Clean Core. After
removal from the sensor handle, it may be cleaned without
further disassembly.
Easy Clean Core
Spiro-Filter
Handle Assembly
To disassemble the Flow sensor unscrew the core assembly counterclockwise
To assemble the Flow Sensor screw in the Core Element clockwise
Figure 8-1: Flow Sensor Disassembly.
8.1.2 CLEANING THE EASY CLEAN CORE
To clean the flow sensor’s core element, do the following:
1. Place the core element in cold sterilization fluid (a protein
dissolving solution). Follow the sterilization fluid
manufacturer'
s instructions for disinfecting and sterilizing
the core.
2. Be sure to rinse in water thoroughly and allow the core to
dry completely before attempting to re-insert the Easy Clean
Core into the handle assembly.
8.1.3 INSTALLING THE EASY CLEAN CORE
To install the Easy Clean Core, insert the Easy Clean Core into
the sensor assembly and tighten by turning until green marker
aligns with the pin.
Feb-04
Chapter 8: Care and Maintenance
111
PC Classic/Classic Plus User’s Manual
Top Pin
Screw in Easy Clean Core
until seated then tighten in
the direction shown until
the green band on the core
is aligned with the top pin.
Figure 8-2: Alignment of Easy Clean Core.
The figure below shows how to assemble the flow sensor.
Spiro-Filter
Easy Clean Core
Screw the Core
Element from this
side to assemble
Handle Assembly
Handle Assembly (fully assembled)
Figure 8-3: Flow Sensor Assembly.
Feb-04
Chapter 8: Care and Maintenance
112
PC Classic/Classic Plus User’s Manual
8.2 SERVICE
If the instrument fails to work, do the following:
1. Ensure that the power to the computer is on and that all
connections are secure.
2. Examine the unit for obvious loose, broken, or damaged
components.
3. Check that the Easy Clean Core is tightened properly. (See
Figure 8-2: Alignment of Easy Clean Core.)
4. Check that the Easy Clean Core is not blocked.
5. Check the computer communications port connection.
If the problem persists and the unit is within the warranty period,
call Spirometrics at 800-767-0004. Otherwise, please contact
Spirometrics at 207-657-6700. Our repair personnel can handle
many problems over the phone.
Please be prepared to provide the information listed on the
following page.
Feb-04
Chapter 8: Care and Maintenance
113
PC Classic/Classic Plus User’s Manual
Product Model Number
(PC Classic)
Serial Number of Sensor
(located on the bottom of the
handle)
Current hardware configuration
including:
CPU:
Amount of RAM
Size of Hard Drive
Available Space on Hard Drive
Type of mouse installed
COM port
Current software configuration,
including:
Operation system and version
Is this computer on a network?
Is the computer used for other
purposes besides spirometry?
If possible, be prepared to work with the device and its program
while on the phone with technical support.
If the problem persists, the unit must be returned to Spirometrics
for repair.
NOTE!
• You MUST call for an RGR number before returning your
product for repair.
• Only Spirometrics and its service representatives are
authorized to service equipment.
Feb-04
Chapter 8: Care and Maintenance
114
PC Classic/Classic Plus User’s Manual
NOTES
Feb-04
Chapter 8: Care and Maintenance
115
PC Classic/Classic Plus User’s Manual
APPENDICES
DEFINITIONS
Forced Vital Capacity (FVC) is a measure of the patient'
s
expiratory vital capacity (the volume of air between a
maximal inspiration and a maximal expiration). FVC
indicates the greatest expired volume of air in a person’s
lungs. Note, however, that this vital capacity is derived
from a forced expiration and dynamic compression of
the airways may occur. Therefore, it may be different
from the vital capacity derived from a slow expiration in
a VC test.
Forced Expiratory Volume at One Second (FEV1) is the
volume of air exhaled in the first second of the FVC
maneuver. It may be reduced in obstructive and
restrictive processes. The FEV1/ FEV6 ratio and FEV1/
FVC ratio is needed to help determine the reason for the
decreased FEV1. FEV1 is derived from the volume-time
curve by finding the volume expired on the Y-axis of the
curve at exactly one second into the test. However, if
the maneuver had a slow start the PC Classic Plus
automatically uses the Back Extrapolation Technique to
determine the start of the test. One second is measured
relative to the extrapolated start of the test.
Forced Expiratory Volume at Three Seconds (FEV3) is
similar to the FEV1, but is measured at three seconds
into the test, rather than one-second.
Forced Expiratory Volume at Six Seconds (FEV6) is similar
to the FEV1, but is measured at six seconds into the test,
rather than one-second.
Feb-04
Appendices
A-1
PC Classic/Classic Plus User’s Manual
FEV1 /FVC% is a ratio of FEV1 to FVC. It is the FEV1 divided
by the FVC, then multiplied by 100 so that it can be
expressed as a percentage. It is decreased in obstructive
processes.
FEV1/ FEV6% is a ratio of FEV1 to FEV6. It is the FEV1
divided by the FEV6, then multiplied by 100 so that it
can be expressed as a percentage. FEV6 is used as a
Forced Vital Capacity surrogate and is recommended by
the National Lung Health Education Program (NLHEP).
It is decreased in obstructive processes.
Forced Mid-Expiratory Flow (FEF25-75%) is the average forced
expiratory flow over the middle 50% of the FVC curve,
between 25 percent and 75 percent of the FVC.
Peak Expiratory Flow (PEF) or maximal expiratory flow is the
highest point on the flow-volume curve. PEF should be
at the very beginning of the curve; if PEF is after the
beginning, the PC Classic Plus uses the Back
Extrapolation Technique to determine the zero second
point for the FEV1 and FEV3 calculations.
Forced Expiratory Flow (FEF50) is the forced expiratory flow
after 50% of the FVC has been exhaled.
Forced Inspiratory Vital Capacity (FIVC) is a measure of the
patient'
s inspiratory vital capacity (the volume of air
between a maximal expiration and a maximal
inspiration). It is derived from a forced inspiration.
Forced Inspiratory Flow (FIF50) is the forced inspiratory flow
after 50% of the FIVC has been inhaled.
Ratio of FIF50 to FEF50 (FIF50/FEF50) is the Forced Expiratory
Flow at 50% as a percentage of the Forced Inspiratory
Flow at 50%, then multiplied by 100 to express the ratio
as a percentage.
Feb-04
Appendices
A-2
PC Classic/Classic Plus User’s Manual
Peak Inspiratory Flow (PIF) is the maximum inspiratory flow
anywhere on the inspiratory portion of the Flow-Volume
Loop (below the zero line). PIF is the lowest point on
the inspiratory portion of the Flow-Volume Loop.
Expiratory Time (ET) is the elapsed time, expressed in
seconds, from the beginning of the expiration until the
expiration is completed.
Maximum Voluntary Ventilation (MVV) is the largest volume
of air inhaled or exhaled over a timed period, typically
12 to 15 seconds, which is then extrapolated to one
minute. The maneuver done to measure the MVV
should imitate rapid breathing during strenuous exercise.
Vital Capacity (VC) is the largest volume of exhaled gas
measured on a slow complete expiration after a maximal
inspiration.
Air Trapping Index (ATI) is the difference between the FVC
and the VC indices. It may reflect how much air
becomes trapped in the lungs during a forced expiration.
Lung Age is an estimate of the age of the subject’s lungs based
on spirometric measurements. The method used to
estimate lung age is that described by Morris and
Temple (Preventive Medicine, pp. 655-662, 1985.)
COPD Index is a measure of the subject’s risk for developing
COPD. To determine the COPD Index, the Tecumseh
Index of Risk is calculated using the subject’s age,
gender, current smoking habits, FEV1, and height
according to the method described by Higgins and
Keller (Journal of Respiratory Diseases, January, 1983).
Back Extrapolation Technique is necessary for the FEV1 and
the FEV timed. All flow related indices are affected
when a back extrapolation error occurs.
Feb-04
Appendices
A-3
PC Classic/Classic Plus User’s Manual
NORMALS TABLES
The principal indication for spirometry testing is to determine
whether a patient'
s pulmonary function is normal or abnormal.
A predicted normal value for a spirometric test index is a
prediction of the value a patient should attain if his/her
pulmonary function is normal. The predictions are based on
extensive studies of a population, and were often done by
leading pulmonologists. To obtain predicted values, the
technologist must enter the height, age, gender, and ethnic
background of the patient. The spirometric test indices from
thousands of people of varying height, age, gender, and ethnicity
were analyzed and compiled into an equation. Each normals
table is named by the pulmonologist who led the study.
The PC Classic Plus has normals tables from the following
seven studies. When customizing your spirometer, select the
table that you want to use (See Section 6.1 CUSTOMIZATION).
The selected normals table should match the population to be
tested as closely as possible. Note the applicable indices and
ranges for each study.
NOTE!
When the table selected in Customization contains the
indices: FVC, PEF and FEF 25-75, a predicted curve will be
generated and displayed during testing and on reports. See
the section 6.1.1 Software Customization for more
information.
Feb-04
Appendices
A-4
PC Classic/Classic Plus User’s Manual
NHANES III
INDICES
SEX
AGE
Yrs: Min-max
HEIGHT
cm: Min-max
HEIGHT
in: Min-max
FVC
FEMALE:
8 – 80
No stated
limitation
No stated
limitation
FEV1
MALE:
8 - 80
No stated
limitation
No stated
limitation
AGE
Yrs -Min-max
HEIGHT
cm - Min-max
HEIGHT
in - Min-max
6 - 10
106.7 - 147.3
42 - 58
11 - 19
132.1 - 182.9
52 - 72
FEV1/FVC%
20 - 69
147.3 - 180.3
58 - 71
FEF 25-75
70 - 87
147.3 - 167.6
58 - 66
FEF 50
6 - 11
111.8 - 154.9
44 - 61
12 - 24
139.7 - 193.0
55 - 76
25 - 84
157.5 - 195.6
62 - 77
FEV6
FEV1/FVC
FEV1/FEV6
FEF 25-75
PEF
Knudson 1983
INDICES
SEX
FVC
FEV1
FEMALE:
MALE:
Feb-04
Appendices
A-5
PC Classic/Classic Plus User’s Manual
Knudson 1976
INDICES
SEX
AGE
Yrs -Min-max
HEIGHT
cm - Min-max
HEIGHT
in - Min-max
FVC
FEMALE:
8 - 79
No stated
limitation
No stated
limitation
FEV1
MALE:
8 - 79
No stated
limitation
No stated
limitation
FEV3
FEV1/FVC%
FEF 25-75
PEF
Crapo
INDICES:
SEX
AGE
Yrs - min-max
HEIGHT
cm. min-max
HEIGHT
in. min-max
FVC
FEMALE
17-84
146-178
57-71
FEV1
MALE
15-91
157-194
61-77
FEV3
FEV1/FVC%
FEF 25-75
MVV vol.
Feb-04
Appendices
A-6
PC Classic/Classic Plus User’s Manual
Polgar
INDICES:
SEX
AGE
Yrs - min-max
HEIGHT
cm. min-max
HEIGHT
in. min-max
FVC
FEMALE
6-18
No stated
limitation
No stated
limitation
FEV1
MALE
6-18
No stated
limitation
No stated
limitation
FEF 25-75
MVV vol.
ECCS with Knudson 1983
Children (ages 18 - 24 are evaluated as age 25)
INDICES
SEX
AGE
Yrs: Min-max
HEIGHT
cm: Min-max
HEIGHT
in: Min-max
FVC
FEMALE:
25 - 90
145.0 - 180.0
56 - 72
6 - 10
106.7 - 147.3
42 - 58
11 - 17
132.1 - 182.9
52 - 72
25 - 90
155.0 - 195.0
58 - 80
6 - 11
111.8 - 154.9
44 - 61
12 - 17
139.7 - 193.0
55 - 76
FEV1
FEV1/FVC%
FEF 25-75
PEF
FEF 50
CHILDREN
(female)
MALE:
CHILDREN
(male)
FIVC
MVV vol.
VC
Feb-04
Appendices
A-7
PC Classic/Classic Plus User’s Manual
Morris
INDICES
SEX
AGE
Yrs: Min-max
HEIGHT
cm: Min-max
HEIGHT
in: Min-max
FVC
FEMALE:
20 - 84
145.0 - 180.0
56 - 72
FEV1
MALE:
20 - 84
155.0 - 195.0
58 - 80
FEV1/FVC%
FEF 0.1 - 1.2
FEF 25-75
FEF 75-85
HSU 1979 (Using Journal of Pediatrics 1979)
INDICES
SEX
AGE
Yrs: Min-max
HEIGHT
cm: Min-max
HEIGHT
in: Min-max
FVC
FEMALE:
7 - 20
111 - 180
43 - 71
FEV1
MALE:
7 - 20
111 - 190
43 - 75
FEF 25-75
PEF
LAM 1979 (Using Journal of Pediatrics 1979)
INDICES
SEX
AGE
Yrs: Min-max
HEIGHT
cm: Min-max
HEIGHT
in: Min-max
FVC
FEMALE:
5 - 74
No stated
limitation
No stated
limitation
FEV1
MALE:
5 - 74
No stated
limitation
No stated
limitation
PEF
Feb-04
Appendices
A-8
PC Classic/Classic Plus User’s Manual
COMPOSITE
This is the Default normals selection. These normals provide
predicted values for most indices.
INDICES
AUTHOR
FVC
NHANES III
FEV1
NHANES III
FEF 50
Knudson 83
FEV3
Crapo
FEV6
NHANES III
FEF 25-75
NHANES III
FEF 75-85
Morris
PEF
NHANES III
FIVC
NHANES III
FIF 50
No Predicted
PIF
No Predicted
FEV1/FVC
NHANES III
FEF 2-1.2
Morris
MVV
35 X FEV1 from NHANES III
VC
NHANES III
DIAGNOSTIC INTERPRETATION
The PC Classic can make simple diagnostic interpretations of
the spirometric test data. The interpretation scheme is designed
to distinguish normal from abnormal pulmonary function test
results without making a diagnosis. Spirometry test data cannot
stand by itself. It is important to coach patients to their maximal
effort.
!
Feb-04
WARNING: Spirometry tests must be evaluated by a qualified
physician. The interpretations printed by the PC Classic
software are suggestive only and should not be considered
conclusive.
Appendices
A-9
PC Classic/Classic Plus User’s Manual
The Summary Report, which is created by clicking on the
Summary Results button in the Browse Patient List window,
contains a box where interpretation information can be written.
See section 5.6 Summary Report for more information. This
box will also optionally contain a brief diagnostic summary
generated by the PC Classic software. See section 6.1.4 Report
Options to enable or disable this option.
Interpretations are based entirely on two indices: FVC and
FEV1. The PC Classic uses the best of each of these indices
from all test data for a particular patient.
INTERPRETATION TABLE
The following table describes the interpretation scheme and
corresponding diagnostic messages:
FVC
% of Predicted
FEV1
FEV1/FVC
Interpretive Message
Low FEV1 Suggests
Obstructive Disorder
Low FEV1 Suggests
< 60%
≥ 75%
Ventilatory Disorder
Low FVC Suggests
< 75%
≥ 75%
Restrictive Disorder
Low FVC Suggests
< 60%
< 75%
Ventilatory Disorder
In all other cases spirometric results appear normal
< 75%
≤ 75%
REFERENCES
STANDARDS AND GUIDELINES:
American Thoracic Society Pulmonary Laboratory Management
and Procedure Manual. New York: ATS; 1998. (Updated
chapters are available each year.)
Feb-04
Appendices
A-10
PC Classic/Classic Plus User’s Manual
American Thoracic Society. Standardization of spirometry-1987
update. Am Rev Respir Dis 1987; 136:1039-1060.
Published concurrently in Respir Care 1987;32(11): 10391060.
American Thoracic Society. Standardization of spirometry 1994
update. Am J Respir Crit Care Med 1995; 152 (3): 11071136.
American Thoracic Society. Lung function testing: Selection of
reference values and interpretative strategies. Am Rev
Respir Dis 1991; 144: 1202-1218.
American Thoracic Society. Guidelines for methacholine and
exercise challenge-1999. Am J Respir Crit Care Med 2000;
161: 309-329.
American Association for Respiratory Care Clinical Practice
Guideline: Spirometry, 1996 update. Respir Care
1996;41:629-636.
American Association for Respiratory Care Clinical
Practice Guideline. Methacholine Challenge Testing: 2001
Revision and Update. Respir Care 2001; 46(5):523-530
National Committee for Clinical Laboratory Standards. HS-4,
Approved document. A Quality System Model for
Respiratory Care. Wayne, PA: NCCLS; 2002.
ADDITIONAL RESOURCES:
Eaton T, Withy S, Garrett JE, Mercer J, Whitlock RML, Rea
HH. Spirometry in primary care practice: The importance
of quality assurance and the impact of spirometry
workshops. Chest 1999;116: 416-423.
Enright PL, Johnson LJ, Connett JE, Voelker H, Buist
AS. Spirometry in the Lung Health Study: methods and
quality control. Am Rev Respir Dis 1991;143:1215-1223.
Feb-04
Appendices
A-11
PC Classic/Classic Plus User’s Manual
American College of Occupational an Environmental Medicine
Position Paper. Spirometry in the occupational setting.
ACOEM. 2000.
Ferguson GT, Enright PL, Buist AS, Higgins MW. Office
Spirometry for Lung Health Assessment in Adults: A
Consensus Statement From the National Lung Health
Education Program. Chest 2000 117: 1146-1161.
Wanger J, Irvin C. Office spirometry: equipment selection and
training of staff in the private practice setting. Journal of
Asthma 1997; 34(2), 93-104.
SPIROMETRY WEBSITES:
American Thoracic Society www.thoraic.org
American Association for Respiratory Care www.aarc.org
National Lung Health Education Program www.nlhep.com
National Lung Health Education Program www.nlhep.com
Global Initiative for Chronic Obstructive Lung Disease:
www.goldcopd.com
PRODUCT LIST
ACCESSORIES:
Item#
2195
2104
20043
3014
Feb-04
Description
Spiro-Filter
Nose Clips
Pediatric Adapter
Pediatric Mouthpiece
Appendices
Packaging
Box of 100
Bag of 10
Bag of 1
Bag of 100
A-12
PC Classic/Classic Plus User’s Manual
EDUCATIONAL PRODUCTS
Item#
Description
SP-061973
Spirometry: Producing Quality Test Results
CDROM
SP-040151
Diagnostic Training and Competence Manual:
Pulmonary and Noninvasive Cardiology
CD-ROM containing manual
SP-111680
Spirometry Quality: The Essentials
Printed Version
SP-081570
Spirometry Quality: The Essentials
CD-ROM Version
SP-101201
Spirometry: Test Quality Assessment Selecting
and Reporting Results
Video and Workbook
SP-070402
Additional Workbook for SP-101201
Feb-04
Appendices
A-13
P.O. Box 680
22 Shaker Road
Gray, ME 04039 USA
Phone: (207) 657-6700
Fax: (207) 657-4123
Sales & Warranty Service: (800) 767-0004