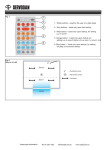
1
User Manual
FreeLocate Switch
FreeLocate Switch
User Manual
This User Manual applies to the following products:
Product No.
Description
U101RWM001
U102RWM001
U106RWM001
FreeLocate Switch
FreeLocate 2-Setting Switch
FreeLocate 6-Setting Switch
1
FREELOCATE SWITCH
IMPORTANT NOTES
HOW TO USE THIS MANUAL
This manual explains how to operate your ULTI FreeLocate Switch. It provides the
guidelines you need to programme your ULTI switches and dimmers for different lighting
scenario settings.
PRODUCT SAFETY
The Remote Control Unit operates at a RF frequency band of 315MHz or 434MHz. Please
contact local sale representatives for specifications in various countries. The effective
radiated power of Remote Control Unit does not exceed 10mW.
WARRANTY
ULTI products come with a one-year, equipment-only warranty. For more details, please
refer to the attached warranty form.
To enjoy product warranty, simply fill out and send us the attached warranty form.
Customer Service Email: [email protected]
URL: www.clipsal-ulti.com.hk
3
FREELOCATE SWITCH
CONTENTS
PACKAGE COMPONENTS
7
INTRODUCTION
8
OPERATING FUNCTION
30
COMPONENT REPLACEMENT
9
PROGRAMMING PROCEDURES
INSTALLATION PROCEDURES
10
(A) FREELOCATE SWITCH
13
32
32
34
35
36
37
MEMORY CLEARING PROCEDURES
38
38
39
OPERATING FUNCTION
14
PROGRAMMING PROCEDURES
16
16
18
19
21
23
24
25
Scene/Device Mode Selection
Scene Number Selection
Delay Time Programming
Scene Programming
Device Programming
Disabling Programmed Scene Setting (For Product No. starting with U20)
Enabling Programmed Scene Setting (For Product No. starting with U20)
MEMORY CLEARING PROCEDURES
Switch/Dimmer Partial Memory Clearing Procedures
Switch/Dimmer Full Memory Clearing Procedures
26
26
27
(B) FREELOCATE 2-SETTING SWITCH
29
Scene/Device Mode Selection
Scene Programming
Device Programming
Disabling Programmed Scene Setting (For Product No. starting U20 only)
Enabling Programmed Scene Setting (For Product No. starting with U20 only)
Switch/Dimmer Partial Memory Clearing Procedures
Switch/Dimmer Full Memory Clearing Procedures
(C) FREELOCATE 6-SETTING SWITCH
41
OPERATING FUNCTION
42
PROGRAMMING PROCEDURES
44
44
46
47
48
49
50
Scene/Device Mode Selection
Scene Programming
Device Programming
Disabling Programmed Scene Setting (For Product No. starting U20 only)
Enabling Programmed Scene Setting (For Product No. starting with U20 only)
Disabling All-Off Command (For Product No. starting with U20 only)
Changing All-Off Function to Scene Function
(For Product No. starting with U20 only)
Resuming All-Off Function
(For Product No. starting with U20 only)
51
53
4
5
FREELOCATE SWITCH
FREELOCATE SWITCH
PACKAGE COMPONENTS
MEMORY CLEARING PROCEDURES
54
54
55
LEARNING ID PROCEDURES
56
56
56
Switch/Dimmer Partial Memory Clearing Procedures
Switch/Dimmer Full Memory Clearing Procedures
Learning from FreeLocate 6-Setting Switch to FreeLocate 6-Setting Switch.
Undo Learning ID
SPECIFICATIONS
57
TROUBLE SHOOTING GUIDE
58
FUNCTION COMPARISON TABLE
61
OR
FreeLocate Switch
Wall Cover with
T-Bracket
Screws x 2
OR
FreeLocate 2-Setting Switch
T-Bracket
Screw Caps x 2
Button Cell Battery x 1
Labels
FreeLocate 6-Setting Switch
User Manual
Rubber Feet x 4
6
7
FREELOCATE SWITCH
FREELOCATE SWITCH
INTRODUCTION
COMPONENT REPLACEMENT
ULTI CONCEPT
Battery Replacement
ULTI, The Ultimate Switch, is a Clipsal Concept. It is a state-of-the-art lighting control and
electrical automation scheme for residential, hotel and office use, offering sophisticated
design, operational simplicity and flexibility to control electrical devices.
1) Press and slide open the battery cover.
2) Identify the correct battery polarity
direction and place the battery in the
battery case.
3) Clip the button cover back in place.
ULTI WIRELESS LIGHTING CONTROL SOLUTION
Each ULTI Remote Controller and FreeLocate Switch works parallel with your ULTI
Switches and Dimmers and allows you to pre-program and recall lighting scenes to
perfectly match your mood, giving you complete freedom of movement and control over
your light settings.
ULTI TERMINOLOGY
Zone
Switch
Device
Scene
-
An area illuminated/controlled by a single lighting circuit.
A switch that controls the on-off of a zone.
A switch that controls the on-off of a zone.
A Scene is defined as a combination of lights and electronic appliances across
various zones with different light levels. You can set your favourite scenes by
following Programming Procedures in this manual.
Dimmer - A switch that controls the on-off and Dimming level of a zone.
FreeLocate Switch Labelling
When you have more than one set of ULTI FreeLocate Switches, it may be difficult to
differentiate between them. Please use provided remote labels to identify each FreeLocate
Switch. (Extra labels are included for your own label creation).
8
9
FREELOCATE SWITCH
FREELOCATE SWITCH
INSTALLATION PROCEDURES
Replacement of Existing Switch
Installing T-Bracket
1) Select an appropriate area; mount and
secure the T-Bracket on the wall with
the 25mm X 3mm counter sunk Philips
head screws provided.
2) Insert the FreeLocate Switch onto the
T-Bracket to complete installation.
Option : If the T-Bracket is mounted on an uneven surface, then you can make use of
rubber feet to reduce lateral movement. Insert as per diagram.
To replace an existing switch with a FreeLocate Switch.
1) Always turn OFF the power source at
Miniature Circuit Breaker (MCB) before
installation, maintenance or servicing
of light fittings.
2) Loosen the screws of the original
wall switch, remove the switch and
disassemble the wiring.
3) Connect the Live wire to the Load wire by a terminal block.
10
11
FREELOCATE SWITCH
FREELOCATE SWITCH
(A) FREELOCATE SWITCH
Replacement of Existing Switch (con’t)
4) Screw the provided Wall Cover and its
attached T-Bracket to cover the wall
box. Then cover the screws with two
screw caps.
5) Insert the FreeLocate Switch on the
wall mounted T-Bracket.
6) Turn on the power source from the MCB to complete installation.
Tips : An ULTI FreeLocate Switch can be used as a 2-way switch by substituting
any existing 2-way switch.
12
13
FREELOCATE SWITCH
FREELOCATE SWITCH
OPERATING FUNCTION
1
• LED Indicator
- Blue for RF transmission.
- Red for programming indication.
- Orange for low batteries indication.
- Purple for delay time indication.
2
• Master Key
- Short press to swap between scenes.
3
• Delete LED
4
• Delete Button
5
• Function Selector
- Programme Mode.
- In-Use Mode.
1
2
3
4
5
14
15
FREELOCATE SWITCH
FREELOCATE SWITCH
PROGRAMMING PROCEDURES
Scene/Device Mode Selection
The Master Key can act as either a Scene or a Device Button. In Scene mode, you can
set a lighting scene with multiple switches and dimmers while in Device mode, you
can control on/off of one or a group of switches and dimmers.
1. Select the Function
Programme position.
Selector
to
2. Press and hold the Delete Button until
the Delete LED lights up in orange
colour.
4. The LED Indicator will flash 3 times
in either red or blue to indicate Scene
or Device mode respectively.
Flash 3 times
Press & hold
3. While pressing the Delete Button, short press the Master Key 4 times.
5. Select the Function Selector to In-Use
position.
LED Indicator
Blue
Red
Mode
Scene
Device
6. Repeat the above procedures to change mode.
Short press 4 times
16
17
FREELOCATE SWITCH
FREELOCATE SWITCH
Scene Number Selection
Delay Time Programming
FreeLocate Switch is default to store 2 scenes. However, it can be programmed
to store up to a maximum of 4 scenes if Delay Time Programming procedures are
performed. For further details, please refer to the appropriate section.
Scenes 3 and 4 are linked to the default scenes 1 and 2 respectively. With one press
of Master Key, scene 1 will be recalled followed by scene 3 with a delay time preset
by you. Similarly, pressing the Master Key again will recall scene 2 and 4, also with a
delay time preset by you.
1. Set the Master Key to Scene mode. See P.16.
2. Push the Function Selector to Programme position once, the LED Indicator will flash 1
time in red, meaning Scene No. 1 is selected. Repeat selecting the Function Selector
from In-Use position to Programme position, the LED Indicator will flash in pattern
indicating the respective Scene Number:
Number of Red flashes
Scene No.
1
2
3
4
1
2
3 (the delayed scene after scene 1)
4 (the delayed scene after scene 2)
Series 1: Scene No.1
Series 2: Scene No.2
Delay time (set by user)
Delay time (set by user)
Scene No.3
Scene No.4
Note : You can only set delay time for Scene 3 and Scene 4. The default delay time set for
Scene 3 and Scene 4 is zero second. If no delay time is set, only Scene 1 and
Scene 2 will be triggered, Scene 3 and Scene 4 will not.
3. After selecting the scene number, you can perform either Scene Programming
procedures or Delay Time Programming procedures.
18
19
FREELOCATE SWITCH
FREELOCATE SWITCH
Procedures :
Scene Programming
1. Set the FreeLocate Switch to scene number 3 or 4. For selecting the scene number,
please see Scene Number Selection procedures on P.18.
Using FreeLocate Switch to set a lighting scene with multiple Switches/Dimmers and
save the setting on the FreeLocate Switch.
2. Select the Function Selector at the back of FreeLocate Switch to Programme position.
1. Set the Master Key to Scene mode. See P.16.
3. Press and hold the Delete Button, the Delete LED will light up in orange.
2. Select Scene Number. See P.18.
4. While pressing the Delete Button, press and hold the Master Key simultaneously, the
LED Indicator will flash in pattern indicating the respective delay time as per below
table:
3. Set Switches/Dimmers to programming mode:
3.1 Remove cover plate.
3.2 Press the Programme Button, the Programme LED will turn on in red colour.
4. Set the desired lighting scenes with multiple Switches/ Dimmers.
Press & hold
Simultaneously
press and hold
Number of Purple flashes
Delay Time (second)
1
2
3
4
0
15
30
45
5. Press the Master Key on the FreeLocate Switch to save the current settings. The
Programme LED of associated Switches/Dimmers will turn off immediately. If the
Programme LED of Switches/Dimmers does not turn off, repeat the above steps.
Press to save setting
Turn off
5. As the desired delay time appears, release both the Delete Button and the Master Key.
6. Select the Function Selector to In-Use position. The delay time is set and it is ready to
programme desired scenes.
20
21
FREELOCATE SWITCH
FREELOCATE SWITCH
6. Select the Function Selector to In-Use position.
Device Programming
Using FreeLocate Switch to perform solely an on/off switching of a particular gang
of Switch/Dimmer.
Note: FreeLocate Switch only has one device storage. It cannot store more than one
device setting.
1. Set the Master Key to Device mode. See P.16.
2. Select the Function Selector to Programme position.
3. Set Switches/Dimmers to programming mode:
3.1 Remove cover plate.
3.2 Press the Programme Button, the Programme LED will turn on in red colour
7. Press the Master Key to verify it is programmed successfully. Repeat the above
procedures if programming fails.
8. Clip the cover plate back in place.
4. Set device:
A) For switch/dimmer model No. starting with U10:
Switch on the specific control button of the desired gang of Switch/Dimmer.
B) For switch/dimmer model No. starting with U20. :
Press and hold the specific control button on the desired Switch/Dimmer.
4. While pressing the control button, press the Master Key of FreeLocate Switch to save
current settings. The Programme LED of Switch/Dimmer will turn off immediately.
5. Release the control button when the Programme LED goes off.
6. If the Programme LED does not turn off, repeat the above steps.
7. Select the Function Selector to In-Use position.
8. Press the Master Key to verify it is programmed successfully. The set device should turn
on and off alternatively. Repeat the above procedures if programming fails.
9. Clip the cover plate back.
Note: Performing the above device programming procedures again for the same
gang will disable the device setting.
22
23
FREELOCATE SWITCH
FREELOCATE SWITCH
Disabling Programmed Scene Setting (For Product No. starting with U20)
Enabling Programmed Scene Setting (For Product No. starting with U20)
Programme a particular gang of Switch/Dimmer not to respond to the FreeLocate
Switch in scene programming, without erasing the identity of Switch/Dimmer of the
FreeLocate Switch.
To enable a previously programmed gang of Switch/Dimmer to respond to the
FreeLocate Switch. There are 2 methods:
1.
Set the Master Key to Scene mode. See P.16.
Method 1 : Repeat the procedures of Disabling Programmed Scene for that particular
gang of Switch/Dimmer.
2.
Select Scene Number. See P.18.
Method 2 : Perform Scene Programming procedures again.
3.
Set Switches/Dimmers to programming mode:
3.1 Remove cover plate
3.2 Press the Programme Button, the Programme LED will turn on in red colour.
4.
Press and hold the control button on the desired Switch/Dimmer.
5.
While pressing the control button, press the Master Key of the FreeLocate Switch to
save current settings. The Programme LED of Switch/Dimmer will turn off
immediately.
6.
Release the control button when the Programme LED goes off.
7.
If the Programme LED of Switch/Dimmer does not turn off, repeat the above steps.
8.
Select the Function Selector to In-Use position.
9.
Press the Master Key to verify it is programmed successfully. Repeat the above
procedures if programming fails.
10. Clip the cover plate back in place.
24
25
FREELOCATE SWITCH
FREELOCATE SWITCH
MEMORY CLEARING PROCEDURES
Switch/Dimmer Partial Memory Clearing Procedures
To remove the ID of individual FreeLocate Switch that has been stored on the
Switch/Dimmer so that the Switch/Dimmer will not respond to the FreeLocate Switch
anymore.
1. Select the Function Selector to Programme position.
2. Press the Delete Button. The Delete LED will light up in orange.
3. Set Switches/Dimmers to programming mode:
3.1 Remove cover plate.
3.2 Press the Programme Button, the Programme LED will turn on in red colour.
Switch/Dimmer Full Memory Clearing Procedures
To remove ALL IDs that have been stored on the Switch/Dimmer so that the Switch/
Dimmer will not respond to any Remote Controller or FreeLocate Switch.
1. Remove the cover plate of Switch/Dimmer.
2. Press and hold the Clear Button on the Switch/Dimmer for 3 seconds. The Programme
LED will flash 3 times in red colour indicating the clearing has been successfully done.
3. Press the Master Key of the FreeLocate Switch to verify, if the Switch/Dimmer responds
to the FreeLocate Switch, repeat the above procedures.
4. Clip the cover plate back in place.
4. Delete ID:
A) For Product No. starting with U10:
Press the Master Key on the FreeLocate Switch.
B) For Product No. starting with U20:
Press and hold the Master Key on the FreeLocate Switch for 5 seconds.
5. The LED Indicator of FreeLocate Switch and the Programme LED of Switches/Dimmers
will turn off immediately. Release the Master Key when the Programme LED goes off.
If the Programme LED of Switches/Dimmers does not turn off, repeat the above steps.
6. Select the Function Selector to In-Use position.
7. Press the Master Key to verify it cannot control the particular Switch/Dimmer anymore.
Repeat the above procedures if necessary.
8. Clip the cover plate back.
26
27
FREELOCATE SWITCH
FREELOCATE SWITCH
(B) FREELOCATE 2-SETTING SWITCH
29
FREELOCATE SWITCH
OPERATING FUNCTION
1
• LED Indicator
- Blue for RF transmission.
- Red for programming indication.
- Orange for low batteries indication.
2
• Scene / Device Button 1 & 2
- Short press to recall the pre-set scenes/devices.
3
• Delete LED
4
• Delete Button
5
• Function Selector
- Programme Mode.
- In-Use Mode.
1
2
3
4
5
30
31
FREELOCATE SWITCH
FREELOCATE SWITCH
PROGRAMMING PROCEDURES
B) Multiple Functions (For product number starting with U20 only)
1. Select the Function Selector to Programme position.
Scene/Device Mode Selection
The two buttons of the FreeLocate 2-Setting Switch can act as either Scene or Device
buttons. In Scene mode, you can set a lighting scene with multiple switches and
dimmers, while in Device mode, you can control on/off of one or a group of switches
and dimmers. You can either set Single Function to both buttons as scene/device
together or set them individually.
A) Single Function
1. Select the Function Selector to Programme position.
2. Press and hold the Delete Button. The Delete LED will light up in Orange colour.
2. Press and hold the Delete Button. The Delete LED will light up in orange colour.
3. While pressing the Delete Button, quickly press any desired Scene/Device button
4 times. The LED Indicator will flash 3 times in either blue or red to indicate Scene or
Device mode respectively.
LED Indicator
Blue
Red
Mode
Scene
Device
4. Repeat the above procedures to change mode.
3. While pressing the Delete Button, double press the Scene/Device Button No.1, then
double press Scene/Device Button No.2. The LED Indicator will flash 3 times in either
blue or red to indicate Scene or Device mode respectively.
LED Indicator
Blue
Red
Mode
Scene
Device
4. Select the Function Selector to In-Use position. The FreeLocate Switch is now ready to
use.
32
33
FREELOCATE SWITCH
FREELOCATE SWITCH
Scene Programming
Device Programming
Using FreeLocate 2-Setting Switch to set a lighting scene with multiple Switches/
Dimmers and save the settings on the FreeLocate Switch.
Using FreeLocate 2-Setting Switch to perform solely an on/off switching of a
particular gang of Switch/Dimmer.
1. Assign the button(s) which you want the setting to be saved on and then set it to Scene
mode. See P.32.
1. Assign the button(s) which you want the setting to be saved on and then set it to Device
mode. See P.32.
2. Select the Function Selector to Programme position.
2. Select the Function Selector to Programme position.
3. Set Switches/Dimmers to programming mode:
3.1 Remove cover plate.
3.2 Press the Programme Button, the Programme LED will turn on in red colour
3. Set Switches/Dimmers to programming mode:
3.1 Remove cover plate.
3.2 Press the Programme Button, the Programme LED will turn on in red colour.
4. Set the desired lighting scenes with multiple Switches/Dimmers.
4. Set Device
A) For Product No. starting with U10:
Switch on the specific control button on the desired Switches/Dimmers.
B) For Product No. starting with U20. :
Press and hold the specific control button on the desired Switches/Dimmers.
5. Press the desired Scene/Device Button on the FreeLocate Switch to save current
settings. The Programme LED of associated Switches/Dimmers will turn off
immediately. If the Programme LED of the Switches/Dimmers does not turn off, repeat
the above steps.
6. Select the Function Selector to In-Use position.
7. Press the programmed Scene/Device Button to verify it is programmed successfully.
Repeat the above procedures if programming fails.
8. Clip the cover plate back in place.
5. While pressing the button, press any Scene/Device Button on the FreeLocate Switch to
save current settings. The Programme LED of Switches/Dimmers will turn off
immediately.
6. Release the control button when the Programme LED goes off. If the Programme LED
does not turn off, repeat the above steps.
7. Select the Function Selector to In-Use position.
8. Press the programmed Scene/Device Button to verify it is programmed successfully.
Repeat the above procedures if programming fails.
9. Clip the cover plate back in place.
Note: Once the device programming is successfully made, performing device
programming procedures to the same gang again will disable the device setting of
that gang.
34
35
FREELOCATE SWITCH
FREELOCATE SWITCH
Disabling Programmed Scene Setting (For Product No. starting U20 only)
Programme a particular gang of Switch/Dimmer not to respond to the FreeLocate
Switch in scene programming, without erasing the identity of Switch/Dimmer of the
FreeLocate Switch.
Enabling Programmed Scene Setting (For Product No. starting with U20
only)
To enable a previously programmed gang of Switch/Dimmer to respond to the
FreeLocate Switch. There are 2 methods:
1. Assign the button(s) which you want the setting to be saved on and then set it to Scene
mode. See P.32.
Method 1 : Repeat the procedures of Disabling Programmed Scene for that particular
gang of Switch/Dimmer.
2. Select the Function Selector to Programme position.
Method 2 : Perform Scene Programming procedures again.
3. Set Switches/Dimmers to programming mode:
3.1 Remove cover plate.
3.2 Press the Programme Button, the Programme LED will turn on in red colour.
4. Press and hold the control button on the desired Switches/Dimmers.
5. While pressing the control button, press the desired Scene/Device Button of the
FreeLocate Switch to save current settings. The Programme LED of Switches/Dimmers
will turn off immediately.
6. Release the control button when the Programme LED goes off. If the Programme LED
does not turn off, repeat the above steps.
7. Select the Function Selector to In-Use position.
8. Press the programmed Scene/Device Button to verify it is programmed successfully.
Repeat the above procedures if programming fails.
9. Clip the cover plate back in place.
36
37
FREELOCATE SWITCH
FREELOCATE SWITCH
MEMORY CLEARING PROCEDURES
Switch/Dimmer Partial Memory Clearing Procedures
To remove the ID of individual FreeLocate Switch that has been stored on the
Switch/Dimmer so that the Switch/Dimmer will not respond to the FreeLocate Switch
anymore.
1. Select the Function Selector to Programme position.
2. Press the Delete Button. The Delete LED will light up in orange colour.
3. Set Switches/Dimmers to programming mode:
3.1 Remove cover plate.
3.2 Press the Programme Button, the Programme LED will turn on in red colour.
Switch/Dimmer Full Memory Clearing Procedures
To remove ALL IDs that have been stored on the Switch/Dimmer so that the Switch/
Dimmer will not respond to any Remote Controller or FreeLocate Switch.
1. Remove the cover plate of Switch/Dimmer.
2. Press and hold the Clear Button on the Switch/Dimmer for 3 seconds. The Programme
LED will flash 3 times in red colour indicating the clearing has been successfully done.
3. Press any Scene/Device Button of FreeLocate Switch to verify, if the Switch/Dimmer
responds to the FreeLocate Switch, repeat the above procedures.
4. Clip the cover plate back in place.
4. Delete ID:
A) For Product No. starting with U10:
Press the Scene/Device Button No.2 on the FreeLocate Switch.
B) For For Product No. starting with U20:
Press and hold Scene/Device Button No.2 on the FreeLocate Switch for 5
seconds.
5. The LED Indicator of FreeLocate Switch, and the Programme LED of Switches/Dimmers
will turn off immediately.
6. Release the Scene/Device Button when the Programme LED goes off. If the Programme
LED of Switches/Dimmers does not turn off, repeat the above steps.
7. Select the Function Selector to In-Use position.
8. Press the Scene/Device Button to verity it cannot control the particular Switch/Dimmer
anymore. Repeat the above procedures if necessary.
9. Clip the cover plate back in place.
38
39
FREELOCATE SWITCH
FREELOCATE SWITCH
(C) FREELOCATE 6-SETTING SWITCH
41
FREELOCATE SWITCH
OPERATING FUNCTION
1
1
• LED Indicator
- Blue for RF transmission.
- Red for Programming or Learning indication.
- Orange for low battery indication.
2
• Device / Scene Button 1 - 5
- Short press to recall the pre-set scenes/devices.
3
• All-Off Button
- Short press to turn all the controlled lights off.
4
• Delete LED
5
• Delete Button
6
• Function Selector
- Programme Mode.
- Learn Mode.
- In-Use Mode.
2
3
4
5
6
42
43
FREELOCATE SWITCH
FREELOCATE SWITCH
PROGRAMMING PROCEDURES
B) Multiple Function (For product number starting with U20 only)
1. Select the Function Selector to Programme position.
Scene/Device Mode Selection
All Scene/Device Buttons of the FreeLocate 6-Setting Switch can act as either Scene
or Device buttons. In Scene mode, you can set a lighting scene with multiple switches
and dimmers, while in Device mode, you can control on/off of one or a group of
switches and dimmers. You can either set single function to both buttons as scene/
device mode or set each button individually. The All-Off Button by default is set to
switch all programmed lighting off in any scene.
A) Single Function
1. Select the Function Selector to Programme position.
2. Press and hold the Delete Button. The Delete LED will light up in orange colour.
3. While pressing the Delete Button, quickly press any desired Scene/Device Button
4 times. The LED Indicator will flash 3 times in either blue or red to indicate Scene or
Device mode respectively.
Colour
Blue
Red
Mode
Scene
Device
4. Repeat the above procedures to change mode.
2. Press and hold the Delete Button. The Delete LED will light up in Orange colour.
3. While pressing the Delete Button, double press Scene/Device Button 1, then double
press Scene/Device Button 2. The LED Indicator will flash 3 times in either blue or
red to indicate Scene or Device mode respectively.
LED Indicator
Blue
Red
Mode
Scene
Device
4. Select the Function Selector to In-Use position. The FreeLocate Switch is now ready to
use.
44
45
FREELOCATE SWITCH
FREELOCATE SWITCH
Scene Programming
Device Programming
Using FreeLocate 6-Setting Switch to set a lighting scene with multiple Switches/
Dimmers, and save the settings on the FreeLocate Switch.
Using FreeLocate 6-Setting Switch to perform solely an on/off switching of a
particular gang of Switch/Dimmer.
1. Assign the button(s) which you want the setting to be saved on to Scene mode. See
P.44.
1. Assign the button(s) which you want the setting to be saved on to Device mode. See
P.44.
2. Select the Function Selector to Programme position.
2. Select the Function Selector to Programme position.
3. Set Switches/Dimmers to programming mode:
3.1 Remove cover plate.
3.2 Press the Programme Button, the Programme LED will turn on in red colour.
3. Set Switches/Dimmers to programming mode:
3.1 Remove cover plate.
3.2 Press the Programme Button, the Programme LED will turn on in red colour.
4. Set the desired lighting scenes with multiple Switches/Dimmers.
4. Set Device
A) For Product No. starting with U10:
Switch on the specific control button on the desired Switches/Dimmers.
B) For Product No. starting with U20. :
Press and hold the specific control button on the desired Switches/Dimmers.
5. Press the desired Scene/Device Button on the FreeLocate Switch to save current
settings. The Programme LED of associated Switches/Dimmers will turn off
immediately. If the Programme LED of the Switches/Dimmers does not turn off, repeat
the above steps.
6. Select the Function Selector to In-Use position.
7. Press the programmed Scene/Device Button to verify it is programmed successfully.
Repeat the above procedures if programming fails.
8. Clip the cover plate back in place.
5. While pressing the button, press any Scene/Device Button on the FreeLocate Switch to
save current settings. The Programme LED of Switches/Dimmers will turn off
immediately.
6. Release the control button when the Programme LED goes off. If the Programme
LED does not turn off, repeat the above steps.
7. Select the Function Selector to In-Use position.
8. Press the programmed Scene/Device Button to verify it is programmed successfully.
Repeat the above procedures if programming fails.
9. Clip the cover plate back in place.
Note: Once the device programming is successfully made, performing device
programming procedures to the same gang again will disable the device setting of
that gang.
46
47
FREELOCATE SWITCH
FREELOCATE SWITCH
Disabling Programmed Scene Setting (For Product No. starting U20 only)
Programme a particular gang of Switch/Dimmer not to respond to the FreeLocate
Switch in scene programming, without erasing the identity of Switch/Dimmer stored
at the FreeLocate Switch.
Enabling Programmed Scene Setting (For Product No. starting with U20
only)
To enable a previously programmed gang of Switch/Dimmer to respond to the
FreeLocate Switch. There are 2 methods:
1. Assign the button(s) which you want the setting to be saved on to Scene mode. See
P.44.
Method 1 : Repeat the procedures of Disabling Programmed Scene for that particular
gang of Switch/Dimmer.
2. Select the Function Selector to Programme position.
Method 2 : Perform Scene Programming procedures again.
3. Set Switches/Dimmers to programming mode:
3.1 Remove cover plate.
3.2 Press the Programme Button, the Programme LED will turn on in red colour.
4. Press and hold the control button on the desired Switches/Dimmers.
5. While pressing the control button, press the desired Scene/Device Button of the
FreeLocate Switch to save current settings. The Programme LED of Switches/Dimmers
will turn off immediately.
6. Release the control button when the Programme LED goes off. If the Programme LED
does not turn off, repeat the above steps.
7. Select the Function Selector to In-Use position.
8. Press the programmed Scene/Device Button to verify it is programmed successfully.
Repeat the above procedures if programming fails.
9. Clip the cover plate back in place.
48
49
FREELOCATE SWITCH
FREELOCATE SWITCH
Disabling All-Off Command (For Product No. starting with U20 only)
Programme the Switches/Dimmers to ignore the All-Off command.
1. Assign the button(s) which you want the setting to be saved on to Scene mode. See
P.44.
2. Select the Function Selector to Programme position.
3. Set Switches/Dimmers to programming mode:
3.1 Remove cover plate.
3.2 Press the Programme Button, the Programme LED will turn on in red colour.
4. Press and hold the control button on the desired Switches/Dimmers.
5. While pressing the control button, press the All-Off Button of the FreeLocate Switch to
save current settings. The Programme LED of Switches/Dimmers will turn off
immediately.
Changing All-Off Function to Scene Function (For Product No. starting with
U20 only)
To change the All-Off function to a scene function which scenes correspond to that of
Scene/Device Buttons 1 and 2. By this way, these 2 buttons can be freed up for Device
function.
To set All-Off function as scene function
1. Select the Function Selector to Programme position.
2. Press and hold the Delete Button. The Delete LED will light up in orange colour.
3. While pressing the Delete Button, quick press the All-Off Button 4 times. The LED
Indicator will flash 3 times in blue.
4. The All-Off button is now ready to store 2 scenes.
6. Release the control button when the Programme LED goes off. If the Programme LED
does not turn off, repeat the above steps.
7. Select the Function Selector to In-Use position.
8. Press the All-Off Button to verify that the particular gang of the programmed Switch/
Dimmer does not switch off even though the All-Off Button is pressed. Repeat the above
procedures if programming fails.
9. Clip the cover plate back in place.
Note: Repeat the above procedure to enable the All-Off command.
50
51
FREELOCATE SWITCH
FREELOCATE SWITCH
To programme scenes for Scene/Device Buttons 1 and 2
Operation of 2 Scenes in All-Off Button:
There are 2 methods of doing this.
Short press to toggle between 2 scenes.
Method 1:
1. Press and hold the Delete Button. The Delete LED will light up in orange colour.
2. While pressing the Delete Button, push the Function Selector at the back of the
FreeLocate Switch to Programme position once, the Delete LED will flash 1 time in
orange, meaning scene No.1 is selected. Repeat Selecting the Function Selector from
In-Use to Programme position, the Delete LED will flash to indicate the respective scene
number.
Number of Orange flashes
Scene No.
1
2
1
2
3. Proceed to Scene Programming to set Scene. For detailed operations, please refer to
previous section on Scene Programming on P.46.
Tips: Since the All-Off Button is functioning as scene button, you can change Scene/
Device Buttons 1 and 2 to act as device function. Please refer to Multiple Functions,
Scene/Device Mode Selection on P.44.
Resume All-Off Function (For Product No. starting with U20 only)
Resume the All-Off function.
1. Select the Function Selector to Programme position.
2. Press and hold the Delete Button. The Delete LED will light on in orange colour.
3. While pressing the Delete Button, short press the All-Off Button 4 times. The LED
Indicator will flash 3 times in red.
4. The All-Off Button is now back to normal All-Off function.
Method 2:
To programme Scenes No. 1 and 2 individually and assign them to Scene/Device Buttons 1
and 2 respectively. The 2 scenes will automatically be reflected in the All-Off Button.
52
53
FREELOCATE SWITCH
FREELOCATE SWITCH
MEMORY CLEARING PROCEDURES
Switch/Dimmer Partial Memory Clearing Procedures
To remove the ID of individual FreeLocate 6-Setting Switch from the Switch/Dimmer
so that the Switch/Dimmer will not recognise any command sent by this particular
FreeLocate Switch.
1. Select the Function Selector Programme position.
2. Press the Delete Button. The Delete LED will turn on in orange colour.
3. Set Switches/Dimmers to programming mode:
3.1 Remove cover plate.
3.2 Press the Programme Button, the Programme LED will turn on in red colour.
Switch/Dimmer Full Memory Clearing Procedures
To remove ALL IDs that have been stored on the Switch/Dimmer so that the Switch/
Dimmer will not respond to any FreeLocate Switch.
1. Remove the cover plate of the Switch/Dimmer.
2. Press and hold the Clear Button on the Switch/Dimmer for 3 seconds. The Programme
LED will flash 3 times in red indicating the clearing process was successful.
3. Press any Scene/Device Button on the FreeLocate Switch to verify. If the Switch/Dimmer
still responds to the FreeLocate Switch, repeat the above steps.
4. Clip the cover plate back in place.
4. Clear Memory:
A) For Product No. starting with U10:
Press the All-Off Button on the FreeLocate Switch.
B) For Product No. starting with U20:
Press and hold the All-Off Button on the FreeLocate Switch for 5 seconds. The LED
Indicator on the FreeLocate Switch, and the Programme LED of Switch/Dimmer will
turn off immediately. Release the All-Off Button when the Programme LED goes off.
If it does not go off, repeat the step.
5. Exit Programming Mode
5.1 Select the Function Selector to In-Use position.
5.2 Press the previously programmed Scene/Device Button on the FreeLocate Switch
to verify that the instruction was successful. Repeat the above procedures if
necessary.
6. Clip the cover plate back in place.
54
55
FREELOCATE SWITCH
FREELOCATE SWITCH
LEARNING ID PROCEDURES
Learning from FreeLocate 6-Setting Switch to FreeLocate 6-Setting Switch
Copy the ID of Master FreeLocate 6-Setting Switch to Slave FreeLocate 6-Setting
Switch so that the Slave can control the same lighting settings as that of the Master.
SPECIFICATIONS
Product
1. Select the Function Selector of both Master and Slave to Learn position.
2. Press the Delete Button on the Master FreeLocate Switch. The Delete LED will turn
on in orange colour.
Memory
FreeLocate
Switch
FreeLocate
2-Setting Switch
FreeLocate
6-Setting Switch
2+2 scenes/
1 devices settings,
delayed activation
of 2 scenes with 4
delay time setting
selection
2 scenes/2 devices
settings
5 scenes/5 devices
settings, All Off.
2. Press and hold the Scene/Device Button 4 on the Master FreeLocate Switch. The
Programme LED of both Master and Slave will flash 3 times in red.
Battery Type
3. Repeat the previous steps if neither of the Switches flashes 3 times.
Operating Temperature
Undo Learning ID
Operating Humidity
To resume the original ID of Slave FreeLocate 6-Setting Switch so that it does not
control the same lighting settings as the Master.
Radio Frequency
Available in 315MHz & 434MHz
(Please consult your regional office)
Operating Range
100m (Open environment)*
1. Select the Function Selector of the Slave FreeLocate 6-Setting Switch to Learn
position.
2. Press the Delete Button on the Slave FreeLocate 6-Setting Switch.
3. Press and hold the Scene/Device Button 5 of Slave FreeLocate 6-Setting Switch. The
Programme LED will flash 3 times in red.
4. Repeat the previous steps if the LED Indicators of neither FreeLocate Switches flash
3 times.
Dimensions
(H) x (W) x (D)
CR2032 button cell battery
0 °C to 40 °C
0% to 95% RH
85mm x 85mm x 13mm
* The performance of the operating range is subject to the actual conditions of the environment, such
as weather. Under normal circumstances, longer range can be achieved outdoors than indoors since
obstacles like concrete walls and metal shelves may shorten the operating range.
5. Exit Programming Mode
5.1 Select the Function Selector at the back of Slave FreeLocate 6-Setting Switch to
In-Use position.
5.2 Press any Scene/Device Button to verify the settings are erased successfully.
57
56
FREELOCATE SWITCH
FREELOCATE SWITCH
TROUBLE SHOOTING GUIDE
Symptom
Switch/Dimmer
is not responding
to the FreeLocate
Switch
Possible Cause
Solution
1.Not previously
programmed
or improper
programming.
Repeat the Programming Procedures.
2.Switch/Dimmer is
set to Programme
mode.
The LED indicator is turned on red now,
indicating the unit is in Programming
mode. If programming is not required,
press the Programme button to exit
Programming mode.
3.Voltage is too low.
Make sure the operating voltage range
is within the requirement.
4.RF wireless
control is disabled.
(Programme LED
flashes continuously
in the pattern of 2)
Press the Programme Button of the
Switch/Dimmer 6 times within 1
minute. Programme LED should stop
flashing.
Symptom
Unable to
programme.
Switch/Dimmer
is not responding
to the FreeLocate
Switch and LED
does not flash.
Possible Cause
Solution
1.Red Programme
LED flashes after
the Programme
Button is pressed.
This indicates the memory is full.
Perform Memory Clearing Procedures
to release space.
2.The Switch does
not receive
programming
commands.
Check the position of the function
selector at the back of the FreeLocate
Switch. Make sure it is in the
Programme position.
3.RF wireless
control is disabled.
(Programme LED
flashes continuously
in the pattern of 2)
Press the Programme Button of Switch
6 times within 1 minute. Programme
LED should stop flashing.
1.Batteries are
installed incorrectly
or the batteries are
low or dead.
Replace with new batteries.
58
59
FREELOCATE SWITCH
FREELOCATE SWITCH
TROUBLE SHOOTING GUIDE (con’t)
Symptom
Main light or LED
backlight does not
turn on.
Main load is turned
off automatically.
Possible Cause
FUNCTION COMPARISON TABLE
Solution
1.Wires are not
properly secured
or connected in
the terminals.
Make sure the wires are secured,
screws are fastened and the Live or
Load wires have been connected to
the correct terminals.
2.MCB is OFF or has
been tripped.
Switch on the MCB. If a breaker
continually trips, contact a registered
electrician to find out the cause of
the problem.
3.Temporary disorder.
Switch off the MCB and then on
again to reset the switch.
1.Power rating is too
low.
Replace the load that meets the
minimum loading requirement.
2.Wires are not
properly secured in
the terminals.
Make sure the wires are secured and
screws are fastened properly.
3.Controlled by other
remote control unit
within the area.
Determine which remote control
unit(s) is (are) controlling the
particular main light. (Refer to
Memory Clearing Procedures).
Functions
Scene Programming
Delay Time Programming
Device Programming
Disabling Programmed Scene Setting*
Enabling Programmed Scene/Device*
Disabling All-Off Command*
Enabling All-Off Command*
Scene/Device Mode Selection
(Single Function)*
Scene/Device Mode Selection
(Multiple Function)*
Changing All-Off Function to
Scene Function*
Resume All-Off Function*
Switch/Dimmer Partial Memory Clear
FreeLocate
Switch
Switch
✓
✓
✓
✓
✓
✗
✗
FreeLocate
2-Setting
Switch
✓
✗
✓
✓
✓
✗
✗
FreeLocate
6-Setting
✗
✓
✓
✓
✓
✓
✗
✗
✓
✗
✓
✗
✓
✓
✓
✓
✗
✓
✓
✓
✓
✓
* Only applicable to the Switches and Dimmers of Product No. Starting with U20.
60
61
FREELOCATE SWITCH
FREELOCATE SWITCH
All rights reserved
Specifications subject to change without notice
4301-7234+0