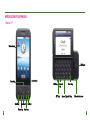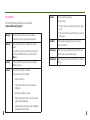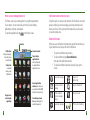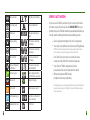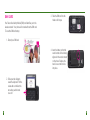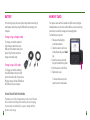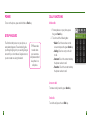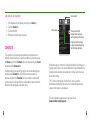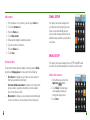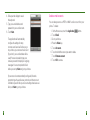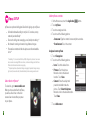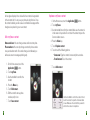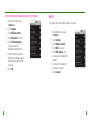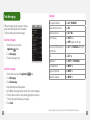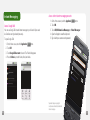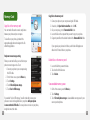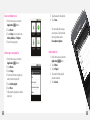
1
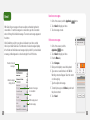
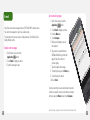
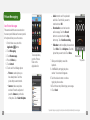
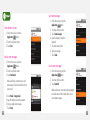
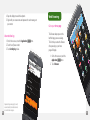
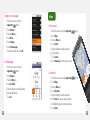
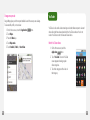
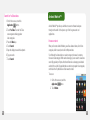
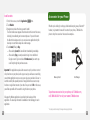
OVERVIEW This guide provides you with everything you need to get started. If you need additional information on features and services, please refer to your User Guide (www.t-mobile.com/g1support). Table of Contents Having Fun Turn to the Having Fun section of this booklet to learn what else your new phone can do. Introducing your Phone........................................................................ 4 Service Activation ...............................................................................11 SIM Card . .............................................................................................12 Battery . .................................................................................................14 Memory Card .......................................................................................15 Power ....................................................................................................16 Setup Wizard .......................................................................................16 Call Functions . ....................................................................................17 Contacts................................................................................................18 Gmail Setup .........................................................................................21 Email Setup . ........................................................................................21 myFaves® Setup...................................................................................24 Bluetooth® Setup.................................................................................29 Wi-Fi . .....................................................................................................31 Emergency Dialing..............................................................................32 Caring for your Phone.........................................................................33 Tips for Safety.......................................................................................34 3 Introducing your phone T-Mobile G1TM 4 5 Key functions End key For more information, please refer to your User Guide (www.t-mobile.com/g1support). Home key Press to return to the Home screen from anywhere. Press and hold to bring up the Applications window. Menu key Press to open a list of actions available on the current screen. Press and hold to see the menu shortcuts for that screen. The shortcuts will blink in place as you hold down the Menu key. Back key Press to go back to the previous screen or to dismiss a dialog box or menu. Send key Press and hold to open the voice dialer. Press to perform one of the following: n n n n n 6 When on a call, press to hang up. When not on a call: Press to lock the screen and put the phone into sleep mode. Press and hold to power on/off the phone or put it into silent mode. n n Trackball Roll the trackball to navigate left, right, up, and down. Press to select an item. Camera key On the Home screen, press and hold to open the camera. While in the camera, press to take a picture. Volume keys While receiving incoming call, press either (+) or (-) to silence the ringer. Open recent call log Call a contact when a contact name/number is highlighted Add another call (while on a call) Display ongoing call on the screen (if you have navigated to another application) Call the number when a phone number is higlighted (example while in the Browser) 7 Home screen and application list Notification and connection icons The Home screen is your starting point for using all the applications on your phone. You can customize your Home screen to display applications, shortcuts, and widgets. To open the application list, tap on the Home screen. Along the top of your screen is the status bar. On the left side, icons will appear, notifying you of new messages, upcoming calendar events, alarms, and more. On the right side of the status bar, you will see the connection status icons. Read notifications Status bar Notifications Slide your fingertip down the screen to read details Today’s date is revealed when you tap notifications Tap any icon to start using the application 8 Connection status When you see a notification in the status bar, tap the bar and slide your finger down the screen to open the list of notifications. To open the notification, tap the item. To clear notifications, tap Clear notifications at the top of the notification window. To close the notification window, slide your finger up the screen. n Tap or drag the application tab with your fingertip to reveal/hide the application icons Recent applications window opens when you press and hold the HOME button (from any screen) For landscape orientation, open the display to reveal the keyboard n n New e-mail message Ringer is off (silent mode) New text or picture message Ringer on vibrate only Problem with text or picture message delivery Phone is on mute New instant message GPS is on and is working 9 10 New voicemail Uploading / downloading Upcoming event Content downloaded Alarm is set GSM signal, roaming, no signal Song is playing GPRS service connected, data flowing Service ACTIVATION If you are a new T-Mobile customer and your service has not been activated, simply call Customer Care at 1-800-937-8997 from your landline phone and a T-Mobile Activations representative will assist you. You will need the following information when activating service: Service Agreement and agent code on your Agreement Your name, home address, home phone, and billing address n n Data is syncing EDGE service connected, data flowing SD card is full 3G service connected, data flowing More (undisplayed) notifications Wi-Fi service connected, network available n Call in progress Battery charge indicators (full, half-full, low, very low) n Missed call Battery is charging Call on hold Wireless services are off Call forwarding is on Bluetooth is on, Bluetooth device connected Speakerphone is on No SIM card NOTE: For business and government account, please provide the name of your company or government agency, address, and tax ID. Your Social Security number, current driver’s license number, and date of birth for credit check purposes Your choice of T-Mobile rate plan and services (see www.t-mobile.com for latest plan information) SIM serial number and IMEI number (located on the box bar code label) n By activating service, you acknowledge that you have read, understand, and agree to be bound by each of T-Mobile’s Terms and Conditions and your Service Agreement. 11 sim CARD Your Subscriber Identity Module (SIM) card identifies you to the wireless network. Your phone will not work without the SIM card. To insert the SIM and battery: 3. Slide the SIM card into the holder until it stops. 1. Detach your SIM card. 4. Insert the battery so that the metal contacts on the battery aligns with the metal contacts on the phone. Replace the back cover so that it clicks into place. 2. Slide open the display to reveal the keyboard. Pull the release tab out while at the same time peel the back cover off. 12 13 battery memory card You can charge your phone using the charger cable connecting to a wall power outlet or by using the USB cable connecting to your computer. Your phone comes with a removable microSD memory card (preinstalled) where you can store multimedia files, such as video clips, music tracks, sound files, images, and messaging data. To install the memory card: 1. Slide open the display to reveal the keyboard. 2. Open the memory card cover located below the green Send key. 3. Insert the memory card with the gold contacts facing down. 4. Push the card in until it clicks. 5. Replace the cover. Charge using a charger cable To charge, connect the small end of the charger cable to the microUSB port on the bottom side of your phone. Plug the other end of the charger into a wall outlet. Charge using a USB cable To charge, connect the small end of the USB cable to the micro-USB port on the bottom side of your phone. Plug the other end of the USB cable to the USB port of your computer. 14 Please read before proceeding The battery is not fully charged when you take it out of the box. Do not remove the battery pack when the phone is charging. Your warranty is invalidated if you open or tamper with the phone’s outer casing. To remove the memory card, press the card in and release. 15 Power call functions To turn on the phone, press and hold the red End key. Make calls 1. From anywhere on your phone, press the green Send key. 2. Touch one of the following tabs: SETUP WIZARD The first time that you turn on your phone, a setup wizard appears. The wizard will guide you through signing in to your existing Google account. If you do not have a Google account, you can create one using the wizard. Dialer: Touch the numbers on the screen and press the green Send key. Call log: Touch an entry on the list to call. Contacts: Touch the contact and tap the phone number to call. Favorites: Touch the contact and tap the phone number to call. n TIP: Remember to write down your username and password and keep them in a safe place. n n n Answer calls To answer a call, press the green Send key. End calls To end the call, press the red End key. 16 17 Call and set up voicemail 1. From anywhere on your phone, press the green Send key. 2. Touch the Dialer tab. 3. Touch and hold 1. 4. Follow the tutorial to set up voicemail. CONTACTS The contacts on your phone are synced with your Google account contacts stored on the Web. To view the contacts on your phone, press the Home key and touch Contacts. You can also press the green Send key and touch the Contacts tab. Contacts belonging to a specific group (you can choose which group) are listed in the Contacts tab. Only those contacts you select as favorites are listed in the Favorites tab. If your contact is online and if you are signed in to Google Talk, their online status as well as their firstlabeled number will appear under their name. Contacts tab Online status The quick scroll tab appears when you begin scrolling with your fingertip. Drag the tab, then release to jump to names beginning with the letter displayed. Browse through your contacts by rolling the trackball or by sliding your fingertip up and down on the screen. Rapid brush movements with your fingertip in either direction accelerates the scrolling. Touch the screen to stop the scrolling. TIP: To find a contact quickly from the Home screen, open the keyboard and start typing their name. Your contact list appears and resolves to the letters you have typed. For more information, please refer to your User Guide (www.t-mobile.com/g1support). 18 19 Add contacts 1. From anywhere on your phone, press the green Send key. 2. Touch the Contacts tab. 3. Press the Menu key. 4. Touch New contact. 5. Slide open the display to reveal the keyboard. 6. Type the contact’s information. 7. Press the Menu key. 8. Touch Save. Display contacts To select which contact group to display in Contacts, press the Menu key and touch Display group. You can select from the following: All contacts to displays every contact you have created or that has been added automatically. Contacts with phone numbers to display only contacts with phone numbers, regardless of whether you have created them on the phone or Web. My contacts to display a group created automatically based on those contacts you communicate with most frequently. n n n 20 Gmail setup Your phone can receive messages from your Gmail account. By signing in to your phone, you are automatically set up to receive e-mail messages, and there are no additional steps needed to set up Gmail on your phone. Email setup Your phone can receive messages from your POP3 and IMAP e-mail accounts. You can fetch messages from up to five e-mail accounts. Add e-mail accounts 1. On the Home screen, touch the Application button. 2. Touch Email. The Email setup screen appears guiding you through the setup process. 3. Touch Next. 21 4. Slide open the display to reveal the keyboard. 5. Type your e-mail address and password to your e-mail account. 6. Touch Next. The application will automatically configure the settings for many common e-mail services. Before you go to your Inbox, you can name the account (if you don’t, your e-mail address will be used). You are also asked to type your name as you want it to display on outgoing messages. You must complete this field before you can tap Next and go to your Inbox. Delete e-mail accounts You can always remove a POP3 or IMAP e-mail account from your phone. To delete: 1. On the Home screen, touch the Application button. 2. Touch Email. 3. Go to your Inbox. 4. Press the Menu key. 5. Touch Accounts. 6. Touch and hold the account you want to delete. 7. Touch Remove account. 8. Touch OK to remove. If your account is not automatically configured, follow the prompts to type the e-mail server, protocol, and other account information yourself. After your account settings have been verified, touch Next to go to your Inbox. 22 23 SETUP myFaves is an optional calling plan. Benefits of signing up to myFaves: Unlimited nationwide calling to any five U.S. numbers, on any network (even landlines)* One-touch calling, text messaging, e-mail, and photo sharing** No domestic roaming or domestic long-distance charges Personalize contacts with favorite pictures and downloadable icons** n Add myFaves contacts 1. On the Home screen, touch the Application 2. Touch myFaves. 3. Touch an unassigned circle. 4. Touch one of the following options: Create new: Type the contact’s name and phone number. From Contacts: Touch the contact. n n n n n * Excluding 411, voicemail, and toll-free, 900, calling card, customer’s own numbers, numbers accessing 500 or more lines, conference bridges, and chat lines. Other restrictions and exclusions may apply. ** Separate purchase /download charges may apply. Separate charges may apply to send/receive domestic/international text picture messages and e-mail. Subscribe to myFaves® To subscribe, go to www.t-mobile.com. When you have subscribed to myFaves, you will see five circles on the main screen a few minutes after you power on your phone. 24 button. Assign an icon to myFaves 5. Touch Change icon. 6. Touch one of the following options: Icons: Touch the desired icon. Pictures: Touch the picture. Move the circle to the desired location. Touch Save. Camera: Frame the subject and press the trackball to take the picture. Touch Select this picture. Move the circle to the desired location. Touch Save. n n n 7. Touch Add contact. 25 An hourglass displays in the circle while the contact is being added to the contacts list. You can use your phone during this time. Once the contact is added, you will receive a confirmation message and the hourglass is replaced by your new contact. Edit a myFaves contact Names and icons: You can change names and icons at any time. Phone numbers: You can only change a contact’s phone number once per calendar month. If a number change is not allowed, you will receive an error message explaining why. Replace a myFaves contact 1. On the Home screen, touch the Application button. 2. Touch myFaves. 3. Use the trackball to scroll to the contact. Make sure the contact is in the center circle position. Do not touch the contact to open the Communication screen. 4. Press the Menu key. 5. Touch Replace contact. 6. Touch one of the following options: Create new: Type the contact’s name and phone number. From Contacts: Touch the contact. n n 1. On the Home screen, touch the Application button. 2. Touch myFaves. 3. Use the trackball to scroll to the contact. 4. Press the Menu key. 5. Touch Edit contact. 6. Edit the contact’s name, phone number, and/or icon. 7. Touch Save contact. 26 7. Touch Add contact. Use the trackball to scroll to the contact. Do not touch the contact to open the Communication screen. Make sure the contact that you want to edit is in the center circle position. 27 Move a myFaves contact to another circle 1. On the Home screen, touch the Application button. 2. Touch myFaves. 3. Use the trackball to scroll to the contact. Make sure the contact is in the center circle position. Do not touch the contact to open the Communication screen. 4. Press the Menu key. 5. Touch Change order. 6. Use the trackball to move the circle to the new position. 7. Press the Menu key. 8. Touch Add contact. 28 bluetooth ® Setup Your phone comes with Bluetooth technology, which is a wireless technology that enables a data connection between your phone and a Bluetooth wireless headset. Prepare a Bluetooth wireless headset To pair your phone with a Bluetooth headset, make sure that your headset is fully charged and that you put the headset into pairing mode. See your Bluetooth headset’s manual for more information. 29 Turn on the Bluetooth feature and pair with a headset 1. On the Home screen, press the Menu key. 2. Touch Settings. 3. Touch Wireless controls. 4. Touch Bluetooth to turn it on. 5. Touch Bluetooth settings. Your phone scans for available Bluetooth devices. 6. Touch the headset to select it. 7. Slide open the display to reveal the keyboard and type the PIN if needed. 8. Touch OK. 30 wi-fi Your phone can connect to Wi-Fi ntworks. To connect: 1. On the Home screen, press the Menu key. 2. Touch Settings. 3. Touch Wireless controls. 4. Touch Wi-Fi to turn it on. 5. Touch Wi-Fi settings. Your phone scans for available Wi-Fi networks. 6. Touch the Wi-Fi network that you want to connect to. 7. Touch Connect. 31 Emergency Dialing Caring for Your Phone While all phones are equipped with 911 emergency calling, this phone may or may not permit its location to be approximated during a 911 call.* MAKING IT LAST * Availability of this feature depends on upgrades to the (a) wireless network and (b) 911 calling system that are required to be installed by the local 911 response agency or public safety answering point (PSAP); these upgrades may not be available everywhere within our wireless coverage area or your roaming area. This approximation of the phone’s location and the transmittal of location information are subject to emergency situations, transmission limits, network problems/limitations, interconnecting carrier problems, your phone, buildings/tunnels, signal strength and atmospheric/topographical conditions, and may be curtailed, interrupted, dropped or refused. The phone’s approximate location is transmitted to the local 911 response agency or PSAP while the call is in progress; this approximation is intended solely to aid the PSAP in dispatching emergency assistance or to limit the search area for emergency services personnel. You should not rely solely on a phone for essential communications (such as a medical or other emergency). Please see T-Mobile’s Terms and Conditions and Privacy Policy for additional service restrictions and details. 32 Your phone is a complex electronic device; think of it as a minicomputer. Here are some hints that should help you extend the life of your new phone. Phones aren’t cheap, so keep yours in a safe place — away from children who may find it fun to see if the phone sinks or floats, and away from dogs that find plastic-coated products to be irresistible chew toys. Water will damage your phone and accessories — even a small amount such as water droplets from a soda in your car cup-holder, melting snowflakes, tears of joy, squirt-gun crossfire or steam from hot water in the kitchen or bathroom. Use only batteries and accessories from the original manufacturer of your phone. Non-approved accessories can cause damage to you or your phone and shorten the phone’s life. Hint: If it’s being sold out of someone’s car trunk, walk away. If your charger or any other accessory is damaged, replace it or take it to a qualified service dealer. Do not attempt to operate your phone charger if it has received a sharp blow, been dropped, thrown from a speeding motorcycle or is otherwise damaged; doing so may damage your phone. 33 Tips for Safety Check with your doctor if you have a pacemaker or hearing aid in order to ensure that cell phone usage is safe with your device. If you have questions about the interaction of cellular radio frequency and any other electronic equipment, ask the manufacturer of the equipment if cell phone radio frequencies will disrupt the equipment’s performance. When you are driving, T-Mobile encourages you to use your phone in a safe and sensible manner. Here are a few tips: Assess road conditions before answering. Your safety is more important than any call. Prepare your hands-free headset, if you have one, or turn on your speakerphone option before you start moving. Keep your phone closed. If it rings and you discover it’s in the back seat, do NOT crawl over the seat to answer it while driving. Program frequently used numbers into your speed dial for easy one-touch dialing. Remember that laws prohibiting or restricting the use of a mobile phone while driving may apply in your area. n n n n n 34 35 having fun Table of Contents Gmail . ..................................................................................................... 2 E-mail...................................................................................................... 4 Picture Messaging................................................................................. 6 Text Messaging...................................................................................... 8 Instant Messaging (IM)........................................................................10 Memory Card....................................................................................... 12 Music..................................................................................................... 14 myFaves® . ........................................................................................... 18 Web Browsing .....................................................................................21 Maps .................................................................................................... 24 YouTube................................................................................................25 Android MarketTM.................................................................................27 Accessories for Your Phone.............................................................. 29 T-Mobile Information.......................................................................... 30 Safety and Regulatory Information ..................................................31 HTC Limited Warranty Statement ....................................................48 D 1 Gmail Read new messages With Gmail, all your messages on the same subject are threaded together into conversations. To read the messages in a conversation, open the conversation and scroll through the individual messages. The most recent message appears at the bottom. All the Gmail that you fetch to your phone is delivered to your Inbox, and the Inbox is your default Gmail view. The total number of unread messages displays in the title bar and individual unread messages display in bold. If you have labeled a message, its label appears in a colored rectangle to the left of the date. Number of unread messages Unread messages display in bold Number of messages in conversation Label 1. On the Home screen, touch the Application 2. Touch Gmail to display your Inbox. 3. Touch a message to read. button. Write new messages 1. On the Home screen, touch the Application button. 2. Touch Gmail to display your Inbox. 3. Press the Menu key. 4. Touch Compose. 5. Slide open the display to reveal the keyboard. 6. Type a name or e-mail address in the To field. Matching contacts will appear. Select the contact or continue typing. 7. Type the subject and message. 8. To attach pictures, press the Menu key and touch the picture to attach. 9. Touch Send. Draft message saved Starred message 2 3 E-mail Your phone can receive messages from your POP3 and IMAP e-mail accounts. You can fetch messages from up to five e-mail accounts. For information on how to set up your e-mail, please see “E-mail Setup” in the Getting Started section. Read e-mail messages 1. On the Home screen, touch the Application button. 2. Touch Email to display your Inbox. 3. Touch the message to open. Send e-mail messages 1. On the Home screen, touch the Application button. 2. Touch Email to display your Inbox. 3. Press the Menu key. 4. Touch Compose. 5. Slide open the display to reveal the keyboard. 6. Type a name or e-mail address in the To field. Matching contacts will appear. Select the contact or continue typing. 7. Type the subject and message. 8. To attach pictures, press the Menu key. 9. Touch the picture to attach. 10. Touch Send. If you have more than one account and want to send an e-mail from a specific account, touch that account name before you press the Menu key and touch Compose. 4 Separate charges may apply to send/receive domestic/international e-mails. 5 Picture Messaging n Send Picture Messages Pictures taken with the camera are stored on the memory card. Make sure the memory card is in the phone before you use the camera. 1. On the Home screen, touch the Application button. 2. Touch Messaging. 3. Touch New message. 4. Press the Menu key. 5. Touch Attach. 6. Touch one of the following options: Pictures to send a picture you have already taken. Touch the picture that you want to attach. Camera to take a new picture and send. Frame the subject and press the Camera key on the side of the phone. Touch Select this photo. n n 6 n n To access pictures, go to the Pictures folder on the Application list. Audio to attach one of the preloaded audio files. Touch the file you want to attach and touch OK. Record audio to record and send an audio message. Touch the Record button to record and touch the Stop button stop. Touch Use this recording. Slideshow to attach multiple pictures and text. Touch Slide 1. Touch Add picture. Touch the picture that you want to add. Touch Done. 7. Slide open the display to reveal the keyboard. 8. At the To field, start typing the phone number. Your contacts list appears. 9. Touch the desired contact or continue typing the phone number. 10. Touch the text entry field and type your message. 11. Touch Send. Record button Stop button Separate charges may apply to send/receive domestic/international picture messages. 7 Text Messaging With text messaging, all your messages on the same subject are threaded together into conversations. The inbox includes picture and text messages. Read text messages 1. On the Home screen, touch the Application button. 2. Touch Messaging. 3. Touch the message to open. Send text messages 1. On the Home screen, touch the Application button. 2. Touch Messaging. 3. Touch New message. 4. Open the display to reveal the keyboard. 5. At the To field, start typing the phone number. Your contacts list appears. 6. Touch the desired contact or keep continuing typing the phone number. 7. Touch the text entry field and type your message. 8. Touch Send. 8 Typing tips Insert special character Press ALT + SPACEBAR Delete characters to the left Press DEL Delete the entire line Press ALT + DEL Turn on all caps Press SHIFT twice press SHIFT again to turn off caps Move cursor to the beginning or end of the line Press ALT + roll TRACKBALL left or right Tab Press ALT + q Highlight text Press SHIFT + roll TRACKBALL Cut highlighted text Press MENU + x Copy text to clipboard Press MENU + c Paste text in clipboard Press MENU + v Separate charges may apply to send/receive domestic/international text messages. 9 Instant Messaging Access Google Talk You can use Google Talk to send instant messages to your friends. All you need is a Gmail account (you already have one). To open Google Talk: Access other instant messaging accounts 1. On the Home screen, touch the Application button. 2. Touch IM. 3. Touch AIM, Windows Live Messenger, or Yahoo! Messenger. 4. Open the display to reveal the keyboard. 5. Sign in with your username and password. 1. On the Home screen, touch the Application button. 2. Touch IM. 3. Touch Google Talk account to launch. The Friends list appears. 4. Press the Menu key to add friends, block, and invite. 10 Separate charges may apply to send/receive domestic/international instant messages. 11 Memory Card Copy files to the memory card You can transfer files such as music and pictures between your phone and your computer. To view files on your phone, just launch the appropriate application and navigate to the file within that application. Set phone to mass storage setting Before you can transfer files, you must first set your phone to mass storage mode. To set: 1. Connect your phone to your computer using the USB cable. 2. On the Home screen, press the Menu key. 3. Touch Settings. 4. Touch SD card & phone storage. 5. Touch Use for USB storage. If you enable “Use for USB storage,” you will not be able to access your pictures or music via the applications on your phone while your phone is connected to the USB cable. To access pictures or music on your phone, simply disconnect the cable. 12 Copy files to the memory card 1. Connect your phone to your computer using the USB cable. 2. If needed, click Open folder to view files and click OK. 3. On your computer, go to the Removable Disk folder. 4. Locate the files on the computer that you want to copy to your phone. 5. Copy and paste files to the desired location in the Removable Disk folder. If you organize your pictures into folders, each folder will display as an album in the Pictures folder on your phone. Delete files on the memory card 1. Locate the file that you want to delete. 2. Touch and hold the file name. 3. Touch Delete. View available memory space 1. On the Home screen, press the Menu key. 2. Touch Settings. 3. Touch SD card & phone storage to view available memory space for your memory card and phone. 13 Music Your music is organized into four categories: Artists, Albums, Songs, and Playlists. Select a category to view the lists within each. Once in a category, keep selecting until you reach the music you want to play. For example, if you select the Artists category, you will see a list of artists in A–Z order. If you select an artist, the list opens to display that artist’s albums. Select an album, and the album’s song list displays. Your phone will play the following music file formats: • MP3 • M4A (iTunes AAC, DRM-free) • AMR • WMA (8) • MIDI • WAV • OGG Vorbis Indicator that song is playing Select to view current playlist Album art Shuffle is ON Repeating all songs Artist Album Song Time elapsed Time remaining Progress bar Playback controls Touch to pause; Touch & hold Touch Touch . once. Touch & hold 14 to resume play. . once. 15 Access and play music 1. On the Home screen, touch the Application button. 2. Touch Music. 3. Touch Songs. You can also touch Artists, Albums, or Playlists. 4. Touch the song to play. Add songs to new play list 1. On the Home screen, touch the Application button. 2. Touch Music. 3. Touch Songs. 4. Touch and hold the song that you want to add to the play list. 5. Touch Add to playlist. 6. Touch New. 7. Slide open the display to reveal the keyboard. 16 8. Type the name for the play list. 9. Touch Save. You can easily add a song as your ringtone. Touch and hold the song and then select Use as phone ringtone. Delete play lists 1. On the Home screen, touch the Application button. 2. Touch Music. 3. Touch Playlist. 4. Touch and hold the play list you want to delete. 5. Touch Delete. 17 Send text messages Call myFaves® contact 1. On the Home screen, touch the Application button. 2. Touch the myFaves contact. 3. Touch Call. Send e-mail messages 1. On the Home screen, touch the Application button. 2. Touch the myFaves contact. 3. Touch Send email. Make sure that you contact has an e-mail address saved in the Contacts list in order to send e-mail. 4. Touch Email or Goggle mail. 5. Open the display to reveal the keyboard. 6. Type your subject and message. 7. Touch Send. 18 1. On the Home screen, touch the Application button. 2. Touch the myFaves contact. 3. Touch Send message. 4. Open the display to reveal the keyboard. 5. Touch the text entry field. 6. Type your message. 7. Touch Send. Send instant messages 1. On the Home screen, touch the Application button. 2. Touch the myFaves contact. 3. Touch Send IM. Make sure that you contact has instant messaging information saved in the Contacts list in order to send instant messages. 19 4. Open the display to reveal the keyboard. 5. Sign in with your screen name and password to send messages to your contact. View activities log 1. On the Home screen, touch the Application 2. Touch the myFaves contact. 3. Touch Activity log to view. button. Web Browsing Go to your home page The Browser always opens to the last Web page you were viewing. The first time you enter the Browser after powering on, your home page will display. 1. On the Home screen, touch the Application button. 2. Touch Browser. 20 Separate charges may apply to send/ receive domestic/international e-mail, text, and instant messages. 21 Change your home page 1. On the Home screen, touch the Application button. 2. Touch Browser. 3. Press the Menu key. 4. Touch More. 5. Touch Settings. 6. Touch Set home page. 7. Type the site address and touch OK. Visit Web pages 1. On the Home screen, touch the Application button. 2. Touch Browser. 3. Press the Menu key. 4. Touch Go to URL. 5. Open the display to reveal the keyboard. 6. Type the Web address. 7. Touch Go. 22 Maps Find a location 1. On the Home screen, touch the Application 2. Touch Maps. 3. Press the Menu key. 4. Touch Search. 5. Open the display to reveal the keyboard. 6. Type an address. 7. Touch Search. 8. Touch Show map to see the result on a map. button. Get direction 1. On the Home screen, touch the Application 2. Touch Maps. 3. Press the Menu key. 4. Touch Directions. 5. Open the display to reveal the keyboard. 6. At the From field, type your starting address. 7. At the To field, type your destination address. 8. Touch Route. button. 23 Change map mode Google Maps gives you both map and satellite views of the area you are viewing. To view satellite, traffic, or street view: 1. On the Home screen, touch the Application 2. Touch Maps. 3. Press the Menu key. 4. Touch Map mode. 5. Touch Satellite, Traffic, or Street View. 24 button. YouTube YouTube is a free online video streaming service that allows anyone to view and share videos that have been uploaded by the YouTube members. You do not need a YouTube account to browse and view videos. Watch YouTube videos 1. On the Home screen, touch the Application button. 2. Touch YouTube. The main YouTube screen appears showing popular video categories. 3. Touch the category and the video in that category. 25 Search for YouTube videos 1. On the Home screen, touch the Application button. 2. Touch YouTube. The main YouTube screen appears showing popular video categories. 3. Press the Menu key. 4. Touch Search. 5. Open the display to reveal the keyboard. 6. Type yor search. 7. Touch Search. Android Market™ Android Market™ provides you with direct access to software developers throughout the world. It is the place to go to find fun games and cool applications. Browse contents When you first enter Android Market, you will see featured items, a list of item categories, a link to search, and a link to My downloads. Scroll through the featured items or select a category to browse its contents, then select a subcategory. Within each subcategory you can select to view items sorted By popularity or By date. Note that all items in a subcategory are listed in each tab; those in the By popularity tab are sorted most popular to least popular, and those in the By date tab are sorted newest to oldest. To access: 1. On the Home screen, touch the Application button. 2. Touch Market. 26 27 Install contents 1. On the Home screen, touch the Application button. 2. Touch Market. 3. Navigate to and select the item you want to install. The Item details screen appears. Read more about the item on this screen, including its overall rating and comments by users. If you scroll down to the About the developer section, you can view more applications by this developer or send the developer an e-mail message. 4. Touch Install (if free) or Buy. After selecting Install, the item will start downloading immediately. After selecting Buy, you may be asked to sign in to an additional Google account. Sign in and select Purchase now if you want to proceed. Step through the purchase screens. Accessories for your Phone Whether you’re looking for a charger, a fashionable carrying case, a Bluetooth® headset, or just want to browse for fun extras for your phone, T-Mobile is the place to shop for accessories. Here are a few examples… n n Important! If an application requires either access to any of your data or control of any functions on your phone, before you proceed, you will see a screen telling you what the application can access so you can give your permission. Be sure to read this carefully! Be especially cautious if an application has access to many functions or a significant amount of your data. Once you touch OK on this screen, you will be responsible for the results of using this item on your phone. All support for Market applications is provided by the developer of that application. The developer information is available on the detail page for each application. Memory Card Car Charger To purchase accessories for your phone, visit T-Mobile.com, call 1.800.204.2449 or visit your nearest T-Mobile store. *Accessory selection subject to change and may vary by location. 28 29 T-mobile Information myFaves: Not available with all rate plans. myFaves is only for direct voice communications between two people. Allows unlimited nationwide calling to any five U.S. phone numbers (exclusions include 411, voicemail, toll-free, 900, calling card, customers’ own numbers, numbers accessing 500 or more lines, conference bridges and chat lines—other restrictions and exclusions may apply). myFaves numbers may be changed only once per calendar month. Photographs/icons incur separate additional charges. Messaging Plans/Features: You will be charged for all data sent by or to you through the network, regardless of whether received. Character length/file size of messages/attachments may be limited. T-Mobile is not liable for content of messages/attachments or for any failures, delays or errors in any T-Mobile generated alerts or notifications. Downloads: Additional charges apply; not all downloads available on all devices. You obtain no rights in downloads; duration of use may be limited; may be stored solely for use with your device. T-Mobile is not responsible for any download lost due to your error. See Pricing, Services and Device brochures, and T-Mobile’s Terms and Conditions (including arbitration provisions) at T-Mobile.com, for rate plan information, charges for features and services, and restrictions and details. Yahoo!® and the Yahoo!® Messenger logos are registered trademarks of Yahoo! Inc. The Bluetooth® word mark and logo are owned by the Bluetooth SIG, Inc. and are used by T-Mobile under license. T-Mobile, t-zones, and the magenta color are federally registered trademarks of Deutsche Telekom AG. myFaves and the myFaves design and G1 are federally registered trademarks of T-Mobile USA, Inc. © 2008 T-Mobile USA, Inc. 30 safety and regulatory information Privacy Restrictions Some countries require full disclosure of recorded telephone conversations, and stipulate that you must inform the person with whom you are speaking that the conversation is being recorded. Always obey the relevant laws and regulations of your country when using the recording feature of your device. Intellectual Property Right Information. Copyright © 2008 HTC Corporation. All Rights Reserved. ExtUSB, and HTC Care are trademarks and/or service marks of HTC Corporation. Bluetooth and the Bluetooth logo are trademarks owned by Bluetooth SIG, Inc. Java, J2ME and all other Java-based marks are trademarks or registered trademarks of Sun Microsystems, Inc. in the United States and other countries. Google is a registered trademark and Google Maps is a trademark of Google, Inc. in the United States and other countries. All other company, product and service names mentioned herein are trademarks, registered trademarks or service marks of their respective owners. HTC shall not be liable for technical or editorial errors or omissions contained herein, nor for incidental or consequential damages resulting from furnishing this material. The information is provided “as is” without warranty of any kind and is subject to change without notice. HTC also reserves the right to revise the content of this document at any time without prior notice. No part of this document may be reproduced or transmitted in any form or by any means, electronic or mechanical, including photocopying, recording or 31 storing in a retrieval system, or translated into any language in any form without prior written permission of HTC. Limitation of Damages To the maximum extent permitted by applicable law, in no event shall HTC or its providers be liable to user or any third party for any indirect, special, consequential, incidental or punitive damags of any kind, in contract or tort, including, but not limited to, injury, loss of revenue, loss of goodwill, loss of business opportunity, loss of data, and/or loss of profits arising out of, or related to, in any manner, or the delivery, performance or nonperformance of obligations, or use of the weather information, data or documentation hereunder regardless of the foreseeability thereof. Important Health Information and Safety Precautions When using this product, the safety precautions below must be taken to avoid possible legal liabilities and damages. Retain and follow all product safety and operating instructions. Observe all warnings in the operating instructions on the product. To reduce the risk of bodily injury, electric shock, fire, and damage to the equipment, observe the following precautions. Electrical Safety This product is intended for use when supplied with power from the designated battery or power supply unit. Other usage may be dangerous and will invalidate any approval given to this product. Safety Precautions for Proper Grounding Installation Caution: Connecting to an improperly grounded equipment can result in an 32 electric shock to your device.This product is equipped with a USB cable for connecting the product to a desktop or notebook computer. Be sure your computer is properly grounded (earthed) before connecting the product to the computer. The power supply cord of a desktop or notebook computer has an equipment-grounding conductor and a grounding plug. The plug must be plugged into an appropriate outlet which is properly installed and grounded in accordance with all local codes and ordinances. Safety Precautions for Power Supply Unit Use the correct external power source. A product should be operated only from the type of power source indicated on the electrical ratings label. If you are not sure of the type of power source required, consult your authorized service provider or local power company. For a product that operates from battery power or other sources, refer to the operating instructions that are included with the product. Handle battery packs carefully. This product contains a Li-ion battery. There is a risk of fire and burns if the battery pack is handled improperly. Do not attempt to open or service the battery pack. Do not disassemble, crush, puncture, short external contacts or circuits, dispose of in fire or water, or expose a battery pack to temperatures higher than 60°C (140°F). Warning: Danger of explosion if battery is incorrectly replaced. To reduce risk of fire or burns, do not disassemble, crush, puncture, short external contacts, expose to temperature above 60°C (140°F), or dispose of in fire or water. Replace only with specified batteries. Recycle or dispose of used batteries according to the local regulations or reference guide supplied with your product. 33 Take extra precautions • Keep the battery or device dry and away from water or any liquid as it may cause a short circuit. • Keep metal objects away so they don’t come in contact with the battery or its connectors as it may lead to short circuit during operation. • Do not use a battery that appears damaged, deformed, or discoloured, or the one that has any rust on its casing, overheats, or emits a foul odor. • Always keep the battery out of the reach of babies and small children, to avoid swallowing of the battery. Consult the doctor immediately if the battery is swallowed. • If the battery leaks: - Do not allow the leaking fluid to come in contact with skin or clothing. If already in contact, flush the affected area immediately with clean water and seek medical advice. - Do not allow the leaking fluid to come in contact with eyes. If already in contact, do not rub; rinse with clean water immediately and seek medical advice. - Take extra precautions to keep a leaking battery away from fire as there is a danger of ignition or explosion. Safety Precautions for Direct Sunlight Keep this product away from excessive moisture and extreme temperatures. Do not leave the product or its battery inside a vehicle or in places where the temperature may exceed 60°C (140°F), such as on a car dashboard, window 34 sill, or behind a glass that is exposed to direct sunlight or strong ultraviolet light for extended periods of time. This may damage the product, overheat the battery, or pose a risk to the vehicle. PREVENTION OF HEARING LOSS CAUTION – Permanent hearing loss may occur if earphones or headphones are used at high volume for prolonged periods of time. NOTE: For France, earphone (listed below) for this device has been tested to comply with the Sound Pressure Level requirement laid down in the applicable NF EN 50332-1:2000 and/or NF EN 50332-2:2003 standards as required by French Article L. 5232-1. - Earphone, manufactured by Cotron, Models HS S200. Safety in Aircraft Due to the possible interference caused by this product to an aircraft’s navigation system and its communications network, using this device’s phone function on board an aeroplane is against the law in most countries. If you want to use this device when on board an aircraft, remember to turn off the phone by switching to Airplane Mode. Environment Restrictions Do not use this product in gas stations, fuel depots, chemical plants or where blasting operations are in progress, or in potentially explosive atmospheres such as fuelling areas, fuel storehouses, below deck on boats, fuel or chemical transfer or storage facilities, and areas where the air contains chemicals or particles, such as grain, dust, or metal powders. Please be aware that sparks 35 in such areas could cause an explosion or fire resulting in bodily injury or even death. Explosive Atmospheres When in any area with a potentially explosive atmosphere or where flammable materials exist, the product should be turned off and the user should obey all signs and instructions. Sparks in such areas could cause an explosion or fire resulting in bodily injury or even death. Users are advised not to use the equipment at refueling points such as service or gas stations, and are reminded of the need to observe restrictions on the use of radio equipment in fuel depots, chemical plants, or where blasting operations are in progress. Areas with a potentially explosive atmosphere are often, but not always, clearly marked. These include fueling areas, below deck on boats, fuel or chemical transfer or storage facilities, and areas where the air contains chemicals or particles, such as grain, dust, or metal powders. Road Safety Vehicle drivers in motion are not permitted to use telephony services with handheld devices, except in the case of emergency. In some countries, using hands-free devices as an alternative is allowed. Safety Precautions for RF Exposure • Avoid using your device near metal structures (for example, the steel frame of a building). • Avoid using your device near strong electromagnetic sources, such as microwave ovens, sound speakers, TV and radio. 36 • Use only original manufacturer-approved accessories, or accessories that do not contain any metal. • Use of non-original manufacturer-approved accessories may violate your local RF exposure guidelines and should be avoided. Interference with Medical Equipment Functions This product may cause medical equipment to malfunction. The use of this device is forbidden in most hospitals and medical clinics. If you use any other personal medical device, consult the manufacturer of your device to determine if it is adequately shielded from external RF energy. Your physician may be able to assist you in obtaining this information. Turn the phone off in health care facilities when any regulations posted in these areas instruct you to do so. Hospitals or health care facilities may be using equipment that could be sensitive to external RF energy. Hearing Aids Some digital wireless phones may interfere with some hearing aids. In the event of such interference, you may want to consult your service provider, or call the customer service line to discuss alternatives. Nonionising Radiation Your phone has an internal antenna. This product should be operated in its normal-use position to ensure the radiative performance and safety of the interference. As with other mobile radio transmitting equipment, users are advised that for satisfactory operation of the equipment and for the safety of personnel, it is recommended that no part of the human body be allowed to 37 come too close to the antenna during operation of the equipment. Use only the supplied integral antenna. Use of unauthorised or modified antennas may impair call quality and damage the phone, causing loss of performance and SAR levels exceeding the recommended limits as well as result in non-compliance with local regulatory requirements in your country. To assure optimal phone performance and ensure human exposure to RF energy is within the guidelines set forth in the relevant standards, always use your device only in its normaluse position. Do not touch or hold the antenna area unnecesily when placing or receiving a phone call. Contact with the antenna area may impair call quality and cause your device to operate at a higher power level than needed. Avoiding contact with the antenna area when the phone is in use optimises the antenna performance and the battery life. General Precautions • Avoid applying excessive pressure to the device Do not apply excessive pressure on the screen and the device to prevent damaging them and remove the device from your pants’ pocket before sitting down. It is also recommended that you store the device in a protective case. Cracked display screens due to improper handling are not covered by the warranty. • Device getting warm after prolonged use When using your device for prolonged periods of time, such as when you’re talking on the phone, charging the battery or browsing the web, the device may become warm. In most cases, this condition is normal and therefore should not be interpreted as a problem with the device. 38 • Heed service markings Except as explained elsewhere in the Operating or Service documentation, do not service any product yourself. Service needed on components inside the device should be done by an authorised service technician or provider. • Damage requiring service Unplug the product from the electrical outlet and refer servicing to an authorised service technician or provider under the following conditions: - Liquid has been spilled or an object has fallen into the product. - The product has been exposed to rain or water. - The product has been dropped or damaged. - There are noticeable signs of overheating. - The product does not operate normally when you follow the operating instructions. • Avoid hot areas The product should be placed away from heat sources such as radiators, heat registers, stoves, or other products (including amplifiers) that produce heat. • Avoid wet areas Never use the product in a wet location. • Avoid using your phone after a dramatic change in temperature When you move your device between environments with very different 39 temperature and/or humidity ranges, condensation may form on or within the device. To avoid damaging the device, allow sufficient time for the moisture to evaporate before using the device. Notice: When taking the device from low-temperature conditions into a warmer environment or from high-temperature conditions into a cooler environment, allow the device to acclimate to room temperature before turning on power. • Avoid pushing objects into product Never push objects of any kind into cabinet slots or other openings in the product. Slots and openings are provided for ventilation. These openings must not be blocked or covered. • Mounting Accessories Do not use the product on an unstable table, cart, stand, tripod, or bracket. Any mounting of the product should follow the manufacturer’s instructions, and should use a mounting accessory recommended by the manufacturer. • Avoid unstable mounting Do not place the product with an unstable base. • Use product with approved equipment This product should be used only with personal computers and options identied as suitable for use with your equipment. • Adjust the volume Turn down the volume before using headphones or other audio devices. 40 • Cleaning Unplug the product from the wall outlet before cleaning. Do not use liquid cleaners or aerosol cleaners. Use a damp cloth for cleaning, but never use water to clean the LCD screen. Regulatory Agency Identifications For regulatory identification purposes, your product is assigned a model number of DREA100. To ensure continued reliable and safe operation of your device, use only the accessories listed below with your DREA100. The Battery Pack has been assigned a model number of DREA160. Note This product is intended for use with a certified Class 2 Limited Power Source, rated 5 Volts DC, maximum 1 Amp power supply unit. Federal Communications Commission Notice This device complies with part 15 of the FCC Rules. Operation is subject to the following two conditions: (1) This device may not cause harmful interference, and (2) this device must accept any interference received, including interference that may cause undesired operation. This equipment has been tested and found to comply with the limits for a Class B digital device, pursuant to Part 15 of the FCC Rules. These limits are designed to provide reasonable protection against harmful interference in a residential installation. This equipment generates, uses, and can radiate radio frequency energy and, if not installed and used in accordance with the instructions, may cause harmful interference to radio communications. However, there is no 41 guarantee that interference will not occur in a particular installation. If this equipment does cause harmful interference to radio or TV reception, which can be determined by turning the equipment on and off, the user is encouraged to try to correct the interference by one or more of the following measures: • Reorient or relocate the receiving antenna. •Increase the separation between the equipment and receiver. • Connect the equipment into an outlet on a circuit different from that to which the receiver is connected. • Consult the dealer or an experienced radio or television technician for help. Modifications The FCC requires the user to be notified that any changes or modifications made to the device that are not expressly approved by HTC Corporation may void the user’s authority to operate the equipment. Safety Precautions for RF Exposure • Use only original manufacturer-approved accessories, or accessories that do not contain any metal. • Use of non-original manufacturer-approved accessories may violate your local RF exposure guidelines and should be avoided. Exposure to Radio Frequency (RF) Signals Your device contains a radio transmitter and receiver. The radiated output power is far below the international radio frequency exposure limits. These limits are part of comprehensive guidelines and establish permitted levels of RF energy 42 for the general population. The guidelines are based on the safety standards previously set by international standards bodies: • American National Standards Institute (ANSI) IEEE. C95.1-1992 • National Council on Radiation Protection and Measurement (NCRP). Report 86. 1986 • International Commission on Non-Ionizing Radiation Protection (ICNIRP) 1996 • Ministry of Health (Canada), Safety Code 6. The standards include a substantial safety margin designed to assure the safety of all persons, regardless of age and health. The exposure standard for wireless mobile phones employs a unit of measurement known as the Specific Absorption Rate, or SAR. The standard incorporates a substantial margin of safety to give additional protection for the public and to account for any variations in usage. As with other mobile radio transmitting equipment, users are advised that for satisfactory operation of the equipment and for the safety of personnel, it is recommended that no part of the human body be allowed to come too close to the antenna during operation of the equipment. Your device has an internal antenna. Use only the supplied integral antenna. Use of unauthorized or modified antennas may impair call quality and damage the phone, causing loss of performance and SAR levels exceeding the recommended limits as well as result in non-compliance with local regulatory 43 requirements in your country. To assure optimal phone performance and ensure human exposure to RF energy is within the guidelines set forth in the relevant standards; always use your device only in its normal-use position. Do not touch or hold the antenna area unnecessarily when placing or receiving a phone call. Contact with the antenna area may impair call quality and cause your device to operate at a higher power level than needed. Avoiding contact with the antenna area when the phone is IN USE optimizes the antenna performance and the battery life. Tests for SAR are conducted using standard operating positions specified by the FCC with the phone transmitting at its highest certified power level in all tested frequency bands. Although the SAR is determined at the highest certified power level, the actual SAR level of the phone while operation can be well below the maximum value. This is because the phone is designed to operate at multiple power levels so as to use only the power required to reach the network. In general, the closer you are to a wireless base station antenna, the lower the power output. Before a phone model is available for sale to the public, it must be tested and certified to the FCC that it does not exceed the limit established by the government-adopted requirement for safe exposure. The tests are performed in positions and locations (for example, at the ear and worn on the body) as required by the FCC for each model. (Bodyworn measurements may differ among phone models, depending upon available accessories and FCC requirements). For body worn operation, to maintain compliance with FCC RF exposure guidelines, use only original manufacturer approved accessories. When carrying the phone while it is on, use the specific original manufacturer supplied or approved carrying case, holster, or other body-worn accessory. 44 Body-worn operation This device was tested for typical body-worn operations with the back of the phone kept 1.5 cm from the body. To maintain compliance with FCC RF exposure requirements, use only belt-clips, holsters or similar accessories that maintain a 1.5 cm separation distance between the user’s body and the back of the phone, including the antenna. The use of belt-clips, holsters and similar accessories should not contain metallic components in its assembly. The use of accessories that do not satisfy these requirements may not comply with FCC RF exposure requirements, and should be avoided. SAR Information 1.11 W/Kg @1g (Head) 1.08 W/Kg @1g (Body) Telecommunications & Internet Association (TIA) safety information Pacemakers The Health Industry Manufacturers Association recommends that a minimum separation of six inches be maintained between a handheld wireless phone and a pacemaker to avoid potential interference with the pacemaker. These recommendations are consistent with the independent research by and recommendations of Wireless Technology Research. Persons with pacemakers: - Should ALWAYS keep the phone more than six inches from their pacemaker when the phone is turned on. 45 - Should not carry the phone in a breast pocket. - Should use the ear opposite the pacemaker to minimize the potential for interference. If you have any reason to suspect that interference is taking place, turn the phone off immediately. Hearing Aids Some digital wireless phones may interfere with some hearing aids. In the event of such interference, you may want to consult your service provider, or call the customer service line to discuss alternatives. Other Medical Devices If you use any other personal medical device, consult the manufacturer of your device to determine if they are adequately shielded from external RF energy. Your physician may be able to assist you in obtaining this information. Turn the phone off in health care facilities when any regulations posted in these areas instruct you to do so. Hospitals or health care facilities may be using equipment that could be sensitive to external RF energy. WEEE Notice The Directive on Waste Electrical and Electronic Equipment (WEEE), which entered into force as European law on 13th February 2003, resulted in a major change in the treatment of electrical equipment at end-of-life. The purpose of this Directive is, as a first priority, the prevention of WEEE, and in addition, to promote the reuse, recycling and other forms of recovery of such wastes so as to reduce disposal. The WEEE logo (shown at the left) on the product or on its box indicates that this 46 product must not be disposed of or dumped with your other household waste. You are liable to dispose of all your electronic or electrical waste equipment by relocating over to the specified collection point for recycling of such hazardous waste. Isolated collection and proper recovery of your electronic and electrical waste equipment at the time of disposal will allow us to help conserving natural resources. Moreover, proper recycling of the electronic and electrical waste equipment will ensure safety of human health and environment. For more information about electronic and electrical waste equipment disposal, recovery, and collection points, please contact your local city centre, household waste disposal service, shop from where you purchased the equipment, or manufacturer of the equipment. RoHS Compliance This product is in compliance with Directive 2002/95/EC of the European Parliament and of the Council of 27 January 2003, on the restriction of the use of certain hazardous substances in electrical and electronic equipment (RoHS) and its amendments. 47 HTC limited warranty statement This limited warranty shall apply to the HTC product (the “Product”). HTC warrants that the product is at the time of its original purchase free of defects in materials and workmanship (“Limited Warranty”). This Limited Warranty is subject to the following terms and conditions: 1. This Limited Warranty is given only to the original purchaser of the Product (“Customer”). It shall neither exclude nor limit. a) any statutory rights of the Customer or b) any of the Customer’s rights against the seller/dealer of the Product. 2. This Limited Warranty shall last for twelve (12) months from the date of original purchase for mobile devices and twelve (12) months for accessories (whether included in the mobile device sales package or sold separately) other than the media on which any software is provided, CDrom, memory card. (“Warranty Period”) Customer shall present the PROOF OF PURCHASE upon claiming this Limited Warranty. This Limited Warranty may not be sold-on, assigned, transferred or given to any subsequent purchaser or acquirer of the Product. This Limited Warranty is only valid and enforceable in the countries where the Product is sold. Moreover, if Product is returned to be repaired under this Limited Warranty in the place other than where you purchased, HTC attempts to repair such Product but can not guarantee the outcome. 48 Warranty service availability and response times may vary from country to country and may also be subject to a registration requirement in the country of purchase. 3. Throughout the Warranty Period HTC or its authorized agent will, at their discretion, without charge and subject to Clause 7 repair or replace a defective Product. Repair or replacement may involve the use of functionally equivalent reconditioned unit. HTC will return the repaired Product or replaced with another functional equivalent Product to the Customer in good working condition. All replaced faulty parts or components will become the property of HTC. 4. This Limited Warranty applies only to the hardware components of the Product as originally supplied and does not apply to any software or other equipment. 5. If HTC repairs or replaces the Product, the repaired or replaced Product shall continue to be warranted for the remaining time of the original Warranty Period or for three (3) months from the date of repair or replacement, whichever is longer. 6. Before returning any unit for service, be sure to back up data and remove any confidential, proprietary, or personal information from the Product. HTC is not responsible for the damage to or loss of any programs, data, or removable storage media. 7. THIS LIMITED WARRANTY SHALL NOT APPLY IF THE DEFECT WAS CAUSED THROUGH ANY OF THE FOLLOWING: a) the Product serial number, the accessory date code the IMEI number, water indicator or the warranty seal has been removed, erased, defaced, altered or is illegible; or b)deterioration of the Product due to normal wear and tear; or 49 c) use other than in accordance with the user manual, rough handling, exposure to moisture, dampness or extreme thermal or environmental conditions or a rapid change in such conditions, corrosion, oxidation, unauthorized modifications or connections, unauthorized opening or repair, repair by use of unauthorized spare parts, accidents, forces of nature, or other actions beyond the reasonable control of HTC (including but not limited to deficiencies in consumable parts) unless the defect was caused directly by defects in materials or workmanship. This Limited Warranty does not cover physical damage to the surface of the Product including but not limited to cracks or scratches on the LCD screen or camera lens; or d) the defects caused by the fact that the battery has been short-circuited or by the fact that the seals of the battery enclosure or the cells are broken or show evidence of tampering or by the fact that the battery has been used in equipment other than those for which it has been specified; or e) the defect was caused by a defective function of the cellular network or other system; or f) the Product software needs to be upgraded due to changes in cellular network parameters; or g)the defect was caused by the fact that the Product was used with or connected to an accessory not approved or provided by HTC or used in other than its intended use and where it can be shown by HTC that such defect is not the fault of the Product itself. 8. Your Product may contain country specify elements, including software, 50 If the Product has been re-exported from its original destination country to another country, the Product may contain country specific elements that are not considered to be a defect under this Limited Warranty. Any claim under this Limited Warranty is subject to you notifying HTC or a HTC authorized service agent of the alleged defect within a reasonable time of it having come to your attention and in any event no later than before the expiry of the Warranty Period. 9. In the event of Product failure, the Customer should take the following actions: a)Refer to the user manual in order to identify and possibly correct the problem. b)If the problem cannot be resolved by reference to the user manual the Customer should then contact the dealer where such Product was purchased or visit your local HTC website, or HTC service center or www. htc.com for further information. c)Before the Customer contacts HTC service agent, please ensure the following information is at hand: The model and serial number, IMEI/ESN number of the Product. The Customer’s full address and contact information. A copy of the Customers original invoice, receipt or bill of sale of the purchase of the Product. HTC will provide the Customer with instructions regarding how and when the defective Product should be returned. HTC will pay costs in connection with both the return of the defective product to HTC and the repaired Product back to the 51 Customer if the Defective Product is within the Warranty Period. 10. THIS LIMITED WARRANTY STATES THE ENTIRE WARRANTY GIVEN BY HTC TO THE CUSTOMER. ALL IMPLIED WARRANTIES OF SATISFACTORY QUALITY OR FITNESS FOR A PARTICULAR PURPOSE ARE LIMITED TO THE RELEVANT WARRANTY PERIOD. IN NO EVENT SHALL HTC BE LIABLE FOR INCIDENTAL OR ONSEQUENTAL LOSSES OR DAMAGES OF ANY NATURE WHATSOEVER, INCLUDING BUT NOT LIMITED TO LOST PROFITS OR COMMERCIAL LOSS, TO THE FULLEST EXTENT THAT THOSE LOSSES OR DAMAGES CAN BE DISCLAIMED BY LAW. IN ANY CASE HTC AND ITS SUPPLIERS ENTIRE LIABILITY UNDER ANY PROVISION OF THIS LIMITED WARRANTY SHALL BE LIMITED TO THE AMOUNT ACTUALLY PAID BY THE CUSTOMER FOR THE HARDWARE. HTC does not exclude or limit liability for personal injury or death resulting from its own negligence. Some countries do not allow exclusions or limitation of incidental or consequential loss or damage, or limitation of the duration of implied warranties, in those circumstances the preceding limitations or exclusions may not apply to such Customers. This warranty gives the Customer specific legal rights; the Customer may also have other rights, which may vary from country to country. This limited warranty does not affect the Customers statutory rights in law specific to the country of purchase, such rights remain protected. This Limited Warranty will be updated by HTC from time to time. Please visit your local HTC website to obtain the latest version of the Limited Warranty for the Product. 52