1
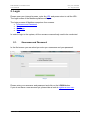
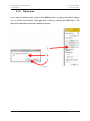
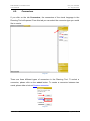
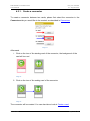
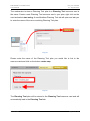
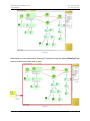
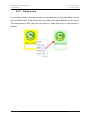
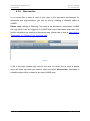
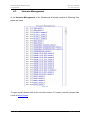
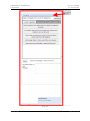
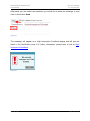
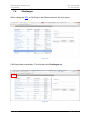
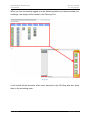
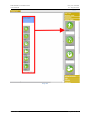
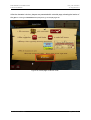
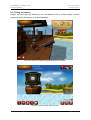
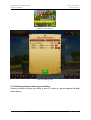
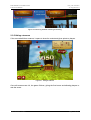
Project number: 257872 METAFORA Learning to learn together: A visual language for social orchestration of educational activities STREP ICT / Technology-enhanced learning User Manual Due date: 31.08.2013 Organization name: Catholic University Eichstätt-Ingolstadt Project co-funded by the European Commission within the 7th Framework Program (2007-2013) Dissemination Level PU Public X PP Restricted to other programme participants (including the Commission Services) RE Restricted to a group specified by the consortium (including the Commission Services) CO Confidential, only for members of the consortium (including the Commission Services) http://www.metafora-project.org/ Deliverable D4.2 Attachment User Manual Proj. No. 257872 31. August 2013 Document number: D4.2 Attachment Document Title: User Manual Work package: WP4 – Framework System, Domain Tools, and Integration Document status: Final Date: 31.08.2013 Author: Kerstin Pfahler (KUEI) Abstract In this document we present how to use the Metafora platform with all its features and functionalities. Keyword list Metafora platform, Metafora system, Planning Tool, visual language, resource cards, Workbench, Reflection Tool, landmarks, CAVilLag. METAFORA Page 2 of 124 Deliverable D4.2 Attachment User Manual Proj. No. 257872 31. August 2013 Table of Contents Abbreviations used ..................................................................................................... 6 1. URL ..................................................................................................................... 7 2. Login.................................................................................................................... 8 2.1. Username and Password .............................................................................. 8 2.1.1. Register a new user .............................................................................. 10 2.2. Group .......................................................................................................... 11 2.2.1. Create a new group .............................................................................. 13 2.3. Challenge .................................................................................................... 15 2.4. Plan ............................................................................................................. 17 2.4.1. Create a new plan ................................................................................. 19 2.5. Logout ......................................................................................................... 20 3. Metafora platform .............................................................................................. 21 3.1. Metafora tabs .............................................................................................. 24 3.2. Tools............................................................................................................ 25 3.3. Group Info ................................................................................................... 27 3.3.1. Change group ....................................................................................... 29 3.3.2. Join the group ....................................................................................... 30 3.3.3. Logout local user................................................................................... 31 3.4. Chat ............................................................................................................. 32 3.4.1. New chat message ............................................................................... 33 3.5. Notification................................................................................................... 34 3.5.1. High Interruptive Feedback ................................................................... 35 3.5.2. Low Interruptive Feedback .................................................................... 36 3.5.3. No Interruptive Feedback ...................................................................... 37 3.5.4. New Feedback Message ...................................................................... 38 3.6. Help ............................................................................................................. 39 4. Planning Tool .................................................................................................... 42 4.1. Plan organizer ............................................................................................. 44 4.1.1. Open a plan .......................................................................................... 45 4.1.2. Save as ................................................................................................. 47 4.1.3. Save version ......................................................................................... 48 METAFORA Page 3 of 124 Deliverable D4.2 Attachment User Manual Proj. No. 257872 31. August 2013 4.1.4. Create new plan .................................................................................... 49 4.1.5. Delete plan ............................................................................................ 50 4.1.6. Share a plan.......................................................................................... 51 4.2. Connectors .................................................................................................. 53 4.2.1. Create a connector ............................................................................... 54 4.2.2. Delete a connector ................................................................................ 55 4.3. Cards ........................................................................................................... 56 4.3.1. Create a card ........................................................................................ 58 4.3.2. Move a card .......................................................................................... 60 4.3.3. Write text in a card ................................................................................ 61 4.3.4. Delete a card......................................................................................... 62 4.3.5. Start using a card .................................................................................. 63 4.3.6. Start using resource cards .................................................................... 64 4.3.7. Finish a card ......................................................................................... 71 4.3.8. Discuss this ........................................................................................... 72 4.3.9. Post to chat ........................................................................................... 74 5. Reflection Tool .................................................................................................. 76 5.1 Zooming and screen size ................................................................................ 79 5.2 Focus landmark .............................................................................................. 82 6. Workbench ........................................................................................................ 83 6.1. Breaking News ............................................................................................ 84 6.2. Documents .................................................................................................. 85 6.2.1. Open a document ................................................................................. 86 6.2.2. Upload a document ............................................................................... 87 6.3. Versions Management................................................................................. 89 6.4. Messaging Tool ........................................................................................... 90 7. CAVilLag ........................................................................................................... 94 7.1. URL ............................................................................................................. 94 7.2. Challenges .................................................................................................. 95 7.2.1. Show challenge design ......................................................................... 97 7.2.2. Show challenge description .................................................................. 98 7.3. Create new challenge .................................................................................. 99 7.4. Change challenge name or URL ............................................................... 104 METAFORA Page 4 of 124 Deliverable D4.2 Attachment User Manual Proj. No. 257872 31. August 2013 7.5. Design challenge ....................................................................................... 107 7.5.1. Add and remove elements .................................................................. 110 7.5.2. Order elements ................................................................................... 112 7.6. Preview and save challenge ...................................................................... 115 7.6.1. Preview ............................................................................................... 116 7.6.2. Save challenge ................................................................................... 117 7.7. Use challenge design ................................................................................ 119 8. Summary ......................................................................................................... 122 References ............................................................................................................. 123 METAFORA Page 5 of 124 Deliverable D4.2 Attachment User Manual Proj. No. 257872 31. August 2013 Abbreviations used: URL – Uniform Resource Locator HIF – High Interruptive Feedback LIF – Low Interruptive Feedback NIF – No Interruptive Feedback PiKI – Pirates of the Kinematics Island CAVilLag – Challenge Authoring tool for the Visual Language METAFORA Page 6 of 124 Deliverable D4.2 Attachment User Manual Proj. No. 257872 31. August 2013 1. URL English: https://metaforaserver.ku.de Greek: https://metaforaserver.ku.de/?locale=gr Hebrew: https://metaforaserver.ku.de/?locale=he Spain: https://metaforaserver.ku.de/?locale=es German: https://metaforaserver.ku.de/?locale=de Portuguese: https://metaforaserver.ku.de/?locale=pt Chinese: https://metaforaserver.ku.de/?locale=zh Browser: we recommend using Google Chrome (updated version). Cookies need to be enabled. Stable internet connection is required. Please note: The only secret data in the Metafora system is the user password, all other data is open and freely accessible to Metafora users. METAFORA Page 7 of 124 Deliverable D4.2 Attachment User Manual Proj. No. 257872 31. August 2013 2. Login Please open your internet browser, enter the URL and press return to call the URL. The login screen of the Metafora platform will open. The login process of Metafora comprises four screens: Username and Password Group Challenge Plan In order to login to the system, all four screens consecutively need to be conducted. 2.1. Username and Password In the first screen you are asked you enter your username and your password. Image 1 Please enter your username and password and click on the LOGIN button. If you do not have a user account yet, please take a look at register a new user. METAFORA Page 8 of 124 Deliverable D4.2 Attachment User Manual Proj. No. 257872 31. August 2013 Image 2 METAFORA Page 9 of 124 Deliverable D4.2 Attachment User Manual Proj. No. 257872 31. August 2013 2.1.1. Register a new user If you don’t have a user account yet and want to register a new user, please enter a new username and your preferred password. Afterwards click on the LOGIN button. The system will automatically detect if it is a new username. Image 3 If the username is untaken and does not yet exist in the system, you will be asked if you would like to create a new user account. Enter “yes” into the text area of the dialog and press OK. Image 4 If creating the new account succeeded you will get a notification prompt. If it was not successful please try again. Image 5 METAFORA Page 10 of 124 Deliverable D4.2 Attachment User Manual 2.2. Proj. No. 257872 31. August 2013 Group Once having entered your username with your correct password, you will be asked to select your group on the next login screen. Image 6 On login screen number two you can see on the top the username with which you are logged in. On the top right corner you can logout from the system. On the bottom is a <BACK button to go back to the previous login screen. Next to the back button is the CONTINUE> button to continue the login process after having selected your group. Here again the explanation visualized: METAFORA Page 11 of 124 Deliverable D4.2 Attachment User Manual Proj. No. 257872 31. August 2013 Image 7 Please select your group and press the CONTINUE> button to proceed with the login. If you want to create a new group, please take a look at Create a new group. Image 8 METAFORA Page 12 of 124 Deliverable D4.2 Attachment User Manual Proj. No. 257872 31. August 2013 2.2.1. Create a new group To create a new group, please click on the Create New Group button. Image 9 You will be asked to enter the name of the new group. Please enter the name and click on the OK button to confirm. Image 10 Afterwards the group name will appear in the drop down list of the groups. Please select your group and continue as explained in Group selection. METAFORA Page 13 of 124 Deliverable D4.2 Attachment User Manual Proj. No. 257872 31. August 2013 Image 11 METAFORA Page 14 of 124 Deliverable D4.2 Attachment User Manual 2.3. Proj. No. 257872 31. August 2013 Challenge The third screen of the login process will bring you to the challenge selection. On this screen as well you can see on the top the username and the group name you had entered in the previous steps. The top right corner offers the coherent logout button in case you want to leave the system. Two buttons on the bottom of the screen direct you through the login process. The <BACK button will bring you back to the previous screen and with the CONTINUE> button you can proceed with the login process once you have selected your challenge. In the middle of the screen you can see a list with all challenges offered in Metafora. Clicking on a challenge will show the challenge description (if exists) on the right side of the screen. The challenge description will explain what you are supposed to do in this challenge. Below the challenge list you can see your recent selected choices of challenges. Image 12 METAFORA Page 15 of 124 Deliverable D4.2 Attachment User Manual Proj. No. 257872 31. August 2013 Please select your challenge and click on the continue button to proceed with the login. To create a new challenge, please take a look at the CAVilLag. Image 13 METAFORA Page 16 of 124 Deliverable D4.2 Attachment User Manual 2.4. Proj. No. 257872 31. August 2013 Plan The last step in the login process to the Metafora system is to select your Planning Tool plan in which you want to create your plan to solve your challenge. Again this screen shows you the entered login information (Name, Group and Challenge) on the top and next to it the coherent logout button, to leave the system. The bottom of the screen offers the <BACK and CONTINUE> button to go back in your login process or to continue. In the center of the screen you can see a list of existing Planning Tool plans. Next to the list your recent selected choices. Image 14 Please select your plan and click on CONTINUE> to proceed. If you want to create a new Planning Tool plan, please take a look at Create a new plan. METAFORA Page 17 of 124 Deliverable D4.2 Attachment User Manual Proj. No. 257872 31. August 2013 Image 15 METAFORA Page 18 of 124 Deliverable D4.2 Attachment User Manual Proj. No. 257872 31. August 2013 2.4.1. Create a new plan To create a new Planning Tool plan, please click on the Create New Map button. Image 16 A prompt will appear, asking you to enter the name of the new Planning Tool plan. Please enter the name and confirm by clicking the OK button. The plan will automatically be created and opened in the Planning Tool of the Metafora platform. Image 17 METAFORA Page 19 of 124 Deliverable D4.2 Attachment User Manual 2.5. Proj. No. 257872 31. August 2013 Logout To logout from the system, you can rather click on the Logout button on the top right corner, or by clicking the X button behind the user name in the Group Info area, what is also described in Logout local user. Image 18 METAFORA Page 20 of 124 Deliverable D4.2 Attachment User Manual Proj. No. 257872 31. August 2013 3. Metafora platform Having successfully completed the login process, the platform will open. Image 19 On the right top corner you again have the Logout button to logout in case you want to leave the platform, for further information, please take a look at Logout. And tab bars for every open tool. METAFORA Page 21 of 124 Deliverable D4.2 Attachment User Manual Proj. No. 257872 31. August 2013 Image 20 In the center of the screen, the tool itself is shown. In this example image the Planning Tool is opened. Image 21 On the left side of the platform you have a menu with Tools, Group Info, Chat, a Notification area and a Help button. To open a menu item, click on it. METAFORA Page 22 of 124 Deliverable D4.2 Attachment User Manual Proj. No. 257872 31. August 2013 Image 22 METAFORA Page 23 of 124 Deliverable D4.2 Attachment User Manual 3.1. Proj. No. 257872 31. August 2013 Metafora tabs All Metafora tools are opened in a tab. Image 23 When clicking on the tab, the open tool will be shown. If you want to close the tab, click on the X. Image 24 METAFORA Page 24 of 124 Deliverable D4.2 Attachment User Manual 3.2. Proj. No. 257872 31. August 2013 Tools When clicking on the Tools menu tab on the left side of the platform, a list with all embedded Metafora tools as buttons will open up. Image 25 The embedded tools are the Planning Tool, the discussion environment LASAD, the microworlds PiKI, Sus-X, eXpresser, Juggler and 3D-Math; as well as a link to Google, a page to write Notes and finally the Messaging Tool. Clicking on a button opens the tool in a new Metafora tab in the center of the screen. For more information on the tab, please take a look at Metafora tabs. A better way to open a tool is to directly enact through resource cards in your Planning Tool plan, where you can persistently save compiled artifacts. For further information, please take a look at start using a card and start using a “Discussion” or “Planning Tool” resource card. METAFORA Page 25 of 124 Deliverable D4.2 Attachment User Manual Proj. No. 257872 31. August 2013 Image 26 Metafora has an automatic login mechanism implemented, to automatically login the user who opened the tool. Thus if you open the discussion environment LASAD, you will be automatically logged in to the tool. Image 27 METAFORA Page 26 of 124 Deliverable D4.2 Attachment User Manual 3.3. Proj. No. 257872 31. August 2013 Group Info Clicking on the Group Info tab on the left side of the Metafora platform will open a register in which you get information about your group. Image 28 On the tab of the Group Info bar, you can see in which group you are logged in. Below your group is a list of all users who are as well logged in to the same group. In this example the group’s name is “Metafora”, in which “Stuart” and “eyal” are currently logged in. Image 29 METAFORA Page 27 of 124 Deliverable D4.2 Attachment User Manual Proj. No. 257872 31. August 2013 Below the tab you can see which challenge you have selected in the login process and on which you are working, as well as your group name. Image 30 Underneath you have the option of changing to another group. For further details, please take a look at Change Group. In the section GROUP MEMBERS is a list with all users who are currently logged in to the same group, in this example the group “Metafora”. As you can see “Stuart” and “eyal” are logged in to the group “Metafora”. Stuart is a local user and eyal is a remote user. A local user is every user, who is logged in from your computer, what can be seen through the X button behind the username. A remote user whereas is every user logged in to the same group, but from another computer, shown via the word remote in brackets behind the username. The following image shows “Stuart” as a local user and “eyal” as remote user. Image 31 METAFORA Image 32 Page 28 of 124 Deliverable D4.2 Attachment User Manual Proj. No. 257872 31. August 2013 3.3.1. Change group If you want to switch to another group, you can do so by entering the name of the group you want to join into the text field of the Group Info and click on the change button. Image 33 The changes will be visualized in the tab of the Group Info and in the content of the tab, by showing the name of the new group and all logged in users. Image 34 METAFORA Page 29 of 124 Deliverable D4.2 Attachment User Manual Proj. No. 257872 31. August 2013 3.3.2. Join the group The Metafora system provides the option to login further local users on your computer. As mentioned above a local user is every user, logged in from your computer (every user with X button behind username). Remote users whereas are users who are logged in to the same group, but from another computer, shown via the word remote in brackets behind the username. In this example “Stuart” is locally logged in on this computer. He now wants to add “Alice”, who is working with him from this computer. To login a local user, please enter the username and the password of the new user in the JOIN THE GROUP section and click on the join button. Image 35 You will get a prompt if the login succeeded. The new local user will then be added to the GROUP MEMBERS list. Image 36 Image 37 METAFORA Page 30 of 124 Deliverable D4.2 Attachment User Manual Proj. No. 257872 31. August 2013 3.3.3. Logout local user A local user is logged in from your computer; a remote user is logged in to the same group, but from another computer. You can logout a local user by clicking the X button behind the username. Only this local user will then be logged out. You can also log out all local users at once, by clicking the blue Logout button on the top right corner, what is also explained in Logout. It is not possible to logout a remote user from your computer, since this user is logged in from another computer. Image 38 METAFORA Page 31 of 124 Deliverable D4.2 Attachment User Manual 3.4. Proj. No. 257872 31. August 2013 Chat The Metafora platform offers a group chat with which you can exchange messages with all logged in members of your group. Clicking on the Chat tab opens the chat. Image 39 If you want to send a chat message to your group, enter the message you want to send into the text area on the bottom of the chat tab and click on the send button. Image 40 The message will then appear in the chat and all logged in group members receive it. They are then able to answer. METAFORA Page 32 of 124 Deliverable D4.2 Attachment User Manual Proj. No. 257872 31. August 2013 3.4.1. New chat message If you have received a new chat message, but your chat tab bar is not opened, you will get an awareness notification. A little red arrow will appear and the amount of new messages will be shown. Image 41 By clicking on the tab, you can open the Chat and read the new messages. METAFORA Page 33 of 124 Deliverable D4.2 Attachment User Manual 3.5. Proj. No. 257872 31. August 2013 Notification If you click on the Notification tab, the Notification area will open. The Notification area in the Metafora platform shows feedback messages. Feedback messages are any advice or guidance provided by the system or some group member to help you working on your learning scenario. Image 42 It holds three different levels of feedback HIF - High Interruptive Feedback LIF - Low Interruptive Feedback NIF - No Interruptive Feedback Image 43 METAFORA Page 34 of 124 Deliverable D4.2 Attachment User Manual Proj. No. 257872 31. August 2013 3.5.1. High Interruptive Feedback High Interruptive Feedback messages are written in red color in the Notification area. If a feedback with high interruption is received, then a popup window appears in the center of the screen with the message in it. The message is also listed in the Notification area to be available for further contribution. Image 44 To continue working in the system, please click on the OK button of the High Interruptive Feedback popup. The popup will then disappear. Image 45 METAFORA Page 35 of 124 Deliverable D4.2 Attachment User Manual Proj. No. 257872 31. August 2013 3.5.2. Low Interruptive Feedback Low Interruptive Feedback messages are written in yellow color in the Notification area. If a feedback with low interruption is received, then a popup window appears on the right bottom of the screen with the message in it. The popup will disappear after some seconds and the message is listed in the Notification area to be available for further contribution. Image 46 METAFORA Page 36 of 124 Deliverable D4.2 Attachment User Manual Proj. No. 257872 31. August 2013 3.5.3. No Interruptive Feedback No Interruptive Feedback messages are written in green color in the Notification area. If a feedback with no interruption is received, the message will be listed in the Notification area to be available for further contribution. Image 47 METAFORA Page 37 of 124 Deliverable D4.2 Attachment User Manual Proj. No. 257872 31. August 2013 3.5.4. New Feedback Message If you have received a new feedback message, but your Notification tab bar is closed, you will get an awareness notification. A little red arrow will appear and the amount of new messages will be shown. Image 48 By clicking on the tab, you can open the Notification area and read the new feedback messages. Image 49 METAFORA Page 38 of 124 Deliverable D4.2 Attachment User Manual 3.6. Proj. No. 257872 31. August 2013 Help The Metafora platform offers a help functionality. On the left bottom of the screen a red HELP button is integrated. If you need help, please click on this button. Image 50 Having clicked the help button a dialog will appear, asking for information about what you need help. METAFORA Page 39 of 124 Deliverable D4.2 Attachment User Manual Proj. No. 257872 31. August 2013 Image 51 In this dialog you can select from whom you would like to receive help in the Ask help from section. When selecting group with pop-up, a popup message will be sent to your group, requesting help. Furthermore you can enter in which tool you need help in About your work in? and write some text into the text area of Why? about the reason you need help. Image 52 If you afterwards click on the ask help button, your help request will be sent to the system. METAFORA Page 40 of 124 Deliverable D4.2 Attachment User Manual Proj. No. 257872 31. August 2013 Image 53 If you have selected group with pop-up in the Ask help from section, your group will receive a help request popup. Image 54 METAFORA Page 41 of 124 Deliverable D4.2 Attachment User Manual Proj. No. 257872 31. August 2013 4. Planning Tool This is the Planning Tool of Metafora. Image 55 In the center of the Planning Tool is an area to create your plan. METAFORA Page 42 of 124 Deliverable D4.2 Attachment User Manual Proj. No. 257872 31. August 2013 Image 56 On the right side of the Planning Tool is a menu palette with options to organize your plans and the embedded visual language with which you can create a plan. To open a menu item, click on it. Image 57 METAFORA Page 43 of 124 Deliverable D4.2 Attachment User Manual 4.1. Proj. No. 257872 31. August 2013 Plan organizer The first menu item in the Planning Tool aims to organize your plans, to make aware about owners of plans and who is currently working on the same plan. You can: Open a plan Save as Save a version Create a new plan Delete a plan Share a plan Image 58 The tab bar of this menu item shows the name of the plan which is currently opened and all members who are working on this plan right now. In this example image the name of the plan is “testMap” on which “Stuart” and “Alice” are currently working. Image 59 METAFORA Page 44 of 124 Deliverable D4.2 Attachment User Manual Proj. No. 257872 31. August 2013 4.1.1. Open a plan To open a plan, please click on the little arrow of the drop down list in the PLAN section, select the plan from the drop down list you would like to open and click on the open button. Image 60 Image 61 The selected plan will open in the center of the Planning Tool. METAFORA Page 45 of 124 Deliverable D4.2 Attachment User Manual Proj. No. 257872 31. August 2013 Image 62 METAFORA Page 46 of 124 Deliverable D4.2 Attachment User Manual Proj. No. 257872 31. August 2013 4.1.2. Save as You can save your plan within a different name by clicking on the save as button. A popup will appear asking you to enter the new name of the plan. Please enter the name and confirm by clicking on OK. Image 63 METAFORA Page 47 of 124 Deliverable D4.2 Attachment User Manual Proj. No. 257872 31. August 2013 4.1.3. Save version You can save a version of your plan in its current state by clicking on the save version button. A copy of your plan will be stored in the Versions Management of the Workbench. Image 64 METAFORA Page 48 of 124 Deliverable D4.2 Attachment User Manual Proj. No. 257872 31. August 2013 4.1.4. Create new plan If you want to create a new plan, click on the new plan button. A popup will appear asking you to enter the name for the new plan. Please enter the name and confirm by clicking the OK button. Image 65 The new plan will then open up in the center of the Planning Tool. METAFORA Page 49 of 124 Deliverable D4.2 Attachment User Manual Proj. No. 257872 31. August 2013 4.1.5. Delete plan If you want to delete a plan, click on the delete button. A popup will appear asking you to confirm the deletion. Enter yes and confirm by clicking the OK button. The plan will be deleted and not be available anymore. Image 66 METAFORA Page 50 of 124 Deliverable D4.2 Attachment User Manual Proj. No. 257872 31. August 2013 4.1.6. Share a plan The plans in the Planning Tool can be shared with users and groups. Thus only the groups with which the plan is shared have access to the plan. SHARED WITH GROUPS shows the groups with which the opened plan is shared. In this example the plan “testMap” is shared with the group “Metafora”. In the “Metafora” group are currently three users online: “Stuart”, “Alice” and “Bob”. Image 67 If you’d like to share your opened plan with other groups, enter the group name into the text area and click on share. Afterwards all members of the new added group have access to the plan. METAFORA Page 51 of 124 Deliverable D4.2 Attachment User Manual Proj. No. 257872 31. August 2013 Image 68 METAFORA Page 52 of 124 Deliverable D4.2 Attachment User Manual 4.2. Proj. No. 257872 31. August 2013 Connectors If you click on the tab Connectors, the connectors of the visual language in the Planning Tool will opened. From this tab you can select the connector type you would like to create. Image 69 There are three different types of connectors in the Planning Tool. To select a connector, please click on the select button. To create a connector between two cards, please take a look at Create a connector. Image 70 METAFORA Page 53 of 124 Deliverable D4.2 Attachment User Manual Proj. No. 257872 31. August 2013 4.2.1. Create a connector To create a connector between two cards, please first select the connector in the Connectors tab you would like to be created, as described in Connectors. Image 71 Afterwards 1. Click on the icon of the starting card of the connector, the background of the card will turn red Image 72 2. Click on the icon of the ending card of the connector Image 73 The connector will be created. You can also take a look at Create a card. METAFORA Page 54 of 124 Deliverable D4.2 Attachment User Manual Proj. No. 257872 31. August 2013 4.2.2. Delete a connector To delete a connector please execute the same procedure as creating a connector. Before you start, please make sure the connector type you want to delete is selected in the Connectors tab of the Planning Tool. Therefore 1. Check if the connector type you would like to delete is selected Image 74 2. Afterwards click on the icon of the starting card of the connection, the background of the card will turn red Image 75 3. Click on the icon of the ending card of the connection Image 76 The connector will be deleted. METAFORA Page 55 of 124 Deliverable D4.2 Attachment User Manual 4.3. Proj. No. 257872 31. August 2013 Cards The remaining menu tabs in the Planning Tool embed the visual language activities, represented as cards. Every tab stands for a category of the activities. There are seven categories, the activity stages, activity processes, roles, attitudes, resources, other and gates. Image 77 To open a category, please click on the tab. METAFORA Page 56 of 124 Deliverable D4.2 Attachment User Manual Proj. No. 257872 31. August 2013 Image 78 As mentioned above, the visual language elements are represented as cards. Every card holds its own icon, title and a text area. The icon states the meaning of the card which is also explained by its title below the icon. In the text area you can enter text for additional information. Image 79 METAFORA Page 57 of 124 Deliverable D4.2 Attachment User Manual Proj. No. 257872 31. August 2013 4.3.1. Create a card The Planning Tool implements a drag and drop mechanism with which elements of the visual language can be created in a plan. To create a card, please 1. click on the icon of the card in the menu palette 2. hold the click 3. move the mouse to the plan where you want the card to be placed and 4. release the click. During the drag mechanism the card will appear in transparent shape. Once having dropped the card, it will appear in full color. Image 80 The new created card will appear on the plan. METAFORA Page 58 of 124 Deliverable D4.2 Attachment User Manual Proj. No. 257872 31. August 2013 Image 81 METAFORA Page 59 of 124 Deliverable D4.2 Attachment User Manual Proj. No. 257872 31. August 2013 4.3.2. Move a card The Planning Tool implements a drag and drop mechanism with which elements of the visual language can be moved on a plan. To move a card on your plan, please 1. click on the icon of the card 2. hold the click 3. move the mouse to the position in your plan where you want the card to be placed and 4. release the click. During the move mechanism the card will appear in transparent shape. Once having released the card on its new position, it will appear in full color. Image 82 METAFORA Page 60 of 124 Deliverable D4.2 Attachment User Manual Proj. No. 257872 31. August 2013 4.3.3. Write text in a card You can write text into the text area of a card to enter additional information to a learning activity. To enter text, please click into the text area of the card, enter the text and afterwards press the return key on your keyboard. The text will be committed and visible to other peers. Image 83 METAFORA Page 61 of 124 Deliverable D4.2 Attachment User Manual Proj. No. 257872 31. August 2013 4.3.4. Delete a card If you would like to delete a card from your plan, please right click on the card you would like to be removed. A popup menu will show up. Select the delete option. The card will be deleted from the plan. Image 84 METAFORA Page 62 of 124 Deliverable D4.2 Attachment User Manual Proj. No. 257872 31. August 2013 4.3.5. Start using a card When you start working on a learning activity you can state this in your plan. Right click on the associated card. A menu will show up. Select the option start using from this menu. The background of the card will turn yellow to state that work on this activity has started. Image 85 METAFORA Page 63 of 124 Deliverable D4.2 Attachment User Manual Proj. No. 257872 31. August 2013 4.3.6. Start using resource cards Resource cards in the Planning Tool serve as gateways to the embedded tools in the Metafora system and aim to persistently store created artifacts for later use. If you start using a resource card, a workspace of the tool will open. Thus you can enact directly from your plan. The integrated resource cards of the Planning Tool are: Image 86 When right clicking on a resource card and selecting start using from the popup menu, the tool will open in a new tab, as in this example the microworld PiKI. METAFORA Page 64 of 124 Deliverable D4.2 Attachment User Manual Proj. No. 257872 31. August 2013 Image 87 You can work in the microworld and create your own artifacts which will be persistently saved to the resource card and are accessible through it. As in this example changes in PiKI can be stored to the associated PiKI resource card and be retrievable from this card at any later point in time. Please click on save in PiKI after you have created your own compilations to store your changes to the Planning Tool resource card. METAFORA Page 65 of 124 Deliverable D4.2 Attachment User Manual Proj. No. 257872 31. August 2013 Image 88 After saving your work in PiKI, you can go back to the Planning Tool and start using the same resource card. The microworld will open again in a new Metafora tab and your artifact of PiKI with all the changes you have undertaken will be loaded. Your compilations were persistently stored and are accessible through the resource card for further contribution at any later point in time. Image 89 METAFORA Page 66 of 124 Deliverable D4.2 Attachment User Manual Proj. No. 257872 31. August 2013 Start using a “Discussion” or “Planning Tool” resource card When start using a new “Discussion” resource card, you can link a new or already existing discussion map to this resource card. Thus, please right click on the Discussion resource card and select the menu option start using. A new LASAD tab will open and ask you to enter the name of the new or existing discussion map. Image 90 Please enter the name of the discussion map you would like to link to the resource card and click on the button create map. Image 91 The LASAD discussion map will be stored to the Discussion resource card and will automatically load in the LASAD tab, where you are already logged in with your username. METAFORA Page 67 of 124 Deliverable D4.2 Attachment User Manual Proj. No. 257872 31. August 2013 Image 92 Afterwards you can retrieve this discussion map through the same Discussion resource card at any later point in time. Image 93 METAFORA Page 68 of 124 Deliverable D4.2 Attachment User Manual Proj. No. 257872 31. August 2013 The mechanism to store a Planning Tool plan to a Planning Tool resource card is the same. Create a new Planning Tool resource card in your plan, right click on the card and select start using. A new Metafora Planning Tool tab will open and ask you to enter the name of the new or existing Planning Tool plan. Image 94 Please enter the name of the Planning Tool plan you would like to link to the resource card and click on the button create map. Image 95 The Planning Tool plan will be stored to the Planning Tool resource card and will automatically load in the Planning Tool tab. METAFORA Page 69 of 124 Deliverable D4.2 Attachment User Manual Proj. No. 257872 31. August 2013 Image 96 Afterwards you can retrieve this Planning Tool plan through the same Planning Tool resource card at any later point in time. Image 97 METAFORA Page 70 of 124 Deliverable D4.2 Attachment User Manual Proj. No. 257872 31. August 2013 4.3.7. Finish a card If you’d like to finish a learning activity you can state this in your plan. Right click on the associated card. A Menu will show up. Select the option done from this menu. The background of the card will turn green to state that work on this activity is finished. Image 98 METAFORA Page 71 of 124 Deliverable D4.2 Attachment User Manual Proj. No. 257872 31. August 2013 4.3.8. Discuss this If you would like to send a card of your plan to the discussion environment for discussion and argumentation, you can do this by creating a referable object in LASAD. Please note: sharing a Planning Tool card in the discussion environment LASAD can only work if you are logged in to LASAD and have a discussion map open. For further information on opening a discussion map, please take a look at start using a “Discussion” or “Planning Tool” resource card. Image 99 If this is the case, please right click on the card you would like to send. A popup menu will show up where you need to select the option discuss this. Afterwards a referable object will be created in the open LASAD map. METAFORA Page 72 of 124 Deliverable D4.2 Attachment User Manual Proj. No. 257872 31. August 2013 Image 100 METAFORA Page 73 of 124 Deliverable D4.2 Attachment User Manual Proj. No. 257872 31. August 2013 4.3.9. Post to chat If you would like to post a referable object of a card into the Metafora chat for further discussion and contribution, please right click on the card. A popup menu will show up where you need to select the option post to chat. Image 101 A referable object will be created in the group chat of Metafora and thus be available to your group. When hovering over the referable object in the chat, the icon of the card will show up. Image 102 METAFORA Page 74 of 124 Deliverable D4.2 Attachment User Manual Proj. No. 257872 31. August 2013 When clicking on the referable object in the chat, the place of the original object will open, therefore the Planning Tool will open with the plan from where the object was created and highlight the referred object. Image 103 METAFORA Page 75 of 124 Deliverable D4.2 Attachment User Manual Proj. No. 257872 31. August 2013 5. Reflection Tool The Reflection Tool of Metafora is integrated as an Add-On to the Planning Tool. Image 104 Its focus relies on the coupled collaboration to help reflect on the whole learning process of a group. Thus it shows all landmarks of a group, visualized in a time bar to support the process awareness. When for example starting a card in the Planning Tool a new balk with the icon of the card is created, which expands until this card gets finished. Please also take a look at start using and finishing a card. The landmarks on the time bar are adapted to its kind and origin, as well as the color of the balk (visual language category). METAFORA Page 76 of 124 Deliverable D4.2 Attachment User Manual Proj. No. 257872 31. August 2013 Image 105 When hovering over a landmark with your mouse in the time bar or a bulk, the content of the landmark will be shown. Image 106 Image 107 Additional when hovering over a bulk the associated landmark in the time bar will be highlighted by a red border. Same with hovering over a landmark in the time bar will highlight the associated bulk of the landmark with a red border. METAFORA Page 77 of 124 Deliverable D4.2 Attachment User Manual Proj. No. 257872 31. August 2013 Image 108 When clicking on it, its content will be shown. Image 109 METAFORA Page 78 of 124 Deliverable D4.2 Attachment User Manual Proj. No. 257872 31. August 2013 5.1 Zooming and screen size In the Reflection Tool you can zoom in and out of the tool to see more details or a more general view of the landmarks by clicking on the magnifying glasses with the plus and minus sign. You can also fit the Reflection Tool to your screen. Zoom in: Image 110 You can also zoom in by clicking into the time bar with your mouse and selecting the area you would like to zoom in. METAFORA Page 79 of 124 Deliverable D4.2 Attachment User Manual Proj. No. 257872 31. August 2013 Image 111 Zoom out: Image 112 Fit to screen: Image 113 METAFORA Page 80 of 124 Deliverable D4.2 Attachment User Manual Proj. No. 257872 31. August 2013 Enabling the auto size in the Reflection Tool by setting a check as shown in this image will fit the screen automatically to your size: Image 114 Or set a check here, to keep the focused landmark centered while zooming: Image 115 METAFORA Page 81 of 124 Deliverable D4.2 Attachment User Manual Proj. No. 257872 31. August 2013 5.2 Focus landmark With the arrows you can click through and focus all landmarks of your group and read its content. The landmark will be highlighted in the time bar. Image 116 You can also read the content of a landmark by clicking on it. Image 117 METAFORA Page 82 of 124 Deliverable D4.2 Attachment User Manual Proj. No. 257872 31. August 2013 6. Workbench This is the Workbench of Metafora. The Workbench is a central overview component. Image 118 In the Workbench you have the Breaking News, Documents, the Versions Management and the Messaging Tool. METAFORA Page 83 of 124 Deliverable D4.2 Attachment User Manual 6.1. Proj. No. 257872 31. August 2013 Breaking News The focus of the Breaking News is the synchronized awareness mode, thus it gives an overview about the latest actions of your own group and shows latest important landmarks of other groups. Breaking News is visualized as a table; results are listed from the bottom up. Every cell of the table includes the time when the action was created, the learning to learn together category via an icon and the description of the result. Thus you can capture the current learning events. Image 119 METAFORA Page 84 of 124 Deliverable D4.2 Attachment User Manual 6.2. Proj. No. 257872 31. August 2013 Documents The Documents section in the Workbench of Metafora serves as persistent storage of documents. It shows all uploaded documents of Metafora, with the time of its upload, the name of the document and its id. You can open a document and also upload documents. Image 120 METAFORA Page 85 of 124 Deliverable D4.2 Attachment User Manual Proj. No. 257872 31. August 2013 6.2.1. Open a document To open a document, please click on the id of the document. The document will open. Image 121 METAFORA Page 86 of 124 Deliverable D4.2 Attachment User Manual Proj. No. 257872 31. August 2013 6.2.2. Upload a document To upload a document, please click on the button as shown in the image. Image 122 A dialog will appear, asking you to select the document you would like to upload. Select the document and confirm. The document will then be listed in the Documents table. METAFORA Page 87 of 124 Deliverable D4.2 Attachment User Manual Proj. No. 257872 31. August 2013 Image 123 METAFORA Page 88 of 124 Deliverable D4.2 Attachment User Manual 6.3. Proj. No. 257872 31. August 2013 Versions Management In the Versions Management of the Workbench all saved versions of Planning Tool plans are listed. Image 124 To open a plan, please click on the id of the version. To create a version, please take a look at save version. METAFORA Page 89 of 124 Deliverable D4.2 Attachment User Manual 6.4. Proj. No. 257872 31. August 2013 Messaging Tool The Workbench also integrates a tool to send High Interruptive Feedback messages to your group. Image 125 Clicking on the Messaging Tool button opens the tool. METAFORA Page 90 of 124 Deliverable D4.2 Attachment User Manual Proj. No. 257872 31. August 2013 Image 126 METAFORA Page 91 of 124 Deliverable D4.2 Attachment User Manual Proj. No. 257872 31. August 2013 In the Messaging Tool several text examples are shown to help you and your group working on your learning scenario. Image 127 If you found a fitting message you would like to take up, please click on it, it will then appear in the text area underneath, where you can work on the text, change it according to your needs or just write a new message. Image 128 METAFORA Page 92 of 124 Deliverable D4.2 Attachment User Manual Proj. No. 257872 31. August 2013 Afterwards you can select the members you would like to send the message to and click on the button Send. Image 129 The message will appear as a High Interruptive Feedback popup and will also be listed in the Notification area. For further information, please take a look at High Interruptive Feedback. Image 130 METAFORA Page 93 of 124 Deliverable D4.2 Attachment User Manual Proj. No. 257872 31. August 2013 7. CAVilLag CAVilLag is the challenge authoring tool for the visual language in Metafora. With CAVilLag you can create a new challenge and design the visual language according to the needs of the challenge. The design will be loaded when logging in to the Metafora platform and selecting the challenge. 7.1. URL English: https://metaforaserver.ku.de/cavillag Browser: CAVilLag is only supported with Google Chrome (updated version). Stable internet connection is required. METAFORA Page 94 of 124 Deliverable D4.2 Attachment User Manual 7.2. Proj. No. 257872 31. August 2013 Challenges When calling the URL to CAVilLag in the Chrome browser, the tool opens. Image 131 CAVilLag holds several tabs. The first tab is the Challenges tab. Image 132 METAFORA Page 95 of 124 Deliverable D4.2 Attachment User Manual Proj. No. 257872 31. August 2013 In the Challenges tab there is a table, which lists all existing challenges of the Metafora system with the name of the challenge, the URL to the challenge description, when the design for the visual language was created and the last use of the challenge. Image 133 On the right side of the frame you can create a new challenge, modify the selected challenge’s name and/or URL, and copy the selected challenge in order to adapt the visual language for your needs. For further information, please take a look at create new challenge. Image 134 The tabs activity stages, activity processes, roles, attitudes, resources, other, gates and Connectors embed the visual language of Metafora. In those tabs you can select the elements of the visual language you would like to be included in your METAFORA Page 96 of 124 Deliverable D4.2 Attachment User Manual Proj. No. 257872 31. August 2013 challenge and thus design your challenge. For further information please take a look at design challenge. In the last tab preview & save, you will get a preview of the visual language elements you have selected and can save your design persistently. For further information, please take a look at preview and save challenge. 7.2.1. Show challenge design When clicking on a Challenge Name in the Challenges table, the design for the challenge will be loaded in the Planning Tool and you can take a look at the design. METAFORA Page 97 of 124 Deliverable D4.2 Attachment User Manual Proj. No. 257872 31. August 2013 Image 135 7.2.2. Show challenge description If a challenge includes a URL to the description of the challenge, then you can open the description by clicking on the entry of Challenge URL in the table of the Challenges tab. The description will open. METAFORA Page 98 of 124 Deliverable D4.2 Attachment User Manual Proj. No. 257872 31. August 2013 Image 136 7.3. Create new challenge To create a new challenge, please go the right side of to the Challenges tab in the CAVilLag. METAFORA Page 99 of 124 Deliverable D4.2 Attachment User Manual Proj. No. 257872 31. August 2013 Image 137 Here you can create a new challenge by entering the name of the challenge and the challenge URL. The challenge URL links to the description of the challenge, which entails what you have to do in this challenge. In general the description is a published Google Docs document. An example can be seen here: METAFORA Page 100 of 124 Deliverable D4.2 Attachment User Manual Proj. No. 257872 31. August 2013 Image 138 Thus to create a new challenge please enter the name of the challenge, the URL to the description (published Google Docs document) and click on create new challenge. METAFORA Page 101 of 124 Deliverable D4.2 Attachment User Manual Proj. No. 257872 31. August 2013 Image 139 If the creation was successful you will get a notification prompt. Image 140 Afterwards the new challenge will be added to the bottom of the challenges table. METAFORA Page 102 of 124 Deliverable D4.2 Attachment User Manual Proj. No. 257872 31. August 2013 Image 141 If you would like to change the name or the challenge description URL of your challenge, please take a look at change challenge name or URL. METAFORA Page 103 of 124 Deliverable D4.2 Attachment User Manual 7.4. Proj. No. 257872 31. August 2013 Change challenge name or URL In CAVilLag you can change the name of your challenge or the URL to the challenge description. Thus, please click on the challenge you would like to change in the table of the Challenges tab. The challenge name and URL will be shown on the right side of the screen. Image 142 The name of the challenge can be changed in Challenge Name; the URL to the description of the challenge can be changed in Challenge URL. When the changes are done, please click on the modify selected challenge button to save the changes. METAFORA Page 104 of 124 Deliverable D4.2 Attachment User Manual Proj. No. 257872 31. August 2013 Image 143 You will get a notification, that the changes were successful. Afterwards the changes will be saved and shown in the table of the Challenges tab. 7.5. Copy Challenge If you want to reuse an already existing challenge and visual language without modifying the original challenge you can copy challenge and save it under a new name. To copy a challenge you need to select it first and then press the copy selected challenge button. METAFORA Page 105 of 124 Deliverable D4.2 Attachment User Manual Proj. No. 257872 31. August 2013 After pressing the button a dialog will appear and ask for the name of the copy. After you have selected the name you can press OK and the copy of the selected challenge including all selections made for the visual language is copied. You can modify the selected cards and then save the visual language. METAFORA Page 106 of 124 Deliverable D4.2 Attachment User Manual 7.6. Proj. No. 257872 31. August 2013 Design challenge To design a challenge, please select the challenge in the Challenges table by clicking on it. The challenge will be loaded. Image 144 Afterwards you can select all the elements of the visual language you would like to integrate in your challenge. The visual language includes learning activities which are categorized in activity stages, activity processes, roles, attitudes, resources, other and gates. Every category holds its own tab in the CAVilLAG, as well as the Connectors tab to connect the activities. Image 145 You can design your challenge by going through the whole visual language, thus working down every tab one after the other. Please start with the tab activity stages by clicking on the tab. Image 146 METAFORA Page 107 of 124 Deliverable D4.2 Attachment User Manual Proj. No. 257872 31. August 2013 In the following sections the design of a challenge will be presented on the case of activity stages, which holds the same mechanism as for all the remaining categories. This is the activity stages tab: Image 147 On the left side you can see all available elements of the category activity stages of the visual language. METAFORA Page 108 of 124 Deliverable D4.2 Attachment User Manual Proj. No. 257872 31. August 2013 Image 148 METAFORA Page 109 of 124 Deliverable D4.2 Attachment User Manual Proj. No. 257872 31. August 2013 7.6.1. Add and remove elements CAVilLag implements a drag and drop mechanism. You can add new elements to your design by dragging and dropping the icon: 1. Click on the icon of the element you would like to add 2. Hold the click 3. Move the icon to the selected area of the tab (right side) 4. Release the click During the drag mechanism, while still holding the click, the icon appears in transparent shape. Once having released the click, the icon it will appear in its full color. Image 149 METAFORA Page 110 of 124 Deliverable D4.2 Attachment User Manual Proj. No. 257872 31. August 2013 To remove an element from the selected area, please: 1. click on the icon of the element you would like to remove 2. hold the click 3. move the icon to the available elements area of the tab (left side) 4. release the click During the drag mechanism, while still holding the click, the icon appears in transparent shape. Once having released the click, the icon it will appear in its full color. Image 150 With this mechanism you can select all the elements you would like to include in your challenge. METAFORA Page 111 of 124 Deliverable D4.2 Attachment User Manual Proj. No. 257872 31. August 2013 7.6.2. Order elements You can order the elements according to your needs. The order will be loaded when logging in to the Metafora system and selecting the challenge. As you can see in this picture the selected elements of the category activity stages is first define questions and second find hypothesis. This is the order which was designed in the CAVilLag and will be loaded in the Planning Tool when logging in to the Metafora system with the challenge. Image 151 METAFORA Page 112 of 124 Deliverable D4.2 Attachment User Manual Proj. No. 257872 31. August 2013 To rearrange this order of the elements in your challenge, please: 1. click on the icon of the element you would like to rearrange 2. hold the click 3. move the icon to the appropriate space (on the right side) 4. release the click During the drag mechanism, while still holding the click, the icon appears in transparent shape. Once having released the click, the icon it will appear in its full color. Image 152 Image 153 The order of the two elements got changed, and the new order (in CAVilLag) is first find hypothesis and second define questions. This order will be loaded in the Planning Tool. METAFORA Page 113 of 124 Deliverable D4.2 Attachment User Manual Proj. No. 257872 31. August 2013 Image 154 Ordering the elements is also valid for the tabs activity stages, activity processes, roles, attitudes, resources, other and gates. METAFORA Page 114 of 124 Deliverable D4.2 Attachment User Manual 7.7. Proj. No. 257872 31. August 2013 Preview and save challenge To finalize your challenge design you need to click on the preview & save tab. Image 155 METAFORA Page 115 of 124 Deliverable D4.2 Attachment User Manual Proj. No. 257872 31. August 2013 7.7.1. Preview In the center of the preview & save tab you can see all the elements you have selected as an overview and preview of what you have designed. Image 156 If you would like to change the elements or rearrange their order, please go back to the associated tab. You can also take a look at design a challenge, add and remove elements and order elements. METAFORA Page 116 of 124 Deliverable D4.2 Attachment User Manual Proj. No. 257872 31. August 2013 7.7.2. Save challenge If you are pleased with the arrangement of the elements of the visual language, you can save the design to your challenge. Please click on the save button on the bottom of the preview & save tab of the CAVilLag to persistently save your challenge. Image 157 You will get a notifying prompt if saving the challenge design was successful. METAFORA Page 117 of 124 Deliverable D4.2 Attachment User Manual Proj. No. 257872 31. August 2013 Image 158 Afterwards you can login to the Metafora platform and select your challenge. The challenge design will be loaded in the Planning Tool. For further information, please take a look at use challenge design. In case you are about to save changes to an existing challenge, which was already in use, a protection mechanism will make you aware about possible damages caused through your update, for example removing required cards for a challenge. You will get an attention prompt, making you aware about the irreversible damage you might cause. Please only save the changes if you are sure about the consequences. Image 159 METAFORA Page 118 of 124 Deliverable D4.2 Attachment User Manual 7.8. Proj. No. 257872 31. August 2013 Use challenge design Now that you have created a new challenge design in the CAVilLag or rearranged an existing one, you can use this design in the Metafora platform. To use the challenge design, please login to the Metafora platform, as described in the section Login of this manual. During the login process of the Metafora system you are asked to select the challenge you would like to use. Please select your challenge. In this example image the new designed challenge is the “New Test Challenge”, which was created and designed in the CAVilLag. On the right side of the challenge selection page of the login process you can see the challenge description which was added to the challenge in the CAVilLag. Please select your challenge, click on the CONTINUE> button and proceed as described in Login. Image 160 METAFORA Page 119 of 124 Deliverable D4.2 Attachment User Manual Proj. No. 257872 31. August 2013 When you are successfully logged in to the Metafora platform and have selected your challenge, the design will be loaded in the Planning Tool. Image 161 It will include all the elements which were selected in the CAVilLag and also show them in the according order. METAFORA Page 120 of 124 Deliverable D4.2 Attachment User Manual Proj. No. 257872 31. August 2013 Image 162 METAFORA Page 121 of 124 Deliverable D4.2 Attachment User Manual Proj. No. 257872 31. August 2013 8. Summary The User Manual of the Metafora system described how to use the platform with all its features. If you are interested in further information you can also take a look at the publications, listed in the References. METAFORA Page 122 of 124 Deliverable D4.2 Attachment User Manual Proj. No. 257872 31. August 2013 References Drachman, R., Abdu, R., Daskolia, M., De-Groot, R., Dragon, T., Harrer, A., Kynigos, C. and Wegerif, R. (2012), The Metafora Project and the Promotion of Creativity – Theory-based Expectations and Preliminary Findings. Submitted to the eChallenges e-2012 Conference and Exhibition - 17-19 October 2012, Lisbon, Portugal. Dragon, T., McLaren, B.M., Mavrikis, M., Harrer, A., Kynigos, C., Wegerif, R., & Yang, Y. (submitted). Metafora: A web-based platform for learning to learn together in science and mathematics. Submitted to the IEEE Transactions on Learning Technologies. Harrer A., Herbst V. PlaTO – the planning tool observer in the multi-tool ELE Metafora. In ITS Workshop Proceedings on Intelligent Support for Exploratory Environments: Exploring, Collaborating, and Learning Together, 2012. Harrer A., Irgang T., Sattes N., Pfahler K. SoCCR – optimistic concurrency control for the web-based collaborative framework Metafora. Proceedings of the 18th International Conference on Collaboration and Technology, CRIWG 2012, Springer, pp. 153- 160, Raesfeld, Germany. Harrer A. Analytics of collaborative planning in Metafora – architecture, data, and analytics methods. Proceedings of the third Conference on Learning Analytics and Knowledge, LAK 2013. Harrer A., Göhnert T., Martínez Monés A., Reffay C. Computational Methods and Tools for Social Network Analysis of Networked Learning Communities. Tutorial at the third Conference on Learning Analytics and Knowledge, LAK 2013. Harrer A., Irgang T., Lingnau A., Sattes N., Pfahler K. The Metafora design principles for a collaborative, interoperable learning framework. In the 19th International Conference on Collaboration and Technology, CRIWG 2013. Springer, to appear in October 2013. Harrer A., Pfahler K., de Groot R., Abdu R. Research on collaborative planning and reflection – methods and tools in the Metafora Project. In EC-TEL Eight European Conference on Technology Enhanced Learning 2013. Springer, to appear in September 2013. Harrer A., Pfahler K., Lingnau A. Planning for life – educate students to plan. In ICALT the 13th IEEE International Conference on Advanced Learning Technologies 2013. Springer, to appear in July 2013. Harrer A., Pfahler K., Lingnau A., Herbst V., Sattes N., Irgang T. Kollaboratives Planen und Lernen mit der web-basierten Lernplattform Metafora. In DeLFI 2013 Mensch & Computer. Springer, to appear in September 2013. Herbst V., Harrer A. Ermittlung von Kollaboration und take-up in Lernszenarien durch autonome Agenten. Accepted to the Workshop Learning Analytics at the DeLFI 2013, 8th of September 2013, Bremen, Germany. Irgang T., Sattes N., Pfahler K., Lingnau A., Harrer A. Reflektionsunterstützung im Metafora System durch eingebettete Learning Analytics Werkzeuge. Accepted to the Workshop Learning Analytics at the DeLFI 2013, 8th of September 2013, Bremen, Germany. Lingnau A., Harrer A., Pfahler K. Bringing learning science and user interface design into one loop of joint research interests – the SoCCR case in Metafora. Learning Science and Human Computer Interaction Workshop at the 10th International Conference on Computer Supported Collaborative Learning. CSLC 2013, 15th June 2013, Madison, Wisconsin, USA. METAFORA Page 123 of 124 Deliverable D4.2 Attachment User Manual Proj. No. 257872 31. August 2013 Harrer A., Schmidt A. Blockmodelling and role analysis in multi-relational networks. Social Networking Analysis and Mining journal, Springer-Verlag, Wien 2013, Online ISSN 18695469, Journal no. 13278. Mavrikis, M., Dragon, T., Abdu, R., Harrer, A., De-Groot, R., and McLaren, B. M. (in press). Learning to Learn Together through Planning, Discussion and Reflection on Microworld-based Challenges. Accepted for Demonstration presentation at EC-TEL 2012: Seventh European Conference on Technology Enhanced Learning. Saarbrücken, Germany, September, 2012. METAFORA Page 124 of 124 Project number: 257872 METAFORA Learning to learn together: A visual language for social orchestration of educational activities STREP ICT / Technology-enhanced learning Pirates of the Kinematics Island (PiKI) User Manual Due date: 31.08.13 Submission date: 30.06.11 Organization name: TL Project co-funded by the European Commission within the 7th Framework Program (2007-2013) Dissemination Level PU Public X PP Restricted to other programme participants (including the Commission Services) RE Restricted to a group specified by the consortium (including the Commission Services) CO Confidential, only for members of the consortium (including the Commission Services) http://www.metafora-project.org/ Deliverable D4.2 Attachment PiKI User Manual Proj. No. 257872 31 August 2013 Document number: D4.2 Attachment Document Title: Pirates of the Kinematics Island (PiKI) - User Manual Work package: WP4 – Framework System, Domain Tools, and Integration Document status: Final Date: 31.08.2013 Authors: Ivan Orvieto (TL) Abstract In this document we present how to use Pirates of the Kinematics Island (PiKI), one of the Microworlds of Metafora platform Keyword list METAFORA – Public PiKI, LASAD, Kinematics, Trajectory, Physics, Game Page 2 of 23 Deliverable D4.2 Attachment PiKI User Manual Proj. No. 257872 31 August 2013 Table of Contents 1. Starting PiKI............................................................................................................ 4 2. Game modes: Launch and Defence ....................................................................... 5 2.1 Defence mode ............................................................................................................... 5 2.1.1 Placing obstacles................................................................................................... 6 2.1.2 Moving and deleting obstacles ............................................................................ 7 2.1.3 Testing the scene .................................................................................................. 8 2.1.4 Publishing the scene............................................................................................. 9 2.2 Launch mode............................................................................................................... 11 2.2.1 Firing the cannon................................................................................................. 14 2.2.2 Placing trampolines and blocks......................................................................... 15 2.2.3 Changing rules of trampolines and blocks....................................................... 15 2.2.4 Switching between shooting and editing.......................................................... 16 2.2.5 Hitting a treasure ................................................................................................. 17 2.3 Analysing the shoot .................................................................................................... 18 2.4 Navigation .................................................................................................................... 20 2.5 Additional features ...................................................................................................... 22 2.5.1 Help........................................................................................................................ 22 2.5.2 Sound on/off ......................................................................................................... 22 2.5.3 Rank of scenes .................................................................................................... 22 2.5.4 Share to LASAD................................................................................................... 23 2.5.5 Save scene........................................................................................................... 23 Abbreviations used LASAD - Learning to Argue: Generalized Support Across Domains METAFORA – Public Page 3 of 23 Deliverable D4.2 Attachment PiKI User Manual Proj. No. 257872 31 August 2013 1. Starting PiKI PiKI can be started from the Planning tool by adding a "PiKI resource card" to the plan. Once done, right clicking on the card opens the contextual menu. Among the various options, clicking on start using makes PiKI opening in a separate Tab. Figure 1: starting PiKI using a resource card Through the usage of the resource card, users are able to start and resume a previously saved status in PiKI. It is also possible to start PiKI using the button contained in the Tools panel on the left side of the screen, but this won't allow any save/load of the status of PiKI. Figure 2: starting PiKI using the PiKI button METAFORA – Public Page 4 of 23 Deliverable D4.2 Attachment PiKI User Manual Proj. No. 257872 31 August 2013 2. Game modes: Launch and Defence PiKI offers two game modes, Launch and Defence, selectable from the start page. Figure 3: start page of PiKI 2.1 Defence mode Playing in Defence mode allows to put obstacles on the island to protect treasures against attacks of the players playing in Launch mode. Figure 4: choosing Defence mode Once selected the Defence mode, players are presented with a tutorial page, showing the basics of the game. Clicking on Continue allows players to go to the playing area. METAFORA – Public Page 5 of 23 Deliverable D4.2 Attachment PiKI User Manual Proj. No. 257872 31 August 2013 Figure 5: tutorial page of Defence mode 2.1.1 Placing obstacles Three types of obstacles are available, in a limited quantity (shown by green numbers): towers, palm trees and boxes. Figure 6: obstacles' icons Clicking on the appropriate icons, the corresponding obstacle will be attached to the mouse pointer, to be placed onto the ground. The obstacle can be placed by clicking on it with the mouse left button, when the box around it becomes green. METAFORA – Public Page 6 of 23 Deliverable D4.2 Attachment PiKI User Manual Proj. No. 257872 31 August 2013 Figure 7: placing an obstacle with the mouse 2.1.2 Moving and deleting obstacles Once placed, an obstacle can be moved to another position or deleted by clicking on the appropriate icons above the obstacle itself. Figure 8: moving or deleting an obstacle METAFORA – Public Page 7 of 23 Deliverable D4.2 Attachment PiKI User Manual Proj. No. 257872 31 August 2013 2.1.3 Testing the scene To check the potential of the defence scene that has been created, players can shoot cannonballs trying to hit treasures. This is possible by clicking on the Test Scene button, on the top left corner of the screen. Figure 9: shifting to Test Scene environment While testing the scene, players can set Angle and Velocity of the cannonball and fire a certain number of shots (shown by green numbers). METAFORA – Public Page 8 of 23 Deliverable D4.2 Attachment PiKI User Manual Proj. No. 257872 31 August 2013 Figure 10: changing Angle and Velocity and firing a shoot 2.1.4 Publishing the scene Once the scene is ready (i.e. the treasures are well protected), players can publish it on the Metafora platform. This allows other players to select it for playing in Launch mode. Publishing a scene is achieved by clicking on the green Publish Scene button, at the bottom of the screen. Figure 11: the Publish Scene button METAFORA – Public Page 9 of 23 Deliverable D4.2 Attachment PiKI User Manual Proj. No. 257872 31 August 2013 Figure 12: setting a name for the published scene Figure 13: screen confirming the publishing of the scene on the Metafora platform METAFORA – Public Page 10 of 23 Deliverable D4.2 Attachment PiKI User Manual Proj. No. 257872 31 August 2013 2.2 Launch mode Playing in Launch mode allows to shoot cannonballs towards the island to hit treasures. To overcome obstacles (placed by players in Defence mode), trampolines and blocks can be used to make the cannonballs bounce. Figure 14: choosing Launch mode Once selected the Launch mode, players are presented with a list of scene (previously published by players playing in Defence mode) among whom to choose the one to play with. Figure 15: list of scenes available on Metafora platform METAFORA – Public Page 11 of 23 Deliverable D4.2 Attachment PiKI User Manual Proj. No. 257872 31 August 2013 The list can be ordered in various modes (name, owner, date of creation, number of plays etc.) by clicking on the corresponding header. Figure 16: list can be ordered by clicking on headers A scene is chosen by selecting it and clicking the Continue button. Figure 17: choosing a scene Once the scene has been chosen, players can select the character to play with. Figure 18: choosing the character METAFORA – Public Page 12 of 23 Deliverable D4.2 Attachment PiKI User Manual Proj. No. 257872 31 August 2013 After the character's choice, players are presented with a tutorial page, showing the basics of the game. Clicking on Continue allows players to go to the playing area. Figure 19: tutorial page of Launch mode METAFORA – Public Page 13 of 23 Deliverable D4.2 Attachment PiKI User Manual Proj. No. 257872 31 August 2013 2.2.1 Firing the cannon Players can set Angle and Velocity of the cannonball and fire a certain number of shots (shown by green numbers) to try to hit all treasures. Figure 20: sliders for changing Angle and Velocity. Fire button Figure 21: the cannonball has been shot METAFORA – Public Page 14 of 23 Deliverable D4.2 Attachment PiKI User Manual Proj. No. 257872 31 August 2013 2.2.2 Placing trampolines and blocks Clicking on appropriate icons on the top right of the screen, trampolines and blocks can be placed on the ground, similarly to what has been done with obstacles in Defence mode. Figure 22: icons for trampolines and blocks Figure 23: cannonball bouncing on a block 2.2.3 Changing rules of trampolines and blocks Once a trampoline or a block has been placed, it is possible to change the restitution coefficient rules (both horizontal and vertical) by clicking the rules icon. METAFORA – Public Page 15 of 23 Deliverable D4.2 Attachment PiKI User Manual Proj. No. 257872 31 August 2013 Figure 24: the rules icon Figure 25: editing rules 2.2.4 Switching between shooting and editing Switching between shooting and editing is done by clicking on Go to Cannon and Edit Scene buttons. METAFORA – Public Page 16 of 23 Deliverable D4.2 Attachment PiKI User Manual Proj. No. 257872 31 August 2013 Figure 26: switching between shooting and editing 2.2.5 Hitting a treasure If the cannonball hits a treasure, it opens to show its content and gives points to players. Figure 27: hitting a treasure Once all treasures are hit, the game finishes, giving the final score and allowing players to rate the scene. METAFORA – Public Page 17 of 23 Deliverable D4.2 Attachment PiKI User Manual Proj. No. 257872 31 August 2013 Figure 28: final reward screen with a resume of the game and rating of the scene 2.3 Analysing the shoot Players can analyse the shoot with different tools: i) by getting the coordinates of the position of the ball during the entire trajectory Figure 29: coordinates of the position of the ball METAFORA – Public Page 18 of 23 Deliverable D4.2 Attachment PiKI User Manual Proj. No. 257872 31 August 2013 ii) by changing the point of view Figure 30: viewing the scene from three different cameras (by clicking on respective icons on the bottom right of the screen) iii) by using a reference grid Figure 31: enabling the grid METAFORA – Public Page 19 of 23 Deliverable D4.2 Attachment PiKI User Manual Proj. No. 257872 31 August 2013 iv) by getting the final distance of the cannonball Figure 32: distance reached by the cannonball in the last shot 2.4 Navigation Navigation in PiKI is done with two main functionalities, pan and zoom. Pan is done either by putting the mouse on the right or left side of the screen (slow pan), or by clicking and dragging with the mouse left button (fast pan). Zoom is done by clicking and dragging vertically with mouse right button. METAFORA – Public Page 20 of 23 Deliverable D4.2 Attachment PiKI User Manual Proj. No. 257872 31 August 2013 Figure 33: zooming in and out METAFORA – Public Page 21 of 23 Deliverable D4.2 Attachment PiKI User Manual Proj. No. 257872 31 August 2013 2.5 Additional features 2.5.1 Help Both in Defence and Launch modes, it is possible to get a help screen by clicking the Help button on the bottom left side of the screen. Figure 34: the Help button Figure 35: help pages in Defence mode 2.5.2 Sound on/off Playing or muting sounds is done by clicking the Sound button. Figure 36: the Sound button 2.5.3 Rank of scenes Players can visualize the rank of scenes by clicking the Rank button. Figure 37: the Rank button METAFORA – Public Page 22 of 23 Deliverable D4.2 Attachment PiKI User Manual Proj. No. 257872 31 August 2013 Figure 38: the Rank of scenes 2.5.4 Share to LASAD Players can share with other groups of players the status of the game they are playing with. The status is sent to LASAD, one of the tools of Metafora platform, so that other players can view and use PiKI scene in a collaborative way. This is accomplished by means of the Share to LASAD button. Figure 39: the Share to LASAD button 2.5.5 Save scene PiKI saves the scene automatically each time a meaningful action is done (e.g. placing an obstacle, shooting the cannon etc.). Nevertheless, players can save the scene by pressing the Save button. Figure 40: the Save button METAFORA – Public Page 23 of 23