1
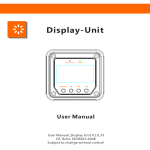
CXM
CID: 181803911
Contents
12~18
19~25
26~32
33~39
40~46
47-53
A
B
1
2
1
3
C
1
4
2
2
5
3
D
SOC
Total Ahin
Vbat
Ahout
3
Iin
Iout
Ahin
E
Day1
Today
Day7
4
Day2
Day6
Day3
Day4
Day5
F
SOC-morning
Ahout
Ahin
SOC-evening
Vbat min.
Vbat max.
5
G
6
H
7
I
8
J
9
K
10
L
11
12
Allgemeine Eigenschaften
Montage und Anschluss
(Seite 1), die Ihnen zeigt, wie man die CXM
1. Verbinden Sie die CXM Fernanzeige mit dem CXN Laderegler
Bitte schauen Sie in die Abb. A
Fernanzeige mit dem CXN Laderegler verbindet.
2. Montage der CXM Fernanzeige
13
[ DIN Hutschienen-Montage ]
Bitte schauen Sie in die Abb. B (Seite 1), die Ihnen zeigt, wie man die
Anzeigekomponente auf einer Standard 35mm Hutschiene montiert.
[ Wandmontage ]
D
Bitte schauen Sie in die Abb. C (Seite 2) die Ihnen zeigt, wie man die CXM Fernanzeige
an der Wand montiert.
Anzeigefunktion
[ Zustandsdaten ]
14
1. Tag - 2. Tag - 3. Tag - 4. Tag - 5. Tag - 6. Tag - 7. Tag - Heute - 1. Tag - 2. Tag ...
F
Bitte schauen Sie in die Abb. E (Seite 4) als Referenz.
Stromsparmodus
Allgemeine Sicherheits- und Verwendungshinweise
15
Programmierung Ihres CXN
16
Haftungsausschluss
G
Zeigt den Strombereich Ihres CXN an
Technische Daten
V
Zeigt den Spannungsbereich Ihres CXN an
2m
A
Verbindungskabel
17
B
H
D
B70 x H67 x D29mm
RoHS
ISO9001:2000
94g (mit Verbindungskabel)
IP22
18
CXM
Remote Display for Phocos CXN charge controllers
User manual (English)
Dear Customer,
Thank you very much for
purchasing this Phocos
product. Please read the
instructions carefully and
thoroughly before using
the product.
19
General Features
The CXM remote display is designed for displaying Panel Current, Load Current and
Clear, readable 3-digit LCD display and symbols
Battery Voltage, Ah, SOC, etc as true values for Phocos CXN series charge controllers.
2 push buttons to select displayed value
Prepared for DIN rail and wall mounting
Allow retrieving data of last 7 days from the CXN datalogger
2 meters long connecting wire
Mounting and Connecting
This product is intended for indoor use only. Protect it from direct sunlight and place
it in a dry environment. Never install it in humid rooms (such as bathrooms).
REMARK: Connect this product by following the steps described below to avoid
installation faults.
1. Connect CXM remote display to CXN controller
CXN controller.
Please see Fig. A (Page 1) that shows how to connect the CXM remote display to a
[ DIN Rail Mounting ]
2. Mounting the CXM remote display
20
standard 35mm DIN rail.
Please see Fig. B (Page 1) that shows how to install the CXM remote display on a
[ Wall Mounting ]
Please see Fig. C (Page 2) that shows how to install the CXM remote display on the
wall.
Display Function
[ Current Value ]
Push the right button to toggle the parameters of your PV system today.
The parameters displayed in the LCD will toggle in this order :
Amperehours) - Ahout (Load Amperehours) - Total Ahin (Total Panel Amperehours since
SOC - Vbat (Battery Voltage) - Iin (Panel Current) - Iout (Load Current) - Ahin (Panel
PV system build up) - SOC - Vbat (Battery Voltage) - ...
Please see Fig. D (Page 3) for reference.
[ History Data]
Step 1: First push the left button to toggle the day (Day 1 means yesterday).
The days displayed in the LCD will toggle in this order :
Day 1 - Day 2 - Day 3 - Day 4 - Day 5 - Day 6 - Day 7 - Today - Day 1 - Day 2 - ...
Please see Fig. E (Page 4) for reference.
21
Step 2: Then push the right button to toggle the parameters of the day.
The parameters displayed in the LCD will toggle in this order :
evening) - Vbat max (Maximum Battery Voltage) - Vbat min (Minimum Battery Voltage) -
SOC morning (State of Charge in the morning) - SOC evening (State of Charge in the
Ahin (Panel Amperehours) - Ahout (Load Amperehours) - SOC morning (State of Charge
in the morning) - SOC evening (State of Charge in the evening) - ...
Please see Fig. F (Page 5) for reference.
Power Saving Mode
If no operation are carried out to CXM for more than 1 minute, the CXM will switch to
Power Saving Mode automatically with nothing displayed on LCD.
Please press left button once to wake up the CXM for normal operation.
General Safety and Usage Recommendation
Batteries store a large amount of energy. Never short circuit a battery under any
circumstances. We recommend connecting a fuse (slow acting type) directly to the
battery.
Batteries can produce flammable gases. Avoid making sparks, using fire or any naked
flame under any circumstances. Make sure that the battery room is ventilated.
22
Avoid touching or short circuiting wires or terminals. Be aware that the voltages
on specific terminals or wires can be up to double the battery voltage. Use isolated
tools, stand on dry ground and keep your hands dry.
Keep children away from batteries and the charge controller.
Please observe the safety recommendations of the battery manufacturer. If in doubt,
consult your dealer or installer.
Programming Your CXN
With the CXM remote display, you can program your CXN controller easily.
Your can enter programming menu by long push right button of CXM for about 5 seconds.
Short push the right button to toggle between main menus.
Long push the right button to enter programming menu, and then short push right button
to select your setting.
H (Page 7)
Short push left button to save setting and exit.
Programming menu:Please see Fig.
Liability Exclusion
The manufacturer shall not be liable for damages, especially on the battery, caused
by use other than as intended or as mentioned in this manual or if the recommendations
of the battery manufacturer are neglected. The manufacturer shall not be liable if there
has been service or repair carried out by any unauthorized person.
23
Technical Data
Display voltage range of your CXN
w70 x h67 x d29mm
2m
V
d
Display current range of your CXN
h
A
Connection Wire
w
94g (with connecting wire)
24
IP22
Subject to change without notice. Version:20080317
Made in one of the following countries:
Germany - China - Bolivia - India
Phocos AG - Germany
www.phocos.com
25
ISO9001:2000
RoHS
26
1. Conecte el visualizador remoto CXM al controlador CXN
[ Montaje con Riel DIN ]
2. Montaje del visualizador remoto CXM
27
[ Montaje Mural ]
C
[ Valor de la Corriente ]
[ Historial ]
28
Modo de Ahorro de Electricidad
Recomendaciones de Seguridad General y de Empleo
29
I
30
V
A
2m
31
w
h
d
RoHS
ISO9001:2000
w70 x h67 x d29mm
IP22
32
33
Montage et Connexion
A
34
C
[ Montage sur rail aux normes DIN ]
B
[ Montage au Mur ]
[ Valeur Actuelle ]
D
35
E
F
36
Comment programmer votre CXN
37
Menu de programmation:Se référer au schéma
Fiche technique
V
A
2m
38
J (Page 9)
L
H
P
RoHS
ISO9001:2000
L70 x H67 x P29mm
IP22
39
40
Recursos Gerais
Montando e Conectando
A
1. Conectar o mostrador remoto CXM ao controlador CXN
[ Grade de Suporte DIN ]
2. Montando o mostrador remoto CXM
41
B
C
[ Montando na Parede ]
[ Valor Atual ]
D
E
42
F
Modalidade da Economia de Energia
43
Programando o Seu CXN
K
44
V
A
larg
alt
prof
Exibe a voltagem actual do seu CXN
2m
larg70 x alt67 x prof29mm
45
IP22
46
ISO9001:2000
RoHS
47
A
48
B
D
E
49
C
F
50
L
51
¿
V
A
‡⁄
52
IP22
53
ISO9001:2000
RoHS