1
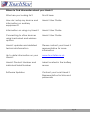
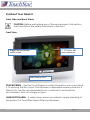
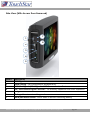
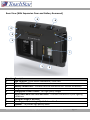
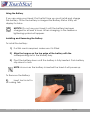
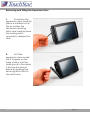
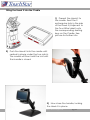
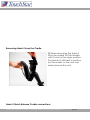
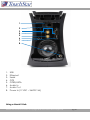
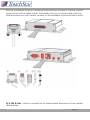
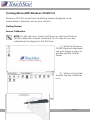
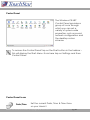
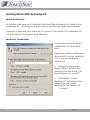
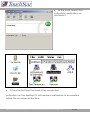
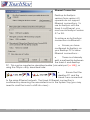
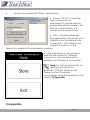
TouchPC Hawk II USER GUIDE Hawk II User Guide Rev3 23-03-12 Copyright © 2012 TouchStar Technologies Ltd pg. 1 TOUCHPC HAWK II 1 1) NOTES, NOTICES AND CAUTIONS ABBREVIATIONS AND ACRONYMS GOOD PRACTICE WHEN USING YOUR DEVICE WHERE TO FIND INFORMATION ABOUT YOUR HAWK II 2) ABOUT YOUR HAWK II FRONT, SIDE AND BACK VIEWS USING THE BATTERY REMOVING AND FITTING THE EXPANSION DOOR CONNECTING AUXILIARY EQUIPMENT USING AN OPTIONAL EXPANSION CABLE OR HUB FITTING THE HAWK II INTO THE CRADLE HAWK II QUICK RELEASE CRADLE CONNECTIONS USING A HAWK II HUB USING EXTERNAL ANTENNAS ATTACHING GPS & HSPA ANTENNAS USING MOUNTS AND BRACKETS USING THE DEBUG PORT USING SD / SDIO, SIM & MICRO SD CARDS INSERTING A SD / SDIO CARD INTO THE FULL SD CARD SLOT REMOVING A SD / SDIO CARD FROM THE SLOT INSERTING THE SIM & MICRO SD CARDS PERFORMING A RESET HAWK II HOW TO CLEAR IPSM SCREEN PROTECTORS ORDERING AND FITTING A SCREEN PROTECTOR 3) USING MICROSOFT® WINDOWS CE.NET 5.0 SCREEN CALIBRATION CONTROL PANEL 4) USING MICROSOFT® ACTIVESYNC® Hawk II User Guide Rev3 23-03-12 Copyright © 2012 TouchStar Technologies Ltd 4 4 5 6 8 9 9 13 17 18 18 19 20 21 24 24 25 26 27 27 27 28 30 31 35 35 36 36 38 41 pg. 2 ABOUT ACTIVESYNC SERIAL PORT CONNECTION ETHERNET CONNECTION ESTABLISHING AN ACTIVESYNC PARTNERSHIP USING TSSYNC 5) APPENDIX SPECIFICATIONS APPLICATION SUPPORT PACKAGE STORAGE TEMPERATURE SHOCK ENVIRONMENTAL REGULATORY NOTICES CE NOTICE (EUROPEAN UNION) CONTACTING TOUCHSTAR TECHNOLOGIES GLOSSARY Hawk II User Guide Rev3 23-03-12 Copyright © 2012 TouchStar Technologies Ltd 41 41 43 44 45 46 48 49 49 49 49 51 51 52 pg. 3 1) Notes, Notices and Cautions NOTE: A NOTE indicates important information that helps you make better use of your Hawk II. NOTICE: A NOTICE indicates either potential damage to the hardware or loss of data and tells you how to avoid the problem. CAUTION: A CAUTION indicates a potential for property damage, personal injury or death. Abbreviations and Acronyms For a complete list of abbreviations and acronyms, see the ‗Glossary‘ at the rear of this document. Information in this document is subject to change without notice. © TouchStar Technologies Ltd. All Rights Reserved. Reproduction in any manner whatsoever without the written permission of TouchStar Technologies Ltd is strictly forbidden. Trademarks used in this text: Intel is a registered trademark and XScale is a trademark of Intel Corporation. Microsoft, CE.Net and ActiveSync are registered trademarks of Microsoft Corporation. Bluetooth is a registered trademark owned by Bluetooth SIG, Inc. Other trademarks and trade names may be used in this document to refer to either the entities claiming the marks and names of their products. TouchStar Technologies disclaims any proprietary interests in trademarks and trade names other than its own. Hawk II User Guide Rev3 23-03-12 Copyright © 2012 TouchStar Technologies Ltd pg. 4 Good Practice CAUTION: Safety Instructions – To ensure your own personal safety and to help protect your Hawk II from potential damage, please use the following safety guidelines. SAFETY: General Do not attempt to service your Hawk II unless you are a TouchStar approved trained technician. When using an extension cable with your AC adapter ensure that the total ampere rating of the products plugged in to the extension power cable does not exceed the ampere rating of the extension cable. Under no circumstances insert any objects into the openings of the Hawk II, other than the specified cards. Doing so can cause damage to your device and / or electric shock to you. Keep the Hawk II away from extreme heat sources such as radiators and fires. Use the AC adapter in a well-ventilated area. Do not cover it with any items as this may result the adapter to run warmer than it should. Use care when handling the adapter during or immediately after operation as it may become hot. Use care when handling CF Cards and SD Cards as they can become warm during normal operation. Clean your Hawk II only with a clean damp cloth. Do not leave a fixed image displayed on your Hawk II screen for long periods of time. Screen ‗burn‘ may occur when fixed patterns are displayed on screen for a long time - the default timeouts will normally prevent this. SAFETY: Power Only use TouchStar AC adapters with this Hawk II. Do not connect the device to a mains electrical socket until you have checked the AC adapter voltage rating to ensure that the required voltage and frequency matches. To remove the Hawk II from all power sources, put it into suspend, disconnect the AC adapter from the electrical outlet, remove the battery and turn the backup battery off using the appropriate DIP switch. Hawk II User Guide Rev3 23-03-12 Copyright © 2012 TouchStar Technologies Ltd pg. 5 Ensure your AC adapter‘s power cable is not located where it can be tripped over or stepped on. SAFETY: Battery Use only Hawk II batteries with this device. Take care when carrying or storing a battery as any metal object that touches across the contacts could result in excessive current flow. This could cause extremely high temperatures and may result in damage to the battery pack or cause fire or burns. Do not disassemble the battery. Handle a damaged or leaking battery with extreme care. All batteries shall be controlled in accordance with the ―Handling Precautions and Prohibitions for Varta Microbattery GmbH Lilon Polymer Pouch Batteries and General Supply Notices‖. When Using Your Device The following guidelines will help prevent damage to your device in a normal working environment. SAFETY: Ergonomic Computing Habits Prolonged touch screen use may result in a repetitive strain injury. Eyestrain can be caused if any display or monitor is viewed for extended periods of time. SAFETY: Using the Hawk II Care for your Hawk II by keeping it away from excessive temperatures and bright sunlight. Condensation can form on or within the device if the Hawk II is moved quickly from one extreme temperature to another. Allow the moisture to evaporate before using your Hawk II. When disconnecting any cable, only pull on the connector – not the cable. When pulling keep it evenly aligned to avoid damaging any pins. Before you connect a cable make sure both connectors are correctly oriented and aligned. SAFETY: Battery Disposal For battery replacement please refer to the section in this document on Hawk II User Guide Rev3 23-03-12 Copyright © 2012 TouchStar Technologies Ltd pg. 6 batteries. Do not dispose of your Hawk II battery. All batteries shall be returned to Touchstar Technologies Ltd. If in doubt please contact a Touchstar for assistance. Hawk II User Guide Rev3 23-03-12 Copyright © 2012 TouchStar Technologies Ltd pg. 7 Where to Find Information about your Hawk II What are you looking for? Find it here: How do I setup my device and information on auxiliary equipment? Hawk II User Guide Information on using my Hawk II Hawk II User Guide Connecting to other devices using hard wired and wireless options Hawk II User Guide Hawk II updates and detailed technical information Please contact your Hawk II representative for more information Up to date information on your Hawk II www.touchstar.co.uk Hawk II Product Number and individual Serial Number Label located in the battery recess. Software Updates Contact your local Hawk II Representative for links and passwords Hawk II User Guide Rev3 23-03-12 Copyright © 2012 TouchStar Technologies Ltd pg. 8 2) About Your Hawk II Front, Side and Back Views CAUTION: Before performing any of the procedures in this section, read and follow the safety instructions in Section 1 Front View 7” TFT 800 x 480 pixel resolution Rugged polycarbonate touch screen Label Recess Area TOUCHSCREEN – Use the TouchScreen to enter information onto your Hawk II. To prolong the life of your TouchScreen a disposable screen protector is fitted. Only use the recommended tools / methods to activate the TouchScreen. Such as a finger or stylus. LABEL RECESS AREA - A label recess area is provided to apply branding of the product. A TouchStar label is fitted as standard. Hawk II User Guide Rev3 23-03-12 Copyright © 2012 TouchStar Technologies Ltd pg. 9 Side View (With Access Door Removed) 7 1 6 2 3 4 5 Item # 1 2 3 4 5 6 7 Description USB Type A Serial Debug – For Development purposes only. USB Mini Type A /Mini Type A – USB Communication Port. SD / SDIO Secure Digital Card Slot – For memory expansion and SDIO expansion J-Tag Debug – Press to enter debug mode. Hard/Soft Reset Button - Reset Hawk II without removing battery Hawk II User Guide Rev3 23-03-12 Copyright © 2012 TouchStar Technologies Ltd pg. 10 Rear View (With Expansion Door and Battery Removed) 8 4 5 6 7 9 1 3 Item # 1 2 3 4 5 6 7 8 9 2 Description SIM Card Slot - HSPA Mobile Broadband / Voice calls Micro SD Card Slot Battery Contact Pad – Provides Electrical connection for Lithium Ion battery Imager - For capture of 1D & 2D Barcodes 3 Megapixel Colour Camera - For high quality images High Power white LED Flash and video - Provides illumination in poor lighting conditions Fixing for straps (2 per side) Securing port for seating in Quick Release Cradle Speaker – To provide high quality audio Hawk II User Guide Rev3 23-03-12 Copyright © 2012 TouchStar Technologies Ltd pg. 11 Rear View (with battery fitted) 1 2 3 4 5 Item # 1 2 3 4 5 Description Mobile Broadband - HSPA external Antenna Communication Port via Cradle Cradle Interface - Permits connection via Quick Release cradle GPS - SIRF IV external Antenna Communication Port via Cradle ATEX Label – Identifies the ATEX Category that Unit is approved to Battery Warning Label Hawk II User Guide Rev3 23-03-12 Copyright © 2012 TouchStar Technologies Ltd pg. 12 Using the Battery If you are using your Hawk II for the first time you must install and charge the battery. Once the battery is charged the Battery Status Utility will display its status. NOTICE: Do not use your Hawk II until the battery has been charged for at least 4 hours. When charging, in the taskbar a lightening symbol will appear. Installing and Removing the Battery To install the battery: 1) If a SIM card is required, make sure it is fitted 2) Align the tongue on the top edge of the battery with the corresponding slot in the battery bay. 3) Pivot the battery down until the battery is fully inserted. Push battery clip down to lock. NOTE: As soon as the battery is inserted the Hawk II will power up. To Remove the Battery: 1) Insert tool in slot to lift locking tab. Hawk II User Guide Rev3 23-03-12 Copyright © 2012 TouchStar Technologies Ltd pg. 13 2) The battery will ‗sit up‘ slightly allowing you to lift it up and out. NOTE: The Hawk II part number and unique serial number are located underneath the battery. You will need the serial number of the device should you need to contact TouchStar Technologies. Hawk II User Guide Rev3 23-03-12 Copyright © 2012 TouchStar Technologies Ltd pg. 14 Charging the Battery Use one of the following options to charge the main battery To charge the battery when it is fitted in the Hawk II firstly connects an AC adapter to the Cradle and plug into a mains electrical socket. Fit the Hawk II to the Cradle. Remove the battery from the Hawk II and fit into the battery charger (available separately). If the main battery is low, it will switch off to maintain the cell‘s performance – the battery should be fully charged as soon as it is drained. To recover from a critically low battery: 1) See above 2) Replace with a fully charged battery (removing the critically low battery will not affect any settings if the backup cell is turned on – see DIP Switch Settings) The main battery will last for approximately 4.5 hours during normal working conditions. Around 2.5 hours if the backlight is continuously on. Backup Battery Information Your Hawk II is fitted with an internal backup battery which in the event of power loss from the main battery will store your device settings together with any application software stored in RAM. The backup battery will not power the unit. If the main battery runs flat or is removed you will not be able to turn the Hawk II on until it is replaced. During the charging of the main battery the backup battery is also charged. A fully charged Backup Battery will store your Hawk II‘s vital settings for approximately 30 days. Hawk II User Guide Rev3 23-03-12 Copyright © 2012 TouchStar Technologies Ltd pg. 15 Looking After Your Hawk II Batteries All batteries shall be controlled in accordance with the ―Handling Precautions and Prohibitions for Varta Microbattery GmbH Lilon Polymer Pouch Batteries and General Supply Notices‖. The cells in your Hawk II battery are Lithium Ion which makes them ideal for sitting on permanent charge (for example in a Cradle). However, if you plan on putting your device in storage for any period of time you must periodically charge and discharge the batteries (also known as cycling). Storing Batteries Ensure your Hawk II battery is stored between -20°c and +50°c. Storing it outside this range will result in diminished battery life. Your Hawk II battery must be cycled once every 30 days whilst in storage. Battery Disposal All batteries shall be returned to TouchStar Technologies Ltd for disposal. Hawk II User Guide Rev3 23-03-12 Copyright © 2012 TouchStar Technologies Ltd pg. 16 Removing and Fitting the Expansion Door 1. To remove the expansion door carefully place a suitable tool in the slot under the aluminium securing latch and carefully lever the locking latch upwards to release the door. 2. To fit the expansion door locate the 2 tongues on the base of door into the mating slots in the Hawk II. Secure the door in place by pushing the securing latch flush to the door face. Hawk II User Guide Rev3 23-03-12 Copyright © 2012 TouchStar Technologies Ltd pg. 17 Connecting Auxiliary Equipment Your Hawk II has several accessories that can improve the functionality of the device and enhance its usability. Using the Cradle The Hawk II Cradle is a docking station. Its primary function is to provide the Hawk II with a semi / permanent fixing, external power, external GPS & HSPA antenna connections and full communication to other devices. Using an Optional Expansion Cable or Hub The Hawk II has Ethernet, Serial, USB, Audio In, Audio Out brought out to the Cradle from the rear of the device. By connecting the correct cable or Hub to the cradle you can communicate with a large selection of devices. Available Cables A 25 Pin D-SUB Cable may be plugged into the Cradle Hawk II User Guide Rev3 23-03-12 Copyright © 2012 TouchStar Technologies Ltd pg. 18 Fitting the Hawk II into the Cradle 1) Present the Hawk II to the cradle. Seat the 2 rectangular slots in the side of the Hawk II (Adjacent to the TouchStar label) onto the corresponding seating keys on the Cradle. See picture for further info. 2) Push the Hawk II into the cradle until seated in place under the top catch. The cradle will then hold the unit until the handle is closed. 3) Now close the handle, locking the Hawk II in place. Hawk II User Guide Rev3 23-03-12 Copyright © 2012 TouchStar Technologies Ltd pg. 19 Removing Hawk II from the Cradle 1) When removing the Hawk II from the cradle, lift the handle until it locks in the open position. The Hawk II is still held in position by the cradle, so the user can easily remove the unit. Hawk II Quick Release Cradle connections Hawk II User Guide Rev3 23-03-12 Copyright © 2012 TouchStar Technologies Ltd pg. 20 1 2 3 4 5 6 7 8 1. 2. 3. 4. 5. 6. 7. 8. USB Ethernet Serial GPS GPRS/HSPA Audio In Audio Out Power In (11VDC – 36VDC 5A) Using a Hawk II Hub Hawk II User Guide Rev3 23-03-12 Copyright © 2012 TouchStar Technologies Ltd pg. 21 For the complete choice of external connections a Hawk II can be used in conjunction with a Hawk II Hub. Essentially, this is a custom break-out box that provides you with instant access to all available communication ports. A) 9 PIN D-Sub – Allows connection to serial based devices such as meters and printers Hawk II User Guide Rev3 23-03-12 Copyright © 2012 TouchStar Technologies Ltd pg. 22 B) USB Host – Allows connection to USB based devices such as memory sticks C) Ethernet - Ethernet socket to connect to a standard CAT5e network D) Audio IN – Allows connection to an external microphone E) Audio OUT – Allows connection to an external speaker NOTE: The Hawk II Hub does not require an external power supply. It is a pass through connection box that handles signals only. Attaching Cables to a Hawk II Hub 1) To attach a 9 PIN D-Sub cable to the Hub insert the connector into the socket on the Hub; using finger and thumb tighten the 2 locking screws to hold the connector in place. Failure to do so may result in loss of connection. Before you connect the cable make sure both connectors are correctly oriented and aligned. 2) To attach a USB cable to the hub simply insert the connector into the socket. The USB connectors have a friction fit. Before you connect the cable make sure both connectors are correctly oriented and aligned. 3) To attach an Ethernet cable into the hub insert the connector into the socket until it ‗clicks‘. A snap fit plastic clip will keep the connector in place. Before you connect the cable make sure both connectors are correctly oriented and aligned. 4) To attach either an Audio IN or Audio OUT cables simply insert the connector into the socket. The Audio connectors have a friction fit. Before you connect the cable make sure both connectors are correctly oriented and aligned. Removing Cables from a Hawk II Hub Hawk II User Guide Rev3 23-03-12 Copyright © 2012 TouchStar Technologies Ltd pg. 23 1) To remove the 9 PIN D-Sub cable, unscrew the 2 locking screw, grip connector and do not tug on cable. As you pull out the connector, keep it evenly aligned to avoid bending any connector pins. 2) To remove the USB cable pull out the connector; keep it evenly aligned to avoid bending any connector pins. 3) To remove an Ethernet cable, depress the plastic clip and pull out the connector; keep it evenly aligned to avoid bending any connector pins. 4) To remove either Audio IN or Audio OUT cables pull out the connector; keep it evenly aligned to avoid bending any connector pins. Using External Antennas When placed into a Hawk II Cradle, with external antenna sockets, the Hawk II will switch off its internal HSPA antenna. There is no internal GPS antenna. In order for a GPS and HSPA signal to be maintained, external antennas must be connected to the 2 sockets on the rear of the cradle. Attaching GPS & HSPA Antennas 1) To attach either a GPS or HSPA antenna to a Hawk II Cradle press fit the antenna connector to the corresponding socket on the rear of the cradle. NOTE: Take care not to mix up the two connectors, as they are both the same style (SMA). The plastic on the rear of the cradle is marked to indicate which is GPS and which is HSPA 2) Using finger and thumb turn the connector collar in a clockwise direction until the connector is tight against the socket. Removing GPS & HSPA Antennas Hawk II User Guide Rev3 23-03-12 Copyright © 2012 TouchStar Technologies Ltd pg. 24 1) To remove either a GPS or HSPA antenna from a Hawk II Cradle unscrew the connector collar and pull out the connector from the socket. As you pull out the connector, keep it evenly aligned to avoid bending any pins. Mounting GPS & HSPA Antennas NOTE: GPS antennas must be in the line of sight of Satellites (i.e. Pointing to the sky). HSPA antennas are less directional but will work better if they are placed away from metal objects. Heated windscreens will impair the performance of both GPS and HSPA antennas. Using Mounts and Brackets The Hawk II Cradle has been designed to work with the RAM Mount system of ball and socket joints. There are 4 threaded inserts on the Hawk II Cradle metalwork which allow a RAM Mount Ball joint to be fitted. Attaching a RAM Mount Ball Socket 1) Take a Ram Mount Ball Socket (C Size Base Mount 1.5‖ Ball) and attach it to the metal part of the Hawk II Cradle. Take four M4 x 12 screws and screw the ball joint to the metalwork. With a 1.5‖ Ball Joint fitted to the rear of the Cradle you can connect your Hawk II Cradle to a large selection of other RAM Mount arms, pedestals, brackets and systems. TouchStar can provide a selection of these options but for large orders and custom fixings please contact your Touchstar representative. RAM Contact Details Hawk II User Guide Rev3 23-03-12 Copyright © 2012 TouchStar Technologies Ltd pg. 25 http://www.ram-mount.com/ http://www.ram-mount-uk.com/ RAM Mount Parts Available from TouchStar Technologies Part Description RAM Mount Mount – w/long Arm C size Base Aluminium Black Base – 9‖ x 9‖ Aluminium Black W/4 Holes RAM Mount TouchStar Part Number 694019/001 694018/001 Using the Debug Port The Hawk II has a Debug port which allows you to connect it to your PC via a Serial to Debug cable. Using HyperTerminal on your PC you can then monitor diagnostic information from the Hawk II. Attaching a Debug Cable to a Hawk II 1) To attach a Debug cable insert the connector into the socket. The USB connectors have a friction fit. Before you connect the cable make sure both connectors are correctly oriented and aligned. Removing a Debug connector from a Hawk II Hawk II User Guide Rev3 23-03-12 Copyright © 2012 TouchStar Technologies Ltd pg. 26 2) To remove the Debug cable pull out the connector; keep it evenly aligned to avoid bending any connector pins. NOTE: The Debug cable will only really be needed by software developers. End users will have no requirement to access this port. Using SD / SDIO, SIM & Micro SD Cards The Hawk II has memory expansion the Secure Digital (SD) card slot. NOTICE: An SD card is keyed so it can only be inserted one way. Do not force the card into the slot. The SD card has its top right corner cut off when viewed directly. Inserting a SD / SDIO Card into the Full SD Card Slot 1) Insert the SD / SDIO card into the slot with the label pointing away from the device. Make sure the card is correctly oriented and aligned. Press the card in until you feel a spring pushing the card back out. Keep pushing the card until you feel it positively click. Removing a SD / SDIO Card from the Slot Hawk II User Guide Rev3 23-03-12 Copyright © 2012 TouchStar Technologies Ltd pg. 27 1) To remove the SD / SDIO card simply press the card inwards and release. The card will then be released and ejected. This will then enable the user to remove the card. Inserting the SIM & Micro SD Cards 1) 2) 3) 4) 5) Remove the battery as per the instructions in the ‗Using the Battery‘. Slide the SIM card cover down until you feel it click open. Carefully swing the SIM Card cover upwards until it is in the vertical position. Unlock the Micro SD card cover by sliding it along and then swing it upwards (@ 90 Degrees to the SIM Card) until it is in the vertical position. (See drg below for further info) Seat the Micro SD card into position and swing the cover back down and lock into position (See fig 2 on next page) Seat the SIM Card into position and swing the cover down flat until it locks. Figure 1 Figure 2 Hawk II User Guide Rev3 23-03-12 Copyright © 2012 TouchStar Technologies Ltd pg. 28 Removing a SIM Card 1) Follow the reverse instruction of the above (Inserting a SIM & Micro SD Cards). Hawk II User Guide Rev3 23-03-12 Copyright © 2012 TouchStar Technologies Ltd pg. 29 Performing a Reset Your Hawk II can be reset in two ways; a Soft Reset and a Hard Reset. Performing a Soft Reset will reset the device but keep all settings and information stored on the device safe. A Hard Reset will restart the device but completely wipe any information on the device. NOTICE: When you perform a hard reset, you will lose all the data stored in your device memory and any programs that you have installed on your device. It will not clear flash file system or stored calibration info. Perform a Soft Reset 1. Remove the expansion door as advised in the ‗Expansion Door‘ section. 2. With a suitable tool briefly press the reset button until you feel a resistive click and then release. 3. Your device will re-boot automatically Perform a Hard Reset Perform a hard reset if: a) You want to delete all the data stored in your device memory b) Your device is experiencing severe operational problems and have already attempted a soft reset. 1. Press and hold the reset button for a minimum of 10 seconds and then release. Hawk II User Guide Rev3 23-03-12 Copyright © 2012 TouchStar Technologies Ltd pg. 30 Hawk II How to Clear IPSM 1. Remove expansion port door, and plug a serial debug cable into the serial debug socket on the Hawk II and plug the 9 way D plug into a serial port on a PC. See Figures 1 & 2. Figure 1: Serial debug cable Figure 2: Position of reset and debug push-buttons, and debug serial port Hawk II User Guide Rev3 23-03-12 Copyright © 2012 TouchStar Technologies Ltd pg. 31 2. Start a terminal emulator on the PC, such as Teraterm with the following settings: baud rate 38400, No parity, 8 data bits, 1 stop bit. 3. Whilst holding down the debug push-button hard reset the Hawk II by holding down the reset push-button for 10 seconds. 4. When the initial boot loader screen appears (see Figure 3 below) on the terminal emulator, release the debug button, and press the space-bar in the terminal emulator to prevent the default option of Program being selected. If the space-bar is not pressed in time, then the boot loader will automatically carry out the default selected option. If this should occur, then press escape to return to the main screen, or repeat step 3. Figure 3: Boot loader main screen Hawk II User Guide Rev3 23-03-12 Copyright © 2012 TouchStar Technologies Ltd pg. 32 5. Press TAB to go to the ADVANCED SCREEN (see Figure 4 below). Figure 4: Boot loader advanced screen 6. Press 6 to enter the Flash blocks to erase, then enter 0x103 and press ENTER (see Figure 5 on next page). The default final block of 0x202 is correct, so just press ENTER again. Figure 5: Enter flash blocks to erase Hawk II User Guide Rev3 23-03-12 Copyright © 2012 TouchStar Technologies Ltd pg. 33 7. Press 7 to begin erasing the IPSM flash blocks. Press Y to confirm. The IPSM flash blocks will now be erased (see Figure 6). Figure 6: Erasing selected flash blocks 8. When the erase has finished, press any key to return to the advanced screen. 9. Press TAB repeatedly until you get back to the main screen, then press I to reboot the OS. 10. When the OS has booted to the desktop, a number of windows will appear in sequence regarding the IPSM registry, and IPSM. Tap on OK for all of these. The last one will start formatting Hawk II User Guide Rev3 23-03-12 Copyright © 2012 TouchStar Technologies Ltd pg. 34 Screen Protectors Your Hawk II is fitted with a durable TouchPanel but as this is the only user interface it has also been fitted with a Screen Protector for extra protection. If the Screen Protector gets scratched or damaged it can be thrown away and replaced without the need for the device being returned to TouchStar Technologies. Ordering and Fitting a Screen Protector Screen protectors for your Hawk II can be ordered from TouchStar Technologies – please reference part number 693032 when ordering. 1) Remove the protective sheet from the Screen Protector. This is the side which faces down towards the Hawk II. 2) Hold the Screen Protector in one hand and squeeze slightly so that it arches in on itself. 3) Feed it between the Upper Case and Touchpanel. Press it in until it touches the Touchpanel Gasket. 4) Work one of the long edges so that it fits in between the Upper Case and Touchpanel. 5) For the last step carefully work the final corner between the Upper Case and Touchpanel. NOTICE: DO NOT crease the Screen Protector. If this happens remove it and replace with a new Screen Protector. To remove a Screen Protector carefully insert a stylus under the corner of the screen protector, lifting the Screen Protector away from the touchpanel. Remove fully and discard. Hawk II User Guide Rev3 23-03-12 Copyright © 2012 TouchStar Technologies Ltd pg. 35 3) Using Microsoft® Windows CE.NET 5.0 Windows CE 5.0 is a real time Operating System designed to be embedded in devices such as your Hawk II. Getting Started Screen Calibration NOTE: On first start your Hawk II will boot up with the Windows CE.NET calibration screen as default. Go to step 4 if you are calibrating the display for the first time. 1) With the Windows CE.NET Desktop displayed use your finger or stylus to double tap the Utilities folder. 2) When in the folder, double tap the Calibrate icon. Hawk II User Guide Rev3 23-03-12 Copyright © 2012 TouchStar Technologies Ltd pg. 36 3) Tap either the tick or cross to confirm your decision to re-calibrate the device. 4) With a stylus press the cross-hair in the middle of the display. 5) The cross-hair will then move to each corner of the display systematically until all four corners have been tapped. 6) You then have 30 seconds to tap the display to confirm the calibration. 7) Finally, tap either the tick or the cross to commit these changes to memory. Hawk II User Guide Rev3 23-03-12 Copyright © 2012 TouchStar Technologies Ltd pg. 37 Control Panel The Windows CE.NET Control Panel provides a group of icons through which you can set a variety of system-wide properties, such as sound, network configuration and the desktop colour scheme. To access the Control Panel Tap on the Start button in the taskbar – this will display the Start Menu. From here tap on Settings and then Control Panel. Control Panel Icons Date/Time Set the current Date, Time & Time Zone on your Hawk II Hawk II User Guide Rev3 23-03-12 Copyright © 2012 TouchStar Technologies Ltd pg. 38 Display Modify the appearance scheme) of your Hawk II Keyboard Change the settings for the on screen keyboard Volume Sounds & (colour Adjust the volume for application software and warning beeps. Mouse Properties Customise the sensitivity & speed of the stylus double-tap Owner Owner information can be stored as well as Network ID information Password Apply password protection to certain elements of the unit Power Define power settings for the device, with battery and mains power Regional Settings Specify local languages as well as number formats, currency and time settings Remove Programs Uninstall programs on your Hawk II Stylus Double-tap and calibration settings System Displays system and memory properties Dialling Specifies dialling settings such as area codes and dial type Certificates Displays the certificates associated with your Hawk II Hawk II User Guide Rev3 23-03-12 Copyright © 2012 TouchStar Technologies Ltd pg. 39 PC Connection Enables direct communication to a desktop computer Network Define network settings for your Hawk II Bluetooth Configure the short-range communication technology wireless CAUTION: Once assigned password access cannot be reset; ensure you have kept a copy of your password. Password will be lost after a hard reset. Hawk II User Guide Rev3 23-03-12 Copyright © 2012 TouchStar Technologies Ltd pg. 40 4) Using Microsoft® ActiveSync® About ActiveSync ActiveSync allows you to transfer data and files between the Hawk II and a desktop PC. ActiveSync is also used to synchronise data and settings. Currently, there are two methods to connect the Hawk II to a desktop PC via ActiveSync: serial port, and Ethernet. Serial Port Connection To achieve an ActiveSync connection via the serial port: Ensure you have configured ActiveSync on your desktop PC to use an available serial port: Using an appropriate serial cable, connect the serial port of the Hawk II to the serial port of your PC. ActiveSync on the desktop PC will detect the connection and start waiting for the Hawk II to Connect: - Hawk II User Guide Rev3 23-03-12 Copyright © 2012 TouchStar Technologies Ltd pg. 41 At this point, launch the ActiveSync application on the Hawk II: - If this is the first time the Hawk II has connected, ActiveSync on the desktop PC will require a partnership to be created. Follow the on-screen instructions. Hawk II User Guide Rev3 23-03-12 Copyright © 2012 TouchStar Technologies Ltd pg. 42 Ethernet Connection Desktop ActiveSync versions from version 4.0 upwards do not support Ethernet connections. To use ActiveSync with the Hawk II via Ethernet, you must use ActiveSync version 3.7 or 3.8. To achieve an ActiveSync connection via Ethernet: Ensure you have configured ActiveSync on your desktop PC to allow Ethernet connections: There must already exist a partnership between the Hawk II and desktop PC. This can be created as described earlier (via serial port [or USB]), or using the TSSync utility, described later. Ensure that the desktop PC and the Hawk II are connected to the same Ethernet network. The Hawk II Ethernet connection is confirmed by observing the associated icon in the System Tray (you may need to scroll the icons to shift into view): - Hawk II User Guide Rev3 23-03-12 Copyright © 2012 TouchStar Technologies Ltd pg. 43 There may be two identical icons; double-tap each icon to confirm the correct one is being checked (CS89001). The Hawk II Ethernet connection is confirmed by checking an appropriate IP Address has been assigned, as per your network. At this point, launch the Ethernet ActiveSync application on the Hawk II Establishing an ActiveSync Partnership using TSSync Hawk II User Guide Rev3 23-03-12 Copyright © 2012 TouchStar Technologies Ltd pg. 44 Launch the desktop PC TSSync application: Ensure ―CE 5.0‖ is selected. Type a name for the partnership; if multiple device partnerships will be created, the device‘s serial number is a handy unique name to use. Click ‗Create Partnership‘. The application will prompt for a folder to store the device-side component. This needs to be copied to and run on the device to complete the partnership creation: The partnership is now created, and the instructions for ‗Ethernet Connection‘ can be followed to establish an ActiveSync connection. Note: For further information on getting connected via Bluetooth, GPS/3G, Ethernet etc. Please contact Touchstar Technologies using the details found in section 7) Appendix. 5) Appendix Hawk II User Guide Rev3 23-03-12 Copyright © 2012 TouchStar Technologies Ltd pg. 45 Specifications Physical Dimensions: 200mm (W) x 45mm (D) x 130mm (H) Weight: 750g Case: Impact resistant, flame retardant Case Material: UV stabilised polycarbonate Display Specification 7‖ Colour TFT, Anti-Glare, 16:9 Ratio Wide 16:9 WVGA 800 x 480 pixels TFT display LED Backlit TouchScreen: Polycarbonate / Resistive Touchscreen Audio Specifications High Power Speaker Performance Specification Processor: PXA270 624MHz Operating System: Microsoft CE5.0 Memory / Storage Specifications 128MB SDRAM – Standard 128MB Flash Power Specification 10.25 – 12VDC 525Ma(typical) Communication & Interface Ports Hawk II User Guide Rev3 23-03-12 Copyright © 2012 TouchStar Technologies Ltd pg. 46 Micro SD Card – Located under battery SD Card – SDIO – Located under door Bluetooth – Class 1, 100 Meters range in free air USB OTG – Located under door SIM Card Socket – Under battery GPS/GPRS/3G-HSPA – External Antenna port via Cradle Battery Backup Single Lithium Ion cell, 1200mAh, 4.6Wh Removable Rechargeable Battery: Main Battery Removable 7.4V Lithium Ion Battery 4060mAh, 30Wh Approvals CE / FCC ATEX / IECEx Cradle Interface USB Host RS232 Channel 1 – 9pin (tx, rx, cts, rts, dtr, dsr, cd, ri) RS232 Channel 2 - tx,rx Ethernet 100Base-t Microphone - Speaker/headset interface HSPAconnector for external antenna (switched) GPS connector for external antenna (switched) Cradle Charge Detect Power Input 10.25V WiFi Summit 802.11b,g GPS Module Performance Hawk II User Guide Rev3 23-03-12 Copyright © 2012 TouchStar Technologies Ltd pg. 47 SiRFstarIV Up to 48 Track Verification Channels TTFF average - Hot start < 1s, Warm < 35s, Cold < 35s NMEA HSPA Module – Mobile Broadband HSPA 7.2 Mbps downlink - 2.0 Mbps uplink Bluetooth Hands Free Audio Interface support Camera 3M Pixel Flash LUXEON Flash Expansion Port Additional RS232 RX, TX, RTS, CTS Scanner/Imager EV15 CCD Scanner EA15 2D Imager Operating System CE 5.0 Professional Application Support Package Hawk II User Guide Rev3 23-03-12 Copyright © 2012 TouchStar Technologies Ltd pg. 48 Full Dialer Application – Bluetooth Full Range of Mobile Applications Operating Temperature -20˚C to +50˚C Storage Temperature -30˚C to +50˚C Shock 1.5m onto Concrete Environmental IP65 Regulatory Notices Hawk II User Guide Rev3 23-03-12 Copyright © 2012 TouchStar Technologies Ltd pg. 49 Electromagnetic Interference (EMI) is any signal or emission, radiated in free space or conducted along power or signal leads, that endangers the functioning of radio navigation or other safety service or seriously degrades, obstructs, or repeatedly interrupts a licensed radio communications service. Radio communications services include but are not limited to AM/FM commercial broadcast, television, cellular services, radar, air-traffic control, pager and Personal Communication Services (PCS). These licensed services, along with unintentional radiators; such as digital devices including computers, contribute to the electromagnetic environment. Electromagnetic Compatibility is the ability of items of electronic equipment to function properly together in the electronic environment. Whilst this Hawk II has been designed and determined to be compliant with regulatory agency limits for EMI, there is no guarantee that interference will not occur in a particular installation. If this equipment does cause interference with radio communications services, which can be determined by turning the equipment off and on, you are encouraged to try to correct the interference by one or more of the following measures: • Reorient the receiving antenna • Relocate the computer with respect to the receiver • Move the computer away from the receiver If necessary, consult a TouchStar Technologies representative for additional suggestions. Hawk II‘s are designed, tested and classified for their intended electromagnetic environment. These electromagnetic environment classifications generally refer to the following harmonised definitions: • Class A is typically for business or industrial environments • Class B is typically for residential environments Hawk II User Guide Rev3 23-03-12 Copyright © 2012 TouchStar Technologies Ltd pg. 50 CE Notice (European Union) Marking with the symbol indicates compliance of this Hawk II to the Electromagnetic Compatibility Directive and the Low Voltage Directive of the European Union. Such marking is indicative that this Hawk II computer meets the following technical standards: Emissions EN55022 Immunity EN55024 A ―Declaration of Conformity‖, in accordance with the preceding directives has been made and is on file at TouchStar Technologies Ltd, 7 Commerce Way, Trafford Park, Manchester, M17 1HW. Contacting TouchStar Technologies TouchStar Technologies Ltd 7 Commerce Way Trafford Park Manchester United Kingdom M17 1HW Telephone: +44 (0) 161 874 5050 Fax: +44 (0) 161 874 5088 Email: [email protected] Hawk II User Guide Rev3 23-03-12 Copyright © 2012 TouchStar Technologies Ltd pg. 51 Glossary 802.11 (WI-FI) — A wireless technology standard for mid-range networking devices that allows for enabled devices to automatically recognize each other. BLUETOOTH® WIRELESS TECHNOLOGY — A wireless technology standard for short-range (10 m [30 ft]) networking devices that allows for enabled devices to automatically recognize each other. CAT5e - Network cabling that consists of four twisted pairs of copper wire terminated by a RJ-45 connector. CRADLE — A device that allows your Hawk II to synchronize with a computer, recharge its battery and run on AC power. GPRS - General Packet Radio Service is a mobile data service available to users of GSM and IS-136 mobile phones. GPRS data transfer is typically charged per megabyte of transferred data, while data communication via traditional circuit switching is billed per minute of connection time. GPS - The Global Positioning System comprises of more than 24 GPS satellites in medium Earth orbit, transmitting signals allowing GPS receivers to determine location, speed and direction. GSM - The Global System for Mobile Communications, (original acronym: Groupe Spécial Mobile), is the most popular standard for mobile phones in the world. HSPA - High Speed Packet Access is an amalgamation of two mobile telephony protocols, High Speed Downlink Packet Access (HSDPA) and High Speed Uplink Packet Access (HSUPA), that extends and improves the performance of existing WCDMA protocols LAN — Local Area Network — A computer network covering a small area. A LAN usually is confined to a building or a few nearby buildings. A LAN can be connected to another LAN over any distance via telephone lines Hawk II User Guide Rev3 23-03-12 Copyright © 2012 TouchStar Technologies Ltd pg. 52 and radio waves to form a wide area network (WAN). POP3 — Post Office Protocol 3 — A standard client/server protocol that allows you to access your e-mail from a server. Using POP3, you must download your e-mail to your local system to view and browse your messages. RAM—Random-Access Memory — The primary temporary storage area for program instructions and data. Any information stored in RAM is lost when you perform a reset. ROM — Read-Only Memory — Memory that stores data and programs that cannot be deleted or written to by the device. ROM, unlike RAM, retains its contents after you perform a reset. Some programs essential to the operation of your device reside in ROM. SECURE DIGITAL MEMORY CARD — A type of removable memory commonly used in digital cameras, handheld devices, cell phones and other devices. Secure Digital memory cards are approximately the size of a postage stamp. SIM - Subscriber Identity Module; a smart card containing the telephone number of the subscriber, encoded network identification details, the PIN and many other user data such as the phone book. A user's SIM card can be moved from phone to phone as it contains all the key information required to activate the phone. SMA - A small type of threaded coaxial signal connector, typically used in higher frequency applications. This connector is typically usable to 26GHz. SMS — Short Message Service — A service that is capable of sending short messages to wireless devices. SMTP — Simple Mail Transfer Protocol — A type of protocol used for sending and receiving e-mail. SMTP is typically coupled with POP3 or IMAP. Hawk II User Guide Rev3 23-03-12 Copyright © 2012 TouchStar Technologies Ltd pg. 53 TCP/IP — Transmission Control Protocol/Internet Protocol — The basic communication language of the Internet. TCP/IP can also be used as a communication protocol in an intranet or extranet. USB — Universal Serial Bus — A hardware interface for a low-speed device such as a USB-compatible keyboard, mouse or storage device. Hawk II User Guide Rev3 23-03-12 Copyright © 2012 TouchStar Technologies Ltd pg. 54