1
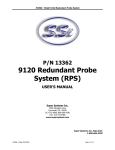
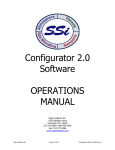
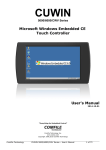
PGA 3510
Portable Multi-Gas IR Analyzer
(CO, CO2, and CH4 Gas Analyzer
with O2 and Optional H2 Measurement and
% Carbon, % Dissociated Ammonia, % NH3, KN, and
KC Calculation Capabilities)
Operations Manual
Please read, understand, and follow these instructions before operating this equipment.
Super Systems, Inc. is not responsible for damages incurred due to a failure to comply with these
instructions. If at any time there are questions regarding the proper use of this analyzer, please contact
us at (513) 772-0060 for assistance.
PGA 3510 Operations Manual
Super Systems Inc.
USA Office
Corporate Headquarters
7205 Edington Drive
Cincinnati, OH 45249
Phone: (513) 772-0060
http://www.supersystems.com
Super Systems Europe
Units 3 & 4, 17 Reddicap Trading Estate,
Sutton Coldfield, West Midlands
B75 7BU
UNITED KINGDOM
Phone: +44 (0) 121 329 2627
http://www.supersystemseurope.com
Super Systems Mexico
Sistemas Superiores Integrales S de RL de CV
Calle 3 Int.: 11.
Zona Ind. Benito Juarez
Querétaro, Qro. Méx.
C.P.: 76120
Phone: +52 (442) 210 2459
http://www.supersystems.com.mx
Super Systems China
No. 335 XianXia Road
Room 308
Shanghai, CHINA
200336
Phone: +86 21 5206 5701/2
http://www.supersystems.com
Super Systems Inc.
Page 2 of 42
PGA 3510 Operations Manual
Table of Contents
Introduction ................................................................................................................................................... 4
Specifications ................................................................................................................................................ 5
Unpacking the Device .................................................................................................................................... 6
Basic Operating Description ......................................................................................................................... 7
Default Screen .............................................................................................................................................. 7
Pump Operation ............................................................................................................................................ 8
Carbon Calculation ........................................................................................................................................ 8
Chart ............................................................................................................................................................. 9
Chart Sub Menu ......................................................................................................................................... 10
Menu Lists ................................................................................................................................................... 11
Carbon Calculation .................................................................................................................................... 13
Nitrider Calculation (Available on Units Configured for Nitriding & FNC Applications).......................... 13
Sessions ..................................................................................................................................................... 14
Pump Control............................................................................................................................................. 16
Sensor Calibration ..................................................................................................................................... 16
Performing a Zero Calibration .............................................................................................................. 17
Use of a CO2 Scrubber for Zero Calibrations ........................................................................................ 18
Performing a Span Calibration ............................................................................................................. 18
Calibrating the Oxygen Sensor ............................................................................................................. 18
Automatic Sampling Parameters .............................................................................................................. 19
COF/PF Adjustment Increment............................................................................................................. 20
COF/PF Adjustment Interval (minutes) ................................................................................................ 20
Minimum COF / PF Value ...................................................................................................................... 20
Maximum COF / PF Value ..................................................................................................................... 20
COF / PF Adjustment Mode ................................................................................................................... 20
Communications and Source Setup .......................................................................................................... 21
IP Address ............................................................................................................................................. 21
Atmosphere/Temp Sources .................................................................................................................. 22
Port Setup ............................................................................................................................................. 23
Instrument Setup ....................................................................................................................................... 24
Calculation Factors ............................................................................................................................... 24
General Setup........................................................................................................................................ 30
Security Settings ................................................................................................................................... 30
Factory Default Settings ....................................................................................................................... 30
Other Settings ....................................................................................................................................... 31
Language Setup .................................................................................................................................... 31
Instrument Information ............................................................................................................................. 31
General Information .............................................................................................................................. 31
Calibration Dates .................................................................................................................................. 31
Power Status ......................................................................................................................................... 31
Tools........................................................................................................................................................... 32
Database Maintenance.......................................................................................................................... 32
Pressure Sensor Calibration ................................................................................................................ 33
Thermister Calibration.......................................................................................................................... 33
SuperCalc .............................................................................................................................................. 33
User Manual .......................................................................................................................................... 33
Set User Cal / Load User Cal ................................................................................................................ 33
Calibration Log ...................................................................................................................................... 33
Analog Input Calibration ....................................................................................................................... 33
Valve Setup ............................................................................................................................................ 36
Parts List ..................................................................................................................................................... 38
Warranty...................................................................................................................................................... 39
Revision History .......................................................................................................................................... 40
Appendix 1: PGA 3510 Common Modbus Registers .................................................................................... 41
Super Systems Inc.
Page 3 of 42
PGA 3510 Operations Manual
Introduction
The Model PGA 3510 (see part numbers in the Parts List on page 38) is a portable Multi-Gas IR analyzer
with an Oxygen (O2) cell. It measures Carbon Monoxide (CO), Carbon Dioxide (CO2) and Natural Gas (CH4)
typically found in an endothermic atmosphere. The measurement of these gases, combined with furnace
temperature information, allows the PGA 3510 to calculate the percent Carbon (%C) of the measured gas.
A Hydrogen (H2) sensor can also be incorporated as an option to provide a more complete picture of the
measured gas.
For nitriding and ferritic nitrocarburizing (FNC) applications, the PGA 3510 can calculate carburizing
potential (KC) and nitriding potential (KN).
Finally, the PGA 3510 can be configured for compatibility with environments containing ammonia (NH3)
gas. NH3 compatibility must be specifically requested when the PGA 3510 is ordered.
IMPORTANT!
Do not use a PGA 3510 for gas analysis with NH3-containing gas if the PGA 3510 has not been
configured with NH3 compatibility. Any use of a non-NH3 compatible PGA 3510 with NH3containing gas will void the product warranty.
Super Systems Inc.
Page 4 of 42
PGA 3510 Operations Manual
Specifications
The unit is designed and manufactured for the atmosphere heat treating industry; however, its uses go
beyond the scope of these applications.
CO range:
CO2 range:
CH4 range:
O2 range:
H2 range:
0.00 to 30.00 %
0.000 to 2.000 %
0.00 to 15.00 %
0.1 to 25.0%
0.00 to 100%
* Note: These sensors have been optimized for use at the levels normally seen in an Endothermic
atmosphere. The ranges can be adjusted to fit other applications. For information regarding
modifications to the ranges shown above, please contact Super Systems.
Sampling method:
Super Systems Inc.
Extraction by internal pump (when necessary)
Page 5 of 42
PGA 3510 Operations Manual
Measurement Method (CO, CO2, CH4):
Measurement Method (O2):
Measurement Method (H2):
Accuracy and repeatability:
Recommended Calibration Interval:
Flow Meter:
AC Power Requirements:
DC Power Source:
Communications:
Data Storage:
Data Retrieval:
Operating Temperature:
External Dimensions:
Weight:
Non-Dispersive Infrared (NDIR)
Electrochemical
Thermal Conductivity
± 1% of full scale
Annual
Inside case lid and also on-screen
90 to 230 VAC, 50 to 60 Hz, 60 Watts
12VDC rechargeable NiCd battery with Integral charger
Ethernet, USB(A), USB(B), RS485 Modbus
Continuous automatic data logging
XGA Viewer Software (included) or on-screen
32° to 122° F (0° to 50° C)
Approx. 16”H X 20”L X 8”D
Approx. 28 lbs.
Unpacking the Device
The following items should be included with the PGA:
1. Portable Gas Analyzer
2. Bowl Filter
3. Sample Tubing
4. In-Line Filter
5. Notepad
6. Touch Screen Stylus
7. XGA Viewer Software CD
8. USB Cable
9. CO2 Scrubber
10. Power Cord
11. Product Manual
Super Systems Inc.
Page 6 of 42
PGA 3510 Operations Manual
Basic Operating Description
The Model PGA 3510 has been designed for the simultaneous analysis of CO, CO2 and CH4 in heat-treat
furnace atmosphere gases. It uses a color touch screen display / operator interface for data entry and for
viewing. Selections can be made on the screen using a finger or a stylus. Avoid the use of sharp objects
(pens, paperclips, screwdrivers, etc.) as they can cause permanent damage to the screen and void the
warranty of the instrument.
After the power switch is turned on, it will take approximately 30 seconds for the PGA 3510 software to
automatically load. Once the software is properly loaded, the instrument is ready to use. When the
power switch is turned off, the PGA 3510 initiates a controlled shutdown procedure which takes about 15
seconds. Following the controlled shutdown, the instrument will completely turn off.
Hydrogen Cell Note:
For highest H2 accuracy, it is recommended that the instrument be powered on for 60 minutes before
measurements are taken.
Default Screen
Once the PGA 3510 has successfully loaded its software, the default screen will be displayed.
A
L
K
B
C
D
E
F
G
H I
J
A – Measured values of CO, CO2, and CH4 (and H2, if the H2 sensor is present)
B – Pump status indicator / Button to change pump status
C – Button to access menu list
D – Session status indicator
E – Temperature / Instrument Temperature indicator
F – Button for Carbon Calculation screen
G – Automatic Carbon Calculation Adjustment indicator
H – External Instrument Communications status indicator
I – Measured value of Oxygen
J – Button for Trend Chart screen
K – Numeric Flow indicator
L – Visual Flow indicator
Super Systems Inc.
Page 7 of 42
PGA 3510 Operations Manual
Pressing the Return button at the bottom right of the operator interface on any screen will take the
display to the default. It may be necessary to press the Return button multiple times.
Pump Operation
Initially, the pump will be off. The pump should remain off while sampling an endothermic generator or
any other atmosphere under positive pressure. The pump should also remain off during calibration. For
proper operation, the flow of gas through the sensors should be between 1.0 and 2.0 SCFH. If the flow
meter on the right of the screen or on the inside of the lid does not indicate sufficient flow, turn the pump
on. When accessed from the main screen, the pump has two possible modes: On and Off.
Carbon Calculation
The PGA 3510 determines the percent carbon in the sample gas using measured amounts of CO, CO2, and
CH4 along with the Furnace Temperature. The Furnace Temperature is either entered by the user or
obtained automatically from the Furnace Temperature Controller via RS-485 communications.
Additionally, the carbon percentage measured by the PGA 3510 can be used as a comparison to the
carbon percentage measured by a furnace’s oxygen probe. This is accomplished either by manually
entering the Probe Temperature, Probe Millivolts, and the Probe CO Factor into the PGA 3510 or by
obtaining the information automatically via RS-485 communications to the Furnace Carbon Controller.
Providing the probe information allows the PGA 3510 to suggest an adjustment for the probe CO Factor
(or Process Factor) in order to keep the oxygen probe measuring properly.
Super Systems Inc.
Page 8 of 42
PGA 3510 Operations Manual
Using infra-red analysis is considered a more accurate method for determining the percent carbon of a
gas compared to using an oxygen probe alone. The single point oxygen probe assumes a theoretical
mixture of endothermic gas to infer the percent carbon whereas the gas analyzer will measure the exact
composition of the process gas. The percent carbon determined by the gas analyzer can then be used to
adjust the carbon percentage determined by the oxygen probe.
Chart
The Chart Display shows between 1 hour and 24 hours of process variable data on the screen and can be
scrolled back to view all of the data stored on the flash card. The vertical timelines change as the time
changes on the screen. The function buttons run along the bottom of the screen.
- will allow the user to select or de-select the trend lines on the trend
The Trend Lines button chart to display. If the checkbox next to each trend line is checked, then that trend line will be displayed.
- will display a screen with the trend data in a grid format instead of
The Datagrid View button with trend lines. The trend data is shown in 1-minute intervals. Clicking on the OK button on this screen
will close the screen down and return to the Chart Display screen.
The Refresh button -
- will refresh the screen’s trend data if the screen is not in real-time mode.
The left-pointing green arrow button specified chart interval.
- will move the chart’s view backward in time by the
- will determine the number of hours displayed on the trend chart. The
The chart interval button options are: 1 Hour, 2 Hours, 4 Hours, 8 Hours, 12 Hours, or 24 Hours.
The right-pointing green arrow button specified chart interval.
Super Systems Inc.
- will move the chart’s view forward in time by the
Page 9 of 42
PGA 3510 Operations Manual
- will toggle between viewing the
The right-pointing arrow with the vertical line next to it button chart in or out of real-time. When in real-time mode, the chart will automatically be updated once a
minute.
Chart Sub Menu
There is a sub-menu available by putting a finger or a stylus anywhere on the chart and holding it there
for a couple of seconds. The sub-menu will have the following options available: Zoom, Restore, Add
Note, Data, and Exit.
The Zoom option will allow the user to zoom in on a particular part of the screen. Once this has been
selected, the user can take a stylus or a finger and create a box around the data. Once the user releases
the stylus or finger, a zoom is no longer possible, and the user will need to re-select the option from the
sub-menu to zoom in again.
The Restore option will back out of any zoom options that have been performed and display the initial
chart screen.
The Add Note option allows the operator to enter a note on the chart, similar to writing on a paper chart.
The note is available when the chart is printed out using the utility software included with the Series 9010
instrumentation. Pressing the Add Note option displays a screen where the operator can enter the
operator ID or initials and a note. The user has the option to enter a note using either the operator
interface keyboard and typing or using the Signature mode and writing the note with the stylus.
The Data option will show the trend data as a data grid instead of the trend lines on a chart. This
functionality is exactly the same as if the user pressed the Datagrid View button screen.
- from the chart
Exit will close out the sub-menu without selecting an item.
Super Systems Inc.
Page 10 of 42
PGA 3510 Operations Manual
Pressing the red ‘X’ in the top right-hand corner of the screen will take the user back to the status
screen.
Menu Lists
Accessing the menu screen will show three or four available options, depending on whether the Nitrider
Calculation feature is installed.
Carbon Calculation, Nitrider Calculation (if installed), Sessions, and Instrument Information can be
accessed by any users. Additional menu items are available when an authorized user logs in using an
appropriate Pass Code. When the Supervisor Pass Code is entered (default = 1), the user will also be able
to access the Pump Control and Instrument Information screen.
Super Systems Inc.
Page 11 of 42
PGA 3510 Operations Manual
To see the full range of options available, the user must use the Configuration Pass Code (Default = 2).
This provides the user with all available options including calibration and setup functions.
Super Systems Inc.
Page 12 of 42
PGA 3510 Operations Manual
To access any items on the menu list, touch the item to highlight it and then press Detail. A specific
description of each item on the list follows.
Carbon Calculation
Please see the Carbon Calculation section starting on page 8.
Nitrider Calculation (Available on Units Configured for Nitriding & FNC Applications)
When configured for nitriding and ferritic nitrocarburizing (FNC) applications, the PGA 3510 has the ability
to provide a calculation of values essential those processes—specifically, nitriding potential (KN) and
carburizing potential (KC). To access these values, open the Nitrider Calculation page. NOTE: If the PGA
3510 unit you are using does not have the Nitrider Calculation option, and you would like this feature
added, please contact SSi at (513) 772-0060.
The Nitrider Calculation page displays data on current atmosphere parameters such as temperature and
measured values for % CO, % CO2, % CH4, % O2, and % H2 (if the H2 sensor is installed). The calculated
value for %C is also shown.
User-provided flow values for N2, NH3, DA, and CO2 are used by the PGA 3510 in performing calculations.
The flow values are visible on the right side of the Nitrider Calculation page. To change a flow value,
simply tap on the blue field for that value. A numeric entry page will appear, allowing you to change the
value. For the purpose of KN and KC calculations, any valid gas flow unit (for example, cubic feet per
minute, or cfm) may be used. The flow unit must be the same for all gases. NOTE: If one or more of the
flow gases do not show up in the list, it is likely that the gas flow valve is not enabled in the Tools →
Valve Setup menu. Refer to the Valve Setup section on page 34 for more information.
KN provides a measurement of the amount of nitrogen that can be diffused into a metal (e.g., iron); it is a
derived measurement based on the partial pressures of NH3 and H2. The PGA 3510 performs the
calculation of KN using user-provided flow values and displays the calculated KN value on the Nitrider
Calculation page.
Super Systems Inc.
Page 13 of 42
PGA 3510 Operations Manual
KC provides a measurement of the amount of carbon that can be diffused into a metal; it is derived from a
calculation involving the partial pressures of CO2, H2, CO, and H20. The PGA 3510 performs the required
calculation using user-provided flow values and displays the calculated KC value on the Nitrider
Calculation page.
Sessions
The instrument is logging data any time that it is powered on. Data of interest can be viewed by entering
its date and time. Users can apply custom tags to sections of data, allowing for easy identification of
viewing and recalling data. These tags can include the name of the operator and the name of the
equipment that is being measured.
The instrument has default values for each of these variables. However, it is highly recommended that
the selections be modified so that data may be tagged in a way that is easily recognized. For more
information on how to set up these selections with custom entries, see the “Tools – Database
Maintenance” section of this manual.
Using the pull-down menus, select the Operator Name and Equipment Name from the list of available
selections. Then begin the session by pressing Start. After confirming the beginning of a session, a
sessions summary screen will be displayed. To end the session, press the red End button.
Super Systems Inc.
Page 14 of 42
PGA 3510 Operations Manual
This screen will identify sessions within the date range specified at the top of the screen. As a default,
sessions from the past 24 hours are shown. By expanding the data range, additional sessions can be
seen. These sessions are sorted with the newest entry at the top, but they can be sorted by End Time,
Equipment Name, or Operator Name by touching the header of each column.
To see the details of any session, highlight it by touching it, and then press Detail. This will display a
graphical representation of the data from the selected session.
For more information on navigating the Chart Screen see the “Chart” section of this manual. To leave the
Chart view, press the red X in the upper right hand corner of the screen.
Super Systems Inc.
Page 15 of 42
PGA 3510 Operations Manual
Pump Control
The Pump Control screen will identify and allow the modification of the pump status (On or Off).
Sensor Calibration
Two types of calibrations can be performed on the NDIR sensor; Zero and Span. The Zero calibration
should be performed with a gas that has none of the measured gases in it. Ideally this would be pure
Nitrogen or Argon. The concentration of the Span calibration gas should closely resemble the gas that is
Super Systems Inc.
Page 16 of 42
PGA 3510 Operations Manual
being measured. For a heat treating application measuring endothermic gas, the ideal composition
would be:
•
•
•
•
•
CO: 20%
CO2: 0.5%
CH4: 5.0%
H2: 40%
N2: Balance
Since the accuracy of the calibration gas directly influences the resulting accuracy of the instrument, the
highest possible accuracy grade should be obtained. Some gas suppliers refer to this as a “Certified
Primary Standard”. The high degree of accuracy is not required to obtain nominal values that exactly
match the values shown above. The accuracy is required to know the exact composition of the gas in the
cylinder. The actual composition will be shown on the bottle when it is delivered.
When flowing calibration gas is into the analyzer, turn the pump off. The amount of flow from the gas
cylinder should be approximately 1.5 SCFH at no pressure. The gas cylinders will be under high
pressure, so it is recommended that a two stage regulator with a low pressure secondary stage be used.
It is good practice to begin the flow of gas before attaching the calibration gas to the instrument. This will
prevent any high pressure bursts from entering the instrument.
Calibration gases can be obtained from Super Systems, however they can also be obtained from any
supplier of custom gases.
Hydrogen Cell Note:
It is recommended that the instrument be turned on for three hours prior to performing an H2 calibration.
Performing a Zero Calibration
From the Sensor Calibration screen, be sure that the button at the upper left of the instrument is
selecting Zero Calibration and not Span Calibration.
When this is selected, the target values will automatically go to zero. Begin the flow of gas at the
appropriate rate, and allow the readings to come to equilibrium. This occurs when the actual values are
not moving in a specific direction, and they display only slight movements up and down. This should take
approximately 45 seconds.
There is a column showing the Status of each gas. In this area the instrument is making a comparison
between the Target value and the Actual value and providing feedback based on the amount of difference
between the two. There are three possible words that can appear in this area:
“OK” – The gas is within 10% of where it is expected to be.
“OK?” – The gas is between 10% and 20% of where it is expected to be. This could indicate an issue with
the calibration gas, so the calibration gas and the associated tubing should be checked and verified to be
free from leaks or improper gas composition. This message does not necessarily indicate that there is a
problem with the sensor or the calibration. It is meant only to have the operator make sure that the
proper procedures are being followed.
“BAD” – The gas is more than 20% from where it is expected to be. The same items should be checked as
described above. This message could indicate an issue with the sensor.
Regardless of the status of each of the gases, the instrument can be calibrated by waiting for the
readings to stabilize and pressing Start Calibration. Timers will begin to count down, and when they
reach zero the Actual values should be the same as the Target values (allowing for slight variations as a
result of gas fluctuations).
Super Systems Inc.
Page 17 of 42
PGA 3510 Operations Manual
Use of a CO2 Scrubber for Zero Calibrations
If an appropriate Zero calibration gas is not available, the included CO2 Scrubber can be used.
The scrubber is designed to remove CO2 from ambient air. Ambient air should not have a significant
amount of CO or CH4. However it does have some CO2 in it. Using the scrubber will result in the
instrument measuring a gas with no CO, CO2, or CH4 which is the function of a good zero gas.
Unfortunately, depending on the environment where the calibration is being performed, ambient air may
contain trace amounts of CO and/or CH4. Also, the scrubber uses an expendable media that loses its
effectiveness after repeated uses. For these reasons, Super Systems Inc. recommends the use of
Nitrogen or Argon instead of the scrubber whenever possible.
To use the CO2 scrubber: Remove the protective caps from the scrubber and attach it to the inlet hose on
the PGA 3510. The pump should then be turned on. This will pull ambient air through the scrubber and
into the analyzer.
Always replace the caps on the CO2 scrubber after use. If it is left exposed to ambient air, the media will
lose its effectiveness. The amount of time that the Scrubber is exposed to ambient air is directly related
to its effective life span. If the protective caps are replaced after each use, the scrubber will provide
years of service.
Never mistake the scrubber for a particulate filter. Not only is it not designed for this purpose, but
because it removes the CO2 from the gas it will result in very inaccurate readings. For these reasons, it
should never be used during a Span calibration.
Performing a Span Calibration
A Span calibration is performed the similarly to the zero calibration but with two small changes. First,
the selector button at the top should be on Span Calibration instead of Zero Calibration.
Second, the gas values for the specific cylinder of gas being used need to be entered into the Target
values. To do this, press the blue box associated with each gas and enter the value shown on the
cylinder. For example, the nominal value for CO may be 20%, but your cylinder may actually have 19.96%
CO. 19.96 is the value that should be entered as a Target.
After the gas values have been entered, proceed with the calibration in the same manner as with the zero
calibration. Never perform a span calibration without first doing a zero calibration.
Calibrating the Oxygen Sensor
The PGA 3510 uses an electrochemical oxygen sensor that should last approximately two years
(depending on usage). It measures oxygen to a resolution of 0.1%, so it is not suitable for calculating
carbon in a furnace. Its intended use is for troubleshooting problems such as air and/or water leaks. The
information from this sensor is not used in the calculation of percent carbon.
Calibration of the Oxygen sensor does not require a special calibration gas. Ambient air contains 20.9%
O2, and since that concentration is relatively stable, it can be used to perform a span calibration on the
sensor. There is no drift at the low range of the sensor so there is no Zero Calibration function for the
Oxygen sensor. There is only a Span Calibration.
To perform a Span calibration: Take the instrument to an office or outdoors where it will be in fresh air.
Press the Calibrate O2 button on the Sensor Calibration screen. When the Oxygen Calibration screen is
entered, the pump automatically turns on. When the Actual value stabilizes, press the Start Calibration
button. This will make the Actual value match the Target value.
Super Systems Inc.
Page 18 of 42
PGA 3510 Operations Manual
Automatic Sampling Parameters
This instrument is capable of communicating directly with a control instrument. This is valuable because
it will provide real-time entry of the temperature and millivolt information from the probe, allowing for an
accurate comparison between the IR % Carbon and the Probe %Carbon. To establish this
communications link, see “Communications and Source Setup – Atmosphere/ Temp Sources.”
The Automatic Sampling Parameters screen will allow the user to adjust the way that the PGA 3510
updates the COF / PF in the atmosphere controller. All of the parameters on this page can be
disregarded if the “COF/PF Adjustment Mode” is set to Monitor mode. These parameters only apply when
the instrument is in Control mode.
Super Systems Inc.
Page 19 of 42
PGA 3510 Operations Manual
COF/PF Adjustment Increment
When adjustments are made automatically, this value indicates the size of the step that is made when the
COF/PF is changed. It is recommended that this number remain low to avoid making sudden changes to
the process that could be caused by temporary conditions.
COF/PF Adjustment Interval (minutes)
This indicates the frequency that automatic adjustments are made. We recommend making small
changes at a frequent interval instead of making large changes at longer intervals. This will prevent
temporary changes in atmosphere from making dramatic adjustments to the COF/PF.
Minimum COF / PF Value
As a safeguard, the COF/PF can be prevented from dropping below a certain point. This point is the
Minimum COF/PF value.
Maximum COF / PF Value
The Maximum COF/PF can also be entered as a safeguard.
COF / PF Adjustment Mode
This selection determines if changes to the COF/PF will be made automatically or if the instrument will
monitor the conditions without making any changes. When in Monitor mode, a COF/PF will continue to be
suggested, but no modifications will be made to the atmosphere controller.
Super Systems Inc.
Page 20 of 42
PGA 3510 Operations Manual
Communications and Source Setup
This screen allows the user to view and modify the method of communications between the instrument
and external devices.
IP Address
This section identifies the IP Address of the instrument. When connected to a network, the PGA 3510
screen will obtain its own IP Address. It does this during the power-up procedure, so if communication
via Ethernet is preferred, plug the cable into the instrument before turning it on. To use a specific IP
address, it must be entered on the Windows CE screen. This can only be accessed when the Gas Analyzer
software has been shut down.
Manually Setting the IP Address
1. Log in to the PGA 3510 touch screen using the supervisor access code (by default, this code is ‘2’).
2. Access the Instrument Setup → General Setup menu.
3. Select “Shut Down Software” followed by “Yes”.
4. The program will shut down and a Windows CE screen will appear.
5. Click the Start menu in the lower left corner.
6. Select ‘Settings” and then “Network and Dial-up Connections”.
7. Select “CS89001”
8. Select the option for “Specify an IP Address”
9. Enter the desired IP Address, Subnet Mask, and Default Gateway.
10. Select “OK”
11. Close open windows to return to the main Windows CE Screen.
12. Double-click on the “SaveRegs” icon.
13. Select “OK” from the Registry Save Complete notification.
14. Turn the instrument off and wait for the screen to turn off.
15. Turn the instrument back on.
16. The instrument will automatically boot up as a gas analyzer with the IP address that has been
manually entered.
Super Systems Inc.
Page 21 of 42
PGA 3510 Operations Manual
Atmosphere/Temp Sources
RS485 communications can be set up to automatically enter and update data from the oxygen probe and,
if desired, make modifications to the COF/PF in the atmosphere controller.
Port Usage
This is the communication method used to supply information to the instrument. The possible values are:
Modbus Master
Modbus Host
Port Baud Rate
This is the speed of communications which can range between 1200 and 115200.
Probe Temp/mV Instrument
This is the make and model of the device that will be supplying the instrument with information on: probe
temperature, probe millivolts, and COF/PF. Possible choices are:
•
•
•
•
•
•
SSi AC20
SSI 9200/9205 Loop 1
Yokogawa UDP750
Honeywell UDC3300
Dualpro Loop 1 Modbus
Dualpro Loop 2 Modbus
Probe Temp/mV Instrument Address
This is the address of the atmosphere controller. It can be directly entered using the numeric keypad on
the touch screen.
Furnace Temp Instrument
This is the make and model of the device that will be supplying the instrument with information on
furnace temperature. If there is no instrument associated with this input, the probe temperature will be
used. Possible selections are:
Super Systems Inc.
Page 22 of 42
PGA 3510 Operations Manual
•
•
•
•
•
•
•
•
•
SSi AC20
SSI 9200/9205 Loop 1
SSI 9200/9205 Loop 2
SSI 9200/9205 Loop 3
SSI 9100 Loop 1
Yokogawa UDP750
Honeywell UDC3300
Dualpro Loop 1 Modbus
Dualpro Loop 2 Modbus
Furnace Temp Instrument Address
This is the address of the furnace temperature instrument. It can be directly entered using the numeric
keypad on the touch screen.
Port Setup
This page is used to set the parameters for the communications ports. The factory default settings are
shown below, and they should not need to be changed by the operator.
Super Systems Inc.
Page 23 of 42
PGA 3510 Operations Manual
Instrument Setup
The items shown in this menu list are settings that should only need to be changed once. Any
modifications to the default values will be saved in the instrument.
Calculation Factors
In this menu, there are two factors that will influence the calculation of carbon: IR Shim Factor and CH4
Factor. Each of these factors is incorporated in the equation used to calculate %C; they are described in
Super Systems Inc.
Page 24 of 42
PGA 3510 Operations Manual
further detail below. The calculation factors should be changed only after determining that additional
adjustments are required based on the specific conditions and equipment at each facility. Neither of them
should be modified without significant testing or consultation from Super Systems, Inc.
IR Factor
This setting determines which of two parameters is incorporated in the %C calculation: CO Factor or
Process Factor (PF).
IR Shim Factor
Changing the IR Shim Factor is a way of modifying the computed percent carbon. The nominal value is
180. There is an inverse relationship between the IR Shim Factor and computed percent carbon. To
increase the computed percent carbon, this number should be lowered, and to decrease the computed
percent carbon it should be increased.
CH4 Factor
This factor increases or decreases the significance of CH4 in the calculation of carbon. CH4 does not have
a significant impact on the computed percent carbon, so it has a minor role in the equation. If the
measured gas has over 5% CH4, its role in the equation becomes greater than it should be. In these cases
the CH4 factor should be reduced. In cases where the CH4 is present in excess of 7 or 8%, this factor can
be reduced to zero.
Current Working IR Factor
This field shows the current IR Shim Factor adjustment value. It is not directly modifiable.
Three Methods of %Carbon Calculation
The PGA 3510 is able to calculate %Carbon using one of three methods: Default Settings, IRF Matrix, or
Equipment-Specific IRF Matrices.
1.
2.
3.
Default Settings. This is the method used when Use IRF Matrix is set to False (off). The sample
gas composition (%CO, %CO2, %CH4) and temperature, along with the programmed IR Shim
Factor and CH4 Factor, are used to arrive at a calculation of atmospheric %Carbon.
IRF Matrix. When Use IRF Matrix is set to True (on), the PGA 3510 will use values configured in
the IRF Adjustment Matrix to set the current IR Shim Factor. Configuring the adjustment matrix
is described in more detail in the IRF Adjustment Matrix section below.
Equipment Specific IRF Matrices. This method allows you to configure an IRF Matrix specific to a
configured piece of equipment and change the calculation method based on the equipment whose
gas composition is being analyzed. This method is described in more detail in the Equipment
Specific IRF Matrices section below.
IRF Adjustment Matrix
The IRF Adjustment Matrix, sometimes referred to simply as the IRF Matrix, is used to set conditions
under which the IR Shim Factor will be changed. Using the IRF Matrix, a total of 16 different IR Shim
Factors can be configured if both temperature and atmosphere are considered; a total of 4 different IR
Shim Factors can be configured if only temperature is considered. NOTE: Use IRF Matrix must be set to
“True” for this function to be used.
Super Systems Inc.
Page 25 of 42
PGA 3510 Operations Manual
The following steps describe how to configure the IRF Matrix.
1.
To begin, decide whether both atmosphere and temperature should be considered in setting the
IR Shim Factor, or only temperature.
• If both atmosphere and temperature apply, set Temp Only to “No” (and then go to step 2
below).
• If only temperature applies, set Temp Only to “Yes” (and then go to step 3 below).
2.
Configure up to 3 atmosphere limits. Each atmosphere limit marks a boundary line within the
matrix. Atmosphere values above and below each limit will be evaluated in determining the IR
Shim Factor.
For example, if the atmosphere limits are 0.25, 0.4, and 0.6, the following ranges will be
evaluated in helping to determine the IR Shim Factor:
• Less than 0.25 (Atm < 0.25)
• 0.25 – 0.39 (0.25 <= Atm < 0.4)
• 0.4 – 0.59 (0.4 <= Atm < 0.6)
• 0.6 and higher (0.6 <= Atm)
3.
Configure up to 3 temperature limits. Each temperature limit marks a boundary line within the
matrix. Temperature values above and below each limit will be evaluated in determining the IR
Shim Factor.
For example, if the temperature limits are 1200, 1400, and 1600, the following ranges will be
evaluated in helping to determine the IR Shim Factor:
• Less than 1200 (Temp < 1200)
• 1200 - 1399 (1200 <= Temp < 1400)
• 1400 - 1599 (1400 <= Temp < 1600)
• 1600 and higher (1600 <= Temp)
4.
Now, enter an IR Shim Factor for each set of ranges. Do this by tapping on a set of ranges and
then tapping “Edit”. A numeric entry screen will appear, allowing you to enter a value for the IR
Shim Factor.
Super Systems Inc.
Page 26 of 42
PGA 3510 Operations Manual
Once IR Shim Factor values have been entered for each set of ranges, the IRF Matrix is configured. The
IRF Shim Factor will be set to the configured value for a set of ranges when the atmosphere and
temperature (or temperature only, if configured that way) are within those respective ranges. For
example, if the atmosphere is 0.3% and the temperature is 1230°, and the IRF for range set
(0.25 <= Atm < 0.4, 1200 <= Temp < 1400) is 125, the PGA 3510 will set the current IR Shim Factor to 125.
Click Return to return to the Calculation Factors screen.
Use IRF Matrix
This setting determines whether or not the IRF Adjustment Matrix is used to set the IR Shim Factor.
There are two possible settings: False (default) and True. If Use IRF Matrix is set to False, the IRF
Adjustment Matrix will not be used (and Default Settings will be applied). If Use IRF Matrix is set to True,
the IRF Adjustment Matrix will be applied to the IR Shim Factor.
Equipment Specific IRF Matrices
The PGA 3510 can be set up to use different IRF Adjustment Matrices based on the specific equipment
whose gas composition is being analyzed. To use this feature, follow the steps below. NOTE: This
procedure requires administrator access (default login: ‘2’).
1.
Make sure that the piece of equipment for
which you want to set up an IRF Adjustment
Matrix is configured in the Tools → Database
Maintenance → Maintain Equipment menu. If
the equipment has not been added, you will
need to add it. Remember that Equipment is
tied to Equipment Types; therefore, you may
need to add an Equipment Type in the Tools →
Database Maintenance → Maintain Equipment
Type menu first.
Super Systems Inc.
Page 27 of 42
PGA 3510 Operations Manual
2.
Open the Instrument Setup → Calculation
Factors menu.
3.
Open the Equipment Specific IRF Matrices
menu option. Select the equipment for which
you want to set up an IRF Matrix. Then click
Edit.
4.
IRF Matrix parameters for the selected
equipment will be displayed. Edit the
parameters for the equipment. Parameters are
described in the IRF Adjustment Matrix section
above.
5.
Click Save when finished editing parameters.
The IRF Matrix for this particular equipment is
now set up.
When ready to start a Session for this piece of
equipment:
6. Open the Sessions menu from the main PGA
3510 menu.
7. Using the Equipment Name drop-down box,
select the piece of equipment for which you
want to want to apply an Equipment Specific
IRF Matrix.
8. Make sure that the Use Equipment Specific IRF
Matrix box is checked.
9. Press Start to begin the Session.
Super Systems Inc.
Page 28 of 42
PGA 3510 Operations Manual
Set Setpoints based on IR Factor
The PGA 3510 has the ability to automatically adjust temperature and atmosphere setpoint in an effort to
get the Process Variables (PVs) for temperature and atmosphere within a selected range set in the IRF
Matrix. This option allows you to select an IRF Matrix range set based on which the PGA 3510 will make
adjustments to temperature and atmosphere setpoints. Of course, if the IRF Matrix is configured so that
only temperature is used in determining changes to the IR Shim Factor, only temperature will be
displayed in the menu for Set Setpoints based on IR Factor, and only the temperature setpoint will be
adjusted by the PGA 3510 when this option is used. Note that Use IRF Matrix and Use Furnace Temp for
Furnace Setpoint must both be set to “True” for this option to work. In addition, the PGA 3510 must not be
configured to communicate with slave instruments; see the IMPORTANT! box below.
An example of how this option is used can be given as follows. Assume that, in the IRF Matrix, one of the
range sets is (0.25 <= Atm < 0.4, Temp < 1200) with a corresponding IR Shim Factor of 135. Because this
range set is set up in the IRF Matrix, it will appear as an option in the Set Setpoints based on IR Factor
selection list. To apply this range set to the atmosphere and temperature setpoints, the user first taps on
line in the menu list until that option is highlighted.
the
Next, the user taps on the Select Input button to apply that option.
Once the range set is selected and applied, the PGA 3510 will automatically change the temperature
setpoint and (if applicable) atmosphere setpoint. In the Carbon Calculation screen, the Temperature
Setpoint and Carbon Setpoint will not be visible or editable while control is based on IR Factor.
Super Systems Inc.
Page 29 of 42
PGA 3510 Operations Manual
IMPORTANT!
This option will work only when the PGA 3510 is
not communicating with any slave instruments.
If you attempt to use this option by tapping it
and then tapping “Edit” when the PGA 3510 is
communicating with a slave instrument, the
message “Cannot use this feature with Slave
Instrument configured” will be displayed. To
disable slave instruments, open the
Communications and Source Setup →
Atmosphere/Temp Sources menu; then set
both the Probe Temp/mV Instrument Address
and Furnace Temp Instrument Address to “0”.
Use Furnace Temp for Furnace Setpoint
When this option is set to “True”, the PGA 3510 will use the furnace temperature as the value used to
select an IR Shim Factor. When this option is set to “False”, the PGA 3510 will use the temperature
setpoint as the value used to select the IR Shim Factor.
General Setup
This screen shows the current time and date for the instrument, as well as the temperature scale. The
temperature mode can be changed from this screen, but the time cannot be changed unless the PGA
software is closed. This can be done through the following steps:
Manually Setting the Time
1. Log in to the PGA 3510 touch screen using the supervisor access code (by default, this code is ‘2’).
2. Access the Instrument Setup → General Setup menu.
3. Select “Shut Down Software” followed by “Yes”.
4. The program will shut down and a Windows CE screen will appear.
5. Click the time in the lower right corner (press the stylus in this corner if the time does not
automatically appear).
6. Set the time and date to the desired settings
7. Select “OK”
8. Double-click on the “SaveRegs” icon.
9. Select “OK” from the Registry Save Complete notification.
10. Turn the instrument off and wait for the screen to turn off.
11. Turn the instrument back on.
12. The instrument will automatically boot up as a gas analyzer with the IP address that has been
manually entered.
Security Settings
This page is used to change the pass code used for logging into the menu list. The default setting for the
Supervisor Pass Code is 1, and the default setting for Configuration is 2. The maximum value for either
code is 32767.
The Configuration Code will also work for all items on the Supervisor Pass Code items, so entering the
Configuration Code (default =2) will provide access to all available menus.
Factory Default Settings
Selecting this option will cause the instrument to revert back to the settings that it contained when it
came from Super Systems. Any changes or modifications made since then will be lost.
Super Systems Inc.
Page 30 of 42
PGA 3510 Operations Manual
Other Settings
This screen displays calculated dew point. This value is not normally displayed because it is only
accurate during certain conditions. Calculating dew point by using the gas values requires assumptions
to be made regarding the composition of the gas being sampled. Since these assumptions are not always
accurate the resulting dew point is not always accurate. When using Endothermic gas in a heat treating
environment, the calculated dew point will usually be close to the correct value, but there is no substitute
for a dew point that is determined through direct measurement of the moisture content of the gas.
When the dew point is enabled, it will appear near the bottom left of the Carbon Calculation screen.
Language Setup
The instrument language should be pre-configured at Super Systems prior to shipment but can also be
changed by making a selection from the drop-down list. For the language change to take effect, the
instrument must be powered off and then back on again.
Instrument Information
These items cannot be modified; they can only be viewed.
General Information
This is information on the revision levels of various components of the instrument. This can be valuable
when consulting with Super Systems about issues with the instrument.
Calibration Dates
This area describes the last time the instrument was calibrated at Super Systems, plus any calibrations
that have been performed since then. These dates and times are automatically computed and cannot be
manually entered.
Power Status
This screen will identify the amount of voltage that is available to the instrument and also indicate if the
instrument is being charged or not. When plugged in, the Internal Supply Voltage will show the amount of
power coming from the internal power supply. When unplugged, the Internal Supply Voltage will indicate
the battery voltage.
Super Systems Inc.
Page 31 of 42
PGA 3510 Operations Manual
Tools
Database Maintenance
To make the information recorded during a Session more valuable, the Sessions database should be
populated with relevant information regarding the people who will be using the instrument and the
equipment that they will be working on. Taking the time to enter this information will provide additional
fields to sort by after the data has been collected in a session.
Maintain Equipment Types
Many of the common types of heat treating equipment have been added into the PGA 3510 as default
entries. This screen allows irrelevant items to be removed and additional items to be added.
Maintain Equipment
Each organization has different names for the various pieces of equipment in their shop. Those names
should be entered here. Each name needs to be associated with a specific Equipment Type, so that
database should be populated first.
Maintain Sessions
The PGA 3510 is designed to delete the oldest files first in the event that the storage capacity has been
exceeded. It is also possible to delete old files manually by entering a date on this screen. All files that
were made before that date would be permanently deleted. It is important to note that after the data has
been downloaded to a computer, a copy is stored on that computer. The data will always be available on
the computer even if it has been deleted from the screen.
Maintain Users
The names of all potential users can be entered here. Names can be added and deleted as required.
Compact Database
Periodic database compaction will help make data storage more efficient and allow more data to be
stored before it is automatically deleted. Nothing is deleted or lost when this button is pressed, and the
only result will be a performance improvement.
Super Systems Inc.
Page 32 of 42
PGA 3510 Operations Manual
Pressure Sensor Calibration
The pressure it set at Super Systems for local conditions. For optimal performance, the ambient
pressure should be reset at the final destination. This can be done by determining the barometric
pressure and the elevation and entering them on this screen. After the two values have been entered,
press the Calibrate button and the pressure sensor calibration will be complete.
Thermister Calibration
This will be set at Super Systems and should not need to be adjusted by the end user. It allows for the
sample gas temperature and the ambient temperature inside the instrument to be set. This should only
be performed after the instrument has been powered on long enough for it to achieve temperature
equilibrium.
SuperCalc
SuperCalc is a proprietary software tool developed by SSI to allow the user to perform different scenarios
and view the resulting percent carbon. It allows the user to enter gas percentages, probe information,
and temperatures to see the effects of each variable on the calculated percent carbon. The data on this
screen is independent of any values that are determined by the PGA 3510, and it is only provided as a
reference tool.
User Manual
An electronic version of the User Manual is located within the instrument for ease of reference.
Set User Cal / Load User Cal
This feature allows the user to create new factory default calibration settings for the sensor. Instead of
reverting to the factory calibration values, it can revert back to different calibration settings. This is
accomplished by first setting the user calibration values. At any time after they are set, they can be
restored by selecting Load User Cal.
Calibration Log
The calibration log is not used on the PGA 3510. If this option is selected, a screen that reads “Not valid
for PGA” will appear.
Analog Input Calibration
The True Temp PGA 3510 is equipped with an analog input card that is calibrated at the factory before the
True Temp unit is shipped. Optionally, you can verify the calibration or re-calibrate the unit at a later time
if desired. The Analog Input Calibration includes Zero and Span calibrations for millivolt input and
calibration of the actual thermocouple inputs based on the type of thermocouple wire used (the PGA 3510
supports calibration with type “K” and type “S” wire). This section provides more information on
performing those calibrations, if you wish to perform them. Note the warning below.
Super Systems Inc.
Page 33 of 42
PGA 3510 Operations Manual
IMPORTANT!
SSi strongly recommends that anyone who performs these calibrations have previous experience
with and strong working knowledge of this type of procedure. If in doubt, contact SSi at (513) 7720060 to request assistance or to have the unit returned to the factory for calibration. An
improperly performed calibration will significantly impact temperature readings in a negative
way.
To perform a millivolt calibration (Zero and Span):
Needed: Copper wire (not thermocouple wire), millivolt sourcing device
1.
2.
3.
4.
5.
6.
7.
8.
Open the Analog Input Calibration page.
Make sure that the selected input at the top of the screen is mV.
Prepare the millivolt sourcing device. This device should be capable of sourcing a specified raw
voltage between 0 and 1 volt.
Connect the copper wire from the millivolt device to the white input jack labeled “CU”
(uncompensated) on the side of the case.
Tap Zero on the touch screen.
Configure the millivolt sourcing device to deliver zero millivolts.
Wait for the “Current Value” displayed on the screen to get as close to zero as possible.
Tap Calibrate. Tap “Yes” when asked if you want to proceed with the calibration. A progress
indicator will appear.
9. When the process completes, Zero calibration is finished.
10. Tap Span on the touch screen.
11. Configure the millivolt sourcing device to deliver the desired voltage at the high end of the
desired span.
Super Systems Inc.
Page 34 of 42
PGA 3510 Operations Manual
12. Wait for the “Current Value” displayed on the screen to get as close as possible to the voltage
being delivered by the millivolt sourcing device.
13. Tap Calibrate. Tap “Yes” when asked if you want to proceed with the calibration. A progress
indicator will appear.
14. When the process completes, Span calibration is finished.
To perform a temperature calibration (“Cold Junction Trim”):
Needed: Thermocouple wire type “S” and/or “K”, temperature sourcing device
1.
2.
Open the Analog Input Calibration page.
Make sure that the selected input at the top of the screen is T/C K or T/C S, depending on which
thermocouple wire type you are using.
Super Systems Inc.
Page 35 of 42
PGA 3510 Operations Manual
3.
4.
5.
6.
7.
8.
9.
Prepare the temperature sourcing device. This device should be capable of sourcing a
temperature from type “S” and type “K” thermocouple types.
Connect the thermocouple wire from the temperature sourcing device to the appropriate input on
the side of the case.
Enter the desired temperature value based on which to deliver a corresponding voltage.
Configure the temperature sourcing device to deliver the proper voltage.
Wait for the “Current Value” displayed on the screen to get as close to the target voltage as
possible.
Tap Calibrate. Tap “Yes” when asked if you want to proceed with the calibration. A progress
indicator will appear.
When the process completes, temperature calibration is finished.
Valve Setup
The PGA 3510 uses four flow control valves for nitriding gas analysis. These valves are enabled and set up
in the Valve Setup window.
Super Systems Inc.
Page 36 of 42
PGA 3510 Operations Manual
A
B
C
D
E
The Valve Setup window contains the following items:
A – Valve Selection Drop-Down List. Using this drop-down list, you can select the valve number ( through
4) that you want to configure.
B – Valve Maximum. This field is used to set the maximum valve that can be entered for the valve gas
flow. Tap on the field to change it.
C – Valve Decimal Place. This field is used to set the number of decimal places that will be used in the
valve gas flow value in the Nitrider Calculation page. For example, if the valve decimal place is set to “1”
in this menu, and “600” is entered for valve 1 flow on the Nitrider Calculation page, the displayed value
will be “60.0”. NOTE: This field will also change the number of decimal places used for the Valve
Maximum field in the Valve Setup menu.
D – Gas Selection Drop-Down List. This drop-down list allows you to select the gas used in the selected
flow control valve. If used, valve 1 must be used with N2, and valve 2 must be used with NH3 (these are
fixed). Valve 3 may be used with Dissociated Ammonia (DA), NH3, a miscellaneous gas (Misc),
endothermic gas (Endo), or CO2. Valve 4 may be used with H2, NH3, a miscellaneous gas (Misc),
endothermic gas (Endo), or CO2.
E – “Enabled” checkbox. If this box is checked, the selected flow control valve number is enabled and will
be displayed on the Nitrider Calculation page. If it is not checked, the valve is disabled; it will not be
displayed on the Nitrider Calculation page.
When finished with valve setup, tap the “Done” button.
Super Systems Inc.
Page 37 of 42
PGA 3510 Operations Manual
Parts List
The following items can be purchased as needed for the PGA 3510.
Part Number
Description
32012
Battery 12VDC
20623
IR Cell
31409
O2 Cell
20624
H2 Sensor
31274
Touch Screen Display
33018
Power Cord, AC
20634
Notepad, Universal portable instruments
36033
Flow scope, .2 to 2.0scfh
13112
CO2 Scrubber
33095
Fuse, 2 amp slow blow
20315
Sample Tubing Assembly
31033
In-Line Filter
37048
Bowl Filter Assembly
31027
Element for Bowl Filter
13084
Span Gas Calibration Kit (including regulator)
30054
Zero Gas Calibration Kit (including regulator)
Full PGA Units
Super Systems Inc.
13533
Standard 3-Gas PGA [CO, CO2, & CH4 (with O2)]
13544
4-Gas PGA (Standard plus H2 measurement)
13548
3-Gas PGA for Corrosive Gases (Standard plus
compatibility with NH3 gas)
13549
4-Gas PGA for Corrosive Gases (Standard plus H2
measurement and compatibility with NH3 gas)
Page 38 of 42
PGA 3510 Operations Manual
Warranty
Limited Warranty for Super Systems Products:
The Limited Warranty applies to new Super Systems Inc. (SSI) products purchased direct from SSI or
from an authorized SSI dealer by the original purchaser for normal use. SSI warrants that a covered
product is free from defects in materials and workmanship, with the exceptions stated below.
The limited warranty does not cover damage resulting from commercial use, misuse, accident,
modification or alteration to hardware or software, tampering, unsuitable physical or operating
environment beyond product specifications, improper maintenance, or failure caused by a product for
which SSI is not responsible. There is no warranty of uninterrupted or error-free operation. There is no
warranty for loss of data—you must regularly back up the data stored on your product to a separate
storage product. There is no warranty for product with removed or altered identification labels. SSI DOES
NOT PROVIDE ANY OTHER WARRANTIES OF ANY KIND, INCLUDING, BUT NOT LIMITED TO, THE IMPLIED
WARRANTIES OR CONDITIONS OF MERCHANTABILITY AND FITNESS FOR A PARTICULAR PURPOSE.
SOME JURISDICTIONS DO NOT ALLOW THE LIMITATION OF IMPLIED WARRANTIES, SO THIS LIMITATION
MAY NOT APPLY TO YOU. SSI is not responsible for returning to you product which is not covered by this
limited warranty.
If you are having trouble with a product, before seeking limited warranty service, first follow the
troubleshooting procedures that SSI or your authorized SSI dealer provides.
SSI will replace the PRODUCT with a functionally equivalent replacement product, transportation prepaid
after PRODUCT has been returned to SSI for testing and evaluation. SSI may replace your product with a
product that was previously used, repaired and tested to meet SSI specifications. You receive title to the
replaced product at delivery to carrier at SSI shipping point. You are responsible for importation of the
replaced product, if applicable. SSI will not return the original product to you; therefore, you are
responsible for moving data to another media before returning to SSI, if applicable. Data Recovery is not
covered under this warranty and is not part of the warranty returns process. SSI warrants that the
replaced products are covered for the remainder of the original product warranty or 90 days, whichever is
greater.
IMPORTANT!
Do not use a PGA 3510 for gas analysis with NH3-containing gas if the PGA 3510 has not been
configured with NH3 compatibility. Any use of a non-NH3 compatible PGA 3510 with NH3containing gas will void the product warranty.
Super Systems Inc.
Page 39 of 42
PGA 3510 Operations Manual
Revision History
Rev.
A
B
C
D
Description
Initial Release
Please Reference MCO #2084
Updated for revised capability of H2 sensor
Updated for added nitriding calculations, available compatibility with
ammonia gas. Updated parts list. Tools menu updated as needed.
Added Calculation Factors; Added Appendix 1 for common Modbus
registers.
Super Systems Inc.
Date
9/1/2011
11/16/2012
2/7/2014
MCO#
N/A
2084
2107
2135
6/20/2014
2138
Page 40 of 42
PGA 3510 Operations Manual
Appendix 1: PGA 3510 Common Modbus Registers
This appendix covers Modbus registers most commonly accessed by PGA 3510 users. These are Modbus
registers 200 through 227 and their descriptions. There are other Modbus registers used by the PGA
3510. If you need information on other registers, call SSi at (513) 772-0060.
Register Location
200
201
202
203
204
205
206
207
208
209
210
211
212
213
214
Parameter
co_data
co2_data
o2_data
ch4_data
Bench_off
IR_carbon
IR_COF
IR_PF
IR_MV
probe_MV
probe_COF
probe_temperature
probe_PF
probe_carbon
pump_run_min
215
pump_run_wks
216
217
pump
pump_run_now
218
pump_run_max
219
220
221
222
calib_status
IR_temperature
output_percent
sample_flow
Super Systems Inc.
Description
Measured CO value
Measured CO2 value
Measured 02 value
Measured CH4 value
Turn off bench, pump, and sample
IR %C
Suggested COF (CO Factor)
Suggested PF (Process Factor)
IR equivalent millivolts
Probe millivolts
Probe COF
Probe temperature
Probe PF
Probe %C
The total time in minutes that the
pump has run since the last time
memory was cleared or a manual
reset took place. This value, plus
pump_run_wks, will provide the total
amount of time the pump has been
running. When this number reaches
10080, pump_run_wks is increased by
1, and pump_run_min is reset to zero.
The total time in weeks that the pump
has run since the last time memory
was cleared or a manual reset took
place. This value, plus pump_run_min,
will provide the total amount of time
the pump has been running.
Pump status
The time in minutes that the pump is
running (reset to zero if pump is
turned off). Maximum value is 30000. If
pump_run_now is greater than
pump_run_max, then pump_run_max
is set to pump_run_now.
The longest time in minutes of a pump
session. If pump_run_now is greater
than pump_run_max, then
pump_run_max is set to
pump_run_now.
Calibration status
IR temperature
Control output in percent
Sample flow
Page 41 of 42
PGA 3510 Operations Manual
Register Location
223
224
225
226
227
Super Systems Inc.
Parameter
sample_valve
sample_control
flow_timer
base_status
alarm_bits
Description
Sample valve state
Sample valve control
Flow control
Status of base (0=OFF, 1=pump ON,
2=sample delay, 3=measure delay,
4=delay OFF, 5=ON)
Alarm bit map (Bit 0=low flow, Bit
1=base communications, Bit 2=max
factor, Bit 3=min factor, Bit
6=programmer alarm, Big 7=high byte
is acknowledge; Bit 4 and 5 not used)
Page 42 of 42