1
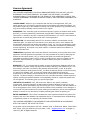
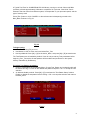
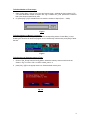
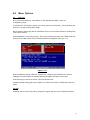
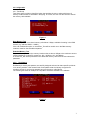
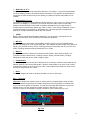
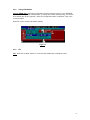
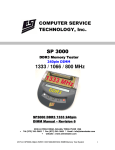
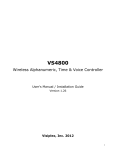
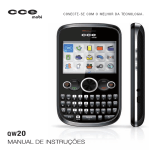
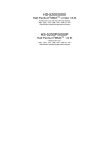
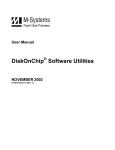
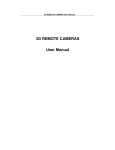
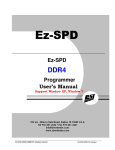
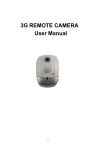
DocMemory PC Memory Diagnostic Software V1.45 - 2000
User Manual & Troubleshooting Guide
Table of Contents
License Agreement
1. Introduction
2. Installation
3. Quick Start
4. Menu
4.1. Run Test
4.2. Quit
4.3. Configuration
4.3.1. Test Group
4.3.2. Test Pattern
4.3.3. Test Loop
5.
Troubleshooting Guide
5.1
How to interpret DocMemory Test Result
5.2
Common Memory Errors
5.3
Troubleshooting without Opening up PC
5.4
Troubleshooting by Opening up PC
5.5
Guide to trouble shooting with BIOS Beep
1
License Agreement
THIS LICENSE AGREEMENT IS A LEGAL BINDING BETWEEN YOU AND CST_INC FOR
DOCMEMORY SOFTWARE PRODUCT. BY USING THIS SOFTWARE, YOU AGREE
UNCONDITIONALLY TO BE BOUND BY THE TERMS OF THIS AGREEMENT, EVEN IF THIS
LICENSE AGREEMENT IS DEEMED A MODIFICATION OF ANY PREVIOUS AGREEMENT OR
CONTRACT.
LICENSE GRANT: Subject to your compliance with the term of this agreement, CST_INC,
hereby grants you a non-exclusive right and license to the software and related documents. You
may make a single copy of the software for backup and archival purposes only provided that any
copy must contain proprietary notices included in the original.
OWNERSHIP: Title, ownership rights and intellectual property rights to the software shall remain
with CST_Inc and are protected by international copyright laws, intellectual rights and treaties.
There will be no transfer of any title or ownership of the software to you. CST Inc shall reserve all
rights that are not specifically granted under this License Agreement.
RESTRICTION: You acknowledge that CST Inc owned the software, documentation and all
intellectual rights. You agree not to sub-license, rent or lease any portion of the software and
documentation without the prior written authorization of CST_Inc. You may not attempt to create
or derive any of the source code or other technology or data within the software by disassembly,
reverse engineering, de-compile or any other method, or otherwise reduce the software to a
human-perceivable form.
TERMINATION: Agreement and License are effective from the time you accept the terms of this
agreement until this agreement is terminated. You may terminate at any time by destroying the
software and all copies thereof. CST_Inc reserved the rights to terminate this agreement
immediately and without further notice if you fail to comply with any terms or conditions of this
agreement. Upon termination, you agree to uninstall or destroy all copies of software and
documentation.
WARRANTY: CST_Inc warrants that the media on which the Software is distributed will be free
from defects for a period of thirty (30) days from the date of delivery of the Software to you. Your
sole remedy in the event of a breach of this warranty will be that CST_Inc will, at its option,
replace any defective media returned to CST_Inc within the warranty period or refund the money
you paid for the Software. CST_Inc does not warrant that the Software will meet your
requirements or that operation of the Software will be uninterrupted or that the Software will be
error-free. The above warranty is exclusive and in lieu of all other warranties, whether express or
implied, including the implied warranties of merchantability, fitness for a particular purpose and
non-infringement. This warranty gives you specific legal rights.
LIMITATION OF LIABILITY: CST_INC shall not be liable for any special, incidental,
consequential, exemplary damages, including without limitation damages for loss of use, lost
profits, loss of data or information of any kind, arising out of or in connection with the software, its
use or this agreement. Even if CST_INC has been advised of the possibility of such damages. In
no event will CST_INC be liable for any claim relating to the software or its use or this agreement,
whether in contract or any other theory of liability exceeding the license fee paid by you.
ENTIRE AGREEMENT: This License constitutes the entire agreement between the parties with
respect to the use of the Software and supersedes all prior or contemporaneous understandings
or agreements, written or oral, regarding such subject matter.
THIS LICENSE AGREEMENT IS GOVERNED BY AND INTERPRETED IN ACCORDANCE
WITH THE LAWS OF THE STATE OF TEXAS.
Any question can be forwarded to CST INC - Address: 2336, Lu Field Road, Dallas, Texas 75229
USA. Phone: (972) 241-2662 Fax (972) 241-2661 ; email : [email protected]. Copyright (c)
1999 CST_INC. All Rights Reserved.
2
1.0
Introduction
DocMemory PC Diagnostic Software is affordable and user friendly DOS based memory-testing
software. Designed to uncover all possible memory problems without removable of physical
memory from the PC System. Application is menu with easy interface to mouse and keyboard
functions. Different and new test patterns are constantly employed to capture wide range of
memory defects that surface within the memory modules, be it a FastPage Mode, EDO, SDRAM
or future RAMBUS and DDR memory modules. The software is applicable PC system using Intel
or compatible processor from the basic 386 to the latest Pentium-based PC , AMD ‘s Athlon PC
and Cyrix System
2.0
Installation
DocMemory is available as a download from the CST website http://www.simmtester.com or
http://www.docmemory.com.
User needs only to execute the filename "install.exe" and a setup instruction menu will be
displayed. Select "make bootable A:" option and insert a blank diskette into drive A:
CAUTION:
Ensure you are in Microsoft Window Win3.1 or Win95 and Win98 environment. Other Win
Operating Systems such as Window NT and Window 2000 will not work properly. Also ensure the
diskette in the floppy does not contain important data, as the installation routine will perform a
format operation on the diskette.
Upon installation completion, reboot the computer with the bootable diskette inside drive A: and
you are ready to start the testing.
3. Quick Start
Upon start-up, DocMemory will prompt user with two-test option to choose, select "Burn-In Test"
or a Quick Test as shown in Fig 3.1.
Fig 3.1
Burnt- In feature provides the user an option to run the selected test continuously until the user
intervene to abort test by selecting [Esc].
If user selects < Burnt-In Test >, the software execute a continuous "Burnt-In Test" operation with
the entire test pattern enabled. If the < Quick-Test > are selected – the entire test will complete in
one cycle or 1 Loop.
Quick Test feature provides the user an option to run the selected test for a single cycle until the
user abort test by selecting [Esc].
3
A Typical Test Time for 32 MB SDRAM PC-100 Memory running on an Intel Celeron 400 Mhz
processor, will take approximately 2 Minutes to complete a full cycle test- if the Quick Test is
selected. Test time varies from different system, it is dependent on your processor speed, and the
type of memory used.
Press [ Esc ] button or click <CANCEL> to abort the test and subsequently proceed to the
Main_Menu as shown in Fig 3.2.
Fig 3.2
To
1.
2.
3.
begin testing:
Select Function key [F5] to run or,
Use Mouse to click on Action menu and select Run_Test
Hot Keys Method: Press [Alt] + [A] for the Action_Menu, and press [Alt] + [R] to start the test.
The Test Patterns are all enabled by default. If user do not pre-set any Test parameters before
beginning Run_Test mode, all tests patterns will be enabled and performed on the system
memory detectable by DocMemory.
Pre-select Test Pattern parameters:
1. Click on Configuration for the pulldown Menu. Choose Test_Pattern and a selection table will
be shown as in Fig 3.3. Click on the desired test pattern and press < OK > to accept the new
selection.
2. An alternate HotKey method: Press [Alt] + [P] to activate the "Test Pattern Setup" window.
Enable or disable the test pattern before clicking < OK > to accept the selection and return to
the Main_menu.
Fig 3.3
4
To Define Number of Test Loops :
1.
2.
Goto Config_Menu, click on Test_Loop and choose Loop 1- 9999 at the menu shown in Fig
3.5. Enter the desire number of loops in box, Fig 3.4 below. Run_Test perform the number of
test cycles loops as specified by user.
Or, press [Alt] + [O] to activate the box to enter the number of loops (from 1 ~ 9999).
Fig 3.4
To Define Number of Burnt-in Loop test :
Go to Config_Menu, click Test_Loop to recall the corresponding indow. Choose Burn In Loop.
Enabling this function will allow the program to run continuously until the user press [Esc] to abort
the test.
Fig 3.5
To Define Area of System memory to Test :
1.
Click on Test_Group from the Config_Menu. Select the memory area to test from the as
shown in Fig 3.6. Click< OK > to return to Main_menu. or
2.
press [Alt] + [G] for the popup menu box. Select desired memory test.
Fig 3.6
5
4.0
Menu Options
4.1
Run Test
Run_Test performs memory check based on user selected test pattern under the
Configuration_Menu.
To activate Run Test function, simply go to Action_Menu and choose Run_Test by pressing the
Hot keys or by just pressing [F5] to begin.
Mouse Interface feature provides an alternative control in the command selection, allowing easy
user control interface.
While DocMemory is executing the Run_Test, screen showing the status of the RAM under test,
system Info and test results of the selected parameters is displayed (see Fig 4.1.1a)
Figure 4.1.1a
When DocMemory detects a bad cell or fails a test, a beeping sound will alert the user and
highlights the exact location the fault lies with the test pattern that picks out this fault.
User selects [s] to remove the sound or [Esc] to abort the test.
Use the troubleshooting guide under chapter 5 to locate bad modules, if DocMemory detects a
failure.
4.2 Quit
Selecting Quit from the Action_Menu, aborts the program and return user to MS-DOS Prompt.
6
4.3 Configuration
4.3.1 Test Group
Test Group setup provides a beneficial option that enables the user to select which area of
memory location he/she is interested in analyzing. Of course, the user can still choose to test all
the memory cells available.
Fig 4.2.1
Base Memory Test
Base Memory is the conventional memory cells below 1 Mbyte, available for testing in the RAM
module.( eg. address 5000H ~ A000H)
If the user enables this option, a normal Run_Test will be carried out on the Base memory
locations, based on the selected test pattern.
Extended Memory Test
Extended Memory refers to the memory locations that are above 1Mbyte to the maximum amount
of Ram installed in a typical PC system (eg: 1M ~ 32 Mbyte; 1M ~ 256 Mbyte).
A normal Run_test will be performed on the Extended memory cells when the user selects this
parameter.
4.3.2
Test Pattern
DocMemory’s memory test patterns are carefully designed and used to detect specific problems
on a memory module. It has several kinds of test patterns that the industry recognizes as
excellent choices for uncovering assembly errors and memory cells failures.
The following list shows an example of Test pattern selections available in the software.
Fig 4.2.2
7
• Walk Data "0" & "1"
This pattern is designed to find Open/Short data lines. The walking "1" test writes a data pattern
into some arbitrary locations and reads back the information to see whether the data pattern is
unchanged. It works the same way for the walking "0" pattern except the data pattern is now
inverted.
• Walk Address "0" & "1"
This pattern is designed to detect address lines that are short, open, stuck or are having missing
bits error. For Walking "1", DocMemory first choose all those locations that can test single
address lines and fill these locations with an arbitrary data pattern. Each single location is
rewritten with its complimentary pattern.(eg. 0x55 => 0xaa ). If any change is detected, it can be
concluded that there are problems on the address line. The same process is repeated with
Walking "0" except the address locations are now inverted.
• MATS+
March Test is a well defined test pattern designed to uncover memory cell failures such as
address decoder faults, stuck at faults and cell interaction problems.
• March B
March B is similar to other March Test algorithm except it uses a much more detailed testing
method. It is designed to unveil various faults like : AFs (Address decoder Faults), SAFs (Stuck At
Faults), TFs (Transition Faults), CFins ( Coupling Inversion Faults) linked with TFs or CFids, and
CFids ( Coupling Idempotent Faults) linked with TFs or CFids.
• March CMarch C- is implement to detect AFs (Address decoder Faults), SAFs (Stuck At Fault), TFs
(Transition Faults) unlinked CFins ( Coupling Inversion Faults), unlinked CFids ( Coupling
Idempotent Faults) and CFsts ( State Coupling Faults).
• Checkerboard
The test is designed to exercise each individual cell in the memory module to find possible shorts
between adjacent columns and data buses. It writes a certain pattern to all even column and its
complimentary pattern to all the odd column cells. It then reads back the data from each column
and row to verify whether it is correct.
• Burst
This test is designed to check for burst functionality in a read or write cycle.
4.3.3
Test Loop
Loop test is designed to repeat a series of chosen test for a programmable number of times.
This is sometimes recommended for modules suspected of heat up problem or problems that
occurs after use of system for sometime. The loop time simulates this situation to unveil more
possible errors. The user selects the number of times to loop the Run_Test.
This test is highly recommended to test the consistency of the module. See Fig 4.3.3
Fig 4.3.3
8
4.3.4
Change DRAM Size
Change DRAM Size, allow user to change the incorrect memory sizing by a non AMI BIOS
motherboard or any newer motherboards. To change the correct memory sizing ,you need to
know exactly the memory capacity , when the “Change Dram Size” is selected – type in the
correct numbers.
Press F5 or F6 to continue to test the memory.
Fig 4.3.4
4.3.5
File
File, allow user to either “Saved” or “Print” the test results upon completion of test
9
5.0 Troubleshooting Guide
5.1
How to Interpret DocMemory Test Result
When DocMemory detects a bad cell or fails a test, a beeping sound will alert the user
and highlights the exact location the fault lies with the test pattern that picks out this fault.
User selects [s] to remove the sound or [Esc] to abort the test.
Figure 5.1
From the above sample test result- Figure 5.1, the module being tested is a single
piece 168pin 32MB SDRAM DIMM Module. Base Memory range starts from 0K to
640K, this is where the Basic DOS operating system resides , see figure 5.2 for
Memory Map of a PC system install with 32MB memory.
Figure 5.2
DocMemory will default testing from memory range 0K up to the maximum memory
install. Using the graphical representation Fig-5.2, the memory range starts from 0KB and
ends at 32 MB. If a failure is detected – DocMemory will display the result and pin-point
exactly which memory range has failed.
10
5.1.1
Analysing Test Results
From the test result shown in Figure 5.1 – there were two failures – : Base Memory and
Extended Memory :
1)
Base Memory Test ( 7F090 – A0000 )
MATS + Loop 1 ................................. Fail
à Addr : 0007F090 ( 506K) , Exp : 55aa55aa , Act : 01500150
Short Form:
Addr = Address
Exp = Expected
Act = Actual
Interpretation for Test Failure-1 ( Basic Test)
Base Memory range starts from 0K to 640K , this is where the Basic DOS operating
system will occupy during Booting Up. Failure were encountered at address location
:0007F090 or memory range at 506K
A “MAT-S” Test pattern had detected failure by writing a set of data pattern [55aa55aa]
into memory range location at 0-640K. In order to detect if any of the memory cell is
defective from range 0-640K – DocMemory will try to read back the data pattern and
match [55aa55aa]. If it the read-back data pattern does not match [55aa55aa] –
DocMemory will detect the fail location. In this example the read-back data was [
01500150] , which is incorrect.
2)
Extended Memory Test ( 7F090 – A0000 )
MATS + Loop 1 ................................. Fail
à Addr : 00100000 ( 1M) , Exp : 55aa55aa , Act : 21802180
Interpretation for Test Failure 2
Extended Memory range starts from 641K onwards, this is where Windows operating
system and other software application will occupy, see figure 5.2 for Memory Map of a
PC system install with 32MB memory.
Failure were encountered at address location :00100000 or memory range at 1M.
A “MAT-S” Test pattern had detected failure by writing a set of data pattern [55aa55aa]
into memory range location at 641KB – 32 MB. DocMemory had detected the fail location
at 1 Mb. In this example the read back data was [21802180], which is incorrect.
5.1.2
Action after analysing the Test Results
From the test results , we know that failure had been detected at two location 504K (
Base Memory) and 1M ( Extended Memory). Since the example uses only one piece of
32MB – the single defective module will have to be replaced.
Refer to Section 5.42 for details for module swapping if more than one piece of modules
is being installed.
11
5.2
Common Memory Errors
This section is written with the assumption there is a general understanding of PC
operating system, in order for you to be capable of performing the diagnostic procedures
detailed below.
We will try to describe the entire process in full detail, however it is beyond the scope of
this troubleshooter guide to provide all the necessary information to cover all possible PC
system failures. For further assistance with non-memory related failures, please consult
your PC manual or manufacturer support help online system. If your particular question is
not addressed in this section – please send us an e-mail and we will do our best to
provide you with the right answers.
When you are experiencing memory failures on your PC system, there are several faults
to determined, check the following:
* PC system does not boot-up
* HIMEM.SYS does not load
* Memory failure due to system hanging up, or system rebooting after executing a large
program.
* Fail to install win3.1, Win95 ,Win98 and Win2000
* Installation of NT fail
* Windows program is unstable
* Can compile a kernel in Linux
* Continuos beeping sound emitted by system during power up
* Continuos ram count during boot-up , without loading Windows program
* No display other than blue screen on the monitor during boot-up
* Totally no video display on the monitor.
* System hang or rebooting after prolong usage.
All of the above are typical of memory related failures, you need to be either well trained
or PC knowledgeable to be able to perform the correct diagnostic methods.
Once a memory failure has been detected, identifying the defective module is not an
easy task either. With a large variety of motherboard provided by different manufacturer
around the world, and with the many different combination of SIMM/DIMM slots provided,
it would be difficult if not impossible to assemble a complete information about how a
particular memory error would map to a failing memory module.
However, there are some basic rules that may be taken to pinpoint defective modules
using a memory diagnostic software as an aid.
5.21
Having trouble with DocMemory Software
There are millions of PC in used today and the combination of different types of memory
used with different type of motherboards are beyond our imagination.
If you encounter unusual problems while using DocMemory with your PC system, you
might need to conduct the following check:
•
Certain PC system BIOS
12
5.3 Troubleshooting without opening up your PC
* Check the PC BIOS settings, make sure that you are only using the BIOS defaults. If
you have just upgraded your BIOS make certain that you have cleared the CMOS and
turned the power off between setting up your BIOS.
* Remove the battery pack from the motherboard. Keep it out for at least 20 minutes.
Make sure you unplug the PC power supply before removing the battery.
* Using Cache Memory check the cache memory, If the cache memory is on the
motherboard, then disable the external cache setting in the BIOS. The Intel
Pentium II processors have the L2 cache built onto the processor package, therefore
make certain that the ECC function for the L2 cache is set properly in the BIOS.
* Only use PC100 memory when operating your PC at 100 MHz
* Check the memory markings.
Sometimes mixing speeds, brands, and types (EDO/FPM) will work, but if you are
receiving these errors, your motherboard might not function well this way. Look at the
markings of the SOJs or TSOPs on the module. Are all the markings the same?
Some major on third modules have this mixing which can cause intermittent
problems.
* Certain brands of memory are known to be work better with certain types of
motherboards. For example use Micron SOJs with Tyan motherboards. You can verify
what type of memory works best with the motherboard by checking the user manual or
the motherboard manufacturer web-site for more information.
* Check your hard drive for data corruption, you might consider it odd, sometimes you
simply have cross-linked files. Windows uses the hard drive space temporarily as a type
of system memory. A corrupt swap file can cause problems.
5.4
Troubleshooting by Opening Up Your PC
5.4.1
Unplug the Power
NOTES: Unplug the computers power cable before opening the case.
Use a grounding strap when installing or removing computer components.
Step 1 Perform Visual Inspection
Check to make sure all memory is well seated in the memory connectors.
For most older motherboards you will need two strips of memory in pairs of two
to function properly. Most new motherboards especially the LX and BX2
motherboard may allow a single memory to be installed in singles. Consult the
manual for your computer or motherboard for valid memory configuration.
The first step will be to identify the memory socket numbering, (SIMM0, SIMM1).
You will always start checking the RAM module starting with the first socket,
usually SIMM-0. ( Always reference your motherboard user manual guide)
1. Remove modules, clean the contacts and re-align the notches on the memory
board with the tabs in the socket. Place the module into the socket at a 60degree angle and tilt up until the module locks into place. If the module will not
lock into place then it is backwards. Turn it around and try again.
2. Repeat step 1 for the second module.
3. Before turning on the computer, (a) make sure that the modules are locked
13
into place, (b) check to make sure that none of the computer cables and adapter
cards came loose.
4. When you turn on the computer it should test the memory (count it) -Boot up.
5. If the computer tests the memory, then you are done.
6. If the computer screen does not come on then you may have 1 or more
problems. (1) You are installing the wrong type of RAM. (2) The RAM is not
seated properly. (3) A cable or adapter card came loose. (4) You forgot to plug
the power cable back in.
7. Keep in mind that on some older systems the computer will not count the ram
properly until you enter the BIOS and then save and exit from the BIOS.
5.4.2
Step 2 Swap the Modules Around
Removing the modules one by one from motherboard
This is simplest method for isolating a failing module, but this may apply only if
the motherboard have more than one module on the SIMM or DIMM Slot. By
selectively removing module one at a time from the system and then running the
test you will be able to find the bad module very quickly. Be sure to mark the
module that passes or when it test fails.
* Swap the modules around
When none of the modules can be removed, swap and rotate modules to find
which module is defective. This technique can only be used if there are two or
more modules in the system. Change the location of two modules one at a time.
For instances, place the module from SIMM slot 1 into slot 2 and place the other
module from slot 2 in slot 1.
Run the diagnostic test and if either the failing data bit or address changes, you
know that one of the module you have just swap is defective. By using several
combinations of module swapping you should be able to check which module is
defective.
* Replacing with known good module
If you are unable to use either of the above two techniques, you are left to use
known good modules and selectively replace of modules one by one to pin point
the memory failure. This is the easiest way to detect memory failure.
* Removing and cleaning the metal contacts
If your PC system is older, sometimes dust and oxidation will cause poor contact
in the SIMM/DIMM slot.
Remove the module and clean the gold or tin contact with a “pencil eraser” or
any cleaning solution used for video and audio head cleaning. Make sure you
remember which slot is being used, and be careful not to reverse the module
while reinserting into the SIMM/DIMM slot
* Identifying memory failure using motherboard BIOS codes
If you are not trained to perform the correct diagnostic methods – majority BIOS
developers and motherboard manufacturers have device a simple way of telling
you if your system is having problem by emitting beeping tones from the build in
speaker on the motherboard, without the aid of a memory tester.
14
5.5
Guide to troubleshooting memory using BIOS Beep Codes .
The BIOS on the motherboard will always perform a power-on-self-test “POST”
during power up, usually this test is perform to ensure proper system function
and if a failure occurs – the “POST” will identify the failure and emits a beeping
sound to prompt the service technician to take corrective action ASAP.
The exact meaning of the beeping codes varies from different BIOS developers,
there are 3 basic BIOS developer today, the most popular BIOS is made by
“American Mega-trend” - AMI, Award and Phoenix BIOS. The beep codes for this
AMI & Award BIOS developer are provided in this memory troubleshooter guide,
we do not provide beep code reference for Phoenix BIOS and custom BIOS
written by other companies other than the two mention.
Beep codes are not entirely consistent sometimes to detect the exact failures, but
generally it is still the most dependent methods to diagnose a fault without
opening up the PC system or using any diagnostic software.
5.5.1
Troubleshooting Memory Failures using AMI BIOS Beep Codes
AMI BIOS is the most popular BIOS used by most motherboard manufactureryou should be able to determine your system BIOS by reading the screen display
on the Top screen during power up.
Procedures – The normal procedure is to power up the PC system, watch for
error message on the monitor screen and listen to the PC beep tone. A single
beep during boot-up process is normal and does not indicate a failure if the
system continues to boot-up.
1 Beep tone - DRAM refresh failure
2 Beep tone - DRAM Parity failure
3 Beep tone - Base 64K RAM failure
4 Beep tone - System timer error
5 Beep tone - CPU failure
6 Beep tone - Keyboard controller error
7 Beep tone - Virtual mode error
8 Beep tone - Display memory read/write error
9 Beep tone - ROM BIOS checksum error
10 Beep tone - CMOS register read/write error
11 Beep tone - Cache memory error
Continuos Beep tone - Memory or Video memory failures
5.5.2
Troubleshooting Memory Failures using Award BIOS Beep Codes
Award is the another popular BIOS developer and they use the fewest beep
codes by far.
Procedures – The normal procedure is to power up the PC system, watch for
error message on the monitor screen and listen to the PC beep tone. A single
beep during boot-up process is normal and does not indicate a failure if the
system continues to boot-up.
1 Long Beep tone - Memory Problem
1 Long Beep and 2 Short Beeps - DRAM Parity failure
1 Long Beep and 3 Short Beeps - Video error
Continuos Beep tone - Memory or Video memory failures
End of Manual
15