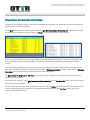
1
OTTR™ 6
User Manual
August 2012
All information contained herein is confidential and proprietary to OTTR™
Chronic Care Solutions and is being distributed for training purposes only.
How to Login to OTTR™ ...................................................................................................... 8
General OTTR™ Functionality............................................................................................. 10
Exiting ........................................................................................................................ 10
Navigating .................................................................................................................. 11
Spell Check ................................................................................................................. 12
Entering Dates ............................................................................................................. 13
Fields ......................................................................................................................... 14
Searching.................................................................................................................... 15
Refetch ....................................................................................................................... 16
Initial Setup .................................................................................................................... 17
Setting Preferences ........................................................................................................ 17
Appearance................................................................................................................. 17
Defaults ...................................................................................................................... 20
Fetch Date................................................................................................................... 21
Logging ...................................................................................................................... 22
Look and Feel .............................................................................................................. 22
OTTR ......................................................................................................................... 23
Password change .......................................................................................................... 24
SyncScroll.................................................................................................................... 25
Advanced.................................................................................................................... 26
Toolbars, Icons, and Master Menus ..................................................................................... 27
Icons .......................................................................................................................... 28
Master Menus .............................................................................................................. 32
1. OTTR Master Menu ............................................................................................... 32
2. Edit Master Menu ................................................................................................. 33
3. List Master Menu .................................................................................................. 34
4. Patient Master Menu ............................................................................................. 35
OTTR™ Version 6.0 User Manual
2012 OTTR™ Chronic Care Solutions
2
All information contained herein is confidential and proprietary to OTTR™
Chronic Care Solutions and is being distributed for training purposes only.
5. Add Master Menu ................................................................................................. 36
6. Tools Master Menu ............................................................................................... 37
7. Windows Master Menu .......................................................................................... 38
8. Help Master Menu ................................................................................................ 38
Tracked Lists ................................................................................................................... 39
List Functionality ........................................................................................................... 41
List Alerts .................................................................................................................... 43
Deleting a My Patient List................................................................................................ 44
List Descriptions .............................................................................................................. 45
Assigning Care Providers .................................................................................................. 52
Creating a New Provider ................................................................................................ 53
Assigning a Medical Facility ............................................................................................... 54
Adding a New Medical Facility to the Database................................................................... 55
Alerts and Allergies .......................................................................................................... 56
Allergies ..................................................................................................................... 56
Alerts ......................................................................................................................... 58
Find Patient .................................................................................................................... 59
Quick Find .................................................................................................................. 59
Advanced Find ............................................................................................................. 60
Patient Review Window ..................................................................................................... 62
Problem List - Diagnosis.................................................................................................... 64
Problem List ................................................................................................................. 65
Actions .......................................................................................................................... 69
Adding an Action .......................................................................................................... 70
1. Action Tab ........................................................................................................... 71
2. Instructions Tab ..................................................................................................... 73
3. Signature Tab ....................................................................................................... 73
4. Authorization Tab .................................................................................................. 74
OTTR™ Version 6.0 User Manual
2012 OTTR™ Chronic Care Solutions
3
All information contained herein is confidential and proprietary to OTTR™
Chronic Care Solutions and is being distributed for training purposes only.
Standard Actions .......................................................................................................... 75
Evaluation Actions ......................................................................................................... 76
Evaluation Report.......................................................................................................... 77
Order Sets................................................................................................................... 78
Labs ............................................................................................................................. 80
Flowsheets .................................................................................................................. 82
Labs All ...................................................................................................................... 83
Misc Labs .................................................................................................................... 83
Patient Serology ........................................................................................................... 84
Lab Graphing .............................................................................................................. 85
Marking Labs Reviewed.................................................................................................. 86
Text Documents............................................................................................................... 88
Revision History ............................................................................................................ 90
Deleting and Retrieving Deleted Documents ....................................................................... 91
Viewing Text Documents................................................................................................. 92
Progress Notes ................................................................................................................ 93
Scanned Documents ........................................................................................................ 97
Info Documents ............................................................................................................... 98
New Patient Referral......................................................................................................... 99
New Referral Form .......................................................................................................101
Patient Demographics .....................................................................................................106
General Tab ...............................................................................................................106
Birth Tab ....................................................................................................................107
Employment Tab .........................................................................................................108
Home Address Tab ......................................................................................................108
Local Temp Address Tab ...............................................................................................109
Education Tab .............................................................................................................109
Other Contacts Tab......................................................................................................110
OTTR™ Version 6.0 User Manual
2012 OTTR™ Chronic Care Solutions
4
All information contained herein is confidential and proprietary to OTTR™
Chronic Care Solutions and is being distributed for training purposes only.
Demographics Tab ......................................................................................................110
Phone Tab..................................................................................................................111
Identifiers Tab .............................................................................................................111
Programs Tab .............................................................................................................112
Insurance ......................................................................................................................113
Adding Insurance Providers............................................................................................113
Standard Insurance Tabs ...............................................................................................115
Policy Info Tab..........................................................................................................115
Verification Tab ........................................................................................................117
Policy Holder Tab ......................................................................................................118
Company Info Tab ....................................................................................................119
Coverage Info Tab ....................................................................................................120
Insurance Notes........................................................................................................121
Adding an Insurance Provider to the Database ....................................................................124
Insurance Tab .............................................................................................................124
Patients Tab ................................................................................................................125
Coverage Tab .............................................................................................................125
Financial Coverage Rules .................................................................................................126
Encounters ....................................................................................................................128
Encounter Tab.............................................................................................................130
Diagnosis Tab .............................................................................................................131
Medications Tab ..........................................................................................................133
Labs Tab ....................................................................................................................134
Progress Notes Tab ......................................................................................................135
Plan Tab ....................................................................................................................136
History of Present Illness Tab ..........................................................................................137
Family/Social History Tab ..............................................................................................138
Review of Systems Tab ..................................................................................................139
OTTR™ Version 6.0 User Manual
2012 OTTR™ Chronic Care Solutions
5
All information contained herein is confidential and proprietary to OTTR™
Chronic Care Solutions and is being distributed for training purposes only.
Detailed Physical Exam .................................................................................................140
Pain Assessment Tab ....................................................................................................141
Patient Education Tab ...................................................................................................142
Visit Information Tab ....................................................................................................143
Viewing and Printing Encounters .....................................................................................144
Auto-capture...............................................................................................................146
Evaluations ...................................................................................................................147
Evaluation Tab ............................................................................................................149
Actions Tab ................................................................................................................150
Diagnoses Tab ............................................................................................................151
Labs Tab ....................................................................................................................152
BMI Tab .....................................................................................................................153
Progress Notes Tab ......................................................................................................153
Risk Factors Tab ..........................................................................................................154
History of Present Illness Tab ..........................................................................................155
Detailed Physical Exam .................................................................................................155
Review of Systems Tab ..................................................................................................156
Family/Social History Tab ..............................................................................................156
Pain Assessment Tab ....................................................................................................157
Patient Education Tab ...................................................................................................157
Visit Information Tab ....................................................................................................158
Preparation for Selection Committee...................................................................................159
Selection Committee Tab ...............................................................................................160
Evaluation Report.........................................................................................................162
Ending the Evaluation ...................................................................................................164
Evaluation Letters .........................................................................................................165
Listings .........................................................................................................................166
Listing Tab .................................................................................................................167
OTTR™ Version 6.0 User Manual
2012 OTTR™ Chronic Care Solutions
6
All information contained herein is confidential and proprietary to OTTR™
Chronic Care Solutions and is being distributed for training purposes only.
History Tab.................................................................................................................169
End Tab .....................................................................................................................169
Info at Listing Time Tab .................................................................................................170
Additional Tabs ...........................................................................................................171
Reports and Lists ..........................................................................................................172
Donors .........................................................................................................................174
Deceased Donor Demographics .....................................................................................175
Deceased Donor Death Info...........................................................................................178
Donor ABO ................................................................................................................179
Donor Info .................................................................................................................180
Adding Potential Donors ...............................................................................................184
Viewing Potential Donors ...............................................................................................186
Transplant.....................................................................................................................188
General Tab ...............................................................................................................189
Surgery Tab ................................................................................................................190
Surgery Tab cont. ........................................................................................................191
Status Tab ..................................................................................................................193
Donors Tab ................................................................................................................194
Tissues/Organs Tab .....................................................................................................195
Additional Organ Tabs .................................................................................................196
Closing the Listing Record..............................................................................................197
Patient Schedules and Calendar ........................................................................................198
Schedules...................................................................................................................198
Patient Calendar .........................................................................................................200
Expired Patients ..............................................................................................................202
General Daily Workflow- Coordinators ...............................................................................205
General Daily Workflow - Transplant Assistants ....................................................................206
Recommended Physician/Coordinator Review Process ............................................................207
OTTR™ Version 6.0 User Manual
2012 OTTR™ Chronic Care Solutions
7
All information contained herein is confidential and proprietary to OTTR™
Chronic Care Solutions and is being distributed for training purposes only.
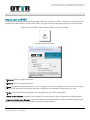
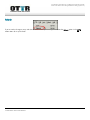
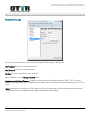
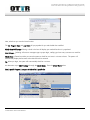
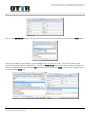
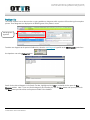
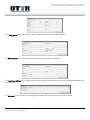
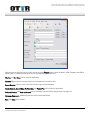
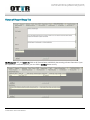
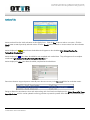
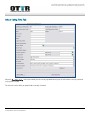
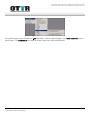
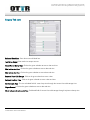
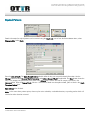
How to Login to OTTR™
It's important to remember NEVER to share your login information. Everything in OTTR™ is tracked with your login account.
Anything that is documented or accessed within OTTR™ using your username will appear as though it was done by YOU.
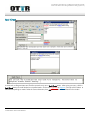
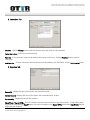
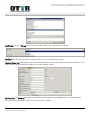
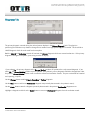
Double-click on the OTTR™ Patient Tracking System Icon on your desktop.
Your login window will appear.
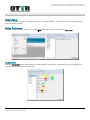
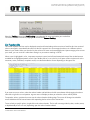
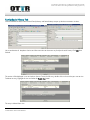
• Username: Enter your assigned username
• Password: Enter your assigned password
• Server: This should be pre-populated for you. You may be given instructions to change this at some point. For example, if
you're in a TEST (testing) environment and need to be in a PROD (live or production) environment or vice versa.
• Vendor: This should also be pre-populated. If it's not, please see your OTTR™ Administrator.
• Always use this database: This option can be selected if you wish to store the Server information for subsequent logins.
• Login Automatically Using Windows: If your site has opted to use Active Directory, this option should be selected. Do not
select this if you are unsure or if your site doesn't intend to use Active Directory.
OTTR™ Version 6.0 User Manual
2012 OTTR™ Chronic Care Solutions
8
All information contained herein is confidential and proprietary to OTTR™
Chronic Care Solutions and is being distributed for training purposes only.
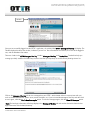
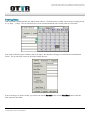
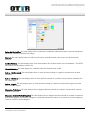
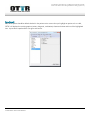
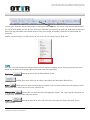
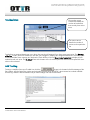
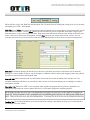
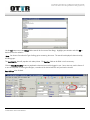
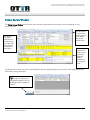
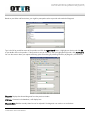
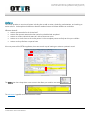
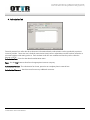
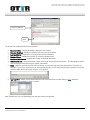
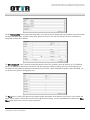
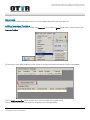
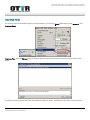
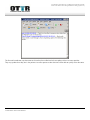
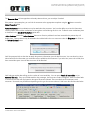
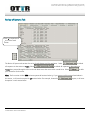
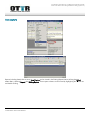
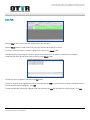
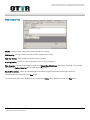
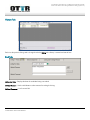
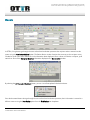
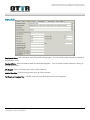
Title Bar
Once you've successfully logged into the OTTR™ application, the window titled OTTR™ Message of the Day will display. The
Title Bar displays the title of the window, indicates if you are in a Test or Production environment, the name of the logged in
user, and the database information.
There are 2 tabs in the OTTR Message of the Day window; Message of the Day and Tracked Lists. Tracked Lists help you
manage your daily workflow and allow easy access to Lists that you frequently use such as the My Pending Actions list.
Click on the Message of the Day tab to view messages that your OTTR™ Administrator wishes to communicate with you;
such as scheduled downtimes, system issues, words of wisdom, etc. If you've viewed the Message of the Day and don't wish
to see it again, select the Don’t show these again option. To view the messages again, click the Show All Messages option.
*Note: The last login information will always display in the Message of the Day tab and can't be cleared. It shows the last
login information with the date/timestamp.
OTTR™ Version 6.0 User Manual
2012 OTTR™ Chronic Care Solutions
9
All information contained herein is confidential and proprietary to OTTR™
Chronic Care Solutions and is being distributed for training purposes only.
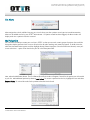
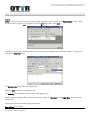
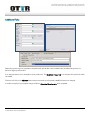
General OTTR™ Functionality
Outlined below are some basic principles and tips for navigating through the OTTR TM application.
Exiting
At the top of each window you have the option to minimize, maximize or close (exit) the window. If you're exiting the
application completely, remember to use the OTTR Master Menu and select Exit.
At the bottom of most windows the options exist to:
Delete - Click to delete the entry from view.
Revert - Click to revert back to the original window prior to any entry being made. This will remove any newly entered
information that hasn't been saved.
Close - Click to exit or close the window without saving.
Save - Click to save your information and remain working in the open window.
Save & Close - Click to save your information and close the current window.
OTTR™ Version 6.0 User Manual
2012 OTTR™ Chronic Care Solutions
10
All information contained herein is confidential and proprietary to OTTR™
Chronic Care Solutions and is being distributed for training purposes only.
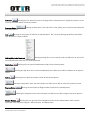
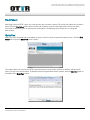
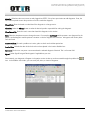
Navigating
Icons Click on an icon to access that area of the chart or select another option using the
dropdown arrow next to the icon .
Hyperlinks -
Buttons -
Click on a hyperlink to directly access where that information is entered.
Much like the icons, you can click a button to access that area.
Master Menu -
OTTR™ Version 6.0 User Manual
2012 OTTR™ Chronic Care Solutions
Utilize the master menu to display options in a menu form.
11
All information contained herein is confidential and proprietary to OTTR™
Chronic Care Solutions and is being distributed for training purposes only.
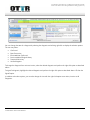
Spell Check
In areas such as Progress Notes and Text Documents there is now a Spell Check option. After typing your entry, click the
Spell Check button to reveal blocked or misspelled words. Click on the misspelled or blocked in the top of the window to
find alternate spellings or words. Select the correct alternative, then OK. Corrections will be reflected in the window.
OTTR™ Version 6.0 User Manual
2012 OTTR™ Chronic Care Solutions
12
All information contained herein is confidential and proprietary to OTTR™
Chronic Care Solutions and is being distributed for training purposes only.
Entering Dates
Most date fields will auto-populate with "today's" date and time. The date can be manually entered using mm/dd/yy format
or +(x days) , - (x days). You can also place your cursor inside the date field and manually make your correction.
If you want to utilize the green calendar, click on the date in the calendar to change, or use the forward and backward
arrows. The up and down arrows can be used to modify the time.
If you're working in an action window, you first have to click the Schedule button and the Mark Done button to activate
those respective date fields.
OTTR™ Version 6.0 User Manual
2012 OTTR™ Chronic Care Solutions
13
All information contained herein is confidential and proprietary to OTTR™
Chronic Care Solutions and is being distributed for training purposes only.
Fields
Free Text arrow or action buttons after the field will accept free text.
Fields with no dropdown
Search -
Fields with a Set button, Pick
button, or a Change button
appropriate option.
don't allow free text. Instead, you must click on the button and search for the
Dropdown Fields with a dropdown arrow don't allow
free text. Instead, you must click on the arrow and select from the list provided.
Add Row - Click the Add Row button which opens a new window allowing you to enter information. When finished, click
OK and your information is saved and displayed in row and column format.
OTTR™ Version 6.0 User Manual
2012 OTTR™ Chronic Care Solutions
14
All information contained herein is confidential and proprietary to OTTR™
Chronic Care Solutions and is being distributed for training purposes only.
Searching
Searches can be initiated by starting to type part first or last name or word, in the case of medications and diagnoses, into
the Search Text area. The application will return possible matches in the All Active box. Select your choice by highlighting
the row and click "OK" or just double click.
Searches can also be initiated by typing into the fields at the top of the window such as first or last name. Click the Begin
Search button and options will be returned below. Select your choice by highlighting the row and click "OK" or just double
click.
If you don't find what you're looking for on the initial search, you can try selecting the More button in the bottom of the
window, then re-initiate your search.
OTTR™ Version 6.0 User Manual
2012 OTTR™ Chronic Care Solutions
15
All information contained herein is confidential and proprietary to OTTR™
Chronic Care Solutions and is being distributed for training purposes only.
Refetch
If you've made a change or entry and don't see it immediately available, you can select the Refetch option in the OTTR
Master Menu for a quick refresh.
OTTR™ Version 6.0 User Manual
2012 OTTR™ Chronic Care Solutions
16
All information contained herein is confidential and proprietary to OTTR™
Chronic Care Solutions and is being distributed for training purposes only.
Initial Setup
This section explains the steps you'll complete after your initial login to OTTR™. It defines the one-time setup preferences
each user should complete.
Setting Preferences
To define on-time individual preferences, click the OTTR Master Menu option and then select Preferences.
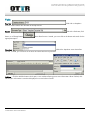
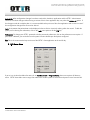
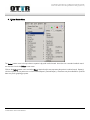
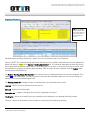
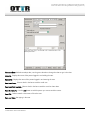
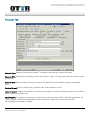
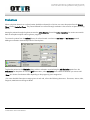
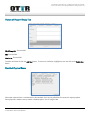
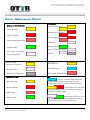
Appearance
Select the Appearance option. Colors allow you to understand the status of labs, medications, actions and diagnosis. It is
important that these colors NOT be changed.
OTTR™ Version 6.0 User Manual
2012 OTTR™ Chronic Care Solutions
17
All information contained herein is confidential and proprietary to OTTR™
Chronic Care Solutions and is being distributed for training purposes only.
Patient Not Yet Notified: This color displays when a medication is modified or added to a patient’s record and the patient
hasn't been marked as notified of the change.
New Lab: This color displays when new labs have either been manually entered or have come over the Automated
Interface.
Lab Rule Violation: This color displays when a lab result violates a lab rule that has been set in the database. * The OTTR™
Administrator has the ability to set lab rules.
Closed Medication: This color displays if a medication has been discontinued or ended.
Actions – Not Scheduled: This color displays when an action has been entered on a patient’s record but has not been
scheduled.
Actions – Not Done: This color displays when an action has been entered on a patient’s record, has been scheduled, but
not marked done.
Actions – Urgent: This color displays when an action has been entered on a patient’s record and the Urgency Level has
been marked as Urgent.
Diagnosis – Preliminary: This color displays when a diagnosis has been entered on a patient’s record and has not been
marked as confirmed.
Diagnosis – Deleted (Verified Negative): This color displays when a diagnosis has been entered on a patient’s record and
then verified negative. For example, a diagnosis was entered and later found to be an inaccurate or incorrect diagnosis, it
would be marked as Verified Negative.
OTTR™ Version 6.0 User Manual
2012 OTTR™ Chronic Care Solutions
18
All information contained herein is confidential and proprietary to OTTR™
Chronic Care Solutions and is being distributed for training purposes only.
Diagnosis – Inactive: This color displays when a diagnosis has been entered on a patient’s record and marked as Inactive.
For example, a patient was treated for pneumonia that is now resolved and no longer an active problem.
(Interface) Results – None: This color displays when a lab result has come over the interface and has not been reviewed.
(Interface) Results – Pending: This color displays when a lab result has come over the interface indicating that the result is
pending.
(Interface) Results – Preliminary: This color displays when a lab result has come over the interface indicating that the result is
preliminary.
(Interface) Results – Final: This color will display when a lab result has come over the interface indicating that the result is
pending.
OTTR™ Version 6.0 User Manual
2012 OTTR™ Chronic Care Solutions
19
All information contained herein is confidential and proprietary to OTTR™
Chronic Care Solutions and is being distributed for training purposes only.
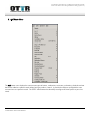
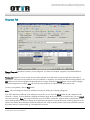
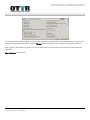
Defaults
Select the Defaults option. You have the ability to set default options for Manual Lab Entry, Medication Entry, Home Address
State/Province/Country, and New Patient Status/Treatment Phase.
Lab Entry – Lab Type: For manual lab entry, you can set the default lab type (Evaluation, Inpatient, Outpatient, Inpatient
Elsewhere, etc) *Lab Types can be added/modified by the OTTR™ Administrator.
Lab Entry – Lab Provider: For manual lab entry, you can set the default Lab Provider.
Medication Entry – Patient Notified: You can default all of your manually entered medications to be marked as Patient
Notified which indicates that the patient is aware of the new or adjusted medication. *Recommended practice is to leave this
unchecked for patient safety reasons.
Medication Entry – Prescribed By: You can decide to have all of you manually entered medications to be prescribed by one
physician.
Home Address – Home State/Prov.: If all of your patients entered into OTTR™ are from a particular state, you can have this
state/province set as a default.
Home Address – Home Country: If all of your patients entered into OTTR™ are from a particular country, you can have this
country set as a default.
New Patient – Status: You can set a default Patient Status for new patients entered into OTTR™. For example, if most of your
patients enter your center as an outpatient, you can select the option of Outpatient.
New Patient – Treatment Phase: You can set a default Treatment Phase for new patients entered into OTTR™. For example,
if most of your patients enter your center as a new referral, you can select the option of Referral.
OTTR™ Version 6.0 User Manual
2012 OTTR™ Chronic Care Solutions
20
All information contained herein is confidential and proprietary to OTTR™
Chronic Care Solutions and is being distributed for training purposes only.
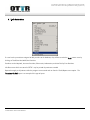
Fetch Date
Select the Fetch Date option. The concept of ‘fetch’ is to retrieve data. In the OTTR™ Master Menu, your options for Refetch
and Refetch All follow the same concept. In Preferences, you can decide how many days back you would like OTTR™ to
‘fetch’ patient data. We have it automatically defaulted to a recommended 180 days so if this is not adjusted, OTTR™ will
‘fetch’ 180 days of patient data from the current date. When working in the patient record, you'll also have the ability to
change the number of Days Back to Fetch in some of the individual OTTRTM windows such as labs.
Default: This represents the default patient status that OTTR™ will adhere to for records to ‘fetch’.
Outpatient/Inpatient/Deceased/Inpatient elsewhere: This represents the status that OTTR™ will adhere to if you have set
days for a patient with this patient status.
*Note: One thing to remember about this is if you extend the number of days and a patient has a lot of data (Labs, Actions,
etc) this may take a longer time to pull up the Patient Review Screen.
OTTR™ Version 6.0 User Manual
2012 OTTR™ Chronic Care Solutions
21
All information contained herein is confidential and proprietary to OTTR™
Chronic Care Solutions and is being distributed for training purposes only.
Logging
This area is designed for OTTR™ Administrators who are working with the Vendor to troubleshoot issues (locking, database
errors, getting kicked out of OTTR™, etc.) that have been reported and need further investigation. Setting this option will
allow OTTR™ to send the SQL output to the Event Log so that OTTR™ can see what commands could possibly be causing
the issue.
*Note: There is no need to visit this area for preferences setting.
Look and Feel
This area is designed for configuration only. It should only be accessed by the OTTR™ Administrator. If at any time you are
able to view this area, please let your OTTR™ Administrator know and DO NOT make any modifications.
OTTR™ Version 6.0 User Manual
2012 OTTR™ Chronic Care Solutions
22
All information contained herein is confidential and proprietary to OTTR™
Chronic Care Solutions and is being distributed for training purposes only.
OTTR
Idle Timeout Minutes -Your OTTR™ Administrator will have this set in the back end to be compliant with your hospital’s
regulations. You cannot lengthen this time beyond what has been set for the database but you can shorten it if you prefer.
For example, if the hospital standard is to Logout after 15 minutes of idle time and Lock after 10 minutes of idle time, you
can adjust your single preference to be 10 minutes for Logout and 5 for Lock.
Default printing format - You may set the Default printing format so that when you select the print option; OTTR™ will send
it to the format selected. These are your options:
Save Window Settings on Exit: This preference will allow OTTR™ to remember your window sizes and splitters. If you are
kicked out of OTTR™ unexpectedly, OTTR™ will also remember the windows you had open and will bring them back up
when you log in again.
*Note: One thing to remember about this is if you are using multiple workstations and the resolutions are different this can
impact your OTTR™ screen sizes. If at any time you are having issues with your window sizes (grey screens, missing
hyperlinks, etc) please see your OTTR™ Administrator.
OTTR™ Version 6.0 User Manual
2012 OTTR™ Chronic Care Solutions
23
All information contained herein is confidential and proprietary to OTTR™
Chronic Care Solutions and is being distributed for training purposes only.
Password change
You can change your password at any time by selecting the Password option in Preferences.
Old Password: Enter your current password here.
New Password: Enter your new password here.
Confirm: Enter your new password again to confirm.
When completed, select the Change Password option.
Login Automatically Using Windows: This option is for sites using Active Directory to log into OTTR™. OTTR™ uses your
Windows login to sign into OTTR™. DO NOT select this option if your site does not have Active Directory set up or if you are
unsure.
*Note: Best practice is to change your OTTR™ login whenever your network login requires a new password to be created.
This ensures that you are compliant with the hospital’s established password policy.
OTTR™ Version 6.0 User Manual
2012 OTTR™ Chronic Care Solutions
24
All information contained herein is confidential and proprietary to OTTR™
Chronic Care Solutions and is being distributed for training purposes only.
SyncScroll
All of these options should be default checked. In the patient review screen when you highlight an option such as a lab,
OTTR™ will display the remaining options (actions, diagnosis, medications) closest to the date and time of the highlighted
item. It provides a snapshot of the care given at that time.
OTTR™ Version 6.0 User Manual
2012 OTTR™ Chronic Care Solutions
25
All information contained herein is confidential and proprietary to OTTR™
Chronic Care Solutions and is being distributed for training purposes only.
Advanced
In the event you are experiencing issues with your window sizes, you can use the Advanced option to reset your Preferences.
Reset All Preferences: This will reset all of your preferences and revert them back to the standard.
Reset Single Preference: This option will allow you to select a preference to reset. In the example of having window/splitter
issues, you may want to reset the single preference for window sizing.
Once you've set all of your preferences, select Apply Changes and close this window using the
window.
OTTR™ Version 6.0 User Manual
2012 OTTR™ Chronic Care Solutions
in the upper right of the
26
All information contained herein is confidential and proprietary to OTTR™
Chronic Care Solutions and is being distributed for training purposes only.
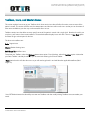
Toolbars, Icons, and Master Menus
This section explains how to set up your Toolbars which have certain icons that will allow for easier access to areas of the
patient’s record. This section will also cover the Master Menus and the items within each menu so that you can be aware of
other areas available to you that may not be accessible from an icon.
Toolbars contain icons that allow access to specific areas of the patient’s record with a single click. Based on the role/s you
may have, you'll want to have certain toolbars. The standard toolbar displays icons with titles. There is an Icon Only option
that does not give a description for the icon
The three main toolbars are:
Basic: Support icons
Clinical: Patient charting icons
Solid Organ Tx: Workflow icons
To activate your Toolbars, select the Windows Master Menu option. From Windows, select the Toolbars option. Notice that
your Basic Toolbar is already checked for you. Proceed with selecting the Clinical Toolbar.
*Note: Notice that this will close the menu so you will need to go back in and add the other applicable toolbars (Solid
Organ Tx)
*Your OTTR Administrator has the ability to create new Toolbars and also modify existing Toolbars to accommodate your
needs.
OTTR™ Version 6.0 User Manual
2012 OTTR™ Chronic Care Solutions
27
All information contained herein is confidential and proprietary to OTTR™
Chronic Care Solutions and is being distributed for training purposes only.
To save space, utilize the drag and drop feature to adjust your toolbars. Position your mouse cursor over the dotted lines to
the very left of the toolbar you wish to move. You'll see a horizontal line with arrows on each side. Hold down the left mouse
button and drag the toolbar to the desired location. Once you've placed your toolbar, release the left mouse button for
placement.
Another way to save space is to adjust the size of your icons. You can choose Large or Small icons.
Icons
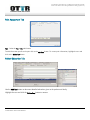
Icons are a one click method to accessing a specific area of a patient’s transplant record. Selecting the drop-down arrow
beside an icon allows you to quickly add or access other areas of the application.
Find Patient
Selecting this Icon opens the Patient Search window.
The drop-down arrow allows you to select the New Patient and New Patient Referral form.
Review
Selecting this Icon opens the Patient Review window. If you are within another area of the patient’s record
and need to return to the main review screen, select this icon.
Demographics
Selecting this Icon opens the Patient Demographics window. This window groups information into
a logical order for ease of data entry and retrieval.
Death Info
selected patient.
Selecting the drop-down arrow next to the Demo Icon opens the Death Information for the
OTTR™ Version 6.0 User Manual
2012 OTTR™ Chronic Care Solutions
28
All information contained herein is confidential and proprietary to OTTR™
Chronic Care Solutions and is being distributed for training purposes only.
Insurance
Selecting this Icon opens the Insurance coverage for the selected patient. It displays the patient’s current
insurance and also historical insurance providers.
Insurance Notes
the selected patient.
Selecting the drop-down arrow next to the Ins Icon allows you to access Insurance Notes for
Labs
Selecting this Icon opens the Labs for the selected patient. This icon opens the appropriate flow sheet based
upon the patient’s Treatment Phase.
Add Lab/Misc Labs/Flowsheets
Selecting the drop-down arrow next to the Lab Icon allows you to enter a lab,
access Miscellaneous Labs and view certain flowsheets.
Medications
Selecting this Icon opens the Medications window for the selected patient.
Selecting the drop-down arrow next to the Medications Icon allows you to add a medication to the patient’s
record.
Actions
Selecting this Icon opens the Actions window for the selected patient.
Selecting the drop-down arrow next to the Actions Icon allows you to add an action to the patient’s record.
Progress Notes
Selecting this Icon opens the Progress Notes window for the selected patient.
Selecting the drop-down arrow next to the Notes Icon allows you to add a progress note to the patient’s
record.
General Medical
Selecting this Icon opens the General Medical window for the selected patient which contains
information such as Primary Diagnosis, ABO verification, and Patient Status.
OTTR™ Version 6.0 User Manual
2012 OTTR™ Chronic Care Solutions
29
All information contained herein is confidential and proprietary to OTTR™
Chronic Care Solutions and is being distributed for training purposes only.
Diagnosis(Problem List)
Selecting this Icon opens the Problem List or a list of diagnoses for the patient.
Selecting the drop-down arrow next to the Diagnosis Icon allows you to add a diagnosis to the problem list
for the selected patient.
Text Documents
Selecting this Icon opens the Text Documents for the selected patient.
Selecting the drop-down arrow next to the Text Documents Icon allows you to add a Text Document to the
patient’s record.
Providers
Selecting this Icon opens the Care Providers window for the selected patient.
Referrals
Selecting this Icon opens the Referral window for the selected patient.
Selecting the drop-down arrow next to the Referral Icon allows you to add a Referral to the patient’s record.
Evaluations
Selecting this Icon opens the Evaluation window for the selected patient.
Selecting the drop-down arrow next to the Evaluations Icon allows you to add an Evaluation to the patient’s
record.
Candidate Listing
Selecting this Icon opens the Candidate Listing window for the selected patient.
Selecting the drop-down arrow next to the Listings Icon allows you to add a Candidate Listing to the
patient’s record.
Transplant
Selecting this Icon opens the Transplant window for the selected patient.
Selecting the drop-down arrow next to the Transplants Icon allows you to add a Transplant to the patient’s
record.
Encounters
Selecting this Icon opens the Encounters window for the selected patient.
Selecting the drop-down arrow next to the Encounters Icon allows you to add an Encounter to the patient’s
record.
OTTR™ Version 6.0 User Manual
2012 OTTR™ Chronic Care Solutions
30
All information contained herein is confidential and proprietary to OTTR™
Chronic Care Solutions and is being distributed for training purposes only.
Potential Donors
Selecting this Icon opens the Potential Donors window for the selected patient (Recipient).
Selecting the drop-down arrow next to the Potential Donors Icon allows you to add a new Potential
Donor to the Recipient’s record.
OTTR™ Version 6.0 User Manual
2012 OTTR™ Chronic Care Solutions
31
All information contained herein is confidential and proprietary to OTTR™
Chronic Care Solutions and is being distributed for training purposes only.
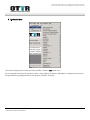
Master Menus
The OTTR™ Master Menus are displayed directly below the title bar and consist of the following options: OTTR, Edit, Lists,
Patient, Add, Tools, Windows and Help.
*Note: Options that are greyed out aren't available in the current window.
1. OTTR Master Menu
Refetch: Refreshes the current screen. If new information has been entered and does not display, you can refetch this
information from the database to display it. Click Ctrl+U keys to accomplish the same outcome.
Print: This option is useful when graphing labs or printing a text document. Click Ctrl+P keys to accomplish the same
outcome.
Print Preview: Use this to preview an item prior to printing.
Save Shortcut: This option is no longer used.
Open Shortcut: This option is no longer used.
Export: You can export a list to excel by selecting the export option.
Import: This menu option is not utilized in the client application. It is utilized within the OTTR™ Admin application.
Change User: Allows the current workstation to be utilized by multiple users. If needed, another user may log into the
OTTR™ application by selecting the Change User menu option.
OTTR™ Version 6.0 User Manual
2012 OTTR™ Chronic Care Solutions
32
All information contained herein is confidential and proprietary to OTTR™
Chronic Care Solutions and is being distributed for training purposes only.
Refetch All: When configuration changes have been made within the Admin application and the OTTR™ Administrator
wishes to view those changes without having to exit out of their client application they may select the Refetch All option. If
the changes made do not display then it is recommended that they exit out of the client application and re-enter it to see if
the configuration changes have occurred as desired.
Lock: It's important that patient data not be displayed unless a clinician is actively working within the record. To lock the
system prior to leaving the workstation, click on the Lock menu option or hit the F12 key.
Preferences: To change your OTTR™ password or define personnel preferences, click on the preferences menu option. If
permission is allowed, you can define how the system functions based upon the options configured.
Exit: This is the recommended way to exit out of the OTTR™ client application at the end of day.
2. Edit Master Menu
If you're in a window that allows free text such as Text Documents or Progress Notes, these menu options will become
active. OTTR™ does allow users to copy information from another system or document and paste it into a free text field.
OTTR™ Version 6.0 User Manual
2012 OTTR™ Chronic Care Solutions
33
All information contained herein is confidential and proprietary to OTTR™
Chronic Care Solutions and is being distributed for training purposes only.
3. List Master Menu
To access lists designed to assist with your daily workflow, utilize the Lists master menu.
Lists are grouped based upon the process a patient is within (Referral, Evaluation, Mobilization, Transplants, Encounters) or
the type of data being displayed within the list (Actions, Schedules, Financial).
OTTR™ Version 6.0 User Manual
2012 OTTR™ Chronic Care Solutions
34
All information contained herein is confidential and proprietary to OTTR™
Chronic Care Solutions and is being distributed for training purposes only.
4. Patient Master Menu
The Patient master menu is the equivalent to a patient’s physical medical record. Items found in a standard medical record
are also found under the Patient master menu.
Click on the Patient master menu and select Chart. Notice that this area represents the patient’s medical record. Report(s)
which are specific to one patient are run from Patient\Reports\ {Desired Report}. Flowsheets may be available for quick lab
data entry or for graphing purposes.
OTTR™ Version 6.0 User Manual
2012 OTTR™ Chronic Care Solutions
35
All information contained herein is confidential and proprietary to OTTR™
Chronic Care Solutions and is being distributed for training purposes only.
5. Add Master Menu
The Add master menu displays the most common types of actions, medications, encounters, evaluations, schedules and text
documents added to a patient record without having to perform a search. It provides the ability to quickly add the most
common items to a patient’s record. The OTTR™ Administrator has the ability to configure this area specific to your site’s
needs.
OTTR™ Version 6.0 User Manual
2012 OTTR™ Chronic Care Solutions
36
All information contained herein is confidential and proprietary to OTTR™
Chronic Care Solutions and is being distributed for training purposes only.
6. Tools Master Menu
If a user has the permissions assigned to add providers to the database, they will do so under the Tools master menu by
clicking on Tools\Providers\Add\Care Providers.
Providers can be Hospitals, Insurance Providers, Pharmacies, Laboratories, and Non Facility Care Providers.
Info Documents which are stored in OTTR™ may be printed for patients as needed.
Reports that apply to all patients within the program are accessed and ran from the Tools\Reports menu option. The
Transplant On Call report is an example of this type of report.
OTTR™ Version 6.0 User Manual
2012 OTTR™ Chronic Care Solutions
37
All information contained herein is confidential and proprietary to OTTR™
Chronic Care Solutions and is being distributed for training purposes only.
7. Windows Master Menu
If you're working in multiple records or have multiple windows open, utilize the Windows master menu option to re-enter a
patient’s record from where it was previously left. You also have access to the various toolbar options from the Windows
master menu to activate or de-activate toolbars as needed.
8. Help Master Menu
To view an electronic copy of the OTTR™ End User Manual, click on OTTR Reference Manual. For support purposes, if
asked what version of OTTR™ you are running click on the About menu option to display your version number.
OTTR™ Version 6.0 User Manual
2012 OTTR™ Chronic Care Solutions
38
All information contained herein is confidential and proprietary to OTTR™
Chronic Care Solutions and is being distributed for training purposes only.
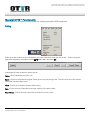
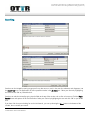
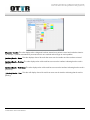
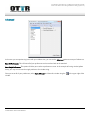
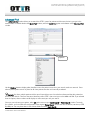
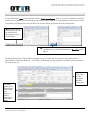
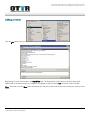
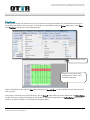
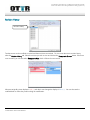
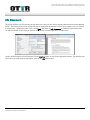
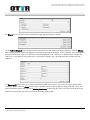
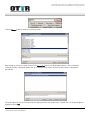
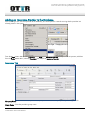
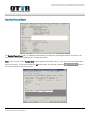
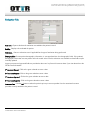
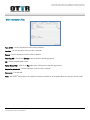
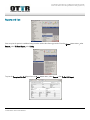
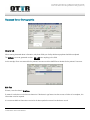
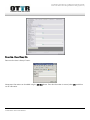
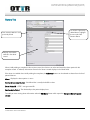
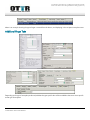
Tracked Lists
The number next to
Tracked Lists details the
number of tracked lists
that currently have active
items.
The Count column
details the number of
actions on that particular
list.
Tracked lists are assigned based upon your role or they may be self-assigned if you have proper permission. The Message
of the Day window, or the first window you see after you’re logged in, displays your assigned tracked lists. This allows quick
access to workflow lists to manage your daily tasks. Check the box in front of Show Empty Tracked Lists to display of your
tracked lists with a 0 count. The Re-Check button at the bottom will re-check the system for new items and update the count
column when selected.
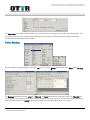
Add Tracking
To assign a workflow list to your Tracked Lists, click the
button in the bottom left of the Message of the
Day window. A Pick a Patient List window opens displaying all lists which the OTTR™ administrator has marked available
for tracking. Select the desired workflow list you want to assign and click the OK button.
OTTR™ Version 6.0 User Manual
2012 OTTR™ Chronic Care Solutions
39
All information contained herein is confidential and proprietary to OTTR™
Chronic Care Solutions and is being distributed for training purposes only.
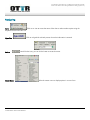
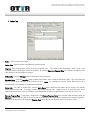
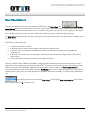
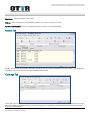
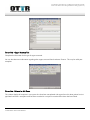
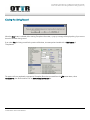
Next, select how you want the list to function:
The List, Program, Role and User fields will pre-populate for you and shouldn't be modified.
Notify when NOT empty – Placing a check in the box will display your tracked list when it is populated.
Alert at logon – Selecting will cause a message to pop up upon login, notifying you how many counts are on each list.
Check Every - Choose how often you want the system to check for new items in minutes or hours. The system will
automatically display the list status at the desired time limit entered.
Tip: When you login, the system will automatically check for new items.
An alternative way to Add Tracking is through the Master Menu. From the Master Menu select:
Lists | specific Program | category of desired list | specific List
OTTR™ Version 6.0 User Manual
2012 OTTR™ Chronic Care Solutions
40
All information contained herein is confidential and proprietary to OTTR™
Chronic Care Solutions and is being distributed for training purposes only.
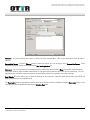
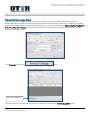
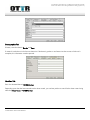
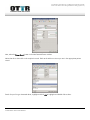
Select the Tracking tab and click Add Tracking to complete the list set up and add to your tracked lists.
To remove a list from tracked lists, highlight the list and click Remove Tracking.
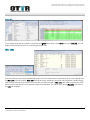
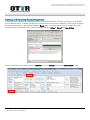
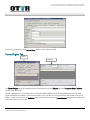
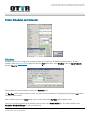
List Functionality
This section explains how lists may be displayed, sorted, and limited along with an overview of each list tab. Lists consist of
columns arranged in a standard order each time the list is opened. You can arrange the columns in a different order to
better suit your needs. When you close the list, the columns will return to the standard format. Upon arranging a list to meet
your needs, you can minimize it rather than closing it as you continue working in OTTR™.
When a row is highlighted in a list, it represents a patient’s record, and all icons located at the top of the window become
available for the highlighted patient record. If you double click on a row in the list, it will open certain windows such as the
encounter, action, evaluation, transplant record, or to the Patient Review Screen depending on the type of list.
If you want to move a column, select the column header and hold down the left mouse button while dragging the column
either left or right of its current position. A green arrow will display to show you where the column will be placed.
To expand a column, position the cursor over the column headers dividing edge. The cursor will change into a double
arrow. Hold down the left mouse button while expanding the list column to the desired size.
To sort a list by a specific column, single click on the column header. The list will re-arrange either by date, number, status,
or alphabetically A to Z or Z to A; depending upon the column header selected.
OTTR™ Version 6.0 User Manual
2012 OTTR™ Chronic Care Solutions
41
All information contained herein is confidential and proprietary to OTTR™
Chronic Care Solutions and is being distributed for training purposes only.
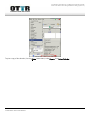
All lists will have a Limit Tab, Data Tab and Description Tab. The New Info and Tracking tab will only show up if it has been
activated by your OTTR™ Administrator.
Limit Tab: Use the Limit tab to search using parameters that will shorten your list such as date or type of action. Each list will
have different limit options. Use the Select buttons to search and limit by name if applicable, enter dates using the green
calendar options, or type in the to and from dates. Drop down boxes and free text areas are also utilized to customize your
search. Once you've entered your limiting data, click the Data tab to see your results with the limits in place. You can
manually clear the limits you've set in the Limit tab or they will default back to no limits when you log out and log back in.
Data Tab: The Data tab displays all records which meet a list’s description requirement. Information may be sorted by
clicking on a column header. Columns may be arranged in a different order by clicking and dragging. Upon exiting the list
the columns will revert back to their original order.
New Info Tab: Patients who have had new information entered into their record will display within this tabs view. The
transplant coordinator will select a record within this tab to review the newly entered data prior to marking the record as
having been reviewed.
Description Tab: Each list in OTTR™ has a description which explains the purpose of the list, how it's populated, and
explains the requirements to remove a patient from the list if it has been designed for workflow purposes.
Tracking Tab: The Tracking Tab allows you to activate the list for tracking. It also places the list on your Tracked List tab in
the Message of the Day window.
OTTR™ Version 6.0 User Manual
2012 OTTR™ Chronic Care Solutions
42
All information contained herein is confidential and proprietary to OTTR™
Chronic Care Solutions and is being distributed for training purposes only.
List Alerts
Alerts assigned to critical workflow lists serve as a visual clue to you that a patient record requires immediate attention.
Alerts can be added to a list by your OTTRTM Administrator. If a patient record has been flagged, the Alert window will
display each time a patient's record is accessed.
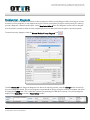
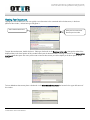
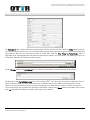
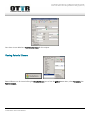
My Patient List
You now have the ability to create your own lists in OTTR™ so that you can track certain groups of patients. Lists could be
designed to display patients which are on a clinical trial or for other tracking and research purposes. To build a New List,
select the Lists Master Menu option and then highlight the My Patient Lists option. Once that has been selected, move your
cursor to the New… option. Enter the title for your list in the Description field.
Next, select the Add Patient button. The Find Patient/Quick Find window will appear. Search for the patient you wish to add
to your list. Add additional patients by selecting Add Patient. To remove a patient from the list, highlight the row and select
Remove Patient. To review lab results for the patients select the New Info tab.
OTTR™ Version 6.0 User Manual
2012 OTTR™ Chronic Care Solutions
43
All information contained herein is confidential and proprietary to OTTR™
Chronic Care Solutions and is being distributed for training purposes only.
Now that you have created a list by naming it and adding patients to it, the list becomes available under the Lists\My Patient
Lists menu option. You can create multiple lists which combine patients for your own specific needs.
Deleting a My Patient List
To delete a list you must first remove all of the patients within the list. Highlight each patient and select Remove Patient.
Once all of the patients have been removed, the Delete List option becomes active. Select Delete List to remove the list from
your My Patient Lists menu option.
OTTR™ Version 6.0 User Manual
2012 OTTR™ Chronic Care Solutions
44
All information contained herein is confidential and proprietary to OTTR™
Chronic Care Solutions and is being distributed for training purposes only.
List Descriptions
This section reviews many of the standard lists in the OTTR™ application that we feel would be helpful to familiarize yourself
with.
Active Patients: This list displays only Active patients. Each patient should display only once. To populate the list the patient’s
status is active. To be removed from the list, the patient must have been marked; Expired, Lost to Follow-up, or Inactive.
All Patients: This list shows all patients within the program. It will include patients who are living; expired; active; and
inactive. Each patient should only occur once on this list. To populate the list the patient is entered into OTTR™ and
assigned a program. Patients will not be removed from this list.
All My Patients: This list displays all patients within the program who are assigned to the current user. To populate the list
the current user must be assigned as a care provider for the patient. To be removed from the list, the care provider must be
removed from the care providers list within the patient's record.
Actions – Actions Due in <=7 days: This list displays actions that are scheduled to occur within the next 7 days. Patients will
be shown once for each action. To populate the list a scheduled action must be occurring within the next 7 days. To be
removed from the list an action must have a schedule date which has passed today's date.
Actions – My Pending Actions All: This list shows actions that have not been scheduled or marked done and are assigned to
the current user. These actions will include those for patients who are assigned to the current user or actions
that have been assigned to the current user as a responsible person. To have an action removed from the list the action
needs to have a scheduled date and a done date.
Actions - Pending Actions - All: This list displays all actions that are unscheduled and have not been marked done. To
populate the list, a patient must have an action which requires scheduling and for it to be marked done. To be removed
from the list, the action will need to be scheduled and marked done.
Actions - Pending Actions – Not Done: This list displays all actions that are not marked done. To populate the list, a patient
must have an action that requires it be marked done. To be removed from the list, the action must be marked done.
Actions – Pending Actions – Unscheduled: This list displays all actions which are not yet scheduled. To populate the list, a
patient must have an action which requires scheduling. To be removed from the list, the action must have a scheduled date.
Awaiting Coordinator Review: This list displays patients who have received new documentation within their OTTR™ record.
All information must be reviewed prior to selecting the Marked Reviewed button. Patients may have multiple labs or
documents which need reviewed. Select the New Info tab to review the new labs and documents. To populate the list, a
patient must have new information such as labs, radiology records, pathology records, etc and will consist of interfaced or
manually entered information. To be removed from the list, all new data must be Marked Reviewed.
Awaiting Physician Review: This list displays patients that a coordinator has marked as Send for Physician Review. The
physician must review the patient’s new data and the coordinators documented concern. To populate the list, a coordinator
marks new data as Send for Physician Review within the Awaiting Coordinator Review List. To be removed from the list, all
new data must be Marked Reviewed.
OTTR™ Version 6.0 User Manual
2012 OTTR™ Chronic Care Solutions
45
All information contained herein is confidential and proprietary to OTTR™
Chronic Care Solutions and is being distributed for training purposes only.
Holding for Lab Completion: Patients are placed on this list by the transplant coordinator while working within the Awaiting
Coordinator Review List. If lab results have come in for a patient and they do not have all of the results needed prior to
marking the patient reviewed, select the Hold button which places the patient onto the list. When any new information has
been added to this patient’s record they will be removed from this list and back to the Awaiting Coordinator Review List.
My Awaiting Coordinator Review: This list displays patients who have the coordinator assigned as a care provider. This list is
identical to the Awaiting Coordinator Review List. The difference is that the patients within have been assigned to the current
user as a care provider. To populate the list, a patient must have received new information. To be removed from the list, all
new data must be Marked Reviewed.
Encounters – Chronological Encounters: This list displays all encounters for patients. A patient may be displayed multiple
times, once for each encounter. Encounters are not removed from the list.
Encounters - Chronological Encounters for Past 12 Months: This list displays all encounters that a patient has had within the
past twelve months. A patient may be displayed multiple times, once for each encounter.
Encounters – Unsigned Encounters: This list displays encounters which have not yet been signed off. A patient may be
displayed multiple times, once for each encounter
Chronological Evaluations: This list displays all evaluations in chronological order.
Open Evaluations: The list displays all active patients which have an open evaluation record. To remove a patient from this
list, an End Date and End Reason must be entered into the End tab of the evaluation record.
Financial – Actions Needing Pre-Auth with Patient, Plan and Type: This list displays actions that require financial
authorization. Actions that have a financial coverage rule will also display on this list.
Financial - Awaiting Financial Coordinator Review: This list displays patients who require financial review. A patient is
added to this list by adding a Send for Insurance Authorization action. The patient is removed from the list when the action
has been marked done.
Financial – Pending Benefits Verification: This list displays all patients who are in the Referral Treatment Phase and do not
have an entry within the Effective Starting date field, Until date field and Verified On date field under the Verification tab of
the patient’s Insurance Plan window. The financial coordinator will verify the patient's insurance plan benefits. To remove a
patient's record from this list you must enter the Effective date, Until date and Verified On date and also select Mark
Reviewed in the Verification tab on Insurance Plan window.
Financial – Plan with Patient Count: This list displays the total number of patients which have a specific Insurance Company,
Plan and Group.
Financial – Active Patients with Insurance and With No Coverage Rules: This list displays the insurance providers who do not
have any financial coverage rules set.
Financial – Billable Actions: This list displays all patients who have had a Billable action ordered. If there is a need to split
the Hospital Billing from the Clinic Billing, this list may be utilized to do so. Additional selection choices may be added to
the billing status such as Clinic Billing or Hospital billing.
OTTR™ Version 6.0 User Manual
2012 OTTR™ Chronic Care Solutions
46
All information contained herein is confidential and proprietary to OTTR™
Chronic Care Solutions and is being distributed for training purposes only.
Financial – Pending MAP Re-verification: This list displays patients that have Unknown or Yes selected next to the Enrolled In
Medication Access Program. This information is located in the Prescription Benefits tab of the patient's Insurance Plan
window. To remove a patient from this list, select the No option next to the Enrolled In Medication Access Program. You can
also enter a date within the Date Enrolled field and Until date field located under the Prescription Benefits tab of the
patient's Insurance Plan window.
Financial – Pending Pre-certification: This list displays patients who are in the Evaluation Treatment Phase and have either
Unknown or Yes selected within the Authorization Required for Evaluation field. These fields are located under the
Authorization Numbers tab of the Insurance Plan window. To remove a patient's record from this list, enter the Evaluation
Pre-certification Number under the Authorization Numbers tab of the patient's Insurance Plan window.
Financial – Pending Prior Approval Re-verification: This list displays patients who are Listed Candidates and are within 10
days of the Until date within the Authorization Numbers tab of the patient's Insurance Plan window. To remove a patient's
record from this list, the user must call the patient's insurance case manager to re-verify insurance coverage. Enter a new
Until date, Verified On date and a Re-verify On date under the Authorization Numbers tab of the patient's Insurance Plan
window.
Financial – Pending Transplant Plan Approval: This list displays patients who have completed a financial consultation and
have had the formal document given to them for their approval/signature. An entry date will be entered within the
Transplant Plan Sent field and Financial Consultation Completed field. However, no entry within the Transplant Plan
Approval field will be entered. This is located under the Authorization Numbers tab of the patient's Insurance Plan window.
To remove a patient's record from this list the financial coordinator will enter the date which they received the signed copy
from the patient within the Transplant Plan Approved field under the Authorization Numbers tab of the patient's Insurance
Plan window.
Financial – Pending Transplant Plan Sent: This list displays all patients who have a date entered within the Financial
Consultation Completed field. However, a date has not been entered within the Transplant Plan Sent field under the
Authorization Numbers tab. This is located under the Authorization Numbers tab of the patient's Insurance Plan window. To
remove a patient from this list, the financial coordinator must create this written documentation to be sent to the patient.
Upon sending to the patient, the financial coordinator will enter the Transplant Plan Sent date under the Authorization
Numbers tab of the patient’s Insurance Plan window.
Financial – Pending Transplant Prior Approval: This list displays patients who are within the Listed Treatment Phase and
have either Unknown or Yes selected next to the Authorization Required for Transplant field under the Authorization
Numbers tab of the Insurance Plan window. To remove the patient's record from this list, enter the Transplant Prior Approval
Number under the Authorization Numbers tab of the patient's Insurance Plan window.
Financial – Plan with Patient Count: This list displays the total number of patients who have a specific Insurance Company,
Plan and Group. This list may be helpful when negotiating global rates or agreements with insurance providers.
TX Census List: This list displays patients who are currently inpatients. Patients automatically display on this list when OTTR™
receives an Admit event from the A.D.T interface. To be removed from the list OTTR™ receives a Discharge event from the
A.D.T. interface.
OTTR™ Version 6.0 User Manual
2012 OTTR™ Chronic Care Solutions
47
All information contained herein is confidential and proprietary to OTTR™
Chronic Care Solutions and is being distributed for training purposes only.
Active Patient Demo Changes: This list displays patients who have a new demographic item from the ADT interface that
must be reviewed prior to posting it to a patient's record. To be removed from the list, the demo changes must be reviewed.
Admitted Patient (A.D.T.): This list displays all patients currently admitted to the facility. To be removed from the list, the
patient must have a discharge event entered into OTTR™.
Chronological (A.D.T.): This list displays all historical Admit, Discharge, and Transfer Events per patient. Patients are not
removed from the list.
Listed Patients: This list displays patients who are currently listed for transplant. To be added to the list, a candidate listing
record must be created within the patient’s record. To be removed from the list, the listing end date must be entered into the
candidate listing record.
Average Waiting Times (Current): This list displays blood type and the average number of days the patient is listed prior to
transplant.
Chronological Listings: This list displays all Listing records that have been entered in chronological order. To be added to
this list, a patient must have a candidate listing record. Patients are not removed from this list.
Listings and Insurance: This list displays patients who have an active candidate listing record with their assigned insurance
provider’s contact information. To be added to the list, a patient must have a listing record. To be removed from the list, the
listing end date must be entered.
Patients with Unverified ABO: This list displays patients who do not have the ABO marked verified by two individuals within
the General Medical window.
All Pending Patients: This list displays patients who have a pending evaluation action, non-evaluation action, schedule or
new medication. To be removed from the list, the action must be marked done or medication marked as patient notified.
All Medications Pending Signoff: This list displays patients who have a medication order that is not signed off. To be
removed from the list, a user with sign off permissions must sign off on the medication.
Medication Changes: This list displays patients who have had medication changes made but have not been marked
notified. To be removed from the list, the Patient Notified check box within the medication inspector window must be
checked.
Medications Ending <=14 days from now: This list displays patients who have medications due to end within the next 14
days. Patients are removed from the list when the medication end date passes.
My Medications Pending Signoff: This list displays patients who the physician is assigned to which require the medication
order to be signed off. To be removed from the list, the medication must be signed off.
Repeat Labs: This list displays patients who have had a repeat lab action ordered and it has not been scheduled or marked
done. To be removed from the list, the action needs to be marked done.
OTTR™ Version 6.0 User Manual
2012 OTTR™ Chronic Care Solutions
48
All information contained herein is confidential and proprietary to OTTR™
Chronic Care Solutions and is being distributed for training purposes only.
Active Protocols: This list displays patients on an active protocol within a program. To be removed from the list the protocol
end date must be entered.
Chronological Protocols: This list displays all patients that have been, or are currently active, on a protocol for a particular
program in chronological order. Patients are not removed from this list.
All Protocols: This list displays all protocols available in the system.
Active Referrals: This list displays referrals which have been entered into the system and have not yet been ended. Patients
may display on the list more than once if they multiple open referrals. To be removed from the list, a referral End date is
required.
Chronological Referrals: This list displays all referrals documented in the system in chronological order. Patients may be
displayed more than once if the patient has more than one recorded referral. Patients are not removed from this list.
Counts by Referring Physicians: This list displays all referrals and distinct patient count of referrals sent to the program by an
individual physician.
Referral Outcomes by Referring Physician: This list displays the count of number of referrals that have occurred for that
physician with that end reason and totals the number of patients in that category. A physician row is added when a new
combination of referring physician and referral end reason exists within the database.
All Active Schedules: This list displays all patients who have an active schedule. The patient is removed from the list when
the schedule is ended.
Overdue Schedule: This list displays patients who have been assigned a schedule such as lab or clinic visits and the
information (result or encounter) has not yet been entered into OTTR™. To be added to the list, an expected schedule date
must pass and no result entered. To be removed from the list the expected schedule date must be reset or the expected
results must be entered.
Schedule Changes: This list displays patients who have had a schedule added to their record and they have not been
notified. To be removed from the list, the Patient Notified option must be selected within the schedule inspector window.
Upcoming Events: This list displays the patient's last name, first name, schedule type, frequency, next expected schedule
date, last schedule date and the schedule end date.
Active Transplant Patients: This list displays active patients with age at time of first and last transplant. To be added to the
list a transplant record must be created with a patient’s record. To be removed from the list the patient must have a date of
death entered.
Transplant - Chronological: This list displays all transplants in chronological order. To be added to the list a patient must
have a transplant record. Patients are not removed from this list.
Transplant - Retransplants: This list displays patients who have received more than 1 transplant. Patients are not removed
from this list.
OTTR™ Version 6.0 User Manual
2012 OTTR™ Chronic Care Solutions
49
All information contained herein is confidential and proprietary to OTTR™
Chronic Care Solutions and is being distributed for training purposes only.
Transplant – Transplant Patients in Alphabetical Order: This list displays all transplanted patients in alphabetical order. To
be added to the list, a transplant record must be created within the patient’s record.
Transplant – Transplanted Patients: This list displays all transplanted patients with blood type.
Transplant - Chronological Failed Grafts: This list displays patients within the specified program who have had a failed
transplant graft and reason for the failure. A patient is added to the list when a graft failure date is entered in the
transplant record. Patients are not removed from the list.
Transplant – Multi Organ Transplants: This list displays patients who have received a multi-organ transplant on the same
day. Patients are not removed from the list.
Blood type Mismatch - Discrepancy Between Lab and Patient Medical: This list displays patients who have an ABO lab result
which does not match the ABO entered under the General Medical window. To be removed from the list the ABO lab result
and the ABO in General medical must match.
Blood type Mismatch – Potential Donor (ABO or Rh): This list displays the recipient’s name and blood type and the donor's
name and blood type. To be added to the list the blood types will not match. To be removed from the list blood types must
match.
Blood type Mismatch – Transplanted (ABO only): This list displays patients who have been transplanted. It also includes the
non-matching ABO for the recipient and donor.
CMS – Cadaveric Transplants: This list displays all transplanted patients that have the transplant type of cadaveric. The
patient is added to this list when a user enters a transplant event and selects the transplant type of cadaveric. This list
displays data for the past 3 years.
CMS – Current Listed Patients: This list displays all patients who have an open candidate listing and do not have a listing
status of Status 7. Patients are removed from the list when a listing end date is entered.
CMS – Living Donors: This list displays all patients who have been living donors. The patient must be a member of a living
donor program. The patient is added to this list by attaching the donor to the recipient transplant record and selecting the
transplant type of living related or living unrelated. This list displays data for the past 3 years.
CMS – Patients Removed from Waitlist: This list displays patients who have been removed from the active waitlist for any
reason. A patient is added to this list when a listing end date and reason is entered and saved in OTTR™. This list displays
data for the past 365 days.
CMS – Patient Removed from Waitlist Other than TX/Death: This list displays patients who have been removed from the
active waitlist. A patient is added to this list when a listing end date and reason is entered and saved in OTTR™. The End
Reasons that qualify for this list are; Patient transplanted, Patient transplanted elsewhere or Patient expired. This list displays
data for the past 365 days.
CMS – Patients Transplanted: This list displays all transplanted patients. This list displays data for the past 3 years.
OTTR™ Version 6.0 User Manual
2012 OTTR™ Chronic Care Solutions
50
All information contained herein is confidential and proprietary to OTTR™
Chronic Care Solutions and is being distributed for training purposes only.
CMS – Evaluated, Not on Waitlist: This list displays all patients who have a completed evaluation but were not listed for
transplant. This list displays data for the past 365 days.
OTTR™ Version 6.0 User Manual
2012 OTTR™ Chronic Care Solutions
51
All information contained herein is confidential and proprietary to OTTR™
Chronic Care Solutions and is being distributed for training purposes only.
Assigning Care Providers
This section explains how to assign Care Providers to a patient’s record. Assigning Care Providers allows for population on
patient reports, and certain lists are driven based on the assigning of Care Providers such as the My Awaiting Coordinator
Review list. There are several ways to access the Provider window:
Patient Review Screen - Hyperlink, the Providers Icon or from the Patient Master Menu
Once you've accessed the Care Providers window by any of the methods listed above, select the Add Provider option. This
will open the Care Provider Search window.
Type the provider’s name into the Search Text Field. You can also use any of the search criteria in the top portion of the
Care Provider Search window. If typing within Search Text, the displayed results will begin to limit by what has been typed
until the desired name is displayed. If you are utilizing the search fields, enter the provider’s information and select Begin
Search. Once you've located the provider from either method, you can either double-click on the line item or highlight the
line once and select OK.
OTTR™ Version 6.0 User Manual
2012 OTTR™ Chronic Care Solutions
52
All information contained herein is confidential and proprietary to OTTR™
Chronic Care Solutions and is being distributed for training purposes only.
Creating a New Provider
In the event that your search returns no values, you may need to add the Care Provider to the database. If given the
appropriate permissions, add the Care Provider by selecting the New button within the Care Provider Search window. You
will be re-directed to the Person/Provider Inspector window. If you are entering a care provider, you will only need to place
data in the following tabs; Name, Contact Information, Billing Address, Identifiers and Care Provider Types. The other tabs
are for building user accounts in OTTR™ and are utilized by the OTTR™ Administrator. *If you don't have Admin
permissions, these other tabs will be greyed out.
Once you've selected a Care Provider, you'll be re-directed back to the Care Providers window. To view a provider’s contact
information, highlight the desired provider and the contact information will display in the top portion of this window.
You can also specify the Referring Relationship by highlighting the provider and selecting the drop-down option next to the
Referring Relationship field. If you need to remove a Care Provider from this list, highlight the desired Care Provider and
select the Remove Provider option.
OTTR™ Version 6.0 User Manual
2012 OTTR™ Chronic Care Solutions
53
All information contained herein is confidential and proprietary to OTTR™
Chronic Care Solutions and is being distributed for training purposes only.
Assigning a Medical Facility
This section explains how to assign a Medical Facility, such as a laboratory, dialysis center, or pharmacy to a patient’s
record. It also explains how to add new Medical Facilities to the database. Select the Patient Master Menu, highlight the
Providers option and select the type of Facility you want to associate to the patient’s record. In this example, Lab Providers
has been selected.
Select the Add to list option to search the database for the desired provider.
Highlight the desired provider from the search list and select the OK button to add this provider to the patient record. Once
you've selected a provider, you'll be re-directed to the Providers window. If you highlight the line item of the selected
provider, you'll see the contact information for that Medical Facility. You can also select the Provider Type by selecting the
drop-down option. *If you are adding a dialysis facility to the patient's record, you'll need to mark the facility as primary to
populate some of the patient reports
OTTR™ Version 6.0 User Manual
2012 OTTR™ Chronic Care Solutions
54
All information contained herein is confidential and proprietary to OTTR™
Chronic Care Solutions and is being distributed for training purposes only.
Adding a New Medical Facility to the Database
If, during the initial search for the provider, it was determined they weren't listed in the database, you can add them if you
have the proper permissions assigned. Select the Add New Provider option. You can also select the New button in the
Provider Search window.
Once you've selected Add New Provider (or the New button from the Search window), you'll be re-directed to the New
Provider window. Fill out all applicable areas and select the Save & Close option. *To designate the Facility Type, select an
option under This Facility has:
OTTR™ Version 6.0 User Manual
2012 OTTR™ Chronic Care Solutions
55
All information contained herein is confidential and proprietary to OTTR™
Chronic Care Solutions and is being distributed for training purposes only.
Alerts and Allergies
Allergies
Allergies can be viewed on the Patient Review window. Allergies can be accessed using the Allergies hyperlink or from the
Add Master Menu, select Allergy.
To modify an existing allergy, double click on the row that you want to modify to open up the Allergy window. To add a
new allergy click the New Allergy button.
Select the Type and Severity of allergy using the dropdown boxes.
OTTR™ Version 6.0 User Manual
2012 OTTR™ Chronic Care Solutions
56
All information contained herein is confidential and proprietary to OTTR™
Chronic Care Solutions and is being distributed for training purposes only.
Use the Set button next to the Allergy field to search for the name of the allergy. Highlight your selection and click OK or
double click on the selection.
Note: You have to first select the Type of allergy prior to entering the name. The search box displayed is determined by
the allergy type.
The Identified On date will populate with "today's" date. The Reaction field can be filled in via free text entry.
Click the Mark Reviewed By button to populate the date and name of the logged in user. Some sites may use this feature if
a non-clinical person is entering the allergies, a member of the clinical staff will verify and mark reviewed.
Save & Close when finished.
OTTR™ Version 6.0 User Manual
2012 OTTR™ Chronic Care Solutions
57
All information contained herein is confidential and proprietary to OTTR™
Chronic Care Solutions and is being distributed for training purposes only.
Alerts
Alerts are social, financial, clinical, and communication related and can be viewed on the Patient Review window. Alerts
can be accessed using the Alerts hyperlink or from the Add Master Menu, select Alert.
To modify an existing alert, double click on the row that you want to modify to open up the Alert window. To add a new
alert click the New Alert button.
The Effective Date will populate with "today's" date.
Select the Type of alert from the dropdown box.
The Made By field will populate with the name of the logged in user.
When the alert is no longer valid or to end the alert, put a check in the End Alert and the Ended Date will populate with
"today's" date.
Free text the specifics of the alert into the free text area.
Save & Close when finished.
OTTR™ Version 6.0 User Manual
2012 OTTR™ Chronic Care Solutions
58
All information contained herein is confidential and proprietary to OTTR™
Chronic Care Solutions and is being distributed for training purposes only.
Find Patient
After logging into the OTTR™ system, the most common step is to locate a patient. This section will explain how to locate a
patient using the Find Patient option. When searching for a patient, you'll more than likely need more than the basic
information to determine if you are selecting the correct patient. The following setup will help you in making that
determination.
Quick Find
Most of the icons associated with your toolbars are grey or inactive until you've opened the patient record. Click the Find
Patient icon to open the Quick Find search window.
This window allows you to search the OTTR™ system for patients, care providers, facilities, or anything with the search
criteria you type in the search textbox. To default back to the original Patient Search window, select the Adv. Find option at
the bottom of the Quick Find window.
OTTR™ Version 6.0 User Manual
2012 OTTR™ Chronic Care Solutions
59
All information contained herein is confidential and proprietary to OTTR™
Chronic Care Solutions and is being distributed for training purposes only.
Advanced Find
This Advanced Find window allows you to search the OTTR™ system for patients with the search criteria you type in the
search textbox. To default back to the Quick Find window, select the Quick Find option at the bottom of the Advanced Find
window.
Options
Use the Options button to display other identifiers next to the patient name when your search results are returned. Once
selected, these options remain in place for all future patient searches until manually unselected.
Example: You have multiple patients with the same first and last name. You also have discovered that this patient has
the same date of birth. There are also some identifiers within OTTR™ that are unique such as MRN and SSN. If you selected
those in Options, these numbers would display as well to assist you with your search.
Once you you've chosen your options, select OK and to return to your Quick Search or Patient Search window. To search
for a patient, you have fields in the top portion of the original Patient Search window such as First Name, Last Name, OTTR
ID, MRN, etc. You can place data in one of those fields and select Begin Search.
OTTR™ Version 6.0 User Manual
2012 OTTR™ Chronic Care Solutions
60
All information contained herein is confidential and proprietary to OTTR™
Chronic Care Solutions and is being distributed for training purposes only.
If you're in the Quick Search window, start typing the name of your patient in the textbox and then select the Search option.
Once you've located the correct patient, you can highlight the line item with your cursor. You now have access to their
record from the Master Menus or Toolbar Icons. To open the Patient Review window, there are a few options; double-click
on the row, highlight the line item and select OK at the bottom right of the screen (Open in Quick Find), or highlight the line
item and select the Review icon.
OTTR™ Version 6.0 User Manual
2012 OTTR™ Chronic Care Solutions
61
All information contained herein is confidential and proprietary to OTTR™
Chronic Care Solutions and is being distributed for training purposes only.
Patient Review Window
The Patient Review Window shows you the most commonly accessed areas of the patient’s record, providing an "at a
glance" overview.
This section is
commonly
referred to as
the Demo Strip
as it holds a lot
of the Patient’s
demographic
information.
The top portion
of any window
opened consists
of the Master
Menus and
Toolbar Icons
The bottom
portion of the
Review Screen
holds Labs,
Diagnosis,
Actions,
Medications
and Progress
Notes.
The Patient Review Screen consists of several Hyperlinks that are designed to take you to the area of the application that the
information is being pulled from.
Example: By selecting the
Transplants hyperlink, you will
be brought to the Transplants
window.
OTTR™ Version 6.0 User Manual
2012 OTTR™ Chronic Care Solutions
62
All information contained herein is confidential and proprietary to OTTR™
Chronic Care Solutions and is being distributed for training purposes only.
As mentioned earlier, Icons are also available from the Patient Review Screen. Icons are a one-click method of accessing a
specific area of a patient’s record. Selecting the icon opens a larger window view of the application. Some of the icons have
a drop-down arrow beside them which will allow you to quickly add or access other areas of the application.
Example: By selecting
the Demo Icon you will
be directed to the
Demographics screen
for that patient.
Example: By selecting the drop-down arrow and the option next
to the Demo Icon, you will be directed to the Death Info for that
patient.
The Patient Review Screen might be different based on the type of patient you have selected. Donor patients have a
separate Review Screen than Recipients. Your OTTR™ Administrator may also configure custom Review Screens based on
the needs of your site.
The Donor
Demo strip
includes
Transplant
Recipient
information
The bottom
portion of the
Donor Review
Screen holds
Labs,
Diagnosis,
Actions,
Medications
and Progress
Notes.
OTTR™ Version 6.0 User Manual
2012 OTTR™ Chronic Care Solutions
63
All information contained herein is confidential and proprietary to OTTR™
Chronic Care Solutions and is being distributed for training purposes only.
Problem List - Diagnosis
This section explains the difference between the referring diagnosis and the primary diagnosis while instructing you on how
to enter the primary diagnosis, or the diagnosis driving the need for a transplant. During the referral process, the referring
provider’s diagnosis is entered into the system via the New Patient Referral form. This diagnosis remains until it's changed
by a clinical team member to reflect what the transplant physician has determined to be the patient’s primary diagnosis.
To enter the primary diagnosis, select the General Medical/Primary Diagnosis icon
.
To add a Primary DX or to change the diagnosis from that of the referring provider, select the Change button to search for
the primary diagnosis desired. The primary diagnosis entered should be what is driving the need for a transplant and reflect
the appropriate UNOS code. This is especially important for populating the TEIDI forms correctly. The primary diagnosis
displays in the Demo Strip area of the Patient Review window.
OTTR™ Version 6.0 User Manual
2012 OTTR™ Chronic Care Solutions
64
All information contained herein is confidential and proprietary to OTTR™
Chronic Care Solutions and is being distributed for training purposes only.
Problem List
This section explains how to document the on-going problems or diagnoses which a patient will have during the transplant
process. These diagnoses are displayed in the following area of the patient’s record.
Add Diagnosis
hyperlink
To add a new diagnosis to the patient’s Problem List, select the Add Diagnosis hyperlink or the Add Diagnosis option from
the dropdown next to the Problem List icon.
Search for the desired diagnosis in the Search Text box, highlight and click OK or just double click to open the New
Diagnosis window. Note: If you can't find the diagnosis you're looking for, click the More button and repeat your search.
The More button provides access to all options available in the database.
OTTR™ Version 6.0 User Manual
2012 OTTR™ Chronic Care Solutions
65
All information contained herein is confidential and proprietary to OTTR™
Chronic Care Solutions and is being distributed for training purposes only.
Based on your Roles and Permissions, you might be prompted to select a provider who made the Diagnosis.
Type in the full or partial last name of the provider and click the Begin Search button. Highlight your choice and click OK,
or just double click on the provider. If the provider is one you use often, after you highlight the provider, click Add Favorite.
You can also narrow down your options at the top, prior to searching, by selecting Favorites, My Programs, and All Users.
Diagnosis: Displays the selected diagnosis from the previous window.
ICD Code: If entered in the database, it will display here.
Diagnosis Date: Defaults to today’s date but can be adjusted if the diagnosis was made on an earlier date.
OTTR™ Version 6.0 User Manual
2012 OTTR™ Chronic Care Solutions
66
All information contained herein is confidential and proprietary to OTTR™
Chronic Care Solutions and is being distributed for training purposes only.
Made By: Defaults to the user's name currently logged into OTTR™ if they have permissions to add diagnoses. If not, the
user will be required to enter the providers name who made the diagnosis.
Closed Date: Enter the closed or ended date if the diagnosis is no longer active.
Closed By: Select the Change button to select the desired provider responsible for ending the diagnosis.
Close Entered By: Enters the user’s name that closed this diagnosis in this window.
State: Select the drop-down arrow to change the state. For example, Confirmed would represent a true diagnosis for the
patient, Verified Negative would represent a situation in which a diagnosis was ruled out. A diagnosis will remain yellow
until confirmed.
Inactive Problem: To mark a problem as inactive, place a check mark with that option box.
Inactive Date: Defaults the date which the check mark was placed in the Inactive Problem box.
Comment: The clinician may enter a comment about the selected diagnosis if desired. This is a free text field.
Signoff: Select Signoff to signoff the diagnosis if applicable to your site.
Once entered, your diagnosis will appear in the patient review window or can be accessed through the problem list
icon. In the Problem List window, you can sort by All, Active, or Inactive Diagnoses.
OTTR™ Version 6.0 User Manual
2012 OTTR™ Chronic Care Solutions
67
All information contained herein is confidential and proprietary to OTTR™
Chronic Care Solutions and is being distributed for training purposes only.
You can change the state of a diagnosis by selecting the diagnosis and utilizing right-click to display the selection options.
The user may select:
Confirmed
Data Conversion
Eliminated/Not Confirmed
Previous Medical/Surgical History
Tentative/Preliminary
Verified Negative
To change the diagnosis from active to inactive, select the desired diagnosis and perform the right click option as described
above.
To signoff a diagnosis, highlight the desired diagnosis and perform the right click option as described above. Click on the
Signoff option.
In addition to the other options, you can also change the view with the right click option to see Active, Inactive or All
Diagnoses.
OTTR™ Version 6.0 User Manual
2012 OTTR™ Chronic Care Solutions
68
All information contained herein is confidential and proprietary to OTTR™
Chronic Care Solutions and is being distributed for training purposes only.
Actions
This section provides an overview of Actions including how to add an action, scheduling, authorizations, and marking an
action as done. It also explains the difference between standard actions and those related to an evaluation.
What are Actions?
Actions represent tasks for the clinical staff
Actions also represent tests/orders that need to be scheduled and completed
Actions are used to indicate the status of a Lab or Document review
Actions are a visual clue as to where the patient is in the transplant process and help to drive your workflow
Actions can be pulled into a report or letter
Like many areas of the OTTRTM application, there are several ways of entering an action to a patient’s record.
The Actions icon has a drop-down arrow next to it that allows you to add a new Action
The Add Action hyperlink on the Patient Review window
OTTR™ Version 6.0 User Manual
2012 OTTR™ Chronic Care Solutions
69
All information contained herein is confidential and proprietary to OTTR™
Chronic Care Solutions and is being distributed for training purposes only.
Adding an Action
From the Add Master menu you can select Action, then the category, then the individual action.
Begin typing the name of the action in the Search Text field. The displayed list will limit down to what has been typed.
Double click on the desired action once it appears or highlight the action and click OK. The Action window will open.
Note: Remember to use the More button and repeat your search if you don't find the action that meets your needs on initial
search.
OTTR™ Version 6.0 User Manual
2012 OTTR™ Chronic Care Solutions
70
All information contained herein is confidential and proprietary to OTTR™
Chronic Care Solutions and is being distributed for training purposes only.
1. Action Tab
Action – Title of action being added.
Action Date – Date the action was added to the patient record.
Urgency- Click the drop-down arrow to select the desired level. If you select 'Delay Scheduling', make a note in the
comment section indicating the reason for the delay. By marking Store as a Progress Note, the comment will display in the
notes section on the Patient Review window.
Ordered By – Click the Change button to select the ordering physician.
Schedule Date – Click the Schedule button located at the bottom of the window to activate this field. Type in the date and
time or use the green calendar to set the date and time. Note: It’s important to have the correct date and time of a
scheduled test if you distribute or use the Patient Calendar .
Done Date – To mark an action done, click the Mark Done button located at the bottom of the window. This defaults
today’s date into the field. To change the date click on the calendar icon. Mark the action as done only after you've
received the results of the test or consultation, or the patient has arrived for the appointment in the case of a clinic visit.
Store as Progress Note – If you place a checkmark in the Store as Progress Notes box, once the action has been saved, an
Edit Note hyperlink will be visible and your comments will display on the Patient Review window. If you select the hyperlink,
you'll be re-directed to the corresponding Progress Note where you can edit the note and/or send it as an email.
OTTR™ Version 6.0 User Manual
2012 OTTR™ Chronic Care Solutions
71
All information contained herein is confidential and proprietary to OTTR™
Chronic Care Solutions and is being distributed for training purposes only.
Outcome – This area becomes active once an action has been marked done. Click on the drop-down arrow to make a
selection.
Responsible Person – Click the Change button to select the person you wish to assign as the Responsible Person. Once
assigned, this action displays on that individual's My Pending Actions list.
Comment – You can free-text a comment regarding this action in the comment box. Note: During the evaluation phase,
many sites choose to paste the abbreviated results or impression of the ordered action in the comment field area. This will
populate on the evaluation report and assists in presenting the patient during selection committee meetings.
Spell Check: This area allows you to check the spelling of your comment. Select the Spell Check button and OTTR will
display any blocked and misspelled words.
The Reschedule button at the bottom becomes active once the test has been scheduled. Click the Reschedule button in the
event the test needs rescheduled to activate the Schedule Date field.
OTTR™ Version 6.0 User Manual
2012 OTTR™ Chronic Care Solutions
72
All information contained herein is confidential and proprietary to OTTR™
Chronic Care Solutions and is being distributed for training purposes only.
2. Instructions Tab
Location – Click the Change button to select the location where this action is to be completed.
Patient Instructions – Enter the instructions desired.
Favorites– If the instructions written will be used for other actions in the future, click the Favorites button to save the
instructions.
Add Favorites – To enter instructions which have been previously added to your favorites list, click the Add Favorites button.
3. Signature Tab
Entered By - Displays the name of the person who entered the action.
Marked Done By - Displays the name of the person who marked the action as done.
Scheduled By - Displays the name of the scheduler.
Signoff Date / Signed Off By - This tab is utilized at sites that require a physician sign-off on actions. To sign-off an action
the physician must select the Signoff button. Their name will display in the Signed Off By field and the Signoff Date field will
display the date of signoff.
OTTR™ Version 6.0 User Manual
2012 OTTR™ Chronic Care Solutions
73
All information contained herein is confidential and proprietary to OTTR™
Chronic Care Solutions and is being distributed for training purposes only.
4. Authorization Tab
Financial personnel can utilize this tab to document information about the authorization number provided by a patient’s
insurance provider. Some sites won’t schedule certain actions (tests) until an authorization number has been entered or a
comment has been made stating to do so. Each site determines their own workflow and how they wish to utilize the
features in OTTR™.
Authorization Date - Enter the date that the authorization starts.
Payer - Use the Pick button to select from the appropriate insurance company.
Authorization Number - The authorization for the test, procedure or transplant phase is entered here.
Authorization Comment - Use this area to free text any additional comments.
OTTR™ Version 6.0 User Manual
2012 OTTR™ Chronic Care Solutions
74
All information contained herein is confidential and proprietary to OTTR™
Chronic Care Solutions and is being distributed for training purposes only.
Standard Actions
You can highlight
multiple actions within
the list and utilize your
right-click functions
here. HUGE time
saver!!
Standard actions are actions ordered for a patient which are not ordered as part of an Evaluation.
Actions in OTTRTM are monitored through patient lists and help drive your workflow. Standard actions that are ordered for a
patient will display in Yellow on the Actions – Pending Unscheduled list. The individual responsible for scheduling will use
this list to schedule the standard patient actions. The ordering person may enter a comment to clarify how an action needs
be scheduled or if a specific provider has been requested. Once an action has been scheduled, select the Refetch button
and that action will fall off the list.
The Actions – Pending Actions Not Done List is for actions that have a scheduled date but have not been completed. They
display Blue until marked done . Clinicians monitor this list by the date scheduled to determine if results are missing or if
patients have missed a scheduled appointment.
The Pending Actions-All List displays actions not scheduled and not marked done all on one list.
Limit tab - allows you to enter parameters to limit your list.
Data tab - displays the list information.
Description tab - supplies a description of how the list is populated and cleared.
Tracking tab - allows you to add the list to your tracked lists to be displayed in your Message of the Day window.
Columns in the list can be sorted by column header or moved using click and drag functionality .
OTTR™ Version 6.0 User Manual
2012 OTTR™ Chronic Care Solutions
75
All information contained herein is confidential and proprietary to OTTR™
Chronic Care Solutions and is being distributed for training purposes only.
Evaluation Actions
Evaluation actions are ordered specifically for a patient’s Evaluation for transplant or ventricular assist device. When adding
an evaluation, an Order Set window appears allowing the transplant or VAD coordinator to select or de-select the required
actions for the patient.
These actions display on the standard actions lists, as well as on the Actions - Pending Pre-Testing Eval-Unscheduled list and
utilized by the scheduler. Once scheduled, the actions fall on the Actions - Pending Pre-Testing Eval-Not Done list until
completed and marked done. This allows you to view just the actions associated with the evaluation if needed. Once the
items on this list are completed and marked done, the clinician can present the patient at their upcoming selection
committee meeting.
Note: Refer to the Lists and List Functionality document for detailed list management.
OTTR™ Version 6.0 User Manual
2012 OTTR™ Chronic Care Solutions
76
All information contained herein is confidential and proprietary to OTTR™
Chronic Care Solutions and is being distributed for training purposes only.
Evaluation Report
After adding an evaluation for transplant or ventricular assist device, the actions that are ordered and attached to the
evaluation will display on the Evaluation Report. As actions are completed during the evaluation process, many sites will
copy and paste the final impression of the test into the comment section of the action. This allows you to quickly view the
test result on the Patient Review window, and it prints on the evaluation report next to the action. You'll have access to the
full detailed results under Text Docs if needed.
OTTR™ Version 6.0 User Manual
2012 OTTR™ Chronic Care Solutions
77
All information contained herein is confidential and proprietary to OTTR™
Chronic Care Solutions and is being distributed for training purposes only.
Order Sets
Order Sets, or action macros, are a group of actions, medications or a combination of both. These items are entered on
one form and are then distributed throughout the patient’s record. Examples include discharge, referral, prednisone taper,
etc.
Access them through the Add Master Menu, select Action Macro or Medication Macros, then the order set of your choosing.
Clinicians who repeatedly order the same actions for a specific type of visit may request that an action order set be created
listing the most common actions ordered for a visit type.
The Order Set can either be entered in Simple Mode or in the Original Order Set mode which is a more detailed form.
Start Date – Use the Green Calendar button to modify the start date. All actions will start on the selected start date.
Ordered/Prescribed By – Defaults to the users name. Use the Change button to modify the field.
Entered By – Displays the name of the clinician entering the macro.
Click the Details button near the bottom of the window to open a the detailed view and customize any of the actions in the
macro.
OTTR™ Version 6.0 User Manual
2012 OTTR™ Chronic Care Solutions
78
All information contained herein is confidential and proprietary to OTTR™
Chronic Care Solutions and is being distributed for training purposes only.
This Order Set window allows you to customize the actions in the action macro.
Un-check the Action box on any actions you don’t want added to the patient’s record.
Action – This field populates with the date entered in the Start Date field above. You can modify the date you want the
action to start using the Green Calendar button next to the field.
Schedule – If you know the date that the action is scheduled to occur, you can enter the schedule date and time using the
Green Calendar button. Otherwise this will be left blank until the action is scheduled.
Done - This field will be left blank until the action is completed and marked done.
Location – Modify the location where the action is to occur using the button next to the field.
Comment – Add any comment in this field.
Pt Instructions – Click to enter any instructions for the patient.
Fav Pt Instructions – Click to view any saved favorite instructions, then add the appropriate instructions from the list.
Save & Close when you're finished.
OTTR™ Version 6.0 User Manual
2012 OTTR™ Chronic Care Solutions
79
All information contained herein is confidential and proprietary to OTTR™
Chronic Care Solutions and is being distributed for training purposes only.
Labs
This section explains the difference between interfaced labs and manual lab entry. It also details how to mark a lab as
having been reviewed, to enter lab results, and how to graph the results. Although the majority of your labs should be
automatically populated in OTTR™ through interfaces, there are some labs that may require manual entry.
Labs results are grouped and displayed on flowsheets which can vary by the type of phase the patient is in, pre -transplant
vs. post-transplant, or by the lab type such as CBC, Chem 7 ,etc.
If you need to enter a lab result to a patient’s record, you can utilize the Add Lab hyperlink on the Patient Review window,
the Add Master Menu or the Add Lab option from the Lab Icon drop down.
Date of Lab: Select the calendar to enter the date and the lab was completed. You may also type in the date or use your
+/-1 function. This information should match the date and time on the physical copy of the lab results sheet.
Lab fields: Manually type in the appropriate results.
OTTR™ Version 6.0 User Manual
2012 OTTR™ Chronic Care Solutions
80
All information contained herein is confidential and proprietary to OTTR™
Chronic Care Solutions and is being distributed for training purposes only.
Lab Provider: Select the Change button to choose the lab provider. This is required prior to saving.
Lab Type: Select the drop-down arrow to select the lab type. This is required prior to saving.
Flowsheet Values Tab: Fields displaying on the Flowsheet Values tab are labs that belong to that particular flowsheet. In the
instance above, it's the flowsheet that displays on the Patient Review window.
All Values Tab: The All Values tab displays all lab fields currently available in the database, listed in alphabetical order.
New lab fields may be added to OTTR™ by the administrator if needed.
OTTR™ Version 6.0 User Manual
2012 OTTR™ Chronic Care Solutions
81
All information contained herein is confidential and proprietary to OTTR™
Chronic Care Solutions and is being distributed for training purposes only.
Flowsheets
If entering external labs, the easiest way to do so is to enter them through a flowsheet. Only fields defined for that type of
lab grouping will display in the entry screen. To enter labs on a flowsheet the select the Patient Master Menu, select Chart,
select Flowsheet, then select the desired Flowsheet type.
Click to add new results
Notice how only the lab fields
associated with a Chem 7 are
available to populate.
Within the flowsheet window select the Add button to display the New Lab Data window and follow the directions above for
entering results.
Once values are entered into a specific flowsheet, such as Chem 7, these results may not be displayed on the Patient Review
window if they aren't configured to display on that flowsheet. The flowsheet displayed in the Patient Review that may vary
based on the patient’s Program, Treatment Phase and Patient Status.
OTTR™ Version 6.0 User Manual
2012 OTTR™ Chronic Care Solutions
82
All information contained herein is confidential and proprietary to OTTR™
Chronic Care Solutions and is being distributed for training purposes only.
Labs All
To see all labs associated to a patient’s record select the Patient Master Menu, select Chart, then select Labs (all). This will
display all entered labs that have an associated patient labs field.
Misc Labs
In the event that you don't find an expected lab either on the main Patient Review window flowsheet or in the Labs(all) area;
the Misc Labs should be checked. Misc Labs holds all lab results whether they have been hand-entered or interfaced. Misc
Labs consist of results and comments. In the event that you locate the result in Misc Labs, you'll need to contact your OTTR™
Administrator so that the lab can be properly mapped to the flowsheet. The easiest way to access Misc Labs is by utilizing
the Labs icon dropdown.
OTTR™ Version 6.0 User Manual
2012 OTTR™ Chronic Care Solutions
83
All information contained herein is confidential and proprietary to OTTR™
Chronic Care Solutions and is being distributed for training purposes only.
The Fetch Limits area of the window will allow you to select a specific date range for the result/s you are looking for. The
Lab Types area allows you to select the type of lab you wish to see (all are checked by default). Sorting can also be
accomplished by selecting the column headers.
Patient Serology
Access serologies using the dropdown next to the Lab icon, or from the Patient Master Menu, select Chart, select Serology.
The Serology flowsheet has 2 tabs, Latest and Historical. The Latest tab shows the most recent results. The Historical tab
shows all of the values that have been entered on this flowsheet. To enter a new result, select the New Result button at the
bottom of either window. The Refetch button act will refresh the screen after looking for any new entries.
OTTR™ Version 6.0 User Manual
2012 OTTR™ Chronic Care Solutions
84
All information contained herein is confidential and proprietary to OTTR™
Chronic Care Solutions and is being distributed for training purposes only.
Lab Graphing
If you would like to see a graphical view of a selection of labs, you can do so from any flowsheet that has the graph icons
icon
available.
Select the labs you wish to graph by holding down your Ctrl key and selecting the columns of the lab. Once you have
selected the labs you want to see, select the graph icon
.
Lab columns can also be arranged to your liking. Highlight the column you want to move and use click and drag
functionality to move the column. When you exit the application, the columns will revert back to their original order.
The Lab Data window will display the selected labs in a graphical view. You have the ability to select the type of view by
utilizing the tools area.
OTTR™ Version 6.0 User Manual
2012 OTTR™ Chronic Care Solutions
85
All information contained herein is confidential and proprietary to OTTR™
Chronic Care Solutions and is being distributed for training purposes only.
Marking Labs Reviewed
When labs are received across an interface or are manually entered, they must be reviewed by the transplant coordinator.
All new labs will display as yellow until reviewed. Once reviewed, inpatient labs will display as a dark pink, and outpatient
labs will display as green.
There are two ways that labs can be marked as reviewed, on the Awaiting Coordinator Review list, and the Mark Reviewed
button in the bottom of the Patient Review window. You can also mark the patient reviewed from the Patient Review window.
There is an option on the bottom-right of the screen called Mark Reviewed.
Note: Be sure to review all new data before marking the patient reviewed as this not only marks labs as reviewed, but also
any new documents or other information that has been entered into the patient record since the last review.
Click here to access the
'mark reviewed' action.
This area will list all
items to review.
Highlight each area and
review prior to marking
reviewed.
Information to review will
populate here. The
information will change
depending on what is
highlighted to the left.
Hold for lab completion
In the Awaiting Coordinator Review list, highlight the row of the patient who's information you want to review. Select the
appropriate Mark Reviewed option. This will place an action on the patients chart. If you want to add a comment to the
action, select the Actions icon which will take you to the list of actions for the patient.
If you're waiting on a particular lab to be resulted, you can click the Hold button to add the patient to the Holding for Lab
Completion list. You may have to place this patient on hold several times before all labs are entered which they must
review together prior to making a determination and marking the patient as having been reviewed.
OTTR™ Version 6.0 User Manual
2012 OTTR™ Chronic Care Solutions
86
All information contained herein is confidential and proprietary to OTTR™
Chronic Care Solutions and is being distributed for training purposes only.
After completing your review, you can exit the list, or use the Previous and Next button to review the next patient's items.
Selecting the Refetch button will allow the patient to fall off the Awaiting Coordinator Review list once 'Marked Reviewed'.
In the bottom of the review window, you'll see the same Mark Reviewed button and functionality.
OTTR™ Version 6.0 User Manual
2012 OTTR™ Chronic Care Solutions
87
All information contained herein is confidential and proprietary to OTTR™
Chronic Care Solutions and is being distributed for training purposes only.
Text Documents
This section explains how to create and attach new text documents and how to review existing text documents within a
patient record. If an interface such as Pathology or Radiology is present, text documents are created when the report is sent
across an interface. They may also be designed to match your facility's standard forms allowing you to document manually
on the form and track the forms electronically. Signed consent forms and written insurance approvals will be scanned and
attached to a patient record through Text Documents.
Text documents can be added using the
icon or from the Add Master Menu. To add a new text
document select the Add Master menu and highlight Text Documents. Select the type of document you want to add.
The desired text document window opens where the clinician will enter the information to be saved.
OTTR™ Version 6.0 User Manual
2012 OTTR™ Chronic Care Solutions
88
All information contained herein is confidential and proprietary to OTTR™
Chronic Care Solutions and is being distributed for training purposes only.
Summary text box
Body
The format of a standard text document consists of:
Document Date – Displays the date the document was created.
Date Last Modified – Displays the date the document was last modified.
Last Modified By – Displays the name of person who last modified it.
Revision History – Displays the number of revisions to the document.
Number of attachments – Displays the number of attached documents.
Summary text box – Users should enter a short summary of what the document contains. This distinguishes reports
and assists others when searching for specific information.
Body – Large free text field area for entering content. You can also copy and paste information in this field. For
example, if you have a result that you've received electronically, you can copy and paste the impression in the body
and then attach the full document using the Add hyperlink.
Add hyperlink – Allows users to attach electronic files to the text document. After selecting Add, choose the
document from the folder in which it resides
Note: Fields shown may vary depending upon the type of document selected.
OTTR™ Version 6.0 User Manual
2012 OTTR™ Chronic Care Solutions
89
All information contained herein is confidential and proprietary to OTTR™
Chronic Care Solutions and is being distributed for training purposes only.
Revision History
Revision History
Text documents can be modified or revised and those revisions are tracked. To view a text document's revision history,
select the Revision History tab. Select the revision you wish to view and click on the Compare to Current button. If there are
more revisions, you can also select Compare to Next which will show the next revision.
What was originally written displays in red (-) and what it was changed to displays in blue (+). You can also see the
modified date as well as the person making the modification.
OTTR™ Version 6.0 User Manual
2012 OTTR™ Chronic Care Solutions
90
All information contained herein is confidential and proprietary to OTTR™
Chronic Care Solutions and is being distributed for training purposes only.
Deleting and Retrieving Deleted Documents
If a text document is added to the wrong patient record it can be deleted from the clinical view, however, it's not deleted
from the patient’s record. To delete a text document, open the document and enter a statement in the summary or body of
the document stating why it's being deleted. Select the Delete option in the lower left corner of the window. You will be
prompted to confirm the deletion with an Alert box. Decide whether to Delete or Cancel, then Save & Close.
To review a text document’s content, select the Text Docs icon or the All Docs button on the Patient Review window.
OTTR™ Version 6.0 User Manual
2012 OTTR™ Chronic Care Solutions
91
All information contained herein is confidential and proprietary to OTTR™
Chronic Care Solutions and is being distributed for training purposes only.
Viewing Text Documents
Highlight the desired document. You can quickly view information in the contained within the document, in the lower
portion of the window, without having to fully open it.
Show deleted documents
Auto-preview most recent
Reverse preview order
To open the text document, double click on it. Placing a checkmark in the Reverse preview order changes the order of the
displayed data in the lower portion of this window based upon the document date. Entering an amount in the Auto-preview
most recent tells the system how many of the most current text documents you wish to display in the lower portion of this
window.
To view deleted text documents place a checkmark in the Show Deleted Documents box located in the upper left corner of
the window.
OTTR™ Version 6.0 User Manual
2012 OTTR™ Chronic Care Solutions
92
All information contained herein is confidential and proprietary to OTTR™
Chronic Care Solutions and is being distributed for training purposes only.
Progress Notes
This section reviews how to add, edit, revise, delete and email Progress Notes. Progress notes can be used for updating staff
about patient care, staff communication, or email reminders for certain tasks or updates. Note: If the update involves a
phone conversation with the patient, you may want to enter a telephone encounter to document the information vs. a
progress note. Once a progress note is written, it can be deleted from the care provider view, but it's not permanently
deleted from the patient's record. There are several ways of entering a Progress Note:
Select the Add Note hyperlink from the Patient Review window
Select the drop down arrow for the Notes icon then select Add Progress Note
Or you can select the Progress Notes button on the Patient Review window
From the Add Master menu, select Progress Note or use Ctrl + N (hold down your Ctrl key and select your N key)
Once you've selected an option for adding a Progress Note, you'll be directed to the New Progress Note window.
OTTR™ Version 6.0 User Manual
2012 OTTR™ Chronic Care Solutions
93
All information contained herein is confidential and proprietary to OTTR™
Chronic Care Solutions and is being distributed for training purposes only.
Comment Type: Select the drop-down arrow to select the type of progress note which will be entered. This
categorizes the notes and allow them to be displayed by comment type. Enter the note in the free-text box provided. Save
and Close. You'll see the progress note displayed on the Patient Review window.
To edit a Progress Note, select the hyperlink for that note. The hyperlink displays the date, time and care provider’s initials
who wrote the note. Make the desired edits to the progress note, Save & Close. Notice that the edited progress note now
displays as having (1 revision). Select the hyperlink for the progress note to view the revisions made (identical to Text
Document revisions).
OTTR™ Version 6.0 User Manual
2012 OTTR™ Chronic Care Solutions
94
All information contained herein is confidential and proprietary to OTTR™
Chronic Care Solutions and is being distributed for training purposes only.
You have the ability to write a progress note and send it as an email reminder.
Example: You could write a progress
note updating a care provider on the patient’s status (medical or financial). To email the progress note, select the Email
Reminder tab.
Select Add to choose the mail recipient. The Send email now field is automatically checked. If you don't want to send it upon
saving, deselect this option. To send the email in the future, select Send email later on date and enter the date you want the
email sent within your hospital’s email account. *Note: Both the recipient and sender need a valid email address in order to
send/receive mail. The recipient won't be able to reply to the email, the email is only outgoing from OTTR TM.
If a progress note is written in the wrong patient record it can be deleted from view. Open the progress note and enter a
comment at the end of the note indicating why the note was deleted. You'll then need to Save & Close, then re-open the
note. Select the Delete button. You'll be prompted on whether or not you want to complete the deletion of the Progress
Note. Select Continue then proceed to Save & Close.
To view deleted notes click on the Notes icon. Place a checkmark in the Show Deleted Notes box in the upper left portion of
the window.
OTTR™ Version 6.0 User Manual
2012 OTTR™ Chronic Care Solutions
95
All information contained herein is confidential and proprietary to OTTR™
Chronic Care Solutions and is being distributed for training purposes only.
Notice the deleted note displays with a line through the text. The notes can be additionally sorted by Comment Type using
the drop-down box to choose a type.
OTTR™ Version 6.0 User Manual
2012 OTTR™ Chronic Care Solutions
96
All information contained herein is confidential and proprietary to OTTR™
Chronic Care Solutions and is being distributed for training purposes only.
Scanned Documents
When scanning received outside records it is best to group information being scanned together in a manner which will
expedite the review of the documentation. For example, lab results, visit history, radiology reports, or consults.
Within the Summary or the Body of the text document a statement can be made about the received medical records. If key
information should be highlighted then make a statement about it within the Summary Line of the text document.
In order to attach scanned documents in OTTRTM you'll need to scan the image or document and save it to a local drive.
*See your IT department for scanning/copying.
Once you've saved your scanned item to a local drive, you can attach it to a Text Document in OTTRTM. Open the document
you'd like to attach your scanned item to or create a new Text Document. Scroll to the bottom of the window to click on the
Add hyperlink. Navigate to where you've saved the scanned document or image. Highlight the desired file and click the
Open button. Once you see that the document's attached, click the Save & Close button.
OTTR™ Version 6.0 User Manual
2012 OTTR™ Chronic Care Solutions
97
All information contained herein is confidential and proprietary to OTTR™
Chronic Care Solutions and is being distributed for training purposes only.
Info Documents
This section explains how to find and print info documents. Many of your facility's standard documents have been added to
OTTR™. These documents may be printed and given to patients for educational or informative purposes, such as a manual
or consent form. Utilizing the master menu, select Tools, drop down to Info documents and select the desired document.
The software utilized at your facility to open the selected document will begin to run i.e. PDF viewer.
Confirm the desired document has opened. Click on File\Print option in your facility's approved software. The default printer
name set for the local computer will display. Click on the Ok button to print.
OTTR™ Version 6.0 User Manual
2012 OTTR™ Chronic Care Solutions
98
All information contained herein is confidential and proprietary to OTTR™
Chronic Care Solutions and is being distributed for training purposes only.
New Patient Referral
There are two options for entering a new patient into OTTRTM from the Find Patient icon.
The New
Patient Referral option is the most efficient way to enter patient specific information without navigating to multiple windows
in OTTR™; and is the recommended way to enter a recipient or living donor new referral to your program(s). The referral
form is divided into frames. Each frame has a header which defines the type of information being captured.
The New Patient option should be used when entering a deceased donor to the system in order to link to a recipient when a
transplant occurs.
What does the referral form do?
It adds a new patient into OTTR™.
It places the patient into the correct program and creates the referral record.
It captures insurance information and places the patient onto the financial coordinators Pending Benefits
Verification list.
It allows the user to enter the matching criteria required by the interface server to begin placing results within a
patient record.
It opens the referral record upon the saving and closing of this form.
Once the patient has been added to the database, interfaced results and documents will flow into the patient’s record.
Depending on the interfaces your site has purchased, OTTRTM can accept incoming messages from your facility’s sending
systems such as Lab, ADT, Radiology, Pathology and Transcriptions. *Prior to entering the New Patient Referral, it's
recommended that you search for the patient using the Find Patient icon to avoid a duplicate patient entry. If the patient is
already present in the system, you would update the demographic information and add a new referral using the Referrals
icon.
Select the drop-down arrow next to the Find Patient icon and select New Patient Referral. *You can also
select this option from the Tools master menu.
OTTR™ Version 6.0 User Manual
2012 OTTR™ Chronic Care Solutions
99
All information contained herein is confidential and proprietary to OTTR™
Chronic Care Solutions and is being distributed for training purposes only.
Once you've selected the New Patient Referral option, you will be re-directed to the New Referral window.
OTTR™ Version 6.0 User Manual
2012 OTTR™ Chronic Care Solutions
100
All information contained herein is confidential and proprietary to OTTR™
Chronic Care Solutions and is being distributed for training purposes only.
New Referral Form
The first, or General frame is your patient’s basic demographic information such as Name, Marital Status and Mother’s
Maiden Name. *You should enter as much information as possible into each frame, but in the event you are limited on
time, the minimum information needed includes name, date of birth, name of referring physician, and assigned program.
You'll have to enter the missing patient information at a different time using the demographics, insurance, and care
provides icons to complete the record.
The Birth frame is where you'll document the patient’s date of birth, location of birth and citizenship information.
Following the Birth frame is the Identifiers frame. Document the patient’s MRN, SSN or other site-defined Identifiers that are
known.
In the Programs frame, place your patient in the appropriate program. If the patient is being referred for more than one
type of transplant, place a check in the box next to each applicable program.
OTTR™ Version 6.0 User Manual
2012 OTTR™ Chronic Care Solutions
101
All information contained herein is confidential and proprietary to OTTR™
Chronic Care Solutions and is being distributed for training purposes only.
In the Employment frame, document the patient’s employment status and occupational details.
The Home Address frame is for documenting the patient’s current address information.
The Local Temp Address area is used to document the temporary address for the patient such as a Ronald McDonald house
near your facility.
The Education frame is to document the highest level of education for the patient and the year in school.
OTTR™ Version 6.0 User Manual
2012 OTTR™ Chronic Care Solutions
102
All information contained herein is confidential and proprietary to OTTR™
Chronic Care Solutions and is being distributed for training purposes only.
Use the Demographics frame to document the gender, race, ethnicity and functional status for the patient using choices that
correlate with UNOS data. Utilize the drop-down options for this area. You won't be able to free-text in areas that are
designated for drop-down selection.
The Other Contacts 1 frame is for documenting the patient’s next of kin, guardian, power-of-attorney, etc. The following
frame is an additional contact frame. Be sure to mark the emergency contact by placing a check in the Emergency box.
This allows the information to populate on the patient review window. *Note: If additional contacts need to be added, you
can do this in the patient’s demographic area.
The Phone frame is where you'll document the phone contact information for the patient such as home, work, mobile and
pager. There is also an area to document the email address for the patient. You can add additional numbers in the Other
Phone fields and free text a name or notes next to them.
OTTR™ Version 6.0 User Manual
2012 OTTR™ Chronic Care Solutions
103
All information contained herein is confidential and proprietary to OTTR™
Chronic Care Solutions and is being distributed for training purposes only.
The Referral frame is to document the referral date, organ type and the type of referral.
Use the Referral Diagnosis frame to document the referring Primary, Secondary and Tertiary diagnosis. Select the Change
button to open a search window for diagnoses, and select the appropriate diagnosis. *Note: If possible, select the diagnosis
that references a UNOS code as this will be the most official diagnosis and is utilized in our Registry tool to complete the
Teidi forms. *If the patient is being referred for a multi-organ transplant, put in the diagnosis that correlates with each
diagnosis.
The Referring MD frame allows you to associate the Referring MD to the patient’s record. You can't type into these fields,
instead you need to select the Attach button to open a provider search window to select the appropriate MD. Once you've
selected the Referring MD, also choose the Referring Relationship as Referring MD. There are 2 other frames to document
additional care providers such as Primary Care or Secondary Referring MD.
OTTR™ Version 6.0 User Manual
2012 OTTR™ Chronic Care Solutions
104
All information contained herein is confidential and proprietary to OTTR™
Chronic Care Solutions and is being distributed for training purposes only.
The Insurance 1 area is where you'll document the patient’s Primary Insurance if known. Select the Attach button to choose
an Insurance Provider and Plan. You can free-text the Policy Number, Group Number, Drug Plan Name and Case Manager
information or add them to the Insurance window at a later date. Click the Enter Patient as Policy Holder button, if
applicable, which auto-populates the information into the blanks if entered in the frame above. The following 2 frames are
to document Secondary and Tertiary Insurance Provider.
Use the Change button in the Coordinator frame to search for and add the primary coordinator for the patient.
The last frame is the Next window to view frame. This is where OTTRTM will re-direct you once you have selected the Save &
Close. The Referral window is recommended and set as a default so that you can add the referral event to the record.
However, you have the option to go to the patient’s Demographics, the Patient Review window or OTTRTM can close this
screen and not direct you anywhere after entering this information. *Note that the Revert button at the bottom of the window
clears all information that has been entered up to that point when selected.
OTTR™ Version 6.0 User Manual
2012 OTTR™ Chronic Care Solutions
105
All information contained herein is confidential and proprietary to OTTR™
Chronic Care Solutions and is being distributed for training purposes only.
Patient Demographics
After entering your referral, you may need to review, add or update information in the patient demographics to complete
the record. This section reviews how to access the patient’s demographic windows and how to attach or remove digital
images.
You can access the Patient Demographics window using the
icon or the Patient Master Menu.
A multi-tabbed patient demographic window opens and offers you the ability to update patient specific demographic
information. Information entered here flows throughout OTTR™ and displays automatically whenever those fields are
included within an active window. *Note this is the window that opens when you select the New Patient option to enter
deceased donor information.
General Tab
The first tab is the General tab. Information that's been entered into the New Patient Referral form will display. You can
update information as needed within the various tabs.
Add a Photo: Click on the Add Photo button and navigate to where you have saved the digital picture. Highlight the desired
digital image and click Open. The selected digital image will then display where you see No photo available. *Note: A
good size to save digital images is 300 X 300 dpi. To remove a photo, select the Clear Photo button.
OTTR™ Version 6.0 User Manual
2012 OTTR™ Chronic Care Solutions
106
All information contained herein is confidential and proprietary to OTTR™
Chronic Care Solutions and is being distributed for training purposes only.
Birth Tab
The Birth tab holds the patient’s date of birth, place of birth and citizenship information. Information is entered via free text
or drop-down if a black arrow is next to the field
. Dates can be entered via free text using the format of mm/dd/yy
or using the forward and back buttons in the green calendar
OTTR™ Version 6.0 User Manual
2012 OTTR™ Chronic Care Solutions
.
107
All information contained herein is confidential and proprietary to OTTR™
Chronic Care Solutions and is being distributed for training purposes only.
Employment Tab
The Employment tab holds the patient’s employment status and, if employed, the employer information.
Home Address Tab
The Home Address tab holds the patient’s current address and captures the distance from your facility if entered.
OTTR™ Version 6.0 User Manual
2012 OTTR™ Chronic Care Solutions
108
All information contained herein is confidential and proprietary to OTTR™
Chronic Care Solutions and is being distributed for training purposes only.
Local Temp Address Tab
The Local Temp Address tab holds the patient’s temporary address information if they live a distance from the center and
are temporarily staying at a local residence.
Education Tab
The Education tab holds the patient’s highest level of education and/or year in school.
OTTR™ Version 6.0 User Manual
2012 OTTR™ Chronic Care Solutions
109
All information contained herein is confidential and proprietary to OTTR™
Chronic Care Solutions and is being distributed for training purposes only.
Other Contacts Tab
The Other Contacts tab holds the information for the patient’s other contacts such as emergency, custodial, billing, etc. If
you need to add to the contacts area, select the new button and it will open a window for you to enter this information. To
remove a contact, highlight the contact row and click the Delete button. *For the patient's emergency contact, be sure that
the Emergency contact box is checked.
Demographics Tab
The Demographics tab holds information such as gender, race, ethnicity and the patient’s functional status. The education
and employment fields will auto-populate with previously entered information.
OTTR™ Version 6.0 User Manual
2012 OTTR™ Chronic Care Solutions
110
All information contained herein is confidential and proprietary to OTTR™
Chronic Care Solutions and is being distributed for training purposes only.
Phone Tab
The Phone tab holds the contact information for the patient. Information can be entered via free text.
Identifiers Tab
The Identifiers tab holds the external identifiers for the patient such as SSN, MRN, UNOS Number, etc. Your site may have
other fields corresponding to your specific site identifiers.
OTTR™ Version 6.0 User Manual
2012 OTTR™ Chronic Care Solutions
111
All information contained herein is confidential and proprietary to OTTR™
Chronic Care Solutions and is being distributed for training purposes only.
Programs Tab
The Programs tab holds the program(s) that the patient has been assigned to. It's important to assign the patient to a
program. If not assigned, they'll fall on the unassigned list and won't come up in a general search when trying to find the
patient.
OTTR™ Version 6.0 User Manual
2012 OTTR™ Chronic Care Solutions
112
All information contained herein is confidential and proprietary to OTTR™
Chronic Care Solutions and is being distributed for training purposes only.
Insurance
Insurance can be added at the time of referral or can be added to the patient record at a later time.
Adding Insurance Providers
Insurance can be added to the patient record using Insurance icon or from the Patient Master Menu, select Insurance, then
Insurance Providers.
The insurance window opens displaying current insurance coverage at the top and historical insurance at the bottom.
Click the Add Insurance Plan button to add a new insurance provider to the patient record.
Once an insurance has been set to Inactive it will display in the Coverage History.
OTTR™ Version 6.0 User Manual
2012 OTTR™ Chronic Care Solutions
113
All information contained herein is confidential and proprietary to OTTR™
Chronic Care Solutions and is being distributed for training purposes only.
Click the Choose button to select an insurance provider.
Begin typing the insurance provider's name in the Search Text field to limit the displayed options. Once the desired
insurance provider is displayed, double click on it. Notice that the number of plans for that provider is displayed in
parentheses.
The various plans for this insurance provider are displayed for the user to select from. Double click on the desired plan or
highlight and click OK.
OTTR™ Version 6.0 User Manual
2012 OTTR™ Chronic Care Solutions
114
All information contained herein is confidential and proprietary to OTTR™
Chronic Care Solutions and is being distributed for training purposes only.
Standard Insurance Tabs
The standard insurance area of OTTRTM will come with certain standard tabs. There are 8 additional tabs that are part of
the Financial Module if purchased: Authorization Information, Evaluation Precertification, Transplant Approval, Donor
Coverage, Organ Acquisition, HLA Coverage, General Benefits, Global Information, Prescription Benefits, and Transplant
Benefits.
The Standard Tabs will be reviewed here and you will be provided additional documentation if the Financial Module is
purchased.
Policy Info Tab
This tab provides information which the financial coordinator will need when contacting the insurance provider. During the
initial insurance verification process they will complete this tab for future reference.
Insurance Type - Use the dropdown to select primary, secondary, self pay, inactive, etc
Policy # - Free text the policy number
Group # - Free text the group number
Drug Benefit Plan - Free text the name of the drug benefit plan and plan number if desired
Case Manager - Free text the name of the name and contact information in the applicable fields
Additional Case Manager Info - Use these fields to add additional information related to the case manager
OTTR™ Version 6.0 User Manual
2012 OTTR™ Chronic Care Solutions
115
All information contained herein is confidential and proprietary to OTTR™
Chronic Care Solutions and is being distributed for training purposes only.
Medicaid Information can be entered.
Hospital Assistance and patient financial services information can be entered.
COBRA information can be documented
Medicare date can be entered if applicable.
OTTR™ Version 6.0 User Manual
2012 OTTR™ Chronic Care Solutions
116
All information contained herein is confidential and proprietary to OTTR™
Chronic Care Solutions and is being distributed for training purposes only.
Verification Tab
Effective Starting - Enter the date that the insurance coverage started.
Until - If coverage is known to end on a particular date, the date that it becomes ineffective.
Verified On - Enter the date that the insurance coverage is verified.
Reverify On - Enter the date that the insurance is due for re-verification.
Medicare Verification dates can be entered.
The patient will populate the Financial Pending Benefits Verification list until the Effective Starting and Verified On dates
have been entered. They will fall off the list once the dates have been entered.
OTTR™ Version 6.0 User Manual
2012 OTTR™ Chronic Care Solutions
117
All information contained herein is confidential and proprietary to OTTR™
Chronic Care Solutions and is being distributed for training purposes only.
Policy Holder Tab
If the patient is the policy holder click on the Enter Patient as Policy Holder button to auto populate the remaining fields.
If the patient is not the policy holder enter the policy holder’s information.
OTTR™ Version 6.0 User Manual
2012 OTTR™ Chronic Care Solutions
118
All information contained herein is confidential and proprietary to OTTR™
Chronic Care Solutions and is being distributed for training purposes only.
Company Info Tab
This tab is auto-populated by the information added when the insurance provider was entered into the database.
If information displayed here needs to be updated click on the Edit button in the upper right portion of this window.
OTTR™ Version 6.0 User Manual
2012 OTTR™ Chronic Care Solutions
119
All information contained herein is confidential and proprietary to OTTR™
Chronic Care Solutions and is being distributed for training purposes only.
Coverage Info Tab
To enter additional Coverage Information which is global in nature, click on the Edit button and then click on the Coverage
tab to enter the global information. Notes should be signed and dated.
Note: Changes made here will change the information for all patients with this insurance plan.
OTTR™ Version 6.0 User Manual
2012 OTTR™ Chronic Care Solutions
120
All information contained herein is confidential and proprietary to OTTR™
Chronic Care Solutions and is being distributed for training purposes only.
Insurance Notes
An insurance note can be added using the Insurance Notes Icon, or from the Patient Master Menu, select Insurance, then
Insurance Notes.
Insurance Plan - Click the Change button to select the patient’s associated insurance provider you wish to make a note
about.
If multiple insurance providers have been associated to the patient’s record, select the plan you wish to write the note on.
OTTR™ Version 6.0 User Manual
2012 OTTR™ Chronic Care Solutions
121
All information contained herein is confidential and proprietary to OTTR™
Chronic Care Solutions and is being distributed for training purposes only.
Comment Date - Defaults to today's date, use the green calendar to change the date or type in the date.
Made By - Displays the name of the person logged in and adding the note.
Entered By - Displays the name of the person logged in and entering the note.
Send email now - Place a check in the box to send the email now.
Send email later on date - Place a check in the box to send the email at a later date.
Send Reminder To - Use the Add button to add the person you want to send the note to.
Load File - Select to attach a document or file to the note.
Save and Close after typing in the note.
OTTR™ Version 6.0 User Manual
2012 OTTR™ Chronic Care Solutions
122
All information contained herein is confidential and proprietary to OTTR™
Chronic Care Solutions and is being distributed for training purposes only.
The financial coordinator may document each time they have called and or have spoken with an insurance provider.
They may update where they are in the patient’s insurance process so that clinicians will be able to quickly review the status.
OTTR™ Version 6.0 User Manual
2012 OTTR™ Chronic Care Solutions
123
All information contained herein is confidential and proprietary to OTTR™
Chronic Care Solutions and is being distributed for training purposes only.
Adding an Insurance Provider to the Database
Prior to adding a new insurance provider to the database, you should perform a search ensuring that the provider isn't
already present in the system.
From the Tools Master Menu, select Providers, select Find, then Insurance Provider. If the provider isn't present, add them
from the Tools Master Menu, selecting Providers, then Add, then Insurance Provider.
Insurance Tab
Company Name – Enter the insurance provider’s company name. This is what displays when performing a search.
Group Name – Enter the provider’s group name.
OTTR™ Version 6.0 User Manual
2012 OTTR™ Chronic Care Solutions
124
All information contained herein is confidential and proprietary to OTTR™
Chronic Care Solutions and is being distributed for training purposes only.
Plan Name – Enter the provider’s plan name.
Address – Enter the provider’s physical address, phone, fax and per-cert phone number.
Contact Phone Numbers – Enter the appropriate phone numbers in the fields provided.
Patients Tab
Initially, you won't see any patients listed under this tab for the new insurance provider you've just created. This tab displays
all patients who've had this insurance plan attached to their record.
Coverage Tab
Information here will display for all patients with this insurance provider, plan and group. Financial coordinators may write
notes which apply to all patients with this insurance coverage. An example may be information about specific tests which
require pre authorizations.
OTTR™ Version 6.0 User Manual
2012 OTTR™ Chronic Care Solutions
125
All information contained herein is confidential and proprietary to OTTR™
Chronic Care Solutions and is being distributed for training purposes only.
Financial Coverage Rules
If desired, financial coverage rules may be built for an insurance provider which defines what actions require preauthorization. When an action is ordered for a patient which has a financial coverage defined, a message box will appear
stating that pre authorization is required upon saving the action. The action will fall onto the Financial Actions Needing PreAuth with patient, plan and type list. The financial coordinator will obtain the required authorization prior to the action
being scheduled for the patient.
In the Insurance tab, select the
button.
New Coverage Rule
All existing coverage rules will display for this plan. To add a new rule, select the New Coverage Rule button.
OTTR™ Version 6.0 User Manual
2012 OTTR™ Chronic Care Solutions
126
All information contained herein is confidential and proprietary to OTTR™
Chronic Care Solutions and is being distributed for training purposes only.
Select the type of coverage rule you wish to create using the Change button next to the Action, Action Category and Global
Action Fields. A window will then open for you to choose the appropriate entry.
Effective and End Dates can be entered if applicable.
Covered - Place a check in the box if the item is covered by the insurance plan.
Precert Needed - Place a check in the box if the item requires precertification.
Copay Amount, Annual Max, Life Time Max, and Percent Pay can be entered if applicable.
Preferred Provider and Referral Needed can be checked if requirements for that particular coverage rule.
Coverage Comment - Additional comments can be documented here.
Save and Close when finished.
OTTR™ Version 6.0 User Manual
2012 OTTR™ Chronic Care Solutions
127
All information contained herein is confidential and proprietary to OTTR™
Chronic Care Solutions and is being distributed for training purposes only.
Encounters
This section reviews the standard encounter record as well as how to add or access an existing encounter. Encounters
represent visits that you've had with the patient, either by telephone or in the clinic. It's a detailed multi-tabbed entry form
that is designed to replace paper charting. There are several ways of adding an Encounter to a patient’s record.
Add Master Menu and select Encounter
The Encounters icon drop-down arrow
The Encounter button on the Patient Review window
Once you've added the Encounter, the new Encounter window will open.
Click on the Set button for the Encounter Type field to search for the type of encounter you wish to add.
Click the Set button for the Encounter With field to enter the provider who is seeing the patient during the visit.
OTTR™ Version 6.0 User Manual
2012 OTTR™ Chronic Care Solutions
128
All information contained herein is confidential and proprietary to OTTR™
Chronic Care Solutions and is being distributed for training purposes only.
The Encounter Date will auto-populate with today's date and time, you can adjust if needed.
If the patient is post transplant, you can link the encounter to the appropriate transplant using the Set button next to the
Linked Transplant field.
Active Medications: Active medications may be attached to the encounter. You have the ability to review this information
with the patient and mark the medications as having been verified during this clinic visit. To attach active medications place
a checkmark in the Attach All Medications option box.
Active Problems: Notice the Active Problems frame area. If active problems have been entered for the patient they will
display here. These problems may be selected to be included within the new encounter under the Diagnoses tab. Click on
the Save & Continue button.
You'll be prompted with an alert box to attach the patient’s information since the last Encounter. You can select Yes, No or
Never based on the information you would like to have pulled into this Encounter. If you select Yes, items such as labs, that
have entered the system since the last encounter will be attached.
You'll also get another alert telling you the number of unreviewed labs. You can opt to Attach all recent labs, or just
Reviewed labs only. Once you've addressed the alert messages, the Encounter window will appear. You'll see several tabs
in each Encounter that will vary based on the type of Encounter selected. There are tabs that will accompany each
encounter. Some tabs may be different depending on the type of encounter selected. We'll cover the common tabs below.
OTTR™ Version 6.0 User Manual
2012 OTTR™ Chronic Care Solutions
129
All information contained herein is confidential and proprietary to OTTR™
Chronic Care Solutions and is being distributed for training purposes only.
Encounter Tab
Encounter Type: Displays the encounter type added. To change this encounter type, select the Set button.
Encounter With: Displays the care provider’s name that the patient is seeing. To change name of the care provider, select
the Set button.
Encounter Date: Displays the date and time the encounter was added. This can be modified using the green calendar
button.
Duration (hh mm): Sites may track how long encounters take. Enter the total time of visit.
Linked Transplant: Displays the transplant it is linked to if post transplant. To link it to a different transplant, click on the Set
button to select the transplant event.
Signoff By/Date: To signoff an encounter you must have the permissions granted in OTTR™. Select the Signoff button. To
remove a signoff, select the Clear Signoff button. Once an encounter is signed off, it is locked and no further
documentation can be added or modified.
OTTR™ Version 6.0 User Manual
2012 OTTR™ Chronic Care Solutions
130
All information contained herein is confidential and proprietary to OTTR™
Chronic Care Solutions and is being distributed for training purposes only.
Diagnosis Tab
Primary Diagnosis: Displays the patient’s primary diagnosis, or reason for transplant, assigned in the General Medical
window.
Problem List: Diagnoses can be viewed, have the state changed, and made inactive using the right click functionality if
appropriate. Clinicians have the ability to enter new problems or diagnoses, or to attach and detach existing problems. The
Shift button can be used to highlight multiple diagnoses to manage, whereas the Control button can be used to highlight
intermittent diagnoses to manage. Note: this same principle applies in the labs and medications tabs as well.
To enter a new problem, click the New button.
Note: refer to the Diagnosis section for detailed instructions on adding and managing diagnoses.
If you didn't attach the problem(s) when adding the encounter, you can click the Attach button to add a diagnosis to the
encounter. Likewise, if you've attached a diagnosis that doesn't apply to this encounter or no longer active, you can Detach
it from the encounter. Note: this same functionality occurs in the labs, medications, progress notes, and plan tabs as well.
When deciding whether to Attach or Detach items, think about printing the encounter to send to a referring physician as an
update, and whether that information should be included or not. Also remember that the information will still be present in
the patient record, it just won't show up in that particular encounter.
OTTR™ Version 6.0 User Manual
2012 OTTR™ Chronic Care Solutions
131
All information contained herein is confidential and proprietary to OTTR™
Chronic Care Solutions and is being distributed for training purposes only.
Click the Attach button to add an unattached diagnoses. All unattached diagnoses will display, highlight the diagnosis and
select OK, or double click to add the diagnosis.
To Detach a diagnosis or problem that isn't relative to the encounter, highlight the problem row and click Detach. The
problem will be removed from the encounter. Notice how the 'abdominal pain' diagnosis has been detached below.
OTTR™ Version 6.0 User Manual
2012 OTTR™ Chronic Care Solutions
132
All information contained herein is confidential and proprietary to OTTR™
Chronic Care Solutions and is being distributed for training purposes only.
Medications Tab
The medication tab displays open medications which the patient is currently taking. In OTTR TM these are referred to as Open
Medications. Medications that the patient is no longer taking are referred to as Closed. Medications can be managed using
right click functionality as well.
Note: refer to the notes above under Diagnoses Tab for more functionality information.
To add a new medication, click on the New button. To add an existing medication to the encounter record, click on the
Attach button. To remove a medication, highlight the desired medication and click the Detach button.
Note: refer to the Medications manual section for detailed information on adding and managing medications.
OTTR™ Version 6.0 User Manual
2012 OTTR™ Chronic Care Solutions
133
All information contained herein is confidential and proprietary to OTTR™
Chronic Care Solutions and is being distributed for training purposes only.
Labs Tab
Lab results can enter the system in two ways, through an interface or via manual entry. Those results are then grouped
together into flowsheets. The lab flowsheet will display different values depending on the transplant phase. In the example
above, the patient is in the post-transplant phase and the flowsheet displays certain immunosuppressant drug level values
along with the dose of immunosuppressant that the patient is currently taking. Note that the labs are display in yellow until
they are marked as reviewed.
To manually enter a lab result, click the New button. To attach existing lab results to this record, click the Attach button. To
remove a lab result from this view, highlight the desired row and click the Detach button.
Note: refer to the notes in the Diagnoses Tab section regarding Attach and Detach functionality, and to the Labs document
for manual entry instructions.
OTTR™ Version 6.0 User Manual
2012 OTTR™ Chronic Care Solutions
134
All information contained herein is confidential and proprietary to OTTR™
Chronic Care Solutions and is being distributed for training purposes only.
Progress Notes Tab
Progress notes can be entered during the encounter. Once written, they will also display on the Patient Review window. To
write a new progress note, click the New button. To add an existing progress note to this encounter, click the Attach button.
To remove a progress note, click on the Detach button and select the progress note you wish to remove.
An example of when to attach an existing note might be that you received notification from their local hospital that the
patient had been seen in the ER, which was recorded in an earlier progress note. This encounter or visit may have been a
follow up to that event, in which case you may want to attach the information contained in that particular progress note.
Note: refer to the notes above in the Diagnoses Tab for Attach and Detach functionality and to the Progress Notes
document for further information on entering and managing progress notes.
OTTR™ Version 6.0 User Manual
2012 OTTR™ Chronic Care Solutions
135
All information contained herein is confidential and proprietary to OTTR™
Chronic Care Solutions and is being distributed for training purposes only.
Plan Tab
A plan can contain the standard items ordered by a physician including upcoming clinic appointments, testing needed, or
follow up actions. These action items can be added individually using the New Action button or as a group of actions
called an order-set, action macro, or a plan. The order-sets, created by the OTTRTM Administrator, enables a clinician to
quickly add multiple action items to a patient record at once.
To add an order set, select the Add Plan button. To attach an action that has already been ordered, select the Attach Action
button. To remove an action, highlight the desired action and click the Detach button. The Reschedule All button can be
used if you want to reschedule all of the action items at one time.
An example of attaching a previously entered action is shown above. The Clinic Visit action displayed in white was Attached
to the encounter, then marked 'Done' since the patient arrived for the appointment. Items displayed in blue have been
scheduled but not marked 'done', items displayed in yellow haven't been scheduled, and items displayed in white have been
scheduled and marked 'done'.
The right click functionality is also present here to manage actions.
Note: refer to the note above in the Diagnoses Tab for functionality information and to the Actions document for detailed
information on adding and managing Actions.
OTTR™ Version 6.0 User Manual
2012 OTTR™ Chronic Care Solutions
136
All information contained herein is confidential and proprietary to OTTR™
Chronic Care Solutions and is being distributed for training purposes only.
History of Present Illness Tab
Chief Complaint, HPI, and Interim Hx fields are all free text boxes available for documenting relevant information. If your
site implements a verification process, you can click the Add Row button to verify.
OTTR™ Version 6.0 User Manual
2012 OTTR™ Chronic Care Solutions
137
All information contained herein is confidential and proprietary to OTTR™
Chronic Care Solutions and is being distributed for training purposes only.
Family/Social History Tab
Click the Add Row buttons under General Family History and Social History to open up the documentation windows.
Use a combination of dropdown choices and free text entries to document any family and social history. Click OK when
finished.
The entries will be displayed in row and column format. To see the full entry, double click on the row that you want to view.
To delete an entry, highlight the row and select the Delete Row button.
The entry is deleted from view.
OTTR™ Version 6.0 User Manual
2012 OTTR™ Chronic Care Solutions
138
All information contained herein is confidential and proprietary to OTTR™
Chronic Care Solutions and is being distributed for training purposes only.
Review of Systems Tab
Click + to expand and
- to minimize each
section
The Review of Systems tab consists of a series of radio buttons and free text boxes. Select
all responses in that section to "none". Select
to default
to default all responses in that section to
"none", then proceed through the form and mark those items that aren't within normal limits. Select
your assessment for that area.
to defer
Note: The first section is titled ROS and encompasses all sections below it. If you enter one of the options listed above in
this section, it will enter that option for all sections below. For example, choose the
that option in each section below.
OTTR™ Version 6.0 User Manual
2012 OTTR™ Chronic Care Solutions
option, it will enter
139
All information contained herein is confidential and proprietary to OTTR™
Chronic Care Solutions and is being distributed for training purposes only.
Detailed Physical Exam
The Detailed Physical Exam tab is a collection of radio buttons, free text boxes, and dropdown boxes. It functions in the
same manner as the Review of Systems tab in the previous section.
Note: The first section is titled Physical Exam and encompasses all sections below it. If you enter one of the options listed
above in this section, it will enter that option for all sections below. For example, choose the
will enter that option in each section below.
OTTR™ Version 6.0 User Manual
2012 OTTR™ Chronic Care Solutions
option, it
140
All information contained herein is confidential and proprietary to OTTR™
Chronic Care Solutions and is being distributed for training purposes only.
Pain Assessment Tab
Use the
radio buttons to indicate whether pain is present.
Click the Add Row button to open the documentation window and use the dropdown and free text boxes to enter your pain
assessment. Click OK when finished.
Your assessment is now entered and displayed in row and column format. To see the full entry, double click on the row that
you want to view. To delete an entry, highlight the row and select the Delete Row button.
OTTR™ Version 6.0 User Manual
2012 OTTR™ Chronic Care Solutions
141
All information contained herein is confidential and proprietary to OTTR™
Chronic Care Solutions and is being distributed for training purposes only.
Patient Education Tab
Click the Add Row button to open the documentation window and use the dropdown and free text boxes to enter your pain
assessment. Click OK when finished.
Your assessment is now entered and displayed in row and column format. To see the full entry, double click on the row that
you want to view. To delete an entry, highlight the row and select the Delete Row button.
OTTR™ Version 6.0 User Manual
2012 OTTR™ Chronic Care Solutions
142
All information contained herein is confidential and proprietary to OTTR™
Chronic Care Solutions and is being distributed for training purposes only.
Visit Information Tab
Enter information regarding this visit or encounter using the free text and dropdown boxes. If the patient missed the
appointment, you can document that information here as well.
Note: The choices in the dropdown boxes can be modified by your OTTR TM Administrator.
OTTR™ Version 6.0 User Manual
2012 OTTR™ Chronic Care Solutions
143
All information contained herein is confidential and proprietary to OTTR™
Chronic Care Solutions and is being distributed for training purposes only.
Viewing and Printing Encounters
Viewing Encounters
To access an existing encounter, select the Encounters icon or from the Patient Master Menu, select Encounters.
A list of all encounters which have been added to the patient record will display. Double click on a selected encounter to
access the encounter to add or review information in the tabs.
To see a preview of the Encounter, place a check in the Show Encounter Preview box in the bottom of the window. You can
then highlight the line item, and view the contents of the Encounter in the viewing pane located in the lower portion of the
window.
Printing an Encounter
From the Patient Master Menu, select Reports then Encounter.
OTTR™ Version 6.0 User Manual
2012 OTTR™ Chronic Care Solutions
144
All information contained herein is confidential and proprietary to OTTR™
Chronic Care Solutions and is being distributed for training purposes only.
In the Report Options you can indicate who you're sending a copy of the encounter to by highlighting the appropriate
person. The Letter signed by will auto-populate with the name of the person logged in and can be changed using the
Search button. Select the encounter you want to print using the dropdown arrow in the Select Encounter field. The date that
you want labs to pull from can be modified using the green calendar button next to the Lab Date field. Select the printer
using the dropdown arrow next to the Printer field. Enter the #Copies to print.
Auto-Capture can be automatically checked for those reports or letters that you want captured for future reference. If the
report you're trying to print isn't set to Auto-Capture, you can put a check in the box to do so.
Click the Print button in the bottom of the window to click your report.
OTTR™ Version 6.0 User Manual
2012 OTTR™ Chronic Care Solutions
145
All information contained herein is confidential and proprietary to OTTR™
Chronic Care Solutions and is being distributed for training purposes only.
Auto-capture
Reports (including letters) that are set to Auto Capture can be viewed in the Existing Reports feature utilizing the Patient
Master Menu, selecting Reports then Existing Reports. Those report or letters can be viewed by highlighting the desired row
and double clicking.
OTTR™ Version 6.0 User Manual
2012 OTTR™ Chronic Care Solutions
146
All information contained herein is confidential and proprietary to OTTR™
Chronic Care Solutions and is being distributed for training purposes only.
Evaluations
When a physician determines a referral patient should be evaluated, the clinician must move the patient from the Referral
Phase into the Evaluation Phase. The process followed from referral through evaluation is the same for recipients and living
donors.
Moving the patient's through the phases ensures the Active Referrals list and the Active Evaluations list remains accurate for
both the transplant recipient and living donor programs.
To remove the patient from the Referral phase, the referral record must have an End Date and End Reason entered.
Adding an evaluation automatically ends the referral phase.
To place the patient into the Evaluation phase, add an evaluation record utilizing the Add Evaluation option from the
Evaluations icon dropdown or from the Add Master Menu, select Evaluation, then select the Evaluation you want to add.
Note: your choice of evaluations differ depending on the program(s) you're assigned to.
**For more detailed information managing items in each tab, refer to the following documents: Encounters, Actions, Labs,
Diagnosis, Medications and Progress Notes.
OTTR™ Version 6.0 User Manual
2012 OTTR™ Chronic Care Solutions
147
All information contained herein is confidential and proprietary to OTTR™
Chronic Care Solutions and is being distributed for training purposes only.
The initial evaluation window displays the most common types of actions ordered for the selected evaluation and the name
of the provider evaluating the patient. Click the Change button to modify the care provider performing the evaluation.
Place a check in the boxes for the actions you wish to order as part of the evaluation and uncheck any actions that aren't
applicable.
Save & Continue when finished.
OTTR™ Version 6.0 User Manual
2012 OTTR™ Chronic Care Solutions
148
All information contained herein is confidential and proprietary to OTTR™
Chronic Care Solutions and is being distributed for training purposes only.
Evaluation Tab
Eval Date - Captures the date the evaluation was added to the patient’s record.
Eval By - Displays who evaluated the patient.
Eval Score - Enter an evaluation score if applicable for the type of evaluation being performed.
Demographics - Current patient demographic information is auto populated into the demographic fields. If the patient’s
demographic information was not present within the record at the time this evaluation was created then these fields may be
manually updated.
Insurance request and approved fields are provided to document key financial insurance dates if your site doesn't have the
OTTRTM Financial Module.
1st Insurance Request– Click on the green calendar to enter a date.
2nd Insurance Request– Click on the green calendar to enter a date.
1st Insurance Approval– Click on the green calendar to enter a date.
2nd Insurance Approval– Click on the green calendar to enter a date.
Insurance Plan – Use the Set button to select the patient’s primary insurance provider from the associated insurance
providers currently attached to the patient’s record.
OTTR™ Version 6.0 User Manual
2012 OTTR™ Chronic Care Solutions
149
All information contained herein is confidential and proprietary to OTTR™
Chronic Care Solutions and is being distributed for training purposes only.
Actions Tab
Actions ordered from the initial evaluation window display here. Click the New button to order a new action. Click the
Attach button to attach previously ordered actions. Click the Detach button to detach or remove actions from the evaluation
phase.
Actions displayed in Yellow haven't been scheduled and will appear on the schedulers Lists|Actions|Pending PreTesting|Eval- Unscheduled list.
Actions displayed in Blue have been scheduled but not completed and marked done. They will appear on the transplant
coordinators Lists|Actions|Pending Pre-Testing|Eval-Not Done list.
Actions displayed in White have been scheduled, completed and marked done.
Some sites choose to copy and paste or manually enter the test summary in the Comment field of an evaluation action.
Doing so allows the committee to review each action along with a brief result and displays on the Patient|Reports|Tx Phase
Report\Evaluation which is used to update the referring provider or present the patient at the Selection Committee Meeting.
OTTR™ Version 6.0 User Manual
2012 OTTR™ Chronic Care Solutions
150
All information contained herein is confidential and proprietary to OTTR™
Chronic Care Solutions and is being distributed for training purposes only.
Diagnoses Tab
The primary diagnosis entered during the referral process displays in the Primary Diagnosis field. The physician
performing the evaluation may choose to change this to another more appropriate diagnosis if needed. This should be a
UNOS diagnosis which drives the need for the transplant.
Both the Referral and Evaluation records will maintain the Primary diagnosis which were entered at that time. If the primary
diagnosis is changed in the phase, upon saving an alert will display.
If you select Yes, the primary diagnosis in the General Medical window will update to the newly entered diagnosis. If you
select No, the General Medical window won't be updated. If the patient’s primary diagnosis should be changed later under
the patient’s General Medical window it will not alter the referral and evaluation records. They are maintained for historical
and reporting purposes.
Use the Change button to add a Primary, Secondary or Tertiary diagnosis.
Use the New button to add a new Problem List diagnosis not previously documented in the patient’s record,.
Use the Attach button to attach a diagnosis previously documented in the patient’s Problem List diagnoses area.
Highlight a diagnosis and click on the Detach button to remove a Problem List diagnosis from the evaluation record.
OTTR™ Version 6.0 User Manual
2012 OTTR™ Chronic Care Solutions
151
All information contained herein is confidential and proprietary to OTTR™
Chronic Care Solutions and is being distributed for training purposes only.
Labs Tab
Click the New button to add a new lab result specific to this evaluation.
Click the Attach button to attach a lab result previously entered into the patient ‘s record.
To remove a lab result from this window, highlight it and click on the Detach button.
Instead of copying and pasting lab results into the lab actions ordered for the patient’s evaluation, the transplant
coordinator will attach the lab results here by clicking on the Attach button.
To select one result, highlight it and click on the OK button.
To select a range of results, highlight the first lab and hold down the Shift key and click on the last lab. All labs between the
two selected will become highlighted. Click OK.
To select multiple labs individually, highlight a lab and hold down the Ctrl key and select the remaining labs. Click OK.
OTTR™ Version 6.0 User Manual
2012 OTTR™ Chronic Care Solutions
152
All information contained herein is confidential and proprietary to OTTR™
Chronic Care Solutions and is being distributed for training purposes only.
BMI Tab
Click the New button to add the patient’s Height and Weight. OTTR™ performs an auto calculation for the BMI and BSA.
To attach a previous BMI click the Attach button.
To remove a BMI from this record, highlight it and click the Detach button.
Progress Notes Tab
Click on the New button to add a new progress note in the patient’s evaluation record. This will also display on the patient
review window.
Click on the Attach button to attach a progress note which was previously entered into the patient record.
Highlight the note and click on the Detach button to remove a progress note from this evaluation.
OTTR™ Version 6.0 User Manual
2012 OTTR™ Chronic Care Solutions
153
All information contained herein is confidential and proprietary to OTTR™
Chronic Care Solutions and is being distributed for training purposes only.
Risk Factors Tab
Smoker – Placing a check mark within the box indicates a yes answer.
Quit Smoking - Placing a check mark within the box indicates a yes answer.
Pack Year History – Enter the patient's pack year history number.
# of Pregnancies – Enter the number of pregnancies if this is a female patient.
Prior Surgeries – Information displayed here pulls from Patient|Chart|RiskFactors if previously completed. This area also
populates the Previous Surgeries field in Candidate Listing record.
Received Transfusion – When you add transfusion information using the New button, this box will auto-check.
To add transfusion history click on the New button.
To remove transfusion history, highlight the row and click the Delete button directly across from the New button.
OTTR™ Version 6.0 User Manual
2012 OTTR™ Chronic Care Solutions
154
All information contained herein is confidential and proprietary to OTTR™
Chronic Care Solutions and is being distributed for training purposes only.
History of Present Illness Tab
Chief Complaint– Free text field.
HPI– Free text field.
Interim Hx– Free text field.
To add a verification click on the Add Row button. To remove a verification, highlight the row and click on the Delete Row
button.
Detailed Physical Exam
Information captured here is considered to be discrete data which can be pulled later for research or report purposes.
Some physician's choose to scan or attach a dictated report in lieu of using this tab.
OTTR™ Version 6.0 User Manual
2012 OTTR™ Chronic Care Solutions
155
All information contained herein is confidential and proprietary to OTTR™
Chronic Care Solutions and is being distributed for training purposes only.
Review of Systems Tab
Information captured here is considered to be discrete data which can be pulled later for research or report purposes.
Some physician's choose to scan or attach a dictated report in lieu of using this tab.
Family/Social History Tab
To add family history, click on the Add Row button. Here is where you may add family members and document their known
health issues.
To add social history, click on the Add Row button. Here you may enter drug, tobacco and alcohol substance abuse.
OTTR™ Version 6.0 User Manual
2012 OTTR™ Chronic Care Solutions
156
All information contained herein is confidential and proprietary to OTTR™
Chronic Care Solutions and is being distributed for training purposes only.
Pain Assessment Tab
Pain – Select the Yes or No radio button.
To add information specific to the pain click on the Add Row button. To remove pain information, highlight the row and
click on the Delete Row button.
Patient Education Tab
Use the Add Row button to document detailed education given to the patient and family.
Highlight the row and click the Delete Row button to remove.
OTTR™ Version 6.0 User Manual
2012 OTTR™ Chronic Care Solutions
157
All information contained herein is confidential and proprietary to OTTR™
Chronic Care Solutions and is being distributed for training purposes only.
Visit Information Tab
Type of Visit – Use the drop-down arrow to make a selection.
Location – Use the drop-down arrow to make a selection.
Reason – Use the drop-down arrow to make a selection.
Attending MD – Click on the Change button to select the attending physician.
RN – Enter the attending RN’s name
Patient Missed Visit – Click on the Yes radio button if the patient missed the appointment.
Reason for missed visit – Use the drop-down arrow to make a selection.
Comments – Free text field.
Note: Your OTTRTM Administrator can modify the selections available in the dropdown boxes to meet your center's needs.
OTTR™ Version 6.0 User Manual
2012 OTTR™ Chronic Care Solutions
158
All information contained herein is confidential and proprietary to OTTR™
Chronic Care Solutions and is being distributed for training purposes only.
Preparation for Selection Committee
To determine which patient‘s record is ready to be presented at the committee, the coordinator must first ensure all of the
ordered actions have been completed.
Use the Lists Master Menu to access the open evaluations. Lists|Evaluations|Open Evaluations list. Highlight a row within
the list to activate the patient's record. Click on the Actions icon to open the patient’s action window.
Notice in the first example, actions have been ordered but need to be scheduled (Yellow). There is one action which has
been scheduled but not yet marked done (Blue). This patient’s record is not ready to be presented at the committee
meeting.
In the second example all of the evaluation actions have been marked done (White). When all of the evaluation actions
have been completed, the patient is ready to be presented at the Selection Committee meeting. Add an action of Selection
Committee to the patient's record and schedule it for the next meeting's date.
The Lists|Actions|Pending Actions- Not Done list can be used to sort all patient's with that open action letting you know
who's ready for presentation.
On the day of the meeting, access Lists|Evaluations|Open Evaluations list and Double Click on the row in this list to open
the patient’s evaluation record.
The committee will review each tab of the evaluation record. Under the Actions tab the presenter can review the comment
section of each action with the committee. For more detailed information, access the Text Docs to open full views of
scanned or interfaced documents.
OTTR™ Version 6.0 User Manual
2012 OTTR™ Chronic Care Solutions
159
All information contained herein is confidential and proprietary to OTTR™
Chronic Care Solutions and is being distributed for training purposes only.
Selection Committee Tab
Once a decision has been made, the disposition can be documented in the Selection Committee form.
Date of Review - Enter the date of the committee meeting.
Transplant Candidacy Being Considered for - Use the dropdown to make your selection.
Additional Organs - If the patient is being conisdered for a multi-organ transplant, place a check in the appropriate
additional actions.
Dispsition - Use the dropdown to select the disposition for transplant or implant.
Additional Testing Requirements - Click the Actions button to be re-directed to the Actions window to add any additional
testing or consults the patient might need.
Patient MEETS or DOES NOT MEET inclusion criteria - Place a check in the appropriate box.
Exception - If an exception is being made for the patient, document the information here.
OTTR™ Version 6.0 User Manual
2012 OTTR™ Chronic Care Solutions
160
All information contained herein is confidential and proprietary to OTTR™
Chronic Care Solutions and is being distributed for training purposes only.
Urgency Status - Use the dropdown to select listing status.
Waitlist as Temporarily Inactive - If temporarily inactive, select the reason using the dropdown.
Non-Transplant Candidacy Discussion - If the patient is not a candidate, document the specific discussion and reasons.
Patient Instructions - Use the Add Row button to document any patient instructions given regarding listing, further testing
need, etc
Committee Clearance - Use the provided fields to document the individual multi-disciplinary decisions and concerns.
At the bottom of the form, document the name of the primary coordinator and physician committee leader using
the Change buttons. Once saved, the form can be found under in the Text Docs area and printed. Some sites
choose print this document, have it signed by all committee members, and scan the signed copy back into the
patient record.
OTTR™ Version 6.0 User Manual
2012 OTTR™ Chronic Care Solutions
161
All information contained herein is confidential and proprietary to OTTR™
Chronic Care Solutions and is being distributed for training purposes only.
Evaluation Report
If you're unable to present the patient electronically using the OTTRTM application. A report may also be printed for each
patient record being presented which displays all of the information entered into the evaluation record. This report may be
used during the committee meeting or can be sent to the referring provider as an update.
To access the report from the Patient Master Menu, select Reports, select Tx Phase Reports, then Evaluation.
Select whether or not you want to print a Cover Letter.
Highlight the Care Provider you're sending the report to. Be sure that you have this type of care provider assigned to the
patient as it will pull this information into the report.
Use the Search button to indicate who is Signing the report.
Use the green calendar button to choose a starting Lab date.
Select the Printer from the dropdown and enter the # of Copies, then select Print.
OTTR™ Version 6.0 User Manual
2012 OTTR™ Chronic Care Solutions
162
All information contained herein is confidential and proprietary to OTTR™
Chronic Care Solutions and is being distributed for training purposes only.
If running the report for the referring provider, above is an example of the standard Cover Letter.
The evaluation report displays all information entered into the patient’s evaluation record.
OTTR™ Version 6.0 User Manual
2012 OTTR™ Chronic Care Solutions
163
All information contained herein is confidential and proprietary to OTTR™
Chronic Care Solutions and is being distributed for training purposes only.
Ending the Evaluation
When a Candidate Listing is added and saved to a patient’s record which has an open evaluation, the following
message window will display.
Selecting Yes will automatically enter an end date of today’s date and an end reason of Listed for Transplant
into the patient’s open evaluation record.
This saves the clinician from having to manually close the open evaluation record.
Manually Ending an Evaluation
If it's determined that a patient currently within the evaluation phase will not be listed for transplant, the clinician must
manually close the open evaluation record by entering an end reason and an end date into the evaluation record.
OTTR™ Version 6.0 User Manual
2012 OTTR™ Chronic Care Solutions
164
All information contained herein is confidential and proprietary to OTTR™
Chronic Care Solutions and is being distributed for training purposes only.
Evaluation Letters
Letters can be sent to the patient informing them of the committee decision. During or after the selection committee
meeting, the presenter can add Selection Committee Acceptance or Rejection actions to the record and assign them to the
person responsible for generating the letters to serve as a task or reminder.
Letters can be accessed using the Patient Master Menu, select Reports, select CMS, then select the desired letter.
OTTR™ Version 6.0 User Manual
2012 OTTR™ Chronic Care Solutions
165
All information contained herein is confidential and proprietary to OTTR™
Chronic Care Solutions and is being distributed for training purposes only.
Listings
Once a patient is evaluated and determined to be an acceptable transplant candidate, the patient is listed with UNOS and
the Listing is added to the OTTRTM patient record. In the case of a multi-organ transplant, separate listing events may need
to be added.
A Listing can be added from the Listings icon dropdown or from the Add Master Menu, select Candidate Listing.
Once you begin to enter listing information and Save, an alert will appear allowing you to automatically end the evaluation.
Note: some of the fields are applicable to certain types of transplants and may not be used by your site. Additionally, your
site will determine which fields you'll use and which you'll disregard.
OTTR™ Version 6.0 User Manual
2012 OTTR™ Chronic Care Solutions
166
All information contained herein is confidential and proprietary to OTTR™
Chronic Care Solutions and is being distributed for training purposes only.
Listing Tab
Listing Date – Displays the date the Candidate Listing record was added. You may want to modify this to match your
UNOS listing date and time.
Listed By – Displays the name of the who added the candidate listing to the patient record. If you added the listing in
UNOS, you may also want to be the person adding the listing in OTTRTM.
Organ Type – Use the dropdown to select the organ type the patient will be transplanted with.
Listing Code – Click on the drop-down arrow to select a listing code. This field won't be activated until an organ type is
selected.
Code Start Date – Displays the date and time the listing code was entered or changed.
Number of Cross Matches – Enter the number of cross matches.
Listing Extra Days – Enter the extra listing days if applicable.
Eval Score Date – Enter the date the patient’s evaluation score was determined if applicable.
Donor Height Range – Enter the desired donor height range.
Lung Lobes – Click on the drop-down arrow to select lung lobe(s) you wish to make a comment about.
OTTR™ Version 6.0 User Manual
2012 OTTR™ Chronic Care Solutions
167
All information contained herein is confidential and proprietary to OTTR™
Chronic Care Solutions and is being distributed for training purposes only.
Comment – Enter a desired comment about the selected lung lobe(s).
Previous Surgeries – Displays information that was entered in the patient’s Risk Factors.
Special Considerations – Enter any special considerations for this candidate listing record.
Option Boxes – Place a checkmark in the option boxes which are appropriate for this candidate listing record.
Other Listings Button – Clicking on this button displays the patient’s previous candidate listings.
Ready for Transplant – Place a checkmark in the Ready for Transplant when applicable.
Mark Ready By – Displays the clinicians name who selected the Ready for Transplant option box.
Insurance Authorization – Enter the patient’s authorization number for transplant.
Form Submission Date – Enter the date the Transplant Registry form was formally submitted.
Transplant Number – Automatically displays what number this transplant is for the patient.
Evaluation Score – Enter the patient’s evaluation score is applicable.
Donor Weight Range – Enter the desired donor weight range.
Donor Age Range – Enter the desired donor age range.
OTTR™ Version 6.0 User Manual
2012 OTTR™ Chronic Care Solutions
168
All information contained herein is confidential and proprietary to OTTR™
Chronic Care Solutions and is being distributed for training purposes only.
History Tab
Each time the patient’s listing code is changed under the Listing tab a history is created and stored here.
End Tab
Listing End Date – Displays the date the candidate listing was ended.
Unlisted Reasons – Use the Add button to select reasons for ending the listing.
Unlisted Comment – Is a free text field.
OTTR™ Version 6.0 User Manual
2012 OTTR™ Chronic Care Solutions
169
All information contained herein is confidential and proprietary to OTTR™
Chronic Care Solutions and is being distributed for training purposes only.
Info at Listing Time Tab
When the Candidate Listing record was added, this tab is auto populated based upon the information currently contained
in the patient’s record.
The clinician has the ability to update fields manually if needed.
OTTR™ Version 6.0 User Manual
2012 OTTR™ Chronic Care Solutions
170
All information contained herein is confidential and proprietary to OTTR™
Chronic Care Solutions and is being distributed for training purposes only.
Additional Tabs
Depending upon the type of transplant to be performed, special tabs may be added to the candidate listing record to
document organ specific details.
In an example above, a liver transplant is to be performed. The Meld/Peld History Tab is an example of a special tab which
was added.
Clinicians will click on the Add Row button to document each time the patient’s Meld/Peld score has changed.
In another example, lung transplant listings include an Allocation Questionnaire to be completed.
OTTR™ Version 6.0 User Manual
2012 OTTR™ Chronic Care Solutions
171
All information contained herein is confidential and proprietary to OTTR™
Chronic Care Solutions and is being distributed for training purposes only.
Reports and Lists
Sites can print the patient’s candidate listing record to send to the referring provider. From the Patient Master Menu, select
Reports, select Tx Phase Report, select Listing.
To print the Transplant On Call Report from the Tools Master Menu, select Reports, then Tx On Call Report
OTTR™ Version 6.0 User Manual
2012 OTTR™ Chronic Care Solutions
172
All information contained herein is confidential and proprietary to OTTR™
Chronic Care Solutions and is being distributed for training purposes only.
Listing Phase reports can be accessed from Lists Master Menu, select the desired program, then Listed Patients-Tx, then the
desired report. The Listed Patients list is good to compare against your official UNOS waitlist.
OTTR™ Version 6.0 User Manual
2012 OTTR™ Chronic Care Solutions
173
All information contained herein is confidential and proprietary to OTTR™
Chronic Care Solutions and is being distributed for training purposes only.
Donors
In OTTRTM, living donors go through the same referral and evaluation process as the recipient and are entered into the
system using the New Patient Referral option. The Patient Review window functions the same way as the recipient review
window but you'll notice some differences in the information that's displayed. Once a donor is linked to a recipient, you'll
notice that some of the Transplant Recipient information displays on the donor review window.
By selecting the All Transplant Recipients button, you can view all transplants linked to that donor.
Since the deceased donors don't go through the same referral and evaluation processes, their information is entered in a
different manner using the New Patient option from the Find Patient icon dropdown.
OTTR™ Version 6.0 User Manual
2012 OTTR™ Chronic Care Solutions
174
All information contained herein is confidential and proprietary to OTTR™
Chronic Care Solutions and is being distributed for training purposes only.
Deceased Donor Demographics
General Tab
When entering deceased donor information, only those fields your facility decides to populate should be completed.
The OTTR ID is an auto generated number. DO NOT enter anything in this field.
In this example, Donor was entered for the patient’s last name and the UNOS Donor Number for the patient’s first name.
Birth Tab
If known, enter the donor’s Birth Date.
If research is to be done in the future to determine if the donor’s age factors into the success or failure of a transplant, this
information must be captured.
It is recommended that information received in the donor packet be entered into the donor record.
OTTR™ Version 6.0 User Manual
2012 OTTR™ Chronic Care Solutions
175
All information contained herein is confidential and proprietary to OTTR™
Chronic Care Solutions and is being distributed for training purposes only.
Demographics Tab
If known, enter the donor’s Gender and Race.
If research is to be done in the future to determine if the donor’s gender or race factors into the success or failure of a
transplant, this information must be captured.
Identifiers Tab
Enter the deceased donor’s UNOS Number.
Depending upon what has been entered into the donor record, you can later perform a search for the donor record using
either the Patient Name or UNOS Number.
OTTR™ Version 6.0 User Manual
2012 OTTR™ Chronic Care Solutions
176
All information contained herein is confidential and proprietary to OTTR™
Chronic Care Solutions and is being distributed for training purposes only.
Programs Tab
It’s VERY IMPORTANT that you assign the patient to a Program. If you don’t assign the program, the patient won’t show up
as a search result when using the Find Patient icon to perform a search.
Add the patient to the Deceased Donor program by placing a checkmark in the box provided. The living donor will be
assigned to the organ specific Living Donor program.
Once you’ve entered the information in the donor demographics, your donor is technically entered into the OTTR TM system
and can be linked to a recipient. You can continue and complete the Death Info and Donor Info if you have the donor
packet available, or you can complete those sections at a later date.
OTTR™ Version 6.0 User Manual
2012 OTTR™ Chronic Care Solutions
177
All information contained herein is confidential and proprietary to OTTR™
Chronic Care Solutions and is being distributed for training purposes only.
Deceased Donor Death Info
Death Information
Select Death Info from the Demo icon dropdown or from the Patient Master Menu, select Demographics, then Death.
Enter the Date of Death using the green calendar box. The Date of Death Entered will default to today’s date but can be
modified using the green calendar box.
Cause of Death, Secondary Cause of Death, and Tertiary Cause of Death are entered using the Change button next to the
fields.
The Autopsy box can be used to indicate whether an autopsy was performed.
Place of Death is a free text entry if known.
This area is also used to record recipient death information so the Death Transplant Related box is more applicable for that
situation.
OTTR™ Version 6.0 User Manual
2012 OTTR™ Chronic Care Solutions
178
All information contained herein is confidential and proprietary to OTTR™
Chronic Care Solutions and is being distributed for training purposes only.
Donor ABO
Donor ABO
The donor’s ABO should be entered in the General Medical window of the donor record using the General Medical Icon,
the Donor ABO hyperlink from the patient review window, or from the Patient Master Menu, select Demographics, then
General Medical.
In the General Medical window, add the ABO and Rh using the Add Blood Type hyperlink.
Once the blood type is entered, it will populate the Blood Type and Rh Factor fields above.
Blood type is verified by selecting the Verify button. The clinician’s name along with today’s date and time will populate in
the field. You will not be able to edit the date and time once entered.
A 2nd verification is performed when another coordinator logs into the system, verifies the blood type and clicks the Verify
button.
Save and Close when finished.
OTTR™ Version 6.0 User Manual
2012 OTTR™ Chronic Care Solutions
179
All information contained herein is confidential and proprietary to OTTR™
Chronic Care Solutions and is being distributed for training purposes only.
Donor Info
Donor Information - Donor Demographics Tab
Access the Donor Info , Transplant Donor Inspector window from the Patient Master Menu, select Transplant, then Donor
Info
Name – The donor name auto-populates from patient demographics
Number – The UNOS number auto-populates from patient demographics
Donor Patient ID – The OTTR ID assigned to the patient auto-populates from patient demographics.
Recovery Date, Start Time, End Time, Recovery By, Recovery Location – Enter the information from the donor packet if
known.
Age, Gender, and Race – auto-populates from the patient demographics. The age displays with a decimal in the event the
donor is less than 1 year in age.
There are hyperlinks at the bottom of the window to allow access to the Demographics and Death windows to complete
missing information.
OTTR™ Version 6.0 User Manual
2012 OTTR™ Chronic Care Solutions
180
All information contained herein is confidential and proprietary to OTTR™
Chronic Care Solutions and is being distributed for training purposes only.
Donor Information - Organs Tab
The Organs tab is intended for use in the Bone Marrow Transplant (BMT) Module and can be disregarded
during solid organ transplant documentation
Donor Information - Donor Labs Tab
Document the donor patient’s lab results provided in the donor packet . This information may be used in future
research and your facility will determine the fields they wish to capture.
OTTR™ Version 6.0 User Manual
2012 OTTR™ Chronic Care Solutions
181
All information contained herein is confidential and proprietary to OTTR™
Chronic Care Solutions and is being distributed for training purposes only.
Donor Info - Donor History Tab
Document the donor’s history if known.
Vasopressor information can be added using the Add Row button. Once the information is entered, select OK to add that
row of information.
OTTR™ Version 6.0 User Manual
2012 OTTR™ Chronic Care Solutions
182
All information contained herein is confidential and proprietary to OTTR™
Chronic Care Solutions and is being distributed for training purposes only.
Donor Info - Organ Recovery Tab
Complete the information for the type of organ recovered.
You can also document information regarding other organs removed from that donor if known. This may be useful posttransplant.
Donor Info - Patients for this Donor
This window displays all recipients in your system who have been transplanted with organs from this donor patient but isn't
populated until after a transplant event has been recorded in a recipient’s record and the donor has been linked.
OTTR™ Version 6.0 User Manual
2012 OTTR™ Chronic Care Solutions
183
All information contained herein is confidential and proprietary to OTTR™
Chronic Care Solutions and is being distributed for training purposes only.
Adding Potential Donors
While still in your donor record you can add potential recipients to the donor utilizing the Patient Master Menu, select
Transplant, then Potential Recipients. You'll search for and add our potential recipient.
From your recipient record, you can add potential donor(s) for this recipient utilizing the Add Potential Donor from the
Potential Donors icon dropdown or from the Patient Master Menu, select Transplant, then Potential Donors.
Select the New Potential Donor button in the bottom of the Potential Donors window.
OTTR™ Version 6.0 User Manual
2012 OTTR™ Chronic Care Solutions
184
All information contained herein is confidential and proprietary to OTTR™
Chronic Care Solutions and is being distributed for training purposes only.
Next, select the Donor Search button in the New Potential Donor window.
Notice that this is done while in the recipient’s record. Refer to the title bar to insure you are in the appropriate patient
record.
Search for your living or deceased donor, highlight and click OK or highlight and double click to select.
OTTR™ Version 6.0 User Manual
2012 OTTR™ Chronic Care Solutions
185
All information contained herein is confidential and proprietary to OTTR™
Chronic Care Solutions and is being distributed for training purposes only.
Your donor is now added as a New Potential Donor for this recipient.
Viewing Potential Donors
Potential Donors can be viewed utilizing the Potential Donors icon or from the Patient Master Menu, select Transplant, then
Potential Donors.
OTTR™ Version 6.0 User Manual
2012 OTTR™ Chronic Care Solutions
186
All information contained herein is confidential and proprietary to OTTR™
Chronic Care Solutions and is being distributed for training purposes only.
Living donors will populate the top of the window while deceased donors will populate the bottom of the widow.
Double click on a highlighted donor to view additional information.
The Potential Transplant Donors tab allows you to view the potential recipient along with basic donor information that autopopulates.
Transplant Type and Organ Type can be entered using the dropdowns next to those fields.
The Donor Plan tab allows you to add actions related to the donor.
The Match Info tab allows you to enter match grade information in addition to Reasons Not Selected if the donor isn’t
selected for transplant.
Once your potential donors are added, you'll link the actual transplant with the donor when you add the transplant event.
OTTR™ Version 6.0 User Manual
2012 OTTR™ Chronic Care Solutions
187
All information contained herein is confidential and proprietary to OTTR™
Chronic Care Solutions and is being distributed for training purposes only.
Transplant
After you've added all potential donor(s) to OTTRTM for your recipient, you'll need to link the actual donor to your recipient
and add the transplant event. Refer to the Donor Management section for detailed instructions on adding and managing
donors.
A Transplant event is added to the recipient's record, using the Add Transplant option from the Transplants icon dropdown
or from the Add Master Menu, select Transplant-Solid Organ.
The window titled Select a donor for the new transplant record will open.
All potential donors will be displayed. Select the appropriate donor by highlighting and double clicking on the appropriate
donor or highlight and select Ok.
OTTR™ Version 6.0 User Manual
2012 OTTR™ Chronic Care Solutions
188
All information contained herein is confidential and proprietary to OTTR™
Chronic Care Solutions and is being distributed for training purposes only.
General Tab
Date of Transplant – Click the green calendar to enter the transplant date.
Organ Type – Click the drop-down arrow to make a selection.
Transplant Type – Click the drop-down arrow to make a selection.
Transplant Facility – Click the Search button to select the facility where the transplant was performed.
Transplant Coordinator – Click the Search button to select the transplant coordinator’s name.
Insurance Plan– Displays the patient’s primary insurance provider at the time of the transplant. If no insurance provider is
displayed, click the Search button to add the patient’s primary insurance provider to the transplant record.
Graft Failure Date– Click on the green calendar to enter a date. If the transplant fails, the coordinator must enter the graft
failure date within the original transplant record.
Graft Failure Reason– Click the Search button to select a graft failure reason.
Graft #– Enter the number for this type of graft.
# of HLA Matches– Enter the number of HLA matches completed.
Match Grade– Click on the drop-down arrow to make a selection.
HLA Mismatched Antigens– Enter the mismatched antigen information in the corresponding fields.
Exclude From Statistics– If checked, this transplant record will not be included in life table statistics.
OTTR™ Version 6.0 User Manual
2012 OTTR™ Chronic Care Solutions
189
All information contained herein is confidential and proprietary to OTTR™
Chronic Care Solutions and is being distributed for training purposes only.
Surgery Tab
Surgeon – Click the Search button to make a selection from the available transplant surgeons.
Surgeon 2 – Click the Search button to make a selection.
Admit – Click the green calendar to enter the date and time of admission.
Discharge – Click the green calendar to enter the date and time of discharge.
Start Case – Click the green calendar to enter the date and time that the patient entered the OR room. (wheels in)
End Case – Click the green calendar to enter the date and time that the patient left the OR room. (wheels out)
Surgical Technique – Free text field.
Primary Incision– Click on the drop-down arrow to make a selection.
Post Op Days in Hospital – Enter the number of days the patient remained in the hospital post transplant.
Post Op Days in ICU – Enter the number of days the patient remained in the ICU.
Additional Days in ICU– Enter the number of additional days in the ICU outside of originally expected days.
OTTR™ Version 6.0 User Manual
2012 OTTR™ Chronic Care Solutions
190
All information contained herein is confidential and proprietary to OTTR™
Chronic Care Solutions and is being distributed for training purposes only.
Surgery Tab cont.
Estimated Blood Loss – Enter the amount of blood loss.
Total Urine Output– Enter total urine output amount.
Cross (Donor) Clamp Time– Click on the green calendar to enter a date and time.
Skin incision start time– Click on the green calendar to enter a date and time.
Skin incision stop time– Click on the green calendar to enter a date and time.
Removed From Cold Storage– Click on the green calendar to enter a date
Recipient Unclamp Time– Click on the green calendar to enter a date and time.
Cold Ischemic Time– This is a calculated field of 'cross clamp time' through the 'remove from cold storage' time.
Organ Removal– Click on the green calendar to enter a date and time.
Warm Ischemic (Anastomosis) Time– Calculated field of 'remove from cold storage' through 'recipient unclamp' time.
OTTR™ Version 6.0 User Manual
2012 OTTR™ Chronic Care Solutions
191
All information contained herein is confidential and proprietary to OTTR™
Chronic Care Solutions and is being distributed for training purposes only.
Pre-Operative Ventilator – Place a check mark if yes.
On Ventilator– Click on the green calendar to enter a date and time.
Off Ventilator– Click on the green calendar to enter a date and time.
Post Op Ventilation time in hours– This is a calculation of the 'On vent' time through the 'Off vent' time.
On Bypass– Click on the green calendar to enter a date and time.
Off Bypass– Click on the green calendar to enter a date and time.
Intra-op Transfusions– Click the Add Row button to enter the number of units and type of blood product. Click OK when
finished. You can continue to make multiple entries using the Add Row feature.
OTTR™ Version 6.0 User Manual
2012 OTTR™ Chronic Care Solutions
192
All information contained herein is confidential and proprietary to OTTR™
Chronic Care Solutions and is being distributed for training purposes only.
Status Tab
Employment Status– Pulls information entered into patient demographics. You can modify or add a selection by clicking on
the drop-down arrow.
Functional Status– Pulls information entered into patient demographics . You can modify or add a selection by clicking on
the drop-down arrow.
Life Support– Click on the drop-down arrow to make a selection.
Medical Condition– Click on the drop-down arrow to make a selection.
Test Results at transplant time – Pulls lab results current for the patient at the time of transplant.
OTTR™ Version 6.0 User Manual
2012 OTTR™ Chronic Care Solutions
193
All information contained herein is confidential and proprietary to OTTR™
Chronic Care Solutions and is being distributed for training purposes only.
Donors Tab
Click to Add a Donor if not
previously linked
To remove a previously
added donor, highlight
the row and select
Remove Donor
Displays information
entered in the donor
record.
When initially adding a transplant to the recipient record, the clinician can select and attach the donor patient for this
transplant record. If selected, information entered in the donor’s record displays in the linked fields.
If the donor isn't added when initially adding the transplant, the Add Donor button can be selected to choose from the list of
potential donors.
Name – Displays the donor patient ‘s name.
Number & Secondary Number - Site defined but is usually the UNOS number.
Donor Patient ID – OTTR™ auto generated ID.
Relationship to Patient - The relationship to the patient displays here.
To modify or enter missing donor information select the Edit Donor button which opens the Transplant Donor Inspector
window.
OTTR™ Version 6.0 User Manual
2012 OTTR™ Chronic Care Solutions
194
All information contained herein is confidential and proprietary to OTTR™
Chronic Care Solutions and is being distributed for training purposes only.
After entering information, select Save & Close to return to the recipient's record.
Tissues/Organs Tab
Donor
Recipient
The Tissues/Organs tab of the transplant event pulls information from the Organs tab of the Transplant Donor Inspector
window on the donor side.
This tab is intended for use in the Bone Marrow Transplant (BMT) Module and can be disregarded when using for solid
organ transplant documentation. Some sites do choose to use it to document the type of organ and location such as 'Left
Kidney'. If used in this manner, the Add New button on the recipient side in the Tissues/Organs tab allows you to bring that
information across into the record.
OTTR™ Version 6.0 User Manual
2012 OTTR™ Chronic Care Solutions
195
All information contained herein is confidential and proprietary to OTTR™
Chronic Care Solutions and is being distributed for training purposes only.
Above is an example showing the type of organ removed from the donor, and displaying in the recipient's transplant event.
Additional Organ Tabs
Depending on the type of transplant performed, additional organ specific tabs will be available to document items specific
to that type of transplant.
OTTR™ Version 6.0 User Manual
2012 OTTR™ Chronic Care Solutions
196
All information contained herein is confidential and proprietary to OTTR™
Chronic Care Solutions and is being distributed for training purposes only.
Closing the Listing Record
When the Save button is selected while entering Transplant information, a pop up message will display asking if you want to
close the candidate listing record.
If you select Yes, the listing record for the patient will be date, time stamped and ended with an End Reason of
Transplanted.
The patient will now populate the appropriate Transplant Phase Lists accessed from the Lists Master Menu, select
Transplant-Tx, then the desired list such as Active Transplant Patients list.
OTTR™ Version 6.0 User Manual
2012 OTTR™ Chronic Care Solutions
197
All information contained herein is confidential and proprietary to OTTR™
Chronic Care Solutions and is being distributed for training purposes only.
Patient Schedules and Calendar
Schedules
Schedules such as clinic, imaging, lab, and yearly check up schedules can be added to a patient record. To add a
schedule, select the Add Schedules hyperlink or from the Add Master Menu, select Schedule, select the type of schedule,
then the frequency.
Enter the date you want the schedule to start in the Start Date field.
The End Date will be used at a later time when you want to end this schedule and is populated by clicking the End button in
the bottom of the window.
After a schedule is active, the Adjust button can be used to activate the Start Date field to adjust the date.
Once you've notified the patient of the schedule, place a check in the Patient Notified box. The patient will fall on the
Schedules - Schedule Changes list until marked notified.
OTTR™ Version 6.0 User Manual
2012 OTTR™ Chronic Care Solutions
198
All information contained herein is confidential and proprietary to OTTR™
Chronic Care Solutions and is being distributed for training purposes only.
In this example a 2 week clinic schedule was selected but can be changed using the dropdown in the Schedule field.
In the case of a lab schedule, the Sync to last lab date will be active, allowing you to reset the next expected date for the
system.
To view or manage schedules, select the Add Schedules hyperlink or from the Patient Master Menu, Select Calendar, then
Schedule.
All active schedules will display. To modify, adjust, or end a schedule, double click on the row of the schedule you want to
open.
From the Lists Master Menu, select Schedules to access the following lists:
Overdue Schedules - This list displays patients which have been assigned a schedule such as lab or clinic visits and
the information (result or encounter) has not yet been entered into OTTR TM. To be added to the list an expected
schedule date must pass and no result entered. To be removed from the list the expected schedule date must be
reset or the expected results must be entered.
All Active Schedules - This list displays all patients which have an active schedule. A patient is added to the list
when a schedule is added. The patient is removed from the list when the schedule end date is entered.
Schedule Changes - This list displays patients which have had a schedule added to their record and they have not
been marked notified. To be removed from the list the mark the Patient Notified check box must be checked in the
schedule inspector.
Upcoming Events - This list displays patients who have an expected schedule date in the future or on today's date.
To be removed from the list date must pass or event completed.
OTTR™ Version 6.0 User Manual
2012 OTTR™ Chronic Care Solutions
199
All information contained herein is confidential and proprietary to OTTR™
Chronic Care Solutions and is being distributed for training purposes only.
Patient Calendar
To view a patient's calendar, from the Patient Master Menu, select Calendar, then Calendar
Change the view here.
The calendar can be used to match appointments with a date that the patient is already scheduled to be at the facility.
OTTR™ Version 6.0 User Manual
2012 OTTR™ Chronic Care Solutions
200
All information contained herein is confidential and proprietary to OTTR™
Chronic Care Solutions and is being distributed for training purposes only.
To print a copy of the calendar, from the Patient Master Menu, select Reports, then Patient Calendar.
OTTR™ Version 6.0 User Manual
2012 OTTR™ Chronic Care Solutions
201
All information contained herein is confidential and proprietary to OTTR™
Chronic Care Solutions and is being distributed for training purposes only.
Expired Patients
Death information for expired patients can be entered using the Death Info icon or from the Patient Master Menu, select
Demographics, Select Death.
Enter the Date of Death. The Date of Death Entered should reflect the day you entered the death information. Use the
Change buttons to select Cause of Death, Secondary and Tertiary Cause of Death if applicable. The Clear button clears the
entry. If an autopsy was performed, but a check in the Autopsy box. Enter a comment or autopsy impression in the
Comment field. Enter the Place of Death if known. If the cause of death was transplant related, place a check in the Death
Transplant Related box.
Save & Close when finished.
Note: In the event that a patient expires, there may be active schedules, unscheduled actions, or pending results which will
need to be either closed or reviewed.
OTTR™ Version 6.0 User Manual
2012 OTTR™ Chronic Care Solutions
202
All information contained herein is confidential and proprietary to OTTR™
Chronic Care Solutions and is being distributed for training purposes only.
Supplemental Documents
OTTR™ Version 6.0 User Manual
2012 OTTR™ Chronic Care Solutions
203
All information contained herein is confidential and proprietary to OTTR™
Chronic Care Solutions and is being distributed for training purposes only.
Color Reference Chart
DIAGNOSIS
MANUALLY ENTERED LABS
Tentative Preliminary:
Not Yet Reviewed:
Deleted/Not-Confirmed:
Lab Rule Violation:
Verified Negative:
Inpatient/Inpatient Elsewhere:
Confirmed:
Outpatient Labs:
No “lab type” was selected
at time of data entry:
Previous Medical/Surgical
History or Data Conversion:
Inactive:
MEDICATIONS
ACTIONS
Patient Not Yet Notified:
Not Scheduled:
Active Medication:
Not Marked Done:
Closed/Inactive Medication:
Urgent/ASAP/Next Available:
INTERFACED LABS
ADT
Not Yet Reviewed:
Defines an unmatched OUT event (event
that sets the patient status to outpatient), such as a
Discharge even without an Admit event that matches.
Lab Rule Violation:
Inpatient Labs:
Outpatient Labs:
OTTR™ Version 6.0 User Manual
2012 OTTR™ Chronic Care Solutions
Defines an unmatched IN event (events that
start the patient stay) such, as an Admit event without a
Discharge event that matches.
Defines a matched IN and OUT event, such
as an Admit event with a matching Discharge event or
Discharge event with a matching Admit event.
204
All information contained herein is confidential and proprietary to OTTR™
Chronic Care Solutions and is being distributed for training purposes only.
General Daily Workflow- Coordinators
Check My Awaiting Coordinator Review List
o
Send appropriate items (actions) for physician review
o
Mark items as reviewed
o
Mark the actions as 'Done' for those items that you've just reviewed. Items can be marked 'Done' from the
Patient Review window, or on the My Pending Actions List. *If any of the items are part of an active
evaluation, be sure to put a short summary of the result in the comment section of the action
Check My Pending Actions List and complete or follow up on remaining items due for the day.
o
The day prior to your Selection Committee meeting, sort your list to look for the scheduled Selection
Committee action indicating your patient is ready to present.
o
Look for upcoming clinic appointment or initial visit actions to know who will be arriving for clinic so that
their chart is updated.
Check the Pending Medication Changes List and notify patient's of any medication changes.
Check the Pending Evaluation Actions - Not Done
o
Look for items yet to be completed
o
Once all evaluation items are completed, add a Selection Committee action for that patient to indicate they
are ready for presentation
As items arrive for patients, update their records
o
Add any pertinent manual labs
o
Scan in documents
o
Prescription refills
Check Overdue Schedules
o
Follow up with patient's regarding overdue lab or clinic schedules
OTTR™ Version 6.0 User Manual
2012 OTTR™ Chronic Care Solutions
205
All information contained herein is confidential and proprietary to OTTR™
Chronic Care Solutions and is being distributed for training purposes only.
General Daily Workflow - Transplant Assistants
Check My Pending Actions List and complete or follow up on remaining items due for the day that are assigned to
you
o
Look for upcoming clinic appointment or initial visit actions to know who will be arriving for clinic so that
their chart is updated
o
Schedule outstanding tests or appointments
Check the Pending Actions - Unscheduled and Not Done lists to follow up on items that aren't assigned directly to
you but may need completed
Check the Pending Evaluation Actions - Unscheduled
o
Schedule any unscheduled items
o
Once all evaluation items are completed, add a Selection Committee action for that patient to indicate they
are ready for presentation
Check the Pending Evaluation Actions - Not Done
o
As items arrive for patients, update their records
o
Add any pertinent manual labs
o
Scan in documents
Check Overdue Schedules
o
Follow up with any patients who were due for scheduled testing or consults and you've yet to see results
Follow up with patient's regarding overdue lab or clinic schedules
When patient's arrive for clinic
o
Verify demographic information
o
Verify Allergies
o
Add Vital Signs, Height and Weight using the Patient master menu, select Chart, select BSA Vitals
OTTR™ Version 6.0 User Manual
2012 OTTR™ Chronic Care Solutions
206
All information contained herein is confidential and proprietary to OTTR™
Chronic Care Solutions and is being distributed for training purposes only.
Recommended Physician/Coordinator Review Process
Listed below is our recommended process for facilitating the communication that occurs during the coordinator and
physician review process. We feel this process enhances patient safety and continuity of care. However, this is a
recommended guideline and you'll need to discuss and adapt to meet your Transplant or Ventricular Assist Device Center's
needs.
The coordinators will review all of their items in their My Awaiting Coordinator Review List. All abnormal results are
sent for physician review using the appropriate action for that abnormal issue. For normal results, the coordinator
can choose the 'Lab Review' action. **Follow your center's policy for sending results for physician review as some
center's will want physician's to review all items regardless of normal or abnormal result.
To assign the particular action to a certain physician, the coordinator can open the action and assign it to the
responsible person or physician.
The physician’s will review the Awaiting Physician Review list, and their My Pending Actions list if coordinators are
assigning individual physician's as responsible.
The physician will add the appropriate action for any additional testing or follow up that needs to be completed,
which will fall on the coordinator's My Pending Actions list. If a medication change is made, they will NOT mark
the patient as notified so that it falls on the Pending Medication Changes list.
The physician review action will be 'marked done' by the physician.
The coordinator will review their My Pending Actions and Medication Changes lists, to schedule any testing,
perform any follow up or notify the patient of any changes in care. The actions will be 'marked done' as
appropriate.
Note: Any issues that need immediate attention and cannot wait 24 hours should be communicated through direct
communication via phone call or face to face conversation for patient safety reasons.
OTTR™ Version 6.0 User Manual
2012 OTTR™ Chronic Care Solutions
207