1
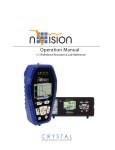
® E stablished 1981 QUICK START USER GUIDE Advanced Test Equipment Rentals www.atecorp.com 800-404-ATEC (2832) OX 7102 III OX 7202 OX 7104 III III OX 7204 III Statement of Compliance Chauvin Arnoux®, Inc. d.b.a. AEMC® Instruments certifies that this instrument has been calibrated using standards and instruments traceable to international standards. We guarantee that at the time of shipping your instrument has met its published specifications. An NIST traceable certificate may be requested at the time of purchase, or obtained by returning the instrument to our repair and calibration facility, for a nominal charge. The recommended calibration interval for this instrument is 12 months and begins on the date of receipt by the customer. For recalibration, please use our calibration services. Refer to our repair and calibration section at www.aemc.com. Serial #: _________________________________ Catalog #: _______________________________ Model #: OX 7102III / OX 7202III / OX 7104III / OX 7204III Please fill in the appropriate date as indicated: Date Received: __________________________________ Date Calibration Due: ________________________ Chauvin Arnoux®, Inc. d.b.a AEMC® Instruments www.aemc.com Table of Contents PRODUCT PACKAGING............................................................................ 3 Model OX 7102III - (2x100MHz)........................................................3 Model OX 7202III - (2x200MHz)........................................................4 Model OX 7104III - (4x100MHz)........................................................5 Model OX 7204III - (4x200MHz)........................................................6 OXIII Optional Accessories................................................................7 Precautions and Safety Measures.....................................................9 Before Use.......................................................................................10 During Use.......................................................................................10 Symbols used on the instrument......................................................10 GETTING STARTED............................................................................... 11 1.1 Receiving Your Shipment......................................................... 11 1.2 Charging the Battery................................................................ 11 1.3 Charging the Battery while using the Oscilloscope..................12 1.4 Powering the Instrument with the Battery................................12 1.5 Power Source..........................................................................12 1.6 External Power Supply Start Up..............................................13 1.7 Turning the instrument ON/OFF..............................................13 1.8 Operating Modes.....................................................................14 Repair and Calibration............................................................................15 Technical and Sales Assistance.............................................................15 Limited Warranty....................................................................................16 Warranty Repairs....................................................................................16 2 OX III - Quick Start User Guide Model OX 7102III - (2 x100MHz) Cat. #2124.58 PRODUCT PACKAGING Ships with the following: (Qty. 1) Aluminum Carrying Case Cat. #2124.79 (Qty. 1) Portable Oscilloscope OX 7102III Cat. #2124.58 (Qty. 2) PROBIX Banana Plug Adapter Cat. #2124.76 (Qty. 2) PROBIX PRHX1, 1/10 Probe Cat. #2124.73 (Qty. 2 red, 2 black) Grip Probes Cat. #2124.86 (Qty. 1) USB Cable Cat. #2124.96 (Qty. 1) Ethernet Cable - Crossed Cat. #2124.81 (Qty. 1 each) Power Adapter 115/230V & Razor Power Cord 110V US Plug Cat. #5000.21 & #5000.22 (Qty. 1) NiMH Battery Pack Cat. #2140.19 (Qty. 2) Stylus Cat. #5000.17 - replacement set of 5 (Qty. 1) Ethernet Cable - Straight Cat. #2124.80 Also Included: • SX-METRO Software on CD-ROM • User Manual on CD-ROM in Paper Sleeve • Three-Year Warranty Card (Qty. 2 red, 2 black) Color-coded Leads (1.5m) with Probe Tips Cat. #2124.85 OX III - Quick Start User Guide • Recorder/Harmonic/Power/50K Memory Option (installed) • Quick Reference User Manual 3 Model OX 7202III - (2 x200MHz) Cat. #2124.59 PRODUCT PACKAGING Ships with the following: (Qty. 1) Aluminum Carrying Case Cat. #2124.79 (Qty. 1) Portable Oscilloscope OX 7202III Cat. #2124.59 (Qty. 2) PROBIX Banana Plug Adapter Cat. #2124.76 (Qty. 2) PROBIX PRHX1, 1/10 Probe Cat. #2124.73 (Qty. 2 red, 2 black) Grip Probes Cat. #2124.86 (Qty. 1 each) Power Adapter 115/230V & Razor Power Cord 110V US Plug Cat. #5000.21 & #5000.22 (Qty. 1) NiMH Battery Pack Cat. #2140.19 (Qty. 1) USB Cable Cat. #2124.96 (Qty. 1) Ethernet Cable - Crossed Cat. #2124.81 (Qty. 1) 512MB Memory Card Cat. #2124.97 (Qty. 2) Stylus Cat. #5000.17 - replacement set of 5 (Qty. 1) Ethernet Cable - Straight Cat. #2124.80 Also Included: • SX-METRO Software on CD-ROM • User Manual on CD-ROM in Paper Sleeve • Three-Year Warranty Card (Qty. 2 red, 2 black) Color-coded Leads (1.5m) with Probe Tips Cat. #2124.85 4 • Recorder/Harmonic/Power/50K Memory Option (installed) • Quick Reference User Manual OX III - Quick Start User Guide Model OX 7104III - (4 x100MHz) Cat. #2124.67 PRODUCT PACKAGING Ships with the following: (Qty. 1) Aluminum Carrying Case Cat. #2124.79 (Qty. 1) Portable Oscilloscope OX 7104II Cat. #2124.67 (Qty. 4) PROBIX Banana Plug Adapter Cat. #2124.76 (Qty. 4) PROBIX PRHX1, 1/10 Probe Cat. #2124.73 (Qty. 4 red, 4 black) Grip Probes Cat. #2124.86 (Qty. 1) USB Cable Cat. #2124.96 (Qty. 1) Ethernet Cable - Crossed Cat. #2124.81 (Qty. 1 each) Power Adapter 115/230V & Razor Power Cord 110V US Plug Cat. #5000.21 & #5000.22 (Qty. 1) NiMH Battery Pack Cat. #2140.19 (Qty. 2) Stylus Cat. #5000.17 - replacement set of 5 (Qty. 1) Ethernet Cable - Straight Cat. #2124.80 Also Included: • SX-METRO Software on CD-ROM • User Manual on CD-ROM in Paper Sleeve • Three-Year Warranty Card (Qty. 4 red, 4 black) Color-coded Leads (1.5m) with Probe Tips Cat. #2124.85 OX III - Quick Start User Guide • Recorder/Harmonic/Power/50K Memory Option (installed) • Quick Reference User Manual 5 Model OX 7204III - (4 x200MHz) Cat. #2124.68 PRODUCT PACKAGING Ships with the following: (Qty. 1) Aluminum Carrying Case Cat. #2124.79 (Qty. 1) Portable Oscilloscope OX 7204III Cat. #2124.68 (Qty. 4) PROBIX Banana Plug Adapter Cat. #2124.76 (Qty. 4) PROBIX PRHX1, 1/10 Probe Cat. #2124.73 (Qty. 4 red, 4 black) Grip Probes Cat. #2124.86 (Qty. 1 each) Power Adapter 115/230V & Razor Power Cord 110V US Plug Cat. #5000.21 & #5000.22 (Qty. 1) NiMH Battery Pack Cat. #2140.19 (Qty. 1) USB Cable Cat. #2124.96 (Qty. 1) Ethernet Cable - Crossed Cat. #2124.81 (Qty. 1) 512MB Memory Card Cat. #2124.97 (Qty. 2) Stylus Cat. #5000.17 - replacement set of 5 (Qty. 1) Ethernet Cable - Straight Cat. #2124.80 Also Included: • SX-METRO Software on CD-ROM • User Manual on CD-ROM in Paper Sleeve • Three-Year Warranty Card (Qty. 4 red, 4 black) Color-coded Leads (1.5m) with Probe Tips Cat. #2124.85 6 • Recorder/Harmonic/Power/50K Memory Option (installed) • Quick Reference User Manual OX III - Quick Start User Guide OXIII Optional Accessories PROBIX PRHX4, BNC adapter (HX0031) Cat. #2124.74 PROBIX PRHX5, 50W adapter (HX0032) Cat. #2124.75 PROBIX PRHX7 K thermocouple adapter (HX0035) Cat. #2124.78 PROBIX RTD100 (PT100) Adapter (HX0036) Cat. #2124.98 Tip and Clip Accessory (600V) for PROBIX PRHX1 1/10 Probe Cat. #2124.90 MiniFlex® 0.5A to 300A, 3MHz (HX0073) Cat. #2124.92 OX III - Quick Start User Guide AmpFlex® 0.5A to 3kA, 200kHz (HX0072) Cat. #2124.91 PROBIX current probe, 20mA-20A, 100kHz (HX0034) Cat. #2124.77 7 READ CAREFULLY BEFORE USING FOR THE FIRST TIME Your instrument is equipped with a NiMH battery. This technology offers several advantages: • Long battery charge life for a limited volume and weight. • Possibility of quickly recharging your battery. • Significantly reduced memory effect: you can recharge your battery even if it is not fully discharged. • Respect for the environment: no pollutant materials such as lead or cadmium, in compliance with the applicable regulations. After prolonged storage, the battery may be completely discharged. If so, it must be completely recharged. Your instrument may not function during part of this recharging operation. Full recharging of a completely discharged battery may take several hours. In this case, at least 5 charge/discharge cycles will be necessary for your battery to recover 95% of its capacity. To make the best possible use of your battery and extend its effective service life: • Only use the charger supplied with your instrument. Use of another charger may be dangerous. • Only charge your instrument at temperatures between 0° and 40°C. • Comply with the conditions of use defined in the operating manual. • Comply with the storage conditions specified in the operating manual. NiMH technology allows a limited number of charge/discharge cycles depending significantly on: • The conditions of use. • The charging conditions. Please refer to the user manual for correct replacement of the battery. Do not dispose of the battery pack with other solid waste. Used batteries must be entrusted to a qualified recycling company or to a company specialized in processing hazardous materials. 8 OX III - Quick Start User Guide Precautions and Safety Measures Read the user manual, supplied on CD-ROM, completely and comply with the operating precautions before operating this instrument. Non-compliance with the warnings and/or operating instructions might damage the instrument and/or its components and could prove dangerous for the user. This instrument has been designed for use: • • • • • indoors in an environment with pollution level 2, at an altitude of less than 2000 m, at a temperature between 0°C and 40°C with relative humidity of less than 80% up to 31°C. The safety of any system integrating the apparatus concerns the responsibility of the assembler of the system. It can be used for measurements on circuits 600V CAT III, 1000V CAT II in relation to earth and can be powered by a 98 to 264V mains network, with an external power supply. However, some accessories can lead you to use this instrument on circuits of lower voltage and category. Conform the given values when connecting the accessory. Definition of Measurement Categories CAT I: CAT I circuits are circuits protected by low level transient over- voltage limiters. Example: protected electronic circuits CAT II: CAT II circuits are household or similar appliance power circuits, which may carry medium-level transient over-voltage. Example: household appliance and portable tool power supplies CAT III: CAT III circuits are high-power appliance power circuits, which may carry high-level transient over-voltage. Example: industrial machinery or instrument power supplies CAT IV: CAT IV circuits are circuits which can carry very substantial transient over-voltage. Example: power feeders OX III - Quick Start User Guide 9 Before Use • Comply with environmental and storage conditions. • External power supply : it must be connected to the instrument and to the mains network (from 98 to 264VAC). Make sure that it is in good working conditions. During Use • Read carefully all the notes preceded by the symbol . • The instrument power supply is equipped with an electronic protection system which is reset automatically when the fault is eliminated. • Be sure not to obstruct the ventilation holes. • As a safety measure, use only suitable cords and accessories supplied with the instrument or approved by the manufacturer. Symbols used on the instrument Warning: Risk of danger. Refer to the operating manual to find out the nature of the potential hazards and the action necessary to avoid such hazards. Earth/Ground Dual insulation Selective sorting of waste for recycling electric and electronic materials. In accordance with the WEEE 2002/96/EC directive: must not be treated as household waste. Application or withdrawal not authorized for non-insulated conductors carrying dangerous voltage levels 10 OX III - Quick Start User Guide CHAPTER 1 GETTING STARTED 1.1 Receiving Your Shipment Upon receiving your shipment, make sure that the contents are consistent with the packing list. Notify your distributor of any missing items. If the equipment appears to be damaged, file a claim immediately with the carrier and notify your distributor at once, giving a detailed description of any damage. Save the damaged packing container to substantiate your claim. 1.2 Charging the Battery IMPORTANT NOTE: When the oscilloscope is delivered, the battery may be discharged and require a complete recharge. Full charging of the battery will then take about two and a half hours, with the oscilloscope switched off. Once the battery is installed, follow the external power supply start-up instructions. • To speed up recharging of the battery, switch off the power to the oscilloscope with a long press of the ON/OFF button. • Battery fully discharged: during the first 10 minutes, the CHARGE LED of the external power supply flashes, indicating that the battery is slow-charging. The CHARGE LED then lights up when it switches to fast-charging. During the charging of the battery (after 15 min), powering on of the oscilloscope causes premature stopping of the charge. It is possible to restart the charging by disconnecting, then reconnecting the charger. The LED goes out when the battery is fully charged (approx. 2h30). OX III - Quick Start User Guide 11 1.3 Charging the Battery while using the Oscilloscope When the oscilloscope is connected to the AC power via the external power supply, it is possible to perform slow-charging of the battery. The CHARGE LED of the external power supply lights up. Full recharging of a totally discharged battery then takes approximately five and a half hours. The LED goes out when the battery is fully charged. Frequently recharging a battery when it is not fully discharged reduces its life span. 1.4 Powering the Instrument with the Battery When the oscilloscope is powered by a battery, a charge status indicator appears in the display area: the battery is 100% charged the battery is 80% charged the battery is 60% charged, etc. If only one charge bar is present, it means that the battery can only operate for a few minutes more, so you are advised to recharge it or switch to the AC power supply. The battery is totally dead and the screen is about to shut off. You must either recharge the battery or connect the instrument to the external power supply. To maintain good condition of the battery, use the oscilloscope until at least one bar remains before recharging. 1.5 Power Source The portable oscilloscope is designed to operate on a power source from 98 to 264V (ACrms) at 50 to 60Hz or in stand-alone mode with a battery. The instrument is delivered with an AC power adapter, an external power supply (battery charger) and an NiMH battery (9.6V, 3.5A/h). Type: time delay, 2.5 A, 250 V, 5 x 20 mm The external power supply is equipped with a protection fuse that must only be replaced with an identical model. Replacement must only be performed by qualified personnel. Contact your distributor or AEMC® for servicing. 12 OX III - Quick Start User Guide 1.6 • External Power Supply Start Up Connect the 4-pin lead of the external power supply to the “DC-Input” socket located on the side of the oscilloscope. WARNING: Do not insert any metal objects into this lead. • Connect the power cord from the external power supply to the power line. The POWER LED on the adapter lights up, indicating that it is live. The CHARGE LED flashes, indicating: • the absence of the battery or • slow charging of the battery, if it is present in the oscilloscope. Press the instrument’s ON button. It lights up and a clock is displayed on the screen during the start-up sequence. The message “Instrument startup” is displayed. The oscilloscope is then ready for use. in the display area for the current value means The symbol that the instrument is connected to the AC power supply. NOTE: By default, the “Advanced” mode is not active. 1.7 Turning the instrument ON/OFF • Power on by a short press. • Switch the instrument to standby (yellow LED flashing inside the key) by one short press. A second press on the key reactivates the instrument. • Power off by a long press (>3 s): the configuration and files are saved after approximately 15 s. WARNING: If the instrument is not equipped with a battery, never disconnect the instrument from the AC power while the message “System shut down: Please wait before switch off power” is displayed on the screen. Otherwise, the current file and all the files previously saved will be lost. OX III - Quick Start User Guide 13 1.8 Operating Modes You can select the operating mode of the instrument by pressing one of these 4 keys: Oscilloscope Multimeter Harmonic analyzer (option) Recorder (option) The complete user manual with operating instructions, descriptions of the modes, and all specifications can be found on the CD-ROM that was shipped with the instrument. 14 OX III - Quick Start User Guide Repair and Calibration To ensure that your instrument meets factory specifications, we recommend that it be scheduled back to our factory Service Center at one-year intervals for recalibration, or as required by other standards or internal procedures. For instrument repair and calibration: You must contact our Service Center for a Customer Service Authorization Number (CSA#). This will ensure that when your instrument arrives, it will be tracked and processed promptly. Please write the CSA# on the outside of the shipping container. If the instrument is returned for calibration, we need to know if you want a standard calibration, or a calibration traceable to N.I.S.T. (Includes calibration certificate plus recorded calibration data). Ship To: Chauvin Arnoux®, Inc. d.b.a. AEMC® Instruments 15 Faraday Drive Dover, NH 03820 USA Phone:(800) 945-2362 (Ext. 360) (603) 749-6434 (Ext. 360) Fax: (603) 742-2346 or (603) 749-6309 E-mail:[email protected] (Or contact your authorized distributor) Costs for repair, standard calibration, and calibration traceable to N.I.S.T. are available. NOTE: You must obtain a CSA# before returning any instrument. Technical and Sales Assistance If you are experiencing any technical problems, or require any assistance with the proper operation or application of your instrument, please call, mail, fax or e-mail our technical support team: Chauvin Arnoux®, Inc. d.b.a. AEMC® Instruments 200 Foxborough Boulevard Foxborough, MA 02035 USA Phone:(800) 343-1391 (508) 698-2115 Fax: (508) 698-2118 E-mail:[email protected] www.aemc.com NOTE: Do not ship Instruments to our Foxborough, MA address. OX III - Quick Start User Guide 15 Limited Warranty The OXIII Oscilloscopes are warranted to the owner for a period of three years from the date of original purchase against defects in manufacture. This limited warranty is given by AEMC® Instruments, not by the distributor from whom it was purchased. This warranty is void if the unit has been tampered with, abused or if the defect is related to service not performed by AEMC® Instruments. For full and detailed warranty coverage, please read the Warranty Coverage Information, which is attached to the Warranty Registration Card (if enclosed) or is available at www.aemc.com. Please keep the Warranty Coverage Information with your records. What AEMC® Instruments will do: If a malfunction occurs within the three-year period, you may return the instrument to us for repair, provided we have your warranty registration information on file or a proof of purchase. AEMC® Instruments will, at its option, repair or replace the faulty material. REGISTER ONLINE AT: www.aemc.com Warranty Repairs What you must do to return an Instrument for Warranty Repair: First, request a Customer Service Authorization Number (CSA#) by phone or by fax from our Service Department (see address below), then return the instrument along with the signed CSA Form. Please write the CSA# on the outside of the shipping container. Return the instrument, postage or shipment pre-paid to: Ship To: Chauvin Arnoux®, Inc. d.b.a. AEMC® Instruments 15 Faraday Drive • Dover, NH 03820 USA Phone:(800) 945-2362 (Ext. 360) (603) 749-6434 (Ext. 360) Fax: (603) 742-2346 or (603) 749-6309 E-mail:[email protected] Caution: To protect yourself against in-transit loss, we recommend you insure your returned material. NOTE: You must obtain a CSA# before returning any instrument. 16 OX III - Quick Start User Guide 02/11 99-MAN 100356 v2 Chauvin Arnoux®, Inc. d.b.a. AEMC® Instruments 15 Faraday Drive • Dover, NH 03820 USA • Phone: (603) 749-6434 • Fax: (603) 742-2346 www.aemc.com