1
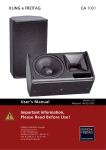
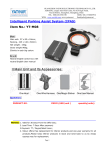
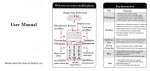
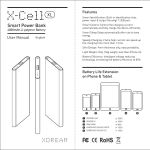
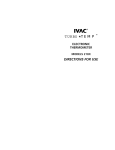
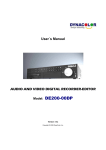
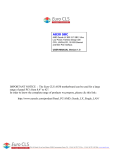
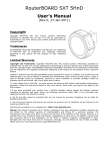
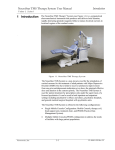
2.4G Wireless
Digital Color
LCD Baby Monitor Kit
Contents
Note.............................................................................................3
Main Function..............................................................................3
Function Introduction....................................................................4
Standard Package Content..........................................................6
Instructions...................................................................................6
Menu............................................................................................7
Baby Vol Mode.............................................................................7
Effect Mode..................................................................................8
Setup Mode................................................................................10
ZOOMMode................................................................................11
TIME Set...................................................................................................12
Pair Process...............................................................................12
Problems & Solutions.................................................................13
Parameters.................................................................................14
Signal Indicators:........................................................................16
Note:
1:Please do not work at a high temperature,high magnetic field or under
the glare.
2:Use the designated power adaptor and battery in case any serious damage
of this product
3:Do not put this product in those places which the temperature is
extremely low or high.
4:Please turn off the power when you do not use this
product.Meanwhile,please take out the battery when you do not use it for
a long time.
5:Please avoid water and dust.
6:Please do not use thinner or other chemicals to wipe this product
7:This product is designed for baby,please try to use it in interior.And
it will reduce the display effect under strong light.
8:The AC adaptor is for indoor use only.
Main Function
●Adopt 2.4GHz Frenquency transmission,accord with FCC,CE Standard;
●With high resolution 2.4” LCD display screen;
●Have operation text menu display function;
●Support one receiver can connect 4 transmitters;
●Long-distance transmission:Up to 200-300m in open air;
●Day and night monitoring with clear images for 24 hours;
●Half-duplex Voice Transmission,Voice clear, volume of sound (0~10)
is adjustable;
●Vox Alarm function,the volume of baby sound or happened in baby room
over the volume which software of baby monitor has been fixed will alarm
to monitor (screen automatically turn off,and then turn on with sound),
to remind parents to pay more attention to baby.
●Monitor with TV Out function,support TV display;
●Monitor with real time function,and display real time information;
●Camera and receiver use lithium batteries, convenient for mobile use;
●With pairing code function: make pairing through the pairing code
buttons of monitor
and camera;
●Abelt buckle receiver clip, easy to carry.
Lens
Power key
Night
vision
IR
5V Power input
Code pair/Work
indicator
Microph
one
Function Introduction
2.4G Wireless Camera Illustration
2.4" LCD baby monitor Illustration:
Power/Pair key
LCD Screen
Long
press
to
start,short click to enter
the sleep mode
Sound
Volume
Indicator
DC 5V power input
3 seconds long press
to amplify the image
Power /Pair Key
Turn up the volume
Switch channels
Switch channels
TV output , Plug in A/V line to
switch to TV display, pulled out
AV line to switch to LCD display
turn down the volume
Pair Key,short press this button until the
power indicator light is on,press the Pair
button of the transmitter for 3 seconds to
pair,it will display the image of camera
after pairing successfully
Stents and back clip
2.4G Wireless Camera
1 PCS Wireless Camera
1 PCS Wireless LCD Receiver
2 PCS power adapter
1 PCS AV Cable
1 PCS user manual
1 PCS lithium battery for
camera use
Standard Package Content
● 5V DC Power adapter
● 2.4G Wireless LCD Baby Receiver
● 2.4G Wireless Camera
2PCS
1PCS
1PCS
● User manual
1PCS
● AV Cable
1PCS
● lithium battery for camera use
1PCS
Instructions
The camera and receiver use external power supply or supply battery by
built-in lithium battery, short press the Power/Pair button of the camera
until the power indicator light is on,After switching on, press the Power
button of the receiver for 3 seconds,then press the Power/Pair key of
camera for 3 secons,Green light flash and enter into pairing code.After
pairing successful,Monitor will show “Paired” information,and connect
with cameras automatically.
The camera and receiver use external power supply or supply battery
by built-in lithium battery, short press the Power/Pair button of the
camera until the power indicator light is on,After switching on, press
the Power button of the receiver for 3 seconds,then press the Power/Pair
key of camera for 3 secons,Green light flash and enter into pairing
code.After
pairing
successful,Monitor
will
show
“ Paired ”
information,and connect with cameras automatically.
In the preview screen to press up/down button to adjust the volume of
the LCD receiver and press left/right to switch the channels.
Menu
In the preview screen short click OK button to enter
the main menu display
● Baby Vol
● Effect
Baby Vol Mode
MAIN
MENU
BABY
Baby Vol
Effect
Setup
Exit
VOL
[ 70 ]
In the preview screen short click OK button to enter the main menu display,the
options box stops in the "Baby Vol" option,this model is to adjust the volume
of the camera and to adjust the volume of the LCD when pressing up/down button
in the preview screen.Click OK button to enter the volume adjustment, press
left and right adjust the volume , volume level from 0-100 (10 a level
volume).Press OK Key to confirm and exit after this.
Effect Mode
MAIN
MENU
Baby Vol
Effect
Setup
Exit
EFFECT
Briness
Vertizontal
Horizontal
Contrast
Saturation
[ 50
]
[ ON ]
[ ON ]
[ 50
]
[ 50
]
1:Brightness Mode
In the preview screen short click OK button to enter the main menu
display,hen press the up/down key move to Effect position when the press
OK to enter.Press the up/down key move to brightness ,press left/right
key to modify the parameter,the brightness
level from 0-100 (10 a level
brightness )
Press OK Key to confirm and exit after this.Briness
Note:The brightness can be adjusted usefully only after receiving the
image of camera,and the brightness is the camera`s,not the LCD`s.
2:Vertical Mode
In the preview screen short click OK button to enter the main menu
display,then press the up/down key move to Effect position when the press
OK to enter.Press the up/down key move to Vertical,press left/right key
to modify the the ON/OFF state.
ON:Image display properly
OFF:Mirror image shows around
Press OK Key to confirm and exit after this.
3:Horizontal Mode
In the preview screen short click OK button to enter the main menu
display,then press the up/down key move to Effect position when the press
OK to enter.Press the up/down key move to Horizontal,press left/right
key to modify the the ON/OFF state.
ON:Image display properly
OFF:Mirror image shows around
Press OK Key to confirm and exit after this.
4:Contrast Mode
In the preview screen short click OK button to enter the main menu
display,then press the up/down key move to Effect position when the press
OK to enter.Press the up/down key move to contrast,press left/right key
to modify the parameter,the contrast level from 0-100 (10 a level
contrast)
Press OK Key to confirm and exit after this.
Note:The contrast can be adjusted usefully only after receiving the image
of camera.
5:Saturation Mode
In the preview screen short click OK button to enter the main menu
display,then press the up/down key move to Effect position when the press
OK to enter.Press the up/down key move to Saturation,press left/right
key to modify the parameter,the saturation level from 0-100 (10 a level
saturation)
Press OK Key to confirm and exit after this.
Note:The saturation can be adjusted usefully only after receiving the
image of camera,and the saturation of this mode is fixed so the parameter
won`t change when adjusting.
Setup Mode
MAIN
MENU
SETUP
Baby Vol
Effect
Setup
Exit
VOX Mode
[---]
Auto Sleep
[ OFF]
TV Out [
PAL
]
1:VOX Mode
In the preview screen short click OK button to enter the main menu
display,then press the up/down key move to Setup position when the press
OK to enter.Press the up/down key move to VOX Mode,press left/right key
to modify the parameter.There are OFF/LO/HI 3 choices,it will display
[---] if not receiving images.
OFF:close sonic function, sonic function is invalid
LO:Sonic low sensitivity,when the LCD enter sleep mode,the voice of
the camera is more than 60 dB ,and the LCD will open automatically, and
the screen display "VOX ".
HI:Sonic high sensitivity,when the LCD enter sleep mode,the voice
of the camera is more than 56 dB ,and the LCD will open automatically,
and the screen display "VOX ".
2:Auto Sleep Mode
In the preview screen short click OK button to enter the main menu
display,then press the up/down key move to Setup position when the press
OK to enter.Press the up/down key move to Auto Sleep,press left/right
key to modify the parameter.
OFF:When auto sleep mode off,short press POWER button to enter the auto
sleep mode.
30S/1M/3M/5M/10M:choose the time of automatic out screen time,then the
LCD receiver will enter auto sleep mode.When the LO/HI of vox mode is
on, the voice of the camera in the control level more than set up,the
LCD will light automatically.
3:TV OUT Mode
In the preview screen short click OK button to enter the main menu
display,then press the up/down key move to Setup position when the press
OK to enter.Press the up/down key move to TV OUT TV formats output
model,press left/right key to modify the parameter, PAL-M/NTSC-3.58 /
PAL/NTSC-4.43 four formats for choosing.
ZOOM Mode
12:00
12:00
In the preview screen long press TALL/ZOOM
magnifying
glass
icon
is
displayed
Key for 3 seconds,a
on
the
LCD
display,pressup/down/left/right buttons can move the image of the
display area,then short press TALL/ZOOM Key to confirm and exit after
this.
TIME Set
In the preview screen long press OK Key for 3 seconds to enter into time
setup,Press Left/Right Key to adjust the increase or decrease of the
number of the time,set up the hour first and short press OK Key to confirm
it,then set up the minute,and short press OK Key to confirm and exit after
this.
Pair Process
LCD Monitor with power,meantime cameras should be with power;
1:Choosing the camera code which is going to pair by Left and Right Key
of the Monitor,such as CH1;
2:Press Power/Pair of Monitor for 3 seconds to make pairing, POWER light
will flash LCD display” 1# baby Pairing…”
3:Press the Power/Pair key of camera for 3 secons,Green light flash and
enter into pairing code;
4:After pairing successful,Monitor will show “Paired” information,and
connect with cameras automatically.
If can not pair code, it returns to original code and back to origital
state after 15 seconds,
Repeat Step 4.2.2 ~ Step 4.2.5 to make pairing code of Camera 2,3,4.
Note:Different cameras should choose different channel to code,
otherwise, it will override other cameras in this channel to code.
Problems & Solutions
1:There are screaming voice if the distance between the camera and monitor
is near
Answer: This phenomenon is caused by the acoustical feedback,the audio
signal of microphone is gleaned by receiver’s speaker and then the
microphone pick the signal again and transmit them together with camera’
s voice,the receiver will have louder voice than before.Therefore,it can
cause the formation of self-excited oscillation round and round ,and
result in the screaming voice.However,you can solve this problem by turn
down the speaker volume or insert the headset into the receiver.
2:No response
Answer:Check whether the power adaptor is connected well,check whether
the battery is installed well.Please install the battery in correct
direction.And check whether receiver power button is ON position
3:LCD can`t display when power on
Answer:Please Check whether the AV line and not connected to insert
the TV,whether press the POWER button is short in auto sleep mode,then
press the POWER button in short time to see if the display work or not.
Parameters
a: Function
Function
Description
Frame Rate
15-25 Frame,Signal strong,frame high
Signal
strength 6 grade
indication
Voice Volume
10 grade
Talkback
Two-way talk, half-duplex
VOX
Switch on automatically when there is voice
One monitor with 4 One receiver with 4 cameras,switch CH display
transmitter
Realtime clock
Yes,24 hours system
LCD Size
2.4inch 960*240 RGB color LCD
Transmission
Use after pair code
safety
b: Electrical parameters
LCD
Receiver DC:5V/1000MA;Battery:Built-in 3.6V/700MAH
Voltage
lithium battery
DC : 5V/1000MA ; Battery:External lithium
Camera Voltage
battery 3.6V/700MAH
Frequency
Wireless
2.4GHz ISM Band
Work
FHSS
Method
Transmission
19dBm@CW mode
Power
Transmission rate
3Mbps
Operating Range
Open field:200-300 meter
Work
current
TX:400mA MAX,RX:400mA MAX(No charge current
( Transmitter and
calculation)
receiver)
120-200MA (Transmitter and Receiver have the
Charge current
same charge current)
Work current for
Auto sleep
TX:35mA(once every 0.5s)RX:20mA(once
every 0.5s)
Audio rate
16K
Audio range
120Hz~3KHz
VOX Power
-56/-60dB@ MIC Input
Camera resolution
0.3 Mega
Picture resolution
320*240QVGA
AV OUT function
5-15 frame VGA from AV Output
Video Rate
15-25FPS
Total
harmonic
<5.0%
distortion
SNR
46dB
Receiving
-96dBm@BER=1e-3
Sensitivity
Night vision range
2—3 meters
Operating
20--80% RH
Humidity
Operating
0℃--60℃
Temperature
Signal Indicators:
Signal Strength lndicators
Description
Perfect Signal
Low Signal
No Signal