1
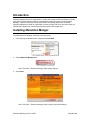
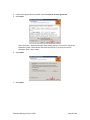
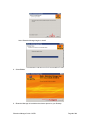
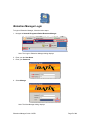
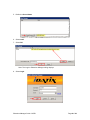
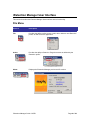
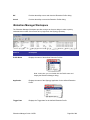
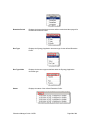
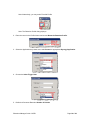
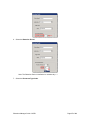
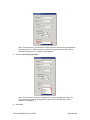
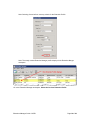
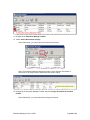
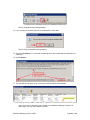
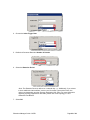
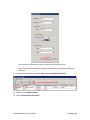
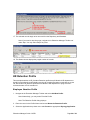
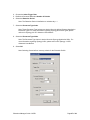
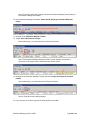
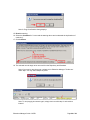
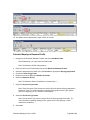
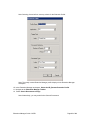
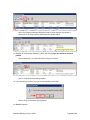
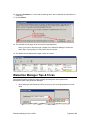
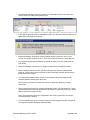
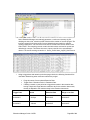
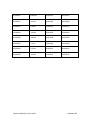
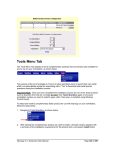
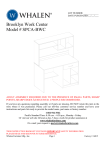
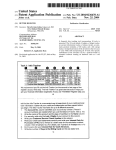
iRetention Manger Administration Manual Version 3.9 SP1 iDatix Corporation 15201 Roosevelt Blvd., Ste. 104, Clearwater, FL 33760 Tel: (727) 441-8228 – Fax: (727) 444-4419 Email: [email protected] Web: www.idatix.com iRetention Manager Guide 3.9 SP1 Page 1 of 36 Copyright © 2000 – 2009, iDatix Corporation, All rights reserved. All rights reserved. No part of the contents of this publication may be reproduced, transmitted, transcribed, stored in a retrieval system, or translated into any language in any form without written consent from iDatix Corporation. This software product, including the manual and media, is copyrighted and contains proprietary information that is subject to change without notice. The software may be used or copied only in accordance with the terms of the license agreement. Microsoft and Windows are either registered trademarks or trademarks of Microsoft Corporation in the United States and/or other countries. iDatix and iSynergy are registered trademarks of iDatix Corporation. All other trademarks are acknowledged as the exclusive property of their respective owners. Version 3.9 SP1 --- 5.20.2009 iRetention Manager Guide 3.9 SP1 Page 2 of 36 Table of Contents Introduction ........................................................................................................... 4 Installing iRetention Manger ................................................................................. 4 iRetention Manager Login .................................................................................. 7 iRetention Manager User Interface ....................................................................... 9 File Menu ........................................................................................................... 9 Toolbar............................................................................................................. 10 iRetention Profile.............................................................................................. 11 iRetention Manager Workspace ....................................................................... 13 iRetention Manager Bottom Toolbar ................................................................ 15 Working with iRetention Manager ....................................................................... 15 Invoice Retention Profile .................................................................................. 15 Checks Retention Profile ................................................................................. 22 HR Retention Profile ........................................................................................ 26 iRetention Manager Tips & Tricks ....................................................................... 33 iRetention Manager Guide 3.9 SP1 Page 3 of 36 Introduction iRetention Manager allows an organization to create and manage retention profiles that contain user defined criteria enabling iSynergy to automatically purge documents. Using iRetention Manager, a specific time period can be associated to an iSynergy application. In addition, iRetention Manager will allow an organization to define a trigger date for a document which will officially begin applying the retention period policy based on that trigger date. Installing iRetention Manger To install iRetention Manager, follow the below procedure. 1. In the iSynergy Installation folder, navigate to Server>Utils. 2. Select iRetention Manager.msi Note: The iDatix – iRetention Manager Setup dialog displays. 3. Select Next. Note: The iDatix – iRetention Manager Setup License Agreement displays. iRetention Manager Guide 3.9 SP1 Page 4 of 36 4. If the license agreement is acceptable, select I accept the license agreement. 5. Select Next. Note: The iDatix – iRetention Manager Setup dialog displays. If you wish to change the Destination Folder, select Browse and follow the prompts. If you wish to leave the destination folder, skip to step 6. 6. Select Next. 7. Select Next. iRetention Manager Guide 3.9 SP1 Page 5 of 36 Note: iRetention Manager begins to install. 8. Select Finish. 9. iRetention Manager is installed and a shortcut placed on your Desktop. iRetention Manager Guide 3.9 SP1 Page 6 of 36 iRetention Manager Login To login to iRetention Manager, follow the below steps. 1. Navigate to Start>All Programs>iDatix>iRetention Manager. Note: The Login to iRetention Manager dialog displays. 2. Enter your the User Name. 3. Enter your Password. 4. Select Manage. Note: The Alias Manager dialog displays. iRetention Manager Guide 3.9 SP1 Page 7 of 36 5. Define the Server Name. 6. Select Load. 7. Select OK. Note: The Login to iRetention Manager dialog displays. 8. Select Login. iRetention Manager Guide 3.9 SP1 Page 8 of 36 iRetention Manager User Interface This section describes the iRetetion Manager User Interface and its functionality. File Menu Element Description File Provides the ability to allow a user to add, edit or delete a new iRetention profile, as well as exit the application. Action Provides the ability to Search or Purge documents as defined by the iRetention profile. About Displays the iRetention Manager product and file version. iRetention Manager Guide 3.9 SP1 Page 9 of 36 Toolbar This section describes the iRetention Manager Toolbar functionality Element Description Add Profile Provides the ability to launch the Retention Profile dialog and add a new iRetention profile. Edit Profile Provides the ability to launch the Retention Profile dialog and edit an existing iRetention profile. Delete Profile Provides the ability to launch the Retention Profile dialog and delete an existing iRetention profile. Search Documents to Purge Provides the ability to search for documents as defined by the selected iRetention profile to purge from the database and repository. Purge Documents Provides the ability to purge documents from the database and repository for Checked Profiles as defined by the selected iRetention profile Stop Search/Purge Provides the ability to stop a search or purge from the selected iRetention profile. iRetention Manager Guide 3.9 SP1 Page 10 of 36 iRetention Profile Element Description Profile Name Provides the ability to uniquely name the Retention profile name. Application Provides the ability to select a defined and implemented iSynergy Application from the drop down menu. This Application contains the documents that will be purged. Trigger Date>Index Provides the ability to select a system or user defined date from the aforementioned iSynergy Application. Note: The Trigger Date is an iSynergy Application value that is used in combination with a retention period to determine when a document is to be purged. The trigger date can be a UDL value or a system defined list. Document Retention>Number of Periods Provides the ability to define a numeric value for the Retention period. iRetention Manager Guide 3.9 SP1 Page 11 of 36 Note: The Retention Period is used in combination with the Trigger Date to determine when a document is to be purged. Document Retention>Period Provides the ability to define a retention period that can be Days, Months or Years. Document Type>Index Provides the ability to define an index from the aforementioned iSynergy Application in a drop down menu. Note: iSynergy UDL values further restrict which documents within an application are to be purged. If a selected iSynergy Application does not have a UDL representing a document type or a document type is not selected by the user, all the documents within the application are purged based on the date/retention period criteria. Document Type>Value Provides the ability to define a value from the aforementioned iSynergy Application in a drop down menu. Note: If the iSynergy Application does not have a document type UDL, these fields are disabled. Additionally, if all document types have been selected for other profiles that use this same iSynergy Application these fields are disabled. iRetention Manager Guide 3.9 SP1 Page 12 of 36 OK Provides the ability to save and close the iRetention Profile dialog. Cancel Provides the ability to cancel the Retention Profile dialog. iRetention Manager Workspace The iRetention Manager Workspace provides a simple to discover design in order to quickly understand the number of documents to be purged from the iSynergy repository. Element Description Profile Name Displays the name of the defined Retention Profiles. Note: In this view, you can double click the Profile name and display the Retention Manager dialog. Application Displays the name of the iSynergy Application for the defined iRetention Profile. Trigger Date Displays the Trigger date for the defined iRetention Profile. iRetention Manager Guide 3.9 SP1 Page 13 of 36 Retention Period Displays the time period the documents will be retained and then purged for the defined iRetention Profile. Doc Type Displays the iSynergy Application document type for the defined iRetention Profile. Doc Type Value Displays the document type as defined within the iSynergy Application document type. Status Displays the status of the defined iRetention Profile. iRetention Manager Guide 3.9 SP1 Page 14 of 36 Exit Provides the ability to exit the iRetention Application. iRetention Manager Bottom Toolbar The iRetention Manager bottom toolbar provides the ability to quickly discover the status, date and connected Server. Element Description [State] Ready Provides the ability to know the current state of iRetention Manager. [Date] 1/20/2009 Displays the current date. [Server] esx5-w2k3amy Displays the current server the user has accessed. Working with iRetention Manager iRetention Manager provides a simple interface, enabling you to automatically purge records from the iSynergy Repository. In this section, we will set up a new retention profile and purge records according to the profile record. Note: These examples assume you have already logged in and have records that meet the retention profile criteria. Invoice Retention Profile This example describes an Invoice Retention profile that will allow the Accounting department to Simplify its Workplace by automatically removing all records that are over three years old. 1. Navigate to the iRetention Manager Toolbar and select Add New Profile. iRetention Manager Guide 3.9 SP1 Page 15 of 36 Note: Alternatively, you may select File>Add Profile. Note: The Retention Profile dialog displays. 2. Place the cursor in the Profile Name text box and Name the Retention Profile. 3. Select the Application drop down menu and Choose the appropriate iSynergy Application. 4. Choose the Index Trigger Date. 5. Define the Document Retention Number of Periods. iRetention Manager Guide 3.9 SP1 Page 16 of 36 6. Select the Retention Period. Note: The Retention Period is defined as a calendar day + 1. 7. Select the Document Type Index. iRetention Manager Guide 3.9 SP1 Page 17 of 36 Note: These Document Type Indexes are derived from the defined iSynergy Application Document Types. For more information regarding iSynergy Document Types, please refer to the iSynergy 3.9 SP1 Advanced User Manual. 8. Select the Document Type Value. Note: The Document Type Value is derived from the iSynergy Application UDLs. For more information regarding iSynergy UDLs, please refer to the iSynergy 3.9 SP1 Advanced User Manual. 9. Select OK. iRetention Manager Guide 3.9 SP1 Page 18 of 36 Note: Selecting Cancel will not save any criteria for the Retention Profile. Note: The newly created Retention Manager profile displays in the iRetention Manger workspace. 10. In the iRetention Manager workspace, Select the Invoices Retention Profile. iRetention Manager Guide 3.9 SP1 Page 19 of 36 11. Navigate to the iRetention Manager Toolbar. 12. Select Search Documents to Purge. Note: Alternatively, you may select Action>Search Documents. Note: The iRetention Manager Workspace Status column displays the number of documents to be purged per the defined retention profile criteria. 13. Navigate to the iRetention Manager Toolbar and select Purge documents for checked profiles. Note: Alternatively, you may select Action>Purge Documents. iRetention Manager Guide 3.9 SP1 Page 20 of 36 Note: A Purge Documents dialog displays. 14. If you are sure you want to purge the checked profiles, select Yes. Note: A Purge Confirmation dialog displays. 15. Select the Checkbox for “I have read the warning above and understand the implications of continuing.” 16. Click Continue. 17. The selected records begin to be removed from the Repository and Database. Note: If you need to stop the purge, navigate to the iRetention Manager Toolbar and select Stop. You may select Stop at any time. iRetention Manager Guide 3.9 SP1 Page 21 of 36 18. The Status column displays the purged number of records. Checks Retention Profile This example describes a Checks Retention profile that will allow the Accounting department to Simplify its Workplace by automatically removing all records that are over five years old. 1. Navigate to the iRetention Manager Toolbar and select Add New Profile. Note: Alternatively, you may select File>Add Profile. Note: The Retention Profile dialog displays. 2. Place the cursor in the Profile Name text box and Name the Retention Profile. 3. Select the Application drop down menu and Choose the appropriate iSynergy Application. iRetention Manager Guide 3.9 SP1 Page 22 of 36 4. Choose the Index Trigger Date. 5. Define the Document Retention Number of Periods. 6. Select the Retention Period. Note: The Retention Period is defined as a calendar day + 1. Additionally, if you choose to have additional criteria defined, such as your Document Type and the Value, the options are dependent upon the iSynergy Application UDL setup. For more information regarding iSynergy Applications and UDLs, please refer to the iSynergy 3.9 SP1 Advanced User Manual. 7. Select OK. iRetention Manager Guide 3.9 SP1 Page 23 of 36 Note: Selecting Cancel will not save any criteria for the Retention Profile. Note: The newly created Retention Manager profile displays in the iRetention Manger workspace. 8. In the iRetention Manager workspace, Select the Checks Retention Profile. 9. Navigate to the iRetention Menu. 10. Select Action>Search Documents. iRetention Manager Guide 3.9 SP1 Page 24 of 36 Note: Alternatively, you may select the Search Icon from the Toolbar. Note: The iRetention Manager Workspace Status column displays the number of documents to be purged per the defined retention profile criteria. 11. Navigate to the iRetention Manager Menu. 12. Select Action>Purge Documents. Note: Alternatively, you may navigate to the iRetention Manager Toolbar and select Purge documents for checked profiles icon. Note: A Purge Documents dialog displays. 13. If you are sure you want to purge the checked profiles, select Yes. Note: A Purge Confirmation dialog displays. 14. Read the warning. 15. Select the Checkbox for “I have read the warning above and understand the implications of continuing.” 16. Click Continue. iRetention Manager Guide 3.9 SP1 Page 25 of 36 17. The selected records begin to be removed from the Repository and Database. Note: If you need to stop the purge, navigate to the iRetention Manager Toolbar and select Stop. You may select Stop at any time. 18. The Status column displays the purged number of records. HR Retention Profile This example describes a HR_Vacation Retention profile that will allow the HR department to simplify its workplace by automatically removing all Vacation Requests records that are a year old, and another HR_Resume profile that will allow the HR department to purge received resumes that are over six months old. Employee Vacation Profile 1. Navigate to the iRetention Manager Toolbar and select Add New Profile. Note: Alternatively, you may select File>Add Profile. Note: The Retention Profile dialog displays. 2. Place the cursor in the Profile Name text box and Name the Retention Profile. 3. Select the Application drop down menu and Choose the appropriate iSynergy Application. iRetention Manager Guide 3.9 SP1 Page 26 of 36 4. Choose the Index Trigger Date. 5. Define the Document Retention Number of Periods. 6. Select the Retention Period. Note: The Retention Period is defined as a calendar day + 1. 7. Select the Document Type Index. Note: These Document Type Indexes are derived from the defined iSynergy Application Document Types. For more information regarding iSynergy Document Types, please refer to the iSynergy 3.9 SP1 Advanced User Manual. 8. Select the Document Type Value. Note: The Document Type Value is derived from the iSynergy Application UDLs. For more information regarding iSynergy UDLs, please refer to the iSynergy 3.9 SP1 Advanced User Manual. 9. Select OK. Note: Selecting Cancel will not save any criteria for the Retention Profile. iRetention Manager Guide 3.9 SP1 Page 27 of 36 Note: The newly created HR_Employee Vacations Retention Manager profile displays in the iRetention Manger workspace. 10. In the iRetention Manager workspace, Select the HR_Employee Vacations Retention Profile. 11. Navigate to the iRetention Manager Toolbar. 12. Select Search Documents to Purge. Note: Alternatively, you may select Action>Search Documents. Note: The iRetention Manager Workspace Status column displays the number of documents to be purged per the defined retention profile criteria. 13. Navigate to the iRetention Manager Toolbar and select Purge documents for checked profiles. Note: Alternatively, you may select Action>Purge Documents. Note: A Purge Documents dialog displays. 14. If you are sure you want to purge the checked profiles, select Yes. iRetention Manager Guide 3.9 SP1 Page 28 of 36 Note: A Purge Confirmation dialog displays. 15. Read the warning. 16. Select the Checkbox for “I have read the warning above and understand the implications of continuing.” 17. Click Continue. 18. The selected records begin to be removed from the Repository and Database. Note: If you need to stop the purge, navigate to the iRetention Manager Toolbar and select Stop. You may select Stop at any time. Note: To start purging documents again, simply start over with step 10 and continue forward. iRetention Manager Guide 3.9 SP1 Page 29 of 36 19. The Status column displays the purged number of records. Potential Employee Resume Profile 1. Navigate to the iRetention Manager Toolbar and select Add New Profile. Note: Alternatively, you may select File>Add Profile. Note: The Retention Profile dialog displays. 2. 3. 4. 5. 6. Place the cursor in the Profile Name text box and Name the Retention Profile. Select the Application drop down menu and Choose the appropriate iSynergy Application. Choose the Index Trigger Date. Define the Document Retention Number of Periods. Select the Retention Period. Note: The Retention Period is defined as a calendar day + 1. 7. Select the Document Type Index. Note: These Document Type Indexes are derived from the defined iSynergy Application Document Types. For more information regarding iSynergy Document Types, please refer to the iSynergy 3.9 SP1 Advanced User Manual. 8. Select the Document Type Value. Note: The Document Type Value is derived from the iSynergy Application UDLs. For more information regarding iSynergy UDLs, please refer to the iSynergy 3.9 SP1 Advanced User Manual. 9. Select OK. iRetention Manager Guide 3.9 SP1 Page 30 of 36 Note: Selecting Cancel will not save any criteria for the Retention Profile. Note: The newly created Retention Manager profile displays in the iRetention Manager workspace. 10. In the iRetention Manager workspace, Select the HR_Resume Retention Profile. 11. Navigate to the iRetention Manager Toolbar. 12. Select Search Documents to Purge. Note: Alternatively, you may select Action>Search Documents. iRetention Manager Guide 3.9 SP1 Page 31 of 36 Note: The iRetention Manager Workspace Status column displays the number of documents to be purged per the defined retention profile criteria. 13. Navigate to the iRetention Manager Toolbar and select Purge documents for checked profiles. Note: Alternatively, you may select Action>Purge Documents. Note: A Purge Documents dialog displays. 14. If you are sure you want to purge the checked profiles, select Yes. Note: A Purge Confirmation dialog displays. 15. Read the warning. iRetention Manager Guide 3.9 SP1 Page 32 of 36 16. Select the Checkbox for “I have read the warning above and understand the implications of continuing.” 17. Click Continue. 18. The selected records begin to be removed from the Repository. Note: If you need to stop the purge, navigate to the iRetention Manager Toolbar and select Stop. Consequently, you may select Stop at any time. 19. The Status column displays the purged number of records. iRetention Manager Tips & Tricks This section has been provided to further Simplify the Workplace and empowers the Administrator when using iRetention Manager. When defining a new iRetention Profile, you may not use an existing iRetention Profile name. iRetention Manager Guide 3.9 SP1 Page 33 of 36 The iRetention Manager Interface columns are customizable and you may select the column dividers to change the spacing layout. If you stop the purge process for a Retention profile, you will have to start the search over again before the purge can continue. iRetention Manager will support creating multiple retention profiles for one or more servers. All retention profiles for one or more servers will be saved in a single XML file. The retention profiles that load initially are based on whatever server is defined in the login dialog. iRetention Manager must be ran on a single machine where the XML file resides. When creating a Retention profile, the document type and value are optional fields. However, if these values are not selected, all documents that meet the defined criteria trigger date will be purged. You may select multiple profiles, search for documents to purge and purge all the checked retention profiles at the same time. Note: You may also select a profile and choose the keyboard delete key to purge documents. When purging documents from a selected Retention Profile, you must select the “I have read the warning above and understand the implications of continuing” before you will be able to continue the purge process. Note: The purged documents are irretrievable in the current system and can only be recovered through a backup. To view a detailed text history of the documents you have purged by profile, navigate to C:\Program Files\iDatix\iRetention Manager\Detail. iRetention Manager Guide 3.9 SP1 Page 34 of 36 Note: iRetention Manager automatically generates a continuous summary log file detailing the date, time, retention profile criteria and the number of records purged. The text files contain all the index values for each deleted document within a selected iSynergy Application. The first record in the text file contains the column names of the index values. The remaining records contain the index values enclosed in quoted and delimited by commas. This allows the user to import a text file into a spreadsheet if desired. The text file naming convention is: Server_Profile Name_App ID_DateTime.txt Using a trigger date and retention period as purge criteria, the following formula will be used when determining when a document should be purged. Purge document if current date>Retention Date. Trigger Date + Retention Period = Retention Date. If adding a month or year period to a trigger date results in the retention date having a day that is larger than the maximum day for the retention date month, the day is adjusted to the maximum days in the retention date month. Trigger Date Period Retention Date Purge on or after 01/02/2007 + 30 Days 02/01/2007 02/02/2007 01/30/2007 + 1 Month 02/28/2007 03/01/2007 iRetention Manager Guide 3.9 SP1 Page 35 of 36 01/30/2007 + 2 Months 03/30/2007 03/31/2007 01/30/2007 + 2 Years 01/30/2009 01/31/2009 01/28/2007 +1 Month 02/28/2007 03/01/2007 01/28/2008 + 1 Month 02/28/2008 02/29/2008 01/30/2008 + 1 Month 02/29/2008 03/01/2008 02/29/2008 + 1 Year 02/28/2009 03/01/2009 02/28/2008 + 4 Years 02/28/2012 02/29/2012 02/29/2008 + 4 Years 02/29/2012 03/01/2012 iRetention Manager Guide 3.9 SP1 Page 36 of 36