1
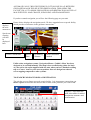
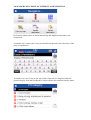
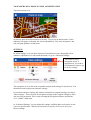
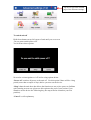
SIMPLIFIED NAVIGATION USER MANUAL
To switch unit on:
Hold down button on top left corner of unit for three seconds.
Software will load and screen will default to ‘Cabbie’s Mate’ Main Menu screen.
Tap screen on position of moving taxicab.
Screen now shows three icons. Tapping the ‘X’ icon returns to previous screen.
If you wish to start working with ‘Navigation’ tap the ‘Navigation icon. Navigation
will open and show the ‘tracking screen’
To change between ‘Navigation’ and ‘A-Z’ tap the A-Z or NAV icon as appropriate.
Please note, navigation software takes slightly longer to load than A-Z.
Tap here to toggle between navigation and A-Z without losing your entry.
Tapping
on
Centre
icon
will
centre
GPS
triangle
on map
and
adjust
the
zoom
level.
Displays the speed limit of the
road and current speed.
Tap on to enable or mute the
sound.
Tap on search icon to search
for street, postcode or POI.
Tap to save the current
position in saved destination.
Need screenshot
Displays the current
position.
GPS connection
indicator
Tap here to toggle between A-Z and navigation without losing your entry.
Unit will search for a GPS signal. This may take several minutes when unit is started
for very first time (up to 30-45 minutes). Unit will connect quicker on subsequent use
(within 4 minutes when cold and instantly when warm).
NAVIGATION
When GPS signal has been found, screen will show geographical position of unit.
Details will be displayed on bottom line of page. Picture below displays the tracking
mode.
The map can be best scrolled with either the back of your nail or with the stylus
supplied with the unit.
TO SEARCH FOR A DESTINATION:
Tap ‘Search’ button. Screen will change to show options available.
Tapping on this triangle GPS
icon, will take you back to
the tracking mode.
Tapping
on this
will take
you
back to
the
previous
page.
ADDRESS
Tap ‘Address’
The keyboard is predictive on top information line.
Next page defaults to search for address in Greater London.
If you wish to search for an address beyond Greater London tap the icon to the left of
the ‘tick’ box. This will open the facility to enter the name of the city where you wish
to locate a street.
Tap on this icon to select a
different City
If the entry is correct, tap on
this icon to go to the next
page. You can also tap on
the list to select an entry.
Backspace button. Tap on
this to delete one letter at a
time.
Space button. Also tap on this
once instead of entering
apostrophe or comma.
Tap on this icon to change country if your
unit contains a Western Europe map.
Tap on this icon to open list of
streets or tap again to bring
the keyboard on screen.
Please note. There are no apostrophe and comma buttons on the keyboard. Where an
apostrophe or a comma is required, eg Saint James’s Street insert a space in lieu.
Using the keyboard tap the name of the street to be the destination.
The unit will then display the street name in red letters at the top of the page. If the
database contains more than one street with the same name, tap the button (keyboard
icon) below the ‘tick’ box and you will see a drop down menu showing the location of
streets with the same name. Tap the line which shows the desired destination.
The unit will then display the keyboard and you can then either:Insert the street number using the figures at top of keyboard then again tap the ‘tick’
button. This will be the chosen destination.
OR
Tap the button below the ‘tick’ box (keyboard icon) which will then provide a drop
down menu of the junctions on the selected street. Tapping any named junction street
will set that as the chosen destination for navigation.
The unit will then display a page showing the location on the map of the chosen
destination.
Tap on this icon to go to
A-Z map if desired.
Tap on this
icon to
zoom in to
destination
After a few seconds the unit will display a page showing the calculated route as a blue
line, together with the straight cotton line from your current position also in blue.
Without starting the navigation process you can use the buttons on this page to either:Return to tracking screen by tapping on the red triangle on top right.
Go to the A-Z map by tapping on A-Z on top right.
Insert stop points
Change route settings from fastest to shortest or vice versa
See a list of roads on planned route. (some road names not shown as there is no
manoeuvre involved when driving)
Or
Start navigation.
Tap to add stopover destination if
there is more than one destination.
You can add 5 stopover
destinations.
Tap on this
icon to
overview
the whole
route.
Tap on this to change to fastest or
shortest
Tap on this to view the road list.
Not all roads are displayed.
Only the instructions/manoeuvres
are shown.
Tap on this to go to navigation
screen and start navigating.
THE NAVIGATION AND A-Z APPLICATIONS IN THIS UNIT WORK IN
CONCERT. SELECTING A DESTINATION IN NAVIGATION
AUTOMATICALLY CREATES THE BLUE COTTON LINE IN A-Z BETWEEN
GPS POSITION AND THE SELECTED DESTINATION. THIS OPENS THE
FACILITY IN A-Z TO SHOW GPS POSITION AND DESTINATION ON THE A-Z
MAP WITH FULL MAP CHANGE, SCROLLING AND ZOOM OPTIONS.
If you have started navigation you will see the following page on your unit.
This icon
displays
the next
manoeuvre
Picture below displays the navigation mode. We have upgraded text to speech facility
which provides road names in the guidance instructions.
Speed cam
warning
will also
be
displayed
here.
Tap here to cancel current route
Clock. Current time.
Arrival
Time.
Remaining
distance
Route calculation
method
Unlike other navigation systems, Navigation Master ‘Cabbie’s Mate’ has been
designed to be scrolled instantly. The map is best scrolled using either the back
of your nail or the stylus supplied with the unit, when you have finished scrolling
tap on ‘Centre’ icon for your current position. Our new design has reduced
screen tapping compared to other systems.
TO SEARCH FOR POSTCODES AS DESTINATION
The unit has a seven figure post code search facility. It is important to ensure that you
insert a space between the first and second sections of the postcode you wish to find.
Displays 7 digit Postcode
with street name for added
destination assurance and
confirmation.
TO SEARCH FOR A POINT OF INTEREST AS DESTINATION
In Greater London points are listed numerically and alphabetically and are not
categorised.
‘In another city’ requires the City to be identified to the unit before the name of the
point is searched for.
‘In another city’ and ‘Close to me’ the points of interest are categorised and the
desired category from the list should be selected before the nominal search is made.
TO SEARCH FOR A POINT ON MAP AS DESTINATION
Tap point on map icon.
Scroll map until desired destination is located. Tap screen on that location. A blue
indicator will appear to identify the selected destination. Tap ‘start navigation’ and
unit will plan guidance to that point.
SETTINGS
In ‘Main Settings’ you can chose between Fastest/shortest route, Day/night colour
schemes, adjust/turn on or off sound directions. Or go to ‘Advanced Settings’
Tap on this to close
navigation and A-Z
application if you wish to
use Bluetooth, music or go
to device settings.
The navigation is set to the most acceptable and practical settings for taxi drivers. You
should not need to adjust any advance settings.
If you adjust advance settings and want to return back to original settings, just tap on
‘Reset settings’. This will reset all navigation settings to the original settings to when
unit was first purchased. This is only resetting the navigation software and not the
A-Z+ Cabbie’s Mate unit.
In ‘Advanced Settings’ you can adjust the settings available under each option to suit
your own specification. When you have done so, tap the ‘tick’ box to save your
chosen settings.
Tap here to go to the second
page of the advance settings.
To switch unit off
Hold down button on top left corner of unit until you see screen
‘Do you want switch power off?’
You will have three options.
No need to exit navigation or A-Z before using options below.
‘Power off’ switches all power to the unit off. Use this option if there will be a long
period (more than a couple of days) before you next use the device.
‘Sleep’ shuts the unit down but allows the functions to run on low power to facilitate
quick starting on next use (please use this option at the end of your session if you
intend to use the device the following day, the map will also remember your last
position).
‘Cancel’ is self explanatory.