1
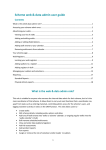
Version 2.2 June 2015 Contact for further information and support: [email protected] © Copyright Ramblers 2015. All rights reserved. DdM/JA/CP/JC/LN 30/06/2015 GWEM 6: Uploading multiple walks details using a spreadsheet Introduction .......................................................................................................................... 3 Uploading walks details using a spreadsheet ....................................................................... 4 1. Download the spreadsheet template. ......................................................................... 4 2. Open the template and save a copy. .......................................................................... 4 3. Get to know the spreadsheet. .................................................................................... 4 4. Convert your spreadsheet to CSV format ................................................................... 6 5. Upload the CSV file and publish the walks ................................................................. 7 6. Check your work ........................................................................................................ 8 7. Submit and publish the walks .................................................................................... 8 8. Get ready for the next batch....................................................................................... 8 More information................................................................................................................... 8 Uploading walks details for more than one group ............................................................. 8 Customising the template ................................................................................................. 8 Page 2 of 9 Version 2.2 June 2015 GWEM 6: Uploading multiple walks details using a spreadsheet This document explains how to upload multiple walks details in bulk to the Group walks and events manager using a spreadsheet. This is useful if you have a large number of walks details to upload at once, compiled using a different system, for example an established system for putting together a regularly issued printed walks programme. We recommend that for best results you use the Group walks and events manager as the main tool for compiling your walks programmes. If you enter walks individually, you can take advantage of all the built-in features to help you create your walk listings, including interactive maps, which can’t be reproduced in a spreadsheet. Editors can nominate others (for example walk leaders) as contributors who submit walk details without publishing them, avoiding the need for copying and pasting and retyping. There are numerous ways to get walks details out of the system once entered, as printable programmes suitable for opening in word processors and as various data feeds and downloads. However we appreciate that for some groups, changing established ways of working will take time, and the spreadsheet method provides another option. We assume you already have a basic familiarity both with working with spreadsheets and with the Group walks and events manager and are successfully able to logon as an editor for your area or group. If you haven’t already done so, we strongly recommend you read the Getting started and Essentials factsheets first, and work through adding a single walk. We recommend you use Microsoft Excel to work with the spreadsheet template as the formatting works best using this software. The instructions below assume you’re using Excel. Most other modern spreadsheet software should be able to open the template, but may have different ways to view, save and edit data. Note: we don’t recommend the use of the Safari browser on a Mac for uploading walks via spreadsheet. You may need to use an alternative browser such as Firefox. Version 2.1 May 2015 Page 3 of 9 GWEM 6: Uploading multiple walks details using a spreadsheet You can find this in the volunteer toolkit under spreadsheet template (it might be on a second page). The filename is walksuploadsinglegroupv4.xls. Open the file you’ve just downloaded in Excel (or other spreadsheet software, but see the Introduction). Before you start work, use Save As to save a copy under a different name, for example swansea-walks-winter2014.xls. That way, if you get stuck you can go back to the original without having to download it again. We have used colours, text boxes, grouped columns and pop-up comments to help you find your way around. E D A B C A. Green cells are for information you have to provide or your walk will be rejected (‘mandatory fields’). B. Orange cells are for information you have to provide but where there are several different ways of doing this. You must fill in at least one of a group of orange cells, but not more than one. C. White cells are for optional information. D. Most columns have extra help in the column headings. Just hover over them and more information should pop up. This is the place to look to find out what format to use for time, for example. E. To make the spreadsheet more manageable, there are some hidden columns we don’t think will be used by everyone. To view and edit these, click on the + signs above the column headings. To hide them again, click on the – signs. Page 4 of 9 Version 2.2 June 2015 GWEM 6: Uploading multiple walks details using a spreadsheet F. Lilac cells are similar to orange cells but for optional information. If you want to provide this information, you should only fill in one of a group of lilac cells. Currently the spreadsheet doesn’t include walk classification information other than Suitability. So if you want to add Surroundings, Theme, Special status or Facilities you will need to do this in the Walks and events manager. The help in the column headings will tell you how to enter information correctly. You can also find guidance on what to put in each field in the guide to entering a single walk and in the User manual. Here are some useful hints and tips. Dates should be in the format dd/mm/yyyy, so 05/01/2015 for 5 January 2015. Days of the week are automatically calculated once the walk is uploaded so no need to add these separately. Choose a good short title for your walk that contains useful information and distinguishes it from other walks. Time should be in HH:MM format using the 24-hour clock, for example 14:30 not 2.30pm. Only enter one piece of information to find a location. We recommend using postcode or Ordnance Survey grid reference as these are more accurate (though be aware postcodes can be inaccurate in rural areas, similarly, in urban areas a grid reference won’t give enough detail). If you use a place name and there are several places with that name, the system will simply pick the first one on its internal list and use that, whether it’s the place you intended or not. Please note: if you enter more than one location one may overwrite the other with misleading results. Enter postcodes with the space, for example EH14 6JY. Enter Ordnance Survey (OS) grid references in 2-letter 6-figure format without spaces, for example TQ123456. The letter prefixes are shown on all OS maps. Don’t give the map number. Enter kilometres OR miles for the walk distance, not both. Just give the figures, with fractions up to one decimal place. If you give more decimal places these will be rounded. Don’t use fraction symbols (for example ‘¼’) or ranges (for example “5-6 miles”). Don’t add symbols for miles or km, just make sure you use the correct column. If you include contact details in the spreadsheet, the system will create a new record on your contacts database, which could lead to duplicate records. If a contact is already in your database, you just need to give their ID and the other details will be added automatically when the walk is uploaded. If you want to add a new contact, Version 2.1 May 2015 Page 5 of 9 GWEM 6: Uploading multiple walks details using a spreadsheet put their details in the spreadsheet and they will be stored for you to use next time. For more about the contacts database, see section 10. If you add ascent, note the Feet and Metres cells work in a similar way to the Miles and km cells and only one needs to be filled in. Currently the spreadsheet doesn’t include walk classification information other than Suitability. So if you want to add Surroundings, Theme, Special status or Facilities you will need to do this once the walks are uploaded. You can choose who will see your walk details, in the ‘Restrictions’ column, with ‘Public,’ ‘Members only’ and ‘Print only’ to choose from. We recommend setting the restriction to Public where possible so your walk will be seen by the widest number of potential new walkers and new members Do not delete or rename any of the columns or the upload will not work! Make sure you save your work regularly! Before you can upload your walks, you need to convert the file to a different format known as CSV or ‘commadelimited’. When you’ve finished entering details, save what you have G done, then select Save as on the File menu. Now select CSV or ‘commadelimited’ in the Save as type box (G). One or more warning boxes may appear: this is normal, so click OK for each one. Page 6 of 9 Version 2.2 June 2015 GWEM 6: Uploading multiple walks details using a spreadsheet Go to Walks & Events tab on the main Group walks and events manager (H). Click on the + sign next to Upload walks using a spreadsheet to find the upload dialogue (I). If the correct group doesn’t appear automatically, make sure you select it in the Upload for group box (J below). Click on Browse (K). Find the CSV file you just saved and select it, then click on Open. The file name should now appear on the dashboard. Click Upload (L). After a few seconds, you should get a message to say the file has uploaded successfully. If the system finds missing information in a row of your spreadsheet, it will stop the upload and display an error message. If there were no problems with previous rows, these walks should have already uploaded correctly. If the details don’t upload correctly, you’ll need to check your work in the spreadsheet and save as a CSV again. Note that when working with spreadsheets it’s possible to add blank rows at the bottom of your walks list without noticing. If there’s a blank row in your spreadsheet, the system will add all the walks above that row, so long as they are correctly entered, and display a warning. If this happens, it’s likely all your walks have loaded correctly and you can simply ignore the warning, but do check carefully first. Version 2.1 May 2015 Page 7 of 9 GWEM 6: Uploading multiple walks details using a spreadsheet Your walks are now uploaded but not yet published and still awaiting approval. You should find them under the Walks & events tab. We recommend you check each one to see that the details have uploaded correctly, and in particular the location is right. You can: Preview the way the listing will appear by clicking on the title of the walk in the Walks & Events listing: a preview will open in a new window. Select Edit from the dropdown box next to the walk in the Walks & Events listing. For more information on editing, see the single walks guide and the manual. You can either submit and publish the walks individually as you review them, or alternatively select a batch of walks under Walks & events and then click on Publish all walks awaiting approval. Note you will have to be registered as an editor to publish walks – if you are registered as a contributor, all the walks you upload will be submitted to the editor automatically for approval. Once published the walks should appear on the map and listings on the public search page. To enter a new batch of walks, just go back to the original template and save a new copy with a different name as described in Step 2 above. We recommend you don’t edit the original template but always save a new copy before you start work. Currently it’s not possible to upload walks details for multiple groups from a single spreadsheet. If you need to upload details for more than one group, you will need to split your data into separate spreadsheets for each group. Then make sure you select the right group in the Upload for group box (Step 5, J above) before uploading each sheet. Unlike the old Group Walks Finder system, the new system doesn’t use customised fields. If you add additional columns, the spreadsheet will upload successfully so long as all the other details are correct, but data in the additional columns will be ignored. Please include all relevant details in the fields provided, using the Description or Additional details fields for information that doesn’t belong anywhere else. Some editors prefer spreadsheets with a minimum of columns, and deleted columns in the old spreadsheet template that they didn’t regularly use. We recommend you don’t delete columns. If you prefer not to see certain columns, hide them in your spreadsheet software (in Excel, simply select the column, right click on it and select Hide). Then if you decide you Page 8 of 9 Version 2.2 June 2015 GWEM 6: Uploading multiple walks details using a spreadsheet want to start using the columns later, you can simply Unhide them again (select the columns either side of the hidden column, right click and select Unhide). Alternatively, you can upload spreadsheets with missing columns, but: All the mandatory fields in the green columns must be included (A above) AND All the orange starting location and distance columns must be included (B above) even if they’re not filled in. If you delete any of the green or orange columns or don’t provide mandatory information, the spreadsheet will not upload successfully. Version 2.1 May 2015 Page 9 of 9