1
Hunk 6.0
Hunk User Manual
Generated: 12/18/2013 10:05 pm
Copyright (c) 2013 Splunk Inc. All Rights Reserved
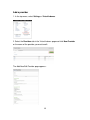
Table of Contents
Introduction..........................................................................................................1
Meet Hunk.................................................................................................1
FAQ...........................................................................................................2
Learn more and get help...........................................................................4
Hunk concepts.....................................................................................................5
About virtual indexes.................................................................................5
About external results providers................................................................6
How Splunk returns reports on Hadoop data.............................................6
Install Hunk...........................................................................................................9
About installing and configuring Hunk.......................................................9
System and software requirements...........................................................9
Download and install Splunk...................................................................10
Install Splunk...........................................................................................11
Start Splunk.............................................................................................13
License Hunk..........................................................................................13
Use Hunk and Splunk together...............................................................14
Uninstall Hunk.........................................................................................15
Manage Hunk using the configuration files....................................................16
Set up your Splunk search head instance................................................16
Set up a provider and virtual index in the configuration file.....................16
Add a sourcetype....................................................................................20
Configure Hunk to run reports as a different user...................................21
Work in the Hunk user interface.......................................................................24
About the Hunk user interface.................................................................24
Add or edit an HDFS provider.................................................................24
Add or edit a virtual index........................................................................27
Use search commands on a virtual index...............................................29
Tutorial................................................................................................................31
Welcome to the Hunk tutorial..................................................................31
Step 1: Set up a Hadoop Virtual Machine instance.................................32
Step 2: Set up your data.........................................................................33
Step 3: Set up an HDFS directory for Hunk access................................33
Step 4: Install and license Hunk..............................................................34
Step 5: Configure an HDFS provider......................................................34
i
Table of Contents
Tutorial
Step 6: Set up a Virtual Index..................................................................36
Step 7: Try a simple data search.............................................................38
Step 8: Save a report..............................................................................39
Learn more..............................................................................................41
Reference............................................................................................................42
Troubleshoot Hunk..................................................................................42
Performance best practices....................................................................43
Provider Configuration Variables............................................................44
Required configuration variables for YARN............................................46
Release Notes....................................................................................................48
Known issues...........................................................................................48
ii
Introduction
Meet Hunk
Hadoop lets you store massive amounts of structured, polystructured and
unstructured data, however extracting value from that data can be a hard and
time consuming task.
Hunk lets you access data in remote Hadoop clusters via virtual indexes and
allows you to use the Splunk Processing Language to analyze your data using
the full power of Hadoop.
With Hunk you can do the following with your Hadoop data:
• Process large amounts of structured, polystructured and unstructured
data.
• Report and visualize large amounts of data.
• Preview report data to fine to your search-generating reports.
• Run combined reports on Hadoop data and data from your Splunk
Enterprise indexes.
• Use SDKs and apps with Hadoop data.
Due to the nature of how data is stored in Hadoop, there are certain Splunk
Enterprise index behaviors that cannot be duplicated:
• Hunk currently doesn't support real-time searching of Hadoop data,
although preview functionality is available.
• Since events are not sorted in any particular order, any search command
which depends on implicit time order will exhibit different behavior in Hunk.
(For example: head, tail, delta, etc.) For more information about how
certain timestamp-sensitive commands work with virtual indexes, see
"Search a virtual index" in this manual.
• Data is not always returned as quickly as data is returned for a local index.
• Data model and report acceleration are not currently available in Hunk
To set up Hunk to work with your own HDFS data, see "About installing and
configuring Hunk."
To learn about configuring and searching data in the Hunk user interface, see
"Work in the Hunk user interface."
1
To learn more about how Hunk works, see "Hunk concepts."
To test drive Hunk on a virtual machine using sample data we provide, see the
Tutorial.
FAQ
Q. Can you search Splunk indexes and Hadoop in the same query?
A. Yes! In order to do this, you install Splunk and add two licenses: one for Hunk
and one for Splunk Enterprise.
Q. Are all the new Splunk Enterprise 6.0 reporting tools/functions available when
searching Hadoop?
A. Yes, with a few exceptions. Accelerated Data Model is unsupported, since we
do not have an index structure to store the analytics store data. A few commands
(transaction & localize) that rely on event time order do not work. For information
about search command behavior specific to Hunk, see Search a virtual index.
Q. What is the overhead on the Hadoop infrastructure to deploy from Splunk?
A. Minimal! You just need enough local disk to store the Splunk deployment and
temporary disk usage needs. 5GB of local storage would more than meet your
needs. There are no agents running. Hunk only executes processes on Hadoop
as part of the MapReduce job and leaves no running processes behind.
Q. What happens to the virtual index after a report is complete?
A. Nothing. The virtual index waits, retaining the settings and information exactly
as you configured it, ready for the next report you run.
Q. Does summary indexing work with Hunk?
A. Yes traditional summary indexing and tscollect are supported in Hunk.
Q. Is there a limit to the number of results that can be returned from an HDFS
2
directory?
A. No.
Q. How does this affect ingest rates for licensing purposes?
A. It doesn't! Hunk processes data that is already in Hadoop, so you are not
processing data in Splunk. Hunk pricing is not based on data the way it is in
Splunk. For more information about pricing and licensing, see your sales
representative.
Q. Where does the reduce phase/function execute?
A. In the search head.
Q. Which Hadoop distributions will work with Hunk?
A. All Apache Hadoop-based distributions, including Cloudera and Hortonworks,
as well as MapR. For more information about system requirements for Hunk, see
System and software requirements.
Q. Do you need a Splunk Enterprise license to run Hunk?
A. Hunk is a separate product and has its own license. You'll need a Splunk
Enterprise license only if you want to run searches against Splunk Enterprise
indexers.
Q. Can I use Hunk and Splunk together?
A. Absolutely. You can install both licenses on an installation of Splunk 6.0 build
to analyze and compare data on local and virtual indexes.
Q. I'd like to give Hunk a spin, how can I get a copy to play with?
A: Download it! Splunk/Hunk downloads come with a "Trial" license which allows
Hunk and Splunk Enterprise features for 60 days. After that, if you still want to
use it, you'll need to contact a sales representative and purchase the full license.
3
Q. Why would I move data from Hadoop to Splunk?
A. Most likely, you wouldn't. Moving data is an expensive proposition, which is
why we developed Hunk. The only reason you might move data in an HDFS
directory into a local Splunk index is if you need to do needle-in-haystack type
searches.
Q. Can you analyze data when some data is in Splunk and some in Hadoop?
A. Yes, you can analyze and correlate data that resides in different Hadoop
clusters. You'll need both licenses: Hunk and Splunk Enterprise.
Q. Can I configure a Splunk search head to connect to Hadoop/Hunk?
A. No, you will need a license for Hunk and a search head configured specifically
to work with virtual indexes.
Learn more and get help
You've got a variety of options for finding more information about Splunk:
• Splunk Support
• The Splunk Enterprise documentation
• Splunk Answers
• The #splunk IRC channel on EFNET
4
Hunk concepts
About virtual indexes
Virtual indexes let Hunk address data stored in external systems and push
computations to those systems. With virtual indexes you can access and report
on structured, unstructured and polystructured data residing your Hadoop cluster.
With virtual indexes, Hunk leverages the MapReduce framework to execute
report-generating searches on Hadoop nodes. Data does not need to be
pre-processed before it is accessed because Hunk lets you run analytics
searches against the data where it rests in Hadoop.
Hunk treats Hadoop virtual indexes as read-only data stores and binds a schema
to the data at search time. This means the data you report on with Hunk remains
accessible in the same format as before to other systems and tools that use it,
such as Hive and Pig.
Configuring virtual indexes
Before you set up a virtual index, you set up providers and configure an ERP. An
ERP is a search helper process that we've created to carry out searches on
Hadoop data. When you configure a provider, you tell Hunk details about your
Hadoop cluster, which the ERP needs to carry out reporting tasks. See About
external results providers for more information about ERPs.
You then configure virtual indexes by giving Hunk information about your Hadoop
data, such as the data location, a set of whitelist and blacklisted files or
directories. When properly configured, virtual indexes recognize certain directory
structures and extract and use that information to optimize searches. For
example, if your data is partitioned in a directory structure using dates, then Hunk
can reduce the amount of data it processes by properly choosing to process only
the data in relevant paths.
Learn more
• To configure your providers and virtual indexes using the CLI, see Set up
a provider and virtual index."
• To set up new providers in the Hunk user interface, see "Add or edit an
HDFS provider."
5
• To set new virtual indexes in the Hunk user interface, see "Add or edit a
virtual index."
About external results providers
In order to access and process data in external systems, Hunk leverages
External Result Providers (ERP) to carry out the implementation logic and details
for data retrieval and computation. ERPs are a collection of helper processes
provided with Hunk. You configure them in indexes.conf when you describe your
provider and provider family.
About configuring an ERP
To configure a virtual index for data that resides in Hadoop, you first set up an
ERP by telling Hunk about the Hadoop cluster. You can do this by adding a
provider family.
You can add a provider by editing indexes.conf with the results provider name,
location, etc. See "Set up a provider and virtual index" for information about
setting up a provider with indexes.conf.
You can also set up a provider in Web UI. See "Add an HDFS provider" for more
information.
After you set up a provider, you can configure virtual indexes by giving Hunk
information about the data location. Hunk can be configured to recognize certain
directory structures and extract and use that information to optimize searches.
For example, if your data is partitioned in a directory structure using dates, then
Hunk can reduce the amount of data it processes by properly choosing to
process only the data in relevant paths.
You can learn more about how indexes.conf values are used, see indexes.conf
in the Splunk Enterprise Admin Manual.
How Splunk returns reports on Hadoop data
When a report-generating search is initiated, Hunk uses the Hadoop MapReduce
framework to process the data in place. All of the parsing of data, including
source typing, event breaking, and time stamping that is normally done at index
time is performed in Hadoop at search time.
6
Note that Hunk does not index this data, rather it processes it on every request.
Here's a high level overview of how searches against Hadoop virtual indexes
operate:
1. The user initiates a report-generated search on a virtual index (see "Search a
virtual index" for more information about generating report-generated searches).
2. Hunk recognizes that the request is for a virtual index, and rather than
searching a local index, Hunk spawns an ERP process to help with the request.
(You configure this process when you set indexes.conf in the
provider-family:hadoop stanza. See "Set up a provider and virtual index" for
more information.)
3. Based on your configuration, Hunk passes configuration and run-time data,
including the parsed search string etc, to the ERP in a JSON format.
4. If this is the first time a search is executed for a particular provider family, the
ERP process sets up the necessary Hunk environment in HDFS by copying a
Hunk package to HDFS and copying the knowledge bundles to HDFS.
5. The ERP process analyses the request from the Hunk search: It identifies the
relevant data to be processed and generates tasks to be executed on Hadoop. It
then spawns a MapReduce job to perform the computation.
6. For each task, the MapReduce job first checks to see whether the Hunk
environment is up-to-date, checking for the correct Splunk package and
knowledge bundle. If not found, the task copies the Splunk package from HDFS
(see step 4) then extracts it into the configured directory. It then copies the
bundles from HDFS (see step 4) and expands them in the correct directory within
the TaskTracker.
7. The map task proceeds to spawn a Hunk search process on the TaskTracker
node to handle all the data processing.
8. The map task then feeds data to the Hunk search process and it consumes its
output - which becomes the output of the map task. This output is stored in
HDFS.
9. The ERP processes on the search head constantly poll HDFS to pick up the
results and feed them to the search process running on the search head.
10. The Hunk search process on the search head uses these results to create
the reports (executing the reduce step). The report is constantly updated as new
7
data arrives.
8
Install Hunk
About installing and configuring Hunk
This chapter walks you through every step in the process of configuring Hunk
and setting up providers and virtual indexes.
To set up Hunk and virtual indexes, just follow the steps in this chapter to install
Splunk and then license and configure Hunk. Since Hunk uses a lot of Splunk
functionality, we also recommend that you check out some of the Splunk
Enterprise documentation, especially the Search Manual and Search Tutorial.
If you are not ready to configure Hunk on your own system
and just want to try it out
Skip this chapter entirely and head to the Tutorial in this manual. The tutorial will
walk you through setting up an instance of Hunk in a Hadoop Virtual Machine
using provided sample data. It's a great way to play with Hunk functionality
without the commitment of configuring it to work with you HDFS directories.
System and software requirements
Before you get started, make sure you have the following in place:
• Access to at least one Hadoop cluster (with data in it!) and the ability to
run MapReduce jobs on that data. Hunk is supported on the following
Hadoop distributions and versions:
♦ Apache Hadoop
◊ 0.20.203.0
◊ 1.0.2
◊ 1.0.3
◊ 1.0.4
◊ 2.0.0
♦ Cloudera Distribution Including Apache Hadoop
◊ 3u4
◊ 3u6 (Kerberos)
◊4
9
◊ 4.2
◊ 4.3.0
◊ 4.4 (HA NN and HA JT)
♦ Hortonworks Data Platform (HDP)
◊ 1.0
◊ 1.1
◊ 1.3
◊ 1.3.2
◊ 2.0.0
♦ MapR 2.1.0
What you need on your Hadoop nodes
On Hadoop TaskTracker nodes you need:
• A directory on the *nix file system running your Hadoop nodes that meets
the following requirements:
♦ One gigabyte of free disk space for a copy of Splunk.
♦ 5-10GB of free disk space for temporary storage (this is used by
the search processes).
What you need on your Hadoop filesystem
On your Hadoop filesystem (HDFS or otherwise) you will need:
• A subdirectory under jobtracker.staging.root.dir (usually /user/) with
the name of the user account under which Hunk is running on the search
head. For example, if Hunk is started by user "hunk" and
jobtracker.staging.root.dir=/user/ you would need to have a directory
/user/hunk that is accessible by user "hunk"
• A subdirectory under the above directory that can be used by this Hunk
server for intermediate storage, e.g. /user/hunk/server01/
Download and install Splunk
To install Hunk on your system, you download the Linux distribution for Splunk
6.0 and install it, then add a Hunk license.
You can find the correct version to download here:
http://www.splunk.com/download/hunk
10
You must configure this installation to run on a search head that resides on a *nix
platform. You can run Hunk on any machine that meets the requirements for a
search head. For more information about search heads, see Configure the
search head.
Note: Hunk is not supported on Windows.
If you want to learn more about installing or updating Splunk, see "Install on
Linux" in the Installation manual.
Install Splunk
Before you get started, take a look at the system requirements and configuration
prerequisites.
• System and Software requirements
RedHat RPM install
To install the Splunk RPM in the default directory /opt/splunk:
rpm -i splunk_package_name.rpm
To install Splunk in a different directory, use the --prefix flag:
rpm -i --prefix=/opt/new_directory splunk_package_name.rpm
To upgrade an existing installation that resides in /opt/splunk using the RPM:
rpm -U splunk_package_name.rpm
To upgrade an existing installation that was done in a different directory, use the
--prefix flag:
rpm -U --prefix=/opt/existing_directory splunk_package_name.rpm
Note: If you do not specify with --prefix for your existing directory, rpm will
install in the default location of /opt/splunk.
11
For example, to upgrade to the existing directory of
$SPLUNK_HOME=/opt/apps/splunk enter the following:
rpm -U --prefix=/opt/apps splunk_package_name.rpm
If you want to automate your RPM install with kickstart, add the following to your
kickstart file:
./splunk start --accept-license
./splunk enable boot-start
Note: The second line is optional for the kickstart file.
Debian DEB install
To install the Splunk DEB package:
dpkg -i splunk_package_name.deb
Note: You can only install the Splunk DEB package in the default location,
/opt/splunk.
Tar file install
To install on a Linux system, expand the tarball into an appropriate directory
using the tar command:
tar xvzf splunk_package_name.tgz
The default install directory is splunk in the current working directory. To install
into /opt/splunk, use the following command:
tar xvzf splunk_package_name.tgz -C /opt
Note: When you install with a tarball:
• Some non-GNU versions of tar might not have the -C argument available.
In this case, if you want to install in /opt/splunk, either cd to /opt or place
the tarball in /opt before running the tar command. This method will work
12
for any accessible directory on your machine's filesystem.
• Splunk does not create the splunk user automatically. If you want Hunk to
run as a specific user, you must create the user manually before installing.
• Ensure that the disk partition has enough space to hold the uncompressed
volume of the data you plan to keep indexed.
Start Splunk
Startup options
The first time you start Splunk after a new installation, you must accept the
license agreement. To start Hunk and accept the license in one step:
$SPLUNK_HOME/bin/splunk start --accept-license
Note: There are two dashes before the accept-license option.
Launch Splunk Web and log in
After you start Splunk and accept the license agreement,
1. In a browser window, access Hunk Web at http://<hostname>:port.
• hostname is the host machine.
• port is the port you specified during the installation (the default port is
8000).
2. Splunk Web prompts you for login information (default, username admin and
password changeme) before it launches.
License Hunk
In order to set up and search virtual indexes, you install Splunk and then install a
Hunk license. You can install Hunk and Splunk licenses and run reports that
include data from local and virtual indexes.
For more information about the different types of licenses you can install, see
"How Splunk licensing works" in the Splunk Enterprise Administration Guide.
13
Before you execute this task, you must have procured a Hunk license and placed
it somewhere that Splunk is able to access is (for example, your desktop or the
server on which you have installed Splunk). If you do not have a Hunk License
and are unsure how to get one, contact your Sales Account representative.
Add a Hunk license
To add a new license:
1. Select Settings > Licensing.
2. Click Add license.
3. Either click Choose file and browse for your Hunk license file and select it, or
click copy & paste the license XML directly... and paste the text of your license
file into the provided field.
4. Click Install. If this is the first license that you are installing, you must restart
Splunk for the license to take effect and Hunk functionality to become available.
Use Hunk and Splunk together
If you want to search local indexes (data sent from forwarders to Splunk
indexers) and Hadoop directories at the same time, you can install licenses for
both Hunk and Splunk.
For more information about licensing, see "Download and Install Hunk."
When you set up Splunk with the specific purpose of configuring Hunk (whether
you also plan to use Splunk Enterprise functionality as well), you configure your
MapReduce user as the user who runs Splunk during the initial configuration.
However, if you are installing a Hunk license on a pre-existing and already
configured Splunk installation, you will likely need to reconfigure the original
14
Splunk user to have proper permissions against Hadoop.
For example, if you have installed Splunk as root (which is not the recommended
path) and then you install Hunk, MapReduce jobs will be spawned as the root
user, which will most likely not be allowed by your Hadoop administrator. You
can resolve this by giving your MapReduce user permissions to Splunk and then
reassigning your MapReduce user as the Splunk/Hunk user. See "Run reports as
a different user" to reassign your MapReduce user.
Uninstall Hunk
RedHat Linux
To uninstall from RedHat Linux
rpm -e splunk_product_name
Debian Linux
To uninstall from Debian Linux:
dpkg -r splunk
To purge (delete everything, including configuration files):
dpkg -P splunk
Once you have uninstalled Hunk, we recommend that you also clean up your
HDFS temporary storage and remove the Splunk package installed on your
Hadoop node.
15
Manage Hunk using the configuration files
Set up your Splunk search head instance
After you have installed Splunk, you'll need to configure a search head to support
the providers and virtual indexes you will add later.
See "Set up a provider and virtual index" for more information about configuring
providers and virtual indexes.
1. Keep a copy of the .tgz version of Splunk on your search head (you need this
package even after installing it on the search head).
During the first virtual index search, Splunk copies this package to HDFS then
extracts it into all TaskTracker nodes that participate in the search. The extracted
package is used to process search results in Hadoop.
If you installed Splunk using a download other than the .tgz, you can download a
copy of the Splunk_package.tgz file to install on your search head.
2. If you have not done so already, install Java on the Splunk search head. You'll
need this to access the Hadoop cluster.
3. Install the Hadoop client libraries on your search head. Keep in mind that the
client libraries must be the same version as your Hadoop cluster. For instructions
on how to download and install Hadoop Client libraries, as well the JDK, see
Install Hadoop CLI in the Hadoop Connect manual.
Set up a provider and virtual index in the
configuration file
Configure providers and virtual indexes for Hadoop data
Once you have successfully installed and licensed Hunk, you can modify
indexes.conf to create a provider and virtual index or use Hunk Web to add
virtual indexes and providers.
16
• To add a virtual index in the Hunk user interface, see Add a virtual index in
this manual.
• To add a new provider, see Add an HDFS provider in this manual.
Edit Indexes.conf
Gather up the following information before you edit Indexes.conf
You'll need to know the following information about your search head, file
system, and Hadoop configuration:
• The host name and port for the NameNode of the Hadoop cluster.
• The host name and port for the JobTracker of the Hadoop cluster.
• Installation directories of Hadoop client libraries and Java.
• Path to a writable directory on the DataNode/TaskTracker *nix filesystem,
the one for which the Hadoop user account has read and write permission.
• Path to a writable directory in HDFS that can be used exclusively by this
Hunk search head.
Create indexes.conf
Edit indexes.conf to establish a virtual index. This is where you tell Splunk about
your Hadoop cluster and about the data you want to access via virtual indexes.
Create a copy of indexes.conf and place it into your local directory. In this
example we are using:
$SPLUNK_HOME/etc/system/local
Note: The following changes to indexes.conf become effective at search time, no
restart is necessary.
Create a provider
1. For each different Hadoop cluster you need to create a separate provider
stanza. In this stanza, you provide the path to your Java installation and the path
to your Hadoop library, as well as other MapReduce configurations that you want
to use when running searches against this cluster.
The attributes in the provider stanza is merged with the family stanza, which it
inherits from. The "vix." prefix is stripped from each attribute and the values are
passed to the MapReduce job configuration.
17
You must configure the provider first. You may configure multiple indexes for a
provider.
[provider:MyHadoopProvider]
vix.family
= hadoop
vix.env.JAVA_HOME
= /path_to_java_home
vix.env.HADOOP_HOME
= /path_to_hadoop_client_libraries
2. Tell Splunk about the cluster, including the NameNode and JobTracker as well
as where to find and where to install your Splunk .tgz copy.
vix.mapred.job.tracker = jobtracker.hadoop.splunk.com:8021
vix.fs.default.name = hdfs://hdfs.hadoop.splunk.com:8020
vix.splunk.home.hdfs = /<the path in HDFS that is dedicated to this
search head for temp storage>
vix.splunk.setup.package = /<the path on the search head to the package
to install in the data nodes>
vix.splunk.home.datanode = /<the path on the TaskTracker's Linux
filesystem on which the above Splunk package should be installed>
Create a virtual index
1. Define one or more virtual indexes for each provider. This is where you can
specify how the data is organized into directories, which files are part of the index
and some hints about the time range of the content of the files.
[hadoop]
vix.provider
= MyHadoopProvider
vix.input.1.path
=
/home/myindex/data/${date_date}/${date_hour}/${server}/...
vix.input.1.accept
= \.gz$
vix.input.1.et.regex = /home/myindex/data/(\d+)/(\d+)/
vix.input.1.et.format = yyyyMMddHH
vix.input.1.et.offset = 0
vix.input.1.lt.regex = /home/myindex/data/(\d+)/(\d+)/
vix.input.1.lt.format = yyyyMMddHH
vix.input.1.lt.offset = 3600
• For vix.input.1.path: Provide a fully qualified path to the data that
belongs in this index and any fields you want to extract from the path.
For example:
/some/path/${date_date}/${date_hour}/${host}/${sourcetype}/${app}/...
Items enclosed in ${}'s are extracted as fields and added to each search result
from that path. The search will ignore the directories which do not match the
search string, thus significantly aiding performance.
18
• For vix.input.1.accept provide a regular expression whitelist of files to
match.
• For vix.input.1.ignore provide a regular expression blacklist of files to
ignore. Note, ignore takes precedence over accept.
2. Use the regex, format, and offset values to extract a time range for the data
contained in a particular path. The time range is made up of two parts: earliest
time vix.input.1.et and latest time vix.input.1.lt. The following
configurations can be used:
• For vix.input.1.et/lt.regex, provide a regular expression that matches
a portion of the directory which provides date and time, to allow for
interpreting time from the path.
Use capturing groups to extract the parts that make up the timestamp. The
values of the capturing groups are concatenated together and are
interpreted according to the specified format. Extracting a time range from
the path will significantly speed searching for particular time windows by
ignoring directories which fall outside of the search's time range.
• For vix.input.1.et/lt.format, provide a date/time format string for how
to interpret the data extracted from the above regex. The format string
specs can be found in the SimpleDateFormat.
</br>The following two non-standard formats are also supported: epoch to
interpret the data as an epoch time and mtime,/code> to use the modification
time of the file rather than the data extracted by the regex.
• For <code>vix.input.1.et/lt.offset, you can optionally use it to provide an
offset to account for timezone and/or safety boundaries.
Set provider configuration variables
Hunk also provides preset configuration variables for each provider you create.
You can leave the preset variables in place or edit them as needed. If you want t
edit them, see Provider Configuration Variables in the reference section of this
manaual.
Note: If you are configuring Hunk to work with YARN, you must add new
settings. See "Required configuration variables for YARN" in this manual.
19
Edit props.conf (optional) to define data processing
Optionally, you can edit props.conf to define how to process data files. Index and
search time attributes are accepted for either type. The example below shows
how twitter data (json object representing tweets) is processed using index and
search time props. It shows a single line json data, with _time being a calculated
field (note we've disabled index-time timestamping)
[source::/home/somepath/twitter/...]
priority
= 100
sourcetype
= twitter-hadoop
SHOULD_LINEMERGE = false
DATETIME_CONFIG = NONE
[twitter-hadoop]
KV_MODE
= json
EVAL-_time
= strptime(postedTime, "%Y-%m-%dT%H:%M:%S.%lZ")
Add a sourcetype
If you want to search your virtual indexes by sourcetype, you must first configure
them for your data via props.conf.
Any common data input format can be a source type, though most source types
are log formats. If your data is unusual, you might need to create a source type
with customized event processing settings. And if your data source contains
heterogeneous data, you might need to assign the source type on a per-event
(rather than a per-source) basis.
See "Why sourcetypes matter" in the Splunk Enterprise documentation to learn
more about why you might want to use sourcetyping in your HDFS data.
To add a sourcetype to an HDFS data source, you can simply add a stanza to
$SPLUNK_HOME/etc/system/local/props.conf. When defining sourcetypes for
HDFS data, keep in mind that searches of HDFS data occur at search-time, not
index time and that Hunk only reads the latest timestamps and not original HDFS
timestamps. As a result, timestamp recognition may not always works as
expected.
In the example below, we add two sourcetypes. A new sourcetype
access_combined represents data from the access_combined log files. mysqld will
let you search data from the specified <mysqld.log</code> file(s):
20
[source::.../access_combined.log]
sourcetype=access_combined
priority=100
[source::.../mysqld.log]
sourcetype=mysqld
priority=100
(You do not need to restart Hunk)
Once you do this, you can search your HDFS by sourcetypes. For more
information about searching, including searching by sourcetypes, see "Use fields
to search" in the Splunk Enterprise Search Tutorial.
Note the following when adding a sourcetype:
• INDEXED_TIME extractions do not work with Hunk
• While search time extractions should work with Hunk, it's easier to use the
SimpleCSVRecordReader to do what you're looking for (if the file has a
header) by adding it to the default list:
#append the SimpleCSVRecordReader to the default list:
vix.splunk.search.recordreader =
...,com.splunk.mr.input.SimpleCSVRecordReader
vix.splunk.search.recordreader.csv.regex = <a regex to match csv files>
vix.splunk.search.recordreader.csv.dialect = tsv
Configure Hunk to run reports as a different user
By default, Hunk runs and spawns MapReduce jobs as the OS user used to
install and run the search head server. If you install a Hunk license on an existing
Splunk installation that has already been configured, or if your MapReduce user
changes, you may need to reconfigure your Hunk user in order to run
MapReduce jobs.
To run MapReduce jobs as a different user, you spawn the Splunk MapReduce
process in the search head as that user. To do this you:
• Give your MapReduce user permissions to Splunk.
• Assign your MapReduce user as the Hunk user.
We do the rest by providing a script that changes the user before running the
ERP process
21
Reconfigure your user for Hunk:
1. Create a *nix user on the machine your search head resides on and give it the
name of the user you want to use to run MapReduce jobs. For this example, let's
call this *nix user "NewUser".
2. Set the umask for the *nix account that was originally used to install Splunk. For
this example, let's call this original user "SplunkUser".
umask [-S ] [SplunkUser]
This makes the files created by "SplunkUser" readable to the "NewUser" *nix
user account you just created. If you want to learn more about the umask
command, check out the following article: http://en.wikipedia.org/wiki/Umask.
3. Set Splunk's internal umask so that files Splunk creates are readable to
NewUser. You do this in launch.conf like so.
$SPLUNK_HOME/etc/splunk-launch.conf
SPLUNKD_MINIMAL_UMASK=<octal>
Example : SPLUNKD_MINIMUM_UMASK=0002
4. Give "SplunkUser" Passwordless sudo permissions, so they can run as
"NewUser" for bin bash by adding the following line via visudo:
SplunkUser ALL=(NewUser) NOPASSWD: /bin/bash
5. Disable requiretty for "SplunkUser". Via visudo
add the following line
(otherwise the virtual index search and you will see something like this: "sudo:
sorry, you must have a tty to run sudo.")
Defaults:SplunkUser !requiretty
6. Update indexes.conf to tell Hunk to run MapReduce jobs as "NewUser". This
can be updated in the provider or the virtual index stanza.
vix.env.MAPREDUCE_USER=NewUser
7. Make sure the following are executable by both "SplunkUser" and "NewUser":
• The hadoop script in your $HADOOP_HOME/bin directory exists.
• The Hadoop CLI script in your $HADOOP_HOME directory is executable.
• The SplunkMR jars in $SPLUNK_HOME/bin/jars exist.
22
• Any Splunk jars in the "NewUser" home directory must also be executable
by "SplunkUser".
• Any Splunk jars in the "HunkUser" home directory, must be executable by
"NewUser".
8. Restart Hunk to propagate your changes.
23
Work in the Hunk user interface
About the Hunk user interface
The Hunk user interface consist of several pages that become available when
you license Hunk on a Splunk 6.0 installation.
These pages let you:
• Add and edit HDFS providers
• Add and edit virtual indexes
• Run search-generated reports on your configured HDFS directories
To learn more about Hunk works, also check out the Hunk concepts chapter in
this manual.
To test drive Hunk on a virtual machine with some sample data (that we provide)
see the Tutorial in this manual.
Add or edit an HDFS provider
Before you add a new virtual index, you need to set up the provider for that
index. You can set up multiple providers with multiple indexes for one provider.
When you add a virtual index, you need to have the following information at
hand:
• The host name and port for the NameNode of the Hadoop cluster.
• The host name and port for the JobTracker of the Hadoop cluster.
• Installation directories of Hadoop command line libraries and Java
installation.
• Path to a writable directory on the DataNode/TaskTracker *nix filesystem,
the one for which the Hadoop user account has read and write permission.
• Path to a writable directory in HDFS that can be used exclusively by
Splunk on this search head.
You can also add HDFS proviers and virtual indexes by editing indexes.conf. See
"Set up a virtual index" in this manual for instructions on setting up virtual indexes
in the configuration file.
24
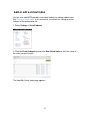
Add a provider
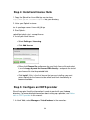
1. In the top menu, select Settings > Virtual Indexes.
2. Select the Providers tab in the Virtual Indexes page and click New Provider
or the name of the provider you want to edit.
The Add New/Edit Provider page appears:
25
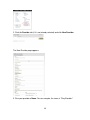
3. Give your provider a Name.
4. Select the Provider Family in the drop down list (note that this field cannot be
edited).
5. Provide the following Environment Variables:
• Java Home: provide the path to your Java instance.
• Hadoop Home: Provide the path to your Hadoop client directory.
6. Provide the following Hadoop Cluster Information:
• Hadoop Version: Tell Hunk which version of Hadoop the cluster is running
one of: Hadoop 1.0, Hadoop 2.0 with MRv1 or Hadoop 2.0 with Yarn
• JobTracker: Provide the path to the Job Tracker.
• File System: Provide the path to the default file system.
7. Provide the following Splunk Settings:
• HDFS working directory: This is a path in HDFS (or whatever the default
file system is) that you want Hunk to use as a working directory.
• Job queue: This is job queue where you want the MapReduce jobs for
this provider to be submitted to.
8. The Additional Settings fields specify your provider configuration variables.
Hunk populates these preset configuration variables for each provider you
create. You can leave the preset variables in place or edit them as needed. If you
want to learn more about these settings, see Provider Configuration Variables in
the reference section of this manual.
Note: If you are configuring Hunk to work with YARN, you must add new
settings. See "Required configuration variables for YARN" in this manual.
9. Click Save.
26
Add or edit a virtual index
You can also add HDFS providers and virtual indexes by editing indexes.conf.
See "Set up a virtual index" in this manual for instructions on setting up virtual
indexes in the configuration file.
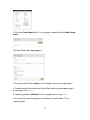
1. Select Settings > Virtual Indexes.
2. Click the Virtual Indexes tab and click New Virtual Index or click the name of
the index you want to edit.
The New/Edit Virtual Index page appears:
27
3. In the Name field, provide a name for your virtual index.
4. Select a Provider. To add a new provider, see Add an HDFS provider.
5. Provide the following path information:
• Path to data in HDFS: This is the path to the data that Hunk will be
accessing and reporting on. For example:
/home/data/apache/logs/
• Recursively process the directory: Check this if you want Hunk to
(recursively) include the content of sub directories.
• Whitelist: Provide a regex that matches the file path. You can specify
regular expressions to filter in/out files (based on the full path) that
should/not be considered part of the virtual index. A common use case for
using it is to ignore temporary files, or files that are currently being written
to. Keep in mind that ignore takes precedence over accept. For example:
\.gz$
6. CheckCustomize timestamp format to open the controls that allow you to
customize how data is collected based on timestamp information. Use simple
28
date format to optionally customize the following:
• Earliest Time: Provide a regex that determines the earliest date/time that
will be collected and processed based on timestamp. For example:
/home/data/(\d+)/(\d+)/
• Time Format: For the earliest time above, provide a time format that
describes how to interpret the extracted time string. For example:
yyyyMMddHH
• Offset: Amount of time, in seconds, to add to the earliest time. Example
(+7hrs): 25200
• Latest Time:Provide a regex that determines the latest date/time that will
be collected and processed based on the timestamp. For example:
/home/data/(\d+)/(\d+)/
• Format: For the latest time, specify the format that describes how to
interpret the extracted time string. For example:
yyyyMMddHH
• Offset:Amount of time, in seconds, to add to the latest time. For example,
+8hrs = 28800
Use search commands on a virtual index
Once you properly install and configure your virtual indexes, you can create
reports and visualize data as you would against data in a traditional Splunk
index. If you are using Hunk on top of Splunk, you can also choose to gather
data from the virtual index alone; or you can query both local and virtual indexes
for a single report.
For the most part, you can create reports for virtual indexes much as you would
for local indexes. For more information about creating reports, see the Splunk
Enterprise Search Manual.
Due to the size and the nature of Hadoop datastores, there are certain Splunk
Enterprise index behaviors that cannot be duplicated:
29
• Hunk currently doesn't support real-time searching of Hadoop data,
although preview functionality is available.
• Data is not always returned as quickly as data is returned for a local index.
• Data model acceleration is not available for virtual indexes.
Since events are not sorted, any search command which depends on implicit
time order will not work exactly the way you'd expect. (For example: head, delta,
or transaction.) This means that a few search commands operate differently
when used on virtual indexes, mostly because of the way Hadoop reports
timestamps.
You can still use these commands, and may particularly want to when creating a
single report for local and virtual indexes, but you should be aware of how they
operate and return data differently.
How Hunk reporting uses search language
For the most part, you can use Splunk Enterprise search language to create your
reports. However, because Hunk does not support strict requirements on the
order of events, there are a few differences.
The following commands are not supported when the search includes a virtual
indexes:
• transactions
• localize
The following commands work on virtual indexes, but their results may differ from
Splunk. This is because in Hunk, descending time order of events is not
guaranteed:
• streamstats
• head
• delta
• tail
• reverse
• eventstats
• dedup (Since the command cannot distinguish order within an HDFS
directory to pick the item to remove, Hunk will choose the item to remove
based on modified time, or file order.)
30
Tutorial
Welcome to the Hunk tutorial
This tutorial shows you how to start using a simple installation of Hunk using a
Hadoop Virtual Machine and some sample data.
• This tutorial shows you one relatively simple way to set up Hunk, add data
(included) to HDFS, and configure a provider and index. We then show
you how to check your data and run a few simple searches on the Hadoop
directory. We are walking through the steps using the Cloudera Quickstart
VM for VMware. If you wish to try out Hunk using YARN, we recommend
you try using the Hortonworks Sandbox 2.0 here. See "System and
Software requirements" for the full list of supported Hadoop distributions
and versions.
• This tutorial does not teach you how to install Hunk to work with your
existing HDFS infrastructure. For instructions on installing Hunk on your
system see "Install and configure Hunk" in this manual.
• This tutorial does not deep dive into working with the search bar and
writing search commands, which is discussed in great detail in the Splunk
Enterprise documentation. If you are not already familiar with Splunk
Enterprise's rich reporting functionality, we recommend you check out the
Splunk Enterprise Search Manual.
• This tutorial uses a Hunk license installed on the free Splunk Enterprise
download from http://www.splunk.com, which also includes a Splunk
license. If you want to try working with sample data in local indexes and
virtual indexes at the same time, also check out the Search Tutorial in the
Splunk Enterprise documentation, which provides sample data and step
by step instructions for setting up local indexes.
Note: Copying and pasting searches directly from the PDF document into Splunk
Web is not recommended. In some cases, doing so causes errors because of
hidden characters that are included in the PDF formatting.
31
Step 1: Set up a Hadoop Virtual Machine instance
The easiest way to get started sampling searches in Hunk is to install a Virtual
Machine that comes preconfigured with Hadoop.
For this tutorial we are using using the Cloudera Quickstart VM for VMware. See
System and Software requirements for the full list of supported Hadoop
distributions and versions.
Setting up your Virtual Machine for this tutorial
This tutorial uses Cloudera Quickstart Virtual Machine. If you are using another
VM with Hadoop instance, see that product's directions for installation and setup.
If you wish to try out Hunk using YARN, we recommend you try using the
Hortonworks Sandbox 2.0 here.
If you are following this example using Cloudera Quickstart for VM:
1. untar the Cloudera Quickstart VM on your computer:
tar ?xvf cloudera-quickstart-vm-4.3.0-vmware.tar.gz
2. Start and access the virtual machine.
3. Import the OVF file from VMware Fusion.
4. Start the VM and open the terminal to find the IP address of your virtual
machine.
=Trying this tutorial with YARN
If you wish to try out Hunk using YARN, we recommend you try using the
Hortonworks Sandbox 2.0 here.
Note: You can also use any of the virtual machines provided by Hortonworks
here: http://hortonworks.com/products/hortonworks-sandbox.
You might need to assign more memory to Yarn that is defined by default. You
can do this by editing the following property in yarn-site.xml. We recommend
that YARN have at least 5120 MB assigned to it (how much you are able to
assign to it depends on how much memory is assigned to your zVM):
32
<name>yarn.nodemanager.resource.memory-mb</name> <value>5120</value>
Step 2: Set up your data
1. Upload the Hunkdata.json.gz and Hunk installer to the virtual machine you
configured in "Set up your virtual machine".
Once you have your virtual machine configured, you need to install the tutorial
sample data: Hunkdata.json.gz.
2. SSH to your virtual machine, and move Hunkdata.json.gz and your Splunk
downloadto the HDFS user?s home directory. (If you are using the Cloudera
quickstart VM, the password for root user is ?cloudera?.)
scp Hunkdata.json.gz [email protected]:~
scp splunk-6.0-<version number>-Linux-x86_64.tgz [email protected]:~
ssh [email protected]
mv Hunkdata.json.gz ~hdfs (this is moves the data to the hdfs user)
3. Put the data into HDFS as the hdfs user
su - hdfs -c "hadoop fs -mkdir hdfs://localhost:8020/data"
su - hdfs -c "hadoop fs -put ~/Hunkdata.json.gz
hdfs://localhost:8020/data"
su - hdfs -c "hadoop fs -ls hdfs://localhost:8020/data"
Step 3: Set up an HDFS directory for Hunk access
This step shows you how to create a new HDFS directory that gives the root user
access. This is needed for this specific example because we will install Splunk as
root, and Splunk must have permissions for an HDFS directory.
Another option, if you are not following this example exactly, is to set up Splunk
as one of the users that already has HDFS permissions.
su - hdfs -c "hadoop fs -mkdir hdfs://localhost:8020/user/root"
su - hdfs -c "hadoop fs -chown root:root
hdfs://localhost:8020/user/root"
hadoop fs -mkdir hdfs://localhost:8020/user/root/splunkmr
Run the following command to see the new directory and permissions:
hadoop fs -ls -R hdfs://localhost:8020/user/root
33
Step 4: Install and license Hunk
1. Copy the Splunk for Linux 64bit tgz version from
http://www.splunk.com/download/hunk into your directory.
2. Untar your Splunk instance:
tar xf <package name>-Linux-x86_64.tgz
3. Start Splunk:
splunk/bin/splunk start --accept-license
4. Install your Hunk license:
• Select Settings > Licensing.
• Click Add license.
• Either click Choose file and browse for your Hunk license file and select
it, or click copy & paste the license XML directly... and paste the text of
your license file into the provided field.
• Click Install. If this is the first license that you are installing, you must
restart Splunk for the license to take effect and Hunk functionality to
become available.
Step 5: Configure an HDFS provider
We will now give Hunk the information it needs to work with your Hadoop
directory. For more detailed information about setting up a provider, see Add or
edit an HDFS provider in this manual.
1. In Hunk Web, select Manager > Virtual Indexes in the menu bar.
34
2. Click the Provider tab (if it is not already selected) and click New Provider.
The New Provider page appears:
3. Give your provider a Name. For our example, the name is "PonyProvider".
35
4. Select a Provider Family, if you are using our example, the option is
"Hadoop".
5. In the Java Home field, provide the path to your Java instance. The path in
our example is /usr/java/jdk1.6.0_31. (You can run ls /usr/java to verify your
version for this example.)
6. In the Hadoop Home field, provide the path to your Hadoop client directory. In
our example we are using /usr/lib/hadoop.
7. In the Hadoop Version field, tell Hunk which version of Hadoop you are using.
Our example uses Hadoop 2.x, (MRv1). Hunk currently supports MRv1 and
MRv2. If you are using YARN, make sure you select it as your type.
8. In the JobTracker field, provide that host and port to where the JobTracker
resides. In our example, this is localhost:8021. If you are using YARN, leave
this field blank.
9. In the File System field, provide the URI to the default file system. In our
example, this URI is: hdfs://localhost:8020.
10. For HDFS working directory provide the path in HDFS that you want Hunk
to use as a working directory. For our example, this is /user/root/splunkmr.
11. If you are using YARN (Hortonworks for Sandbox 2.0), you will need to add a
few new settings in the Additional Settings section. These are:
• vix.yarn.resourcemanager.address= <namenode>:8050
• vix.yarn.resourcemanager.scheduler.address= <namenode>:8030
12. Click Save.
Step 6: Set up a Virtual Index
This step walks you through setting up a simple virtual index. If you would like
more in-depth information about virtual index configuration, see "Add or edit a
virtual index" in this manual.
1. Select Manager > Virtual Indexes in the menu bar.
36
2. Click the Virtual Index tab (if it is not already selected) and click New Virtual
Index.
The New Virtual Index page appears:
3. Give your virtual index a Name in this example, we are using "ponyindex."
4. Provide the path to the data that Hunk will be accessing and reporting on. In
our example, this is /data.
5. Optionally provide a Whitelist. In this example we are using \.gz$.
6. If you want to recursively process the directory, check the box. This is
recommended.
37
7. Click Save to save your index and return to the Virtual Indexes page.
Note that we won't be using the optional partitioning fields for this example, but if
you would like to learn more about them, see Add a virtual index.
Step 7: Try a simple data search
Let's try a simple search of our test data.
1. Click on the Search link for your new Virtual Index.
2. Take a look at the data in "ponyindex."
3. Try the following simple search:
- index=ponyindex | rex field=source
"/data/(?<my_host>[^/]+)/(?<file_name>[^/]+)$" | stats count
values(sourcetype) as sourcetype values(tasktracker) as tasktracker by
my_host file_name
4. For time range, select "All time". If you do want to use time ranges in your
eventual deployment, note that time-dependent search commands work
differently (and occasionally not at all) on HDFS directories. For more
information, see Search a virtual index.
38
5. Run your report. In the next step we will save this report and share it with other
users.
Step 8: Save a report
Let's use our simple search from Step 7 to create a saved report.
If you closed your search from the previous step, simply run it again:
- index=ponyindex | rex field=source
"/data/(?<my_host>[^/]+)/(?<file_name>[^/]+)$" | stats count
values(sourcetype) as sourcetype values(tasktracker) as tasktracker by
my_host file_name
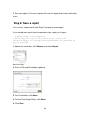
1. Above the search bar, click Save as and select Report.
2. Enter a Title and Description (optional).
3. For Visualization, click None.
4. For the Time Range Picker, click None.
4. Click Save.
39
The Your report has been created window opens.
There are other options in this window. Continue Editing lets you refine the
search and report format. You can also Add to dashboard, which we will
address in the next step. You can also click View to view the report.
Find and share saved reports
You can access your saved reports by clicking on Reports in the app navigation
bar.
When you save a new report, its Permissions are set to "Private" by default. This
means that only you can view and edit the report. You can allow other apps to
view, or edit, or view and edit the reports by changing its Permissions.
To share the new report with everyone,
1. Under Actions, click Edit and select Edit Permissions. This opens the Edit
Permissions dialog.
2. Next to Display for, click App and check the box under Read for Everyone.
3. Click Save.
Back at the Reports listing page, your new report permissions are now available
to the App.
A note about report acceleration
As of 6.0, Report Acceleration is not available for virtual indexes, though if you
are running Hunk and Splunk Enterprise together, you can still use report
acceleration on your Splunk Enterprise local indexes. See "Accelerate Reports"
topic in the Splunk Enterprise Reporting Manual for more information.
40
Learn more
The tutorial you've just completed only shows you a fraction of what you can do
with Hunk. With a few exceptions, you can run searches and reports on virtual
indexes much as you would using Splunk Enterprise on local indexes. If you are
new to Splunk and are not familiar with the Splunk Web and Splunk Enterprise
features, we recommend you take a look at the Splunk Enterprise documentation
set to learn more about what you can do with Hunk.
Learn more about writing reported-generating searches
See the Splunk Enterprise Search tutorial to learn more about how to use search
language.
See Search reference manual for information about search commands.
Make sure you also read Search a virtual index in this manual to understand how
time-related commands work specific to virtual indexes.
Learn more about reporting and knowledge objects
See the Reporting Manual in the Splunk Enterprise Documentation to learn more
about saving and sharing reports.
Check out the Splunk Enterprise Dashboards and Visualizations Manual and
Knowledge Manager Manual to see what else you can do with your
report-generated searches.
41
Reference
Troubleshoot Hunk
This section describes some of the issues you may have with various
components of your configuration and possible ways to resolve those issues.
For more troubleshooting questions and answers, and to post questions yourself,
search for Hunk issues in Splunk Answers.
Issue: Splunk throws a "failed search" message.
For example:
[APACHE] External result provider name=APACHE asked to finalize the
search
[APACHE] MapReduce job id=job_201303081521_0020 failed, state=FAILED,
message=# of failed Map Tasks exceeded allowed limit. FailedCount: 1.
LastFailedTask: task_201303081521_0020_m_000000
This sort of error appears because of java child processes that are also running.
Check the MapReduce logs, where you should see something like the following:
TaskTree [pid=7535,tipID=attempt_201303061716_0093_m_000000_0] is
running beyond memory-limits.
Current usage : 2467721216bytes. Limit : 2147483648bytes. Killing task.
To resolve this, edit indexes.conf as follows:
vix.mapred.child.java.opts = -server -Xmx1024m
Issue: A reporting search throws an error.
If a reporting search throws the following error:
INFO mapred.JobClient: Cleaning up the staging area
hdfs://qa-centos-amd64-26.sv.splunk.com:8020/user/apatil/.staging/job_201303061716_0033
ERROR security.UserGroupInformation: PriviledgedActionException
as:apatil cause:org.apache.hadoop.ipc.RemoteException:
java.io.IOException:
job_201303061716_0033(-1 memForMapTasks -1 memForReduceTasks): Invalid
job requirements.
at
org.apache.hadoop.mapred.JobTracker.checkMemoryRequirements(JobTracker.java:5019)
Try adding the following parameters to indexes.conf
42
vix.mapred.job.map.memory.mb = 2048
vix.mapred.job.reduce.memory.mb = 256
Issue: Hadoop fails to start
Make sure that the user account has proper permission to the needed Hadoop
directories.
Performance best practices
When your raw HDFS data is subjected to the search process, the data passes
through index-time processing. (Index time extractions run at search time and
cannot be turned off.)
In order to more efficiently process this data, you should optimize your index-time
settings, particularly timestamping and aggregation. The following settings added
to your data source in props.conf can be configured to improve performance:
• DATETIME_CONFIG
• MAX_TIMESTAMP_LOOKAHEAD
• TIME_PREFIX
• TIME_FORMAT
• SHOULD_LINEMERGE
• ANNOTATE_PUNCT
For example, for single line, non-timestamped data, the following settings can
improve throughput roughly four times over:
[source::MyDataSource]
ANNOTATE_PUNCT
= false
SHOULD_LINEMERGE = false
DATETIME_CONFIG = none
Note: If you need to use timestamping, we strongly recommend that you use
TIME_PREFIX and TIME_FORMAT to improve processing.
The table below shows examples of possible timestamping and breaking options
and how long (in seconds) that combination can take when processing a file with
10 million single line events:
Timestamping and breaking options:
Time:
Default configuration
190 seconds
MAX_TIMESTAMP_LOOKAHEAD = 30
179
105
43
MAX_TIMESTAMP_LOOKAHEAD = 30
SHOULD_LINEMERGE = false
MAX_TIMESTAMP_LOOKAHEAD = 30
SHOULD_LINEMERGE = false
TIME_PREFIX = ^
107
MAX_TIMESTAMP_LOOKAHEAD = 30
SHOULD_LINEMERGE = false
TIME_FORMAT = %a, %d %b %Y %H:%M:%S %Z
51
MAX_TIMESTAMP_LOOKAHEAD = 30
SHOULD_LINEMERGE = false
TIME_PREFIX = ^
TIME_FORMAT = %a, %d %b %Y %H:%M:%S %Z
53
MAX_TIMESTAMP_LOOKAHEAD = 30
SHOULD_LINEMERGE = false
TIME_FORMAT = %a, %d %b %Y %H:%M:%S %Z
ANNOTATE_PUNCT = false
44
SHOULD_LINEMERGE = false
109
SHOULD_LINEMERGE = false
TIME_PREFIX = ^
99
SHOULD_LINEMERGE = false
TIME_FORMAT = %a, %d %b %Y %H:%M:%S %Z
54
SHOULD_LINEMERGE = false
TIME_PREFIX = ^
TIME_FORMAT = %a, %d %b %Y %H:%M:%S %Z
54
MAX_TIMESTAMP_LOOKAHEAD = 30
SHOULD_LINEMERGE = false
DATETIME_CONFIG = NONE
49
SHOULD_LINEMERGE = false
DATETIME_CONFIG = CURRENT
50
MAX_TIMESTAMP_LOOKAHEAD = 30
SHOULD_LINEMERGE = false
DATETIME_CONFIG = NONE
ANNOTATE_PUNCT = false
35
Provider Configuration Variables
When you configure an HDFS provider, Hunk automatically sets a number of
configuration variables. You can use the preset variables, or you can modify
44
them as needed by editing the provider.
• For more information about editing them in the configuration file, see "Set
up a provider and virtual index in the configuration file."
• For information about editing providers in the Hunk user interface, see
"Add an HDFS provider."
• For information about setting provider configuration variables for YARN,
see "Required configuration variables for YARN."
Setting:
Use it to:
Determines whether to
perform setup (install &
BR) on search.
vix.splunk.setup.onsearch
Location for the Splunk
.tgz package that Splunk
can install and use on data
nodes (in
vix.splunk.setup.package
vix.splunk.home.datanode).
A value of current uses
current install.
vix.splunk.home.datanode
on the
DataNode and/or
TaskTracker
vix.splunk.home.hdfs
The location of scratch
space on HDFS for this
Splunk instance.
vix.splunk.search.debug
Determines whether
search is run in debug
mode.
SPLUNK_HOME
Provides a comma
separated list of data
pre-processing classes
This value must extend
vix.splunk.search.recordreader
BaseSplunkRecordReader
and return data to be
consumed by Splunk as
the value
vix.splunk.search.recordreader.avro.regex
45
Specifies a regex that files
must match in order to be
considered avro files,
defaults to \.avro$.
vix.splunk.search.mr.threads
Determines the number of
threads to use when
reading map results from
HDFS.
vix.splunk.search.mr.maxsplits
Determines the maximum
number of splits in an
MapReduce job.
vix.splunk.search.mr.poll
Determines the polling
period for job status, in
milliseconds.
vix.splunk.search.mixedmode
Determines whether mixed
mode execution is enabled
vix.splunk.search.mixedmode.maxstream
Determines the maximum
number of bytes to stream
during mixed mode. The
default value is 10GB. A
value of 0 indicates that
there is no stream limit.
Bytes will cease streaming
after the first split that
takes the value over the
limit.
vix.splunk.jars
Provides a
comma-delimted list of
dirs/jars to use in SH and
MR
Required configuration variables for YARN
If you are using YARN, you must add resource manager settings to the
configuration variable settings:
• vix.yarn.resourcemanager.address= <namenode>:<port>
• vix.yarn.resourcemanager.scheduler.address= <namenode>:<port>
If you installed Hortonworks for Sandbox 2.0), add the following settings/port:
46
• vix.yarn.resourcemanager.address= <namenode>:8050
• vix.yarn.resourcemanager.scheduler.address= <namenode>:8030
If you are using the Cloudera VM for Yarn, add the following settings/port:
• vix.yarn.resourcemanager.address = <your namenode>:8032
• vix.yarn.resourcemanager.scheduler.address = <your namenode>:8030
47
Release Notes
Known issues
This topic lists known issues for Hunk.
Known issues for Hunk 6.0
• Subsearches against virtual indexes may fail with a license error.
(SPL-74861)
• When reporting on a search head configured to both search virtual
indexes and Splunk indexers, you may experience errors when fetching
events while in "Verbose Mode". (SPL-75588)
48