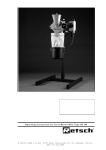
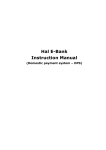
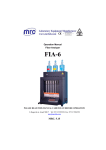
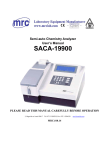
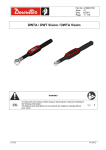
1
Operation Manual for
BEAD BEATER
BMIX-100
PLEASE READ THIS MANUAL CAREFULLY BEFORE OPERATION
3, Hagavish st. Israel 58817 Tel: 972 3 5595252, Fax: 972 3 5594529 [email protected]
MRC.VER.01-8.12
USER'S MANUAL %0,;
TABLE OF CONTENTS
1. SAFETY INFORMATION ........................................................................................ 3
1.1. WARNING SYMBOLS .......................................................................................... 3
1.2. SAFETY INSTRUCTIONS .................................................................................... 3
2. GENERAL DESCRIPTION...................................................................................... 5
3. TECHNICAL FEATURES........................................................................................ 6
3.1. CONSTRUCTION ................................................................................................. 6
3.2. TECHNICAL DATA ............................................................................................... 6
4. INSTALLATION ...................................................................................................... 7
4.1. UNPACKING ........................................................................................................ 7
4.2. SELECTING THE RIGHT PLACE ........................................................................ 7
4.3. CONNECTING THE POWER CORD ................................................................... 7
4.4. ENVIRONMENT CONDITIONS ............................................................................ 8
5. INSTRUCTIONS FOR USE ..................................................................................... 8
5.1. OVERALL VIEW ................................................................................................... 8
5.2. CONTROL PANEL DESCRIPTION ...................................................................... 9
5.3. INSERTING / REPLACING THE MILLING CUPS .............................................. 10
5.4. BASIC OPERATION ........................................................................................... 11
5.5. ADDITIONAL OPERATIONS .............................................................................. 13
6. WORKING INSTRUCTIONS ................................................................................. 14
6.1. GENERAL .......................................................................................................... 14
6.2. MILLING PROCES ............................................................................................. 14
6.3. MILLING CUPS FILLING LEVELS ..................................................................... 15
6.4. REPLACING THE MACHINE FUSES ................................................................ 15
7. TROUBLESHOOTING .......................................................................................... 16
8. MAINTENANCE .................................................................................................... 16
8.1. WEAR ................................................................................................................. 16
8.2. CLEANING ......................................................................................................... 17
9. ACCESSORIES .................................................................................................... 17
9.1. MILLING CUPS AND BALLS .............................................................................. 17
9.2. MILLING RACKS AND BALLS ........................................................................... 17
2
USER'S MANUAL %0,;
1. SAFETY INFORMATION
Before using the machine, make sure to read and understand this manual
thoroughly. Keep the manual close to the machine, easily accessible to all the users.
Improper operation can cause injury to persons or damage to the equipment.
1.1. WARNING SYMBOLS
The following are the warning symbols that are used in this manual.
This symbol indicates a potential risk and alerts you to proceed with
caution.
This symbol indicates the presence of high voltage and warns the user
to proceed with caution.
This symbol indicates risks associated with hot surfaces.
1.2. SAFETY INSTRUCTIONS
Safety instructions
Claims for damages in any form whatsoever, for injury to persons or
damage to the machine, caused through non-observance of the
following safety instructions, are excluded.
Use according to the intended purpose
Do not make any alterations to the machine and use only approved
spare parts and accessories. Otherwise the Declaration of Conformity
will lose its validity and this will also lead to the loss of any guarantee
claims.
Transport
Do not knock, shake or throw the %0,; during transport. Otherwise
the electronic and mechanical components may be damaged.
Packing material
Please keep the packing material for the duration of the guarantee
period. In case of a complaint and return of the machine in unsuitable
packing material, your guarantee claim will be lost.
Temperature variations
If the %0,; is subjected to high temperature variations, protect it
against condensed water. Otherwise the electronic components may be
damaged.
Ambient temperature
If the temperature drops below 5°C or exceeds 40°C, electronic and
mechanical components can be damaged. Performance can be
changed to an unknown extent.
3
USER'S MANUAL %0,;
Atmospheric humidity
If the humidity exceeds 85%, electronic and mechanical components
can be damaged. Performance can be changed to an unknown extent.
Electrical connection
If the values for the mains power supply on the name plate are not
observed, the electrical and mechanical components may be damaged.
Inserting milling cups
Ensure that the milling cups are inserted correctly in the milling cup
holder. Otherwise they can be damaged, when starting the machine.
Both milling positions must always be used. Otherwise this will cause
considerable unbalance.
Removing and opening hot milling cups
When removing and opening hot milling cups, always wear protective
gloves. There is a danger of burning the hands.
Materials
Observe the relevant regulations and directives for handling chemicals
and hazardous materials.
Milling of materials, which give a risk of fire or explosion, is prohibited.
Cleaning
Do not clean the %0,; under running water. Danger to life through
electric shock.
Use only a soft cloth moistened with water. Cleaning agents and
solvents should not be used, not for cleaning the milling tools either.
Repair
For your own safety, repairs must be carried out only by authorized
service technicians.
4
USER'S MANUAL %0,;
2. GENERAL DESCRIPTION
The %0,; is a laboratory machine, which is suitable for milling and
homogenizing soft, fibrous, hard and brittle materials in the dry and wet state.
It is used for fast, super fine milling of 2 samples simultaneously.
The closed milling system guarantees complete recovery of the samples. Owing to
the extremely short milling time and the high final fineness of the milled material, the
BMIX-100 is also ideally suitable for sample preparation for all spectral analyses.
Final finenesses of down to 1 μm can be achieved, depending on the milling time and
the specific properties of the sample material. The optimum milling cup filling is as a
rule 1/3 of the milling cup volume.
Exceptions to this are voluminous materials, such as wool, leaves, grasses and
suchlike. In these cases a filling level of 70-80% is necessary.
The sample quantity should not be less than 25% of the milling cup
volume.
The milling balls may otherwise damage the milling cups.
The milling cup materials and milling ball materials must always be
identical or compatible.
The milling balls may otherwise damage the milling cups.
5
USER'S MANUAL %0,;
3. TECHNICAL FEATURES
3.1. CONSTRUCTION
The housing of %0,; is made of steel plate varnished with high resistant
polyurethane lacquer.
Protective equipment
The milling chamber of the %0,; is enclosed by a strong covering hood.
Starting of the machine is possible only with the hood closed. If the hood is open,
message "LId" appears on display, when you press the START/STOP key.
When message "LId" appears on display, you have to close the hood and clear the
message by pressing the START/STOP key. Then you can start the machine by
pressing the START/STOP key again.
If you open the hood during the operation, the machine stops rapidly and message
"Er3" appears on display.
When message "Er3" appears on display, you can't start the machine again by
pressing the START/STOP key. You have to turn the main POWER switch OFF and
then ON again, to clear the message and use the machine again.
3.2. TECHNICAL DATA
Power supply
Rated power
Fuses
Vibrational frequency
regulation
Timer
Max. volume of milling cups
Dimensions W x D x H
Weight
Noise emission
(without milling balls)
Ambient temperature
Atmospheric humidity
230V ± 10% - 50/60Hz
200W
2 x T2A 250V
Digital, from 3 to 30 Hz (180 - 1800 min-1),
in 0.1 Hz steps
5 sec - 99 min, timer HOLD function,
in 1 sec steps (below 10 min),
or 10 sec steps (above 10 min)
2 x 50 ml
385 x 420 x 240 mm (465 mm with hood open)
42 kg
70 dB(A)
5°C - 40°C
< 85% RH
6
USER'S MANUAL %0,;
4. INSTALLATION
4.1. UNPACKING
Before the installation, carefully examine the delivery for possible damage or missing
parts.
Unscrew and remove two transportation safety screws, on the bottom side of the box.
Open the box and take the machine out of the box. Check that the machine has not
been visibly damaged during the transport.
Please keep the packing material for the duration of the guarantee period. In case of
a complaint and return of the machine in unsuitable packing material, your guarantee
claim will be lost.
Check that the mains cord is compatible with the local standard.
If any kind of damage occurred during transport, immediately make a complaint to
the carrier. Any incorrect delivery or missing parts should be reported to the
distributor.
4.2. SELECTING THE RIGHT PLACE
When selecting the right place for the machine, please consider the following:
-
Put the device on smooth, horizontal and stable place.
Leave enough space beyond the device for normal air circulation, min. 10 cm.
Leave enough space around the device, that you will easy control and maintain it.
Don’t use the device in surroundings, where there are fast temperature and
humidity changes. Also avoid places exposed to direct sunlight and places nearby
heating devices.
- Avoid places, where the possibility of shocks and vibrations exists.
Note: The machine should not be placed so, that it is difficult to pull out the
cord plug from mains power supply.
4.3. CONNECTING THE POWER CORD
The correct voltage and frequency for the BMIX-100 are given on the name plate.
Ensure that these values correspond to the available power supply system.
Fit one end of the power cord, included in the delivery, into the mains socket on the
machine. Connect the other end of the cord to a grounded wall socket.
To avoid interference from noise, surges and spikes, a dedicated line is preferred. If
no such line is available, avoid lines to which powerful electric motors, refrigerators
and similar devices are connected.
The power can be turned on and off by the POWER switch, located on the right side
of the housing of the machine. Light in the switch indicates, when the power is on.
7
USER'S MANUAL %0,;
4.4. ENVIRONMENT CONDITIONS
The machine has been built for operating in laboratory environment. Therefore the
environmental conditions should be the following:
- Temperature from 5°C to 40°C
- Humidity up to 85% RH, non-condensing
5. INSTRUCTIONS FOR USE
5.1. OVERALL VIEW
1
2
3
5
4
2
5
6
8
7
USER'S MANUAL %0,;
Position
1
2
3
4
5
6
7
Description
Control panel with display
Hood
Milling cup holder - left
Milling cup holder - right
POWER switch
Mains socket
Fuse compartment
Function
Time and vibrational frequency setting,
starting / stopping the machine.
Closes the milling chamber.
Holds the milling cup.
Holds the milling cup.
For switching the BMIX-100 on and off.
Connection for power cord to the machine.
Contains two fuses.
5.2. CONTROL PANEL DESCRIPTION
- POWER switch (on the right side of %0,;) - switches ON (power switch
shines) or OFF the power of the machine.
- RUN signal light (green) - shines when %0,; is running.
- TIME signal light (yellow) - shines when %0,; is set on time.
- FREQUENCY signal light (yellow) - shines when %0,; is set on vibrational
frequency.
- ENCODER knob (push or rotate) - with rotating ENCODER right (+) or left (-),
you change TIME or FREQUENCY on the machine. Push ENCODER to switch
between TIME and FREQUENCY setting values.
If you rotate ENCODER knob fast, then values on display go up or down
quickly.
- START/STOP key - starts or stops the operation of %0,;.
Starting of the machine is possible only with the hood closed. If the
hood is open, message "LId" appears on display.
Always start and stop the machine with START/STOP key.
9
USER'S MANUAL %0,;
5.3. INSERTING / REPLACING THE MILLING CUPS
Place the milling cups, filled with the material to be milled and milling balls, into the
centering points A of the clamping devices and clamp firmly.
B
B
A
A
C
C
• Lift the locking pin B upwards from the groove and turn it for 90° in any
direction. This unlocks the locking device.
• Turn the knob C counterclockwise, until the max. clamping range is reached.
• Turn the locking pin B back for 90° until it engages in the groove again.
• Insert the milling cup and press lightly into the centering point A.
• Gently turn the knob C clockwise, until the milling cup just fits, free of play, in
the holder. Then continue to turn the knob clockwise for 1 - 2 clicks, while at the
same time the locking pin B is raised and lowered.
The engaged locking pin prevents automatic opening of the milling cup holder.
If the locking pin B cannot be pulled upwards to release it, unlocking should not be
forced with any tool. Otherwise the locking pin can break off. Briefly retighten the
knob C in the clockwise direction and the locking pin can then move freely again.
To remove the milling cup, lift the locking pin B, turn it for 90° and turn the knob C in
the direction to loosen it.
10
USER'S MANUAL %0,;
5.4. BASIC OPERATION
• Switch on the %0,; with POWER switch on the right side of the housing.
Setting the milling time
• TIME signal light shines. With rotating ENCODER right (+) or left (-), set the
milling time to required value from 5 sec to 99 min.
Examples: 98.5 ⇒ 98 min 50 sec
9.59 ⇒ 9 min 59 sec
0.59 ⇒ 59 sec
• If you want to set the time to hold (continued operation), set "HLd" on display.
You get message "HLd" on display, under time value 0.05 or above time value
99.0.
Setting the frequency
• Push ENCODER knob, so that FREQUENCY signal light shines. With rotating
ENCODER right (+) or left (-), set the vibrational frequency to required value
from 3 to 30 Hz.
Example: 20.0 ⇒ 20.0/s
11
USER'S MANUAL %0,;
Starting the milling process
• Press START/STOP key. RUN and TIME signal lights shine. The machine
counts down the time from set value.
Note: You cannot modify the time during the operation of the machine.
Changing the frequency during the operation
• If you want to change the vibrational frequency during the operation of the
machine, push ENCODER knob, so that the FREQUENCY signal light shines.
Rotate ENCODER right (+) or left (-) to required value. In the meantime
FREQUENCY signal light is flashing. When you stop rotating ENCODER knob,
signal light FREQUENCY stops flashing after 2 sec.
Stopping the milling process
• When the time elapses or when you press START/STOP key again, message
"End" appears on display and RUN signal light flashes. When the machine
stops completely, the last used values for time and frequency are automatically
reset.
12
USER'S MANUAL %0,;
5.5. ADDITIONAL OPERATIONS
Checking the set time during operation
• If you want to check the set value for time during operation, push ENCODER
knob, so that TIME signal light shines. Then rotate ENCODER for one click right
(+) or left (-). TIME signal light flashes for 2 sec and display shows the set time
value. After 2 sec, the real time value is shown on display again and TIME
signal light stops flashing.
Checking the set frequency during operation
• If you want to check the set value for frequency during operation, push
ENCODER knob, so that FREQUENCY signal light shines. Then rotate
ENCODER for one click right (+) or left (-). FREQUENCY signal light flashes for
2 sec and display shows the set frequency value. After 2 sec, the real frequency
value is shown on display again and FREQUENCY signal light stops flashing.
13
USER'S MANUAL %0,;
6. WORKING INSTRUCTIONS
6.1. GENERAL
The BMIX-100 is a high performance product. Because of the large selection of
accessories, the bead beater %0,; is a machine with many different application
possibilities in laboratories, industry and research. It is used mainly in the chemical
and pharmaceutical sectors and in mineralogical and biological applications etc.
6.2. MILLING PROCES
Clamp the milling cups, filled with material to be milled and the milling balls, in the
milling cup holders as described.
Starting the milling process:
• Close the hood.
• Set the time.
• Set the frequency.
• Start the milling operation by pressing the START/STOP key.
• The milling time starts running and the remaining milling time is shown on display.
The milling process can only be started, when the hood is closed.
In order to ensure quiet running of the %0,;, both milling positions
have to be loaded with approximately the same mass.
Do not open the hood during the milling process.
Although the milling cups are brought to a standstill immediately after
the opening of the hood, the milling process can no longer be continued
with the remaining running time.
The BMIX-100 must be restarted and the initial parameters are then
available again.
Do not mill inflammable or explosive samples!
Please note that the properties and therefore the dangerous nature of
your sample, can change during the milling process.
14
USER'S MANUAL %0,;
Stopping the milling process:
• Stop the milling operation by pressing the START/STOP key.
Or
• When the milling time elapses, the milling process is automatically ended. The
display is reset to the last set value.
When removing and opening hot milling cups, always wear protective
gloves. There is a danger of burning the hands.
6.3. MILLING CUPS FILLING LEVELS
Milling cup
volume
1.5 ml
5 ml
10 ml
25 ml
50 ml
Milling sample
amount
0.5 ml
2 ml
4 ml
10 ml
20 ml
Max. sample
grain size
1 mm
2 mm
4 mm
6 mm
8 mm
Balls max.
diameter
5 mm
10 mm
10 mm
15 mm
25 mm
6.4. REPLACING THE MACHINE FUSES
7
6
The following fuses are required for %0,;:
2 x T2A 250V.
• Unplug mains plug from the mains socket 6.
• By pressing the locking device on the bottom side
of the fuse compartment 7, fuse holder is released
and you can pull it out.
• Replace fuses.
• Insert fuse holder and push it, until it locks.
15
USER'S MANUAL %0,;
7. TROUBLESHOOTING
Problem
POWER switch doesn’t
shine, when it is
switched ON.
Display doesn’t work.
Message "LId" appears
on display.
Message "Er1" appears
on display.
Message "Er2" appears
on display.
Message "Er3" appears
on display.
Explanation / Solution
Check the mains power supply.
Check fuses and replace them, if necessary.
Call authorized service.
Call authorized service.
The hood was open, when you tried to start the machine
by pressing the START/STOP key. Close the hood and
clear the message by pressing the START/STOP key.
Then you can start the machine by pressing the
START/STOP key again.
Motor overheated. Turn the main POWER switch OFF
and wait for the motor to cool down.
The machine can't reach the set vibrational frequency. It
tries to start 5 times, then "Er2" appears. Check if the
milling cup holders are blocked and remove any
obstacle. You have to turn the main POWER switch OFF
and then ON again, to clear the error message and use
the machine again.
You opened the hood during the operation. The machine
stopped rapidly and message "Er3" appeared on display.
When message "Er3" appears on display, you can't start
the machine again by pressing the START/STOP key.
You have to turn the main POWER switch OFF and then
ON again, to clear the message and use the machine
again.
When error message (ErX) appears on display, machine stops automatically and you
can't start it again by pressing the START/STOP key. You have to turn the main
POWER switch OFF and then ON again, to clear the error message and use the
machine again.
8. MAINTENANCE
%0,; is maintenance free. When used properly, no maintenance and setting is
necessary. Do not make any alterations to the machine and use only approved spare
parts and accessories.
8.1. WEAR
The milling tools can become worn out, depending on the frequency of the milling
operation and the milled material. The milling cups and balls should be regularly
checked for wear and replaced, if necessary.
16
USER'S MANUAL %0,;
8.2. CLEANING
Before cleaning the machine, unplug the mains cord from wall socket.
Use only a soft cloth moistened with water. Cleaning agents and
solvents should not be used, not for cleaning the milling tools either.
Do not clean the BMIX-100 under running water. Danger to life through
electric shock.
9. ACCESSORIES
9.1. MILLING CUPS AND BALLS
Milling cups
Milling cup 1.5 ml
Milling cup 5 ml
Milling cup 10 ml
Milling cup 25 ml
Milling cup 50 ml
Milling cup 1.5 ml
Milling cup 5 ml
Milling cup 10 ml
Milling cup 25 ml
Milling cup 50 ml
Material
Hardened steel
Milling balls diameter
5, 10, 15, 25 mm
5, 10, 15, 25 mm
Material
Hardened steel
Stainless steel
Stainless steel
9.2. MILLING RACKS AND BALLS
Round milling racks
0.2 ml with 12 places for screw cap tubes
1.5/2.0 ml with 6 places for standard tubes
1.5/2.0 ml with 6 places for screw cap tubes
1.5/2.0 ml with 12 places for standard tubes
1.5/2.0 ml with 12 places for screw cap tubes
Material
Teflon
Square milling rack
For 1 Deep well plate or 3 Microtiter plates
Material
Teflon
Milling balls diameter
0.10-0.25, 0.50-0.75, 1.00-1.50 mm
Material
Glass
Note: Subject to technical modifications.
17
EC DECLARATION OF CONFORMITY
We declare under our sole responsibility that
Bead Beater
%0,;
product designation:
tip / model:
type / model:
ustreza zahtevam naslednjih predpisov
is in conformity with the provisions of the following regulations
1.
Direktiva 2006/42/ES Evropskega parlamenta in Sveta z dne 17. maja 2006 o strojih
Directive 2006/42/EC of the European Parliament and of the Council of 17 May 2006 on
machinery
2.
Direktiva 2006/95/ES Evropskega parlamenta in Sveta z dne 12. decembra 2006 o uskladitvi
zakonodaje držav članic v zvezi z električno opremo, konstruirano za uporabo znotraj
določenih napetostnih mej (Uradni list Evropske unije OJ EU L 374 z dne 27. decembra 2006)
Directive 2006/95/EC of the European Parliament and of the Council of 12 December 2006 on
the harmonisation of the laws of Member States relating to electrical equipment designed for
use within certain voltage limits (Official Journal of the European Union OJ EU L 374,
27 December 2006)
3.
Direktiva 2004/108/ES Evropskega parlamenta in Sveta z dne 15. decembra 2004 o
približevanju zakonodaj držav članic v zvezi z elektromagnetno združljivostjo
Directive 2004/108/EC of the European Parliament and of the Council of 15 December 2004
on the approximation of the laws of the Member States relating to electromagnetic
compatibility
in zadovoljuje tudi zahteve naslednjih standardov
and also complies with the following standards
'LUHFWLYH(&
EN ISO 12100-2
'LUHFWLYH(&
EN 61010-1, EN 61010-2-051
Directive 2004/108/EC
EN 55011, EN 55014-1, EN 55014-2, EN 55022,
EN 61000-3-2, EN 61000-3-3, EN 61000-6-2, EN 61326-1
Place and date of issue
Name, surname and signature of authorized person
21.03.2012
PDQDJHU