1
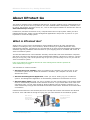
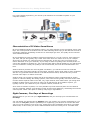
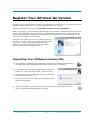
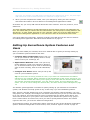
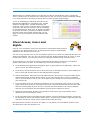
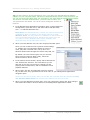
Milestone
XProtect
®
Go 2.0
Getting Started
Guide
Milestone XProtect Go 2.0; Getting Started Guide
Contents
ABOUT XPROTECT GO ................................................. 4
Minimum Requirements for XProtect Go ............................................... 6
INSTALL XPROTECT GO .............................................. 7
REGISTER YOUR XPROTECT GO VERSION ................... 8
CONNECT AND ADD CAMERAS TO YOUR XPROTECT GO
SYSTEM ...................................................................... 9
Got Some Analog Cameras? .................................................................. 9
Adding Your Cameras in XProtect Go .................................................... 9
Adding USB Cameras (Web Cameras) ................................................ 10
Setting Up Surveillance System Features and Users ........................... 11
ADVANCED CONFIGURATION OVERVIEW ................. 12
Cameras.............................................................................................. 12
USB Cameras (Web Cameras) .......................................................... 13
Pan/Tilt/Zoom Cameras ................................................................... 13
360° Lens Technology ..................................................................... 13
Scheduling .......................................................................................... 13
Client Access, Users and Rights .......................................................... 14
USING THE XPROTECT® SMART CLIENT .................... 16
Log In ................................................................................................. 16
Brief Introduction to XProtect Smart Client ........................................ 17
Get Additional XProtect Smart Clients ................................................ 18
www.milestonesys.com
Contents
Milestone XProtect Go 2.0; Getting Started Guide
EXPLORE FURTHER XPROTECT GO FEATURES ........... 19
Events and Output .............................................................................. 19
Recording Databases and Archiving.................................................... 19
Privacy Masking .................................................................................. 20
Dual Streaming ................................................................................... 20
UPGRADE FROM PREVIOUS VERSION ....................... 21
UPGRADE TO AN ADVANCED XPROTECT VERSION .... 22
www.milestonesys.com
Contents
Milestone XProtect Go 2.0; Getting Started Guide
About XProtect Go
This guide is aimed at users of Milestone XProtect Go. It briefly explains how to install XProtect Go,
and how to set up some of its key features. For more detailed feature descriptions, manuals, howto videos, the XProtect Go users’ forum, etc., refer to the targeted website for XProtect Go users at
www.milestonesys.com/go.
Furthermore, XProtect Go features a very comprehensive built-in help system: When you have
installed XProtect Go, simply use the Management Application’s Help menu or press F1 on your
keyboard to access the help system.
What is XProtect Go?
XProtect Go is a free version of Milestone’s market-leading XProtect IP video management
software. Providing an entry-set of features, XProtect Go lets you explore Milestone’s video
management software, and discover the true benefits of IP video and the Milestone Open Platform.
Seamless upgrade possibilities make XProtect Go your stepping stone to a reliable and secure IP
video surveillance system.
The fact that XProtect Go is free software obviously means that it has some limitations compared
with other versions of the XProtect IP video management software. XProtect Go, however, will still
take you a long way, and it is the perfect way for you to try out how easy it is to run your own IP
video surveillance system.
Learn more about the complete XProtect IP video management software portfolio at
www.milestonesys.com/go.
Your XProtect Go version includes:
● XProtect Go server software, which you install on the computer you want to use as your
surveillance system server. When the software is installed, your computer can work as an
XProtect Go server.
● XProtect Go Management Application, which you use for setting up your surveillance
system. The Management Application is automatically installed on the XProtect Go server.
● XProtect Smart Client, which you use for viewing live and recorded video. The XProtect Smart
Client is automatically installed on the XProtect Go server. If you would rather view video from
somewhere else, you can easily install an XProtect Smart Client on another computer: Go to
www.milestonesys.com/go and download the XProtect Smart Client. Welcome to IP-based video
surveillance!
Cameras and network are not included, but even a cheap web camera connected to the XProtect
Go server via a USB cable is enough for trying out your own XProtect Go surveillance system:
Web camera
connected to
XProtect Go server
via USB interface
www.milestonesys.com
XProtect Go server
with Management
Application
Page 4
About XProtect Go
Milestone XProtect Go 2.0; Getting Started Guide
For a more flexible experience, you can set up an XProtect Go surveillance system on your
computer network:
XProtect Go server
with Management
Application
Network
IP video cameras
Analog camera with video
encoder
XProtect Smart Client on
other computer
Characteristics of IP Video Surveillance
On an old-fashioned analog surveillance system, you would typically record everything onto a video
tape. This could provide for endless hours of video watching when trying to find the few seconds of
recordings containing something of interest. As video tapes got worn, the quality of the recorded
video would deteriorate.
On an intelligent IP video surveillance system like XProtect Go, you can view live video whenever
you want, but you will typically only record video when there is a reason to do so, for example
when there is motion in a camera’s pictures (XProtect Go, by the way, lets you quickly set up
motion detection on all your cameras). If you really do want everything to be recorded, that is of
course also possible in XProtect Go. Your recorded video will be stored digitally on your XProtect Go
server’s hard disk in exactly the quality it was recorded with; there will be no deterioration over
time.
XProtect Go thus provides far more targeted surveillance; you will have much less irrelevant
recorded video. Recordings will take up less space, and they will be much easier to find. Combined
with the very powerful search features in the XProtect Smart Client, XProtect Go lets you find
relevant video clips in a matter of seconds.
Another thing you are likely to notice with an IP surveillance system compared with an analog
system is a lot less cabling. On analog systems, each camera was typically connected to the video
recorder with a separate cable. Even with, say, eight cameras, that could lead to you having thick
bundles of cables across your house or office. On an XProtect Go IP surveillance system, you
typically connect your cameras to your computer network, and that is it.
In IP video surveillance systems, it is even possible to provide electrical power for the cameras
over the computer network (a technology known as Power Over Ethernet), eliminating the need for
camera power cables. This option is used by many larger organizations.
Eight Cameras, Five Days of Recordings
With XProtect Go you can use up to eight cameras, and you can keep your recorded video for
five days.
You can initially use XProtect Go for 30 days, but if you register your version of XProtect Go, you
can use it for one year (with the possibility of re-registering your XProtect Go version after that
year so you can continue to use it for free). Simply fill out the registration form when you install
XProtect Go, or later when you use the XProtect Smart Client for viewing live or recorded video.
www.milestonesys.com
Page 5
About XProtect Go
Milestone XProtect Go 2.0; Getting Started Guide
Minimum Requirements for XProtect Go
Make sure the computer on which you install XProtect Go meets the following requirements:
Operating System
Microsoft® Windows® XP Professional (32-bit or 64-bit*), Windows
Server 2003 (32-bit or 64-bit*), Windows Server 2008 R1/R2 (32-bit or
64-bit*), Windows Vista™ Business (32-bit or 64-bit*), Windows Vista
Enterprise (32-bit or 64-bit*), Windows Vista Ultimate (32-bit or 64bit*), Windows 7 Home Premium (32-bit or 64-bit*), Windows 7
Professional (32-bit or 64-bit*), Windows 7 Enterprise (32-bit or 64bit*) and Windows 7 Ultimate (32-bit or 64-bit*).
* Running as a 32-bit service/application.
CPU
Intel® Pentium® 4, 2.4 GHz or higher (CoreTM 2 recommended).
RAM
Minimum 1 GB (2 GB or more recommended).
Network
Ethernet (1 Gbit recommended).
Graphics Adapter
AGP or PCI-Express, minimum 1024×768, 16 bit colors.
Hard Disk Type
E-IDE, PATA, SATA, SCSI, SAS (7200 rpm or faster).
Hard Disk Space
Minimum 1 GB free hard disk space available, excluding space needed
for recordings.
Your hard disk space requirements will depend on:
● The number of cameras you use on XProtect Go
● The amount of video you want to record
● The quality of the video you want to record
Software
Microsoft .NET 4.0 Framework Service Pack 1 or newer Service Pack
version. Windows Help (WinHlp32.exe). If you do not have them, you
can download both from http://www.microsoft.com/downloads/.
System requirements for the XProtect Smart Client are available in the separate XProtect Smart
Client User’s Manual, available on www.milestonesys.com/go.
www.milestonesys.com
Page 6
About XProtect Go
Milestone XProtect Go 2.0; Getting Started Guide
Install XProtect Go
1.
Run the downloaded XProtect Go installation file from the location you have saved it to.
2.
Depending on your computer’s security settings, you may receive one or more security
warnings. If that is the case, click the Run button.
3.
When the installation wizard starts, click Next to continue.
4.
Read and accept the End User License Agreement and select
whether or not you want to help Milestone improve XProtect Go
by allowing Milestone to collect information about how you use
the system. Collected information will not be used to personally
identify you. When ready, click the Continue button.
5.
During the installation process, all necessary components will be
installed one after the other. In addition to the XProtect Go
server software, you will also automatically get the XProtect Go Management Application,
driver software for communicating with cameras, and the XProtect Smart Client for viewing live
and recorded video.
6.
On the last page of the installation wizard, we recommend you choose to view the Quick
getting Started Guide and open XProtect Go’s Management Application (as suggested by the
wizard). Then click Finish.
7.
The computer on which you performed the
installation now works as an XProtect Go server.
XProtect Go’s Management Application, in which you
define cameras and set up your XProtect Go system,
opens automatically.
If the Management Application does not start
automatically, or you get a warning, it is
typically because your computer’s Windows firewall
or your virus protection/internet security software
does not allow it. Try checking the settings of your
Windows firewall or your virus protection/internet
security software.
www.milestonesys.com
Page 7
Install XProtect Go
Milestone XProtect Go 2.0; Getting Started Guide
Register Your XProtect Go Version
Registering your XProtect version is highly recommended. It will allow you to use XProtect Go for a
full year. Without registration, you can only use XProtect Go for 30 days.
Register your XProtect Go version at www.milestonesys.com/go/registration.
When you register, you must enter an email address. This is because a Software License File will be
sent to your email after you have registered. The Software License File must be imported into the
XProtect Go Management Application (as described in the following). Save the license file on your
computer, for example on your desktop.
Once you have registered, you can use XProtect Go for a
full year. If you are unsure as to when the license expires,
go to Help > About. A message will now show your
software license code and the date when the license
expires, for example November 25, 2011.
Importing Your Software License File
1. Open XProtect Go’s Management Application, either from the Windows Start menu or
by double-clicking the Management Application shortcut on your desktop.
2. In the XProtect Go Management Application’s menu bar,
select File > Manage License Offline > Import License.
3. Find the location on your hard disk where you saved the
license file. Then click OK.
4. A text box will let you know that the license file has been
imported successfully.
5. Save your changes by clicking the Save Changes and Restart Surveillance Services
button in the Management Application’s toolbar.
www.milestonesys.com
Page 8
Register Your XProtect Go Version
Milestone XProtect Go 2.0; Getting Started Guide
Connect and add Cameras to Your
XProtect Go System
You can use up to eight cameras with your XProtect Go system.
●
Before connecting cameras to your network, verify that they are compatible with XProtect Go—
more than 850 cameras from more than 80 different manufacturers are! And that is without
counting USB cameras (web cameras); you can use any USB camera from any manufacturer
too. To make sure your cameras are compatible, view the list of supported cameras on
www.milestonesys.com/go/support.
●
When ready, connect your cameras to your network with Ethernet cables as described in the
documentation that came with your cameras. If using USB (web) cameras, connect them
directly to the XProtect Go server with USB cables.
●
For network cameras: Once you have connected your cameras, make sure you set up each
camera’s address and administrator password on the camera itself as described by the camera
manufacturer.
When you have connected and initially set up your cameras, you can add them to your XProtect Go
surveillance system.
Got Some Analog Cameras?
If you have analog cameras, you can still use them with XProtect Go, but they must be connected
to your network through a video encoder, which converts the cameras’ analog signals to digital.
You can view a list of supported video encoders on www.milestonesys.com/go/support. On
many video encoders, you can connect several analog cameras. They basically work just like when
you connect several electrical appliances in your
kitchen to a single socket through a power strip. You
can of course still set up and use each camera
individually, even when several cameras are attached
to a single video encoder.
IP video cameras
Analog camera with video
encoder
Adding Your Cameras in XProtect Go
If you are going to add USB cameras (web cameras) connected directly to the XProtect Go server
via a USB interface, also see page 10.
When you are ready, do the following to add your cameras to your XProtect Go surveillance
system:
1.
Open XProtect Go’s Management Application, either
from Windows’ Start menu or by doubleclicking the Management Application
shortcut on your desktop.
2.
In the Management Application, click the big Add
Hardware Devices… button.
www.milestonesys.com
Page 9
Connect Cameras, and Add them to …
Milestone XProtect Go 2.0; Getting Started Guide
3.
A wizard now offers to guide you through adding cameras. Two of the wizard’s options are
particularly interesting for XProtect Go users:
● Express (recommended): Quickly scans your network for cameras, and helps you add
them to your XProtect Go system. This method is quick and easy since it only scans for
cameras supporting device discovery, and only on the part of your network where the
XProtect Go server itself is located.
Device discovery is a method with which hardware devices make information about
themselves available on the network. Based on such information, XProtect Go can recognize
relevant hardware devices on your network, and thus include cameras—but not printers and
other irrelevant devices—in the scan.
To be able to use the Express method, your XProtect Go server and your cameras must
communicate without any routers between them. Otherwise, use the Manual method.
● Manual: Lets you specify details about each camera separately. A good choice if you only
want to add a few cameras, and you know their IP addresses, required user names and
passwords, etc.
When you add a camera to your XProtect Go system, you must in most cases supply the
username and password for the camera’s administrator account. That account gives full access
to the camera, and XProtect Go is going to need that. A camera device’s administrator
username and password are typically specified when you connect and initially set up the
camera on your network (covered in the beginning of this chapter). Make sure you know the
username and password for the administrator account of each camera you are going to add to
your XProtect Go system.
If your cameras have microphones, XProtect Go will automatically detect the microphones
and add them to your surveillance system as well.
4.
When you have completed the wizard, save your changes by clicking the Save Changes
and Restart Surveillance Services button in the Management Application’s toolbar.
Adding USB Cameras (Web Cameras)
Most professional surveillance cameras use Ethernet connections, but you
can of course also use cheaper cameras, such as web cameras, connected
directly to the XProtect Go server via a USB interface—provided, of course,
that you have installed any software that came with the camera.
Note that USB cameras use a lot of computer processing power because they deliver video in a
much more raw data format than dedicated surveillance cameras. Therefore, do not use more than
a couple of USB cameras.
If you want to add USB cameras, do the following in the Add Hardware devices wizard:
1. Select the Express hardware detection method, and click Next.
2. After a short while, the wizard will detect your USB camera(s), and list them as a single entry
with the Address 0.0.0.1. Click Next.
3. On the last page of the wizard you may notice that four possible cameras (and microphones)
are listed, even if you have fewer than four USB cameras. This is simply because the driver
(the software used for communication between USB cameras and XProtect Go) is able to
handle up to four cameras. If you have more than one USB camera, make sure the Enable
check box is selected for each camera you are going to use (for example Camera 1 and Camera
2 if you have two cameras). Then click Finish.
Do all four cameras count towards XProtect Go’s maximum of eight cameras? If you
www.milestonesys.com
Page 10
Connect Cameras, and Add them to …
Milestone XProtect Go 2.0; Getting Started Guide
only have, for example, one USB camera connected to the XProtect Go server, only that single
USB camera will count towards XProtect Go’s maximum of eight cameras.
4. When you have completed the wizard, save your changes by clicking the Save Changes
and Restart Surveillance Services button in the Management Application’s toolbar.
In XProtect Go, you set up USB cameras almost like other cameras. There are, however, a few
differences.
The most important difference is that USB cameras can only deliver video to one application at a
time. This means that you should close the USB cameras’ own setup and/or viewing windows—but
also Skype™ or other similar programs on your computer—while you set up the USB cameras in
XProtect Go’s Management Application or view video from them in the XProtect Smart Client.
A few other differences also apply, especially regarding how USB cameras are listed in XProtect
Go’s Management Application. Read about those differences on page 13.
Setting Up Surveillance System Features and
Users
When you have added your cameras, three more wizards offer to guide you through setting up
your surveillance system’s features and users:
● Configure Video and Recording wizard: Lets you
set up your cameras’ video quality, when to record,
where to store your recordings, etc.
● Adjust Motion Detection wizard: Lets you set up
motion detection, which is key element in XProtect
Go, as detected motion may be used for determining
when to start recording, when to send notifications,
etc.
● Configure User Access wizard: Lets you set up the
users of your surveillance system.
Tip: You don’t have to set up yourself as a user; if you have not used XProtect surveillance
software on your computer before, XProtect Go will automatically create a user account for you.
You can use that account later when you are going to view video with the XProtect Smart Client:
The account uses basic authentication, your user name is admin, and your password is also
admin. You can of course change the account later, see Client Access, Users and Rights on page
14.
The wizards’ guided approach is excellent for quickly setting up your XProtect Go surveillance
system, and XProtect Go’s help system is only a click away if you need additional guidance.
Note, however, that the wizards only cover a selection of frequently used functionality, not every
setup option. For example, the Configure User Access wizard only lets you set up users with access
to all your cameras. This means that the users you add through the wizard will be able to view
video from all cameras on your system. This is ideal if your XProtect Go system is only going to
have a small number of trusted users, but if you want to specify different feature and camera
rights for each user, you must use advanced configuration.
In the following chapter, we will therefore take a quick look at some of the advanced configuration
options. Advanced configuration of client access, users, and their rights is covered on page 14.
www.milestonesys.com
Page 11
Connect Cameras, and Add them to …
Milestone XProtect Go 2.0; Getting Started Guide
Advanced Configuration Overview
Cameras
With advanced configuration, you can set up camera settings on a general
and on a camera-specific level.
On the general level, you can specify shared settings for all your cameras:
1. In the Management Application’s navigation pane, expand Advanced Configuration, rightclick Cameras and Storage Information, and select Properties.
2. Specify properties for, for example, Frame Rate or Audio Recording. When ready, click OK.
3. Save your changes by clicking the Save Changes and Restart Surveillance Services
button in the Management Application’s toolbar.
On the camera-specific level, you can set up video quality, recording and other features (such as
motion detection) for each individual camera.
1. In the Management Application’s navigation pane, expand
Advanced Configuration, and then expand Cameras and
Storage Information.
2. Right-click the required camera, and select Properties.
3. Specify properties as required for:
● Camera (for example the camera’s name).
● Frame rate (how many frames per second do you want
your video to consist of?).
● Video quality (format, resolution, compression, etc.).
● Audio (many cameras have built-in microphones, or can have microphones connected to
them—in XProtect Go, you can have one
microphone enabled at a time).
● Recording (always, never, or on certain
conditions—for example when motion is
detected).
● Recording & archiving paths (where to store
recordings—archiving is a feature that can
move recordings to different locations when
needed, read more on page 19).
● Event notification (get notified when specific
events occur, for example if somebody
tampers with one of your cameras).
● Output (you can connect output units, such
as lights, sirens or door openers, to your
cameras, and then, for example, automatically sound a siren if there is motion in a
camera’s pictures).
● Motion Detection (a key element in XProtect Go, as detected motion may be used for
determining when to start recording, when to send notifications, etc.). XProtect Go sees
it as motion when the green bar goes above the threshold and turns red; drag the
www.milestonesys.com
Page 12
Advanced Configuration Overview
Milestone XProtect Go 2.0; Getting Started Guide
sliders to suit your needs. If certain areas in the camera’s pictures cause irrelevant
motion (trees swaying in the wind, cars passing by in the background, etc.), you can
exclude these areas with the Exclude regions feature. You can also turn off motion
detection if you do not want to use this feature.
● Privacy masking. It is possible to mask some parts of an image if there are things you
do not want viewers of the Smart Client to see. See Explore Further XProtect Go
Featureson page 19 for further information.
Help at hand: Remember, if you need help with a feature in XProtect Go, just use the
Management Application’s Help menu or press F1 on your keyboard.
Depending on your cameras’ features, you may also be able to set up:
● 360° lens technology (for cameras delivering 360° panoramic images)
● Settings for PTZ (Pan/Tilt/Zoom) cameras, such as presets and event-based movement.
See also the information about PTZ cameras in the following.
4. Save your changes by clicking the Save Changes and Restart Surveillance Services
button in the Management Application’s toolbar.
USB Cameras (Web Cameras)
If you use USB cameras (web cameras), you set them up in XProtect Go
almost like other cameras. Note, however, that in XProtect Go’s
Management Application, your USB cameras will all be listed as belonging
to the same hardware device.
For technical reasons this hardware device has four video channels, and consequently XProtect Go
will display it as having four cameras and also four microphones. Disabled cameras are indicated by
a red , and they will of course not count towards your maximum allowed total of eight cameras.
To enable a camera from the list, right-click and select Enable. If you enable cameras, remember
to restart the services in order for the cameras to start recording: Click the Save Changes
and Restart Surveillance Services button in the Management Application’s toolbar (or select
File > Save Changes and Restart Services from the menu bar).
Pan/Tilt/Zoom Cameras
PTZ (Pan/Tilt/Zoom) movable cameras are supported throughout XProtect Go.
Such cameras can be operated manually (by users of the XProtect Smart Client)
as well as automatically (for example when a door is opened).
PTZ cameras have a
symbol next to them when listed in the Management
Application’s navigation pane. They typically have a higher number of advanced
configuration options than regular cameras.
360° Lens Technology
XProtect Go supports cameras with 360° lenses (lenses that allow you to record 360° panoramic
images). Only some cameras (using Immervision Enabled® 360° panomorph lens) support this
technology.
Scheduling
XProtect Go’s scheduling feature makes sure surveillance system features are enabled in
accordance with defined periods of time.
www.milestonesys.com
Page 13
Advanced Configuration Overview
Milestone XProtect Go 2.0; Getting Started Guide
With XProtect Go’s default settings, the cameras you add are automatically online (transferring
video to XProtect Go) at all times. This means that you will only need to modify scheduling settings
if you want cameras to be online at specific times or when specific things happen.
To set up scheduling for individual cameras: In the
Management Application’s navigation pane, expand
Advanced Configuration, expand Scheduling and
Archiving, right-click the required camera, and select
Properties. You can then choose to set up scheduling
for all cameras at the same time, or specific schedules
for specific cameras by creating a template schedule
that will create some default settings that you can
apply to any of the cameras you have added to the
system.
Client Access, Users and
Rights
Users of your surveillance system use the feature-rich XProtect Smart Client to
connect to your XProtect Go server. An XProtect Smart Client is automatically
installed on the XProtect Go server too.
You can set up as many users of your surveillance system as you want, but note that with the free
XProtect Go software, only one user can connect with the XProtect Smart Client at a time. In paidfor XProtect versions, you can have from five to unlimited simultaneously connected users.
In the following, we will begin by setting up XProtect Smart Clients’ access to the surveillance
system. When that is in place, we will define the actual users and their rights.
●
In the Management Application’s navigation pane, expand Advanced Configuration, right-click
Server Access, and select Properties ...
●
In the Server Access section’s Server name field, type a descriptive name for your XProtect Go
server (users will see this name in their XProtect Smart Clients).
●
Data communication takes place through different ports; XProtect Go uses port number 80 for
communication with XProtect Smart Clients. If you know that port 80 is used for something
else on your XProtect Go server, you can change the port number in the Local port field. If not,
just use port 80.
●
If your XProtect Go server should be accessible from the internet through a router or firewall,
select Enable internet access, and specify the server’s internet address and internet port. Note
that the router/firewall must be set up so requests sent from clients to the internet address
and port are forwarded to the local address and port of the XProtect Go server.
●
IP address ranges which should be recognized as coming from your local network can be
defined in the Local IP Ranges section.
●
In the Language Support and XML Encoding section, select the language/character set used by
the XProtect Go server and XProtect Smart Clients. This will ensure that the right language and
character encoding is used in users’ communication with the server.
Now that clients’ access to the server is in place, we can define your surveillance system’s users
and what those users are allowed to do:
www.milestonesys.com
Page 14
Advanced Configuration Overview
Milestone XProtect Go 2.0; Getting Started Guide
Tip: You don’t have to set up yourself as a user; if you have not used XProtect surveillance
software on your computer before, XProtect Go will automatically create a user account for you.
You can use the account later when you are going to view video with the XProtect Smart Client:
The account uses basic authentication, your user name is admin, and
your password is also admin. You can of course change the account as
required.
●
In the Management Application’s navigation pane, expand Advanced
Configuration, right-click Users, and select either Add New basic
User … or Add New Windows User …
Basic Users are authenticated by a simple user name and password
combination, which you define on the XProtect Go server itself.
Windows Users are users defined in a database on the XProtect Go
server and authenticated by their Windows login. Basic Users are
very easy to set up; Windows Users require a slightly more
advanced setup, but provide better security.
●
When you have added a user, the User Properties window opens.
There you can review the user’s general access settings,
i.e. whether the user should be allowed to view live
video, play back recorded video, set up his or her
XProtect Smart Client through the client’s Setup tab, etc.
By default, the user has full rights, but you can limit
those rights as required. When ready, select the
window’s Camera Access section.
●
In the Camera Access section, specify which cameras the
user should have access to. For each camera you are
also able to give the user access to viewing live and
playing back recorded video, and to individual live and
playback features.
●
When ready, click OK, and add other users as required.
As you add users, they get added to the list of users in your Management Application’s
navigation pane.
There is no limit to how many users you can add, but remember that with XProtect Go only
one XProtect Smart Client can connect to the XProtect Go server at a time.
●
When you have added all required users, save your changes by clicking the Save Changes
and Restart Surveillance Services button in the Management Application’s toolbar.
www.milestonesys.com
Page 15
Advanced Configuration Overview
Milestone XProtect Go 2.0; Getting Started Guide
Using the XProtect® Smart Client
Providing a unique combination of control, efficiency and
adaptability, the XProtect Smart Client is an easy-to-use
client application with superior features for ultimate
control of your surveillance system. Simply put, the
XProtect Smart Client perfects your installation. An
XProtect Smart Client for viewing live and recorded video
is automatically installed on your XProtect Go server.
Note that with the free XProtect Go software, only one
user can connect with the XProtect Smart Client at a time.
In paid-for XProtect versions, you can have from five to
unlimited simultaneously connected users.
Log In
To begin using the XProtect Smart Client on the XProtect Go server itself, simply click
the desktop shortcut. Alternatively, open the XProtect Smart Client from Windows’
Start menu.
Tip: If you have not used XProtect surveillance software on your computer before,
XProtect Go has automatically created a user account for you. To use the automatically created
account with XProtect Smart Client on the same computer as XProtect Go, simply log in with the
following:
•
Server address: http://localhost
•
Authentication: Basic authentication
•
User name: admin
•
Password: admin
The detailed login procedure described below is only relevant if logging in from another computer
or with a different account.
In the XProtect Smart Client login dialog, specify your login information in the following fields:
●
Server address: Type http://localhost (localhost simply means the local computer).
If you are accessing XProtect Go from another computer than the XProtect Go server itself, you
cannot type http://localhost. Instead you must type the XProtect Go server’s IP address. How
do you know the IP address of the XProtect Go server? On the XProtect Go server itself,
open Windows’ Start menu, select Run, and type cmd in the field, then click OK. In the
command prompt window, type ipconfig. Under the heading Ethernet adapter Local Area
Connection, you can now see the IP address. Note down the IP address, and close the
command prompt window again.
If you have chosen to use another port number than the default port number 80 (see Client
Access, Users and Rights on page 14), you should specify the port number too. Example
(where port 100 is used): http://localhost:100 (note the colon between the IP address and the
port number).
If connecting to the XProtect Go server from the internet through a router or firewall, you
must connect to the internet address and port of the XProtect server; see Client Access, Users
and Rights on page 14.
www.milestonesys.com
Page 16
Use the XProtect Smart Client
Milestone XProtect Go 2.0; Getting Started Guide
●
Authentication: Select between different methods of authentication (that is the process of
verifying that you are who you claim you are).
o
Windows authentication (current user) for users set up as Windows Users. You will
be authenticated through your current Windows login, and do not have to specify any
user name or password.
o
Windows authentication for users set up as Windows Users. You will be
authenticated through your Windows login, but you will need to type your Windows
user name and password.
o
Basic authentication for users set up as Basic Users. Specify your user name and
password for accessing the surveillance system.
•
User name: Only required if you select the authentication methods Windows authentication or
Basic authentication. If using Windows authentication, type your Windows user name. If using
Basic authentication, type your surveillance system user name as you specified it in the
XProtect Go Management Application. The user name is case-sensitive, that is there is a
difference between typing, for example, Karen and karen.
•
Password: Only required if you select the authentication methods Windows authentication or
Basic authentication. If using Windows authentication, type your Windows password. If using
Basic authentication, type your surveillance system password exactly as you specified it in the
XProtect Go Management Application.
•
When ready, click Connect to begin using the XProtect Smart Client.
Brief Introduction to XProtect Smart Client
•
The XProtect Smart Client has three main areas:
o
o
o
Live for viewing live video
Playback for playing back recorded video
Setup for setting up your XProtect Smart Client
Tip: On the three tabs, only a few features are initially available in the panes in the left side of
the XProtect Smart Client window. However, you can easily
open more features by clicking the icons in the bottom left
corner of each tab.
•
If you have not used the XProtect Smart Client before, it will automatically create a view
containing all your cameras, and display that view on the Live tab.
A view is simply a collection of cameras that you can
view together. You can have as many views as you
want. If you are a shop-owner, for example, you could
include four cameras from the shop itself in one view,
and four cameras from your back-office environment in
another view.
Creating further views is easy: On the XProtect Smart
Client’s Setup tab, go to the Views pane in the top left
corner. Right-click either Private (views for your own
use) or Shared (views you can share with other users),
and select New Group. Give your new group a name,
then right-click it, select New View, and choose one of
the many available layouts. Then go to the Setup tab’s
www.milestonesys.com
Page 17
Use the XProtect Smart Client
Milestone XProtect Go 2.0; Getting Started Guide
System Overview pane, and drag cameras to required positions in the view. You can now use
the view on the Live and Playback tabs. For more detailed information, see the XProtect Smart
Client User’s Manual.
Get Additional XProtect Smart Clients
You can use the XProtect Smart Client from virtually anywhere; it does not have to be installed on
the XProtect Go server itself. If you require more XProtect Smart Clients, for yourself or for other
users, you can easily download and install them from www.milestonesys.com/go.
Even though you can download and install as many XProtect Smart Clients as required, remember
that with the free XProtect Go software, only one user can connect with the XProtect Smart Client
at a time. In paid-for XProtect versions, you can have from five to unlimited simultaneously
connected users.
www.milestonesys.com
Page 18
Use the XProtect Smart Client
Milestone XProtect Go 2.0; Getting Started Guide
Explore Further XProtect Go Features
XProtect Go offers more advanced configuration options than we are able to cover in a short guide
like this. However, if you are interested in further exploring the flexibility and freedom offered by
your XProtect Go surveillance system, we recommend that you explore these features that can help
you getting even more benefits out of using XProtect Go.
Events and Output
Virtually anything can be turned into a system event in XProtect Go, and such events can be used
for triggering virtually any kind of action. Example: Say your house has a back entrance fitted with
a door sensor. If the door is opened, XProtect Go can register that as an event, and that event can
in turn be used for automatically starting recording on certain cameras, for automatically sending
you an e-mail notification, or for automatically activating output units, such as sirens, lights, etc.
Creating an event-based setup thus allows for a huge amount of automation and flexibility in your
surveillance system.
Hardware input events (based on input from, for example, door sensors attached to XProtect
Go’s cameras), manual events (activated manually by XProtect Smart Client users) and timer
events (occurring a specified number of seconds or minutes after another event) can be used for
automatically starting/stopping recordings, sending notifications, etc.
Hardware output can be used for activating output units, such as
sirens, lights, door openers, etc. Hardware output can be activated
automatically by events.
The use of most hardware input events and all types of hardware
output requires that external sensors are wired to input/output
(I/O) connectors on the cameras in question, and that I/O
operation on the cameras is supported by XProtect Go.
To set up events and output: In the Management Application’s
navigation pane, expand Advanced Configuration, expand Events
and Output, right-click the required type of event or output, and
select Add New ...
Once you have set them up, events can be used with features
throughout XProtect Go, regardless of where sensors or output
units are physically connected.
Recording Databases and Archiving
When XProtect Go records video from your cameras, it stores the video in a database—
one database for each camera. The databases are created automatically on the XProtect
Go server for each camera you add; you do not have to worry about that. Each database
can contain up to 40 GB of data, or 600.000 database records—whatever comes first.
To give you an idea of what this means in practice, a camera’s database can contain approximately
24 hours of non-stop recordings if you record with a frame rate of six frames per second. Note that
very few users of surveillance systems want their cameras to record non-stop; most users set up
www.milestonesys.com
Page 19
Explore Further XProtect Go Features
Milestone XProtect Go 2.0; Getting Started Guide
their systems so that cameras record at specific times or when motion is detected. When that is
the case, it can take much longer than 24 hours before a database becomes full.
Archiving is the automatic transfer of recordings from cameras’ databases to another location on
the XProtect Go server, for example on another built-in disk drive or on a USB drive or external
hard disk connected directly to the XProtect Go server. This way, the amount of recordings you are
able to store is not limited by the maximum size of the databases. Archiving also makes it possible
to secure your recordings on backup media of your choice. Archiving does not affect how you or
other users find and view recordings in the XProtect Smart Client.
XProtect Go automatically archives recordings if a camera’s database becomes full. You are
furthermore able to schedule archiving at particular points in time every day. This way, you can
proactively archive recordings, so databases will never become full.
If your XProtect Go server is equipped with several disk drives, we highly recommend using
dynamic archiving paths. With this dynamic feature, you can specify several different disk drives
for archiving. Then, XProtect Go automatically archives to the disk drive with the most available
space at any time.
To set up dynamic archiving paths: In the Management Application’s navigation pane, expand
Advanced Configuration, right-click Cameras and Storage Information, and select Properties ...,
then Dynamic Path selection – Archives.
Five days is the maximum time for which you can keep recordings—including archived
recordings—in XProtect Go. In other XProtect versions, for example XProtect Essential, only the
capacity of your hard disks sets the limit.
Privacy Masking
If there are areas in the camera view that you do not want to show up when you or others look at
surveillance footage in the Smart Client, you can mask out areas. This can, for example, be
relevant if you have video surveillance outside and record from an angle where a part of your
neighbor’s private property is visible in the video. In order to avoid invading on the privacy of your
neighbor, you can set the privacy mask up so that you cannot see your neighbor’s property when
you view the video in the Smart Client.
Privacy masking is configured under Advanced Configuration in the Management Application's
navigation pane. Expand Cameras and Storage Information, right-click the camera you want to
have the privacy mask on and select Properties, Privacy Masking.
If you decide that you do not need your privacy mask anymore, note that the privacy mask will
then also be removed from previously recorded video.
Dual Streaming
Normally, you will only have one stream from a camera. However, more and more camera models
are produced that are able to show two independent video streams at the same time, where one
normally is optimized for showing live video while the other normally is configured for recorded
video. For more information about dual streaming, see the XProtect Go Manual, available at
http://www.milestonesys.com/go.
www.milestonesys.com
Page 20
Explore Further XProtect Go Features
Milestone XProtect Go 2.0; Getting Started Guide
Upgrade from Previous Version
If you have a previous version of XProtect Go installed on your
computer and want to install XProtect Go 2, simply follow the
installation process at the beginning of this guide.
When you install XProtect Go 2, you will notice that your old
versions of the Smart Client and the Management Application will
automatically be removed before anything new is installed.
However, you will not lose your recordings, user accounts or
configuration. These will be transferred to the new versions of the
Smart Client and the Management Application.
www.milestonesys.com
Page 21
Upgrade from Previous Version
Milestone XProtect Go 2.0; Getting Started Guide
Upgrade to an Advanced XProtect
Version
XProtect IP video management software caters for every need; from small home or office systems
with a few cameras to multi-server enterprise installations with thousands of cameras dispersed
over many geographical locations.
Having tried out XProtect Go, XProtect Essential could be a very interesting upgrade option for you:
With XProtect Essential, you can use up to 26 cameras, you can keep recordings for as long as you
want, and up to five users can connect simultaneously.
Should you want to upgrade to XProtect Essential or another even more feature-rich version of the
XProtect IP video management software, simply visit www.milestonesys.com/go/upgrade.
Copyright
© 2011 Milestone Systems A/S.
Trademarks
XProtect is a registered trademark of Milestone Systems A/S. Microsoft and Windows are registered
trademarks of Microsoft Corporation. All other trademarks mentioned in this document are
trademarks of their respective owners.
Disclaimer
This document is intended for general information purposes only, and due care has been taken in
its preparation. Any risk arising from the use of this information rests with the recipient, and
nothing herein should be construed as constituting any kind of warranty. Milestone Systems A/S
reserve the right to make adjustments without prior notification. All names of people and
organizations used in this document’s examples are fictitious. Any resemblance to any actual
organization or person, living or dead, is purely coincidental and unintended.
XPGO20-gsg-2-080911
www.milestonesys.com
Page 22
Upgrade from Previous Version
Milestone Systems offices are
located across the world. For
details about office addresses,
phone and fax numbers, visit
www.milestonesys.com.