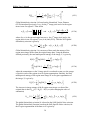
1
RHSeg User's Manual: Including HSWO, HSeg, HSegExtract, HSegReader, HSegViewer and HSegLearn Version 1.59 February 7, 2014 Copyright © 2006 United States Government as represented by the Administrator of the National Aeronautics and Space Administration. No copyright is claimed in the United States under Title 17, U.S. Code. All Other Rights Reserved. (Reserved for licensing information) RHSeg User’s Manual Version 1.59 Table of Contents Overview ............................................................................................................................ ii Documentation Conventions ............................................................................................ 1 Additional Sources of Information .................................................................................. 1 Chapter 1: What are HSWO, HSeg, RHSeg, HSegExtract, HSegReader and HSegViewer? ..................................................................................................................... 2 Overview ........................................................................................................................ 2 What is Image Segmentation? ........................................................................................ 2 What is a Segmentation Hierarchy? ............................................................................... 2 What is HSWO? ............................................................................................................. 3 What is HSeg? ................................................................................................................ 3 What is RHSeg? ............................................................................................................. 5 What is HSegExtract? .................................................................................................... 7 What is HSegReader? .................................................................................................... 7 What is HSegViewer? .................................................................................................... 7 What is HSegLearn? ...................................................................................................... 8 References ...................................................................................................................... 8 Chapter 2: Installing the Programs............................................................................... 10 Overview ...................................................................................................................... 10 HSWO/HSeg/RHSeg Demonstration Version ............................................................. 10 HSWO/HSeg/RHSeg Licensed Serial Version ............................................................ 11 HSWO/HSeg/RHSeg Licensed Parallel Version ......................................................... 12 HSegExtract, HSegReader, and HSegViewer.............................................................. 12 Advice on Installing GDAL, gtkmm and pthreads ...................................................... 12 Chapter 3: Running the Programs ................................................................................ 14 Overview ...................................................................................................................... 14 Running HSWO and HSeg........................................................................................... 14 Running RHSeg ........................................................................................................... 14 Running HSegExtract................................................................................................... 16 Running HSegReader ................................................................................................... 18 Running HSegViewer .................................................................................................. 19 Running HSegLearn ..................................................................................................... 21 Chapter 4: Guide to HSWO/HSeg/RHSeg Parameters and Parameter Settings ..... 22 Overview ...................................................................................................................... 22 HSWO/HSeg/RHSeg Program Parameters .................................................................. 22 Guidance on HSWO/HSeg/RHSeg Program Parameter Settings ................................ 46 References .................................................................................................................... 47 Chapter 5: HSegViewer Tutorial .................................................................................. 49 Overview ...................................................................................................................... 49 HSegViewer Tutorial ................................................................................................... 49 Notes on viewing 3-D data with HSegViewer ............................................................. 54 Chapter 6: HSegLearn Tutorial ................................................................................... 55 Overview ...................................................................................................................... 55 HSegLearn Tutorial ...................................................................................................... 55 ii RHSeg User’s Manual Version 1.59 Overview This manual provides a detailed description of and detailed instructions on how to install and use HSWO, HSeg, RHSeg, HSegExtract, HSegReader, HSegViewer and HSegLearn. Documentation Conventions The following conventions are followed within this document: Bold text signifies command line text. Italicized text signifies variable names and program parameter names. Unless otherwise specified, “clicking” the mouse button means pressing the left mouse button. Additional Sources of Information The following web sites can be consulted for additional and updated information: http://ipp.gsfc.nasa.gov/ft_tech_rhseg.shtm http://science.gsfc.nasa.gov/606.3/TILTON/index.html 1 RHSeg User’s Manual Version 1.59 Chapter 1: What are HSWO, HSeg, RHSeg, HSegExtract, HSegReader, HSegViewer and HSegLearn? Overview HSWO is an implementation of the hierarchical step-wise region growing approach to image segmentation. The HSeg algorithm is an augmentation of HSWO which (i) provides for the merging of non-adjacent regions (effectively classifying groups of connected region objects into spatially disjoint region classes), and (ii) provides approaches for selecting region growing iterations from which segmentation results are saved to form a segmentation hierarchy. RHSeg is a recursive approximation of HSeg. RHSeg is implemented in a software package that can optionally utilize parallel computing for increased processing speed. HSegExtract is a program for extracting certain segmentation features (e.g., region mean, region standard deviation) from selected levels of the segmentation hierarchies produced by HSWO, HSeg or RHSeg. HSegReader is a user interactive program for examining the region class and region object feature values of the regions in the segmentation hierarchies produced by HSWO, HSeg or RHSeg. HSegViewer is a user interactive program for visualizing, manipulating and interacting with the segmentation hierarchies produced by HSWO, HSeg or RHSeg. HSegLearn is a user interactive program for photo-interpretive binary labeling of the segmentation hierarchies produced by HSWO, HSeg or RHSeg. A basic understanding of image segmentation and segmentation hierarchies is required before the HSWO, HSeg and RHSeg algorithms can be described. What is Image Segmentation? Image segmentation is the partitioning of an image into related sections or regions. For remotely sensed images of the Earth, an example of segmentation is a map that divides the image into areas labeled by distinct Earth surface covers such as water, snow, and types of natural vegetation, rock formations, crops and other man created objects. In unsupervised image segmentation, the labeled map may consist of generic labels such as region 1, region 2, etc., which may be converted to meaningful labels by a postsegmentation analysis. What is a Segmentation Hierarchy? A segmentation hierarchy is a set of several image segmentations of the same image at different levels of detail in which the segmentations at coarser levels of detail can be produced from simple merges of regions at finer levels of detail. This may be useful for applications that require different levels of image segmentation detail depending on the characteristics of the particular image objects segmented. A unique feature of a 2 RHSeg User’s Manual Version 1.59 segmentation hierarchy that distinguishes it from most other multilevel representations is that the segment or region boundaries are maintained at the full image spatial resolution for all levels of the segmentation hierarchy. In a segmentation hierarchy, an object of interest may be represented by multiple image segments in finer levels of detail in the segmentation hierarchy, and may be merged into a surrounding region at coarser levels of detail in the segmentation hierarchy. If the segmentation hierarchy has sufficient resolution, the object of interest will be represented as a single region segment at some intermediate level of segmentation detail. The segmentation hierarchy may be analyzed to identify the hierarchical level at which the object of interest is represented by a single region segment. The object may then be potentially identified through its spectral and spatial characteristics. Additional clues for object identification may be obtained from the behavior of the image segmentations at the hierarchical segmentation levels above and below the level(s) at which the object of interest is represented by a single region. What is HSWO? Hierarchical Step-Wise Optimization (HSWO) is a form of region growing segmentation that directly forms a segmentation hierarchy [1]. HSWO is an iterative process, in which the iterations consist of finding the best segmentation with one region less than the current segmentation. The HSWO approach can be summarized as follows: 1. Initialize the segmentation by assigning each image pixel a region label. If a presegmentation is provided, label each image pixel according to the pre-segmentation. Otherwise, label each image pixel as a separate region. 2. Calculate the dissimilarity criterion value between all pairs of spatially adjacent regions, find the pair of spatially adjacent regions with the smallest dissimilarity criterion value, and merge that pair of regions. 3. Stop if no more merges are required. Otherwise, return to step 2. HSWO naturally produces a segmentation hierarchy consisting of the entire sequence of segmentations from initialization down to the final trivial one region segmentation (if allowed to proceed that far). For practical applications, however, a subset of segmentations needs to be selected out from this exhaustive segmentation hierarchy. What is HSeg? HSeg interjects between HSWO iterations of merges of spatially adjacent regions the merges of spatially non-adjacent regions constrained by a threshold derived from the previous HSWO iteration [2,3]. The relative importance of region growing and spectral clustering merges is controlled by the parameter spclust_wght, which can vary from 0.0 to 1.0. When spclust_wght = 0.0, only merges between spatially adjacent regions are allowed (no spectral clustering). With spclust_wght = 1.0, merges between spatially adjacent and spatially non-adjacent regions are given equal priority. For 0.0 < spclust_wght < 1.0, spatially adjacent merges are given priority over spatially nonadjacent merges by a factor of 1.0/spclust_wght. Thus for spclust_wght > 0.0, spatially 3 RHSeg User’s Manual Version 1.59 connected region objects may be grouped or classified into spatially disjoint region classes. HSeg also adds to HSWO approaches for selecting a subset of segmentations for an output segmentation hierarchy. By default, the subset is selected that minimizes the number of hierarchical levels utilized to guarantee that each large region (a region containing at least min_npixels pixels) is involved in no more than one merge with another large region from one hierarchical level to the next. The user may instead choose to explicitly a set of iterations based on the number of regions or merge thresholds at those iterations. Further, since segmentation results with a large number of regions are usually not interesting, the hierarchical segmentation results are not output until the number of regions reaches a user specified value, chk_nregions, the first entry in the hseg_out_nregions list, or the merging threshold reaches the value of the first entry of the hseg_out_thresholds list. See Chapter 4 for a detailed description of the chk_nregions, hseg_out_nregions and hseg_out_thresholds parameters. The min_npixels program variable is discussed later in this section. While the addition of non-adjacent region merging significantly reduces the number of regions required to characterize an image, especially for larger highly varied images, it also significantly increases HSeg’s computational requirements. This is because the inclusion of spatially non-adjacent region merging in HSeg requires the inter-comparison of each region to every other region. Since HSeg is normally initialized with single pixel regions, this results in a combinatorial explosion of inter-comparisons in the initial stage of the algorithm. In contrast, HSWO only requires that each region be compared just with its neighboring regions. This increase in computational requirements is counteracted by RHSeg, a computationally efficient recursive approximation of HSeg. RHSeg is described in the next section. However, with version 1.50 of HSeg, another method for reducing HSeg’s computational requirements was implemented [3,4]. Here a program parameter spclust_max (defaulted to 1024) was introduced along with a program variable min_npixels through which the number of regions involved constrained spectral clustering is limited to no more than spclust_max regions by allowing only those regions containing at least min_npixels pixels to participate in the constrained spectral clustering. Such regions are termed “large regions.” The value of min_npixels is adjusted periodically to the smallest value that restricts the number of large regions to no more than spclust_max. With version 1.51 of HSeg, this method for reducing HSeg’s computational requirements was modified with the introduction of the spclust_min program parameter (defaulted to 512) which is used in a scheme that seeks to prevent the number of “large regions” involved in spectral clustering from falling to too small of a value [3,5]. In tests of version 1.50 of HSeg it was observed that at times image segmentation quality was degraded when the number of “large regions” involved in spectral clustering dropped to a small value. So with version 1.51 of HSeg, as in version 1.50, the value of min_npixels is initially adjusted to the smallest value that restricts the number of “large regions” to no more than spclust_max. However, if this value of min_npixels results in the number of “large regions” being less than spclust_min, the value of min_npixels is reduced by one (unless it is already equal to one) and the number of “large regions” with this new value of min_npixels is checked. If this new value of min_npixels results in the number of 4 RHSeg User’s Manual Version 1.59 “large regions” being more than 6*spclust_max, the value of min_npixels is incremented back up by one, unless this would result in the number of “large regions” becoming less than two. In the later case, the value of min_npixels as is left as is even though this results in the number of large regions exceeding 6*spclust_max. What is RHSeg? RHSeg is a recursive, divide-and-conquer, approximation of HSeg. Following [3,6] and [7], it can be described for ND spatial dimension image data as: 1. Given an input image X, specify the number of levels of recursion (rnb_levels) required and pad the input image, if necessary, so that for each spatial dimension the image can be evenly divided by 2(rnb_levels-1). (Prior to version 1.50, a good value for rnb_levels was one that resulted in an image section at level = rnb_levels consisting of roughly 1000 to 4000 pixels. However, with the introduction of spclust_max and min_npixels with version 1.50 of HSeg, a good value of rnb_levels is now one that results in an image section at level = rnb_levels that consists of about 1,048,576 = 1024*1024 pixels.) Set level = 1. 2. Call rhseg(level,X). 3. Execute the HSeg algorithm on the image X using as a pre-segmentation the segmentation output by the call to rhseg( ) in step 2. where rhseg(level,X) is as follows: 2.1. If level = rnb_levels, go to step 2.3. Otherwise, divide the image data into 2 N D equal subsections and call rhseg(level+1, X 2 N D ) for each image section (represented as X 2 N D ). 2.2. After all 2 N D calls to rhseg() from step 2.1 complete processing, reassemble the image segmentation results. 2.3. If level < rnb_levels, initialize the segmentation with the reassembled segmentation results from step 2.2. Otherwise, initialize the segmentation with one pixel per region. Execute the HSeg algorithm on the image X with the following modification: For level > 1, terminate the algorithm when the number of regions reaches the preset value min_nregions. Note that rnb_levels and min_nregions are user specified parameters (with default values available). Under a number of circumstances, the segmentations produced by the RHSeg algorithm exhibit processing window artifacts. These artifacts are region boundaries that are along the processing window seams, even though the image pixels across the seams are very similar. Processing window artifacts are usually minor, but can be more noticeable, depending on the image. They tend to be more noticeable and prevalent in larger images. However, the processing window artifacts can be completely eliminated by adding a 4th step to the definition of rhseg(level,X) given above (following [3,8]): 5 RHSeg User’s Manual Version 1.59 2.4. If level = rnb_levels, exit. Otherwise do the following (and then exit): a. For each region, identify other regions that may contain pixels that are more similar to it than the region that they are currently in. These regions are placed in a candidate_region_label set for each region. This is done by: i. scanning the processing window seam between sections processed at the next deeper level of recursion for pixels that are more similar (by a factor of seam_threshold_factor) to the region existing across the processing window seam. ii. identifying regions that have a dissimilarity between each other less than or equal to region_threshold_factor*max_threshold). b. For each region with a non-empty candidate_region_label set, identify pixels in the region that are more similar by a factor of split_pixels_factor to regions in the candidate_region_label set than to the region they are currently in. If spclust_wght = 1.0, simply switch the region assignment of these pixels to the more similar region. Otherwise, split these regions out of their current regions and remerge them through a restricted version of HSeg in which region growing is performed with these split-out pixels and merging is restricted to neighboring regions and regions in the candidate_region_label set from which the pixel came from. NOTE: For level > 1, step 2.4 is performed once HSeg reached a number of regions equal to min_nregions. For level = 1 step 2.4 is usually performed once HSeg reaches a number of regions equal to the greater of min_nregions, chk_nregions (if specified), or the first entry in the hseg_out_nregions list (if specified). However, if this value is greater than (3*init_nregions)/4, where init_nregion is the number of regions at the start of step 2.3, step 2.4 is instead performed one HSeg reaches a number of regions equal to (3*init_nregions)/4. To be most effective, a sufficient number of HSeg iterations must be performed prior to the execution of step 2.4. Processing window artifact elimination as introduced here not only eliminates the processing window artifacts, but does so with minimal computational overhead. The computational overhead is no more than double for a wide range of image sizes [3,7]. The program defaults for the parameters values seam_threshold_factor = 1.5, split_pixels_factor = 1.5 work well for a wide range of images. (The default value for region_threshold_factor is 0.0, as this aspect of the processing window artifact elimination procedure is usually unnecessary.) The processing window artifact elimination step is performed after HSeg converges at hierarchical levels 1 through rnb_levels – 1. At recursive level 1, HSeg is again run normally after the processing window artifact elimination step is performed until it reaches final convergence when the number of regions reaches the value of the program parameter, conv_nregions. Yet another modification of RHSeg introduced with version 1.50 is that those regions not involved in spectral clustering (the “small” regions), are also not involved in the pixel split out stage of processing window artifact elimination (step 2.4.a). 6 RHSeg User’s Manual Version 1.59 What is HSegExtract? HSegExtract is a program written in C++ for extracting certain segmentation features from selected levels of the segmentation hierarchies produced by HSeg or RHSeg. With HSegExtract, an analyst can select a particular hierarchical segmentation level and then output region class or region objects features from the selected hierarchical level in the form of ENVI format images. The following region class or region objects features may be output: Region labels, region number of pixels, region mean, region standard deviation and region boundary pixel to number of pixels ratio. With version 1.53 of HSegExtract, the program can also optionally output class and object shapefiles containing region class and region object information plus “shapefile” information describing the four nearest neighbor region object label map for the selected hierarchical level. What is HSegReader? HSegReader is a graphical user interactive (GUI) program written in C++ (utilizing the gtkmm GUI library, see http://www.gtkmm.org/) that enables an analyst to examine the feature values of the region classes and region objects contained in the hierarchical segmentation results produced by HSeg or RHSeg. With HSegReader, an analyst can select a particular hierarchical segmentation level and then view the feature values of the region classes in the segmentation at that particular hierarchical level. The analyst can order the region classes by size, standard deviation or boundary pixel ratio feature values. Then for each region class the analyst can view the feature values of the region objects contained in that particular region class. These region objects can also be ordered by size, standard deviation or boundary pixel ratio feature value. What is HSegViewer? HSegViewer is a graphical user interactive (GUI) program written in C++ (utilizing the gtkmm GUI library, see http://www.gtkmm.org/) that enables an analyst to visualize, manipulate, and interact with, the hierarchical segmentation results produced by HSeg or RHSeg. It is based on an earlier version of HSegViewer that was written in Java, which was, in turn, based on the “Region Labeling Tool” [8], an earlier GUI program written in C. With HSegViewer, an analyst can view pseudo-color (random color table) versions of the region class and region object segmentations at each hierarchical level saved by HSeg or RHSeg, as well as view a region mean image and hierarchical region boundary map image for each of these segmentations. An analyst can also select a particular region class or object from a particular hierarchical level and label it with a selected color and ASCII text string. With this region selection and labeling facility, an analyst can selectively create a tailored image labeling. HSegViewer also displays certain region statistics for the selected region class or object over all hierarchical levels, including region number of pixels, region mean vector values, region boundary pixel ratio, and region standard deviation. 7 RHSeg User’s Manual Version 1.59 What is HSegLearn? HSegLearn is a graphical user interactive (GUI) program written in C++ (utilizing the gtkmm GUI library, see http://www.gtkmm.org/) that is designed to facilitate the labeling of image regions that are members of a specific category of land cover. HSegLearn uses the output from the HSeg or RHSeg programs as a basis for defining similar image regions. HSegLearn can be used by an analyst to label sets of regions (as defined by HSeg or RHSeg) as “positive” or “negative” examples of the sought for category of land cover. The HSegLearn program automatically searches the hierarchical segmentation for HSeg or RHSeg for the coarsest level of segmentation at which selected positive example regions do not conflict with negative example regions and labels the image accordingly. The negative example regions are always defined at the finest level of segmentation detail. References [1] J-M. Beaulieu and M. Goldberg, “Hierarchy in picture segmentation: A stepwise optimal approach,” IEEE Transactions on Pattern Analysis and Machine Intelligence, Vol. 11, No. 2, pp. 150-163, Feb. 1989. [2] James C. Tilton, “Image Segmentation by Region Growing and Spectral Clustering with a Natural Convergence Criterion,” Proceedings of the 1998 International Geoscience and Remote Sensing Symposium, Seattle, WA, pp. 1766-1768, July 610, 1998. [3] James C. Tilton, Yuliya Tarabalka, Paul M. Montesano and Emanuel Gofman, “Best Merge Region Growing Segmentation with Integrated Non-Adjacent Region Object Aggregation,” IEEE Transactions on Geoscience and Remote Sensing, Vol. 50, No. 11, November 2012, pp. 4454-4467. [4] J. C. Tilton, “Refinement of the HSeg Algorithm for Improved Computational Processing Efficiency,” Disclosure of Invention and New Technology: NASA Case No. GSC 16,024-1, March 2, 2010. [5] J. C. Tilton, “Further refinement of the computationally efficient HSeg algorithm,” Disclosure of Invention and New Technology: NASA Case No. GSC 16,250-1, Feb. 21, 2011. [6] J. C. Tilton, “D-dimensional formulation and implementation of recursive hierarchical segmentation,” Disclosure of Invention and New Technology: NASA Case No. GSC 15199-1, May 26, 2006. [7] J. C. Tilton, “Parallel Implementation of the Recursive Approximation of an Unsupervised Hierarchical Segmentation Algorithm,” Chapter 5 of High Performance Computing in Remote Sensing, C.-I. Chang and A. J. Plaza, editors, CRC Press, pp. 133-144, 2007. [8] James C. Tilton, “A split-remerge method for eliminating processing window artifacts in recursive hierarchical segmentation,” Disclosure of Invention and New Technology: NASA Case No. GSC 14,994-1, March 9, 2005. NOTE: U. S. Patent No. 7,697,759 was awarded to this technology on April 13, 2010. 8 RHSeg User’s Manual [9] Version 1.59 James C. Tilton, “A Region Labeling Tool for use with Hierarchical Segmentation,” Disclosure of Invention and New Technology: NASA Case No. GSC 14,331-1, February, 29, 2000. 9 RHSeg User’s Manual Version 1.59 Chapter 2: Installing the Programs Overview The HSWO/HSeg/RHSeg package is available in three versions. Each version is installed differently. This chapter provides detailed information on how to install each version. The three versions are: 1. HSWO/HSeg/RHSeg Demonstration Version 2. HSWO/HSeg/RHSeg Licensed Serial Version 3. HSWO/HSeg/RHSeg Licensed Parallel Version All versions also include HSegExtract, HSegReader, HSegViewer and HSegLearn. NOTEs: The HSWO/HSeg/RHSeg Demonstration Version provides a 2-Dimensional version of HSWO/HSeg/RHSeg with the processing window artifact elimination code. The 3-Dimensional version is available only be special arrangement or with a licensed version of HSWO/HSeg/RHSeg. HSWO/HSeg/RHSeg Demonstration Version The demonstration version is available for 32-bit Windows XP, Vista and 7, and for 64bit Windows 7 operating systems. Obtain a copy of RHSegV1p58_install.exe or RHSegV1p58_install64.exe and copy it to a convenient location on your computer. You can start the RHSeg installation by double clicking on the program icon. You can also start the installation by clicking on “start”, then on “Run.” After browsing for the RHSegV1p58_install.exe (or RHSegV1p58_install64.exe) program, run it by clicking on “OK.” By default, the RHSeg package is installed in the C:\Program Files\RHSeg directory. However, you can choose to have it installed in another directory if you so desire. You can then choose to have RHSeg installed in an existing Program Manager Group, or in its own group called “RHSeg.” Following the simple installation instructions will complete the process. What the installation does: The RHSeg suite of executables (rhsegGUI.exe, rhseg.exe, rhseg_setup.exe, rhseg_run.exe, hsegextractGUI.exe, hsegextract.exe, hsegreader.exe, hsegviewer.exe and hseglearn.exe) and several other associated files are copied to the installation directory (by default, C:\Program Files\RHSeg). A subdirectory, named “Sample Data,” is also created into which a sample image data set and parameter file are copied. You can use this sample image data set and parameter file to test your installation of RHSeg. Finally the dlls subdirectory is also created. This subdirectory contains the necessary dll library files. The directory paths to the RHSeg executables and the dll library files (by default C:\Program Files\RHSeg and C:\Program Files\RHSeg\dll\bin, respectively) are added to the system PATH environment variable. 10 RHSeg User’s Manual Version 1.59 An entry “RHSeg” is added to the Program List (accessed through the “start” button). Included under the RHSeg entry, are subentries “HSegExtract,” “HSegReader,” “HSegViewer,” “HSegLearn,” “RHSeg Release Notes,” and “RHSeg User's Manual.” HSWO/HSeg/RHSeg Licensed Serial Version The RHSeg suite of programs is written in C++. To install the programs, you need to compile and link the provided source code with a C++ compiler. The instructions provided here assume you have a GNU C++ (gcc) compiler installed under a Linux or UNIX (e.g., Sun Solaris) operating system, or under a Linux-type environment on Windows. Use cygwin (http://www.cygwin.com/), djgpp (http://www.delorie.com/djgpp) or MinGW-msys (http://www.mingw.org) to provide a Linux-type environment for Windows machines. Tests were performed using gcc versions 4.1.2, 4.4.4, 4.5.1, 4.6.1, 4.6.3 and 4.8.0. Results are not guaranteed for other compilers and systems, though it is very likely that you will be successful compiling the code in other environments (particularly with the GNU C++ compiler). The RHSeg program is available in three versions. Building the “rhseg_run” version requires nothing else besides a C++ compiler. However, the “rhseg” version requires that you have the Geospatial Data Abstraction Library (GDAL) installed on your computer. If GDAL is not already installed on your computer go to http://www.gdal.org/ and install GDAL before proceeding further in building the “rhseg” version of RHSeg. The “rhsegGUI” version of RHSeg (RHSeg with a graphical user interface) also requires that you have gtkmm (the C++ Interface for GTK+) installed on your system. GTK+ is a toolkit for creating graphical user interfaces. See http://www.gtkmm.org to download and install this software. The “rhsegGUI” of RHSeg also needs the pthreads library. The GNU Portable Threads version of pthreads can be obtained from http://www.gnu.org/software/pth/. Please also see the note at the end of this section for advice on installing GDAL, gtkmm and pthreads. You will also need “makepp” (http://makepp.sourceforge.net/) in order to build the RHSeg suite of programs. The build process was formulated and tested with the stable, version 2.0 release candidate of makepp. Downloading and installing makepp is very easy and straightforward. Just follow the instructions in the provided “INSTALL” file. Note that you will also need to have version Perl 5.6.0 or higher (version 5.8.0 or higher recommended) installed on you system. Most Linux-type systems have Perl pre-installed. Once your licensing agreement is finalized, you should be provided with copies of rhsegV1.59.tar.gz and CommonV1.59.tar.gz. As the first step in building the suite of RHSeg programs, place rhsegV1.59.tar.gz in an appropriate directory (e.g., $HOME/ src/RHSeg) and uncompress and extract the files from this gzip’d tar file using gunzip and tar (or just tar with the “z” option) as follows: gunzip rhsegV1.59.tar.gz and tar xf rhsegV1.59.tar or 11 RHSeg User’s Manual Version 1.59 tar xzf rhsegV1.59.tar.gz Upon completing the above, you will see a directory rhsegV1.59 with various subdirectories. In the following we will refer to this directory (with the suggested full path $HOME/src/RHSeg/rhsegV1.59) as RHSEG_DIR. The programs in the RHSeg suite that requires GDAL also require CommonV1.59.tar.gz (which contains interfaces to various GDAL and gtkmm routines). Place this file in an appropriate directory (e.g., $HOME/src) and unpack it. You will now see the directory CommonV1.59 with various subdirectories. The path to this directory will be referred to as COMMON_DIR (e.g., $HOME/src/CommonV1.59) in the following. You will find files named “RootMakeppfile” and “standard_defs.mk” in the RHSEG_DIR directory. These files contain the instructions on how to adaptively build the RHSeg suite of programs in several different environments. Some minor changes in these files should be all that is necessary to build the RHSeg suite of programs in environments other than those the process has already been designed for. To build the RHSeg suite of programs go to the RHSEG_DIR directory and just type “makepp.” In some environments you might see a warning like warning: '__cur' might be used uninitialized in this function that you should ignore. Besides this warning all programs should build cleanly. If you do not have GDAL, gtkmm or pthreads properly installed on your system, at the end of the build makepp will report on whether or not it detected the proper installation of these software packages, and what versions it detected if it did detect the proper installation of these software packages. In any case, it will build the programs it can build with the set of software packages you do have properly installed. It will always build at least rhseg_run, rhseg_setup, and hsegextract because these programs do not need anything besides a C++ compiler. The following programs are built by makepp: rhseg, rhseg_setup, rhseg_setup_3d, rhseg_run, rhseg_run_3d, hsegextract, hsegreader, hsegreader_3d, hsegviewer, and hsegviewer_3d. (Under the Windows environment, makepp also builds rhsegGUI and hsegextractGUI.) Since you are a licensed user of RHSeg, you will want to make build versions of rhseg, rhseg_run and rhseg_run_3d that don’t require a “Serial Key” to run the programs. You can do this by building the RHSeg suite of programs with “makepp NOSKEY=true” instead of just “makepp.” RHSeg Licensed Parallel Version TBD Advice on Installing GDAL, gtkmm and pthreads GTK+ (required for gtkmm) and pthreads are usually available as options in most Linux installation. Precompiled binary versions of gtkmm for some operating systems are available from http://www.gtkmm.org/en/download.html. Source code for gtkmm and other software packages that gtkmm depends on can be also downloaded from or through 12 RHSeg User’s Manual Version 1.59 http://www.gtkmm.org/en/download.html. Precompiled binaries of GDAL for some operating systems are available from http://trac.osgeo.org/gdal/wiki/ DownloadingGdalBinaries. Source code for GDAL and other software packages that GDALdepends on can be downloaded from or through http://trac.osgeo.org/gdal/wiki/ DownloadSource. Installation packages for GDAL and gtkmm binaries are available for most Linux operating systems and for the MinGW-msys environment under Windows. While pthread binaries don’t appear to be generally available, this package should be easy to build from source under most Linux operating systems. Pre-built versions of the latest DLL, development library and include files for pthreads on Windows (including MinGW-msys) are available from ftp://sourceware.org/pub/pthreads-win32/dll-latest. I build versions of the HSeg software for Windows machines using MSYS/MinGW. Instructions for installing MSYS/MinGW on Windows machines (32 bit and 64 bit) can be found at http://sourceforge.net/apps/trac/mingw-w64/wiki/MSYS. The GCC/MinGWw64 compiler suite for 32- and 64-bit Windows can be downloaded from http://tdm-gcc.tdragon.net/download. An install package for gtkmm version 2.22 is available from https://live.gnome.org/gtkmm/MSWindows. Building GDAL under MSYS/MinGW is a bit tricky, but doable. The advice provided at http://trac.osgeo.org/gdal/wiki/BuildingWithMinGW is helpful, but appears to be somewhat out of date (all of the recommended steps are not actually necessary). I have built the latest versions of gtkmm and GDAL under MSYS/MinGW on my Windows 7 64-bit machine. Please contact me directly for detailed instructions by sending email to [email protected]. 13 RHSeg User’s Manual Version 1.59 Chapter 3: Running the Programs Overview This chapter provides an overview of how to run the HSWO, HSeg, RHSeg, HSegExtract, HSegReader, HSegViewer and HSegLearn suite of programs. Running HSWO and HSeg HSWO and HSeg are run by running one of the variants of the RHSeg program (see next section) and selecting “Program Mode” “HSWO” or “HSEG,” respectively, in the graphic user interface (GUI) versions or specifying “HSWO” or “HSEG,” respectively, for the value of the “program_mode” parameter in the non-GUI versions. Running RHSeg There are three versions of the RHSeg program provided with the demonstration version of RHSeg, all of which can also be built in the licensed version. The version that does not depend on gtkmm or GDAL is named “rhseg_run,” the version that depends on both gtkmm and GDAL is named “rhseg.” (In the Windows environment this version is called “rhsegGUI,” and a version that depends on GDAL and doesn’t depend on gtkmm is called “rhseg.”) There is also a companion program to “rhseg_run” called “rhseg_setup,” which depends on both gtkmm and GDAL. The version of RHSeg most similar to versions of RHSeg prior to version 1.45 is “rhseg_run.” This is also the only version that can be used for three-dimensional image processing and for parallel processing (licensed version only). To run “rhseg_run,” create a parameter file with the appropriate entries, and run the program with the following command: rhseg_run parameter_file_name The parameter file consists of entries of the form: -parameter_name parameter_values(s) This parameter file may be constructed manually following the definitions provided in the on-line help, which may be obtained through the command: rhseg_run –h or rhseg_run -help and/or by referring Chapter 4 of this User’s Manual. The “rhseg_run” version of RHSeg requires that the input data be a headerless binary 1-, 2-, or 3-spatial dimension image or image-like data file in band sequential format. See Chapter 4 of this User’s Manual for more details. The parameter file may also be constructed automatically using the “rhseg_setup” program with the command: rhseg_setup 14 RHSeg User’s Manual Version 1.59 Invoking this command will display a GUI through which you can provide the input parameter information. In this case, the input image data must be in one of the image data formats recognized by GDAL instead of the headerless binary data file expected by “rhseg_run.” You must specify the “Program Mode,” “Input image data file,” “the relative importance of spectral clustering vs. region growing,” (for HSeg and RHSeg) and the “Output log file” through this GUI. You may also optionally specify an “Input mask data file” and “Input region map data file” as well as specify a “Dissimilarity Criterion” other than the default “Square Root of Band Sum Mean Squared Error.” Once the requirements of this GUI panel are satisfied, you may either run the program by selecting the “Program Action” “Run RHSeg Setup,” or specify additional output files by selecting the “Program Action” “Go to Next Panel.” From the “RHSeg Output File Specification” panel you may similarly also choose to “Run RHSeg Setup” or “Go to Next Panel.” In this case, the next panel allows you to specify non-default values for other RHSeg parameters. From this “RHSeg Parameter Specification” panel you may also run the program by selecting the “Program Action” “Run RHSeg Setup.” Running the “rhseg_setup” program does not actually run the RHSeg algorithm, but instead creates an input parameter file for “rhseg_run” (with the default name “rhseg_run.params”). It also creates the headerless binary input data files required by “rhseg_run.” You may also run RHSeg from a command line with a parameter file using the “rhseg” command. In contrast the “rhseg_run,” in this case the input image data must be in one of the image data formats recognized by GDAL instead of the headerless binary data file expected by “rhseg_run.” At a minimum you must also specify a value for the parameters program_mode, spclust_wght and log (see Chapter 4 of this User’s Manual). Invoking “rhseg” (without the parameter file name) will bring up the GUI version of RHSeg (in the Windows environment invoke “rhsegGUI” instead). The GUIs are exactly the same as described in the discussion of “rhseg_setup” above. In this case, though, when you select “Run Program” from the first panel menu, or when you select “Run RHSeg” (or “Run HSWO” or “Run HSeg”) from the other parameter input panels you will actually run the RHSeg (or the HSWO or HSeg) algorithm! If you like, you can create a shortcut for this program and place it on your desktop. When RHSeg is run using the rhseg GUI version, upon completion of the RHSeg program, the user is given the opportunity to run HSegReader, HSegViewer and/or display the log file by selecting buttons on a GUI. Again, for help on the parameter file entries, type rhseg –h or rhseg -help To find out the version of your copy of RHSeg type rhseg –v or rhseg -version Special notes for the RHSeg demonstration version: Notes for the demonstration version: (i) For the demonstration version, the first time you run the “rhseg” or “rhseg_run” version of the RHSeg program, you will be prompted for your user name and Serial Key, 15 RHSeg User’s Manual Version 1.59 which should have been provided to you with RHSeg_setup.exe. This information is written to a file in the system TEMP directory. Subsequent runs of RHSeg read the user name and Serial Key information from this file, and you will not be prompted at all. However, if this file gets corrupted or deleted - then you will again be prompted for the information. In this case, reenter your original Serial Key, or obtain a new Serial Key from the distributor of RHSeg_setup.exe. When your time allotment expires you will again be prompted to enter your user name and Serial Key. In this case, you will have to contact the distributor of RHSeg_setup.exe for terms under which a new Serial Key can be obtained, or for arranging the procurement of a licensed version of RHSeg. (ii) For the demonstration version, the Sample Data folder in the RHSeg installation directory (C:\Program Files\RHSeg by default) contains the following sample files: girl.bmp rhseg.params Sample Image Data File Sample Parameter File Using these files, you can test RHSeg by bringing up a DOS window, setting your directory location to this Sample Data folder and typing the command: rhseg rhseg.params The program should take about 30 seconds to run on a 2 GHz clock machine. You may also use this sample data set to test the GUI version of RHSeg. Running HSegExtract In running the HSegExtract program, you will find it most convenient to set your directory location to the directory where the output files from a run of the RHSeg reside, but this is not necessary. You may run HSegExtract with either of the following commands: hsegextract or hsegextract parameter file name The first choice brings up a parameter input GUI (in the Windows environment invoke “hsegextractGUI” instead). This version of HSegExtract can also be called from “RHSeg” group in “All Programs” in the “start” menu in Windows. If you like, you can create a shortcut for this program and place it on your desktop. The second choice uses an input parameter file. A description of the contents of this file can be found using the command: hsegextract –h or hsegextract -help To find out the version of your copy of HSegExtract type hsegextract –v or hsegextract -version The HSegExtract program is designed to directly use the outputs from the RHSeg program as its inputs. In particular, the output parameter file from RHSeg (with the suffix “oparam”) provides most of the needed inputs for the HSegExtract program. 16 RHSeg User’s Manual Version 1.59 If you run HSegExtract with a parameter file and all the required parameters are not specified properly in the parameter file, the program will display the parameter input GUI panel (as if run with the “hsegextract” command). Once all appropriate parameters are entered in the HSegExtract parameter input GUI panel, select the “Run Program” option in the “Program Actions” menu. The HSegExtract program will now run producing the selected outputs. For the demonstration version, the Samples folder in the RHSeg installation directory (C:\Program Files\RHSeg by default) contains the following sample files: girl.bmp rhseg.params Sample Image Data File Sample Parameter File As noted earlier in the section “Running RHSeg,” RHSeg can be tested by bringing up a DOS window, setting your directory location to this Samples folder and typing the command: rhseg rhseg.params Once RHSeg completes, you will find that RHSeg produced the following files: girl.log RHSeg log file girl.oparam RHSeg output parameter file girl_boundary_map RHSeg hierarchical boundary map girl_boundary_map.hdr ENVI header for girl_boundary_map girl_class_labels_map RHSeg region class label map for hierarchical level 0 girl_class_labels_map.hdr ENVI header for girl_class_labels_map girl_object_labels_map RHSeg region object label map for hierarchical level 0 girl_object_labels_map.hdr ENVI header for girl_object_labels_map girl_region_classes RHSeg region class information (all levels) girl_region_objects RHSeg region object information (all levels) HSegExtract uses these files as input (except for girl.log). The girl.oparam file contains the names of all of the input files for HSegExtract, plus other required information such as number of regions at hierarchical level 0, and the number of hierarchical levels. An input parameter file for HSegExtract is also provided: hsegextract.params. Thus, HSegExtract can be run by simply providing it with the name of the HSegExtract input parameter file: hsegextract hsegextract.params An alternate way to run HSegExtract is with the command: hsegextract As noted earlier, this version of HSegExtract can also be called from “RHSeg” group in “All Programs” in the “start” menu in Windows. In this case you will need to enter “girl.oparam” as the “RHSeg/HSeg Output Parameter File” (as an input to HSegExtract). When run with the “hsegextract” command, all the other required parameter value entries will be read from the “RHSeg/HSeg Output Parameter File.” Once you have selected values for the optional parameters (or left them at their default values) you run the 17 RHSeg User’s Manual Version 1.59 program by selecting “Run Program,” under the “Program Actions” menu (upper left corner of the panel). The HSegExtract program will now run producing the selected outputs. Running HSegReader In running the HSegReader program, you will find it most convenient to set your directory location to the directory where the output files from a run of the RHSeg reside, but this is not necessary. You may run HSegReader with either of the following commands: hsegreader or hsegreader parameter file name The first choice brings up a parameter input GUI. This version of HSegReader can also be called from “RHSeg” group in “All Programs” in the “start” menu in Windows. If you like, you can create a shortcut for this program and place it on your desktop. The second choice uses an input parameter file (this version is not available in the Windows environment). A description of the contents of this file can be found using the command: hsegreader –h or hsegreader -help To find out the version of your copy of HSegReader type hsegreader –v or hsegreader -version The HSegReader program is designed to directly use the outputs from the RHSeg program as its inputs. In particular, the output parameter file from RHSeg (with the suffix “oparam”) provides most of the needed inputs for the HSegReader program. If you run HSegReader with a parameter file and all the required parameters are not specified properly in the parameter file, the program will display the parameter input GUI panel (as if run with the “hsegreader” command). Once all appropriate parameters are entered in the HSegReader parameter input GUI panel, select the “Run Program” option in the “Program Actions” menu. The main panel for the HSegReader program will now appear. For the demonstration version, the Samples folder in the RHSeg installation directory (C:\Program Files\RHSeg by default) contains the following sample files: girl.bmp rhseg.params Sample Image Data File Sample Parameter File As noted earlier in the section “Running RHSeg,” RHSeg can be tested by bringing up a DOS window, setting your directory location to this Samples folder and typing the command: rhseg rhseg.params Once RHSeg completes, you will find that RHSeg produced the following files: 18 RHSeg User’s Manual Version 1.59 girl.log RHSeg log file girl.oparam RHSeg output parameter file girl_boundary_map RHSeg hierarchical boundary map girl_boundary_map.hdr ENVI header for girl_boundary_map girl_class_labels_map RHSeg region class label map for hierarchical level 0 girl_class_labels_map.hdr ENVI header for girl_class_labels_map girl_object_labels_map RHSeg region object label map for hierarchical level 0 girl_object_labels_map.hdr ENVI header for girl_object_labels_map girl_region_classes RHSeg region class information (all levels) girl_region_objects RHSeg region object information (all levels) HSegReader uses these files as input (except for girl.log). The girl.oparam file contains the names of all of the input files for HSegReader, plus other required information such as image number of rows and columns, number of regions at hierarchical level 0, and the number of hierarchical levels. An input parameter file for HSegReader is also provided: hsegreader.params. Thus, HSegReader can be run by simply providing it with the name of the HSegReader input parameter file: hsegreader hsegreader.params An alternate way to run HSegReader is with the command: hsegreader As noted earlier, this version of HSegReader can also be called from “RHSeg” group in “All Programs” in the “start” menu in Windows. In this case you will need to enter “girl.oparam” as the “RHSeg/HSeg Output Parameter File” (as an input to HSegReader). When run with the “hsegreader” command, all the other required parameter value entries will be read from the “RHSeg/HSeg Output Parameter File.” Once you have selected values for the optional parameters (or left them at their default values) you run the program by selecting “Run Program,” under the “Program Actions” menu (upper left corner of the panel). The main “Hierarchical Segmentation Results Reader” panel will then appear. Once the “Hierarchical Segmentation Results Reader” panel is displayed, you may select a particular hierarchical segmentation level. Once you do so, you can choose to order the region classes by size, standard deviation or by boundary pixel ratio feature value. The feature values for the appropriate region class are now displayed. You can then examine the next largest region class, or choose to order the region objects contained in the selected region class by size, standard deviation or by boundary pixel ratio feature value. The feature values for the appropriate region object are now displayed. Running HSegViewer In running the HSegViewer program, you will find it most convenient to set your directory location to the directory where the output files from a run of the RHSeg reside, but this is not necessary. You may run HSegViewer with either of the following commands: 19 RHSeg User’s Manual Version 1.59 hsegviewer or hsegviewer parameter file name The first choice brings up a parameter input GUI. This version of HSegViewer can also be called from “RHSeg” group in “All Programs” in the “start” menu in Windows. If you like, you can create a shortcut for this program and place it on your desktop. The second choice uses an input parameter file (this version is not available in the Windows environment). A description of the contents of this file can be found using the command: hsegviewer –h or hsegviewer -help To find out the version of your copy of HSegViewer type hsegviewer –v or hsegviewer -version The HSegViewer program is designed to directly use the outputs from the RHSeg program as its inputs. In particular, the output parameter file from RHSeg (with the suffix “oparam”) provides most of the needed inputs for the HSegViewer program. If you run HSegViewer with a parameter file and all the required parameters are not specified properly in the parameter file, the program will display the parameter input GUI panel (as if run with the “hsegviewer” command). Once all appropriate parameters are entered in the HSegViewer parameter input GUI panel, select the “Run Program” option in the “Program Actions” menu. The main panel for the HSegViewer program will now appear. Note: The “Output Selected Class Label Map File” and the optional “Output ASCII Class Label Names List File” can be used to store intermediate results from one session of the HSegViewer program. These files can be used as the “Input Class Label Map File” and “Input ASCII Class Label Names List File”, respectively, to start up where you left off in a previous session. (The ASCII Class Label Names List File also includes color map information.) For the demonstration version, the Samples folder in the RHSeg installation directory (C:\Program Files\RHSeg by default) contains the following sample files: girl.bmp rhseg.params Sample Image Data File Sample Parameter File As noted earlier in the section “Running RHSeg,” RHSeg can be tested by bringing up a DOS window, setting your directory location to this Samples folder and typing the command: rhseg rhseg.params Once RHSeg completes, you will find that RHSeg produced the following files: girl.log girl.oparam girl_boundary_map girl_boundary_map.hdr RHSeg log file RHSeg output parameter file RHSeg hierarchical boundary map ENVI header for girl_boundary_map 20 RHSeg User’s Manual Version 1.59 girl_class_labels_map RHSeg region class label map for hierarchical level 0 girl_class_labels_map.hdr ENVI header for girl_class_labels_map girl_object_labels_map RHSeg region object label map for hierarchical level 0 girl_object_labels_map.hdr ENVI header for girl_object_labels_map girl_region_classes RHSeg region class information (all levels) girl_region_objects RHSeg region object information (all levels) HSegViewer uses these files as input (except for girl.log), along with the original data file (in this case, girl.bmp). The girl.oparam file contains the names of all of the input files for HSegViewer, plus other required information such as image number of rows and columns, number of regions at hierarchical level 0, and the number of hierarchical levels. An input parameter file for HSegViewer is also provided: hsegviewer.params. Thus, HSegViewer can be run by simply providing it with the name of the HSegViewer input parameter file: hsegviewer hsegviewer.params An alternate way to run HSegViewer is with the command: hsegviewer As noted earlier, this version of HSegViewer can also be called from “RHSeg” group in “All Programs” in the “start” menu in Windows. In this case you will need to enter “girl.oparam” as the “RHSeg/HSeg Output Parameter File” (as an input to HSegViewer). When run with the “hsegviewer” command, with the exception of the Red, Green and Blue Display Band values, all the other required parameter value entries will be read from the “RHSeg/HSeg Output Parameter File.” Since the example girl image is a RGB image with bands stored in the order blue, green then red, enter “0” for the “Red Display Band,” “1” for the “Green Display Band,” and “2” for the “Blue Display Band.” Then, under the “Program Actions” menu (upper left corner of the panel), select “Run Program.” The main “Hierarchical Segmentation Results Viewer” panel will then appear. Details on using the HSegViewer main panel for viewing and interacting with the hierarchical segmentation results, and more details on configuring and starting the HSegViewer program are provided in Chapter 5: “HSegViewer Tutorial.” Running HSegLearn The HSegLearn program is run exactly the same way the HSegViewer is run. Just follow the instructions provided in the previous sections substituting “hseglearn” for “hsegviewer.” Details on using the HSegLearn main panel to label image regions that are members of a specific category of land cover, and more details on configuring and starting the HSegLearn program are provided in Chapter 6: “HSegLearn Tutorial.” 21 RHSeg User’s Manual Version 1.59 Chapter 4: Guide to HSeg/RHSeg Parameters and Parameter Settings Overview This chapter provides information on the HSeg/RHSeg program parameters and provides some guidance as to appropriate parameter settings. For a history of program changes see the Release Notes. HSWO/HSeg/RHSeg Program Parameters NOTE: In the following discussion, most parameters are valid for HSWO, HSeg and RHSeg. However some parameters are not valid for HSWO or HSeg. The discussion will indicate which parameters are not valid for HSWO or HSeg. The first entry in the input parameter file should be the program mode: program_mode (string) Program Mode – Valid values are: HSWO, HSEG, or RHSEG (no default) This parameter specifies which mode the program (“rhseg,” “rhseg_setup” or “rhseg_run”) is to be run in, HSWO (Hierarchical Step-Wise Optimization), HSEG (Hierarchical Segmentation), or RHSEG (Recursive Hierarchical Segmentation). HSeg is a subset of the RHSeg code and HSWO, in turn, is a subset of the HSeg code. The input image data file name must be specified in the input parameter file: input_image (string) Input image data file name The input image data file from which hierarchical image segmentation is to be produced. For “rhseg_run,” this image data file may be a headerless binary 1-, 2-, or 3spatial dimension image or image-like data file in band sequential format. This means that the column index increments that fastest, followed by the row index, followed by the slice index, followed by the spectral band index. The number of columns, rows, slices, spectral bands and the data type are specified by other required parameters (see below). Data types “unsigned char (byte),” “short unsigned int,” and “float” are supported (see dtype below). For “rhseg_setup” and “rhseg” this image data file is assumed to be in one of the wide variety of image data formats supported by GDAL (Geospatial Data Abstraction Library – see http://www.gdal.org/). If “rhseg_run” is compiled in an environment in which GDAL is available, it can also accept image data in GDAL supported formats. 22 RHSeg User’s Manual Version 1.59 If using a headerless binary file for image data input for “rhseg_run,” the following parameters must also be specified (no defaults): ncols (int) Number of columns in the input image data (0 < ncols < 65535) nrows (int) Number of rows in the input image data (0 < nrows < 65535) nslices (int) Number of slices in the input image data (Only for the 3-D version) (0 < nslices < 65535) nbands (int) Number of spectral bands in input image data (0 < nbands < 65535) dtype (string) Data type of input image data: dtype = UInt8 designates “unsigned char (byte)” dtype = UInt16 designates “short unsigned int” dtype = Float32 designates “float” (otherwise undefined) The following input image data files may also be specified in the input parameter file: mask (string) Input data mask file name (default = {none}) The optional input data mask must match the input image data in number of columns and rows. Even if the input image data has more than one spectral band, the input data mask need only have one spectral band. If the input data mask has more than one spectral band, only the first spectral band is used and is assumed to apply to all spectral bands for the input image data. If the data value of the input data mask is not equal to mask_value (see the next parameter definition), the corresponding value of the input image data object is taken to be a valid data value. If the data value of the input data mask object is equal to mask_value, the corresponding value of the input image data object is taken to be invalid and a region label of “0” is assigned to that spatial location in the output region label map data. If using a headerless binary file for image data input for “rhseg_run,” the input data mask data type is assumed to be “unsigned char (byte).” Otherwise, the GDAL supported format input data mask is converted, as necessary, to “unsigned char (byte).” mask_value (int) region_map_in (string) If input data mask file is provided, this is the value in the mask file that designates bad data. (In general, the default = 0. However, if the “no_data_value” is specified in the GDAL recognized formatted image for “rhseg_setup” and “rhseg,” this “no_data_value” is the default.) Input region label map file name. (default = {none}) The optional region label map must match the input image data in number of columns and rows (and slices for 3-D). If provided, the image segmentation is 23 RHSeg User’s Manual Version 1.59 initialized according to the input region label map instead of the default of each pixel as a separate region. Wherever a region label of “0” is given by the input region label map, the region labeling is assumed to be unknown and the region label map is initialized to one-pixel regions at those locations (except see mask_value above). If using a headerless binary file for image data input for “rhseg_run,” the input region label map data type is assumed to be “short unsigned int.” Otherwise, the GDAL supported format input region label map is converted, as necessary, to “short unsigned int.” The following parameters must also be specified: spclust_wght (float) Relative importance of spectral clustering versus region growing (Not valid and need not be specified for HSWO.) (0.0 spclust_wght 1.0, no default) dissim_crit Dissimilarity criterion (int) “1-Norm,” “2-Norm,” “Infinity Norm,” “Spectral Angle Mapper,” “Spectral Information Divergence,” “Square Root of Band Sum Mean Squared Error,” 7. “Square Root of Band Maximum Mean Squared Error,” 8. “Normalized Vector Distance,” 9. “Entropy,” 10. “SAR Speckle Noise.” (default: 6 “Square Root of Band Sum Mean Squared Error”) 1. 2. 3. 4. 5. 6. Criterion for evaluating the dissimilarity of one region versus another. Dissimilarity criteria 1, 2 and 3 are based on vector norms. The 1-Norm of the difference between the region mean vectors, ui and uj, of regions Xi and Xj, each with B spectral bands, is: ui u j B 1 ib jb , (4-1a) b 1 where μib and μjb are the mean values for regions i and j, respectively, in spectral band b, i.e., ui = (i1, i2, …, iB)T and uj = (j1, j2, …, jB)T. The dissimilarity function for regions Xi and Xj, based on the vector 1-Norm, is given by: d1-Norm X i , X j ui u j 1. 24 (4-1b) RHSeg User’s Manual Version 1.59 The vector 2-Norm of the difference between the region mean vectors, ui and uj, of regions Xi and Xj is: ui u j 2 B 2 ib jb b1 1 2 (4-2a) , The dissimilarity function for regions Xi and Xj, based on the vector 2-Norm, is given by: d2-Norm X i , X j ui u j 2 . (4-2b) The vector -Norm of the difference between the region mean vectors, ui and uj, of regions Xi and Xj is: ui u j max ib jb , b 1,2, ,B , (4-3a) The dissimilarity function for regions Xi and Xj, based on the vector -Norm, is given by: d-Norm X i , X j ui u j . (4-3b) Dissimilarity criterion 4 is the Spectral Angle Mapper (SAM) criterion, which is widely used in hyperspectral image analysis [1]. This criterion determines the spectral similarity between two spectral vectors by calculating the “angle” between the two spectral vectors. An important property of the SAM criterion is that poorly illuminated and more brightly illuminated pixels of the same color will be mapped to the same spectral angle despite the difference in illumination. The spectral angle between the region mean vectors, ui and uj, of regions Xi and Xj is given by: u u i j ui u j 2 ui , u j arccos 2 B ib jb b 1 arccos . 12 12 B B 2 2 jb ib b 1 b 1 (4-4a) The dissimilarity function for regions Xi and Xj, based on the SAM distance vector measure, is given by: dSAM X i , X j ui , u j . Note that the value of dSAM ranges from 0.0 for similar vectors up to /2 for the most dissimilar vectors. Dissimilarity criterion 5 is the Spectral Information Divergence (SID) criterion, which is derived from the concept of divergence in information theory, and 25 (4-4b) RHSeg User’s Manual Version 1.59 measures the discrepancy of probabilistic behaviors between two spectral signatures [2, 3]. It is based on a process that models the region mean vector, ui, of region Xi as a random variable. Although the assumption of this model do not necessarily hold true for most images, the effect of the violation is negligible [4]. Noting that, for image data, the elements of ui are nonnegative, a probability measure for ui can be defined as qb ui ib b 1 (4-5a) , B ib where ui = (i1, i2, …, iB)T as before. This being the case, the entropy of the region mean vector, ui, of region Xi is B Hui qb ui logqb ui . (4-5b) b1 The relative entropy of the region mean vector, uj, of region Xj with respect to the region mean vector, ui, of region Xi with can be defined by Kui || u j qb ui log qb u j logqb ui B b1 qb ui B q u log q u . b1 b i b (4-5c) j K(ui||uj) in (4-5c) is also known as the Kullback-Leibler information measure [5]. The symmetric hyperspectral measure, SID, can be defined using (4-5c) by B q u qb u j SID ui , u j Kui || u j Ku j || ui qb ui log b i qb u j log . b 1 qb ui qb u j (4-5d) The dissimilarity function for regions Xi and Xj, based on the SID vector measure, is given by: dSID X i , X j SIDui , u j . (4-5e) Dissimilarity criteria 6 and 7 are based on minimizing the increase of mean squared error between the region mean image and the original image data. The sample estimate of the mean squared error for the segmentation of band b of the image X into R disjoint subsets X1, X2, , XR is given by: MSEb X 1 R MSEb X i , N 1 i 1 where N is the total number of pixels in the image data and 26 (4-6a) RHSeg User’s Manual Version 1.59 MSEb X i x p X i ib 2 pb (4-6b) is the mean squared error contribution for band b from segment Xi. Here, xp is a pixel vector (in this case, a pixel vector in data subset Xi), and pb is the image data value for the bth spectral band of the pixel vector, xp. A dissimilarity function based on a measure of the increase in mean squared error due to the merge of regions Xi and Xj is given by: dBSMSE X i , X j MSEb X i , X j , (4-7a) ∆MSEb(Xi,Xj) = MSEb(Xi Xj) - MSEb(Xi) - MSEb(Xj) . (4-7b) B b 1 where BSMSE refers to “band sum MSE.” Instead of summing over the bands in (4-7a) one could take the maximum over the spectral bands, resulting in a “band maximum MSE:” , B . dBMMSE X i , X j max MSEb X i , X j , b 1,2 (4-7c) Using (4-6b) and exchanging the order of summation, (4-7b) can be manipulated to produce an efficient dissimilarity function based on aggregated region features: MSEb X i , X j pb ijb x X p ij 2 x p X i pb ib 2 x p X j pb 2 jb pb ijb 2 pb ib 2 pb ijb 2 pb jb 2 x X x p X j p i 2 2 pb 2 pbijb ijb2 pb 2 pbib ib2 x X p i 2 2 2 2 pb 2 pbijb ijb pb 2 pb jb jb x X p j 2 2ijb pb ni ijb 2ib pb ni ib2 x p X i x p X i 2 2ijb pb n j ijb 2 jb pb n j 2jb x p X j x p X j 2 2ni ib ijb ni ijb 2ni ib2 ni ib2 2n n 2 2n 2 n 2 j jb ijb j ijb j jb j jb 2 2 ni ib2 2 ib ijb ijb n j 2jb 2 jb ijb ijb ni ib ijb n j jb ijb . 2 2 where μijb is the mean value for the bth spectral band of the mean vector, uij, of region represented by Xij = Xi Xj. 27 (4-8a) RHSeg User’s Manual Version 1.59 Since ni ib n j jb ijb ni n j (4-8b) , an alternate form for Equation (4-8a) is: ∆MSEb(Xi,Xj) = ni ib ijb n j jb ijb 2 2 ni ijb2 2ni ib ijb ni ib2 n j ijb2 2n j jb ijb n j 2jb ni ib2 n j 2jb 2ni ib n j jb ijb ni n j ijb2 1 ni n j ni ib2 n j 2jb 2ni ib n j jb 2 ni ib n j jb 2 ni n j n i 1 ni n j ni ib2 n j 2jb ni ib n j jb 2 nj 1 ni2 ib2 ni n j 2jb ni n j ib2 n 2j 2jb ni2 ib2 2ni n j ib jb n 2j 2jb ni n j n ni n j i nj 2 jb ib2 2 ib jb ni n j n i nj jb . (4-8c) 2 ib Combining Equations (4-7a) and (4-8c), i j 2 dBSMSE X i , X j n n ib jb . i j b 1 nn B Similarly combining Equations (4-7c) and (4-8c), ni n j 2 X , X max ib jb : b 1,2, i j dBMMSE ni n j (4-9a) ,B. (4-9b) The dimensionality of the dBSMSE and the dBMMSE dissimilarity criteria is equal to the square of the dimensionality of the image pixel values, while the dimensionality of the vector norm based dissimilarity criteria is equal to the dimensionality of the image pixel values. To keep the dissimilarity criteria dimensionalities consistent, HSeg uses the square root of these dissimilarity criteria. The “Square Root of Band Sum Mean Squared Error” criterion is: 1 d 1 2 BSMSE B 2 X i , X j ni n j ib jb 2 , ni n j b1 28 (4-10a) RHSeg User’s Manual Version 1.59 and the “Square Root of Band Sum Maximum Squared Error” criterion is: d 1 2 BMMSE X i , X j ni n j max ib jb 2 : b 1,2, ni n j 1 2 ,B . (4-10b) Dissimilarity criterion 8, the Normalized Vector Distance (NVD), is taken from papers by Baraldi and Parmiggiani [6, 7]. The NVD is based on a combination of a vector modulus measure (such as the 2-norm of the vector) with the previously defined SAM criterion (4-4a). Under this criterion, two vectors are considered to be equal if they have the same modulus (i.e., 2-norm) and the spectral angle between them is zero. As before, let ui and uj be the mean vectors of regions Xi and Xj, respectively. Define ui u j 1 ui , u j min B 2 1 2 ib min b1 1 2 B 2 b1 jb 2 , 2 u j 2 ui 2 12 B 2 jb . , b1 12 B 2 ib b1 (4-11a) Note that 0.0 1(ui,uj) 1.0 and 0.0/0.0 is defined to equal 1.0. Here, similar length vectors will have 1 close to 1.0 and dissimilar vectors will have 1 close to 0.0. The spectral angle between the region mean vectors, ui and uj, of regions Xi and Xj was defined earlier in (4-4a). Define 2 ui , u j 2 ui , u j 2 (4-11b) as the normalized spectral angle between the vectors ui and uj. Note that 0.0 2(ui,uj) 1.0 and that similar length vectors will have 2 close to 1.0 and dissimilar vectors will have 2 close to 0.0. The NVD dissimilarity criterion is then defined as: dNVD X i , X j 1.0 1 ui , u j 2 ui , u j . (4-11c) Note that 0.0 dNVD 1.0 and that similar length vectors will have dNVD close to 0.0 and dissimilar vectors will have dNVD close to 1.0. The Entropy criterion, dissimilarity criterion 9, was first defined by Tilton [8]. The basic idea behind the Entropy criterion is to minimize the change of entropy between the existing region mean image and the region mean image created after a pair of regions merge. For the previously defined Spectral Information Divergence criterion, we defined a probability measure for a pixel element by normalizing the pixel element value by the sum of the pixels at that location over 29 RHSeg User’s Manual Version 1.59 all spectral bands. However, for the Entropy criterion, we define a probability measure for a pixel element, pb, by normalizing the pixel element value by the sum over all pixels for a particular spectral band over all image pixels: qb' x p pb N p 1 , (4-12) pb where xp = (p1, p2, …, pB)T. Then, entropy of band b (out of B spectral bands) of the image X is then given by N N H b X qb' x p log qb' x p pb log pb p 1 p 1 NM b NM b N 1 N pb log pb log NM b log NM b pb log pb . (4-13a) NM b p1 p 1 NM b where Mb is the mean value of spectral band b over all N image pixels. The total multispectral entropy is taken to be B HX H b X . (4-13b) b1 This summation is strictly true only if all spectral bands are uncorrelated, which is generally not the case. Notwithstanding this statistical technicality, this summation still leads to a useful dissimilarity criterion for multispectral (and hyperspectral) data. For a particular pair of regions Xi and Xj, with mean vectors, ui and uj, respectively, let H(ui,uj) be the change in H(X) for the multispectral region mean image formed after the pair of regions is merged as compared to the region mean image before the merge: Hui , u j 1 N 1 B 1 N M b1 b 1 M n B i b1 ib x pX ij ijb log ijb x pX i ib log ib x pX j jb log jb logib n j jb log jb ni n j ijb log ijb . (4-14a) b where the ijb are the elements of the mean vector uij = (ij1, ij2, …, ijB)T and ni (nj) is the number of pixels in region Xi (Xj). Noting that the factor N has no effect on dissimilarity comparisons, the Entropy criterion is defined as: dENT X i , X j N Hui , u j 1 M n B b1 i ib logib n j jb log jb ni n j ijb log ijb . b 30 (4-14b) RHSeg User’s Manual Version 1.59 If the data is normalized so as to have equal mean values across the bands (see the discussion for the normind parameter below), the Mb factor can also be dropped: d 'ENT X i , X j ni ib logib n j jb log jb ni n j ijb log ijb . B (4-14c) b1 Note that ijb can easily be calculated using (4-8b) above. Dissimilarity criterion 10 is based on the “SAR Speckle Noise Criterion” from a paper by J.-M. Beaulieu [9].The criterion is: ni n j d SAR X i , X j ni n j 1 ib jb * ni n j 2 B n b 1 ni n j ni n j 1 i n b 1 n j jb ib jb B 2 ib i ib , n j jb (4-15) NOTE: Other dissimilarity criterion can be included as additional options without changing the nature of the RHSeg implementation. log (string) Output log file (no default) At a minimum (for debug = 1), the output log file records program parameters and the number of regions and maximum merge ratio value for each level of the region segmentation hierarchy. The following optional parameters specify the scaling of the input image data: scale (double) Comma delimited list of input data scale factors (specify one value per band, default = 1.0 for each band) offset (double) Comma delimited list of input data offset factors (specify one value per band, default = 0.0 for each band) The optional scale and offset values were added to accommodate the input of MODIS data into RHSeg. The MODIS multispectral data are normally stored in scaled short integer format, with scale and offset factors provided to rescale the data into calibrated reflectance or radiance values. These scale and offset values are used in the following manner to scale the input image data (input_image) for each band: scaled_input_image[band] = scale[band]*(input_image[band] – offset[band]) The following parameters specify output files (with default names): class_labels_map (string) Output region class labels map data file name (default = ‘input_image’_class_labels_map) The region class labels map at the finest level of segmentation detail (hierarchical level 0). Together with region_classes (see below), this forms the main output of RHSeg. Region class label values of “0” correspond to invalid input data values in the input image data. Valid region label values range from 1 through 4,294,967,295. The data is of data type “unsigned int,” and the rows and columns 31 RHSeg User’s Manual Version 1.59 (and slices for 3-D) of class_labels_map correspond to the rows and columns (and slices for 3-D) of the input image data. boundary_map (string) Output hierarchical boundary map file name (default = {none}) The hierarchical boundary map is an optional output of RHSeg. The data values of this map are (of type unsigned char (byte)), and the rows and columns (and slices for 3-D) of boundary_map correspond to the rows and columns (and slices for 3-D) of the input image data. The data values of the boundary map correspond to the last hierarchical level (plus one) at which the image pixel was last on the boundary of a region. region_classes (string) Output region classes file name (default = ‘input_image’_region_classes) The region classes file contains selected information about each region class at each hierarchical level. The information includes the “region merges list” and “region number of pixels” feature values, plus various region features as selected by the region_sum, region_std_dev, region_boundary_npix, region_threshold, region_nb_objects, and region_objects_list parameters (see below). The region merges list feature consists of the renumberings of the region class labels map required to obtain the region class labels map for the second most detailed level (hierarchical level 1) through the coarsest (last) level of the segmentation hierarchy from the class_labels_map (see above). The data is stored as rows of values, with the column location (with counting starting at 1) corresponding to the region class labels value in the class_labels_map (the region class labels map at the finest level of detail in the segmentation hierarchy) and the row location corresponding to the segmentation hierarchy level (the lth row contains the renumberings required to obtain the (l+1)th level of the segmentation hierarchy). The region number of pixels feature consists of the number of pixels in each region class stored as rows of values, with the column location (with counting starting at 1) corresponding to the region class label value and the row location corresponding to the segmentation hierarchy level (with counting starting at 0). oparam (string) Output parameter file name (default = ‘input_image’.oparam) The output parameter file contains (in ascii form) all the output parameters from RHSeg. This parameter file is formatted in the same way as the input parameter file for RHSeg and contains most of the same parameters. Additional parameters are the number of hierarchical segmentation levels (nb_levels) in the hierarchical segmentation output and the number of regions (level0_nregions) in the hierarchical segmentation with the finest segmentation detail. These additional parameter values are required to interpret the region_classes output file and the optional region_objects output file (see below). When spclust_wght > 0.0, the following optional parameters may be used to output information on the region objects contained in each region class (no defaults, not valid 32 RHSeg User’s Manual Version 1.59 for HSWO and ignored if spclust_wght = 0.0 or if both of the object_labels_map and region_objects parameters are not specified): object_conn_type1 (bool) If 1 (true), create object labels map with “conn_type” = 1, irrespective of the value of “conn_type” (below), (optional, default = 0 (false)). object_labels_map (string) Output region object labels map data file name (optional) The region object labels map at the finest level of segmentation detail (hierarchical level 0). Region object label values of “0” correspond to invalid input data values in the input image data. Valid region label values range from 1 through 4,294,967,295. The data is of data type “unsigned int,” and the rows and columns (and slices for 3-D) of object_labels_map correspond to the rows and columns (and slices for 3-D) of the input image data. region_objects (string) Output region objects file name (optional) The region objects file contains selected information about each region object at each hierarchical level. The information includes the “region merges list” and “region number of pixels” feature values, plus various region features as selected by the region_sum, region_std_dev and region_boundary_npix parameters (see below). The region merges list feature consists of the renumberings of the region object labels map required to obtain the region object labels map for the second most detailed level (hierarchical level 1) through the coarsest (last) level of the segmentation hierarchy from the object_labels_map (see above). The data is stored as rows of values, with the column location (with counting starting at 1) corresponding to the region object labels value in the object_labels_map (the region object labels map at the finest level of detail in the segmentation hierarchy) and the row location corresponding to the segmentation hierarchy level (the lth row contains the renumberings required to obtain the (l+1)th level of the segmentation hierarchy). The region number of pixels feature consists of the number of pixels in each region object stored as rows of values, with the column location (with counting starting at 1) corresponding to the region object label value and the row location corresponding to the segmentation hierarchy level (with counting starting at 0). The following parameters select the optional contents of the required output region_classes file and the optional output region_objects file (above): region_sum (bool) Region sum feature inclusion flag (1 (true) or 0 (false), default = 1 if nbands < 20, default = 0 otherwise) When this flag is true, the region sum feature values for each spectral band are stored in the region_classes file (and region_objects file, if specified). When available, the region sum squared values and the sum of the product of the region values times the log of the region values are also stored. 33 RHSeg User’s Manual region_std_dev (bool) Version 1.59 Region standard deviation inclusion flag (1 (true) or 0 (false), default = 0) When this flag is true, the region standard deviation feature values are stored in the region_classes file (and region_objects file, if specified). Here the region standard deviation feature is defined as the maximum over spectral bands of the region mean normalized standard deviation for each region. See the discussion of the std_dev_wght parameter (below) for more information on this feature. region_boundary_npix (bool) Region boundary number of pixels inclusion flag (1 (true) or 0 (false), default = 0) When this flag is true, the region number of boundary pixels feature values are stored in the region_classes file (and region_objects file, if specified). region_threshold (bool) Inclusion flag for the merge threshold for the most recent merge for each region class (1 (true) or 0 (false), default = 0) When this flag is true, the merge threshold for the most recent merge for each region class is stored in the region_classes file. region_nb_objects (bool) Flag to request the inclusion of the number of region objects contained in each region class. (true (1) or false (0), default = 1 (true) if spclust_wght != 0.0 and both "-object_labels_map" and "-region_objects" are specified, and 0 (false) otherwise. A true value is allowed only when spclust_wght != 0.0 and both “-object_labels_map" and "-region_objects" are specified. User provided value ignored and set to true if "-region_objects_list" (below) is true.) When this flag is true, the number of region objects contained in each region class is stored in the region_classes file. region_objects_list (bool) Flag to request the inclusion of the list of region objects contained in each region class. (1 (true) or 0 (false), default = 1 (true) if spclust_wght != 0.0 and both "-object_labels_map" and "-region_objects" are specified, and 0 (false) otherwise. A true value is allowed only when spclust_wght != 0.0 and both "-object_labels_map" and "-region_objects" are specified.) When this flag is true, the list of the labels of the region objects contained in each region class is stored in the region_classes file. 34 RHSeg User’s Manual Version 1.59 The following optional parameters are recommended for variation by all users (defaults provided): conn_type (int) Neighbor connectivity type: One-dimensional case: 1. “Two Nearest Neighbors,” 2. “Four Nearest Neighbors,” 3. “Six Nearest Neighbors,” 4. “Eight Nearest Neighbors,” (default: 1. “Two Nearest Neighbors”) based on the following neighborhood chart, where the focal pixel is marked “X”: 7 5 3 1 X 2 4 6 8 Using this chart, n Nearest Neighbors include pixels 1, 2, … n. Two-dimensional case: 1. “Four Nearest Neighbors,” 2. “Eight Nearest Neighbors,” 3. “Twelve Nearest Neighbors,” 4. “Twenty Nearest Neighbors,” 5. “Twenty-Four Nearest Neighbors,” (default: 2. “Eight Nearest Neighbors”) based on the following neighborhood chart, where the focal pixel is marked “X”: 21 15 11 17 23 13 5 3 7 19 9 1 X 2 10 20 8 4 6 14 24 18 12 16 22 Using this chart, n Nearest Neighbors include pixels 1, 2, … n. Three-dimensional case: 1. “Six Nearest Neighbors,” 2. “Eighteen Nearest Neighbors,” 3. “Twenty-Six Nearest Neighbors,” (default: 3. “Twenty-Six Nearest Neighbors”) based on the following neighborhood chart, where the focal pixel is marked “X”: slice-1 Slice slice+1 19 11 23 7 3 9 22 14 26 15 17 1 X 2 18 25 13 21 10 4 8 24 12 20 5 35 6 16 RHSeg User’s Manual Version 1.59 Using this chart, n Nearest Neighbors include pixels 1, 2, … n. chk_nregions (unsigned int) Number of region classes at which segmentation hierarchy output is initiated (2 chk_nregions < 65535, default = 255 if hseg_out_nregions and hseg_out_thresholds not specified) The chk_nregions parameter specifies the number of region classes (or region objects in the case of HSWO) at which the segmentation hierarchy output is initiated. After this point, the iterations at which the segmentation is output is determined such that the minimal subset of hierarchical levels in which no large region (i.e., a region with number of pixels greater or equal to the current value of min_npixels) is involved in more than one merge with another large region. (See the discussion following the definition of the spclust_min and spclust_max parameters for the definition of min_npixels). hseg_out_nregions (unsigned int) The set of number of regions at which hierarchical segmentation output are made (a comma delimited list, default = {none}) hseg_out_thresholds (float) The set of merge thresholds at which hierarchical segmentation output are made (a comma delimited list, default = {none}) NOTE: chk_nregions, hseg_out_nregions, and hseg_out_thresholds are mutually exclusive. If more than one of these is specified, the last one specified controls and the previous specifications are ignored. conv_nregions (short unsigned int) Number of regions for final convergence (the iteration at which HSeg or RHSeg is terminated) (0 < conv_nregions < 65535, default = 2) gdissim Flag specifying whether or not the global dissimilarity value is output for each level of the output segmentation hierarchy (1 (true) or 0 (false), default = 0) (bool) The dissimilarity criterion utilized is specified by the dissim_crit parameter (above). The global dissimilarity is a measure of the quality of the image segmentations based on the global dissimilarity of the region mean image versus the original image data. The global dissimilarity criteria 1, 2 and 3 are based on vector norms. The global dissimilarity function, based on the vector 1-Norm, for the R region segmentation of the N pixel data set X is given by: R D1-Norm X N 1 i 1 x p X i x p ui . 1 where xp is the pth image pixel and ui is the region mean vector for region Xi. 36 (4-16) RHSeg User’s Manual Version 1.59 The global dissimilarity function, based on the vector 2-Norm, for the R region segmentation of the N pixel data set X is given by: R D2-Norm X N 1 i 1 x p X i x p ui . (4-17) 2 The global dissimilarity function, based on the vector -Norm, for the R region segmentation of the N pixel data set X is given by: D-Norm X 1 N R i 1 x p X i x p ui (4-18) . The global dissimilarity criterion 4, based on the Spectral Angle Mapper (SAM) criterion introduced previously, is given by: DSAM X 1 N x , ui R i 1 x p X i p 1 N R x ui p arccos x u x p X i p 2 i i 1 2 . (4-22) where (xp,ui) is the spectral angle between xp, the pth image pixel, and ui, the region mean vector for region Xi. The global dissimilarity criterion 5 is based on the Spectral Information Divergence (SID) criterion introduced previously. The entropy of the pth image pixel, xp, and the entropy of the region mean vector, ui, for region Xi are defined as qb x p pb and qb ui B b 1 pb ib , B b 1 ib respectively, where xp = (p1, p2, …, pB)T and ui = (i1, i2, …, iB)T. Then D SID X 1 N q u q x q x log q u q u log q x . R B i 1 x pX i b1 b b p b p i b i b i b p (4-19) The global dissimilarity criteria 6 and 7 are based on the square root of the mean squared error between the region mean image and the original image data. With the mean square error for spectral band b as given in (4-6a) and (4-6b), the global dissimilarity criterion “Square Root of Band Sum Mean Squared Error” is: R B 1 2 pb ib 2 D BSMSE X b 1 N 1 i 1 x p X i 1 1 2 1 1 R B 2 2 2 pb ni ib . N 1 i 1 b 1 x p X i Similarly, the global dissimilarity criterion “Square Root of Band Maximum Mean Squared Error” is: 37 (4-20) RHSeg User’s Manual Version 1.59 1 1 2 D BMMSE 2 R B 1 2 max pb ni ib2 . b 1 N 1 i 1 x p X i (4-21) Global dissimilarity criterion 8 is based on the Normalized Vector Distance (NVD) introduced previously. Let xp be the pth image pixel and ui be the region mean vector for region Xi. Then define x p ui 1 x p , ui min 2 , 2 and xp 2 ui 2 x p , ui 2 2 x p , ui , 2 (4-22a) where (xp,ui) is the spectral angle between xp, the pth image pixel, and ui, the region mean vector for region Xi (see (4-4a) and (4-22)). Then the NVD global dissimilarity criterion is given by D NVD X 1 N 1.0 x R 1 i 1 x pX i p , ui 2 x p , ui . (4-22b) Global dissimilarity criterion 9 is a measure of how much the entropy of the region mean image differs from the original image data. Using the notation defined previously, the total multispectral entropy of the image, X, is given by B 1 HX log NM b NM b b1 1 log NM b NM b b1 B R N p 1 pb log pb pb log pb i 1 x pX i (4-23a) where the summation over the N image pixels is reordered to sum over the groups of pixels in each of the regions in an R region segmentation. Similarly, the total multispectral entropy of the region mean image of an R region segmentation of the image, X, is given by B 1 H R X log NM b NM b b1 R n i 1 i ib log ib (4-23b) The increase in image entropy of the R region mean image over that of the original data is then DENT(X) = HR(X) – H(X), or (after changing the order of summation) D ENT X 1 N B 1 i 1 b 1 M b R x p X i log n log pb pb i ib ib . (4-24) The global dissimilarity criterion 10 is based on the SAR Speckle Noise criterion. The global dissimilarity function, based on the SAR Speckle Noise criterion, for the R region segmentation of the data set X is given by: 38 RHSeg User’s Manual Version 1.59 pb jb . DSAR X ni n j ni n j 2 i 1 x X b 1 pb n j jb R B 1 p (4-25) i where xp is the pth image pixel and ui is the region mean vector for region Xi. The default values should be used for the following optional parameters, except in special circumstances (defaults provided): (debug 0, default = 1) debug (int) Debug option normind (short unsigned int) Image normalization type 1. “No Normalization,” 2. “Normalize Across Bands,” 3. “Normalize Bands Separately” (default: 2. “Normalize Across Bands”) Let pb be the original value for the pth pixel (out of N pixels) in the bth band (out of B bands). The sample mean and sample variance of the bth band are b 1 N N pb and b2 p 1 1 N pb b 2 , N 1 p1 (4-26) respectively. The following transformation of the data, pb, will produce image data, pb, with mean, , and standard deviation, : pb b pb b b' pb b' , (4-27a) where b' b and b' b b . (4-27b) For convenience, for most dissimilarity criteria, the data is normalized by default such that 2(=)=1, and =0. However the Spectral Angle Mapper, Spectral Information Divergence, Normalized Vector Distance and Entropy assume that all data values are nonnegative. Moreover, to avoid the singularity at log(0.0) for the Spectral Information Divergence and Entropy criteria, all data values should be strictly positive (i.e., all greater than zero) in these cases. Due to these considerations, the default value of M is set such that the overall normalized minimum value is 0.0 for the Spectral Angle Mapper and Normalized Vector Distance criteria, and the default value of M is be set such that the overall normalized minimum value is 1.0 for the Spectral Information Divergence and Entropy criteria. As written above, the normalization is applied to each spectral band separately. It can also be defined to apply equally across all spectral bands. For this case, use max b : b 1,2, , B in (4-27a) and (4-27b). However, this choice of normalization will produce the same hierarchical segmentation result as no normalization at all. 39 RHSeg User’s Manual init_threshold (float) Version 1.59 Threshold for initial fast region merging by a region oriented first merge process adapted from an algorithm proposed by Muerle and Allen [10]. (default = 0.0) In this region scan version of first merge region growing, unmerged pixels are visited in random order and designated as a new single pixel region. This new region is grown by adding individual (unmerged) neighboring image pixels that are similar enough to the growing region. After no more pixels can be added to a particular region, a region is similarly grown from the next randomly selected unmerged pixel. This process continues until no unvisited or unmerged pixels remain. The seminal first merge region growing approach of Muerle and Allen [10], hereafter called MARG, utilizes a left to right, top to bottom scan to select the next unmerged pixel from which to start growing a region. However, in the adaptation of their algorithm that is utilized for initialization of HSeg and RHSeg, a random scan order is used to select the next pixel. The adaptation of MARG utilized herein is as follows: 1) Give all image pixels, xp, in image X (p = 1 to NP) region label 0, and compute a random ordering, p’ = Rand(p), over the NP pixels. Set T as the value of the merge threshold, p = 0, r = 0, and continue to step 2. 2) Set p = p + 1. If p > NP, exit (the segmentation result contains NR = r regions). Otherwise, continue to step 3. 3) Select image pixel x p ' , where p’ = Rand(p). If the image pixel x p ' has already been merged into a region (i.e, it has a region label other than 0), return to step 2. Otherwise, set r = r + 1 and create region object or with region label r, feature values computed from pixel x p ' , and a pixel neighbor list specifying the pixel index of unmerged neighboring pixels (i.e., neighboring pixels having region label 0). If the new region object or has no unmerged neighboring pixels, give region label r to pixel x p ' and return to step 2. Otherwise, randomly shuffle the ordering of the pixel indices in the pixel neighbor list, give region label r to pixel x p ' , and continue to step 4. 4) Successively compute the dissimilarity, d(or,xk), between region object or and the unmerged neighboring pixels, xk, in the randomly shuffled pixel neighbor list until a pixel is found that has d(or,xk) T, or all neighboring pixels are checked. If d(or,xk) > T for all unmerged neighboring pixels, xk, return to step 2. Otherwise, continue to step 5. 5) Merge the first found neighboring unmerged neighboring pixel, xk, with d(or,xk) T into region object or by updating the region feature values and neighbor pixel index list for region object or, and giving pixel xk region label r. If the new region object or has no neighboring unmerge pixels, return to step 2. Otherwise, randomly shuffle the ordering of the pixel indices in the new pixel neighbor list, and return to step 4. 40 RHSeg User’s Manual Version 1.59 Besides the random order of seed pixel selection, the main difference between the above algorithm and Muerle and Allen’s approach is in step 5 where the first found unmerged neighboring pixel with dissimilarity less than or equal to T is selected for merging from a randomly shuffled list of unmerged neighboring pixels. It is not clear what scanning order Muerle and Allen used to select this next found unmerged neighboring pixel, but it is unlikely that it was a random ordering. Another difference is that Muerle and Allen initially aggregate the image pixels into blocks sized anywhere from 2 2 to 8 8 before performing region growing, whereas the initial regions in the above algorithm are single pixel in size. random_init_seed (bool) Flag to request a “random” seed for the sampling procedure utilized in the initial fast region merging process (1 (true) or 0 (false), default = 1) If a “random” seed is request, the program generates a seed for the random sampling procedure based on the current clock time. Otherwise, the random sampling procedure is initialized with a hard coded seed. The option of a hard coded seed is provided if consistency is needed between runs of the programming, such as when debugging is being performed. sort (bool) Flag to request that the region classes and region objects (if requested) are sorted. fast region merging process (1 (true) or 0 (false), default = 1) If true, the output numerical labels of the region classes and region objects will be sorted to have the darkest to brightest regions correspond to the smallest to largest values, based on the vector distance from the minimum valued image data vector, std_dev_wght (float) Weight for standard deviation spatial feature (std_dev_wght 0.0, default = 0.0) The parameter std_dev_wght sets the weighting for the standard deviation feature. The mean normalized standard deviation is used here instead of the usual standard deviation feature. If D is the dissimilarity function value before combination with the spatial feature value, the combined dissimilarity function value (comparing regions i and j), Dc, is: sdf i sdf j D c D * 1.0 * std _ dev_wght , sdfi sdf j (4-28) where sdfi and sdfj are the standard deviation feature values for regions i and j, respectively. The standard deviation feature employed here is the spectral band maximum, mean normalized region standard deviation. For regions consisting of 2 or more pixels, the mean normalized region standard deviation for spectral band b of region i is: 41 RHSeg User’s Manual ib Version 1.59 1 pb ib 2 ni 1 x p X i ib 1 2 2 pb ni ib ni 1 x p X i ib , (4-29a) where ni is the number of pixels in the region and ib is the region mean for spectral band b of region i: ib 1 ni x p i pb . The standard deviation feature value for region i is then defined as: sdf i i max ib : b 1,2,, B (4-29b) where B is the number of spectral bands. The region standard deviation is not defined for regions consisting of only one pixel. Further, the mean normalize region standard deviation as calculated by equation (4-17a) can only be considered a rough estimate for small regions (say, regions less than 9 pixels in size). Thus, if one of the regions being compared consists of less than 9 pixels, the std_dev_wght factor is modified by a std_dev_factor as follows: std_dev_wght’ = std_dev_factor*std_dev_wght, (4-30a) std_dev_factor =(min_npix-1.0)/8.0, (4-30b) where and min_npix is the number of pixels in the smaller of the two regions being compared. Note that for min_npix = 1, std_dev_factor = 0.0. Thus, std_dev_factor serves to gradually phase in the standard deviation spatial feature as the regions get larger. split_pixels_factor (float) Pixel splitting factor. This factor is used to determine if a pixel will be split out from its current region. User specified value ignored and set to 0.0 for HSWO and HSEG when hseg_out_thresholds are specified. (0.0 = split_pixels_factor, default = 1.5 for the RHSEG program mode, and default = 0.0 for HSWO and HSEG program modes. The “min_nregions” and “region_threshold_factor” parameters must also be specified in the HSWO and HSEG programs modes. No pixel splitting is performed if split_pixels_factor = 0.0.) For the RHSEG program mode, for each region with a non-empty “candidate region label” set, compute the dissimilarity of each pixel in that region to its current region (own_region_dissim) and to each region in the region’s “candidate region label” set (other_region_dissim). If a pixel is found to have 42 RHSeg User’s Manual Version 1.59 own_region_dissim > split_pixels_factor*other_region_dissim, the pixel is split out from its current region. (In this case, normally split_pixels_factor > 1.0.) For the HSWO and HSEG program modes, compute the dissimilarity of each pixel to its current region (own_region_dissim). Let max_threshold be the maximum merging threshold utilized so far in the region growing process. If a pixel is found to have own_region_dissim > split_pixels_factor*max_threshold, the pixel is split out from its current region. (In this case, it may be necessary to set split_pixels_factor < 1.0 for any pixel splitting to occur.) NOTE: The lower the value of split_pixels_factor, the more pixels are split out from their regions. seam_threshold_factor (float) This threshold factor is used in determining whether a region found across a processing window seam is to be considered in determining whether a pixel is to be split out of its current region. Not valid and ignored for HSWO and HSEG program modes. (1.0 <= seam_threshold_factor, default = 1.5. If seam_threshold_factor = 1.0, no regions are selected by this method) During the processing window elimination process, a “candidate region label” set is accumulated for use in considering whether or not a pixel is to be split out of its current region. Consider the data points that are in the pairs of rows and columns along the seam between the data quadrants reassembled in step 2 of the RHSeg algorithm. For each of these pixels calculate the dissimilarity between the pixel and its current region (own_region_dissim), and calculate the dissimilarity between the pixel and the region of the pixel across the seam (other_region_dissim). If own_region_dissim > seam_threshold_factor* other_region_dissim, add the region label of the region of the pixel across the seam to the “candidate region label” set of the region the pixel belongs to. NOTE: The lower the value of seam_threshold_factor, the more regions are included in the “candidate region label” set. region_threshold_factor (float) This threshold factor is used in determining which regions are to be considered in determining whether a pixel is to be split out of its current region. (0.0 < threshold_factor, default = 0.0. If region_threshold_factor = 0.0, no regions are selected by this method) During the processing window elimination process, a “candidate region label” set is accumulated for use in considering whether or not a pixel is to be split out of its current region. Compare each region to every other region. If the dissimilarity between a pair of regions is less than region_threshold_factor* max_threshold, add each region label to the “candidate region label” set for the other region. NOTE: max_threshold is the maximum merging threshold encountered in the previous merging iterations. This factor is ignored for spclust_wght = 0.0. Also, 43 RHSeg User’s Manual Version 1.59 the higher the value of region_threshold_factor, the more regions are included in the “candidate region label” set. rnb_levels (short unsigned int) Number of recursive levels. Not valid and ignored for HSWO and HSEG program modes. (1 rnb_levels < 255, default calculated) The number of recursive levels. The default is calculated such that the number of data points in the subsections of data processed at recursion level rnb_levels is no more than 1024*1024 = 1,048,576 data points. The number of columns, rows and slices at recursion level rnb_levels is sub_ncols = ncols/2rnb_levels-1, sub_nrows = max(1, nrows/ 2rnb_levels-1, and sub_nslices = max(1, nslices/2rnb_levels-1). NOTE: A different default is used for parallel processing: In this case the calculated such that the number of data points in the subsections of data processed at recursion level rnb_levels is no more than 128*128*2 = 32,768 data points. ionb_levels (short unsigned int) Recursive level at which data I/O is performed. Not valid and ignored for HSWO and HSEG. (1 ionb_levels rnb_levels, default calculated) The recursive level at which data I/O is performed and pixel oriented data is maintained (sequential version only). Temporary data files are used to store the pixel oriented data for each section of data that the image is divided into at this recursive levels. The default value is ionb_levels = 1, unless the number of data points exceeds 9,437,184 (=262,144*36), where the default is calculated such that the number of data points in the subsections of data processed at recursion level ionb_levels is no more than 262,144 (=5122) data points. The number of columns, rows and slices at recursion level ionb_levels is ionb_ncols = ncols/2ionb_levels-1, ionb_nrows = max(1, nrows/2ionb_levels-1), and ionb_nslices = max(1, nslices/ 2ionb_levels-1). In any case, the value of ionb_levels is less than or equal to rnb_levels. Important note: RHSeg uses environmental variables to determine in what directory the temporary files should be stored in. RHSeg first looks for the TMP environmental variable, and if this does not exist, it looks for the TEMP environmental variable, and if this does not exist, it looks for the TMPDIR environmental variable, and if this does not exist, it assumes the temporary directory is /tmp. To be sure RHSeg works as it should you should, set one of the listed environmental variables to a directory that has sufficient disk space to hold the temporary files. The space required will vary with data set characteristics and parameter settings. You should monitor the free space available in the temporary directory during your initial runs if your image contains more than 9,437,184 pixels (with the default parameter settings). 44 RHSeg User’s Manual min_nregions (unsigned int) Version 1.59 Number of regions for convergence for recursive stages. Not valid and ignored for HSWO and HSEG program modes. (0 < min_nregions < 65,535, default calculated) If not specified, the default is calculated to be min_nregions = sub_ncols*sub_nrows*sub_nslices / 2 N D , where ND is the number of spatial dimensions (for sub_ncols, sub_nrows and sub_nslices see the rnb_levels parameter). NOTE: At recursive level 1, HSeg is stopped when reaching the number of regions equal to converge_nregions, where converge_nregions is the greater of min_nregions, chk_nregions (if specified), or the first entry in the hseg_out_nregions list (if specified), and the processing window artifact elimination step is performed at that point before HSeg is resumed until final convergence at conv_nregions regions. However, to ensure that a sufficient number of HSeg iterations are performed prior to running the artifact elimination step, if converge_nregions > (3*init_nregions)/4, converge_nregions is set to (3*init_nregions)/4, where init_nregions is the number of regions (large and small) at point where the segmentation is reassembled from the results from the previous recursive level. spclust_min (short unsigned int) Nominal minimum number of regions for which non-adjacent region merging (spectral clustering) is performed in HSEG or RHSEG program modes. (0 spectral_max < 65,535, default = 512 for HSEG and RHSEG. Invalid and ignored for HSWO.) spclust_max (short unsigned int) Nominal maximum number of regions for which non-adjacent region merging (spectral clustering) is performed in HSEG or RHSEG program modes. (0 spectral_max < 65,535, default = 1024 for HSEG and RHSEG. Invalid and ignored for HSWO.) The spclust_min and spclust_max parameters, along with the min_npixels variable, are used to control the number of regions that are involved in nonadjacent region merging (or constrained spectral clustering). The regions involved in non-adjacent region merging are restricted to those regions that contain at least min_npixels pixels. Such regions are termed “large regions,” and the number of these regions is designated at nb_large_regions. The value of min_npixels is initially set to the smallest value such that nb_large_regions <= spclust_max. However, if this value of min_npixels results in nb_large_regions < spclust_min, the value of min_npixels is reduced by one (unless it is already equal to one) and the value of nb_large_regions with this new value of min_npixels is determined. If this new value of min_npixels results in nb_large_regions > 6*spclust_max, the value of min_npixels is incremented back up by one, unless this would result in nb_large_regions < 2. In the later case, the value of min_npixels as is left as is even though this results in nb_large_regions > 6*spclust_max. The above logic for setting the value of min_npixels serves to keep the nb_large_regions as close as possible to and less than spclust_max. However, this 45 RHSeg User’s Manual Version 1.59 logic allows nb_large_regions to rise above spclust_max (but not too far above spclust_max) as necessary to keep nb_large_regions > spclust_min. Finally, nb_large_regions is allowed to fall below spclust_min if keeping nb_large_regions above spclust_min would result in nb_large_regions being too large, that is, being more than 6*spclust_max. However, nb_large_regions is never allowed to fall below 2. Further, the value of min_npixels is not checked for adjustment every iteration. Whenever the value of min_npixels is changed, “current” values of spclust_max and spclust_min are determined (call them current_spclust_max and current_spclust_min for this discussion), and the value of min_npixels is checked only when the number of “large regions” becomes less than current_spclust_min (and the value of min_npixels is more than one) or larger than current_spclust_max. The value of current_spclust_min is determined as follows whenever min_npixels is checked for adjustment: First a maximum value for current_spclust_min (max_spclust_min) is determined as max_spclust_min = spclust_max 0.05*(spclust_max - spclust_min). Let nb_large_regions be equal to the current number of “large regions.” Initialize current_spclust_min = nb_large_regions. If nb_large_regions ≤ spclust_max, then compute temp_int = spclust_max 2*(spclust_max – nb_large_regions). If temp_int > spclust_min, then let current_spclust_min = temp_int. If current_spclust_min > nregions (the current number of regions, both “large” and “small”), let current_spclust_min = nregions. If current_spclust_min > max_spclust_min, let current_spclust_min = max_spclust_min. The value of current_spclust_max is determined as follows whenever min_npixels is checked for adjustment: Initialize current_spclust_max = spclust_max. However, if nb_large_regions > spclust_max, let current_spclust_max = nb_large_regions. The above logic for determining when to check the value of min_npixels for adjustment prevents wasting computation when it is unlikely that the value of min_npixels would be changed by the result of that computation. merge_acceleration (bool) Flag to request utilization of a merge acceleration factor for small regions. (1 (true) or 0 (false), default = 0) If merge acceleration for small regions is requested, the value of the min_npixels variable is used to calculate a merge acceleration factor, factor, which is multiplied times the dissimilarity criterion value. For two regions of size (number of pixels) n1 and n2, let Ni = min(ni, min_npixels) for i = 1 and 2, and let Nmax = max(N1,N2). Then 46 RHSeg User’s Manual factor Version 1.59 N1 * N 2 N1 N 2 1 2 1 N max * N max N max N max 1 2 2 * N1 * N 2 2 . N * N N 1 2 max (4-31) Note that if both n1 and n2 min_npixels, factor = 1.0. Guidance on HSWO/HSeg/RHSeg Program Parameter Settings The parameters that have the most effect on the nature of the segmentation results for HSWO, HSeg and RHSeg are dissim_crit and chk_nregions. The spclust_wght parameter also has a major effect for HSeg and RHSeg. The default values are recommended for the other optional parameters for routine use of HSWO, HSeg and RHSeg, with the exception that specification of the output file name parameter boundary_map is also recommended. Of course, if some input data elements are invalid, the some method of data masking should also be employed. The following paragraphs give some guidance on the setting of the spclust_wght, dissim_crit, and chk_nregions parameters: spclust_wght: The user may want to vary the value of spclust_wght to modify the overall nature of the segmentation results. For spclust_wght = 0.0, you will obtain relatively coherent closed connected regions. For spclust_wght = 1.0, you will obtain relatively variated regions consisting of possibly several spatially disjoint subsections. For other values of spclust_wght you will obtain results intermediate the spclust_wght = 0.0 and spclust_wght = 1.0 results. dissim_crit: The user may also want to vary the value of dissim_crit to modify the overall nature of the segmentation results. The different dissimilarity criterion will result in different merge ordering. It has been noted that the segmentation results generally have fewer smaller regions for the mean squared error and entropy based criteria (dissim_crit – 6, 7 or 9) chk_nregions: The user may want to vary the value of chk_nregions to vary the level of segmentation detail in the most detailed level of the segmentation hierarchy. Higher values will increase the detail (the segmentation will have more regions) and lower values will decrease the detail (the segmentation will have fewer regions) and the most detailed level of the segmentation hierarchy. Another parameter you might consider varying is rnb_levels. This parameter is only valid for RHSeg. The calculated default value should give the fastest or nearly the fastest processing time. However, sometimes increasing or decreasing this value by one vis-à-vis the default can give somewhat faster processing times. Varying the other optional parameter values away from the default values requires a thorough understanding of the inner workings of the HSeg and RHSeg programs. 47 RHSeg User’s Manual Version 1.59 References [1] F. A. Kruse, A. B. Lefkoff, J. W. Boardman, K. B. Heidebrecht, A. T. Shapiro, P. J. Barloon, and A. F. H. Goetz, “The Spectral Image Processing System (SIPS) – Interactive Visualization and Analysis of Imaging Spectrometer Data,” Remote Sensing of Environment, Vol. 44, Nos. 2-3, pp. 145-163, May-June 1993. [2] Chein-I Chang, “An Information-Theoretic Approach to Spectral Variability, Similarity, and Discrimination for Hyperspectral Image Analysis,” IEEE Transactions on Information Theory, Vol. 46, No. 5, pp.1927-1932, August 2000. [3] J. C. Tilton,W. T. Lawrence, and A. J. Plaza, “Utilizing Hierarchical Segmentation to Generate Water and Snow Masks to Facilitate Monitoring Change with Remotely Sensed Image Data,” GIScience and Remote Sensing, Vol. 43, No. 1, pp. 39-66, 2006. [4] Chein-I Chang, Hyperspectral Imaging: Techniques for Spectral Detection and Classification, Kluwer Academic/Plenum Publishers: New York, 2003. [5] Peter J. Bickel and Kjell A. Doksum, Mathematical Statistics: Basic Ideas and Selected Topics, Holden-Dya, Inc.: San Francisco, 1977. [6] A. Baraldi and F. Parmiggiani, “A Neural Network for Unsupervised Categorization of Multivalued Input Patterns: An Application to Satellite Image Clustering,” IEEE Transactions on Geoscience and Remote Sensing, Vol. 33, No. 2, pp. 305-316, March 1995. [7] A. Baraldi and F. Parmiggiani, “Single Linkage Region Growing Algorithms Based on the Vector Degree of Match,” IEEE Transactions on Geoscience and Remote Sensing, Vol. 34, No. 1, pp.137-147, January 1996. [8] J. C. Tilton, “Experiences using TAE-Plus Command Language for an Image Segmentation Program Interface,” Proceedings of the TAE Ninth Users’ Conference, New Carrollton, MD, pp. 297-312, Nov. 5-7, 1991. [9] J.-M. Beaulieu, “Utilization of contour criteria in micro-segmentation of SAR images,” International Journal of Remote Sensing, Vol. 25, No. 17, pp. 3497-3512, Sept. 10, 2004. [10] J. L. Muerle, D. C. Allen, “Experimental Evaluation of Techniques for Automatic Segmentation of Objects in a Complex Scene,” in G. C. Cheng, et al. (Eds.), Pictorial Pattern Recognition, Thompson, Washington, DC, pp. 3-13, 1968. 48 RHSeg User’s Manual Version 1.59 Chapter 5: HSegViewer Tutorial Overview This chapter provides a tutorial on the HSegViewer program. HSegViewer Tutorial The demonstration version of RHSeg includes a sample data set which is by default installed in the C:\Program Files\RHSeg\Sample Data directory. To provide inputs for the HSegViewer program, run the RHSeg program on the “girl.bmp” sample image provided, using the provided “hseg.params” input parameter file: rhseg hseg.params With the specified set of parameters, the rhseg program should take about 1 minute and 20 seconds to run on a 64-bit 2.66 GHz clock machine. (NOTE: Be sure to use the “hseg.params” parameter file instead of the “rhseg.params” parameter file. The “hseg.params” parameter file selects the “Entropy” dissimilarity criterion. The processing time would be much shorter – about 15 seconds – if the default dissimilarity criterion, "“Square Root of Band Sum Mean Squared Error” was used instead. The “Entropy” dissimilarity criterion is selected here because of the quality of the segmentation results that are produced with that criterion.) When rhseg completes processing, you may run HSegViewer by entering the command: hsegviewer You may also run this version of HSegViewer from “RHSeg” group in “Run Program” in the “start” menu in Windows. If you like, you can create a shortcut for this program and place it on your desktop. The “Hierarchical Segmentation Results Viewer Parameter Input” GUI panel will now appear. You will need to enter the HSeg/RHSeg output parameter file through this panel. The easiest way to do this is to click on the file input box under the label “Input HSeg Parameter File (oparam) for Input to HSegViewer,” and then select the “girl.oparam” file through the file selector. You will then have to enter the appropriate values for Red, Green and Blue Display Bands. Since the girl image is an RGB image, enter these values by typing the number 0 in the box to the right of the “Red Display Band” label, the number 1 in the box to the right of the “Green Display Band” label, and the number 2 in the box to the right of the “Blue Display Band” label. (NOTE: When viewing a single-band image, enter the number 0 for all three “Display Band” values – Red, Green and Blue.) At this point you may also specify if you want to view the region class map in pseudo color or in grey scale by selecting either “Display Region Classes in Psuedo Color” or “Display Region Classes in Grey Scale” from a “Combo Box.” For this tutorial, use the default “Display Region Classes in Psuedo Color.” Now you are ready to run the HSegViewer program. Click on the “Program Actions” menu button at the top left of the panel and select “Run Program.” The main 49 RHSeg User’s Manual Version 1.59 “Hierarchical Segmentation Results Viewer” panel will then appear. You may resize this panel as desired. You may also run HSegViewer by entering the command (using the provided “hsegviewer.params” file): hsegviewer hsegviewer.params When running HSegViewer in this manner, the main “Hierarchical Segmentation Results Viewer” panel will then appear without further user input. The main panel holds several buttons and value entry fields with a large table at the bottom. Click on the “RGB Image” button. You will see an RGB rendition of the girl image, with a main viewing panel and a reduced sized image in the upper left. For large images, this reduced sized image will help you navigate to desired locations in your large image. As with all other HSegViewer panels, this panel has an “Actions” menu button in the upper left corner. Click on this menu button and select “Zoom In.” The image data in the “RGB Image” panel will now be displayed zoomed by a factor of two. You may view the entire image by resizing the panel. Return to the original display resolution by selecting “Zoom Out” from the “Actions” menu. Now click on the “Current Region Labels” button on the main panel. You will now see the “Current Region Labels” display panel, which is initially blank. Now enter the value “1” in the text field to the right of the label “Select Pixels with Segmentation Level 0 Region Class Label” (you need to press the “Enter” key after typing “1” in the text field). This will cause region class 1 at hierarchical level 0 to be highlighted in white in the “Current Region Labels” panel. Region class 1 consists of several dark (mainly shadowed) areas. You may highlight any specific region class in this way by entering in the region class label value in this text box. You can also highlight other region classes by clicking on any pixel in the RGB Image panel, and then clicking the “Select Pixels with Segmentation Level 0 Region Class Label” button on the main panel. Use this facility now by clicking on a bright yellow pixel in the yellow flower and then clicking on “Select Region Class at Location of Last Left Mouse Click” button on the main panel. If you clicked on the pixel I clicked on (at column 175 and row 235), bright portions of the yellow flower will be highlighted. Looking at the table on bottom portion of the main panel, you should see region class 62 listed with 279 pixels at hierarchical level 0. We can explore how this region class changes at coarser levels of the segmentation hierarchy by clicking on the “Select Next Coarser Segmentation” button on the main panel. Click on this button once now. You should now see that more of the yellow flower is added to the region at hierarchical level five (you can tell that this region at hierarchical level five is being highlighted by noting that the value “5” is displayed in the text box between the “Select Next Finer Segmentation” and “Select Next Coarser Segmentation” buttons) along with most of the pink flower some bright hair areas. Clicking on this button a second time adds some more bright hair areas at hierarchical level seven, along with bright areas in the window behind the girl. Clicking on this button yet another time adds the rest of the yellow flower to the region at hierarchical level nine, along with several other bright areas. 50 RHSeg User’s Manual Version 1.59 You can also highlight region objects in the same way. Enter the value “1” in the text field to the right of the label “Select Pixels with Segmentation Level 0 Region Object Label.” This will cause region object 1 at hierarchical level 0 to be highlighted in white in the “Current Region Labels” panel. Region object 1 is a fourteen pixel dark region in the center lower part of the image (a dark portion of the green leaf). You may highlight any specific region object in this way by entering in the region object label value in this text box. You can also highlight other region objects by clicking on any pixel in the RGB Image panel, and then clicking the “Select Pixels with Segmentation Level 0 Region Object Label” button on the main panel. Use this facility now by clicking on a bright yellow pixel in the yellow flower and then clicking on “Select Region Object at Location of Last Left Mouse Click” button on the main panel. If you clicked on the pixel I clicked on (at column 175 and row 235), a small bright yellow portion of the yellow flower will be highlighted. Looking at the table on bottom portion of the main panel, you should see region object 1665 listed with 90 pixels at hierarchical level 0. We can explore how this region object changes at coarser levels of the segmentation hierarchy by clicking on the “Select Next Coarser Segmentation” button on the main panel. Click on this button once now. You should now see that more of the yellow flower is added to the region object at hierarchical level five. Click on the “Select Next Coarser Segmentation” button once again, and you will see that most of the rest of the yellow flower together with the pink flower is added to the region at hierarchical level nine. Let’s go ahead and label this area “yellow flower” by clicking on the “Label Region” button in the upper right corner of the main “Hierarchical Segmentation Results Viewer” panel (we will correct the mislabeling of the pink flower in the next step). You will now see the “Label Region Panel.” With this panel you can label a highlighted region with a desired color, and associate that color with a text label. You can even modify one of the pre-configured colors by clicking on one of the colors. Let’s go ahead and do that by clicking on the bright yellow color button labeled “60:” towards the bottom right of the panel. You will now see a “Pick a color” panel. For example, you can select a different shade of yellow by clicking somewhere on the triangle in the left part of the panel. Alternatively you can provide specific HSB or RGB values in the provide text fields. Let’s change the Blue value to 100 (to lighten the color a bit). Save this new color and exit this panel by clicking on the “OK” button. To label the highlighted area with your chosen color type in a label, such as “yellow flower,” in the text box to the right of your chosen color. Hitting the “Enter” key while in that text box will record your text label and label the highlighted region with your chosen color. Now close the “Label Region Panel” by clicking on the “X” at the upper left corner of the panel or by selecting “Close” from the “Action” menu. Now go the RGB Image panel and select a pixel in the pink flower for highlighting. Do this by performing a left mouse click in the middle of the pink flower in the “RBG Image” and click on the “Select Region Object at the Location of Last Left Mouse Click” button on the main panel. If you clicked on the pixel I clicked on (at column 210 and row 51 RHSeg User’s Manual Version 1.59 250), you should now have region object 1664 highlighted. Looking at the bottom of the table on the main panel, you should see region 1664 listed with 148 pixels at hierarchical level zero. Click on the “Select Next Coarser Segmentation” button three times and most of the remaining pixels from the pink flower will be added to the highlighted region at hierarchical level seven. Give this highlighted region a pink color and the label “pink flower” using the “Label Region Panel.” Now select an area on the girl’s red shawl for highlighting. Do this by clicking on a pixel in the girl’s shawl and then clicking on the “Select Region Class at the Location of Last Left Mouse Click” button. If you clicked on the pixel I clicked on (at column 90 and row 200), you should see that portions of the red shawl and part of the girl’s red lips are highlighted. Click on the “Select Next Coarser Segmentation” button, and you will see that part of the red flower is added at hierarchical level one. Clicking on the “Select Next Coarser Segmentation” button again adds more of the red flower at hierarchical level four. Click on this button one more time to add more of the girl’s lips to the region, along with more of the red shawl at hierarchical level five. We can separate the girl’s red lips from the rest of the highlighted region by doing the following. Select “Circle Region of Interest” from the “Program Control” menu of the “Current Region Labels” panel, and draw a line surrounding the girl’s lips on the panel. Now only the girl’s lips will be highlighted. Use the “Label Region” panel to label this area “girl’s lips” with a shade of red. Now perform a left mouse click in the lower middle portion of the green leaf in the girl’s flower bouquet in the “RBG Image” and click on the button “Select Region Class at the Location of Last Left Mouse Click.” If you clicked on the pixel I clicked on (at column 150 and row 230), you will now see most of the green leaf highlighted plus some other dark areas throughout the image. Looking at the bottom of the table on the main panel, you should see that this is region class 3 consisting of 2011 pixels. (If statistics for another region are displayed at the bottom of the table, you can select region class 3 by entering the number “3” in the text box to the right of the “Select Pixels with Segmentation Level 0 Region Class Label” label and pressing the “Enter” button on your keyboard.) Now click on the “Select Next Coarser Segmentation” button. You will see that region class 3 grows to 3746 pixels at hierarchical level four with the addition of more of the green leaf along with numerous other dark areas throughout the image. Clicking on this button one more time adds more of the green leaf and additional background areas to the region at hierarchical level five. You can select and label a portion of the green leaf as follows. From the “Actions” menu on the “Current Region Labels” panel select “Select Region” from the menu and perform a left mouse click on the bottom portion of the leaf. Let’s now label the lower portion of the green leaf currently highlighted by clicking on the “Label Region” button. In the “Label Region Panel” that now appears, type “green leaf” in the text box to the right of dark green color button towards the lower left of the panel and then hit “Enter” on your keyboard. You will now see this region colored dark green in the “Current Class Labels Image” panel. You can now close the “Label Region Panel.” You will note that a dark portion of the girl’s red shawl was mislabeled as “green leaf.” We can correct this by clicking on a pixel in this area (e.g., column 130 and row 214) and 52 RHSeg User’s Manual Version 1.59 clicking on the “Select Region Object at Location of Last Left Mouse Click” button. Use the “Label Region” button to label this area as “dark shawl.” Correct another mislabeled portion of the green leaf region by clicking on the pixel at column 164 and row 217 and clicking on the “Select Region Object at Location of Last Left Mouse Click” button. Again se the “Label Region” button to label this area as “dark shawl.” You have now exercised most of the features of HSegViewer for labeling an image. However, there are other features of HSegViewer we have not visited yet. The “Initial Segmentation Level” text box allows you to set the initial segmentation level that is displayed (defaulted to 0) when you select a new region class or object for highlighting. The “Refocus on Selected Region” button centers all image panels on the pixel selected with the “Select Region Class at Location of Last Left Mouse Click” button or “Select Region Object at Location of Last Left Mouse Click” button. The text box between the “Select Next Finer Segmentation” and “Select Next Coarser Segmentation” buttons not only displays the currently highlighted hierarchical segmentation level, but entering a valid hierarchical segmentation level into this text box will jump you to that hierarchical level. We now come to the set of buttons under the “Display Options” label. We have already visited the “RGB Image” and “Current Class Labels” buttons. The “Segmentation Classes Slice” button provides a pseudo colored rendition of the region class segmentation at the currently selected hierarchical level. Similarly, the “Segmentation Objects Slice” button provides a pseudo colored rendition of the region object segmentation at the currently selected hierarchical level. The “Region Mean Image” button provides a view of the region mean image. The “Hierarchical Boundary Map” button provides a boundary map of the image segmentation, where the darker image boundaries correspond to boundaries that persist up to the highest hierarchical levels, while the lighter image boundaries correspond to boundaries that disappear at lower hierarchical levels. Finally, the “Region Class (Object) Boundary Pixel Ratio Image” displays this ratio for each region class (object). At the bottom of the display panels the cursor location (column, row) is displayed. The pixel value is also displayed on the “Segmentation Slice View Image,” “Current Class Labels Image,” and “Hierarchical Boundary Map” display panels. The pixel value on the “Hierarchical Boundary Map” display panel corresponds to the last hierarchical level at which the boundary still exists. You may save whatever is displayed in any of the image display panels (except for the reference file displays) to a PNG format file by selecting “Save PNG Image” from the “Actions” menu. You will be prompted to specify an output file name with a file chooser. Finally, the large table at the bottom of the HSegViewer main panel gives the available information about the selected region, at all hierarchical levels. To exit the HSegViewer program, click on the “Program Action” menu on the HSegViewer main panel and select “Quit” from the menu. (You could also click on the red X in the top right corner of the panel.) You can exit HSegViewer and restart it where you left off by renaming the “label_out.raw” and “ascii_out.txt” (default names) files (I often use the file names 53 RHSeg User’s Manual Version 1.59 “label_in.raw” and “ascii_in.txt”), and selecting them as the “Input Class Label Map File” and the “Input ASCII Class Labels Name File,” respectively, in the parameter input file. If you have reference files (such as ground truth) in “PNG” format files, you can use them as a reference files (Input Reference File 1 or Input Reference File 2) by specifying them as “Input Reference” files in the parameter input panel on startup. Notes on viewing 3-D data with HSegViewer HSegViewer cannot currently render 3-D data in three dimensions. One can display and interact only with selected 2-D planes of 3-D hierarchical segmentation results. Assume that you have a single band 3-D image with 256 columns, 256 rows and 172 slices (this corresponds to an actual 3-D brain scan image that has been processed with rhseg_3d). By default, HSegViewer looks at the 256 column by 256 row 2-D image plane at the 0th slice. You can change the slice viewed by changing the value in the text box to the right of the label "For 3-D data, view the 2-D Representation of ". For example, you can change from viewing the 0th slice to viewing the 86th slice. Once you specify the desired slice for viewing, click on the "Program Actions" pull-down menu at the top left of the panel and select "Run Program." You can now do everything you learned in the 2-D tutorial on this 2-D plane of the 3-D image data. To view from a different perspective you can select "Quit Program" from the "Program Control" pull-down menu at the top left of the Viewer panel and then select "OK" on the "Confirm Quit" panel. The "Parameter Input" panel then reappears. To the right of the Label "For 3-D data, view the 2-D Representation of" you can select "row" or "column" instead of "slice". For example, select "row" and then specify row index 128 (for the 2-D rendition along the middle row). Again select "Run Program" from the "Program Control" menu. You can now see and interact with the data and hierarchical segmentation results from this new perspective. 54 RHSeg User’s Manual Version 1.59 Chapter 6: HSegLearn Tutorial Overview This chapter provides a tutorial on the HSegLearn program. HSegLearn Tutorial The “HSegLearn” program is designed to be a computer-interactive tool for labeling image regions that are representations of a specific category of land cover. HSegLearn uses the output from the HSeg or RHSeg programs as a basis for defining similar image regions. HSegLearn can be used by an analyst to label sets of regions (as defined by HSeg or RHSeg) as “positive” or “negative” examples of the sought for category of land cover. The HSegLearn program automatically searches the hierarchical segmentation for HSeg or RHSeg for the coarsest level of segmentation at which selected positive example regions do not conflict with negative example regions and labels the image accordingly. The negative example regions are always defined at the finest level of segmentation detail. To use the HSegLearn navigate to the directory containing the output from the HSeg or RHSeg program and type “hseglearn” (no quotes). After doing so you should see a Graphical User Interface (GUI) panel looking similar to that shown in Figure 1. Figure 1. HSegLearn’s initial parameter input GUI. To select the HSeg/RHSeg output parameter file, perform a left mouse click on the box containing “(Select File)” below the label “HSeg/RHSeg Output Parameter File (oparam) for Input to HSegLearn:”, and then select the appropriate file ending with “.oparam”. The GUI panel will now grow to provide additional input options as shown in Figure 2. Next you should specify the Red, Green and Blue display bands by entering in the appropriate numbers in the provided text boxes. The values 2, 1, and 0 are appropriate for our initial test images. If you have a reference image you would like to use, you can select it by left button clicking on the check box to the left of the label “Input Reference Image File:” and left button clicking on the text box that then appears below this label. You can also similarly select a georeferenced panchromatic image to use as a higher resolution reference image. The optional “Input ASCII Examples List File:” is not normally used for an initial run of HSegLearn. Its purpose is to provide the list of positive and negative example regions from a previous run of HSegLearn (to pick up where you left off). 55 RHSeg User’s Manual Version 1.59 Figure 2. HSegLearn’s second parameter input GUI panel. You can now run the HSegLearn program by selecting “Run Program” from the “Program Actions” menu at the top left of the HSegLearn second parameter input GUI panel. You will then see the main HSegLearn GUI as shown in Figure 3. Figure 3. HSegLearn’s main GUI panel. The next thing you should do is left button click on the “RGB Image” and “Current Region Labels” buttons and situate the resulting display panels comfortably on your computer screen. For an initial run of HSegLearn, the “Current Regions Labels” display panel will be blank (entirely black). You may now explore the RGB Image of your image data set by manipulating the scroll bars on the right and bottom edges of the RGB Image display panel. You may also pan around the image scene by performing left mouse button clicks on the thumbnail image at the upper left corner of the display panel. Also, if you perform a left mouse button click on a pixel you will notice that the arrow cursor turns into a crosshair when you hold down the left mouse button, and a “cloned” cursor appears in the same location on the 56 RHSeg User’s Manual Version 1.59 “Current Region Labels” display. In addition, the (col,row) locations, (R,G,B) values and (UTM_X,UTM_Y) coordinates of the selected pixel location with appear at the bottom of the display panel. In order to select a region of area for submission as positive or negative examples of your target land cover type, you must first highlight it. The “Actions” menu on each of the display panels provide two modes for selecting regions for highlighting, namely “Highlight by Circling an Area of Interest” and “Highlight by Clicking on a Region Object.” In the “Highlight by Clicking on a Region Object” mode, region classes associated with the selected region objects are highlighted each time you perform a left mouse button click on a pixel in a region object. You may highlight multiple region classes while in this mode of operation. You can turn off this mode by selecting “Turn off Highlight by Clicking” from the “Actions” menu on any display panel. Turning off the highlight by clicking mode will allow you again view the (col,row) locations, (R,G,B) values and (UTM_X,UTM_Y) coordinates of the selected pixel locations without highlighting additional region classes. The second mode for highlighting region classes is by drawing a circle (with the left mouse button held down) that contains a positive or negative example of your target land cover type in either of the image display panels. You can go in to this mode of operation by selecting the option “Highlight by Circling an Area Region of Interest” from the “Actions” menu on either of the display panels. You will see that the trace of the circle is drawn on each display panel as you draw it. A few moments after you complete drawing your circle, will see that the full extent of all region classes that your circled area contained are highlighted in white in the “Current Region Labels” display panel. You may highlight as many regions as you like of a particular cover type using either mode of operation before you “Select” or “Submit” the highlighted region classes as either negative or positive examples of your cover type of interest. After you highlight at least one region class, HSegLearn’s main GUI panel will appear as in Figure 4. Figure 4. HSegLearn’s main GUI Panel after highlighting as least one region class. 57 RHSeg User’s Manual Version 1.59 If you made a mistake and highlighted region classes that are both positive and negative examples of your cover type of interest, you can clear all highlighted regions and start the highlighting process over by selecting the “Clear all Highlight Regions” button. If you are satisfied that all of your highlighted regions classes are either positive or negative examples of your cover type of interest, you may either “Select” or “Submit” the highlighted regions as either positive or negative examples by selecting the appropriate button on HSegLearn’s main GUI panel. The difference between “selecting” and “submitting” is that selecting just places the selected region classes in a queue for later submission, while submitting causes hseglearn to actually process the selected region classes as positive or negative examples, as indicated (more on this later). When region classes are “selected” as either positive or negative examples, HSegLearn will determine the class label identity of each region class contained in the highlighted area and then highlight in yellow the spatial extent of all of these region classes. HSegLearn’s main GUI panel will appear as in Figure 5 after at least one region class is selected as either a positive or negative example. Figure 5. HSegLean’s main GUI panel after selecting highlighted region classes as positive or negative examples. As seen in Figure 5, after selecting highlighted areas as either positive or negative examples, HSegLearn’s main GUI panel will modify itself to provide the option of submitting the selected positive and/or negative examples. The panel also rescinds the options to select highlighted regions (because no regions are now highlighted), but still makes available the option to highlight regions classes by choosing a highlight mode for the display panel actions menu. Note that you could have skipped the “selecting” step and could have “submitted” your region classes instead without first “selecting” them. However, you may find it convenient to initially highlight and select several positive example region classes and then highlight and select several negative example region classes before submitting the selected positive and/or negative examples to the HSegLearn program for processing. 58 RHSeg User’s Manual Version 1.59 Clicking on the “Submit Selected Positive and/or Negative Example(s)” button will submit the region class positive and negative examples that are currently stored in the positive and/or negative examples queue(s). As noted earlier, submitting positive or negative examples is different than just selecting them. The spatial extent of all selected region classes, positive or negative, is simply colored yellow on the Current Region Labels display panel. The spatial extent is the area covered by the region class at the finest (most detailed) level of the HSeg/RHSeg segmentation hierarchy. When a negative example region class is submitted to the HSegLearn program, it is recorded in the “examples_out.txt” file and highlighted in red in the Current Region Labels display panel. As with a selected region class, the spatial extent for a negative example region class is the area covered by the region class at the finest (most detailed) level of the HSeg/RHSeg segmentation hierarchy. When a positive example region class is submitted to the HSegLearn program, it is recorded in the “examples_out.txt” file and highlighted in green in the Current Region Labels display panel. Unlike as done for a negative example region class, the spatial extent for a positive example region class is the area covered by the region class at the coarsest (least detailed) level of the HSeg/RHSeg segmentation hierarchy that does not conflict with a previously specified negative labeling in the Current Region Labels display panel. Once you have submitted a set of selected region classes to HSegLearn, HSegLearn’s main GUI panel will appear as shown in Figure 6. This version of HSegLearn’s main GUI panel provides an option for undoing the last submit of positive and/or negative examples. Figure 6. HSegLean’s main GUI panel after submitting a set of selected or highlighted region classes as positive or negative examples. If you notice a location in the Current Region Labels display that is colored green (positive example), but should not be a positive example, you may click on that location and submit it as a negative example. 59 RHSeg User’s Manual Version 1.59 If it is a case of the region class in question being labeled at too coarse a level from the HSeg/RHSeg segmentation hierarchy, HSegLearn will color the selected region class as red, and then readjust the display of the mislabeled region class to display a spatial extent from a finer level from the segmentation hierarchy such that is does not conflict with the new submitted negative example. If it is a case of the region class in question being labeled is already labeled at the finest level from the HSeg/RHSeg segmentation hierarchy, HSegLearn will color the selected region class as blue, which signifies that this particular region class labeling is ambiguous. If you notice a location in the Current Region Labels display that is colored red (negative example), but should not be a negative example, you may click on that location and submit it as a positive example. In this case, HSegLearn will color the selected region class as blue, which signifies that this particular region class labeling is ambiguous. You may change a region class labeling from ambiguous (blue) to either a positive (green) or negative (red) labeling by highlighting the region (left mouse click on an image location in this particular region) and submitting it as either a positive or negative example region. You may save the current display shown in the Current Region Labels panel as either a “png” or “tif” image by selecting “Save PNG Image” or “Save Image Data” from the “Actions” menu of the Current Region Labels panel. You may also zoom in or zoom out both display panels by selecting “Zoom In” or “Zoom Out” from the “Actions” menu of either display panel. You may also re-center the display panels at the location of the last region selected for highlighting by clicking on the “Refocus Displays at location of last Highlighted Region” button on the HSegLearn main GUI panel. To exit the program, select “Quit” from the “Program Actions” menu on the HSegLearn main GUI panel. The HSegLearn stores all the submitted positive and negative example region classes (plus the region classes that end up being labeled ambiguous) in a file with the default name of “examples_out.txt”. You may start up the HSegLearn program at the point that you previously exited the HSegLearn program in the following manner. I recommend renaming the “examples_out.txt” file from the previous run of HSegLearn to “examples_in.txt.” Then restart HSegLearn as previously described, with the additional step of selecting the “examples_in.txt” file as the optional “Input ASCII Examples List File.” HSegLearn will then go through the process of first submitting the ambiguous example region classes, then the negative example region classes, and then the positive example region classes. In doing so, HSegLearn will drop out positive example region classes that are redundant with previously submitted positive example region classes. 60