1
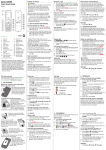
Carephone Mobile User Manual To Get In Touch Call: 0800 849 9254 Visit: thecarephone.com Follow us on Twitter: @thecarephone 2 Contents Page 1. At a Glance In The Box 4 Product Ket Features 4 Emergency SOS Functions 4 Overview 5 2. Basic Phone Setup Inserting The SIM Card 6 Inserting The Battery 6 Charging 6 Switching On & Off 7 Setting Time & Date 7 Display Symbols 7 3. Enhanced Features Setup Change Language 8 Set Font Size 8 Set Ringtone/Audio 8 Set Volume 8 Set Menu Block Function 8 Set M1/M2/M3 Quick Dial Numbers 9 Setup Bluetooth Headset 9 FM Radio 9 www.thecarephone.com Carephone Mobile 0800 849 9254 3 4. SOS Emergency Setup Setup Remote Panic Button 10 Set Help Voice Numbers 10 Set Help SMS Numbers 10 5. Emergency (SOS) Call Function How To Activate Emergency Call 11 How To Cancel Emergency Call 11 6. Emergency Functions Flow SOS Voice Call Sequence 12 GPS Tracking 12 Connecting To ERC 12 SOS SMS ALERTS 12 7. Safety Instructions 13 8. Troubleshooting 14 9. Warranty 15 Warranty Claim Form 15 www.thecarephone.com Carephone Mobile 0800 849 9254 4 1. At a Glance In The Box 1 x Mobile Handset 1 x Rechargeable Battery 1 x Waterproof Remote Panic Button and Neck Strap 1 x Power Adaptor 1 x Desktop Charging Station 1 x User Manual 1 x Hands-free Earphones (Optional Accessory) 1 x Car Charger (Optional Accessory) Product Key Features • • • • • • • • • • • • • • • GPS Location Tracking via www.thecarephone.com SOS Help Key IP57 Waterproof Remote Panic button – wirelessly active SOS mode Internal Accelerometer - user down detection 2” TFT Color Display Big Font Setting Loudspeaker Suitable for hearing aid devices (Compatible to HAC M3/T3 Device) 3 Quick Dial Numbers (M1 / M2 / M3) Call Amplification -30dB Loud Ringtone Volume - over 100dB Bluetooth FM Radio One Touch Torch Menu Item Blocking – improves user friendliness Important! • Exposure to the receiver at full volume for a long period could cause ear damage. Emergency SOS Functions • • • • • • • • SOS Help Key & Pendant GPS Location Tracking via www.thecarephone.com (subscription required) Instantly Calls Carephone Emergency Response Centre (subscription required) SOS Speakerphone – 2 Way Audio Call up to 3 SOS Help Voice Numbers Send Emergency SMS to up to 3 SOS SMS Help Numbers Human Call Answer Authentication – In SOS call mode, it won’t be fooled by voicemails. GPS Zone Alert – Alerts when the handset is out of a set GPS fenced area. If you have not already subscribed to Carephone Monitoring then you can do so by calling 0800 849 9254. www.thecarephone.com Carephone Mobile 0800 849 9254 5 Overview 1. Torch 2. Hole for strap 3. Earpiece 4. LED Indicator 5. Left Soft Key 6. Call key - Accept call 7. M1/M2/M3 Direct Dialing Key 8. * Key - Special Character/Keypad Lock 9. Up / Down keys Up key - Direct to Message Down key - Direct to Phonebook 10. Right Soft Key - Back key 11. Device ON/OFF And End Call Key 12. Microphone 13. # Key - Change Input method 14. Charging connection pins 15. Loudspeaker 16. SOS Help Button 17. Earphone Socket 18. Charging Socket 19. Unlock key - Long press 20. Volume Keys 21. Torch key 22. Hole For Neck Strap 23. SOS Remote Panic Button www.thecarephone.com Carephone Mobile 0800 849 9254 6 2. Basic Phone Setup Inserting the SIM Card Inserting the Battery Charging 1. Place the phone on the Desktop Charging Station. 2. Plug the USB power adaptor to the USB port of Desktop Charging Station. You can also direct plug the USB power adaptor to the USB jack of phone NOTE: Charge the phone for over 12 hours the first time. After that, it takes approximately 2 hours to fully charge the battery. Batteries do degrade over time, which means that call time and standby time will normally slightly decrease with regular use. www.thecarephone.com Carephone Mobile 0800 849 9254 7 Switching on/off 1. 2. 3. 4. Press and hold until the device switches on. Enter the PIN of the SIM card if needed. Press to confirm PIN. Press and hold until the device switches off. Setting Time & Date 1. Press “Menu” “Phone Settings” “Clock & Alarm” 2. Go to “Time and Date” “Set Time/Date” Enter time and date value. Enter the current time: Hours (HH), minutes (MM) 3. Press to enter the date. Enter the current date: year (YYYY), month (MM), day (DD) 4. Press to confirm your entry. 5. Press to return to idle mode. Display Symbols Battery Display Signal Strength Alarm Switched On Earphone Plugged In Call Missed Vibration Only Roaming Vibration and Ring Ringtone Switched On GPS Switched On GPS Sleeping Inbox full (flashing) SMS Received GPRS Active Vibration Then Ring Muting Silent GPS Location fix Bluetooth On Bluetooth visibility off Bluetooth is connecting Key Lock on www.thecarephone.com Carephone Mobile 0800 849 9254 8 3. Enhanced Features Setup Change Language In the Display Setting menu, you can adapt, for example, the language, screen saver, etc. to your personal requirements. 1. Go to “Menu” “Phone Settings” “Display Setting” “Language” 2. Press to select desired language. 3. Press to confirm. Set Font Size You can set your desired font size of display in order to provide a better visibility. Large Font Normal Font 1. Go to “Menu” “Phone Settings” “Display Settings” “Font Size” 2. Select “Normal” or “Large” 3. Press to confirm. Setup Ringtone/Audio 1. Go to “Menu” “Phone Settings” “Sound Setting” “Set Sound” 2. You can select “Ring Tone”, “Message”, “Alarm” and “Keypad” 3. Set your desired tone and select to confirm Setup Volume 1. Go to “Menu” “Phone Settings” “Sound Setting” “Set Volume” 2. You can select “Ring Tone Volume”, “Message Tone Volume”, “Alarm Tone Volume”, “Keypad Tone Volume” and “System Tone Volume” 3. Set your desired tone volume and select to confirm Volume Warning! Never hold the mobile phone to your ear when it is ringing, when the hands-free function is active, or when an emergency call has been triggered. This could damage your hearing. Setup Menu Block Function You can disable some functions to simplify use of the phone. 1. Go to “Menu” “Phone Settings” “Block Function” 2. Select each function “Calendar”, “Calculator”, “FM Radio”, “Bluetooth”, SOS Settings” and “Audio Profile” you want to disable. 3. Press to turn on. You can press again to turn off. www.thecarephone.com Carephone Mobile 0800 849 9254 9 Set M1/M2/M3 Quick Dial Numbers You can save your desired phone number you dial the most frequent, e.g. your families, your best friends or your care center. Simply press and hold M1/M2/M3 button to make the quick dial call out. 1. 2. 3. 4. 5. Or 1. 2. 3. 4. Go to “Menu” “Phone Settings” “Set M1/M2/M3”. Press M1/M2/M3 Call Number. Enter “Ok” “From Phonebook”. Press until the desired phone number appears. Press to confirm your selection. Go to “Menu” “Phone Settings” “Set M1/M2/M3” Press M1/M2/M3 Call Number. Enter “Ok” “Add New” ”To SIM/To Phone”. Input the Name and Number. Press to confirm. Setup Bluetooth Headset 1. 2. 3. 4. Go to “Menu” “Bluetooth” “Inquiry audio device”. You are requested to power on the Bluetooth. Please press “Yes” to confirm. Pair the Bluetooth earphone with mobile phone. You may be required to enter the passcode during the connection. Please refer to the user manual of your Bluetooth headset. 5. Go to “Menu” “Bluetooth” “Audio Path”. 6. Select “Forward to Bluetooth headset”. NOTE: If pairing successful, you can receive and make a call by Bluetooth earphone. The package doesn't include Bluetooth headset. FM Radio Step 1: Plug in earphones 1. Plug in the supplied earphones into the jack socket on the left of the handset. Step 2: Search FM 1. Go to “Menu” “FM Radio” 2. Press or to select < or > to search FM channel. 3. Select to play/stop the FM Radio. 4. You can select to edit “Channel List”, “Manual Input”, “Auto Search” or turn on “Loud Speaker”. www.thecarephone.com Carephone Mobile 0800 849 9254 10 4. SOS Emergency Setup Setup Remote Panic Button (RPB) You can use the remote panic button device in the package to active the emergency mode wirelessly. Simply press for 3 seconds or more. Remote Panic Button (RPB) Registration 1. Go to “Menu” “SOS Settings”, enter the password “901745”, go to “Remote Panic Button Setting” “RPB Registration”. 2. Select “ON/OFF RPB”, press to enable. 3. Press to go to “RPB Registration” and press to enter. 4. Select one register, put the remote closer to you phone, then press and hold the panic button over 3 seconds. A prompt display on the phone, input the password “2835”and press OK key to confirm. The remote is registered successfully and could be used now. 5. Press to return to idle mode. Set Help Voice numbers NOTE: All phone numbers in Help Settings should be edited in International format. e.g. +44XXXXXXXXXXX 1. 2. 3. 4. 5. Go to “Menu” “SOS Settings”, input password”901745”. Press to enter “Set Help Voice Numbers”. Press Select Help No./2/3 for the help voice number that is to be set. Press to enter “Options”. Press to select “Edit”. 6. Press to enter the phone number to be saved. All phone numbers in Help Settings should be edited in International format, e.g. +44XXXXXXXXXXX 7. Press to save. 8. Press to return to idle mode. Save up to three help voice numbers that will be dialed in sequence in case of emergency. If no number is entered the phone dials 999. If you have a Carephone Monitoring subscription then please don’t edit Help Voice Number 1. Set Help SMS numbers 1. Go to “Menu” “SOS Settings”, input password”901745”, go to “Set Help Voice Numbers”. 2. Press to select Help SMS No.1/2/3 for the help SMS number that is to be set. 3. Press to enter “Options”. 4. Press to select “Edit”. 5. Press to enter the phone number to be saved. All phone numbers in Help Settings should be edited in International format, e.g. +33XXXXXXXXXXX 6. Press to save. 7. Press to return to idle mode. NOTE: Unlike for emergency call numbers, the Help SMS numbers are notified by SMS when an emergency call occurs. An emergency SMS contains date, time, and, where available, the GPS coordinates of the Carephone Mobile. www.thecarephone.com Carephone Mobile 0800 849 9254 11 5. Emergency (SOS) Call Function This mobile phone is equipped with an emergency SOS call function. If you purchased the handset with our Carephone Monitoring subscription then we will configure your phone via our website www.thecarephone.com and you don’t need to do anything. You can also login to your supplied user area and configure additional numbers for contact during SOS alerts. Your first Help Voice Number will be configured as “ERC” (Emergency Response Centre). Please do not change this, as it will disconnect the handset from our ERC. Up to 3 Help Voice numbers and 3 Help SMS numbers can be contacted in the event of an SOS emergency. How to activate Emergency Call Function You can activate the Emergency Call function by one of the following 5 ways. -‐ -‐ -‐ -‐ -‐ Push SOS Help Key on the back of the device firmly upwards or; Press and hold Remote Panic Button for over 2.5 seconds or; If phone detects Man Down action* or; The phone detects No motion* or; You can still active Emergency function immediately when the phone is OFF. Simply push SOS Help Key firmly upwards in Phone OFF mode. Please make sure the SIM card has no SIM lock and Phone lock, otherwise, the Emergency call can’t be activated. How to cancel Emergency Call Function? -‐ -‐ Push SOS Help Key downwards or; Press “Cancel” button if the emergency calls function is activated by the Remote Panic button or man down setting. www.thecarephone.com Carephone Mobile 0800 849 9254 12 6. Emergency Functions Flow SOS Voice Call Sequence 1. When Emergency call function is activated, the SOS call begins. 2. You can save 3 Help Voice numbers in total (ERC, relatives, neighbors or friends). These numbers, previously saved in order of sequence, will be automatically dialed in an emergency when emergency SOS alert is activated. 3. If you cannot get through on the first number, the second number will be called automatically. If you cannot get through on the second number, the third number will be called etc. 4. If you make connection, the phone automatically switches to Hands free mode. The person you are ringing must press the “#” button within the first 30 seconds otherwise the conversation will be cut off. Confirmation with “#” is necessary so that the emergency call does not go to an answering machine by mistake. GPS Tracking Carephone Mobile is equipped with a GPS receiver. This function will activate automatically in case of an emergency and the handsets location will update on www.thecarephone.com Very Important NOTE: GPS signals can only be received when there is clear view to the sky. The GPS signal will not penetrate walls or other obstacles. GPS signals cannot be received in an indoor environment. Connecting to Emergency Response Centre If you have a Carephone Monitoring subscription then when an SOS Alert is triggered the handset will connect directly to our Emergency Response Centre staff who will be on hand to gather the correct data required to assist the user. SOS SMS Alerts If you have your handset setup to send out SMS alerts when the SOS function is triggered then an SMS will be sent out to your configured numbers containing the date, time, and, where available, the GPS co-ordinates of the Carephone Mobile. www.thecarephone.com Carephone Mobile 0800 849 9254 13 7. Safety Instructions WARNING Our product and accessories can contain small parts. Keep out of reach of small children. Medical Apparatus Interference The Carephone Mobile transmits cellular and radio signals, this can interfere with insufficiently protected medical equipment. Consult the manufacturer or supplier of the equipment to ensure it has adequate protection against interference from radio devices. Certain health care facilities may display signs requesting that mobile handsets are turned off, this is due to interference with medical apparatus and we advise that you always follow these instructions fully with your Carephone. Pacemakers HIMA (Health Industry Manufacturers Association) recommend that wireless phone handsets maintain a minimum distance of 15cm from a pacemaker to avoid potential interference. Advice for persons with pacemakers: • • • • Should always keep the phone more than 15cm from their pacemaker: Should always keep the phone more than 15cm from their pacemaker when the phone is turned on Should not carry the phone in a breast pocket Should use the ear opposite the pacemaker to minimize the potential for interference If you have any reason to suspect that interference is taking place, you should turn the handset off immediately. Emergency Calls Mobile phones use radio signals, cellular reception with the mobile network and have various user programmable functions. This means that a connection cannot be guaranteed in all circumstances. Hearing Aids The device is hearing aid compatible HAC M3/T3. Full compatibility with all equipment cannot be promised. If you have any compatibility issues with any hearing aid devices then please don’t hesitate to get in touch with us. www.thecarephone.com Carephone Mobile 0800 849 9254 14 8. Troubleshooting If you experience any operational issues with your Carephone Mobile then please take the following actions: Contact the place you purchased the handset: All of our re-sellers are on hand to provide assistance in getting to know the handset and how it works, they can assist either in person or over the phone with any operational problems. Call us on 0800 849 9254: Our team is on hand to guide you through any problems you may have with your Carephone handset. On the Internet, visit: www.thecarephone.com and click on FAQ. Here you will find information on frequently asked questions by our users. By e-mail: If you have a troubleshooting issue you can e-mail [email protected]. We aim to respond to all queries within 48 hours. Conformity Declaration Carephone Ltd hereby declares that Carephone Mobile conforms to the essential requirements and other relevant regulations contained in the Directives 1999/5/EC (R&TTE) and 2002/95/EC (RoHS) Bluetooth® is a registered trademark of Bluetooth SIG, Inc. eZiType™ is a trademark of Zi Corporation. www.thecarephone.com Carephone Mobile 0800 849 9254 15 9. Warranty Your device is covered by a 12 month manufacturers warranty period. This covers any handset faults that are deemed manufacturers liability. In the unlikely event of a fault occurring during your 12-month warranty period please contact your place of purchase initially for advice. Proof of purchase is required for any service needed during the warranty period. The warranty does not cover any faults caused by liquid ingress to the Carephone Mobile, it also does not cover user damage, abnormal usage or negligence towards the handset. Any faults caused by voltage fluctuations during charging are also not covered, we suggest that you disconnect your handset during thunderstorms and when fully charged. This warranty policy does not cover batteries or accessories supplied with your Carephone handset. Handsets sent without a returns authorization number will be rejected. Warranty Claim Form ---------------------------------------------------------------------------------------------------------------------------------------Name: Address: Contact Number: Fault Description: Purchase Date: For warranty claims please call 0800 849 9254 for returns processing. Please complete the above fields and return this slip with your handset. www.thecarephone.com Carephone Mobile 0800 849 9254 16 RoHS www.thecarephone.com Carephone Mobile 0800 849 9254