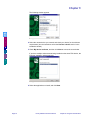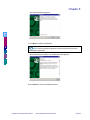
1
Is Your Solution
MAS 90
Our
Welcome
to the
Library Master Extensions
Version 4.20 Manual
How To Use This Guide
Contents
Index
How to Use This Guide
Go to the How to Use This Guide page (this page).
C
O
N
T
E
N
T
S
Go to the Contents.
S
T
Go to the previous page.
Go to the next page.
B
A
C
K
Go back to the previous link.
I
N
D
E
X
Go to the Index.
Text on page...
Indicates a jump to a topic.
Bookmarks appear in the overview window to the left of the document window.
These bookmarks are similar to a table of contents.
Note: This manual is best viewed using the latest version of Adobe Reader, which
is available free of charge at http://www.adobe.com/products/acrobat/readstep2.html.
For best printing results, print to a PostScript printer.
Page 2
Library Master Extensions Manual
How to Use This Guide
Information in this document is furnished only under a Customer License Agreement or non-disclosure agreement, and may
be used or copied only in accordance with the terms of such agreement. The software described in this document is
protected by copyright, and may not be copied on any medium except as specifically authorized in the license or
non-disclosure agreement.
This document is also protected by copyright, and may not be reproduced or transmitted, in whole or in part, by any means,
including photocopying, facsimile transmission, or reduction to any electronic medium or machine readable form, without
the express written consent of HighTower.
Copyright Statements:
Direct Deposit, Gift Card Expansion Pack, MAStransit, MICR Encoded Laser Checks, Multi-Bin Advanced Distribution,
Point of Sale® Professional, Professional Retainer Control, Remote Salesperson PDA, ScanBlaster, Time and Billing®,
Time and Billing® Professional, and Timekeeper® are products of HighTower. Copyright © 2007. All rights reserved.
Sage Software and Sage Software product names mentioned herein, including Sage MAS 90, Sage MAS 200,
Sage MAS 200 SQL, and Sage MAS 500, are registered trademarks or trademarks of Sage Software, Inc. and/or its
affiliated entities.
Palm™ Desktop name and logo are trademarks of Palm™ Inc. Copyright © 2007.
HotSync® Manager name and logo are registered trademarks of PalmSource Inc. Copyright © 2005-2006.
Microsoft® Windows® NT®, 95®, 98®, 2000®, ME®, and XP® names and logos are registered trademarks of the Microsoft
Corporation. Copyright © 2005-2006.
All other trademarks and copyrights are the property of their respective holders.
This manual was written for Library Master Extensions version 4.20. It was last updated on 11/19/07.
How to Use This Guide
Library Master Extensions
Page 3
New Features for Library Master Extensions Version 4.20
The 4.20 version of Library Master Extensions has been enhanced with the new
Windows CE Sync feature.
New Windows CE Sync Feature
Use the Windows CE Sync functionality (see page 49) in the Remote menu to
locally synchronize your PDA application on your Windows CE device with your
Sage MAS 90 or 200 system.
Contents
New Features for Library Master Extensions Version 4.20 4
New Windows CE Sync Feature 4
Chapter 1 — Introduction 8
S
T
B
A
C
K
I
N
D
E
X
The HighTower Ideal 8
Welcome to the Library Master Extensions Module 8
Using the Library Master Extensions Manual 8
Sections in this Manual 9
Graphic Conventions 9
Text Conventions 10
Getting Additional Copies of the Manual 10
Open the Online Manual 10
Using the Online Help 11
Open the Online Help 12
Support Services 12
Chapter 2 — Library Master Extensions Concepts 13
How Library Master Extensions Works 13
Enhancement Registration 13
Client/Server Workstation Install 14
Spell Check Maintenance 14
Dictionary Maintenance 14
Remote User Maintenance 14
Remote Device Maintenance 14
Remote License Maintenance 14
PDA Application Install 15
Windows CE Sync 15
Enhancement Patch Install 15
Palm Conduit Utility 15
Enhancement Diagnostic Inquiry 15
Enhancement Data Definitions 15
Migrate Level 3 Enhancement Data 15
Chapter 3 — Installing the Library Master Extensions Module 17
System Requirements 17
Installing Library Master Extensions 17
System Startup 19
Set Up the Library Master Extensions in Role Maintenance 19
Register the Library Master Extensions Module 20
Sage MAS 200 or Sage MAS 200 for SQL Installations 21
Chapter 4 — Navigating in Library Master Extensions 22
Using the Modules Tree 22
Open a Library Master Extensions Window through the Modules Tree 22
Using the Library Master Extensions Menu Bar 23
Open a Library Master Extensions Window through the Menu Bar 23
Using Buttons and Keyboard Commands in Library Master Extensions 24
Table of Contents
Library Master Extensions Manual
Page v
Contents
Chapter 5 — Using the Main Menu 28
How to Use the Main Menu 28
Open a Window from the Main Menu 28
Enhancement Registration 28
Register an Enhancement 28
Client/Server Workstation Install 29
Perform the Client/Server Workstation Installation 30
Spell Check Maintenance 30
Select the Items to be Spell Checked 31
Dictionary Maintenance 32
Create Dictionary Terms 32
S
T
B
A
C
K
I
N
D
E
X
Chapter 6 — Using the Remote Menu 34
How to Use the Remote Menu 34
Open a Window from the Remote Menu 34
Device Setup Overview 34
Standard Storage Locations 34
Recommended and Minimum Hardware 35
Palm OS Devices 35
Pocket PC Devices 35
Installing and Configuring Your PDA Device 35
Palm OS Devices 35
Pocket PC Devices 36
Synchronization Architecture 36
Palm OS Devices 37
Pocket PC Devices 39
Remote User Device Licenses 39
Remote User Maintenance 40
Create a Remote User 40
Remote Device Maintenance 40
Create a Remote Device 41
Remote License Maintenance 41
Create a Remote License 42
PDA Application Install 42
Install the Module on a Palm Device 43
Install the Module on a Pocket PC Device 46
Windows CE Sync 49
Synchronize Your Windows CE Device with the Sage MAS 90 or 200 System 49
Chapter 7 — Using the Utilities Menu 50
How to Use the Utilities Menu 50
Open a Window from the Utilities Menu 50
Enhancement Patch Install 50
Complete the Enhancement Patch Installation 50
Palm Conduit Utility 52
Configure the Conduit 52
Unregister the Synchronization DLL 53
Enhancement Diagnostic Inquiry 53
Page vi
Library Master Extensions Manual
Table of Contents
Contents
Perform Diagnostic Testing 54
Enhancement Data Definitions 54
Access the Enhancement Data Definitions 54
Migrate Level 3 Enhancement Data 56
Migrate Level 3 Data 57
Chapter 8 — Glossary 60
S
T
B
A
C
K
I
N
D
E
X
Table of Contents
Library Master Extensions Manual
Page vii
Chapter 1
Introduction
The HighTower Ideal
At HighTower, we are committed to delivering superior accounting, time
management, manufacturing and distribution solutions to small and mid-sized
businesses.
HighTower is a Sage Software® Master Developer for Sage MAS 90 ERP and
Sage MAS 200 ERP software with titles such as Direct Deposit, Gift Card
Expansion Pack, MAStransit, MICR Encoded Laser Checks, Multi-Bin® Advanced
Distribution, Point of Sale® Professional, Professional Retainer Control, Remote
Salesperson PDA, ScanBlaster, Time and Billing®, Time and Billing®
Professional, and Timekeeper® to our credit.
C
O
N
T
E
N
T
S
HighTower uses a unique Patch Installation system, which installs the HighTower
enhancements without overwriting your original Sage Software program. Our
patch installation method makes our products attractive to users installing
enhancements from multiple Sage Software Master Developers.
S
T
B
A
C
K
Our promise of exceptional technical products is only exceeded by our
commitment to customer service. Our success is measured in customer
satisfaction.
Welcome to the Library Master Extensions Module
I
N
D
E
X
The Library Master Extensions module (formerly called HighTower Library Master)
is required by every HighTower module for the Sage MAS 90 and Sage MAS 200
system. The Library Master Extensions module includes our unique Patch
Installation feature, which installs the enhancements without overwriting your
original Sage Software program or modules written by other Master Developers.
This module also contains maintenance features for applications designed for
remote devices, and a utility for Palm conduits. In addition, Library Master
Extensions module includes utilities for troubleshooting enhancements, such as
the Enhancement Diagnostic Inquiry feature and the Enhancement Data
Definitions feature.
The Library Master Extensions module also includes the Spell Check Maintenance
feature free of charge. This feature was available in the Spell Check module, but
will now be installed for all software users. This feature can check the spelling in
virtually any entry field across ALL of your Sage MAS 90 or 200 modules.
Using the Library Master Extensions Manual
This manual provides the information necessary for installing and operating your
Library Master Extensions module. Use the Library Master Extensions manual as
a guide when initially installing the module, and then as a resource for
understanding features of the module. The manual contains overviews and
samples of windows and menus.
Page 8
Library Master Extensions Manual
Chapter 1: Introduction
Chapter 1
Sections in this Manual
This manual is divided by the menu options available in the Library Master
Extensions module. The following table describes the chapters available in this
manual.
C
O
N
T
E
N
T
S
S
T
B
A
C
K
I
N
D
E
X
Chapter
Description
Chapter 2: Library Master
Extensions Concepts
This chapter explains different concepts you need to
know about using your Library Master Extensions
module.
Chapter 3: Installing the
Library Master Extensions
Module
This chapter details the installation procedures for the
Library Master Extensions module.
Chapter 4: Navigating in
Library Master Extensions
This chapter describes the windows and button fields
available in the Library Master Extensions module.
Chapter 5: Using the Main
Menu
This chapter describes how to use the features in the
Main menu, including how to register HighTower
enhancements.
Chapter 6:Using the
Remote Menu
This chapter details how to configure remote devices
such as PDAs and laptops that use HighTower software.
Chapter 7: Using the
Utilities Menu
This chapter details how to use the Enhancement Patch
Install feature and how to use additional utilities.
Graphic Conventions
The following icons are used throughout this manual to indicate different types of
information.
Graphic
Description
5
2
The Note symbol is followed by additional
information about a topic.
:
Chapter 1: Introduction
The Helpful Hint symbol is located in the left
margin and contains additional information about an
option.
The Warning symbol is followed by information to
help you avoid costly mistakes.
Library Master Extensions Manual
Page 9
Chapter 1
Text Conventions
The following table describes the text conventions used in this manual.
Text Convention
Explanation
Field font
Indicates a field name, list box name, options in a
list, column name, or check box.
Italic font
Indicates directory names or references to other
manuals.
There are online manuals, online help, and technical support for the Library
Master Extensions enhancement.
C
O
N
T
E
N
T
S
Getting Additional Copies of the Manual
The Library Master Extensions manual is available when you install the module.
Open the Online Manual
S
T
1 From the Help menu on the Sage MAS 90 or 200 menu bar, select
Enhancement Manuals. The Manuals list appears on the right side of the
screen.
B
A
C
K
I
N
D
E
X
Manuals List
Page 10
Library Master Extensions Manual
Chapter 1: Introduction
Chapter 1
2 Click the Library Master Extensions link. This manual will appear in PDF
format.
C
O
N
T
E
N
T
S
S
T
Online Manual
B
A
C
K
Using the Online Help
I
N
D
E
X
The Library Master Extensions module includes an extensive online help with the
standard content online help and context-sensitive online help for fields and
windows.
Online Help
Chapter 1: Introduction
Library Master Extensions Manual
Page 11
Chapter 1
Open the Online Help
• For field level context-sensitive help, move your cursor to the field and press F1.
A pop-up window appears with help for the field.
• For window level context-sensitive help, click the
The help screen for the window appears.
button on the window.
Support Services
There are several methods of support for your Library Master Extensions module:
• Contact your Authorized Reseller or Consultant. If you do not have an
Authorized Reseller or Consultant, contact (1.888.583.3000).
C
O
N
T
E
N
T
S
• Refer to the Data Definitions available in the Library Master Extensions module
in the Utilities menu. This feature lists all the data fields available on each
window of each module.
For more information about fee-based customer support services, contact our
Help Desk Department. Regular Help Desk hours are 9:00 A.M. to 5:00 P.M.
Central Standard Time Monday through Friday. You can reach our Help Desk
Department in the following ways:
S
T
B
A
C
K
• Phone: 1.888.583.3000
• Fax: 847.674.0544
I
N
D
E
X
• E-mail: [email protected]
___________________________________________________________
This concludes Chapter 1: Introduction of the Library Master Extensions manual.
Page 12
Library Master Extensions Manual
Chapter 1: Introduction
Chapter 2
Library Master Extensions Concepts
Chapter 1
Chapter 2: Library Master Extensions Concepts explains different concepts you
need to know to use your Library Master Extensions module efficiently.
How Library Master Extensions Works
The Library Master Extensions module is required by the MICR Encoded Laser
Checks, Multi-Bin® Advanced Distribution, Point of Sale® Professional, Remote
Salesperson PDA, ScanBlaster, Time and Billing®, Time and Billing®
Professional, and Timekeeper® modules. You will not be able to install these
enhancements without first installing the Library Master Extensions module. This
module includes the following features:
C
O
N
T
E
N
T
S
S
T
B
A
C
K
I
N
D
E
X
• Enhancement Registration (see page 13, 28)
• Client/Server Workstation Install (see page 14, 29)
• Spell Check Maintenance (see page 14, 30)
• Dictionary Maintenance (see page 14, 32)
• Remote User Maintenance (see page 14, 40)
• Remote Device Maintenance (see page 14, 40)
• Remote License Maintenance (see page 14, 41)
• PDA Application Install (see page 15, 42)
• Windows CE Sync (see page 15, 49)
• Enhancement Patch Install (see page 15, 50)
• Palm Conduit Utility (see page 15, 52)
• Enhancement Diagnostic Inquiry (see page 15, 53)
• Enhancement Data Definitions (see page 15, 54)
• Migrate Level 3 Enhancement Data (see page 15, 56)
Enhancement Registration
All enhancements require registration for complete access to all software features.
The Enhancement Registration feature (see page 28) registers enhancements
that you install. The enhancement registration process is quick, easy and secure.
Chapter 2: Library Master Extensions Concepts
Library Master Extensions Manual
Page 13
Chapter 2
Client/Server Workstation Install
The Client/Server Workstation Install feature (see page 29) allows your company
to install client/server versions of enhancements on your company’s server, as well
as your local workstation. Local workstation installations provide only the
necessary program files required by the computer to interact with the shared
server. Program-specific bitmap images, help files, and user manuals are only
installed on your company’s server but can be copied to your local workstation
through the Client Server Workstation Install utility.
Spell Check Maintenance
Spell Check Maintenance (see page 30) allows you to check the spelling of any
data-entry field in Sage MAS 90 or 200 by pressing CTRL + F1. Spell Check
Maintenance can be configured to automatically check spelling on exit of a
changed field by selecting that field in Spell Check Maintenance. Spell Check
Maintenance allows you to specify fields that you require to be spell checked
whenever they are modified. Spell Check Maintenance provides a list of available
fields by application and menu selection. The fields listed are determined at
runtime by the modules installed on your system.
C
O
N
T
E
N
T
S
S
T
Dictionary Maintenance
You can create your own company dictionary to be used with the Spell Check
Maintenance feature. The Dictionary Maintenance feature (see page 32) allows
you to enter terms unique to your business that would not normally be available in
a dictionary used for spell check. This feature also lets you specify unique
capitalization rules for specific words. For example, if a user entered the word
Hightower and you want the term to appear as HighTower, you can correct the
capitalization by entering the correct capitalization in Dictionary Maintenance.
Dictionary Maintenance can also be used to replace a word. For example, if the
HighTower abbreviation HTI is entered, you can set Dictionary Maintenance to
change it to HighTower.
B
A
C
K
I
N
D
E
X
Remote User Maintenance
The Remote User Maintenance feature (see page 40) is used to create remote
users and is required by remote modules, including ScanBlaster and Timekeeper.
Remote Device Maintenance
The Remote Device Maintenance feature (see page 40) is required by remote
modules including ScanBlaster and Timekeeper. The Remote Device
Maintenance feature is used to create remote devices for Sage MAS 90 or 200.
Remote License Maintenance
The Remote License Maintenance feature (see page 41) is required by remote
modules including ScanBlaster and Timekeeper. The Remote License
Maintenance feature is used to assign available licenses to particular applications.
Each User/Device/Application combination requires one license.
Page 14
Library Master Extensions Manual
Chapter 2: Library Master Extensions Concepts
Chapter 2
PDA Application Install
The PDA Application Install feature (see page 42) is required to install remote
modules such as ScanBlaster and Timekeeper on PDA devices. You must connect
your PDA device while installing.
Windows CE Sync
Use the Windows CE Sync feature (see page 49) to locally synchronize your PDA
application on your Windows CE device with your Sage MAS 90 or 200 system.
Enhancement Patch Install
C
O
N
T
E
N
T
S
S
T
B
A
C
K
I
N
D
E
X
This program features a Patch Installation system when installing our
enhancements. It does not install modified versions of your Sage MAS 90 or 200
modules. The Enhancement Patch Install feature (see page 50) inserts lines of
code into your existing Sage MAS 90 or 200 modules, and into programs modified
by other Master Developers (unless the Master Developer password protects the
Sage Software owned Sage MAS 90 or 200 programs). The Enhancement Patch
Install feature, creates a backup of the Sage MAS 90 or 200 modules before
inserting the lines of code. If you ever uninstall a module, your system will return to
the backed up version of the modules.
Palm Conduit Utility
The Palm Conduit Utility feature (see page 52) is required for remote modules
such as Timekeeper on PDA devices. This feature allows you to view conduit
information.
Enhancement Diagnostic Inquiry
The Enhancement Diagnostic Inquiry feature (see page 53) is located under the
Library Master Extensions Utilities menu. This feature is used to view company
parameters and program revision information. Simply select an enhancement you
want to view and the company parameters for the company you are currently in
will display, along with the revision number for all the programs in that
enhancement.
Enhancement Data Definitions
The Enhancement Data Definitions feature (see page 54) provides the technical
details for each window and field in each of the installed modules. You can use this
information for troubleshooting purposes.
Migrate Level 3 Enhancement Data
The Migrate Level 3 Data Wizard (see page 56) brings over the remote user,
device, and license information from your previous version of Sage MAS 90 or
200. If you have ScanBlaster, Timekeeper, or Remote Salesperson installed on a
4.05+ Sage MAS 90 or 200 system and also had them installed on a 3.xx level of
Chapter 2: Library Master Extensions Concepts
Library Master Extensions Manual
Page 15
Chapter 2
Sage MAS 90 or 200, then run the Migrate Level 3 Data Wizard to bring over the
setup information for these modules. The setup information that will be migrated to
your 4.05+ system is Remote User records, Remote Device Records, Remote
License records, Fid0Map records, and any MAS90xxx.ini files.
___________________________________________________________
This concludes Chapter 2: Library Master Extensions Concepts of the Library
Master Extensions manual.
C
O
N
T
E
N
T
S
S
T
B
A
C
K
I
N
D
E
X
Page 16
Library Master Extensions Manual
Chapter 2: Library Master Extensions Concepts
Chapter 3
Installing the Library Master Extensions Module
Chapter 2
Chapter 3: Installing the Library Master Extensions Module provides detailed
installation instructions, and contains the steps to register the Library Master
Extensions module.
System Requirements
Sage Software does set standard system requirements for workstations using
Sage MAS 90 or 200. See the system requirements determined by Sage Software
(www.sagesoftware.com).
Installing Library Master Extensions
C
O
N
T
E
N
T
S
S
T
Complete the following steps to install the Library Master Extensions module.
1 Close all programs.
2 Insert your Enhancements CD-ROM into your CD-ROM drive. The installation
screen appears.
B
A
C
K
I
N
D
E
X
Installation Wizard
3 Select Install Enhancements. The system starts the installation wizard.
Welcome Window
Chapter 3: Installing the Library Master Extensions Module
Library Master Extensions Manual
Page 17
Chapter 3
4 Click Next from the main Welcome screen to begin installation. The
License Agreement window appears.
C
O
N
T
E
N
T
S
Software License Agreement Window
5 Click Yes to accept the terms of the software License Agreement...
S
T
B
A
C
K
I
N
D
E
X
Installation Location Window
6 Browse to the location on your computer where your Sage MAS 90 or 200
system is installed, and click Next.
Components Window
Page 18
Library Master Extensions Manual Chapter 3: Installing the Library Master Extensions Module
Chapter 3
7 Select the enhancement you want to install from the list of applications and click
Next.
A warning dialog box displays reminding you to close Sage MAS 90 or 200
before proceeding with the installation.
C
O
N
T
E
N
T
S
Current Settings Window
S
T
8 Verify the installation settings and click Next.
.
B
A
C
K
I
N
D
E
X
Finish Installation Window
9 Click Finish to complete the installation.
You may view the Read Me file by selecting the Launch Read Me check box.
System Startup
System Startup is an automatic procedure that must be performed once per
company. This procedure is initiated the first time you access Library Master
Extensions for a specific company.
Set Up the Library Master Extensions in Role Maintenance
You must make sure that you check the Library Master Extensions module in the
Role Maintenance feature of the Sage MAS 90 or 200 Library Master module.
Chapter 3: Installing the Library Master Extensions Module
Library Master Extensions Manual
Page 19
Chapter 3
1 From the Main menu of Sage MAS 90 or 200 Library Master, select Role
Maintenance. The Role Maintenance window appears.
C
O
N
T
E
N
T
S
Role Maintenance Window
2 Select your user role defined for your Sage MAS 90 or 200 system from the
Role field.
S
T
3 Check the Library Master Extensions option.
4 Click Accept.
B
A
C
K
Register the Library Master Extensions Module
I
N
D
E
X
You can install all enhancements for a 45-access trial period. When you purchase
an enhancement, you will receive a registration ID and key from your reseller, or
you can access the key through the Internet.
You register enhancements through the Library Master Extensions module.
1 From the Main menu of the Library Master Extensions module, select
Enhancement Registration. The Enhancement Registration window appears.
Enhancement Registration Window
Page 20
Library Master Extensions Manual Chapter 3: Installing the Library Master Extensions Module
Chapter 3
2 Enter the registration key in the Registration Key field.
You can also access the registration key by clicking the Via Internet button.
3 Enter the unlocking key in the Product Key field.
4 Click Accept. The system will register your purchased enhancements.
See the Enhancement Registration section (see page 28) for more information
about this feature.
Sage MAS 200 or Sage MAS 200 for SQL Installations
C
O
N
T
E
N
T
S
S
T
B
A
C
K
I
N
D
E
X
After the installation or upgrade is completed on the Sage MAS 200 server, you
must run the Client Server Workstation Install on each workstation for each
enhancement that has been installed or upgraded.
1 To run the Client Server Workstation Install, click the Main menu of the Library
Master Extensions module.
2 Click the Client/Server Workstation Install menu option to display the Client
Server Workstation Installation window.
3 For each enhancement, there are three options that may be selected. Select
Install (the optional Help and Manual options are not required).
4 After the options have been selected, click Proceed to install the selected
options to the workstation.
See the Client/Server Workstation Install section (see page 29) for more
information about the client install.
___________________________________________________________
This concludes Chapter 3: Installing the Library Master Extensions Module of the
Library Master Extensions manual.
Chapter 3: Installing the Library Master Extensions Module
Library Master Extensions Manual
Page 21
Chapter 4
Navigating in Library Master Extensions
Chapter 3
Chapter 4: Navigating in Library Master Extensions contains instructions on how to
access specific features of the Library Master Extensions module. This chapter
describes how to access windows in Library Master Extensions, use the menu bar,
and use different button fields available in the module.
Using the Modules Tree
The Library Master Extensions module displays the menu options on the
Sage MAS 90 or 200 Modules tab, which contains the "tree-like" view. You can
access a window in the Library Master Extensions module through this tree-like
view.
C
O
N
T
E
N
T
S
S
T
B
A
C
K
I
N
D
E
X
Sage MAS 90 Window
Open a Library Master Extensions Window through the Modules Tree
1 Double-click the Library Master Extensions module from the Modules tab. The
module expands to display all the menu options available in the Library Master
Extensions module.
2 Click the menu option you want to access. The names of the windows available
in the menu appear on the right side of the Sage MAS 90 or 200 window.
Windows Available in the Main Menu
Page 22
Library Master Extensions Manual
Chapter 4: Navigating in Library Master Extensions
Chapter 4
3 Double-click the name of the window to open. The system displays the selected
window.
Using the Library Master Extensions Menu Bar
The Library Master Extensions menu bar is available through the Sage MAS 90 or
200 menu bar. You can access the windows in the Library Master Extensions
module through the menu bar.
Library Master Extensions Menu
C
O
N
T
E
N
T
S
S
T
B
A
C
K
I
N
D
E
X
Sage MAS 90 Window
Open a Library Master Extensions Window through the Menu Bar
1 From the Modules menu, select Library Master Extensions.
2 Select the menu option, and then select the name of the window. The system
displays the window.
After opening the Library Master Extensions module, the Library Master
Extensions menu appears on the right side of the menu bar. You can access
additional Library Master Extensions windows using this menu bar.
Chapter 4: Navigating in Library Master Extensions
Library Master Extensions Manual
Page 23
Chapter 4
Using Buttons and Keyboard Commands in Library Master Extensions
The Library Master Extensions module uses the standard Sage MAS 90 or 200
buttons that you use to perform a specific activity. You can also use the keyboard
to perform many of the same functions. The following table describes each button
and provides the keyboard variation of the button when applicable.
Button
C
O
N
T
E
N
T
S
S
T
B
A
C
K
I
N
D
E
X
Page 24
Keyboard
Description
TAB
Advances you to the next field on a window.
In a grid, pressing the TAB key moves focus from cell to cell. At
the end of the row, pressing TAB moves the key to the next row.
ENTER
Advances you to the next required field on a window and allows
you to save changes.
SPACEBAR
You can use the spacebar to clear or select a check box or radio
button field.
BACKSPACE
Deletes the information in a field.
ESC
Closes the current window.
In a grid, pressing the ESC key cancels a cell entry.
DELETE
Deletes information from a field.
HOME
Highlights the first item in a list box or Lookup window.
In a grid, pressing the HOME key moves focus to the first cell of a
row.
END
Highlights the last item in a list box or Lookup window.
In a grid, pressing the END key moves focus to the last cell of a
row.
PAGE UP
Highlights an item in the previous page of a list box or Lookup
window.
PAGE DOWN
Highlights an item in the next page of a list box or Lookup
window.
CTRL+HOME
In a grid, moves focus to the first row in the same cell position.
CTRL+END
In a grid, moves focus to the last row in the same cell position.
CTRL+ENTER
In a grid, adds line feeds to comments.
CTRL+INSERT
Inserts a line.
CTRL+DELETE
Deletes the current line.
ARROW
In a grid, pressing the ARROW keys moves focus from cell to
cell.
F1 in a Field
Displays the pop-up help for the current field.
F1 on a Window
Displays the help for the entire window.
F2
Displays the Lookup window for the current field. Select an item
from the Lookup window and click Select. The item appears in
the field.
Library Master Extensions Manual
Chapter 4: Navigating in Library Master Extensions
Chapter 4
Button
C
O
N
T
E
N
T
S
S
T
B
A
C
K
I
N
D
E
X
Keyboard
Description
F3
or
ALT+L
Displays an alternate Lookup window for the current field. This
window is usually more tailored for the current field than the
general Lookup window. Select an item from the Lookup window
and click Select. The item appears in the field.
F4
Allows you to print the information available on a window. This
option my display an options window, where you can select the
type of data to include in a printout.
F5
In a grid, allows you to toggle between the primary and
secondary grids.
Opens a window for you to perform a special task associated to
the field or window. Usually allows you to display/enter lot/serial
items.
CTRL+F5
Many windows display Browse buttons to help you browse
through existing records. This button displays the first record
available.
CTRL+F6
Many windows display Browse buttons to help you browse
through existing records. This button displays the previous record
available.
CTRL+F7
Many windows display Browse buttons to help you browse
through existing records. This button displays the next record
available.
CTRL+F8
Many windows display Browse buttons to help you browse
through existing records. This button displays the last record
available.
ALT+A
Saves the information you added or changed in a window.
ALT+C
Disregards any changes you entered in a window.
ALT+D
Removes the currently selected record from the
Sage MAS 90 or 200 system.
ALT+P
Click this button to print a report, journal, or listing.
ALT+V
Click this button to preview a report, journal, or listing before
printing it.
ALT+S
Click this button to change the printing configurations for the
report, journal, or listing.
SHIFT+F1
Displays Help text for the window.
ALT+O
Click OK for dialog boxes and line entries.
ALT+U
Undo line changes.
Chapter 4: Navigating in Library Master Extensions
Library Master Extensions Manual
Page 25
Chapter 4
Button
Keyboard
Description
ALT+N
Inserts a line.
ALT+E
Deletes a line.
ALT+1, 2, 3 . . .
In a data entry window, selects the first tab, second tab, third tab .
..
ALT+B
Opens a Batch window where you can start a multiple data entry
session.
Sends an e-mail to the address entered in the E-mail Address
field.
C
O
N
T
E
N
T
S
Displays a text window to enter or view additional information
about an item.
S
T
ALT+M
Opens the Memo Maintenance window where you can write a
memo.
ALT+Q
Launches the MapQuest website for directions to a location.
ALT+S
Shows the image specified at the adjacent field.
B
A
C
K
ALT+S
I
N
D
E
X
Search through a list or Lookup window for items that match a
specified search criteria. Use the Search option to limit the
number of items in a list or Lookup window.
ALT+U
Launches a website based on the URL entered at the URL
Address field.
ALT+N
Displays the next number for a record. Click this button to add a
new item.
Changes the size of the window to the expanded view.
Changes the size of the window to the standard view.
ALT+Z
Displays the details of an item.
Calculates the net balance.
F2
Opens the calculator.
F2
Opens the calendar.
Displays options for changing budget amounts.
ALT+U
Page 26
De-selects all rows in a grid.
Library Master Extensions Manual
Chapter 4: Navigating in Library Master Extensions
Chapter 4
Button
Keyboard
Description
ALT+S
Selects all rows in a grid.
Selects a column in a grid.
Selects a row in a grid.
C
O
N
T
E
N
T
S
S
T
ALT+N
Inserts a row in a grid.
ALT+W
Moves a row down in a grid.
ALT+U
Moves a row up in a grid.
This button prints a report from a grid.
ALT+E
Deletes a row in a grid.
ALT+R
Resets a row in a grid.
B
A
C
K
Saves changes.
I
N
D
E
X
Switches between displaying the New Balance view and the
Debits and Credits view.
Lists files in a directory.
Opens a Text Maintenance window where you can write an
extended description.
This button is available on a Lookup window. Click Filters to enter
additional filters for the lookup. The text on this button will appear
in red, if filters already exist.
This button is available on a Lookup window. Click Custom to
create a unique lookup view by adding, removing, and/or
modifying columns and filters.
This button is available on a Lookup window. Click Find to
activate the search.
Click Select to select a record, or double-click the current line.
___________________________________________________________
This concludes Chapter 4: Navigating in Library Master Extensions of the Library
Master Extensions manual.
Chapter 4: Navigating in Library Master Extensions
Library Master Extensions Manual
Page 27
Chapter 5
Using the Main Menu
Chapter 4
Chapter 5: Using the Main Menu teaches you how to use the features available in
the Main menu of the Library Master Extensions module.
How to Use the Main Menu
Open a Window from the Main Menu
1 Double-click the Library Master Extensions module from the Modules tab. The
module expands to display all the menu options available in the Library Master
Extensions module.
2 Click the Main menu. The names of the windows available in the menu appear
on the right side of the Sage MAS 90 or 200 window.
C
O
N
T
E
N
T
S
S
T
Windows Available in the Main Menu
B
A
C
K
I
N
D
E
X
3 Double-click the name of the window to open. The system displays the selected
window.
Enhancement Registration
The Enhancement Registration feature registers enhancements that you install. All
enhancements require registration for complete access to all software features.
Register an Enhancement
1 From the Main menu of the Library Master Extensions module, select
Enhancement Registration. The Enhancement Registration window appears.
Enhancement Registration Window
Page 28
Library Master Extensions Manual
Chapter 5: Using the Main Menu
Chapter 5
This window displays the enhancements installed on your system, whether they
are registered, and the expiration date if one applies.
2 To obtain your registration key and product key without contacting your reseller,
click the Via Internet button. The following warning may appear.
Sage MAS 90 Dialog
C
O
N
T
E
N
T
S
S
T
B
A
C
K
I
N
D
E
X
3 Click Continue and your registration key, product keys, and licenses will be
updated.
4 If you do contact your reseller, enter the registration key the reseller supplied in
the Registration Key field. This number will be between 4 and 20 characters.
5 Enter the unlocking key from your reseller in the Product Key field.
This number is 25 characters and unlocks all purchased enhancements.
If you purchase another enhancement, you will receive a new product key that
will work for newly purchased products in addition to existing modules.
6 To access your unlocking keys from the Internet, click the Via Internet button.
7 Click Accept. The system registers the purchased enhancements.
Client/Server Workstation Install
The Client/Server Workstation Install feature allows your company to install
client/server versions of enhancements on your company’s server, as well as on
your local workstation.
5SPECIAL NOTE: This feature is used with Sage MAS 200 ONLY!
You can install only the program files necessary to run the enhancements on your
employees’ workstations, and the full installation on your company’s server.
This utility automatically detects the enhancements that have been installed on
your company’s server and presents you with a series of options to copy select
program files to your local workstation. You can opt to install program-specific
bitmap images, help files, and user manuals to your local workstation by selecting
the appropriate check boxes for the desired application(s).
Chapter 5: Using the Main Menu
Library Master Extensions Manual
Page 29
Chapter 5
Perform the Client/Server Workstation Installation
1 From the Main menu of the Library Master Extensions module, select Client
Server Workstation Install. The Client Server Workstation Installation window
appears.
C
O
N
T
E
N
T
S
Client Server Workstation Installation Window
The Application field displays the enhancements that are installed on your
company’s server.
S
T
2 Check the Install field to copy program-specific bitmap images for the selected
application(s) from your company’s server to your local workstation.
A new folder is created within your local Sage MAS 200 directory for each
selected application and contains the installed bitmap images.
B
A
C
K
3 Check the Help field to copy the help files for the selected application(s) from
your company’s server to your local workstation.
The installed help files are placed in the Help folder within your local Sage MAS
200 directory.
I
N
D
E
X
4 Check the Manual field to copy the user manual for the selected application(s)
from your company’s server to your local workstation.
The installed user manuals are placed in the Docs folder within your local Sage
MAS 200 directory.
5 Click Proceed to copy the selected files from the server to your local
workstation.
Spell Check Maintenance
Spell Check Maintenance allows you to check the spelling of any data-entry field in
Sage MAS 90 or 200 by pressing CTRL + F1 (press F11 in a Citrix environment).
Use the Spell Check Maintenance feature to specify the fields you require to be
spell checked whenever they are modified.
Page 30
Library Master Extensions Manual
Chapter 5: Using the Main Menu
Chapter 5
Select the Items to be Spell Checked
1 From the Main menu of the Library Master Extensions module, select Spell
Check Maintenance. The Spell Check Maintenance window appears.
C
O
N
T
E
N
T
S
S
T
B
A
C
K
I
N
D
E
X
Spell Check Maintenance Window
2 Open the module you want to use the spell check feature with by double-clicking
the
icon to view all the menus for the module.
3 Double-click the
icon for a menu to view all the windows you can use the
spell check feature with.
4 Double-click the
icon for a window to view all the entry fields you can use the
spell check feature with. The Spell Check Maintenance window for the selected
module appears.
Time/Expense Entry Spell Check Maintenance Window
Chapter 5: Using the Main Menu
Library Master Extensions Manual
Page 31
Chapter 5
5 The fields that you can spell check are marked by the Toggle Automatic Spell
Check (
) button. Select the fields you want to spell check by clicking the
button. The icon changes to a check mark
icon.
5NOTE: The field names are coded because the fields are read directly
from the Sage MAS 90 or 200 libraries. As a result, Spell Check Maintenance
can check the spelling of any field in your system, including fields developed for
future releases of the software.
Use the Customizer feature in the Custom Office module to research the
names of the fields, or use the Data Dictionary for the names of fields within
your modules.
6 Close the module window when finished selecting all the fields that will be spell
checked. The Spell Check Maintenance window appears.
C
O
N
T
E
N
T
S
S
T
7 Click Close to save the changes.
Dictionary Maintenance
You can create your own company dictionary to be used with the Spell Check
Maintenance feature. The Dictionary Maintenance feature allows you to enter
terms unique to your business that would not normally be available in a dictionary.
This feature also lets you specify unique capitalization rules for specific words. For
example, if a user entered the word Hightower and you want the term to appear
as HighTower, you can correct the capitalization by entering the correct
capitalization in Dictionary Maintenance. Dictionary Maintenance can also be used
to replace a word. For example, if the HighTower abbreviation HTI is entered, you
can set Dictionary Maintenance to change it to HighTower.
B
A
C
K
I
N
D
E
X
Create Dictionary Terms
1 From the Main menu of the Library Master Extensions module, select
Dictionary Maintenance. The Dictionary Maintenance window appears.
Dictionary Maintenance Window
2 Enter the term you want to add to the dictionary in the Word field. This term can
be your company-specific term, or a commonly misspelled term.
Page 32
Library Master Extensions Manual
Chapter 5: Using the Main Menu
Chapter 5
3 Select the dictionary action to the term from the Action field. You can determine
how Sage MAS 90 or 200 will respond when a user enters the term. The
following table describes each term:
C
O
N
T
E
N
T
S
S
T
B
A
C
K
Option
Description
User Defined Word
Select User Defined Word to create a new word that is not
normally found in a dictionary. When you select this
option, the Replacement field is not necessary.
Automatic - Original Case
Select Automatic - Original Case to have Sage MAS 90 or
200 automatically change a term, using the same case as
the original term entered. For example, the words
cancelled and canceled are both considered correct
spellings. You can set Sage MAS 90 or 200 to
automatically replace canceled with cancelled. The word
will be entered in the correct case size (capital or small)
as was originally entered by the user.
Automatic - Replacement
Case
Select Automatic - Replacement Case to have
Sage MAS 90 or 200 automatically change a term to the
case size you want. For example, if a user entered the
word Hightower and you want the term to appear as
HighTower, you can set Sage MAS 90 or 200 to
automatically replace the term.
Conditional - Original
Case
Just as with the Automatic - Original Case option, you can
set Sage MAS 90 or 200 to change a term, using the
same case as the original term entered. However, with
the Conditional - Original Case feature, this change will
not be automatic. The term will be highlighted during entry
and the correct term offered as a suggestion to the user.
The user can then select whether or not to change the
term.
Conditional Replacement Case
Just as with the Select Automatic - Replacement Case
option, you can set Sage MAS 90 or 200 to change a term
to the case size you want. However, with the Conditional Replacement Case feature, this change will not be
automatic. The term will be highlighted during entry and
the correct term offered as a suggestion to the user. The
user can then select whether or not to change the term.
I
N
D
E
X
4 Enter your corrected term in the Replacement field. This term will be the word
that is used in Sage MAS 90 or 200.
5 When finished entering dictionary terms, click Accept to save the changes.
5NOTE: The next time you open the Dictionary Maintenance window, the
dictionary terms will be sorted alphabetically.
___________________________________________________________
This concludes Chapter 5: Using the Main Menu in the Library Master Extensions
manual.
Chapter 5: Using the Main Menu
Library Master Extensions Manual
Page 33
Chapter 6
Using the Remote Menu
Chapter 5
Chapter 6: Using the Remote Menu contains instructions on how to set up remote
modules.
How to Use the Remote Menu
Open a Window from the Remote Menu
1 Double-click the Library Master Extensions module from the Modules tab. The
module expands to display all the menu options available in the Library Master
Extensions module.
2 Click the Remote menu. The names of the windows available in the menu
appear on the right side of the Sage MAS 90 or 200 window.
C
O
N
T
E
N
T
S
S
T
Windows Available in the Remote Menu
B
A
C
K
I
N
D
E
X
3 Double-click the name of the window to open. The system displays the selected
window.
Device Setup Overview
The PDA Synchronization software consists of software provided by the handheld
operating system vendors (such as PalmSource for the Palm OS and Microsoft for
Pocket PCs) and software written in the ProvideX programming language of
Sage MAS 90 and Sage MAS 200.
Timekeeper and Remote Salesperson use AppForge MobileVB™ software (but
not ScanBlaster). Timekeeper and ScanBlaster require device licenses, but
Remote Salesperson does not (Remote Salesperson requires an external user
licenses). The device license structure is based on the user, device, and
application.
• Users are set up in Remote User Maintenance (see page 40).
• Devices are set up in Remote Device Maintenance (see page 40).
• Licenses are managed in Remote License Maintenance (see page 41).
Standard Storage Locations
PDA Applications are stored in the Sage MAS 90 or 200 directory structure. Palm
applications are located at MAS90\HT\Palm, and Pocket PC applications are
located at MAS90\HT\WinCE.
Page 34
Library Master Extensions Manual
Chapter 6: Using the Remote Menu
Chapter 6
The applications are stored in the Sage MAS 90 or 200 directory structure
primarily to ease installation of service packs. It also means that everyone will
easily know where the latest application is.
Recommended and Minimum Hardware
These hardware specifications indicate the recommended, and lowest possible,
hardware configurations.
Palm OS Devices
• Recommended: Palm OS 5.0 or higher, 8 MB of RAM or higher
• Minimum: Palm OS 3.5 or higher, 8 MB of RAM or higher
C
O
N
T
E
N
T
S
S
T
B
A
C
K
I
N
D
E
X
Pocket PC Devices
• Pocket PC 2002 or Pocket PC 2003 handheld running an ARM/XScale, MIPS,
or SH3 processor
• At least 4 MB of available storage space (RAM)
• Will not work from storage cards (such as SD cards)
Installing and Configuring Your PDA Device
This section briefly describes how to install software to your PDA device and what
to configure before you can use the enhancement. Full details for installing
software to your PDA device exist in the user manual for the module being
installed. View the Glossary (see page 60) for any terms not familiar to you.
Palm OS Devices
Synchronization of data from a Palm OS device is handled by the HotSync®
Manager. The HotSync Manager runs a conduit. The execution of the conduit is
determined by two conditions. The first is that the conduit must be registered with
the HotSync Manager. The second is that the Palm OS application associated with
the conduit is present on the device.
To use a module on a Palm OS device, a Palm Desktop of 4.0 or later must be
installed, and at least one Palm OS device must have synchronized with the
workstation. Preparing a Palm OS device for synchronization with Sage MAS 90 or
200 is a three-step process. The first part is done by creating an entry in Remote
Device Maintenance. Secondly, for Timekeeper and ScanBlaster, a license is
needed. You can reserve a license using Remote License Maintenance.
To install a module to a Palm OS device, you must use the PDA Application Install
(see page 42) feature. The installation process must be performed once per
device. The application will not appear on the device until this wizard is
successfully run.
Chapter 6: Using the Remote Menu
Library Master Extensions Manual
Page 35
Chapter 6
Pocket PC Devices
To use a module on a Pocket PC device, first you must create an entry in Remote
Device Maintenance (see page 40). Secondly, for Timekeeper and ScanBlaster, a
license is needed. You can reserve a license using Remote License Maintenance
(see page 41). For synchronizing with a Pocket PC device, Sage MAS 90 or 200
runs a synchronization program residing on the device. The execution of this is
based on two conditions. The first is that the device is connected to the
workstation via ActiveSync®. The second is that the Pocket PC application
associated with the synchronization program is present on the device.
To install a module to a Pocket PC device, you must use the PDA Application
Install (see page 42) feature. The installation process must be performed once per
device. Your Pocket PC device must be connected to the workstation for this
command to succeed.
C
O
N
T
E
N
T
S
Synchronization Architecture
This section briefly describes how the Palm OS and Pocket PC synchronize the
data with Sage MAS 90 or 200 for the remote modules. The synchronization
process is different for the Palm OS and Pocket PC devices. View the Glossary
(see page 60) for any terms not familiar to you.
S
T
B
A
C
K
I
N
D
E
X
Page 36
Library Master Extensions Manual
Chapter 6: Using the Remote Menu
Chapter 6
Palm OS Devices
Application Conduit (i.e. SPWXAA)
Sage MAS 90 and Sage MAS 200 Library Master
PalmSource COM Objects
COM Objects
HotSync Manager
C
O
N
T
E
N
T
S
(Palm Desktop)
S
T
B
A
C
K
I
N
D
E
X
General Architecture of Synchronizing Sage MAS 90 with a Palm OS Device
The HotSync Manager itself is what does the actual communication between the
Palm OS device and the workstation. It takes care of things such as protocol
(network, serial, USB, etc.), user identification, and actually starting the individual
conduits.
Chapter 6: Using the Remote Menu
Library Master Extensions Manual
Page 37
Chapter 6
Application Conduit (i.e. SPWXAA)
MAS 90 and MAS 200 Library Master
WindX Connection
MAS 90 and MAS 200 Library Master
PalmSource COM Objects
C
O
N
T
E
N
T
S
COM Objects
HotSync Manager
(Palm Desktop)
S
T
HotSync Connection
B
A
C
K
I
N
D
E
X
General Architecture of Synchronizing MAS 200 with a Palm OS Device
The synchronization of a Palm OS device across a Sage MAS 200 connection has
a slightly different architecture. Most of the code that actually sends data to the
HotSync Manager must be executed on the same workstation as the HotSync
Manager. To achieve this effect, copies of the necessary Library Master programs
are on the workstation as well.
With a Sage MAS 200 connection there are at least two layers of slower wire-line
communication, so synchronizing in this scenario may be slower than
synchronizing with a Sage MAS 90 installation. This fact is especially important to
keep in mind when using technologies like Citrix.
Page 38
Library Master Extensions Manual
Chapter 6: Using the Remote Menu
Chapter 6
Pocket PC Devices
Application Conduit (i.e. SPWXAA)
MAS 90 and MAS 200 Library Master
COM Objects
ActiveSync
Sync Programs
C
O
N
T
E
N
T
S
S
T
AppForge Booster
Sync Connection
B
A
C
K
I
N
D
E
X
General Architecture of Synchronizing MAS 90 with a Pocket PC Device
The bottom portion of this diagram represents the Pocket PC device. The upper
portion represents the workstation. Synchronization on a Pocket PC device is
accomplished by selecting Windows CE Sync (see page 49) from the Remote
menu of the respective module.
Remote User Device Licenses
The ScanBlaster and Timekeeper remote modules require device licenses in order
to use Sage MAS 90 or 200 data. Each User/Device/Application combination
requires one license. The number of device licenses available for any given
Sage MAS 90 or 200 system, is managed by the registration of the Library Master
Extensions module. Please contact a reseller to purchase licenses. If the Library
Chapter 6: Using the Remote Menu
Library Master Extensions Manual
Page 39
Chapter 6
Master Extensions module is not registered, it will allow 45 days for demonstration
purposes, which is standard for any Sage MAS 90 or 200 module. The Remote
License Maintenance (see page 41) feature will allow one User/Device/Application
to be entered and accessed for 45 days.
Remote User Maintenance
The Remote User Maintenance feature is used to create remote users. You use
this feature if your company uses the ScanBlaster or Timekeeper modules.
Create a Remote User
1 From the Remote menu of the Library Master Extensions module, select
Remote User Maintenance to open the Remote User window.
C
O
N
T
E
N
T
S
S
T
B
A
C
K
I
N
D
E
X
Remote User Window
2 Enter the login name of the user in the Remote User field.
3 Enter the full name of the user in the User Name field.
4 Enter the user’s password in the Password field.
5 Enter the default company code in the Default Company field.
6 Check Use Last Company to default the data to the last active company.
5NOTE: The Default Company and Use Last Company fields work with
the Internet device for .timekeeper.
7 Click Accept to save the changes.
Remote Device Maintenance
The Remote Device Maintenance feature is used to create remote devices for
Sage MAS 90 or 200.
Page 40
Library Master Extensions Manual
Chapter 6: Using the Remote Menu
Chapter 6
Create a Remote Device
1 From the Remote menu of the Library Master Extensions module, select
Remote Device to open the Remote Device window.
C
O
N
T
E
N
T
S
S
T
B
A
C
K
I
N
D
E
X
Remote Device Window
2 Enter the name of the device in the Device Name field.
3 Select the type of device from the Device Type field.
• Select Palm OS if the device is a Palm device,.
• Select Windows CE if the device is a Pocket PC (Windows CE) device.
• Select Computer for a workstation connection.
4 Click Accept. The system saves the changes.
Remote License Maintenance
The Remote License Maintenance feature is used to assign available licenses to
particular applications. Each User/Device/Application combination requires one
license.
You use this feature if your company uses the ScanBlaster or Timekeeper
modules.
Chapter 6: Using the Remote Menu
Library Master Extensions Manual
Page 41
Chapter 6
Create a Remote License
1 From the Remote menu of the Library Master Extensions module, select
Remote License Maintenance to open the Remote License window.
C
O
N
T
E
N
T
S
S
T
Remote License Maintenance Window
2 Select the module from the Module field.
B
A
C
K
3 Select the name of the remote user created on the on the Remote User
Maintenance window (see page 40) from the Remote User field.
I
N
D
E
X
4 Select the name of the device you created on the Remote Device Maintenance
window (see page 40) from the Remote Device field.
5 Click Accept. This license is set to Pending until the user synchronizes the
data.
PDA Application Install
The PDA Application Install feature is required to install all remote modules on
PDA devices. You must connect your PDA device while installing.
Page 42
Library Master Extensions Manual
Chapter 6: Using the Remote Menu
Chapter 6
Install the Module on a Palm Device
1 From the Remote menu of the Library Master Extensions module, select PDA
Application Install. The PDA Application Installation wizard starts.
C
O
N
T
E
N
T
S
S
T
PDA Application Installation Wizard Window
2 Click Next on the Welcome screen to access the next window.
B
A
C
K
I
N
D
E
X
PDA Application Installation Wizard Window
3 Select the enhancement to install from the Choose the application to install
field, and click Next.
Chapter 6: Using the Remote Menu
Library Master Extensions Manual
Page 43
Chapter 6
The following window appears.
C
O
N
T
E
N
T
S
PDA Application Installation Wizard Window
4 Select the remote device you created, and check your device for the minimum
requirements (see the instructions under the How do I check? section in the
installation wizard).
S
T
5 Check My device conforms, and then click Next to access the next window.
If you have multiple enhancements being installed on the same PDA device, the
following installation window appears.
B
A
C
K
I
N
D
E
X
PDA Application Installation Wizard Window
6 Select the applications to install, and click Next.
Page 44
Library Master Extensions Manual
Chapter 6: Using the Remote Menu
Chapter 6
The following window appears. .
C
O
N
T
E
N
T
S
S
T
B
A
C
K
PDA Application Installation Wizard Window
7 Click Next to install the application.
5NOTE: Perform a HotSync operation on the Palm OS device to finish
installing the application.
After performing the HotSync, the following window appears.
I
N
D
E
X
PDA Application Installation Wizard Window
8 Click Finish to close the installation wizard.
Chapter 6: Using the Remote Menu
Library Master Extensions Manual
Page 45
Chapter 6
Install the Module on a Pocket PC Device
1 From the Remote menu of the Library Master Extensions module, select PDA
Application Install. The PDA Application Installation wizard starts.
C
O
N
T
E
N
T
S
PDA Application Installation Wizard Window
S
T
2 Click Next on the Welcome screen to access the following window.
B
A
C
K
I
N
D
E
X
PDA Application Installation Wizard Window
Page 46
Library Master Extensions Manual
Chapter 6: Using the Remote Menu
Chapter 6
3 Select the enhancement to install from the Choose the application to install
field, and click Next.
C
O
N
T
E
N
T
S
S
T
B
A
C
K
PDA Application Installation Wizard Window
4 Select the remote device you created, and check your device for the minimum
requirements (see the instructions under the How do I check? section in the
installation wizard).
5 Check My device conforms, and click Next to access the next window.
If you have multiple enhancements being installed on the same PDA device, the
following installation window appears.
I
N
D
E
X
PDA Application Installation Wizard Window
6 Select the applications to install, and click Next.
Chapter 6: Using the Remote Menu
Library Master Extensions Manual
Page 47
Chapter 6
The following window appears.
C
O
N
T
E
N
T
S
PDA Application Installation Wizard Window
7 Click Install to install the application. The installation process begins.
8 If the following dialog appears, click Yes..
S
T
B
A
C
K
Application Downloading Complete Dialog
9 Check your device to see if any additional steps are required.
I
N
D
E
X
10After completing the additional steps, click OK. The following dialog appears for
the module you are installing.
MAS 90 Dialog
11Click OK. The following dialog appears.
Installing Applications Dialog
12Click Yes. The following dialog appears.
Application Downloading Complete Dialog
13Check your device to see if any additional steps are required.
Page 48
Library Master Extensions Manual
Chapter 6: Using the Remote Menu
Chapter 6
14After completing the additional steps, click OK.
After you install the application, the following window appears.
C
O
N
T
E
N
T
S
S
T
PDA Application Installation Wizard Window
15Click Finish to close the installation wizard.
Windows CE Sync
B
A
C
K
Use the Windows CE Sync window to locally synchronize your application on your
Windows CE device with your Sage MAS 90 or 200 system.
I
N
D
E
X
Synchronize Your Windows CE Device with the Sage MAS 90 or 200 System
1 From the Remote menu in the Library Master Extensions module, select
Windows CE Sync. The MAS 90 Synchronization window appears.
Timekeeper CE Sync Window
2 Ensure your Windows CE device is connected and Sage MAS 90 or 200
PDA applications are not running on the device before performing this
synchronization procedure.
3 Click Sync. The system synchronizes the data.
___________________________________________________________
This concludes Chapter 6: Using the Remote Menu of the Library Master
Extensions manual.
Chapter 6: Using the Remote Menu
Library Master Extensions Manual
Page 49
Chapter 7
Using the Utilities Menu
Chapter 6
Chapter 7: Using the Utilities Menu contains instructions on how to use the
features available in the Library Master Extensions Utilities menu.
How to Use the Utilities Menu
Open a Window from the Utilities Menu
1 Double-click the Library Master Extensions module from the Modules tab. The
module expands to display all the menu options available in the Library Master
Extensions module.
2 Click the Utilities menu. The names of the windows available in the menu
appear on the right side of the Sage MAS 90 or 200 window.
C
O
N
T
E
N
T
S
S
T
Windows Available in the Utilities Menu
B
A
C
K
I
N
D
E
X
3 Double-click the name of the window to open. The system displays the selected
window.
Enhancement Patch Install
The Enhancement Patch Install feature installs modules by inserting lines of code
into your existing Sage MAS 90 or 200 modules, and into programs modified by
other Master Developers (unless the Master Developer password protects the
Sage Software owned Sage MAS 90 or 200 programs).
Complete the Enhancement Patch Installation
1 Make a backup of your Sage MAS 90 or 200 directory before installing
applications.
2 From the Utilities menu of the Library Master Extensions module, select
Enhancement Patch Install. The following Sage MAS 90 or 200 dialog
appears.
Sage MAS 90 Dialog
Page 50
Library Master Extensions Manual
Chapter 7: Using the Utilities Menu
Chapter 7
3 Make sure you have the backups, and click Yes to begin the patch installation.
The Enhancement Patch Installation window appears.
Installation
Removal
C
O
N
T
E
N
T
S
S
T
B
A
C
K
I
N
D
E
X
Enhancement Patch Installation Window
4 Select the Installation/Removal option from the Patch options field.
• Select Installation to install modules.
• Select Removal to remove any modules.
5 Select the module you want to install from the Enhancement field, and then
click the check box available for to the selected module.
• Click the Select All (
• Click the Unselect All (
) button to select all modules.
) button to clear the selection.
6 Click Proceed. The following dialog appears.
Sage MAS 90 Dialog
7 Click Yes. The system installs the enhancement.
Chapter 7: Using the Utilities Menu
Library Master Extensions Manual
Page 51
Chapter 7
Palm Conduit Utility
The Palm Conduit Utility feature registers the Palm OS conduit for remote
modules that have Palm OS components, such as Timekeeper. This utility is
meant as an advanced Palm OS conduit setup and configuration tool. Access
should be limited to system administrators, but it is not strictly necessary. All of the
functions needed by the actual PDA users are contained with the PDA install
wizards.
Configure the Conduit
1 From the Utilities menu of the Library Master Extensions module, select Palm
Conduit Utility. The following Sage MAS 90 or 200 window appears.
C
O
N
T
E
N
T
S
S
T
B
A
C
K
I
N
D
E
X
Sage MAS 90 Conduit Configuration Window
2 Select the remote module from the Installed PDA Modules field.
3 Check Conduit Registered? if you want to register the conduit on the client.
Clear this field to remove it.
5NOTE: Click the Register With Defaults button to reset the correct
default setting. This command is useful if your conduit path settings are
incorrect.
Page 52
Library Master Extensions Manual
Chapter 7: Using the Utilities Menu
Chapter 7
5NOTE: DO NOT click the Toggle Debugging button unless directed by a
Help Desk technician.
4 Click the Apply button. The system registers the conduit and displays the
following dialog.
Sage MAS 90 Dialog
5 Click OK.
C
O
N
T
E
N
T
S
S
T
Unregister the Synchronization DLL
Use the Unregister Sync DLL feature only under the instruction of a help desk
representative.
1 Click the Unregister Sync DLL button. The system displays the following
warning.
B
A
C
K
I
N
D
E
X
Sage MAS 90 Dialog
2 Click OK. The following dialog appears.
Sage MAS 90 Dialog
3 Click OK when finished.
Enhancement Diagnostic Inquiry
The Enhancement Diagnostic Inquiry feature allows you to view company
parameters and program revision information. You can use this feature during
troubleshooting procedures. You can also print this information for a list of the
revision number for all the programs in the selected module.
Chapter 7: Using the Utilities Menu
Library Master Extensions Manual
Page 53
Chapter 7
Perform Diagnostic Testing
1 From the Utilities menu of the Library Master Extensions module, select
Enhancement Diagnostic Inquiry. The Enhancement Diagnostic Inquiry
window appears.
C
O
N
T
E
N
T
S
S
T
Enhancement Diagnostic Inquiry Window
2 Select the enhancement you want to view from the Application field.
B
A
C
K
The Enhancement Diagnostic Inquiry window lists all the files for the
enhancement and the version number of each file. You can use this information
during troubleshooting.
I
N
D
E
X
3 Click OK when finished.
Enhancement Data Definitions
The Enhancement Data Definitions feature provides the technical details for each
field in each of the installed modules. You can use this information for
troubleshooting purposes, to find fields that you want to add to graphical reports,
or to set up imports.
Access the Enhancement Data Definitions
1 From the Utilities menu of the Library Master Extensions module, select
Enhancement Data Definitions. The Enhancement Data Definitions window
appears.
Page 54
Library Master Extensions Manual
Chapter 7: Using the Utilities Menu
Chapter 7
Enhancement Data Definitions Window
C
O
N
T
E
N
T
S
2 Select the module you want to view the definitions for, and click Proceed. The
system displays the definitions for the module.
S
T
B
A
C
K
I
N
D
E
X
Enhancement Data Definitions for Point of Sale Professional
The Technical Reference and Support Guide (TRSG) will open in Internet
Explorer. The TRSG displays all of the data files for the selected module, as well
as their Description, Type, Key, and Record size.
Chapter 7: Using the Utilities Menu
Library Master Extensions Manual
Page 55
Chapter 7
3 Click the name of the Data File you want to view. The system displays the detail
for the data file.
C
O
N
T
E
N
T
S
S
T
B
A
C
K
I
N
D
E
X
Enhancement Data Definitions for Point of Sale Professional
Migrate Level 3 Enhancement Data
The Migrate Level 3 Data Wizard brings over the remote user, device, and license
information from your previous version of Sage MAS 90 or 200. If you have
ScanBlaster, Timekeeper, or Remote Salesperson PDA installed on a 4.00+
Sage MAS 90 or 200 system, and also had them installed on a 3.xx level of
Sage MAS 90 or 200, then run the Migrate Level 3 Data Wizard to bring over the
setup information for these modules. The setup information that will be migrated to
your 4.00+ system is Remote User records, Remote Device Records, Remote
License records, Fid0Map records, and any MAS90xxx.ini files.
Page 56
Library Master Extensions Manual
Chapter 7: Using the Utilities Menu
Chapter 7
Migrate Level 3 Data
1 From the Utilities menu of the Library Master Extensions module, select
Migrate Level 3 Enhancement Data. The Migrate Level 3 Data Wizard
appears.
C
O
N
T
E
N
T
S
S
T
Migrate Level 3 Data Wizard
2 From the Welcome window, click Next to continue. The following window
appears.
B
A
C
K
I
N
D
E
X
Migrate Level 3 Data Wizard
3 Enter the password for the administrator if security is turned on for the
Sage MAS 90 or 200 system.
If security is NOT turned on, then this screen will not appear.
4 Click Next to continue.
Chapter 7: Using the Utilities Menu
Library Master Extensions Manual
Page 57
Chapter 7
The following window appears.
C
O
N
T
E
N
T
S
Migrate Level 3 Data Wizard
5 Enter the path for the Sage MAS 90 or 200 Level 3.xx system that has the data
to copy.
S
T
You can click the Browse button and navigate to the Sage MAS 90 or 200 Level
3.xx directory.
6 Click Next to continue. The following window appears.
B
A
C
K
I
N
D
E
X
Migrate Level 3 Data Wizard
7 Click Proceed to begin copying the data from the Sage MAS 90 or 200 Level
3.xx data.
Page 58
Library Master Extensions Manual
Chapter 7: Using the Utilities Menu
Chapter 7
8 The following window appears during the migration. You can click Cancel to
stop the migration process.
C
O
N
T
E
N
T
S
S
T
Migrate Level 3 Data Wizard
The following window appears when the migration is finished.
B
A
C
K
I
N
D
E
X
Migrate Level 3 Data Wizard
9 Click Finish to end the Migrate Level 3 Data Wizard.
If the Display Migration Log check box is selected, the Migration Log will open in
Notepad when you click Finish. The Migration Log details the Remote Users,
Remote Devices, Remote Licenses, Fid0Maps, and MAS90xxx.ini files that were
copied to your 4.00+ Sage MAS 90 or 200 system.
___________________________________________________________
This concludes Chapter 7: Using the Utilities Menu of the Library Master
Extensions manual.
Chapter 7: Using the Utilities Menu
Library Master Extensions Manual
Page 59
Glossary
Chapter 7
This glossary contains the name of the originator of the term in italics after each
term.
ActiveSync
The software provided by Microsoft that facilitates communication between the
Pocket PC device and the workstation. Microsoft
AppForge Booster
PDA Applications (starting with 3.72) are written for this environment. It is
necessary supporting software. AppForge
C
O
N
T
E
N
T
S
S
T
COM Objects
COM objects are a Windows-level technology used to facilitate communication
between ProvideX and the PDA. On a Palm OS Device, the developer used their
own COM objects in addition to COM objects provided by PalmSource. On a
Pocket PC device, the developer used only their own COM objects. Windows
Conduit
The application-specific program that determines what data to send to and from
the Palm OS device. This program is registered with the HotSync Manager as a
specific application’s conduit. PalmSource
B
A
C
K
I
N
D
E
X
Device ID
This is used to uniquely identify a particular device to Sage MAS 90 or 200.
HighTower
Device Name
The name assigned to a device in Sage MAS 90 or 200. This name may be
different from the Palm OS User Name assigned to the device, or in the case of a
Pocket PC, different from the Pocket PC’s device name. However, it is
recommended that the name be the same to facilitate easy identification of
devices. HighTower
Sync Programs
The COM Objects written by the developer to communicate with the Palm Desktop
(for Palm OS) and Active Sync (Pocket PC). HighTower
Sync Setup
Installs the Sync Programs and COM Objects provided by PalmSource.
HighTower
HotSync Manager
The software provided by PalmSource that facilitates communication between the
Palm OS device and the workstation. PalmSource
Page 60
Library Master Extensions Manual
Glossary
Library Master
The Palm OS Library Master or Pocket PC Library Master on the appropriate
device. HighTower
Palm Desktop
Umbrella term describing not only the actual Palm Desktop PC application, but
also the HotSync Manager and supporting programs. PalmSource
Palm OS User: [Name]
The name of the current user of a Palm OS Device. The name currently assigned
to a Palm OS device is available in the device’s HotSync application, at the
upper-right corner of the screen. PalmSource
C
O
N
T
E
N
T
S
S
T
B
A
C
K
I
N
D
E
X
Glossary
Library Master Extensions Manual
Page 61
Index
A
Role Maintenance 19
Startup 19
System Requirements 17
Using the Manual 8
ActiveSync 36
Glossary Term 60
AppForge Booster
Glossary Term 60
AppForge MobileVB 34
M
B
Button Fields 24
C
C
O
N
T
E
N
T
S
S
T
B
A
C
K
Client/Server Workstation Install 13, 14, 29
Client/Server Workstation Installation
Performing 30
COM Objects
Glossary Term 60
Conduit
Configuring 52
Glossary Term 60
D
Device ID
Glossary Term 60
Device Name
Glossary Term 60
Device Setup Overview 34
Diagnostic Testing 54
E
Enhancement Data Definitions 13, 15, 54
Enhancement Diagnostic Inquiry 13, 15, 53
Enhancement Patch Install 13, 15, 50
Enhancement Registration 13, 28
H
Help 10
Context-Sensitive 12
HighTower 8
HotSync Manager 35
Glossary Term 60
Manual
Graphic Conventions 9
Online 10
Sections in 9
Text Conventions 10
MAS 200 or MAS 200 for SQL Installations 21
Menu Bar
Using 23
Migrate Level 3 Enhancement Data 13, 15, 56
Modules Tree
Using 22
Installation
For MAS 200 or MAS 200 for SQL 21
Patch Installation System 8
Palm Conduit Utility 13, 15, 52
Palm Desktop
Glossary Term 61
Palm Device
Installing a HighTower Module 43
Palm OS 34
Palm OS Devices
Recommended Hardware 35
Patch Installation 8
PDA Application Install 13, 15, 42
PDA Device
Installing and Configuring 35
Pocket PC 34
Pocket PC Device
Installing a HighTower Module 46
Pocket PC Devices
Recommended Hardware 35
ProvideX 34
Register an Enhancement 28
Remote Device
Creating 41
Remote Device Maintenance 13, 14, 40
Remote License
Creating 42
Remote License Maintenance 13, 14, 41
Remote User Device Licenses 39
Remote User Maintenance 13, 14, 40
L
Library Master
Glossary Term 61
Library Master Extensions Module
Install 17
Navigation 22
Overview 8
Registering 20
Page 62
B
C
D
E
F
G
P
R
I
A
S
H
I
J
K
L
M
N
O
P
Q
R
S
T
U
V
W
X
Y
Z
Sage Software 8
Spell Check 8
Spell Check Maintenance 13, 14, 30
Support 10
Sync Programs
Glossary Term 60
Librar Master Extensions Manual
Index
Index
Sync Setup
Glossary Term 60
Synchronization Architecture 36
System Requirements 17
System Startup 19
T
A
Technical Support 10
B
W
C
Windows CE Sync 49
www.sagesoftware.com 17
D
E
F
C
O
N
T
E
N
T
S
G
H
I
S
T
J
K
B
A
C
K
L
M
N
O
P
Q
R
S
T
U
V
W
X
Y
Z
Index
Librar Master Extensions Manual
Page 63