1
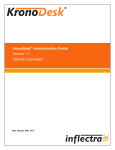
KronoDesk™ User Manual Version 1.0.0 Inflectra Corporation Date: October 18th, 2012 Contents 1. Introduction 2 1.1. Improve Customer Satisfaction 2 1.2. Optimize Customer Support 2. Functionality Overview 2 3 2.1. Dashboards 3 2.2. Knowledge Base 3 2.3. Support Forums 3 2.4. Help Desk Ticketing 3 2.6. User Account Management 4 2.7. Miscellaneous 4 3. Home Page 6 3.1. Customer Home Page 6 3.2. Employee Home Page 10 3.3. Global Search 10 3.4. Register for New Account 12 3.5. Sign-In to Account 13 4. Knowledge Base 15 4.1. Article List 15 4.2. Article Details 16 4.3. Article Attachments 19 5. Forums 22 5.1. Category List 22 5.2. Category Details 23 5.3. Forum Details 23 5.4. Thread Details 25 6. Help Desk 28 6.1. Ticket List 28 6.2. Create New Ticket 30 6.3. Ticket Details 33 7. User Profile 40 7.1. Edit Profile 40 7.2. Change Password 41 Legal Notices © Copyright 2006-2012, Inflectra Corporation 42 Page 1 of 43 This document contains Inflectra proprietary information 1. Introduction KronoDesk™ is an integrated customer support system that includes help desk ticketing, customer support forums and an online knowledge base in a single user interface. KronoDesk™ includes a powerful and flexible help desk ticketing system that can be quickly and easily tailored to meet your support needs. With support for custom fields and workflows you can create different support processes for your different products. KronoDesk™ provides a knowledge base and online support forums, making your customers more self-sufficient with routine issues so that your support personnel can focus their time on the critical issues and complex enquiries. This user manual outlines the features and functionality available in KronoDesk™, and demonstrates how to use the application to improve your customer satisfaction and optimize your customer support. For information on how to install and administer KronoDesk, please refer to the KronoDesk Administrative Guide. 1.1. Improve Customer Satisfaction For your customers, KronoDesk™ provides a single, easy to use destination for all their support needs. When they arrive with a problem, question or enquiry, KronoDesk will direct them to relevant knowledge base articles, suggest helpful discussion threads and provide self-service solutions so that they can find a wide range of immediate solutions and suggestions. For those enquiries that do not match an existing article or have not yet been discussed in a support forum, KronoDesk will direct the customer to log a help desk ticket. The system provides an easy-to-use help desk submission form that gathers the appropriate information to ensure a speedy resolution of the problem. The customer can use their personalized dashboard to view the status of their help desk tickets and provide additional information as requested by the support agents. 1.2. Optimize Customer Support For your support agents, KronoDesk™ eliminates the time and effort spent checking separate systems for help desk tickets, support requests and forum posts. Using the customizable agent dashboard, they can view all their assigned tickets, monitor incoming forum posts and check for new tickets all from the same screen. To reduce the time and effort spent dealing with routine enquiries, the agents can use KronoDesk to create knowledge base articles, FAQs, whitepapers and forum posts to document common problems and the possible solutions. © Copyright 2006-2012, Inflectra Corporation Page 2 of 43 This document contains Inflectra proprietary information 2. Functionality Overview This section outlines the functionality provided by KronoDesk™ in the areas of help desk ticketing, customer support forums, online knowledge base and user account management. 2.1. Dashboards When a customer first accesses KronoDesk, they are taken to the KronoDesk Customer Homepage. This page is designed to provide them with an easy to use starting point for resolving their support issue. They are provided with tools for searching the online knowledge base, asking questions in the support forums and a link to create a help desk ticket. The dashboard also includes recent knowledge base articles, news updates, and recent forum posts so that they can keep on top of recent development and contribute back into the support community. For customer service agents, the Employee Homepage provides them with a consolidated view of their assigned tickets, any tickets not current assigned, recent forum posts, and current news updates so they can see all inbound requests from customers in one single place, ensuring that they are able to monitor the support forums and help desk from a single screen. 2.2. Knowledge Base The KronoDesk™ online knowledge base provides the first level of support to customers. Instead of having to constantly respond to the same routine enquiries and support requests, customer support agents can use the built-in knowledge base to create articles related to different topics, categories and products. Knowledge base articles can be linked to multiple categories and also tagged with meta-tags to make searching easier by customers. The system includes full rich-text editor so that articles can be formatted with lists, tables, different text styles and embedded hyperlinks. 2.3. Support Forums The KronoDesk™ support forums provide the next level of support to customers. Where a fully codified knowledge base article has not yet been synthesized and created by the support agents, the support forums provide a place where users can search for existing messages concerning the same problem. The support forums thereby provide a community where customers and support agents can post replies to common questions visible to the entire community. This provides a faster turnaround for customers who can find immediate solutions to their issues and enables the support agents to focus their time on dealing customer issues that have not been previously encountered or customers issues that particularly complex or environment-specific. 2.4. Help Desk Ticketing The KronoDesk™ help desk ticket management system provides the final level of customer support. When a customer cannot readily find the solution through either the knowledge base or support forums, they can submit a help desk ticket through KronoDesk’s help desk submission system. The system allows them to quickly and easily enter the description of the problem, attach any relevant documents or screenshots, categorize the issue and then submit it for resolution by the support agents. The customer support agents can use the help desk system to review incoming tickets, assign them to themselves or other support agents as needed, provide suggestions to the customer, or escalate to the next level of support. They can use the system to add notes to the ticket, change the fields, or ask for more information. Any changes made to the ticket will be notified to the customer so that they’re kept abreast of changes to their ticket. In addition, the customer can use their customer homepage to see a list © Copyright 2006-2012, Inflectra Corporation Page 3 of 43 This document contains Inflectra proprietary information of their open tickets together to see at a glance what action has been taken and what recommendations have been made. 2.6. User Account Management KronoDesk™ supports the management of an unlimited number of users, which can be administered through the same web interface as the rest of the application, and each user of the system can be given a specific role in the system. In addition, each user has a secure Account management section of the application where they can update their personal information, manage their subscriptions and change their password information. In addition to these administration functions, each user has their own personalized dashboard view of all the pertinent and relevant information. This feature reduces the information overload associated with managing such a rich source of information, and allows a single customer and employee snapshot to be viewable at all times for rapid decision-making. 2.7. Miscellaneous 2.7.1. Artifact Relationships The sections above have outlined the different features and functions available in the system, and have described the various artifacts managed in the system (e.g. tickets, articles, forums, threads, etc.). To aid in understanding how the information is related, the following diagrams illustrates the relationships between the different artifacts and entities: Figure 1: The relationships between the various KronoDesk entities With these overall concepts in mind, the rest of this help manual will outline the functionality in each of the KronoDesk™ screens, and provide specific information on how to manage each of the artifacts illustrated © Copyright 2006-2012, Inflectra Corporation Page 4 of 43 This document contains Inflectra proprietary information above. Note that this manual does not explain the Administration-level functionality of the system; for that, please refer to the KronoDesk™ Administration Guide. 2.7.2. Artifact Naming Conventions On various screens in the system, you will see lists of artifacts (tickets, articles, etc.) together with a unique identification number. In order to make it easier to recognize at a glance which type of artifact the identification number refers to, KronoDesk uses a system of two-letter prefixes which help identify the type of artifact being displayed. The current prefixes used by the system are: Artifact Ticket Ticket Status Ticket Type Ticket Priority Ticket Resolution Product Prefix TK TS TT TP TR PR Artifact Knowledge Base Article User Forum Thread Message Prefix KB US FR TH MG In addition, certain artifacts in the system are displayed with an icon that helps distinguish them from each other, and provides additional context on the state of the artifact: Icon Artifact Description Knowledge Base Article Forum Thread Thread Message Help Desk Ticket SpiraTeam® Incident Artifact has an Attachment © Copyright 2006-2012, Inflectra Corporation Page 5 of 43 This document contains Inflectra proprietary information 3. Home Page When you first access KronoDesk™, the system will default to displaying either the Customer Home Page or the employee home page. The choice of default home page depends on whether you are logged into the system and if so, what role(s) your user belongs to. In either case, you can switch from the Customer Home Page to the Employee Home Page by clicking the link at the top of the page (assuming your user has permissions to see the other page). 3.1. Customer Home Page When you first access the system without being logged-in, it will display the public version of the customer home page illustrated below: This version of the home page is neither personalized, nor customizable and displays the following widgets: • Support Overview – This widget walks you through the steps of getting your support issue resolved. It provides a search box for searching the online knowledge base, links to browse the support forums and a message that you need to first log-in if you want to submit a help desk ticket. • Recent Forum Posts – This widget displays a list of the most recent forum posts, including the name and date of the post. Positioning the mouse over the title will display a popup tooltip containing the long description of the post. • Recent Updates – If enabled by the administrator, this will display a list of recent news items from the company’s website made available by an RSS newsfeed. Positioning the mouse over the title will display a popup tooltip containing the long description of the news item. • Popular Articles – This widget displays a list of the knowledge base articles that have been most frequently viewed by users of the system. Each article is displayed with its title and date of © Copyright 2006-2012, Inflectra Corporation Page 6 of 43 This document contains Inflectra proprietary information publication. Positioning the mouse over the title will display a popup tooltip containing the long description of the article. • Recent Articles - This widget displays a list of the most recently submitted knowledge base articles that have been submitted into the system. Each article is displayed with its title and date of publication. Positioning the mouse over the title will display a popup tooltip containing the long description of the article. If you follow the instructions and login to the system with a basic user account (i.e. a user that does not have the “customer” role), the dashboard will change to the basic authenticated user home page illustrated below: This version of the home page contains all the widgets in the public version, with the following addition: • Subscribed Threads – This widget displays a list of the support forum threads that your user is currently subscribed to. This allows you to keep track of specific topics that are of interest. In addition, when logged-in the various widgets can be repositioned and customized. To reposition, minimize or close any of the widgets, simply click on the “Modify Layout/Settings” link and that will switch the dashboard into edit mode where you can drag and drop them into different positions, minimize, close or edit the settings: © Copyright 2006-2012, Inflectra Corporation Page 7 of 43 This document contains Inflectra proprietary information You can also add additional items to the dashboard by clicking “Add Items to Dashboard” and choosing the appropriate widgets from the list of additional widgets. When logged in as a basic user, the Support Overview widget will display a message letting you know that your role does not permit you to submit a help desk ticket. If you need to be able to submit help desk tickets, you will need to request that your administrator upgrade your user to a “Customer” role. If you login to the system with a Customer account (one that has the role of customer), you will get the registered customer home page which is illustrated below: © Copyright 2006-2012, Inflectra Corporation Page 8 of 43 This document contains Inflectra proprietary information This version of the home page contains all the widgets in the public version, with the following additions: • Support Overview – This widget includes all of the information in the other versions of the home page, but it will also include links for creating a new help desk ticket. • Useful Links – This widget simply displays a list of useful links that have been provided by the customer support agents. • My Open Tickets – This widget displays a list of all the open help desk tickets logged by your user. The list is displayed in descending date-order. The list includes the name of the ticket, the product it relates to, the status of the ticket and the customer support agent it is assigned to (if any). Positioning the mouse over the title will display the full description of the ticket, together with any notes from the customer support agent. © Copyright 2006-2012, Inflectra Corporation Page 9 of 43 This document contains Inflectra proprietary information 3.2. Employee Home Page When you first access the system whilst logged-in as a customer support agent (i.e. in the “Employee” role), it will display the employee home page illustrated below: This dashboard is personalized to the current user and can also be customized by clicking on either the “Modify Layout/Settings” or “Add Items to Dashboard” hyperlink. By default, this home page includes the following customer agent widgets: • My Assigned Tickets – This widget displays a grid containing the most recent open help desk tickets that have been assigned to you. Each ticket is displayed along with the name of the product it relates to, the customer who opened it, the date it was created, its current status, and the date that it was last updated. • Unassigned Tickets – The widget displays a grid containing the most recent open help desk tickets that are not currently assigned to any customer support agent. Each ticket is displayed along with the name of the product it relates to, the customer who opened it, the date it was created, its current status, and the date that it was last updated. • Recent Updates – If enabled by the administrator, this will display a list of recent news items from the company’s website made available by an RSS newsfeed. Positioning the mouse over the title will display a popup tooltip containing the long description of the news item. • Recent Forum Posts – This widget displays a list of the most recent forum posts that have not yet been answered. The list includes the name and date of the post, and positioning the mouse over the title will display a popup tooltip containing the long description of the post. • Subscribed Threads – This widget displays a list of the support forum threads that your user is currently subscribed to. This allows you to keep track of specific topics that are of interest. 3.3. Global Search KronoDesk includes a global search bar that can be used to search across products and artifact types for items that include the entered keywords in either the name or description field: © Copyright 2006-2012, Inflectra Corporation Page 10 of 43 This document contains Inflectra proprietary information You can search for individual keywords by simply entering them in the search box and clicking the arrow button on the right. You can search for phrases by enclosing the words in double quotes. For example, searching on book name will find any artifacts that include either of the two words book and name in the name or description. Searching on “book name” will only return items that have that exact phrase in either the name or description. © Copyright 2006-2012, Inflectra Corporation Page 11 of 43 This document contains Inflectra proprietary information 3.4. Register for New Account When you click on the hyperlink to register a new account, the system will display the following dialog: You need to enter the following fields: • Login – the username that you’d like to use in the system. This has to be unique. • Email Address – a valid email address that notifications will be sent to. • First Name – your first name • Last Name – your last name • Middle Initial – your middle initial (if applicable) • Password – enter your desired password twice to ensure that you have entered it correctly. • Password Question/Answer – enter a question that only you will know the answer to, together with the matching answer to that question. Once click the [Create User] button, the system will create a new user in the system. Depending on how the administrator has configured the system, you may get a welcome email that provides you with a copy of your chosen login information. © Copyright 2006-2012, Inflectra Corporation Page 12 of 43 This document contains Inflectra proprietary information 3.5. Sign-In to Account When you click on the hyperlink to sign-in to an existing user account, the following dialog is displayed: You need to enter a valid login and password to access the system. If you enter an incorrect login or password, the system will display a validation message. If you fail to login successfully after five (5) attempts, the system will lock your user account for ten (10) minutes. This is to prevent brute-force attacks on the system. 3.5.1. Reset Your Password If you have forgotten your password, click on the “Forgot Your Password” hyperlink which will display the following dialog: To reset your password, you need to enter your login name and click the “Submit” button. Then you’ll be taken to the password question/answer challenge screen: © Copyright 2006-2012, Inflectra Corporation Page 13 of 43 This document contains Inflectra proprietary information You will be asked to provide the answer to your secret question. If you successfully enter the correct password answer, the system will generate a new random password and email it to you. If for any reason you do not receive an email with your new password, you need to contact the administrator of your installation to have them manually reset your password. © Copyright 2006-2012, Inflectra Corporation Page 14 of 43 This document contains Inflectra proprietary information 4. Knowledge Base The KronoDesk™ online knowledge base provides the first level of support to customers. Instead of having to constantly respond to the same routine enquiries and support requests, customer support agents can use the built-in knowledge base to create articles related to different topics, categories and products. Knowledge base articles can be linked to multiple categories and also tagged with meta-tags to make searching easier by customers. The system includes full rich-text editor so that articles can be formatted with lists, tables, different text styles and embedded hyperlinks. 4.1. Article List When you click on the Knowledge Base option in the global navigation, you will be taken to the main knowledge base page: This page consists of a category selector, a tag cloud and the main knowledge base article grid. Each of these is described in turn below: 4.1.1. Category Selector The top left-hand pane displays a hierarchical list of the various knowledge base categories that have been setup in the system. Clicking on the [+] expand icon will expand the child categories and clicking on the name of the category will display the list of articles in the category in the main pane to the right. If you want to search across all the categories, just click on the [All Categories] link and the main article grid will display a list of all the articles in the entire system. The screenshot below illustrates how the grid will look when you have selected a specific category: © Copyright 2006-2012, Inflectra Corporation Page 15 of 43 This document contains Inflectra proprietary information 4.1.2. Tag Cloud The tag cloud displays a list of all the tag names associated with knowledge base articles in the system. The size of the font is proportional to the number of articles associated with the tag. Clicking on a tag name will automatically filter the list of articles to find items that contain the selected tag. 4.1.3. Article Grid The main article grid displays a list of articles in either the selected category or in all categories, depending on the option you have chosen. This list can be filtered and sorted, and you can choose how many rows of documents to display on the page at one time. Clicking on the name of the article will display the details of the article. In addition, if you position your mouse over the name of the article it will display a popup tooltip containing the long description of the article. 4.2. Article Details When you click on the name of an article, the article details page is displayed: © Copyright 2006-2012, Inflectra Corporation Page 16 of 43 This document contains Inflectra proprietary information This page displays the following information: • Article List – The navigation pane consists of a link that will take you back to the article list, as well as a list of the other articles in the same category as the current one. This is useful as a navigation shortcut; you can quickly switch between the articles by clicking on the navigation links without having to first return to the article list page. The navigation list can be switched to either display all the articles in the category, or just those that match the current filter. • Knowledge Base Article – This is the main part of the page and displays the name, short description and long description of the knowledge base article. If you click on the Subscription icon to the right of the article title, the article will be added to your list of subscribed knowledge base articles. Whenever a change is made to the article, you will receive an email notification. • Article Info – This information pane displays the unique ID assigned to the article, the date it was last updated and the number of times that it has been viewed. • Tags – This pane displays a list of the meta-tags associated with the current knowledge base article as well as an indication how many other knowledge base articles have been tagged with the same keywords. Clicking on the meta-tag name will automatically take you back to the knowledge base list page with the filter set to the tag name in question. • Operations – This pane is only visible for customer support agents and will display options for creating a new article, deleting the current article or modifying the current article. • Attachments – This section lets you attach documents/links/screenshots to an existing article. This is explained in more detail in section 4.3 4.2.1. Editing an Article Clicking on the operation to “Edit this Article” will display the edit article popup dialog box: © Copyright 2006-2012, Inflectra Corporation Page 17 of 43 This document contains Inflectra proprietary information You can change the name, description, body, tags and assigned categories for the article. Once you are satisfied with your changes you can click the [Save] button to commit the changes. 4.2.2. Creating an Article Clicking on the operation to “Create New Article” will display the new article popup dialog box: You need to enter the name, description, body, tags and assigned categories for the article. Once you are satisfied with your submission you should click the [Save] button to add the new knowledge base article to the system. © Copyright 2006-2012, Inflectra Corporation Page 18 of 43 This document contains Inflectra proprietary information 4.3. Article Attachments 4.3.1. Adding a Document Attachment When you first click on the Attachments panel, it will display an empty list (since there will no documents attached to a new article). As you add documents, web links and screenshots, they will appear in this grid. You can remove any items by selecting the checkbox and clicking Delete. You can also filter and sort the attachments grid by entering a value into one of the filter controls or clicking on the sort direction arrow. To add a new document attachment to the article, click on the “Add New” hyperlink and the following dialog will be displayed: To upload a document, simply click on the [Browse] button, locate the file on your local computer, enter the optional description (that will be displayed alongside the attachment) and click “Upload”. The document will be uploaded from your local computer into KronoDesk, and will appear in the attachment list. Note: The system uses file extensions to identity the type of file, so if your local operating system doesn’t use file extensions, you may want to rename the file before uploading (e.g. changing MyDocument to MyDocument.pdf to identity it as an Acrobat document). 4.3.2. Adding a URL Attachment When you first click on the Attachments panel, it will display an empty list (since there will no documents attached to a new article). As you add documents, web links and screenshots, they will appear in this grid. You can remove any items by selecting the checkbox and clicking Delete. You can also filter and sort the attachments grid by entering a value into one of the filter controls or clicking on the sort direction arrow. © Copyright 2006-2012, Inflectra Corporation Page 19 of 43 This document contains Inflectra proprietary information To add a new URL attachment to the article, click on the “Add New” hyperlink and when the ‘Add New Attachment’ dialog is displayed, click on the radio button to switch it to “URL”: To add a URL web link, simply enter the full URL in the top text box, together with an optional description (that will be displayed alongside the attachment), then click “Upload”. The URL web link will be added to the attachment list for the article. 4.3.3. Adding a Screenshot Attachment When you first click on the Attachments panel, it will display an empty list (since there will no documents attached to a new article). As you add documents, web links and screenshots, they will appear in this grid. You can remove any items by selecting the checkbox and clicking Delete. You can also filter and sort the attachments grid by entering a value into one of the filter controls or clicking on the sort direction arrow. To add a new Screenshot attachment to the article, click on the “Add New” hyperlink and when the ‘Add New Attachment’ dialog is displayed, click on the radio button to switch it to “Screenshot”: © Copyright 2006-2012, Inflectra Corporation Page 20 of 43 This document contains Inflectra proprietary information To upload a screenshot, first copy the image to your computer’s clipboard (e.g. on Windows computers, the PRINT SCREEN button captures the current page and adds to the clipboard). Once the image is in the clipboard, click on the “Paste image from clipboard” hyperlink and the item will appear in the preview window. You can then fill in the optional description field, and click “Upload” to attach the image to the article. © Copyright 2006-2012, Inflectra Corporation Page 21 of 43 This document contains Inflectra proprietary information 5. Forums The KronoDesk™ support forums provide the next level of support to customers. Where a fully codified knowledge base article has not yet been synthesized and created by the support agents, the support forums provide a place where users can search for existing messages concerning the same problem. The support forums thereby provide a community where customers and support agents can post replies to common questions visible to the entire community. 5.1. Category List When you click on the Forums option in the global navigation, you will be taken to the forum home page that displays a list of all the categories and associated forums: Each category will be displayed together with the list of active forums in the category. Each forum will be displayed along with the number of threads and replies in the forum as well as information describing the last post made in the forum. If the forum is highlighted in green, it means that there is at least one new thread or reply in the forum that you have not already read. If the forum is in grey, it means that there are no new forums or replies since the last time you visited. © Copyright 2006-2012, Inflectra Corporation Page 22 of 43 This document contains Inflectra proprietary information 5.2. Category Details If you click on the name of a category, it will bring up the category details page: This page displays the selected category together with a list of active forums in the category. Each forum will be displayed along with the number of threads and replies in the forum as well as information describing the last post made in the forum. If the forum is highlighted in green, it means that there is at least one new thread or reply in the forum that you have not already read. If the forum is in grey, it means that there are no new forums or replies since the last time you visited. 5.3. Forum Details If you click on the name of a forum, it will bring up the forum details page: © Copyright 2006-2012, Inflectra Corporation Page 23 of 43 This document contains Inflectra proprietary information This page displays all the threads in the selected forum, together with the number of replies to the thread, the number of times the forum has been viewed and a description of the most recent reply to the thread. If the thread is highlighted in green, it means that there is either a new thread or there is at least one new reply that you have not already read. If the thread is in grey, it means that you have already viewed the thread and that there are no new replies since the last time you visited. If you click on the orange RSS icon, you can subscribe to the current forum in an RSS-compatible newsreader. If you click on the Subscription icon to the right of the RSS icon, the forum will be added to your list of subscribed forums. Whenever a new thread is posted or a new reply occurs, you will receive an email notification. 5.3.1. Starting a New Thread If you are logged in as an authenticated user, you can click on the “Start New Thread” hyperlink to create a new forum thread: You need to enter the subject and description of the new thread. Once you are satisfied with your submission you should click the “Post Message” hyperlink to add the new thread to the forum. If you would like to subscribe to the new thread (and thereby get notified when someone replies), make sure to check the “Subscribe to this thread” box before submitting. © Copyright 2006-2012, Inflectra Corporation Page 24 of 43 This document contains Inflectra proprietary information 5.4. Thread Details If you click on the name of a thread in the thread list, it will bring up the thread details page: This page displays the subject and description of the thread together with a list of replies from different users. Each reply will be displayed along with information that describes whether the reply is a direct response to the thread itself or a reply to one of the other replies. If you click on the orange RSS icon, you can subscribe to the current thread in an RSS-compatible newsreader. If you click on the Subscription icon to the right of the RSS icon, the thread will be added to your list of subscribed thread. Whenever a new reply occurs, you will receive an email notification. Depending on your role, you will see different operations available for the thread and each of the indivual replies: • Reply – this allows you to reply to the thread or a specific message (see below) • Quote – this allows you to reply to the thread or a specific message, quoting the text (see below) • Edit – this allows you to make changes to the thread or reply (see below) • Delete – this will delete the thread or reply © Copyright 2006-2012, Inflectra Corporation Page 25 of 43 This document contains Inflectra proprietary information 5.4.1. Reply to Thread When you click on the “Reply” hyperlink it will display the following dialog: You need to enter the description of your reply to the original post. Once you are satisfied with your submission you should click the “Post Reply” hyperlink to add the new response to the thread. If you would like to subscribe to the thread (and thereby get notified when someone replies), make sure to check the “Subscribe to this thread” box before submitting. 5.4.2. Reply to Thread with Quote When you click on the “Quote” hyperlink it will display the following dialog: You need to enter the description of your reply to the original post. The original post or reply will be displayed inside a grey box. You can delete some of the text inside the box so that you can make it clear which part of the original message you are responding to. © Copyright 2006-2012, Inflectra Corporation Page 26 of 43 This document contains Inflectra proprietary information Once you are satisfied with your submission you should click the “Post Reply” hyperlink to add the new response to the thread. If you would like to subscribe to the thread (and thereby get notified when someone replies), make sure to check the “Subscribe to this thread” box before submitting. 5.4.3. Editing a Thread/Reply When you click on the “Edit” hyperlink it will display the following dialog: This page lets you edit a specific thread or reply in the forum. You can edit the subject and body of the message. Once you are satisfied with your changes, click the [Save] button to commit the changes. © Copyright 2006-2012, Inflectra Corporation Page 27 of 43 This document contains Inflectra proprietary information 6. Help Desk The KronoDesk™ help desk ticket management system provides the final level of customer support. When a customer cannot readily find the solution through either the knowledge base or support forums, they can submit a help desk ticket through KronoDesk’s help desk submission system. The system allows them to quickly and easily enter the description of the problem, attach any relevant documents or screenshots, categorize the issue and then submit it for resolution by the support agents. 6.1. Ticket List When you click on the Help Desk option in the global navigation, you will be taken to the main help desk page: This page displays on the left-hand side a list of display options for viewing the help desk. The available option will depend on your role in the system. In general customers can only see their submitted tickets whereas customer support agents can see all the tickets in the system. The following display options are available: • My Assigned Tickets – This displays a list of all the open tickets assigned to the current user. • Unassigned Tickets - This displays a list of all the open tickets that are not assigned to any support agents. • My Opened Tickets - This displays a list of all the open tickets that were opened by the current user. • My Closed Tickets - This displays a list of all the closed tickets that were opened by the current user. • All Open Tickets – This displays a list of all the open tickets regardless of who opened them or who they are assigned to. • All Closed Tickets - This displays a list of all the closed tickets regardless of who opened them or who they are assigned to. © Copyright 2006-2012, Inflectra Corporation Page 28 of 43 This document contains Inflectra proprietary information • All Tickets - This displays a list of all the tickets regardless of their status, who opened them or who they are assigned to. In addition, there is an Operations pane that is displayed for support agents and lets you perform the following tasks: • Assign Tickets to Me – If you select ticket(s) in the main grid and then click this option, it will assign the selected tickets to your user. • Assign Tickets to User – If you select ticket(s) in the main grid and then click this option, it will allow you to assign the selected tickets to a specific customer agent. • Unassign Tickets – If you select ticket(s) in the main grid and then click this option, it will return the ticket to the unassigned list. 6.1.1. Filtering and Sorting The main ticket grid allows you to filter and sort the ticket list by any of the displayed columns. You sort the column by simply clicking on the arrow in the header row. To filter a column you simply choose a value or enter search text in the appropriate control in the second row of the grid (the one with the grey background) and then click “Apply Filter” to apply the filter: If you want to undo the filter, simply click the “Clear Filter” hyperlink and the complete list of tickets will be displayed. 6.1.2. Context Menu KronoDesk™ provides a handy shortcut for performing frequent operations on the ticket list. Simply hover the mouse over the ticket grid and click the right mouse button. This brings up the context menu: You can use this to perform the following operations: • Assign Tickets to Me – If you select ticket(s) in the main grid and then click this option, it will assign the selected tickets to your user. • Assign Tickets to User – If you select ticket(s) in the main grid and then click this option, it will allow you to assign the selected tickets to a specific customer agent. © Copyright 2006-2012, Inflectra Corporation Page 29 of 43 This document contains Inflectra proprietary information • Unassign Tickets – If you select ticket(s) in the main grid and then click this option, it will return the ticket to the unassigned list. 6.2. Create New Ticket If you click on the hyperlink to “Create New Ticket”, the system will display the new help desk ticket entry page: This page displays the following information: • Ticket List – The navigation pane consists of a link that will take you back to the ticket list, as well as a list of the other tickets in the same results list as the current one. This is useful as a navigation shortcut; you can quickly open related tickets by clicking on the navigation links without having to first return to the ticket list page. The navigation list can be switched to display all the tickets in the list, just those that match the current filter, those that are assigned to you, and those that were opened by you. • Ticket Name/Description – This section of the page allows you to enter the name and long description of your support issue. The long description allows formatted text and can include lists, tables and hyperlinks. • Ticket Fields – This section displays all the fields that need to be filled out when submitting the ticket. The fields that are required are displayed in bold type with an asterisk(*) next to the field name. When you change the product name field that may change the workflow associated with the ticket. If that happens, you will see some of the fields change. This is normal and allows the administrator to tailor the fields required to the type of product (e.g. a web application may need you to enter the browser type, whereas a mobile application would need to know the cellphone network) © Copyright 2006-2012, Inflectra Corporation Page 30 of 43 This document contains Inflectra proprietary information • Attachments – This section is described in more detail below in section 6.2.1. 6.2.1. Adding a Document Attachment When you first click on the Attachments panel, it will display an empty list (since there will no documents attached to a new ticket). As you add documents, web links and screenshots, they will appear in this grid. You can remove any items by selecting the checkbox and clicking Delete. You can also filter and sort the attachments grid by entering a value into one of the filter controls or clicking on the sort direction arrow. To add a new document attachment to the ticket, click on the “Add New” hyperlink and the following dialog will be displayed: To upload a document, simply click on the [Browse] button, locate the file on your local computer, enter the optional description (that will be displayed alongside the attachment) and click “Upload”. The document will be uploaded from your local computer into KronoDesk, and will appear in the attachment list. Note: The system uses file extensions to identity the type of file, so if your local operating system doesn’t use file extensions, you may want to rename the file before uploading (e.g. changing MyDocument to MyDocument.pdf to identity it as an Acrobat document). 6.2.2. Adding a URL Attachment When you first click on the Attachments panel, it will display an empty list (since there will no documents attached to a new ticket). As you add documents, web links and screenshots, they will appear in this grid. You can remove any items by selecting the checkbox and clicking Delete. You can also filter and sort the attachments grid by entering a value into one of the filter controls or clicking on the sort direction arrow. © Copyright 2006-2012, Inflectra Corporation Page 31 of 43 This document contains Inflectra proprietary information To add a new URL attachment to the ticket, click on the “Add New” hyperlink and when the ‘Add New Attachment’ dialog is displayed, click on the radio button to switch it to “URL”: To add a URL web link, simply enter the full URL in the top text box, together with an optional description (that will be displayed alongside the attachment), then click “Upload”. The URL web link will be added to the attachment list for the ticket. 6.2.3. Adding a Screenshot Attachment When you first click on the Attachments panel, it will display an empty list (since there will no documents attached to a new ticket). As you add documents, web links and screenshots, they will appear in this grid. You can remove any items by selecting the checkbox and clicking Delete. You can also filter and sort the attachments grid by entering a value into one of the filter controls or clicking on the sort direction arrow. To add a new Screenshot attachment to the ticket, click on the “Add New” hyperlink and when the ‘Add New Attachment’ dialog is displayed, click on the radio button to switch it to “Screenshot”: © Copyright 2006-2012, Inflectra Corporation Page 32 of 43 This document contains Inflectra proprietary information To upload a screenshot, first copy the image to your computer’s clipboard (e.g. on Windows computers, the PRINT SCREEN button captures the current page and adds to the clipboard). Once the image is in the clipboard, click on the “Paste image from clipboard” hyperlink and the item will appear in the preview window. You can then fill in the optional description field, and click “Upload” to attach the image to the ticket. 6.3. Ticket Details If you click on the hyperlink for a specific ticket in either the main ticket list page, one of the user dashboards, or the navigation sidebar, you will be taken to the details page for the specific ticket: This page is made up of three areas; the left pane is the navigation window where you can quickly jump to other tickets as well as execute workflow transitions (see below), the upper part of the right pane contains the ticket name and description, and the bottom part of the right pane displays panels that contain information associated with the ticket: • Add Note – This panel lets you add a new comment/note to the ticket. • Ticket Fields – This panel displays the various ticket attributes that can be set © Copyright 2006-2012, Inflectra Corporation Page 33 of 43 This document contains Inflectra proprietary information • Dates & Times – This panel displays key dates related to the ticket (e.g. when it was opened, when it was last updated, and when it was closed) • Attachments – This panel lets you view the existing documents, links and screenshots attached to the ticket as well as add additional items • History – This panel shows you the change history for the ticket. • Incidents – If you have the integration with SpiraTeam® enabled, this panel will display a list of product incidents (defects, bugs, change requests, etc.) related to the current ticket. Each of these panels is described in more detail below. The navigation pane consists of a link that will take you back to the ticket list, as well as a list of the peer tickets to the one selected. This latter list is useful as a navigation shortcut; you can quickly view the peer tickets by clicking on the navigation links without having to first return to the ticket list page. The navigation list can be switched between four different modes: • The list of tickets matching the current filter • The list of all tickets, irrespective of the current filter • The list of tickets assigned to the current user • The list of tickets opened by the current user When editing an existing ticket, the fields that are available and the fields that are required will depend on your stage in the ticket workflow. For example an open ticket might not require an “Assignee” whereas an assigned ticket typically would. The types of change allowed and the email notifications that are sent will depend on how the system administrator has configured the workflow. Administrators should refer to the KronoDesk Administration Guide for details on configuring the ticket workflows to meet their needs. Depending on the user’s role and whether they are listed as the opener or assignee of the ticket, displayed in the left hand side of the page, above the navigation list is a set of allowed workflow operations: These workflow transitions allow the user to move the ticket from one status to another. For example in the default workflow, when the ticket is in the Assigned status, you will be given the options to: Unassign Ticket – changes status to “Open” Propose Solution – changes the status to “Waiting on Customer” Request More Information - changes the status to “Waiting on Customer” Send to Development - changes the status to “Waiting on Development” Mark as Duplicate - changes the status to “Duplicate” Not Reproducible - changes the status to “Non-Issue” © Copyright 2006-2012, Inflectra Corporation Page 34 of 43 This document contains Inflectra proprietary information After changing the status of the ticket by clicking on the workflow link, you can then fill in the additional fields that are now enabled and/or required. Once you’ve made the changes to the appropriate ticket fields, you can either click one of the save icons to commit the changes or “Refresh” to discard the changes and reload the ticket from the database. 6.3.1. Add Note This panel allows you to add a new comment/note to the help desk ticket: You need to enter the note text in the rich-text box and click the [Save] icon to add the note to the ticket. 6.3.2. Ticket Fields This panel displays all the fields associated with the help desk ticket: The list of fields will include both standard fields that are part of the system and any custom fields defined by the administrator of the system. Depending on the product selected and the status of the ticket, different fields may be visible, enabled and/or required. Required fields are indicated in bold type with an asterisk (*) next to their name. 6.3.3. Dates & Times This panel displays the key dates associated with the ticket. Currently it shows the date that the ticket was opened and last updated. © Copyright 2006-2012, Inflectra Corporation Page 35 of 43 This document contains Inflectra proprietary information 6.3.4. Attachments This panel displays the list of documents, screenshots or web-links (URLs) that have been “attached” to the help desk ticket. The documents can be in any format, though KronoDesk™ will only display the icon for certain known types: The attachment list includes the filename/URL that was originally uploaded together with the file-size (in KB), name of the person who attached it and the date uploaded. In addition, if you position the pointer over the filename and hold it there for a few seconds, a detailed description is displayed as a tooltip. To actually view the document, simply click on the filename hyperlink and a new web browser window will open. Depending on the type of file, this window will either display the document / web-page or prompt you for a place to save it on your local computer. To remove an existing attachment from a ticket, simply click the [Delete] button and the attachment will be removed from the list. Using the standard filter/sort options you can also sort and filter the list of attachments to make it more manageable. To attach a new document to the ticket, you need to first click the “Add New” link to display the new attachment dialog box: To upload a document, simply click on the [Browse] button, locate the file on your local computer, enter the optional description (that will be displayed alongside the attachment) and click “Upload”. The document will be uploaded from your local computer into KronoDesk, and will appear in the attachment list. Note: The system uses file extensions to identity the type of file, so if your local operating system doesn’t use file extensions, you may want to rename the file before uploading (e.g. changing MyDocument to MyDocument.pdf to identity it as an Acrobat document). © Copyright 2006-2012, Inflectra Corporation Page 36 of 43 This document contains Inflectra proprietary information To add a new URL attachment to the ticket, click on the “Add New” hyperlink and when the ‘Add New Attachment’ dialog is displayed, click on the radio button to switch it to “URL”: To add a URL web link, simply enter the full URL in the top text box, together with an optional description (that will be displayed alongside the attachment), then click “Upload”. The URL web link will be added to the attachment list for the ticket. To add a new Screenshot attachment to the ticket, click on the “Add New” hyperlink and when the ‘Add New Attachment’ dialog is displayed, click on the radio button to switch it to “Screenshot”: To upload a screenshot, first copy the image to your computer’s clipboard (e.g. on Windows computers, the PRINT SCREEN button captures the current page and adds to the clipboard). Once the image is in the clipboard, click on the “Paste image from clipboard” hyperlink and the item will appear in the preview window. You can then fill in the optional description field, and click “Upload” to attach the image to the ticket. © Copyright 2006-2012, Inflectra Corporation Page 37 of 43 This document contains Inflectra proprietary information 6.3.5. History This panel displays the list of changes that have been performed on the help desk ticket artifact since its creation. An example ticket change history is depicted below: The change history displays the date that each change was made, together with the fields that were changed, the old and new values and the person who made the change. This allows a complete audit trail to be maintained of all changes in the system. 6.3.6. Incidents The incidents panel displays a list of SpiraTeam® incidents that are linked to the current help desk ticket. If you see the following message, it means that your user profile in KronoDesk has not been linked to an equivalent SpiraTeam user profile. To fix the issue, click on the “user profile” link and enter your SpiraTeam RSS Token into your KronoDesk user profile. This is described in more detail in section 7.1 Once your KronoDesk user is linked to a corresponding SpiraTeam user, you will see a list of SpiraTeam incidents that were generated from the current ticket: Each incident is displayed together with its incident ID, name, type, status, priority, severity, owner, last update date and the name of the person who opened. Clicking on the incident hyperlink will open up the incident in SpiraTeam in a new window. This allows support agents to view the status of the incidents use it to determine when the ticket can be resolved because the underlying product issue has been resolved. To log a new incident in SpiraTeam based on the current help desk ticket, you need to click on the “Add New Incident” hyperlink, which will open up the following dialog: © Copyright 2006-2012, Inflectra Corporation Page 38 of 43 This document contains Inflectra proprietary information This dialog lets you add a new incident to the linked instance of SpiraTeam. You need to first choose the SpiraTeam project from the dropdown list at the top. The system will prepopulate the name and description of the incident with the ticket name and description. You can edit this text or clear it completely and enter in custom content. You then need to choose the incident type, priority, detected release and owner followed by values for any of the defined custom properties. Once you are satisfied, click “Upload” to add the new incident to SpiraTeam. Once the incident has been added, it will appear in the KronoDesk incident list. © Copyright 2006-2012, Inflectra Corporation Page 39 of 43 This document contains Inflectra proprietary information 7. User Profile To update your user’s profile, view your list of posted threads/replies or change your password, simply click on your username in the top-right of the application header. The system will then display the user profile home page: This page will display your user’s name, login, email address, date of registration, linked SpiraTeam RSS Token (also known as the API Key) and a list of the roles that your user belongs to. Underneath this section the system will display a list of forum threads and thread replies that you have posted. You click on the hyperlinks to either edit your profile or change your password. 7.1. Edit Profile If you click on the “Edit Profile” hyperlink, it will bring up the following dialog: © Copyright 2006-2012, Inflectra Corporation Page 40 of 43 This document contains Inflectra proprietary information You can update the following fields on this page: • Login – the username that you’d like to use in the system. This has to be unique. • Email Address – a valid email address that notifications will be sent to. • First Name – your first name • Last Name – your last name • Middle Initial – your middle initial (if applicable) • RSS Token – used to allow you view secure KronoDesk RSS newsfeeds from outside the system • Password – enter your current password if you plan on changing the password question/answer. If you don’t need to change the password question/answer, you can leave this blank. • Password Question/Answer – enter a question that only you will know the answer to, together with the matching answer to that question. • Spira Api Key – you need to enter the SpiraTeam RSS token for your user so that your user can view SpiraTeam incidents linked to a specific KronoDesk help desk ticket. Once you are satisfied with the changes, you can click [Update User] to commit the changes. 7.2. Change Password If you click on the “Change Password” link you can update your password You need to enter the old password and the new password twice. Assuming that the old password matches your current password and that the two instances of the new password match, the system will change your password. © Copyright 2006-2012, Inflectra Corporation Page 41 of 43 This document contains Inflectra proprietary information Legal Notices This publication is provided as is without warranty of any kind, either express or implied, including, but not limited to, the implied warranties of merchantability, fitness for a particular purpose, or non-infringement. This publication could include technical inaccuracies or typographical errors. Changes are periodically added to the information contained herein; these changes will be incorporated in new editions of the ® publication. Inflectra Corporation may make improvements and/or changes in the product(s) and/or program(s) and/or service(s) described in this publication at any time. KronoDesk™ and Inflectra® are either trademarks or registered trademarks of Inflectra Corporation in the United States of America and other countries. Microsoft®, Windows®, Explorer® and Microsoft Project® are registered trademarks of Microsoft Corporation. All other trademarks and product names are property of their respective holders. Please send comments and questions to: Technical Publications Inflectra Corporation 8121 Georgia Ave Suite 504 Silver Spring, MD 20910 U.S.A. [email protected] © Copyright 2006-2012, Inflectra Corporation Page 42 of 43 This document contains Inflectra proprietary information