1
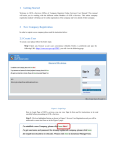
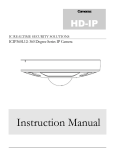
TM
StarSCAN Quick Start
Networking Guide
A Quick Reference Guide for Configuring the
StarSCAN Scan Tool for Networking
Quick Start Networking Guide
Purpose
The purpose of this document is to provide quick step-by-step instructions to enable
networking capabilities on your StarSCAN™ Scan Tool. If you have trouble setting up
your network settings with this manual, you can refer to the more detailed StarSCAN
Networking Manual found under the ‘download center’ at http://www.dcctools.com .
What is Networking?
Networking computers essentially connects them together so they can share information.
Your dealership has a Local Area Network (LAN) which connects all of the computers in
your dealership together. Your LAN also connects to the Internet, allowing you to share
information with other systems outside your dealership, such as DealerCONNECT.
Think of the StarSCAN as just another computer on your network. Setting up your
StarSCAN for networking allows you to download flash files and other useful
information directly to your StarSCAN.
Before You Begin
Before you begin the network configuration, you will need to have your StarSCAN
updated to the latest software version available and have your TechCONNECT™ PC
accessible. This setup will work for StarSCAN software versions 5.01-SP1 and higher,
and should take about 10-15 minutes to complete. The TechCONNECT PC will only be
used to gather already configured network information in your dealership.
Note: Aftermarket customers without a TechCONNECT PC can use a Windows PC in
your garage environment to obtain the necessary network information.
Helpful Hint: The TechCONNECT PC that you choose should be on the same network
segment that you will be using for your StarSCAN. Connecting your StarSCAN to a
Local Area Network (LAN) drop near your TechCONNECT PC will increase the
likelihood that you are on the same network as the TechCONNECT PC.
The StarSCAN development team would appreciate feedback on this document and the
process of configuring the StarSCAN network functionality. After completing this
process, please visit http://www.dcctools.com/cgi-bin/contact.cgi and send us your
comments. Be sure to include detailed information, such as what was the most difficult
part of the process and what was easy.
11-9-04
v1.1
Page 2
Quick Start Networking Guide
Filling out the StarSCAN Network Configuration Worksheet
The first step in setting up StarSCAN on your dealership’s computer network is to gather
information about the network. The easiest way to get this information is to ask your
dealership’s Network Systems Coordinator to fill out the worksheet below. If he has done so,
skip to the section Configuring Your StarSCAN Network Settings. Otherwise, you can follow
the steps below to complete the worksheet on your own.
1. Print the Network Configuration Worksheet. The Network Configuration Worksheet
below will be used to guide you through the configuration process. Print this page and
fill in the information as directed in steps 2 through 5.
StarSCAN Network Configuration Worksheet
IP Settings
DHC P S uppo rte d?
If DHCP is no t s up p o rted , fill o ut the fo llo wing :
IP Addre s s *
S ubne t M a s k
De fa ult Ga te wa y
P rim a ry DNS
S e c o nda ry DNS
Proxy Settings
P ro xy R e quire d?
If a p ro xy is req uired fo r yo ur netwo rk, fill o ut the fo llo wing :
S e rve r
P o rt
* If DHCP is no t s up p o rted , yo u will need to co ntact yo ur Netwo rk Sys tems
Co o rd inato r to o b tain a uniq ue IP ad d res s fo r yo ur StarSCAN
11-9-04
v1.1
Page 3
Quick Start Networking Guide
2. Obtain TechCONNECT PC Network Settings: On your TechCONNECT PC, click
the ‘Start’ menu, select ‘Settings’, then select ‘Control Panel’. Double-click on the
‘Network and Dial-up Connections’ icon.
Double-click the ‘Local Area Connection’icon, and then click the ‘Properties’ button. In
the Local Area Connection Properties box, click ‘Internet Protocol (TCP/IP)’, then click
the ‘Properties’ button.
11-9-04
v1.1
Page 4
Quick Start Networking Guide
Note: The information contained within the screens below may differ from PC to PC.
3. Determine IP Settings: If ‘Obtain an IP Address Automatically’ is selected on the
‘Internet Protocol (TCP/IP)’ screen, then enter ‘Yes’ for the StarSCAN Network
Configuration worksheet item ‘DHCP Supported?’ and skip to step 4 Obtain Proxy
Settings for the TechCONNECT PC.
Enter ‘Yes’ for ‘DHCP Supported’ if ‘Obtain IP address automatically’ is selected.
11-9-04
v1.1
Page 5
Quick Start Networking Guide
If ‘Use the following IP address’ is selected on the ‘Internet Protocol (TCP/IP)’ screen,
then enter ‘No’ for the ‘DCHP Supported?’ worksheet item. Then, copy the numbers
from the ‘Subnet Mask’, ‘Default Gateway’, ‘Preferred DNS Server’, and ‘Alternate
DNS Server’ boxes to the corresponding worksheet items.
Note: DO NOT COPY the ‘IP Address’ number from your TechCONNECT PC. Like a
phone number, your StarSCAN IP address must be unique. Instead, contact your
Network Systems Coordinator to obtain a unique IP address for your StarSCAN.
Enter ‘No’ for ‘DHCP Supported’ if
‘Use the following IP address’ is
selected.
11-9-04
Contact your Network System Coordinator to get a
valid IP address, and enter this address in the ‘IP
Address’ item on the worksheet
v1.1
Page 6
Quick Start Networking Guide
4. Obtain Proxy Settings for the TechCONNECT PC: Some networks require a proxy to
connect to the Internet. To see if your network uses one, click the ‘Start’ menu on the
TechCONNECT PC, select ‘Settings, then select ‘Control Panel’. Double-click on the
‘Internet Options’ icon, then click the ‘Connections’ tab. On the ‘Connections’ tab, click
the ‘LAN Settings’ button to display the ‘Local Area Network (LAN) Settings’ screen,
shown below.
5. Determine Proxy Settings: If ‘Use a proxy server’ is not checked, then enter ‘No’ for
the ‘Proxy Required?’ worksheet item, and leave the ‘Server’ and ‘Port’ items blank on
your worksheet. Skip to the section Configuring Your StarSCAN Network Settings.
If ‘Use a proxy server’ is checked, then enter ‘Yes’ for the worksheet item ‘Proxy
Required?’. Next, copy the ‘Address’ information to the ‘Server’ worksheet item and the
‘Port’ information to the ‘Port’ item on your worksheet.
If ‘Use a proxy server’ is checked on your TechCONNECT PC, enter ‘Yes’ for ‘Proxy
Required’ and transfer ‘Address’ to ‘Server’ and ‘Port’ to ‘Port’. Otherwise, enter ‘No’ for
‘Proxy Required.’
11-9-04
v1.1
Page 7
Quick Start Networking Guide
Configuring Your StarSCAN Network Settings
Now that you have gathered the necessary information from the TechCONNECT PC, the
StarSCAN network settings can be configured. Follow the steps below to complete the
setup:
1. Press the “Network” icon to view the Wired Network Settings pop-up window.
2. Transfer all the information from your StarSCAN Network Configuration Worksheet
to the Wired Network Settings pop-up window below. To change an item, select the
item and press the “Change” button.
Note: The ‘Enabled’ item under ‘Built-in Ethernet Settings & Status’ must be set to
‘Yes’ to enable wired networking.
11-9-04
v1.1
Page 8
Quick Start Networking Guide
3. You can conveniently set your proxy user name in the Wired Network Settings popup window if a proxy is required by your network (i.e. if the ‘Use Proxy’ item was set
to ‘Yes’). You are also able to save the proxy password for future sessions if desired
by setting the ‘Remember Password’ item to ‘Yes’ and entering your password in the
‘Password’ item.
4. You can also set your DealerCONNECT ID, password, and dealer code from the
Wired Network Settings pop-up window. You are also able to save the
DealerCONNECT password for future sessions if desired by setting the ‘Remember
Password’ item to ‘Yes’ and entering your password in the ‘Password’ item.
11-9-04
v1.1
Page 9
Quick Start Networking Guide
Testing Your StarSCAN Network Configuration
1. Press the “Network” icon to view the Wired Network Settings pop-up window if
it is not already open.
2. If you have not done so already, connect your StarSCAN to your LAN using the
Ethernet cable supplied with your StarSCAN.
Note: Make sure you are connecting to the correct network inside your
dealership. Connecting your StarSCAN to a LAN drop near your
TechCONNECT PC will increase the likelihood that you are on the same network
as the TechCONNECT PC.
3. Press the ‘Test’ button located on the right side of the window.
Note: If the ‘Test’ button is grayed out, one or more of the network settings is
incorrect. Review your settings and make sure your Ethernet cable is properly
attached to your network.
Helpful Hint: To obtain more information on a particular setting, select the item
of interest and press ‘Tech Tips’.
11-9-04
v1.1
Page 10
Quick Start Networking Guide
4. If you were able to press the ‘Test’ button, a pop-up should appear at the start of
the test. Press the ‘OK’ button to continue.
5. You will also see a pop-up requiring you to enter DealerCONNECT settings.
Once properly entered, press ‘OK’ to continue.
Note: You may also see a pop-up box requiring a proxy user name and password
if your network requires a proxy.
6. If a screen appears telling you that the configuration was successful, then the
entire setup is now complete. If you received an error, then please go back and
try again with these instructions or refer to the StarSCAN Networking Setup
tutorial under training aides at www.dcctools.com for more detailed instructions.
11-9-04
v1.1
Page 11
Quick Start Networking Guide
11-9-04
v1.1
Page 12
Quick Start Networking Guide
Using Your StarSCAN Networking Capabilities
Currently, your StarSCAN supports downloading flash files directly from the Internet. Other
features using the networking capability of the StarSCAN will be available in the future.
If you would like to try downloading a flash file, select ‘Flash Download’ from the Home
screen. The wizard will guide you through the steps required to download a flash file to your
StarSCAN. If successful, you will see a green check mark next to the file you attempted to
download. This indicates that the download was successful and the file is now located on
your StarSCAN.
11-9-04
v1.1
Page 13
Quick Start Networking Guide
11-9-04
v1.1
Page 14