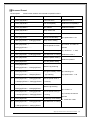
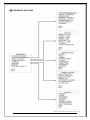
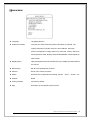
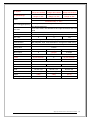
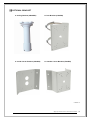
1
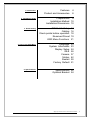
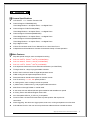
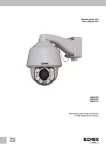
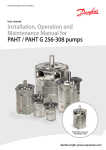
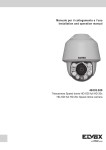
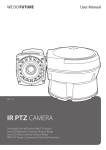
Installation and Operation Manual
for
High Speed Dome Camera
VER: V1.0
15-CD55TWAI
15-CD55TWA
15-CD52WI
Please read the operation manual carefully
before installing and using this unit
CAUTl0N
RISK OF ELECTRIC
SHOCK DO NOT OPEN
CAUTION:To reduce the risk of electrical shock, do not open covers.
No user serviceable parts inside.
Refer servicing to qualified service personal.
This lightning flash with arrowhead symbol is intended to alert the user to the
presence of un-insulated "dangerous voltage" within the product's enclosure that
may be of sufficient magnitude to constitute a risk of electric shock to persons.
This exclamation point symbol is intended to alert the user to the presence of
important operating and maintenance (servicing) instructions in the literature
accompanying the appliance.
WARNING:To prevent the risk of fire or electric shock hazard do not expose
this camera to rain or moisture.
High Speed Dome Camera Introduction Manual
1
▌▌Important Safeguard
1.
Read Instructions
Read all of the safety and operating instructions before using the product.
2.
Retain Instructions
Save these instructions for future reference.
3.
Attachments/Accessories
Do not use attachments or accessories unless recommended by the appliance manufacturer as they
may cause hazards, damage product and void warranty.
4.
Water and Moisture
Do not use this product near water or moisture.
5.
Installation
Do not place or mount this product in or on an unstable or improperly supported location. Improperly
installed product may fall, causing serious injury to a child or adult, and damage to the product. Use
only with a mounting device recommended by the manufacturer, or sold with the product. To insure
proper mounting, follow the manufacturer’s instructions and use only mounting accessories
recommended by manufacturer.
6.
Power source
This product should be operated only from the type of power source indicated on the marking label.
▌▌Precautions
Operating
z
Before using, make sure power supply and others are properly connected.
z
While operating, if any abnormal condition or malfunction is observed, stop using the camera
immediately and then contact your local dealer.
Handling
z
Do not disassemble or tamper with parts inside the camera.
z
Do not drop or subject the camera to shock and vibration as this can damage camera.
z
Care must be taken when you clean the clear dome cover. Especially, scratch and dust will ruin your
quality of camera.
Installation and Storage
z
Do not install the camera in areas of extreme temperature, which exceed the allowable range.
z
Avoid installing in humid or dusty places.
z
Avoid installing in places where radiation is present.
z
Avoid installing in places where there are strong magnetic fields and electric signals.
z
Avoid installing in places where the camera would be subject to strong vibrations.
z
Never expose the camera to rain and water.
High Speed Dome Camera Introduction Manual
2
1. Introduction
2. Installation Guide
Features
Product and Accessories
4
8
Preparations 9
Installation Method 10
Installation Dimensions 10
3. Dome Setting
DIP Switch Setup
Cabling
Check points before operation
Reserved Preset
OSD Menu Functions
14
16
18
19
21
4. How to use OSD Menu
Language
System Information
Display Setup
IDLE
Camera
Motion
Restart
Factory Default
23
23
24
26
37
42
50
51
5. Specifications
Specifications 52
Optional Bracket 54
High Speed Dome Camera Introduction Manual
3
█▐ Features ▌█
▌▌Camera Specifications
z
CCD Sensor: 1 / 4 " Interline Transfer CCD
z
Camera Support: CZ36SCM(COP)
Zoom Magnification: x 36 Optical Zoom, x 32 Digital Zoom
z
Camera Support: FCB-EX1020(SONY)
Zoom Magnification: x 36 Optical Zoom, x 12 Digital Zoom
z
Camera Support: SCM-2270(SAMSUNG)
Zoom Magnification: x 27 Optical Zoom, x 16 Digital Zoom
z
Camera Support: SCM-2370(SAMSUNG)
Zoom Magnification: x 37 Optical Zoom, x 16 Digital Zoom
z
Day & Night Function
z
Various Focus Mode: Auto-Focus / Manual Focus / Semi-Auto Focus.
z
Independent and Simultaneous Camera Characteristic Setup in Preset operation
▌▌Main Features
z
Step less speed changes, auto zoom/speed matching
z
Pan 0.01~360o/S, Tilt 0.01o~120o/S (15-CD55TWAI)
z
Pan 0.01~600o/S, Tilt 0.01o~120o/S (15-CD55TWA)
z
Pan 0.01~120o/S, Tilt 0.01o~120o/S (15-CD52WI)
z
Auto object track with zoom in/out and motion detection (15-CD55TWAI)
z
Timing actions for 7 days of programmable schedule
z
Built-in Semi-conductor heater & digital temperature sensor
z
PWM cooling fan vari-speed temperature control
z
Reserved network interface and space for network module
z
Pan Tilt accuracy +/- 0.01o, 256 preset positions
z
8 cruising tracks, each cruising track has 32 presets
z
4 pattern tours,10 Mins memory, 500 programmable instructions
z
Multi-Protocol through RS485 or coaxial cable.
z
8 auto scan with use-defined left and right boundaries and settable scan speed
z
8 Privacy Zones with defined English camera title
z
Auto Compatible PELCO_P, PELCO_D compatible
z
Guard Location: the dome will rotate back to preset position after a period of
vacant time
z
Alarm triggering: the alarm can trigger preset, auto scan, cruising and pattern tours functions
z
Soft Address Function: the use can set up the dome address without uninstall the dome
High Speed Dome Camera Introduction Manual
4
▌▌Integrated Super Speed PTZ Rotator..
z
Delicate stepping motor, stable, sensitive and accurate
z
360° Pan and 90° Tilt range (auto-flip) without blind area
z
Stepless speed change, auto zoom/speed matching
z
Near / far IR Light auto matches camera zoom in/out
▌▌All-weather Outdoor Design z
High die-cast alloy aluminum construction
z
High Precision Mould with high heat conductivity
z
Fully enclosed isolation design for heat sink
z
Nanometer Dustproof, waterproof and fog-proof lens
z
IP66 Waterproof
z
3000V lightning and surge current protection
▌▌Function Instructions z
Focus / PTZ Speed Auto Match
The pan/tilt rotation speed could be automatically adjusted according to the focus in/out, which
makes it much more practical for manual target tracking. (Only for the auto tracking IR speed dome)
z
Power Up Action
This function enables to resume the last action executed before power down. Most of
actions such as Preset, Pattern, Swing and Group are available for this function but jog
actions are not available to resume.
z
Auto Flip
When the camera tilts downward and goes just beyond the vertical position, the camera will rotate
180 degrees.
z
Preset Position Set up and Call Up
In the Preset function the dome stores the current pan/tilt angle, zoom and other position parameters
in its memory. When necessary the dome recalls these parameters and adjusts the camera to a
particular position. The user can store, recall and clear the presets easily and promptly by using the
keyboard controller. The dome can store up to 220 presets.
z
Auto Scan
Users can set up the left and right boundaries by control keyboard. Then speed
dome can scan between this boundary. It supports up to 8 groups of scanning paths.
High Speed Dome Camera Introduction Manual
5
z
Cruising Track
The preset position can be programmed to be recalled in a set of sequences. This sequence can be
set to let the camera scan from one position to the next in a cycle at a set speed. This feature is
called the “auto cruise”. The cruise sequence and dwell time of each preset can be set. It supports
up to 8 cruising tracks, each cruising track with 32 presets.
z
Pattern Tour
Dome can memorize 600s running path or 500 programmable instructions. When start pattern tour,
speed dome will move automatically according recorded action path. It supports 4 groups of pattern
tours.
z
Guard Location
The dome will automatically return to preset position if there is no operation in a period of vacant
time.
z
Default Action
When you start up the dome camera or do not send commands over a long time, the dome camera
will return to its default functions which include the home place, auto pan, auto cruise and pattern.
z
Dome Address Setup
The dome supports up to 256 addresses and the dome will only response to the instructions given to
its own address. Please check the dip switch on the bottom of the dome for address setup.
z
Manual Object Tracking
The use can move the joystick up, down, left or right to track the appearing object in the screen and
use the joystick to zoom in and out with auto focus.
z
Privacy Mask Protection
Set black mask areas to protect the privacy zones. The black privacy locations can be set, and
support up to 8 mask zones.
z
Timing Running Function
Users can set speed dome operation task at total 8 timing areas during 7 days.
z
Coordinates and Directions Display
User can define the dome’s direction of due north, which will help to show up the exact moving
directions on screen. And zone title is supported to display when the dome moves to the specified
zone.
High Speed Dome Camera Introduction Manual
6
z
Auto Tracking (only for 15-CD55TWAI)
The dome will automatically fix and track the moving object according to the user’s setup via OSD.
z
Motion Detection
The dome will detect the changes in the defined video zone and trigger alarm.
It supports to 8 video Locations, each with 4 detection zones.
z
PTZ and Lens Control
1
Zoom Control
Users can control zoom by keyboard to get near or far images.
dFocus Control
The default setting is auto focus. The camera will auto focus based on the center of the video
display to get the clear image. In some special occasions, the user could do the manual focus
to get the desired image effect.
eAuto Iris Control
Auto Iris is aiming to detect the environmental lights condition and adjust the iris to get the
stabilized brightness of the image.
4Auto Back Light Compensation
In the highly bright background, auto back light compensation is aiming to compensate the
brightness of the dark object and adjust the background brightness to get a clear image.
5Auto/Manual White Balance
Auto/Manual WB adjust depending on the environment light changes.
6 Day and Night Switch (Only for Day/Nigh Camera)
Speed dome camera can auto switch according to the environmental illumination changes.
7OSD Setup (Only for camera with menu)
Call upon preset No.95 to enter into OSD menu setup interface. Press “Focus” to choose
menu items and press “Iris” to set menu contents.
The information such as Camera ID, temperature, Pan/Tilt Angle, Alarm Input and Preset can
be displayed on screen.
z
I/O Functions (for Advance Type)
To reject external electric noise and shock perfectly, alarm sensor Input is decoupled with photo
coupler.
Using the dry contact for alarm input and output.
If an external sensor is activated, camera can be set to move to the corresponding Preset position.
z
Reserved Presets for Special Purpose
Most camera characteristics can be set up easily and directly with reserved preset, not entering
into OSD menu. For more information, refer to “Reserved Preset” in this manual.
High Speed Dome Camera Introduction Manual
7
▌▌Product & Accessories
15-CD55TWAI
z
15-CD55TWA
15-CD52WI
Accessories:
User’s Manual
Anti-drop Rope
Caution:DC12V/4A power for 15-CD55TWA
DC12V/5A power for 15-CD55TWAI & 15-CD52WI
High Speed Dome Camera Introduction Manual
8
█▐ Installation Guide ▌█
▌▌Preparations
z
Basic Requirements
All the electric work must be finished under the latest electric & fire prevention law and rules (and
any related law and rules). Please check according to the packing list if every accessory is included.
And also make sure the installation is operated as required. Please contact us for any help during
the installation.
z
Installation Space and Density Checkup
Please make sure the space is big enough to install our dome. And also ensure the density of the
ceilings or walls to hold total weight of the dome and its accessories.
z
Cables Preparation
Please choose the proper cable according to the transmission distance. The min requirement of
coaxial BNC cable is listed as follows for reference:
z
Models Max Distance(Feet\Meter) RG59/U 750ft(229m) RG61/U 1,000ft(305m) RG11/U 1,500ft(457m) Setup Dip Switch for Dome Address
Please turn to Dome Address Setup for details
※
High Speed Dome Camera Introduction Manual
9
▌▌Installation Method
The IR speed dome could be installed in wall-mount and pendant-mount
▌▌Installation Dimensions
Wall Mount
15-CD55TWAI
15-CD55TWA
15-CD52WI
Drill Drawing:
High Speed Dome Camera Introduction Manual
10
Pendant Mount
15-CD55TWAI
15-CD55TWA
15-CD52WI
Drill Drawing:
High Speed Dome Camera Introduction Manual
11
*Notice: The wall and ceiling must be thick enough to install the expansion and can bear 4 times the
weight of the dome camera itself.
z
Wall-mount Installation Procedures:
1). Take out the bracket from the package (as shown), mark the installation hole positions on the
wall referencing to the bottom of bracket.
2). Drill the hole and install 4 pieces of M8 expansion bolt into the hole.
3) Take out the IR speed dome and put the cables through the bracket.
Use M5 screws to fix the bracket and dome body.
4) Use 4 pieces of M8 screw nuts with washer to fix the bracket on the wall.
High Speed Dome Camera Introduction Manual
12
z
Pendant-mount Installation Procedures:
*Notice: Pendant-bracket is not designed for outdoor installation. If specially required, please do
make sure the waterproof installation of the dome.
1) Take out the bracket from the package (as shown), mark the installation hole positions on the
ceiling referencing to the bottom of bracket.
2) Drill the hole and install 4 pieces of M8 expansion bolt into the hole.
3) Take out the IR speed dome and put the cables through the sockets on the bottom of the pendant
bracket. Use M5 screws to fix the bracket and dome body.
4) Use screw nuts with washer to fix the bracket on the wall.
High Speed Dome Camera Introduction Manual
13
█▐ Dome Setting ▌█
Before the dome is installed, please finish the setup of the communication protocol, baud rate and
dome address. Set the DIP switch inside the dome body. The relative DIP switch site and connecting
wires are diagramed below for reference.
▌▌DIP Switch Setup
15-CD52WI : The dip switches are under the cover as following picture.
15-CD55TWA&15-CD55TWAI: The dip switches are under the flange as following picture.
SW1 — Dip switch for the dome address
SW2 — Dip switch for the dome protocol
High Speed Dome Camera Introduction Manual
14
z
Protocol Setup (SW2)
Our IR speed dome supports two protocols including Pelco P and Pelco D.
All of them supports baud rate of 9600bps、4800bps、2400bps.
Set the No.1~4 dip switch for the protocol configuration.
z
Protocol
SW2-1
SW2-2
SW2-3
SW2-4
PELCO-P
ON
OFF
OFF
OFF
PELCO-D
OFF
ON
OFF
OFF
Reserved
…
…
…
…
Baud Rate Setup (SW2)
Set the No.5~6 dip switch for the baud rate configuration.
Baud Rate
SW2-5
SW2-6
9600
OFF
OFF
4800
ON
OFF
2400
OFF
ON
Reserved
…
…
1. If you want to control using DVR or P/T controller, their protocol must be identical to camera.
Otherwise, you can not control the camera.
2. If you changed camera protocol by changing DIP S/W, the change will be effective after you
reboot the camera.
z
Dome Address Setup (SW1)
1. ID number of camera is set using binary number. The example is shown bellow.
PIN
1
2
3
4
5
6
7
8
ID Value
1
2
4
8
16
32
64
128
Ex) ID=5
ON
OFF
ON
OFF
OFF
OFF
OFF
OFF
Ex) ID=10
OFF
ON
OFF
ON
OFF
OFF
OFF
OFF
2. The range of ID is 1~255. Factory default of Camera ID is 1.
3. If you want to control a certain camera, you must match the camera ID with Cam ID setting of
DVR or Controller.
4. Speed dome can change the ID address and baud rate via OSD menu.
High Speed Dome Camera Introduction Manual
15
▌▌Cabling
Cabling Terminal Block
z
Power Connection
Please, check the voltage and current capacity of rated power carefully.
Rated power is indicated in the back of main unit.
z
Rated Power
Input Voltage Range
Current Consumption
Model
DC 12V
DC 11V~13 V
5A
15-CD52WI&15-CD55TWAI
DC 12V
DC 11V~13 V
4A
15-CD55TWA
RS-485 Communication
1. For PTZ control, connect this line to keyboard and DVR. To control multiple cameras at the
same time,RS-485 communication lines of them is connected in parallel as shown below.
2. Speed Dome OSD Menu, support the distal 120R resistance of the opening and closing.
High Speed Dome Camera Introduction Manual
16
z Video Connection
Connect with BNC coaxial cable.
z
Alarm input (15-CD55TWA、15-CD55TWAI)
Signal
Description
IN COM
Common point for alarm
IN1-,IN2-,IN3-, IN4-,IN5,IN6,IN7
Alarm input signal
Speed dome can detect the status of alarm input (NO or NC) automatically.
Normal Open and Normal Close define as below:
z
Normal Open
No contact between alarm input and common point
Normal Close
Keeping contact between alarm input and common point
Alarm output (15-CD55TWA、15-CD55TWAI)
Signal
Description
Alarm output 1
Alarm output port 1
Alarm output 2
Alarm output port 2
Speed dome can detect the status of alarm input automatically, when any alarm was triggered then alarm
output must be action.
High Speed Dome Camera Introduction Manual
17
▌▌Check points before operation
z
Before power is applied, please check the cables carefully.
z
The camera ID of the controller must be identical to that of the target camera. The camera ID can be
checked by reading DIP switch of the camera.
z
If your controller supports multi-protocols, the protocol must be changed to match to that of the
camera.
z
If you changed camera protocol by changing DIP switch, the change will be effective after you reboot
the camera.
z
Since the operation method can be different for each controller available, refer to the manual for your
controller if camera can not be controlled properly. The operation of this manual is based on the
standard Pelco® Controller.
▌▌Preset and pattern Function Pre-Check
z
Check how to operate preset and pattern function with controller or DVR in advance to operate
camera function fully when using controller or DVR.
z
z
Refer to the following table when using standard Pelco® D protocol controller.
<Go Preset>
Press [Call] input [Preset number]and press [Enter]
<Set Preset>
Press [Preset] input [Preset number] and press [Enter]
<Run Pattern>
Press [Call] input [Pattern number] and press [Enter]
<Set Pattern>
Please refer to the pattern setup, turn to “Pattern Setup”
If controller or DVR has no pattern button or function, use shortcut keys with preset numbers. For
more information, refer to “Reserved Preset” in this manual.
▌▌Starting OSD Menu
z Function
Using the OSD menu, Preset, Pattern, Swing, Group Pan, Tilt and Alarm Input
function can be configured for each application.
z Enter Menu
Press <Call> + Preset Number [95] +<Enter> (or call preset No.1 two times
continuously within two seconds)
z Move/ Select Item Control the joystick to move the cursor around the menu(Move the joystick up
and down to select the item
z Enter Item
Press “Iris Open” to enter the menu for selections (Press “Iris Open” to confirm
the selection)
z Quit from Menu
Press “Iris Close” to cancel the selection
*Note: If your controller does not have a joystick, use the up or down key.
High Speed Dome Camera Introduction Manual
18
▌▌Reserved Preset
z Description
Some Preset numbers are reserved to special functions.
1
<Call> [95]<Enter>
Enters into OSD menu
2
<Call> [99]<Enter>
Run Pan Scan
3
<Call> [98]<Enter>
Run Cruise(SEQ)
Default as Cruise(SEQ) 1
4
<Call> [97]<Enter>
Run Pattern
Default as Pattern 1
5
<Call> [96]<Enter>
Stop / End of set
6
<Set> [93]<Enter>
Set the Right boundary
Default as scan 1
7
<Set> [92]<Enter>
Set the Left boundary
pp: speed value 1~30
8
<Set> [87]<Enter> + <Call>[pp]<Enter>
Stop / End of setting
9
<Set> [84]<Enter> +
Set the preset of cruise
<Call>[pp]<Enter> + ……
Default as scan 1
pp: Preset,the max. 32
presets
10
<Call>[96]<Enter>
End the preset setting
qq: dwell time:1-60S,
11
<Set> [83]<Enter> + <Call>[qq]<Enter>
Set dwell time of cruising
Default as cruise 1
12
<Set> [86]<Enter>
Start the pattern setting
13
<Call>[96]<Enter>
End the pattern setting
Default as pattern 1
<Call>[80]<Enter> +
Start the qq scanning
14
<Call>[pp]<Enter> + <Call>[99]<Enter>
15
<Call>[80]<Enter> +
<Call>[pp]<Enter> + <Set>[93]<Enter>
16
<Call>[80]<Enter> + <Call>[pp]<Enter>
+ <Set>[87]<Enter>+ <Call>[qq]<Enter>
17
Set right boundary of the
pp scanning
pp: Scanning 1-8
qq: speed value:1-30
Set the speed value of
scanning
<Call>[80]<Enter> +
Start the pp cruising
<Call>[pp]<Enter> + <Call>[98]<Enter>
pp: Cruise 1-8
18
<Call>[80]<Enter> + <Call>[pp]<Enter>
Set the preset of the pp
qq: Presets, the max.32
+ <Set>[84]<Enter>+ <Call>[qq]<Enter>
cruising.
presets
19
<Call>[96]<Enter>
End the pp cruise setting
20
<Call>[80]<Enter> + <Call>[pp]<Enter>
Set dwell time of cruising
n:Dwell time 1-60s
+ <Set>[83]<Enter>+ <Call>[n]<Enter>
High Speed Dome Camera Introduction Manual
19
21
<Call>[80]<Enter> +
Start the pp pattern.
<Call>[pp]<Enter> + <Call>[97]<Enter>
22
<Call>[80]<Enter> +
Start setting of the pp
<Call>[pp]<Enter> + <Set>[86]<Enter>
pattern.
<Call> [96]<Enter>
End setting of the pp
pp: Pattern 1-4
23
pattern.
24
<Call> [94]<Enter>
Reset
25
<Call> [82]<Enter>
Load Default
26
<Call> [94]<Enter>
Reset
27
<Call> [71]<Enter>
Start Wiper
z
Main Functions Fast Call Up
Our IR Speed dome supports 220 preset positions. You can activate some special functions by
calling upon code number 65-99.
z
System Self-Testing
The dome will do self-testing after power up, and system status will show “Normal” if system Is
running normally. If error happens, testing result will be shown in “○” or “X”. “○” means normal
and “X” means error. Please check the according meaning as follows:
Serial NO.
1
2
3
4
5
6
Meaning
Dip Switch
Temperature Sensor
Storage
Pan
Tit
Camera
▌▌General Rules of Key Operation for Menu
z The menu items surrounded with<> always has its sub menu.
z For aIl menu level, to go into sub menu, press OPEN key or use joystick in the right.
z To go to up-one-level menu, press CLOSE key or use joystick in the left.
z To move from items to item in the menu, use joystick in the Up/Down.
z To change a value of an item, use Up/Down of the joystick in the controller.
z Press OPEN key or use joystick in the right to save values and Press CLOSE key or use joystick in the
left to cancel Values.
High Speed Dome Camera Introduction Manual
20
▌▌OSD MENU FUNCTIONS High Speed Dome Camera Introduction Manual
21
▌▌MAIN MENU
z Language
Language selection
z System Information
The user can check the dome system information as required. The
system information includes: Dome ID, dome address, baud rate,
protocol, temperature, voltage, alarm info, dome title, version, date, time,
and temperature scale. Display Setup Enable/Disable of OSD display on
Main Screen
z Display Setup
splay setup allows the user to define the way to display the dome titles on
the monitor.
z Dome Setup
Set all of the speed dome functions.
z Camera
Set all of the camera functions.
z Motion
Set the action of speed dome including “Preset”、”Scan”、”Cruise”…etc.
z Prestart
Reset
z Factory Defaults
Load factory default.
z Help
Description of the operating and functions.
High Speed Dome Camera Introduction Manual
22
▌▌LANGUAGE
The language for the on-screen menus is Selectable.
To change the display language:
Press Iris Open to enter selection.
All on-screen menus are changed to the selected language.
▌▌SYSTEM INFORMATION The user can check the dome system information as required.
The system information includes: Dome ID, dome address,
baud rate, protocol, temperature, voltage, alarm info, dome
title, version, date, time, and temperature scale.
Use the following steps to display the
System Information screens:
1.
Use the joystick to position the cursor along the
SYSTEM INFORMATION.
2. Press Iris Open. The SYSTEM INFORMATION
screen opens.
3. Mover the joystick up and town to select the
item.
4. Press Iris Open to enter the setup of each item.
High Speed Dome Camera Introduction Manual
23
▌▌DISPLAY SETUP Display setup allows the user to define the way to display the dome titles
on the monitor.
The displayed titles are listed as follows:
z DOME TITLE
Indicate dome
z PRESET
Indicate the dwell time for preset title
z MOTION
Indicate the dwell time for auto function titles (auto
scan/auto cruise/pattern tour)
z ZONES
Indicate the dwell time for zone titles
z DATE/TIME
Display the current date and time
z PAN/TILT
Time to display PTZ info and zoom info
z ALARM
Time to display alarm in/out info
z IR LED INFO
Time to display IR LED info
z PROMPT
Display prompt info
Two options for the Dome Title and Date/Time: OFF and ON
Other setup selections include:
z OFF
Title will not be displayed when activated.
z ON
Title will be continuously displayed when activated.
z 2 SEC
Title will be displayed for 2 seconds after activation.
z 5 SEC
Title will be displayed for 5 seconds after activation.
z 10 SEC
Title will be displayed for 5 seconds after activation.
Move the cursor by joystick to the one you need to set, and press Iris Open
the item. Move the joystick select the status and press Iris Open to confirm
Titles can be placed anywhere on the monitor. This feature allows you to
customize the window of your monitor screen. To set a title position:
1. Use the joystick to position the cursor in the DISPLAY
POSITION
2. Press Iris Open.
3. Use the joystick to move the title up, down, left, or right.
4. Press Iris Open.
5. Repeat steps 1 through 4 to position other titles
6. Position the cursor at BACK or EXIT. Press Iris Open to
save settings and exit menu.
High Speed Dome Camera Introduction Manual
24
▌▌IR LED The user can open and close the IR LED manually and set up the IR LED
work mode under this OSD mean. (Under normal operation mode, the
user can press IRIS OPEN and IRIS CLOSE to adjust the IR LED power):
1. CONTROL MODE: z AUTO:
IR LED will be opened or closed automatically according
to the light conditions.
z TIMING:
LED will be adjusted according to Open and Close Time.
z OPEN:
IR LED forcedly open
z CLOSE:
IR LED forcedly close
z CAMERA: IR LED status (Open/Close) will be synchronized with
Camera day and night switching
2. SENSITIVIRY:
Here the user can manually set the sensitivity from 1-5.
The smaller the number is, the lower light of the
environment will be when the IR LED on.
3. IR LED POWER:
Here the use can choose the power mode covering:
NORMAL, MATCH and USER.
z NORMAL: Near IR LED will be turned on when wide angle. and Far IR
LED will be turned on when small angle.
z MATCH: The Near and Far IR LED will be turned on and off
automatically to match the zoom in and out.
z USER:
The user can manually adjust the Near and Far IR LED.
4. AUTO CONTROL:
When it is on, the IR LED will turn its power consumption
to the standby status which will effectively extend the
service life of IR LEDs. And under this mode, when
objects appear in the screen, the IR LED will turn its
power consumption back to the normal status.
5. STANDBY POWER:
When the AUTO CONTROL is on, the user can set up the
standby power here.
6. STANDBY DELAY:
Set up how long if there is not moving object, the IR LED
will turn into standby status.
High Speed Dome Camera Introduction Manual
25
7. SENSITIVITY:
When the AUTO CONTROL is on, the user can set up the sensitivity to detect the
moving objects.
8. ENHANCED MODE:
Under normal status, press IRIS OPEN to enhance the IR LED power, when it is
turned to maximum, press IRIS OPEN continuously for 2 seconds to enter the
enhanced mode. And the whole brightness of the image will be improved. Move the
cursor to EHNANCED MODE and press IRIS to enter and select between” STATIC”
and “DYNAMIC”
9. START/STOP TIME:
Set up time for IR LED to open and close under “TIMING” of control mode.
▌▌IDLE IDLE setting means if there is no command for the dome for a period of
time, the dome will run the actions as defined.
1. TIME:
Move the cursor to “TIME” and press IRIS OPEN to enter,
and move the joystick up and dome to select among 30
sec, 1 min, 5 min, 10 min and 30 min. And press IRIS
OPEN to confirm.
2.
ACTION:
Move the cursor to “ACTION” and press IRIS OPEN to
enter. Move the joystick to select the actions including”
NONE, PRESET, SCAN, SEQUENCE, PATTERN. Press
IRIS OPEN to confirm.
▌▌ALARM High Speed Dome Camera Introduction Manual
26
The dome system has 7 alarm inputs and 2 alarm output. (optional
function). When an alarm is received, an input signal to the dome triggers
the user defined action (such as presets, patterns, etc.), and at meantime
the alarm output signals is activated.
1. ALARM NO.:
Move the cursor to the ALARM NO. Press IRIS OPEN to
enter and move the joystick up and down to select the
alarm input no. (Channel 1 and Channel 2)
2. INPUT STATE:
Set the alarm contact status. There are two input states,
OPEN and CLOSE.
z OPEN
normally open
z CLOSE
normally close
3. ALARM MODE
z OFF
Alarm function is deactivated.
z ON
Alarm function is activated.
z AUTO
AUTO Alarm function will be activated and deactivated
between START TIME and STOP TIME.
4. ACTION:
Set the alarm action:
z NONE
(default) No action.
z PRESET
Dome goes to preset. (Default as Preset 1)
z SCAN
Dome starts auto scan (Default as Auto Scan 1)
z SEQ
Dome runs auto cruise (Default as Auto Cruise 1)
z PATTERN
Dome runs pattern (Default as Pattern 1)
5. ALARM OUT:
Set the auxiliary to activate:
z OFF
Not alarm output will be activated.
z OUT1
An alarm action will close AUX 1 output..
z OUT2
An alarm action will activate AUX2 output.
6. RESET TIME:
Set up time for the alarm output (such as an alarm buzzed) when is triggered by the
detector. .
7. START /STOP TIME:
Set up the time to start alarm and stop alarm ONLY under the AUTO mode under
ALARM MODE
High Speed Dome Camera Introduction Manual
27
▌▌PRIVACY MASK Privacy mask allows the user to mask the privacy areas with
black frame. The user can set up 8 privacy masks at most.
1. MASK NO.:
Move the cursor here and press IRIS OPEN to enter the
setup of Mask Number of the privacy zone,
2. ENABLE:
To enable or disable this privacy mask function.
3. SET:
Move the cursor here and press IRIS OPEN to enter the
mode of setting the privacy mask. Move the joystick
(Left/Right/Up/Down) on the screen to set up the privacy
zone and press IRIS OPEN to confirm.
4. DELETE:
Move the cursor here and press IRIS OPEN to delete the
current No. of privacy mask zone.
High Speed Dome Camera Introduction Manual
28
▌▌CLOCK
The dome can display the data and time. And the user could enter this
CLOCK menu to set up the DATE and TIME.
1. DATE:
Move the cursor here and press IRIS OPEN to enter.
Move the joystick left and right to choose the date
position and move it up and dome to adjust the figures.
Press IRIS OPEN to confirm.
2. TIME:
Move the cursor here and press IRIS OPEN to enter.
Move the joystick left and right to choose the time
position and move it up and dome to adjust the figures.
Press IRIS OPEN to confirm.
3. SAVE/CANCEL:
Move the cursor to “SAVE” and press IRIS OPEN to save
the settings. Move the cursor to “DELETE” and press
IRIS OPEN to cancel the settings.
High Speed Dome Camera Introduction Manual
29
▌▌PASSWORD The dome features password protection function to prevent unanthorized
changes to the dome settings. If the PASSWORD function is enabled,
the operator can not access any dome setting without entering a valid
password.
1. EDIT PASSWORD:
Move the cursor here and press IRIS OPEN to enter.
Please under the old password before set up the new
password. The initial password is “111111”
2. ENABLE:
Move the cursor here and press IRIS OPEN to enter.
Move the joystick to select between “ON” and “OFF” .
The user need to enter the password when opening the
OSD under the status of “ENABLE: ON”.
High Speed Dome Camera Introduction Manual
30
▌▌DOME TITLE The user can set up the dome title to define each camera. Dome title
support up to 12 characters
Move the cursor according the left steps and select INPUT. Press IRIS
OPEN to enter.
1. Move the joystick left and right to position “←”, and press
IRIS OPEN to delete the character at“←”. Press IRIS
CLOSE to exit the edit mode.
2. Move the cursor to “<CAP>” and press IRIS OPEN to
enter. Move the joystick up and down to select the input
method (such as English Cap, English, Chinese, Figures,
and Symbols)
3. Mover the cursor to next line of <CAP> and press IRIS
OPEN to enter the mode of character input. The selected
character will be shown in high brightness. Move the
joystick up/down/left/right to choose the needed
characters. Press IRIS OPEN to move the selected
character to the INPUT position at“←”.
4. After finishing the character inputs, move the cursor to
“OK” and press IRIS OPEN to confirm.
5. Also user can move the cursor to “CANCEL” to cancel the
character input settings.
High Speed Dome Camera Introduction Manual
31
▌▌SOFT ADDRESS SET
The use can set up the SOFT ADDRESS, SOFT PROTOCOL and
SOFT BAUD RATE under this menu here to activate the soft address
function. And then the defined dome address by dip switch will be
disabled.
1. Move the cursor to INPUT (under DOME ID) and press
IRIS OPEN to enter the mode of setting dome ID, Move
the joystick to position the cursor beside :0 1 2 3 4 5 6 7 8
9” and press IRIS OPEN to enter. And move the joystick
again to select numbers of dome ID and press IRIS
OPEN to confirm. The number selected will be input on
the upper line.
2. Move the cursor to INPUT (the bottom menu) and press
IRIS OPEN to enter the mode of setting soft address,
Move the joystick to position the cursor beside :0 1 2 3 4
5 6 7 8 9” and press IRIS OPEN to enter. And move the
joystick again to select numbers of dome soft address
and press IRIS OPEN to confirm. The number selected
will be input on the upper line.
3. Enable or disable the soft address function. Press IRIS
CLOSE to exit last step. Move the cursor to
“SOFTADDRESS:ON/OFF”. Press iris open to enter.
Move the joystick up or down to select ON of OFF. Press
IRIS OPEN to confirm.
4. Press OK to save and confirm all the settings and press
CANCEL to exit all the settings.
High Speed Dome Camera Introduction Manual
32
▌▌AUX
The user can set up the auxiliary output to trigger other devices from an
alarm or a controller.
Move the cursor to AUX and press IRIS OPEN to enter to select “ON” or
“OFF” to enable or disable this function.
High Speed Dome Camera Introduction Manual
33
▌▌SOFT LIMIT
The user can set up the soft limit to define the left and right boundaries
for the pan movement.
SOFT LIMIT: Move the cursor here and press IRIS OPEN to enter. Move
the joystick to select “ON” or “OFF” to enable or disable this function.
1. LEFT LIMIT:
Move the cursor here and press IRIS OPEN to enter.
Now the user can mover the joystick to control the PAN
movement of the dome to a defined position for the left
limit. Press IRIS OPEN to confirm.
2. RIGHT LIMIT:
Move the cursor here and press IRIS OPEN to enter.
Now the user can mover the joystick to control the PAN
movement of the dome to a defined position for the right
limit. Press IRIS OPEN to confirm.
3. LIMIT DELETE:
Move the cursor here and press IRIS OPEN to delete all
the settings.
High Speed Dome Camera Introduction Manual
34
▌▌DOME SPEED
To make a selection of the dome speed, the user can enter this menu to
set up.
Move the cursor to DOME SPEED and press IRIS OPEN to enter. Move
the joystick to select the dome speed when doing the pan movement.
Move the cursor to BACK/EXIT and press IRIS OPEN to run the
command of BACK or EXIT.
High Speed Dome Camera Introduction Manual
35
▌▌POWER ON ACTION
The user can define the dome action when power on,
Move the cursor to POWER ON ACTION and press IRIS OPEN to enter
the mode of setup.
z NONE
(default) No action.
z PRESET
Dome goes to preset. (Default as Preset 1)
z SCAN
Dome starts auto scan (Default as Auto Scan 1)
z SEQ
Dome runs auto cruise (Default as Auto Cruise 1)
z PATTERN Dome runs pattern (Default as Pattern 1)
High Speed Dome Camera Introduction Manual
36
▌▌CAMERA
The dome can automatically recognize the main camera modules in the
market. For the cameras it can not recognize, the user can set up here.
1. CAMERA:
Move the cursor here and press IRIS OPEN to enter the
setup mode. Move the joystick up and down to select the
camera types. Press IRIS OPEN to confirm.
2. BAUDRATE:
Move the cursor here and press IRIS OPEN to enter the
setup mode. Move the joystick up and down to select the
baud rate. Press IRIS OPEN to confirm.
3. PARITY:
Move the cursor here and press IRIS OPEN to enter the
setup mode. Move the joystick up and down to select the
parity mode. Press IRIS OPEN to confirm.
High Speed Dome Camera Introduction Manual
37
▌▌COMMUNICATION TEST
The dome can do self diagnosis for the communications between
keyboard and speed dome. The test needs to match with our software
VK200.
If the self testing is successfully finished via the software, the system will
show up the testing results as left diagram.
High Speed Dome Camera Introduction Manual
38
▌▌OTHERS
The user can set up TEMP MODE, INTERNAL FAN, PRESET FREEZE,
STOP TIME. MENU OFF TIME and NORTH ZERO here under the menu
of “OTHERS”
1. TEMP MODE:
To set up the control mode of dome fans and heaters. It
includes three modes of AUTO, FAN HIGH SPEED and
FAN LOW SPEED.
2. PRESET FREEZE:
This feature freezes the scene on the monitor when going
to a preset. This allows smooth switching from one preset
scene to another.
3. AUTO FLIP:
When the camera tilts downward and goes just beyond
the vertical position, the camera will rotate 180 degrees.
The user can press IRIS OPEN to enter and choose to
turn on/off this function.
4. STOP TIME:
To set up the time that dome will stops after receiving the
last command. Options include 5/15/30/60 Sec.
5. MENU OFF TIME:
To set up the time that OSD menu be off when no
operations. Options include 1/2/5/10 min.
6. NORTH ZERO:
To set up the due north of the dome (pan 0º) Move the
cursor here and press IRIS OPEN to enter. Move the
joystick to control the dome to pan 0º and press IRIS
OPEN to confirm.
High Speed Dome Camera Introduction Manual
39
▌▌CAMERA (Module)
The user can make adjustment for the cameras under this
menu.
1. FOCUS MODE:
AUTO FOCUS allows the camera lens to remain in focus
during zooming in, zooming out and pan/tilt movement.
Move the cursor here and press IRIS OPEN to enter.
Setup the mode: AUTO” or “OFF” and press IRIS OPEN
to confirm. When auto focus is off, the user needs to do
manual focus.
2. DIGITAL ZOOM:
Move the cursor here and press IRIS OPEN to enter.
Setup the function to be “ON” or “OFF”.
Note: the above camera menu supports
only SONY FCB-EX1020.
3. BACKLIGHT:
Move the cursor here and press IRIS OPEN to enter.
Setup the function to be “ON” or “OFF”.
4. PICTURE FLIP:
To set up the Tilt flip for the dome. Move the cursor here
and press IRIS OPEN to enter. Setup the function to be
“ON” or “OFF”.
5. FREEZE:
Note: SCM-2270 & SCM-2370 camera
If turn on this function, the screen image will be frozen
set using the embedded module itself
until it is turned off. Move the cursor here and press IRIS
menu settings.
OPEN to enter. Setup the function to be “ON” or “OFF”.
6. ZOOM SPEED:
To set up the zoom speed of Low, Normal and high when
doing the zoom in and out. Move the cursor here and
press IRIS OPEN to enter. Move the joystick to choose
and press IRIS OPEN to confirm
Note: CZ36SCM camera set using the
embedded module itself menu settings
7. DAY NIGHT:
To set up the day and night mode of AUTO, CLOUR and
B/W. Move the cursor here and press IRIS OPEN to
High Speed Dome Camera Introduction Manual
40
enter. Move the joystick to choose and press IRIS OPEN
to confirm
►CAMERA
.
ADVANCED
The use can set up more detailed parameters of
camera here under the menu of CAMERA
ADVANCED.
1. WB:
To set up the white balance of the camera.
Options include AUTO, MANUAL. INDOOR and
OUTDOOR. The use can select different mode
according the different locations.
2. RED GAIN:
Only can be adjusted whet WB set as manual.
3. BLUE GAIN:
Only can be adjusted whet WB set as manual.
4. BIRGHT:
To set up the brightness of the image. Move the
cursor here and press IRIS OPEN to enter. Move
the joystick to adjust and press IRIS OPEN to
confirm
5. EXPOSURE:
To set up the exposure mode of the camera.
Options include AUTO, MANUAL, SHUTTER
PRIORITY, IRIS PRIORITY and BRIGHT
PRIORITY. The use can select different mode
according the different locations.
6. WIDE DYNAMIC:
Wide dynamic range (WDR) balances thebrightest and darkest sections of a scene
to produce a picture that is perfectly balanced in light and clarity. Available settings
are OFF.LOW.MID and HIGH. The default setting is OFF.
High Speed Dome Camera Introduction Manual
41
▌▌PRESET
The dome supports 220 presets. Please check the following
steps to set up a preset.
1. PRESET NO.:
Move the cursor here and press IRIS OPEN to enter the
setup of Preset Number. Move the joystick to select a
preset number (1-64 and 100-255) and press IRIS OPEN
to confirm.
2. TITLE:
Move the cursor here and press IRIS OPEN to enter the
setup of Preset Title. Check the detailed above in DOME
TITLE settings.
3. <SET>:
Move the cursor here and press IRIS OPEN to enter.
Move the dome to a defined position as preset point and
press IRIS OPEN to save the preset position.
4. CALL:
Move the cursor here and press IRIS OPEN to call up the
current preset.
5. DELETE:
Move the cursor here and press IRIS OPEN to delete the
current preset.
6. SPEED:
Move the cursor here and press IRIS OPEN to set up the
preset call up speed of LOW, MID and HIGH.
High Speed Dome Camera Introduction Manual
42
▌▌SCAN
The dome supports 8 groups of auto scan. Please check the
following steps to set up a scan.
1. SCAN NO.:
Move the cursor here and press IRIS OPEN to enter the
setup of SCAN Number. Move the joystick to select a
preset number (1-8) and press IRIS OPEN to confirm.
2. TITLE:
Move the cursor here and press IRIS OPEN to enter the
setup of SCAN Title. Check the detailed above in DOME
TITLE settings.
3. <LEFT LIMIT>:
Move the cursor here and press IRIS OPEN to enter.
Move the dome to a defined position as left limit and
press IRIS OPEN to save this left boundary.
4. <RIGHT LIMIT>:
Move the cursor here and press IRIS OPEN to enter.
Move the dome to a defined position as right limit and
press IRIS OPEN to save this right boundary.
5. START:
Move the cursor here and press IRIS OPEN to start the
current scan.
6. SCAN SPEED:
Move the cursor here and press IRIS OPEN to set up the
scan speed ranging 1-30.
High Speed Dome Camera Introduction Manual
43
▌▌AUTO CRUISE (SEQUENCE)
The dome supports 8 groups of auto cruise and each cruise
supports 32 presets. . Please check the following steps to set
up cruise.
1. SEQ NO.:
Move the cursor here and press IRIS OPEN to enter the
setup of Sequence Number. Move the joystick to select a
preset number (1-8) and press IRIS OPEN to confirm.
2. TITLE:
Move the cursor here and press IRIS OPEN to enter the
setup of Sequence Title. Check the detailed above in
DOME TITLE Settings.
3. <SEQUENCE SET>:
Move the cursor here and press IRIS OPEN
to enter.
Move the cursor to EDIT and press IRIS OPEN enter edit
mode of sequence. Move the joystick left and right to
select each item.
z When the < > is on the item NO., move joystick up or down to select
the Serial NO. of the preset in a sequence. There are up to
32 presets in each sequence.
z When the < > is on the item PRESET, move the joystick up or down to
select the preset NO. that the user wants to add in the
sequence.
z When the < > is on the INTERVAL, move the joystick up or down to
select the interval time between each preset.
z When the < > is on the last item, move the joystick up or down to
select edition mode as “INS (insert)”, “ok” and “delete”.
z Press IRIS OPEN when selecting INS to insert the settings into the
position of current Serial No.
z Press IRIS OPEN when selecting OK to override the settings of
Current Serial No.
z Press IRIS OPEN when selecting delete to delete the settings
of the Current Serial No.
z Press IRIS OPEN to save all the setting and press IRIS CLOSE
to exit.
4. DELETE/START:
Move the cursor here and press IRIS OPEN to delete/start the current sequence.
High Speed Dome Camera Introduction Manual
44
▌▌PATTERN
The dome supports 4 pattern tours and each pattern cover at
most 10 Minutes of 500 commands. Please check the
following steps to set up a pattern.
1. PATTERN NO.:
Move the cursor here and press IRIS OPEN to enter the
setup of Pattern Number. Move the joystick to select a
pattern number (14) and press IRIS OPEN to confirm.
2. TITLE:
Move the cursor here and press IRIS OPEN to enter the
setup of Pattern Title. Check the detailed above in DOME
TITLE settings.
3. <SET>:
Move the cursor here and press IRIS OPEN to enter.
Move the dome up/down/left right, make the zoom in/out
and press IRIS OPEN to save the pattern tour.
4. START:
Move the cursor here and press IRIS OPEN to start the
current pattern tour.
5. DELETE:
Move the cursor here and press IRIS OPEN to delete the
current pattern tour.
High Speed Dome Camera Introduction Manual
45
▌▌ZONES
The use can set up zone title when the camera moves to a
defined location, which will make it much easier for the user
to identify the location. The dome supports 8 zone titles.
Please check the following steps to set up a zone
1. ZONE NO.:
Move the cursor here and press IRIS OPEN to enter the
setup of Zone Number. Move the joystick to select a zone
number (1-8) and press IRIS OPEN to confirm.
2. TITLE:
Move the cursor here and press IRIS OPEN to enter the
setup of Zone Title. Check the detailed above in DOME
TITLE settings.
3. <LEFT LIMIT>:
Move the cursor here and press IRIS OPEN to enter.
Move the dome to a defined position as left limit and
press IRIS OPEN to save this left boundary.
4. <RIGHT LIMIT>:
Move the cursor here and press IRIS OPEN to enter.
Move the dome to a defined position as right limit and
press IRIS OPEN to save this right boundary.
5. DELETE:
Move the cursor here and press IRIS OPEN to delete the
current zone.
High Speed Dome Camera Introduction Manual
46
▌▌TIMING ACTION
TIMING ACTION allows the user to set up the actions of the
dome in 7 days (each day with 8 timing segments). When
fishing the setup, the dome will do the actions according to
the setup motion during the defined time segment.
1. NO.:
Here shows the day within a week. Move the cursor here
and press IRIS OPEN to enter. Move joystick up or down
to select the Serial No. (1-8) for the timing action. Press
IRIS OPEN to confirm.
2. START:
To set up the start time for the defined motion within this
time segment. Press IRIS OPEN to confirm.
3. STOP:
To set up the stop time for the defined motion within this
time segment. Press IRIS OPEN to confirm.
4. MOTION:
To setup the motion that will be operated in this time
segment. The motion includes: NONE. PRESET 1-8,
SCAN 1-4, SEQUENCE 1-4 and PATTERN 1-4.
5. ON/OFF:
Move the cursor here and press IRIS OPEN to enter to
enable or disable this function. Press IRIS OPEN to
confirm.
6. COPY:
The user could set up each 8 segment of 7 days
separately or can copy the finished setting for one day to
the current day. Move the cursor there and press IRIS
OPEN to copy the settings.
7. BACK:
Press IRIS OPEN to save and be back to last menu.
NOTE: It is not allowed to set up the same time segment
during one day. And the time segment can not exceed 00:00.
During the timing action segment, the defined action will be
stopped if the user moves the dome. If there is operation
during the defined time segment, the action will re-activated
as long as it is in the defined timing action segment.
High Speed Dome Camera Introduction Manual
47
▌▌MOTION DETECT
The user can set up 8 motion detection scenes (each scene
with 4 detecting areas) under this menu. The alarm output
will be triggered when moving objects enter these detecting
areas
1. SCENE NO.:
Move the cursor here and press IRIS OPEN to enter the
setup of Scene Number. Move the joystick to select a
preset number (1-8) and press IRIS OPEN to confirm.
2. <EDIT SCENE>:
Move the cursor here and press IRIS OPEN to enter.
Move the dome to a user-defined detecting scene. Press
IRIS OPEN to confirm.
3. <EDIT AREA>:
Move the cursor here and press IRIS OPEN to enter the
menu of AREA EDIT.
z AREA NO.: Move the cursor here and press IRIS OPEN to enter the
setup of AREA Number. Move the joystick to select a preset
number (1-4) and press IRIS OPEN to confirm.
z <AREA EDIT>: Move the cursor here and press IRIS OPEN to enter
the setup of AREA EDIT. The screen will display frame with Serial
No. The user can move the frame to the top left conner of the
wanted detecting area and press IRIS OPEN to confirm. Then
move the joystick to adjust the size of the detecting area and press
IRIS OPEN to confirm
z DELETE: Move the cursor here and press IRIS OPEN to delete the
current detecting area.
z SENSITIVITY: Move the cursor here and press IRIS OPEN to enter.
Select among LOW. MID and HIGH and press IRIS OPEN to
confirm the sensitivity.
z DELETE SCENE: Move the cursor here and press IRIS OPEN to
delete the current scene.
z AUX ACTIVATE: The dome can activate the alarm aux output when
detecting the moving object. Press IRIS OPEN to enter and select
between “ON” and “OFF” to activate or deactivate this function.
z CANCEL (SEC): Here means when the alarm aux output is activated
by the detecting function, for how long it will last before the aux
output will be closed. The time ranging 1-60 Sec.
START: Move the cursor here and press IRIS OPEN to start the function of motion detection.
High Speed Dome Camera Introduction Manual
48
▌▌AUTO TRACKING
Under the auto tracking mode, the dome will auto track the
moving objects entering the scene. When the object is
moving out of the scene, the dome will return to a preset
position as defined after the defined time.
1. SENSITIVITY:
The user can set up the auto tracking sensitivity under
this menu. When set as LOW, the dome will do auto
tracking when obvious object entering the screen. When
set as HIGH, the dome will do auto tracking when small
object moving into the screen. Move the cursor there and
press the IRIS OPEN to enter. The options include: LOW,
MID and HIGH.
2. TARGET:
To set up the size of the tracking object. The options
include Large. MID and SMALL.
3. AUX:
If set “ON” here, the object auto tracking will activate
alarm aux output at the same time. Press IRIS OPEN to
enter to select “ON” or “OFF”
4. ZOOM MATCH:
Under the auto tracking model, if turn on the function of
ZOOM MATCH, the dome will do zooming in and out
during auto tracking to keep the right proportion between
the object and background. Move the cursor there and
press the IRIS OPEN to enter. And move the joystick to
select the optical zoom.
5. ENABLE:
Move the cursor here and press IRIS OPEN to enter to
select “ON” or “OFF” to enable or disable this function.
6. TRACKING SCENE SET:
Here the user can set up the scene that the dome will get
back to when finishing the action of auto tracking. Move
the cursor here and press IRIS OPEN to enter. Move the
dome to the wanted scene and press IRIS OPEN to
confirm.
7. DELETE: Move the cursor here and press IRIS OPEN to delete the return scene.
8.RETURN DELAY:
To set up the time that dome will waiting to return to this scene.
High Speed Dome Camera Introduction Manual
49
▌▌RESTART
The dome allows the user to reset its settings remotely under this menu. Move the cursor here and press IRIS OPEN to enter. Select “OK” or “CANCEL” to continue the reset or cancel the reset. High Speed Dome Camera Introduction Manual
50
▌▌FACTORY DEFAULTS
FACTORY DEFAULTS will allow the user to recover all the
setting to factory default setting.
Move the cursor here and press IRIS OPEN to enter.
Select “OK” or “CANCEL” to continue the reset or cancel the
reset.
High Speed Dome Camera Introduction Manual
51
▌▌SPECIFICATIONS
Product No.
15-CD52WI
15-CD55TWA
Video Signal System
15-CD55TWAI
NTSC / PAL
CCD
1/4" Interline CCD
SCM-2270(SAMSUNG):
NTSC: 768(H)×494 (V) / PAL: 752(H)×582 (V)
CZ36SCM(COP):
Effective Pixels
NTSC: 1028(H)×508(V)520K / PAL: 1028(H)×596(V)610K
SCM-2370(SAMSUNG):
NTSC: 768(H)×494 (V) / PAL: 752(H)×582 (V)
FCB-EX1020(SONY):
NTSC: Approx.380.000 pixels/PAL: Approx.440.000 pixels
Horizontal Res.
SCM-2270(SAMSUNG):
560 TV Line
CZ36SCM(COP):
700 TV Line
SCM-2370(SAMSUNG):
560 TV Line
FCB-EX1020(SONY):
550 TV Line
SCM-2270(SAMSUNG):
x 27 Optical Zoom, x 16 Digital Zoom
CZ36SCM(COP):
x 36 Optical Zoom, x 32 Digital Zoom
Zoom
SCM-2370(SAMSUNG):
x 37 Optical Zoom, x 16 Digital Zoom
FCB-EX1020(SONY):
x 36 Optical Zoom, x 12 Digital Zoom
Focal length
S/N
Min. Illumination
Day & Night
SCM-2270(SAMSUNG):
f 3.5mm~95mm
CZ36SCM(COP):
f 3.4mm~122.4mm
SCM-2370(SAMSUNG):
f 3.5 mm~129.5 mm
FCB-EX1020(SONY):
f 3.4mm~122.4mm
Ration 50 dB (AGC Off)
0.2 Lux /F1.67(50 IRE)Color / 0.02 Lux F1.67 (50 IRE)B/W
Auto / Day(Color) / Night(ICR, B/W)
Focus
Auto / Manual / Semi Auto
Iris
Auto / Manual / Semi Auto
Shutter
AGC
White Balance
BLC
1/1~ 1/120000 sec
Low / Middle / High / Off
Auto / Manual(Red, Blue Gain Adjustable)
Normal / High / Off
High Speed Dome Camera Introduction Manual
52
Pan Speed
Tilt Speed/Range
0.01~120°/S
Range:360°endless
0.01~120°/S
Range:-5°~90°
Auto Scan
Pattern
Other Functions
Auto Track
Schedule
Communication
0.01~360°/S
Range:360°endless
0.01~120°/S
Range:-5°~90°
256 Preset(Label)
Preset
Auto Cruising(Sequence)
0.01~600°/S
Range:360°endless
0.01~120°/S
Range:-10°~90°
Preset Accuracy +/- 0.01°
8 cruising tracks, each cruising tracks has 32 preset positions,
user-defined dwell time
8 auto scan tracks, user-defined left and right boundaries and scan
speed
4 Pattern, each pattern 600 sec or 500 instructions
Auto flip, Auto Parking, Power Up Action etc.
X
X
Yes
Timing actions for 7 days of programmable schedule
RS-485(9600, 4800, 2400 Selectable or change from OSD menu)
Protocol
Pelco-D, Pelco-P, Auto identify
Privacy Zone
8 Zone
Alarm Input
X
7 Input
7 Input
Alarm Output
X
2 Output
2 Output
OSD
IR LED
Projection Distance
Menu / PTZ information etc
9 pcs Hi-Power
X
10 pcs Hi-Power
120M
X
150M
Fan and Heater
Wiper
Yes
Yes
IP Protection
Power
Dimension
Weight
Operating Temp.
X
Yes
IP66
DC12V / 5A
DC12V / 4A
DC12V / 5A
Ø210x 304(H)mm
Ø228 x 310(H)mm
Ø228 x 341(H)mm
4.8Kg
4.5Kg
6.3 Kg
-25°C~+55°C
-20°C~+55°C
-25°C~+55°C
High Speed Dome Camera Introduction Manual
53
▌▌OPTIONAL BRACKET
► Ceiling Bracket (CD03BU1)
► Pole Bracket (CD04BH)
► Inside Corner Bracket (CD06BH)
► Outside Corner Bracket (CD05BH)
V.20140115
High Speed Dome Camera Introduction Manual
54