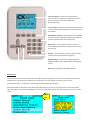
1
CX Lighting Control Panel
Users’ Guide
PRECAUTIONS
•
READ AND FOLLOW ALL SAFETY INSTRUCTIONS.
•
No components in the CX Panel should be removed while power is still being supplied to the CX Transformer. This will result
in Panel failure and the entire CX Panel and components will need to be replaced. This is an unsupported action and voids
Warranty.
•
CAUTION - RISK OF ELECTRICAL SHOCK. To prevent electrical shock, turn off power at the circuit breaker before installing
or servicing unit. Never wire energized electrical components.
•
NOTICE: For installation by a licensed electrician in accordance with National and/or local Electrical Codes and the following
instructions.
•
CAUTION: USE COPPER CONDUCTOR ONLY.
•
Be sure to read and understand all instructions before installing or servicing unit
•
Do not operate unit with panel door assembly or relay guard covers removed.
•
For Indoor use only. Do not use outdoors.
•
Do not mount near gas or electric heaters.
•
Disconnect switch or a circuit breaker must be provided and marked as the disconnecting device.
•
The use of accessory equipment not recommended by the manufacturer may cause an unsafe condition.
•
Confirm that device ratings are suitable for application prior to installation.
•
No user serviceable parts contained inside unit. Refer all service related questions to the factory. All servicing shall be
performed by qualified service personnel.
•
Equipment should be mounted in locations and at heights where it will not readily be subjected to tampering by unauthorized
personnel.
•
Use only approved materials and components (i.e. twist on connectors, electrical box, etc.) as appropriate for installation.
•
NOTICE: Do not install if product appears to be damaged.
•
If the equipment is used in a manner not specified by the manufacturer, the protection provided by the equipment may be
impaired.
•
Do not use this equipment for other than intended use.
SAVE THESE INSTRUCTIONS!
1
Table of Contents
Inputs-Applying Priorities
Part 1 Introduction
Description
Product Configuration
Panels
Relays
Enclosure Mounting
Installing individual relay cards
Connecting panel power
Connecting lighting loads
Connecting low voltage inputs
Operating the Panel
Troubleshooting
CX Specifications
Panel load schedule form
Inputs-Using Photocells and Photocell Settings
Photocell Control with ON/OFF Functionality
Only
Photocell Control with Dimming Functionality
Only
Outputs
Presets
Dimming
System Tools
Manual Control
System Status
Save/Restore Program
Priorities/Masking
Masking
Access Control
Diagnostics
Update Firmware
Controller Version
Relay Version
Reboot System
Part 2 CX Lighting Control Panels Programming
Guide
User interface
Menu Structure and Navigation
Help Screens
Function Keys
Programming Procedures
System Settings
Date/Time Preferences
Set Date/Time
Astro Clock Settings
Open/Close Times
Panel Names
After-Hours Sweep
Blink Alert
Power-On Settings
Relay Function
Idle Time-Out Settings
Backlight Settings
Clock Adjustment
Factory Defaults
Scenarios
Groups
Schedules
Schedules – Days of the Week
Schedules – ON Only, Off Only or ON/OFF
Actions
Schedules – Block/Unblocked on Holidays,
Date Range and Priorities
Holidays
Standard U.S. Holidays
Holiday Dates
Holiday Schedules
Clear Expired Holidays
Inputs
Select Inputs – Input Designations and Naming Inputs
Input-Type and Function
Mapping Input Control and Masking
Part 3 CX Lighting Control Panels Trouble Shooting Guide
Trouble Shooting Guide
2
PART 1 - CX Lighting Control Panels Installation Guide
Introduction
The information in this User Manual is provided as a guide for understanding of the components and the reliable programming
examples for a User. The instructions should be selected based on application and functionality.
Installation Instructions
Programming Instructions
Installation Instructions
The installation instructions consist of the following:
Description
Product Configurations
Enclosure Mounting
Installing individual Relay Cards
Connecting Panel Power
Connecting Lighting Loads
Connecting Low Voltage Inputs
Operating the Panel
Troubleshooting
Panel Specifications
Panel Load Schedule Form
Description
CX Commercial Lighting Control Panels – 4, 8, 16 and 24 Relay Panels are shipped in one package. Panels are configured with
all relays of the same type installed or no relays with space only for relays to be installed in the field. Relays are mounted with
lighting circuit terminals in the high voltage area separated by a metal divider. Low voltage control inputs are located in the low
voltage area of the panel. The following information describes the CX 4, 8, 16 and 24 relay panel installations. For programming
information, refer to the “CX Panel Programming Guide” provided as a separate document with the Panel.
Product Configuration
Example: CX082S08R2NM - CX 8 Relay Panel, 120/208/220/277VAC input, with 8 20A/1P NO Electrically Held Relays
installed in NEMA 1 Surface Mount Master Panel.
Panel
Model
Relay Spaces
Input Voltage
Housing
Relay Quantity
Relay Type
Options
CX
04 4 Relay Spaces
2 120/208/220-277VAC Multi-Tap
00 No relays
2N 20A, 1P, NO Elect Held
N Stand Alone (4-Relay ONLY)
08 8 Relay Spaces
3 120/277/347VAC Tri-Tap
S Surface
NEMA 1
04 4 Relays Installed
3L 30A, 1P, Latching
M Master (8 Relay ONLY)
08 8 Relays Installed
TN 20A, 2P, NO Elect Held
S Secondary (8 Relay ONLY)
TC 20A, 2P, NC Elect Held
SP Space Only
Panel
Model
Relay Spaces
Input Voltage
Housing
Relay Quantity
Relay Type
Options
CX
16 16 Relay Spaces
2 120-277VAC Universal
00 No relays
2N 20A, 1P, N/O Elect Held
M Master
24 24 Relay Spaces
3 347-480VAC Universal
S Surface
NEMA 1
16 16 Relays Installed
3L 30A, 1P, Latching
S Secondary
24 24 Relays Installed
TN 20A, 2P, N/O Elect Held
TC 20A, 2P, N/C Elect Held
SP Space Only
3
Panels are available fully populated with a single relay type or with SP option (Space Only) to allow for field installation of
individual relays. This is the methodology to provide for panels with a mix of more than one type of relay. Relays can be
ordered separately as follows:
Relay Model
CXR
Relay Type
2N 20A, 1P, NO Elect Held, 120/277VAC, 14KAIC Rated
3L 30A, 1P, Latching, 120/277/347VAC, 18KAIC Rated
TN 20A, 2P, NO Elect Held, 208/240/480VAC, 14KAIC Rated
TC 20A, 2P, NC Elect Held, 208/240/480VAC, 14KAIC Rated
Enclosure Mounting
Typically the CX Panel is installed near the circuit breaker panel or in the ceiling of the room containing the lighting circuits
to be controlled. Select an appropriate location that meets the environmental conditions listed in the specification section of
this document. The panel interior is divided into high voltage and low voltage areas as shown in Figures 1(a) (b). Select an
appropriate location for incoming line voltage panel power, branch circuits to be controlled and low voltage input wiring. The
housing is supplied with conduit knock-outs labeled to indicate line or low voltage wiring use. All terminations within the panel
enclosure require installation by a licensed electrician in accordance with national and/or local Electrical Codes.
Figure 1(a) – CX4 or 8 Panel Interior
4
Figure 1(b) – CX16 or 24 Panel Interior
Place the enclosure on the mounting surface and use a level to ensure that it is properly oriented and aligned. Secure the
enclosure to the mounting surface with hardware as appropriate for the application using the three keyed mounting holes
located near the top corners and in the center bottom of the enclosure as shown in Figures 2(a) (b).
Figure 2(a) - Enclosure Mounting Holes - 4/8 Panels
Figure 2(b) - Enclosure Mounting Holes 16/24 Panels
5
Installing Individual Relay Cards
CX RELAY PANELS ARE MOST COMMONLY SHIPPED WITH ALL RELAY CARDS INSTALLED. If the project requires different
types of relays installed in the same panel then the relays are supplied separately and they will require field installation. In this
application, reference the applicable Relay Installation Instruction supplied with the individual Relay Cards on how to install relays.
Caution: ALWAYS remove supply power to the Panel control Transformer prior to making any connections between relay
boards and panel processor board. Failure to do so may result in personnel injury, damage to the panel, and void its
warranty.
Connecting Panel Power
The panel is designed to operate on 120, 208, 240, or 277VAC for input voltage “2” designator or 120, 277, or 347VAC for input
voltage “3” designator. Panel input power is supplied to the multi-tap transformer located in the upper center of the panel as shown
in Figures 1(a) (b).
To connect the panel power, do the following:
1. With the power turned off, route the dedicated panel power supply leads to the transformer and connect them to the
appropriate system voltage specific leads of the transformer. A voltage lead color label is located on or adjacent to the
transformer.
2. Connect the power supply ground lead to the panel chassis grounding lug. A label indicating this ground lug is located
adjacent to the connection location.
Caution: When power is applied to the transformer, the unused transformer leads become electrified. Cap unused
transformer leads with wire nuts to prevent electrical shorting.
Connecting Lighting Loads
To connect the lighting loads, do the following:
1. With the power turned off, route the lighting system line and load leads through the high voltage area of the panel shown in
Figure 1(a) (b).
2. Connect line and load leads for each lighting load to the output terminals of the appropriate relay as delineated in the
project plans and/or Panel Load Schedule. Space is provided for the circuit identification number to be written adjacent to
the terminals on each relay card.
Notice: If relays are not already installed, reference the applicable Relay Installation Instruction supplied with the
individual Relay Cards on how to install relays.
Caution: Prior to making any connections to the relay outputs, verify that none of the loads are shorted. Failure to do so
may result in personnel injury, damage to the panel, and void its warranty.
Notice: If no Panel Load Schedule exists, use the Panel Load Schedule Form supplied in the clear plastic pocket inside
the Panel Door to record the lighting circuit relay assignments while connecting the relays.
Connecting Low Voltage Inputs
To connect the low voltage inputs, do the following:
1. Bring the low voltage wiring for the contact inputs in through the knockouts in the low voltage wiring area where indicated
in Figure 1(a) (b). The CX04 Relay Panel supports 6 inputs, the CX08 Relay Panel supports 12 inputs, the CX16 Relay
Panel supports 20 inputs and the CX24 Relay Panel supports 30 inputs. Inputs are software configurable through
programming to support momentary switches, maintained switches (latching), motion sensors, or photocells. Each
Relay Card includes one low voltage input. By default, low voltage inputs located on an individual relay card are set to
be controlled by a momentary switch station associated to that specific relay. The quantity of Auxiliary Inputs available is
Dependant of the mother board(s) utilized. 2 Auxiliary Inputs for the CX04 Relay Panel, 4 Auxiliary Inputs for the CX08
Relay Panel, 2 Auxiliary Inputs for the CX16 and 3 Auxiliary Inputs for the CX24. These inputs may be connected prior to
programming. Input devices may be connected to any terminal location regardless of final control programming.
2. Connect contact closure input devices to the input terminals using 18 AWG wire.
6
Notice: Use the Panel Load Schedule Form supplied in the clear plastic pocket inside the Panel Door to record the low
voltage input types while making connections.
Low Voltage Control Diagrams shown in Figure 3 below are for use with Hubbell Building Automation Input Devices ONLY.
Diagrams may not apply to input devices from other manufacturers.
Figure 3 - Low Voltage Input Wiring Diagrams
Operating the panel
To operate the panel, do the following:
1. Connect the User Interface control ribbon cable to the User Interface Ribbon Cable Connector on the Mother Board
where shown in Figure 4. The User Interface control ribbon cable is supplied connected to the User Interface Module that
is attached to the panel door.
2. Connect the green ground jumper to the panel housing ground lug, labeled “GND” with the hardware provided. The green
ground jumper is supplied attached to the panel door.
3. Provide control power to the panel and restore power to the lighting circuits at the source circuit breakers. The panel will
take a few moments to initialize during which time the User Interface screen on the front of the panel door will initiate and
display the clock, date, and time zone un-programmed factory defaults. Inside the panel the Mother board power status
LED will show continuous “green”. The Relay board status LED will turn on “green” for approximately 2 seconds and then
go off.
4. Push, but do not hold the Relay Manual Control button on each relay card to operate each relay to test functionality. The
Relay State Status LED will turn on “red” when the relay is energized and be off when the relay is un-energized. The
panel is now fully functional and ready to control the lighting loads.
Figure 4 - Panel Start-Up Controls
CX04 and CX08
CX16 and CX24
7
Troubleshooting
A blinking “green” Relay board status LED indicates that communication has not been properly established for this card.
Contact Hubbell Building Automation Technical Service at (888) 698-3242 for assistance and replacement as required. A
complete Troubleshooting Guide is contained in the “CX Panel Programming Guide” provided as a separate document with the
Panel.
CX Panel Specifications
Panel Input Power Requirements:
Input Voltage “2” designator – 40VA, 120/ 208/ 240/277VAC for a CX04 and CX08. 120-277 for a CX16 and CX24
Input Voltage “3” designator – 75VA, 120/277/347VAC for a CX04 and CX08. 247-480VAC for aCX16 and CX24.
Overall Dimensions:
Surface mount CX04-08, 14.5” W x 17” H x 3.5” D
Surface mount CX16-24, 20”W x 24”H x 3.5”D
Relay Load Ratings:
CXR2N – 120/277VAC, Electrically Held, NO, 20Amps, HID, Ballast and Tungsten (120V only), 1HP at 120V, 2HP at
277V, 14KAIC Rated
CXR3L – 120/277/347VAC, Latching, 30Amps, HID, Ballast and 20A mps Tungsten (120V only), 1HP at 120V, 2HP at
277V and 347V, 18KAIC Rated
CXRTN – 208/240/480VAC, Electrically Held, NO, 20Amps, HID, Ballast, 2HP, 14KAIC Rated
CXRTC – 208/240/480VAC, Electrically Held, NC, 20Amps, HID, Ballast, 2HP, 14KAIC Rated
Low Voltage Inputs:
CX04-Relay Panel - 6 available inputs
CX08-Relay Panel - 12 available inputs
CX16-Relay Panel - 20 available inputs
CX24-Relay Panel - 30 available inputs
Low Voltage Switches:
Momentary or Maintained style, with or without LED indication. LED indication support is LED - “ON” when switch is
active and LED - “OFF” when switch is inactive. Green “ON” with Red “OFF” indication is not supported.
Motion Sensor Input:
Three wire 24 VDC.
Photocell;
Three wire 24VDC power, 0-10V DC control input.
Output Relay Contacts:
Two each for CX08/CX16 - Relay Panels - Dry Contact Output, NO/NC, 24V AC/DC, 50mA
Three for the CX24 – Relay Panel - Dry Contact Output, NO/NC, 24V AC/DC, 50mA
Dimming Control Card:
CX04 and CX08 Relay Panels – Supports 1 Dimming Card each
CX16 Relay Panel – Support 2 Dimming Cards
CX24 Relay Panel – Support 3 Dimming Cards
Each Dimming Card supports 8 low voltage 0-10V dimming channels
Four RJ45 ports per Dimming Card to connect to low voltage switches using CAT5 Cables with RJ45 jacks.
Zone5 Low Voltage Switches:
Z5-SW-MC, to be used for On and Off only functionality
Z5-SW-AVD, to be used for Raise/Lower functionality for 0-10V dimming channels
When using Master/Secondary configuration, only a maximum of 4 Dimming Control Cards can be used to work together.
Operating Environment:
Indoor Use Only; 0 to 50°C; Relative Humidity: 0 - 90% non-condensing.
Panel load schedule form
A Panel Load Schedule Form is supplied in the clear plastic pocket inside the Panel Door to record the lighting circuit relay
assignments while connecting the relays. Low voltage input types and assignments should also be recorded on the form.
8
PART 2 - CX Lighting Control Panels Programming Guide
Programming Instructions
The programming instructions include the following sections:
User Interface
Menu Structure and Navigation
HELP Screens
Function Keys
Programming Procedures
System Settings
Scenarios
Groups
Schedules
Holidays
Inputs
Outputs
Presets
Dimming
System Tools
Special Instructions – Priorities and Masking
User interface
The user interface is accessed from the front of the CX Panel enclosure and
can be operated with the door closed and locked condition. Programming
does not require access to the panel interior. All electrical line and low voltage
connections should be complete and tested by a qualified electrician prior to
programming.
Menu Structure and Navigation
The user interface is designed with simple navigation logic. From the HOME
screen press ENTER to begin programming. The Main Menu will display.
Use the arrow Up/Down keys to navigate to the selected menu line. When
the desired line is highlighted, press ENTER to access this section of the
programming.
CX Panel Home Screen
CX Panel Main Menu
9
Color LCD Display – Allows for most programming
to be completed in a single screen. Right side scroll bars
appear when more choices are available than
are currently visible.
Function Keys – These keys provide programming choices
in various screens. Key labels appear on-screen when keys
are available.
Alpha-Numeric Keypad – This keypad is used to populate
names and numeric values while programming. Tap/Scroll
operation is similar to that used for cell phones.
Escape Key – This key takes the user to the previous
screen. Warning prompts when changes have been made
but not saved.
Help Key – This key will bring up help screens in specific
locations driven by the field that is highlighted.
Navigation Keys – Allows user to navigate Up/Down/
Right/Left/Toggle through editable fields to select program
choices.
Enter Key – Use this key to make selections.
HELP Screens
The CX Panel system has been designed to include HELP screens throughout the menu structure. Descriptive information is
available when a HELP symbol is indicated in the upper right corner of the display, (a question mark in a circle).
Press the HELP button, a yellow Help screen will appear with the additional information.
When finished with the information press HELP again OR the ESC key to return to the previous Menu. Please note that the
HELP text applies to the field that is highlighted. If you do not see the HELP symbol, then that selection does not have a HELP
screen.
HELP
Icon
10
Function Keys
The F1, F2, F3, and F4 Function Keys located just above the numerical keypad provide additional programming options in various
screens. These will appear when additional options are available.
Select Screens
The following Function Key actions occur in the “Select” screens for Open/Close Times, Groups, Schedules, Holiday Dates,
Holiday Schedules, Inputs, Outputs, and Access Control:
EXAMPLE - Select Group - Highlight a Group then press ENTER. You
may use the function keys instead for added functionality:
F1 = Create a New Group. This key will take the user to the next unprogrammed Group.
F2 = View an existing Group. This key will allow viewing of the Group,
but does not allow programming.
F3 = Edit an existing Group. This key allows editing of an already
programmed or un-programmed Group.
F4 = Delete an existing Group. This key allows for the deletion of
programming of a Group. The system will prompt the user to select Yes
or No to the deletion before removing programming.
NOTE: Actions will become
visible above the function keys
when additional programming
inputs are possible.
EXAMPLE: Select Groups
Name Screens
The following Function Key actions occur in the “Name” screens for Open/Close Times, Relay Function, Groups, Schedules,
Holiday Dates, Holiday Schedules, Inputs, Outputs, and Access Control:
EXAMPLE - Edit Group - Highlight a Group. Press ENTER. To NAME
the Group, Use the Alpha-Numeric keypad to enter each letter,
pressing the specific key multiple times to scroll. Pressing ENTER
at any time while in the name field will pull up a table of architectural
naming words. Scroll up/down to highlight the desired word and press
ENTER to populate the selection into name field. More than one
word may be selected in sequence Name length may be up to 19
characters including spaces.
F1 = Clear the current name. This key will clear the Group Name that
appears in the field.
F2 = Insert a space. When the Insert, F2 button, is pressed the
location of the cursor will make a space and push any text to the right
of the cursor to the right.
F3 = Delete a character. Use the <> Arrow keys to navigate to a
location and delete a character.
F4 = Insert special character. Use the up and down arrow keys to search
special characters (-.#’&@/+).
11
EXAMPLE: Name Group
Programming Procedures
When the system is powered on, you will see the CX Lighting Control Home Screen. If the CX Lighting Control Home Screen is
not displayed, press ESC several times until it is displayed.
Press ENTER to display the MAIN MENU.
The MAIN MENU contains 10 section programming categories. These categories are placed in the logical order that is needed
to program the system in an efficient manner. Each category is comprised of sub-sections associated with its function placed in
logical order
CX Panel Main Menu
CX Panel Home Screen
System Settings
The following programming selections are available in the System Settings Menu:
•
•
•
•
•
•
•
•
•
•
•
•
•
Date/Time Preferences
Set Date/Time
Astro Clock Settings
Open/Close Times
Panel Names
After-Hours Sweep
Blink Alert
Power-on Settings
Relay Function
Idle Time-out Settings
Backlight Settings
Clock Adjustment
Factory Defaults
Date/Time Preferences
Use the Date/Time Preferences to enable Daylight Savings Time (DST), to choose Date/Time Formats and select Time Zone.
Note that the Date/Time Preferences are the baseline of all scheduled events, holidays, and masking, as well as other date and
time settings.
•
•
From the MAIN MENU, use the navigation arrows to select System Settings > Date/Time Preferences. Press ENTER.
Use the navigation arrows to scroll to and change the DATE/TIME PREFERENCES.
Select Date/Time Preferences
12
Edit each field by scrolling RIGHT/LEFT until the desired characteristic appears. Scroll DOWN to the next field and make additional
selections as needed. Daylight Savings Time (DST) is default set as ON. Be sure to select the correct Time Zone for your location.
WARNING: Astronomical clock and schedule functions will not operate as expected if the correct time zone is not selected.
After you have made your choices, scroll down to SAVE. Press ENTER to save your changes.
Set Date/Time
The date and time, once set and saved, are backed up by an on-board battery and will be retained for up to 10 years without
commercial power. Normal power outages will not interrupt the system clock.
•
•
From the MAIN MENU, use the navigation arrows to select System Settings > Set Date/Time. Press ENTER.
Use the navigation arrows to scroll to and set the DATE and TIME.
After you have made your choices, scroll down to SAVE. Press ENTER to save your changes.
Select Set Date/Time
Astro Clock Settings
The Astro Clock setting is optional, and calculates astronomical sunrise and sunset times by calendar date and the Latitude and
Longitude defined by the user. This allows ON and OFF events to be programmed based on sunrise/sunset times.
•
•
From the MAIN MENU, use the navigation arrows to select System Settings > Astro Clock Settings. Press ENTER.
Use the navigation arrows to define the settings for the ASTRO CLOCK.
Astro Clock Settings
•
•
•
•
To select the closest major city, select “City Lookup” and press ENTER on the keypad.
Using the keypad, type the first few letters of the closest major city, or scroll through the list of cities predefined.
When you have found the appropriate city, highlight it and press ENTER. If a city does not appear on the predefined list it
will be necessary to manually enter the Lat/Long.
To manually enter coordinates, scroll to the field and enter the numerical values. These are in degrees/tenths. The
(-) indicator on the Latitude designates south. The (-) indicator on the Longitude designates west. HELP screens are
available to describe the correct input format.
13
Open/Close Times
TIP: The use of Open/Close Times for scheduling is optional and can be useful in
applications where the business operation hours are likely to change periodically and more
than one schedule is to be used. Each schedule can be set to reference an Open/Close
time rather than having to re-set the discrete times when the schedules need to change.
Set the Open/Close Times to schedule events based on standard facility operating hours.
Four unique Open/Close Time schedules are available and each can accommodate
numerous events. For example, when changes in facility operations occur, such as
lengthened open hours, the Open/Close Time settings can be conveniently re-programmed
and the new hours will be applied to all the events tied to that particular Open/Close Time.
•
•
•
•
From the Main Menu, use the navigation arrows to select System Settings >
Open/Close Times. Press ENTER.
Select Open/Close - Highlight one of the Open/Close 1-4. Press ENTER or
you may use the function keys as described in “Function Keys” section at the
beginning of the Programming Section of this manual.
Name Open/Close - Use the Function keys and the alphanumeric keypad to edit
the Open/Close name. Refer to “Function Keys” section at the beginning of the
Programming Section of this manual.
Edit Open/Close
Select Times: [CHANGE] > ENTER to change the Open/Close Times. Refer to
“Schedules” section for instruction to enter various ON and OFF times. When finished, scroll down to highlight SAVE.
Press ENTER to save your changes.
Panel Names
Master panels and Secondary panels are better managed if they are named. Use Panel
Names to give meaningful names to the Master and Secondary panels.
•
•
•
From the Main Menu, select System Settings > Panel Names. Press ENTER.
Name Panel – Use the Function keys and the alphanumeric keypad to edit
the Panel name. Refer to “Function Keys” section at the beginning of the
Programming Section of this manual.
When finished scroll down to highlight SAVE. Press ENTER to save your changes.
After-Hours Sweep
Edit Panel Names
After-Hours Sweep is an optinal feature that turns off (sweeps off) controlled lighting at a user-selected start time to assure that
zones are eventually OFF. This function allows 1-4 sweeps in succession with an interval of 1-120 minutes. Any relay can be
selected to participate in After-Hours Sweep. Note that after hour sweeps should be reserved for special applications. Properly
programmed shedules will negate the need for sweeps. *If a motion sensor is controlling a Relay or Group selected to participate
in the After-Hours Sweep and the relay is in the ON state indicating that the room is occupied, the sweep will turn off the relays
unless a Blink event occurs.
•
•
•
•
•
•
From the Main Menu, select System Settings > After-Hours Sweep. Press
ENTER.
For the Start time, use the left and right arrows to choose Clock and set the clock
time to begin the sweeps, or choose one of the 4 Close Times. (Refer to “Open/
Close Times” section). If you chose a close time, use the arrow keys to scroll
down to Offset. The Offset is the time either before or after the close time at which
to begin the sweep(s). Note that with the F2 Function key, you can select +/offsets (- means before the time and + means after the time shown).
Set Number of Sweeps to 1, 2, 3, or 4. This is the number of times to sweep the
Set After-Hours Sweep
facility.
Set the Interval from 1-120 minutes. This is the time between successive sweeps.
For Relays, select [CHANGE]. Use the F4 function key to select or deselect the relays to participate in the After-Hours
Sweep. Press ENTER when all relays are selected.
When finished scroll down to highlight SAVE. Press ENTER to save your changes.
14
CX Programming TIP:
The Start Time: <Clock> selection will perform sweeps at the selected time 365 days per year. To execute After-Hours Sweeps on selected Days,
use the Close Time function. Since Open/Close Times can be developed based on all of the CX Panel Schedules functionality, then Close Time can
be any or all days of the week.
Blink Alert
The Blink Alert function allows the user to define a warning period of up to 15 minutes prior to a schedule OFF event. Occupants
are alerted to the impending OFF event by 2 blinks of the lights. The user can issue a manual override command to extend the
schedule OFF event by 1-120 minutes by activating a switch that is mapped to the same relay or group associated to the schedule
OFF event. The manual override must be initiated during the warning period. The user may also manually turn OFF the lights after
the Override was initiated by activating the switch again, thus canceling any pending new blink warn and extended Schedule OFF
event.
Important Functionality NOTES:
The Override Switch and the Schedule OFF event MUST be mapped exactly to the same
Relay or Group for the Extension of the impending OFF to occur.
The switch MUST be activated during the Warning Period
The Switch MUST be set as an ON/OFF Toggle
The Relay must be defined as a Blink Relay in the Relay Function Section. System
Settings>Relay Functions
•
•
•
•
From the Main Menu, select System Settings > Blink Alert. Then press ENTER.
Blink Alert Settings
Set the Warning period from 1-15 minutes. The schedule OFF event occurs at the end of the Warning period.
Set the Override time from 1-120 minutes. This extends the scheduled OFF event by the Override time.
When finished scroll down to highlight SAVE. Press ENTER to save your changes.
If the lights are still ON at the end of the Override time the system will initiate another warning blink and allow another Override to
occur. This Override process will repeat until the ON event of the schedule occurs. The ON event will cancel any impending OFF
initiated by the override switch. If a Timer Switch is used during an Off Sweep/Schedule blink alert, the Timer Switch will be ignored
and the load will turn off according to the Schedule. The Blink Override will only work with a Momentary Toggle Switch Input to
extend the time. Blink Alerts only work with Schedules.
CX Programming TIP:
Additional OFF Only Schedules can be added and mapped to the same relay or group to “Re-Start” the After-hours Override functionality where
users may return after all other occupants have left and an impending OFF has already occurred
If the Override time elapses without the switch being activated the impending schedule OFF will be executed. The override switch
will then behave as a normal ON/OFF toggle.
Power-On Settings
Power ON Settings define the state of each relay at restoration of power following an outage. The relays can be assigned a state
of OFF, Last, or ON. The Last setting returns the relay to the state in which it was in prior to the outage. Relays will be changed to
ON or OFF when power is returned when these settings are chosen. Additionally, for relays set as Last and controlled by ON/OFF
schedules, the CX Panel will check the current time and apply the ON or OFF state based on
the programmed the schedule.
•
•
•
From the Main Menu, select System Settings > Power-on Settings. Then press
ENTER.
Use the arrow keys to scroll to a relay, and then use the Function keys to set any
relay to either OFF, ON or Last. Note the icons, which represent the 3 states.
When finished scroll down to highlight SAVE. Press ENTER to save your changes.
NOTE: Relays initiate Power-on State when power returns, NOT when power is lost.
15
Power-on Settings
Relay Function
Relay Function defines relay names, and the function of each relay.
•
•
•
•
From the Main Menu, select System Settings > Relay Function. Then press
ENTER
Select Relay – Scroll to Relay to program. Then press ENTER or Function
Keys.
Name Relay – Use the Function keys and the alphanumeric keypad to edit
the Relay name. Refer to “Function Keys” section at the beginning of the
Programming Section of this manual.
Function – Select the desired function by scrolling Left/Right using the following
choices
• No Blink: The relay does not participate in Blink Alerts, (The Default
Setting)
• Blink: The relay participates in Blink Alerts
• HID: The relay does not blink, but will be extended by the switch during
the warning period. (Use when including HID sources in Blink Alert
Groups)
• LineV: Circuit has a Line Voltage Control Switch that is operated by 3- or
5-second intervals of power loss to the switch to activate the switch ON or
OFF at a scheduled event.
Name Relay and Select Type
When finished scroll down to highlight SAVE. Press ENTER to save your changes.
Note: The use of the HID type requires another Blink type relay in the same group to flash the Blink Alert. The default setting for all
relays is the “No Blink” function.
Idle Time-Out Settings
Idle Timeout defines the time after which the CX Controller will log out an inactive user.
The system default is “2”. When set as “0” the Idle Timeout is in the “disabled” state.
Logging Out involves reverting to the CX Lighting Control Home Screen.
•
•
•
From the Main Menu, select System Settings > Idle Time-Out Settings. Then
press ENTER.
Idle time-out: The number of minutes (1-99) of idle time before forced log-out, or
0 to “disable”
When finished scroll down to highlight SAVE. Press ENTER to save your
changes.
Backlight Settings
Backlight Settings define the backlight parameters of the CX Controller screen.
•
•
•
•
•
•
From the Main Menu, select System Settings > Backlight Settings. Then
press ENTER.
On level: The screen brightness when the controller is in use
Dim level: The screen brightness when the controller is idle
On time: The number of minutes before screen dimming begins
Dim time: The number of minutes to dim from On level to Dim level
When finished scroll down to highlight SAVE. Press ENTER to save your
changes
16
Idle Time-Out Settings
Clock Adjustment
Clock Adjustment allows for the user to adjust the real-time clock to run slower by 0-127
parts per million. The clock cannot be adjusted to run faster than normal.
•
•
•
From the Main Menu, select System Settings > Clock Adjustment. Then press
ENTER.
Enter value desired.
The Estimated adjustment will be displayed below based on the Adjustment time
entered.
Factory Defaults
Factory Defaults allows for the clearing of all input programming to the factory default
state. This function will clear all existing programming. It is recommended that the existing
program be saved to a back-up or exported to an SD card using the ‘Save/Restore
Program’ function in the System Tools Menu prior to taking this action.
•
•
•
From the Main Menu, select System Settings > Factory Defaults. Then press
ENTER.
Use the right arrow to select <YES>, and then press ENTER.
All System Settings have been reset to Factory Defaults
NOTE: Once the system has been set to Factory Defaults the existing programming cannot
Factory Defaults
Scenarios
The Scenarios programming feature allows a user to select from a list of pre-established control schemes to more easily assign
schedules, relays and inputs for the desired actions. The use of Scenarios will shorten programming time by only requiring specific
values unique to the Scenario selected. When selecting the Scenario desired, Priorities will automatically be assigned based on
the selected behavior. Dimming is currently not included in the scenarios section.
Notes:
If the control of a Group, (collection of relays) is desired with the scenario, then the Group can be created before starting the
Scenarios process or during the definition of the Relay/Group during the scenarios process. The Scenarios control schemes are
merely prompts, they are not saved in the Scenarios section. If a user wants to “see” what was done or change the programming
established in the scenario, the user must make those changes in the appropriate programming menu section.
An example of these automatic assignments would be a motion sensor required for the scenario. The only selection needed is to
choose which input has the motion sensor connected and what it is controlling, whether a Relay or a Group. During the Scenario
process the input selection for the input (sensor, photocell or switch) would be made automatically.
The use of Scenarios is especially beneficial when selecting control schemes that require the setting of different priorities in order
to create a sequence of operation. The priority selections are made automatically and have been tested for appropriate operation
to assure proper function.
The Scenarios menu is divided into two categories – Indoor and Outdoor. Once a selection of categories is made, a number of
possible scenarios is presented that are most often used for typical project control needs. By highlighting the scenario and pressing
the HELP button a short synopsis will appear on the screen of the selected scenario. By selecting the scenario appropriate to the
application the Scenario process will begin. Note that scenaris are optional. All functionality achieved through the use of scenarios
can be implemented using descrete menu selections.
Following are all the scenarios available at this time and a short synopsis of the functionality available. Following this list are a
couple of programming examples.
17
Operational descriptions for a Scenario: Outdoor Scenerios
Photocell ON/OFF
Automatic photocell ON/OFF control of outdoor lighting
Photocell ON/Sched OFF
Automatic photocell control ON and schedule control OFF of outdoor lighting
Photo ON/Sch OFF/Ovride SW
Automatic photocell control ON and schedule control OFF of outdoor lighting with
manual switch bypass TIMED-ON control.
Astro-Clock ON/OFF
Automatic ON/OFF control of outdoor lighting based on astronomic calculated
sunset and sunrise times for input longitude and latitude.
Astro-clock ON/Sched OFF
Automatic control ON based on astronomic calculated sunset time for input
longitude and latitude, and schedule control OFF of outdoor lighting.
Astro ON/Sch OFF/Ovride SW
Automatic control ON based on astronomic calculated sunset time for input
longitude and latitude, and schedule control OFF of outdoor lighting with manual
switch bypass TIMED-ON control.
Operational descriptions for a Scenario: Indoor Scenerios
Switch ON/OFF
Manual switch ON/OFF control.
Motion Sensor ON/OFF
Automatic motion sensor ON/OFF control.
Switch ON/Auto Motion OFF
Manual switch turns lights ON/OFF; motion sensor automatically turns lights OFF.
Lights turn ON only if switch is turned ON first.
Sched ON/OFF/Photo ON/OFF
Sched ON/OFF with photocell ON/OFF for daylight harvesting during schedule ON
hours.
Sch ON/OFF/Ph ON/OFF OvrSW
Schedule ON/OFF with photocell ON/OFF for daylight harvesting during schedule
ON hours and a temporary override TIMED-ON switch.
Motion ON/OFF/Photo OFF
Automatic control of lighting by a motion sensor, with daylight harvesting OFF while
occupants are present.
Switch ON/OFF/Photo OFF
Manual switch turns lights ON/OFF; daylight harvesting only operates while switch
is in the ON state.
Switch ON/Motion-Photo OFF
Manual switch turns lights ON/OFF; motion sensor and daylight-harvesting
photocell will automatically turns lights OFF. Lights turn ON only if switch is turned
ON first.
Schedule ON/OFF
Schedule ON/OFF control
Sched ON/OFF/Override SW
Schedule ON/OFF control and a temporary override TIMED-ON switch. Switch
allows for cancellation of impending schedule OFF event.
Sched ON/OFF/Blink Ovr SW
Schedule ON/OFF control with blink warning and manual override switch to extend
schedule OFF event to a later time.
Sched OFF/Blink Ovr SW
Schedule OFF control with blink warning and manual override switch to extend
schedule OFF event to a later time.
Sched ON/OFF/Blnk LineV SW
Schedule ON/OFF control, blink warning, LineV switch ON/OFF
Sched OFF/Blink LineV Sw
Schedule OFF control, blink warning, LineV switch ON/OFF.
Sched/Switch ON/OFF After hrs
Schedule ON/OFF control, with manual switch ON/OFF that is active only during
schedule OFF period.
Sch/Motion ON/OFF After hrs
Schedule ON/OFF control, with motion sensor ON/OFF that is active only during
schedule OFF period.
Master Override Switch
Master control override assigned to a switch to turn ON lights as an override to
other programmed controls.
Master Override Ext Input
Master control override assigned to an external input to turn ON lights as an
override to other programmed controls.
18
Example How Scenarios Work
For this exercise we will be demonstrating the Scenario steps to achieve manual ON/ automatic
OFF for a room with a motion sensor and a switch.
•
•
•
From the Main Menu, select Scenarios >Factory Defaults. Then press ENTER.
Use the Up/Down arrow to choose Indoor Scenarios. Then press ENTER
Use the Up/Down arrow key to select Switch ON/Auto Motion OFF. If the HELP
button is pressed while highligting the selection a pop-up screen with the message,
“Manual switch turns lights ON/OFF; motion sensor automatically turns lights OFF.
Lights turn ON only if switch is turned ON first.”
The following prompts appear and need to be completed in the order from top to bottom. Once each section is completed the User
will be brought to the Scenarios Screen until SAVE has been selected.
1. Define the Switch. Highlight [CHANGE]
next to Switch, press ENTER
2. Select the Input the Momentary Switch will be connected, Highlight and
press ENTER. The Name can be changed by highlighting the Input needed and
selecting the Function Key under Name and using the alphanumeric keypad.
3. Define the Motion Sensor. Highlight
[CHANGE] next to Motion, press ENTER
4. Select the Input the Motion Sensor will be connected, Highlight and press
ENTER. The Name can be changed by highlighting the Input needed and
selecting the Function Key under Name and using the alphanumeric keypad.
5. Define the Relay/Group. Highlight
[CHANGE] next to Relay/Group, press
ENTER.
6. Select the Relay or Group to be controlled, press ENTER. If a Group needs to
be created, use the F4 function key to create the Group by selecting NewGrp and
selecting your relays. Edit allows the User to change the function of the Relay,
(see Relay Function). F1 and F2 when pressed allow the User to quickly go to the
top of the list of Relays or Groups without scrolling.
7. When all the values have been entered select [SAVE] and press ENTER to return to the Scenario Screen.
19
Groups
This menu allows the user to create relay or dimmer groups that can be mapped to inputs, outputs or schedules. Relays and
dimmers in both master and secondary panels can be included in groups. There are a total of 32 groups available. Groups that
have been programmed will be indicated on the CX User Interface display by a solid box adjacent to the group name. Once a
Group has been created and saved, it can be viewed, edited, and deleted.
•
•
When finished scroll down to highlight SAVE. Press ENTER to save your changes.
The Group you created should appear in the Group list. Note the small black square next to the Group name. Scroll to
it and press the F2 key to view the Group. Press the F3 or F4 keys to edit or delete the Group.
1. From the Main Menu, select Groups. Then press the
ENTER key.
2. Select Group – Scroll to Group to program. Select any
of the 32 Groups Press the ENTER key or the F1 key to
create a Group.
3. Name Group – Use the Function keys and the
alphanumeric keypad to edit the Group name. Refer to
“Function Keys” section at the beginning of the Programming
Section of this manual.
4. Select Relays: [CHANGE] Then press the ENTER key. Use the ENTER key or the
F4 key to select or deselect relays to include in the group. Press the F1 key to SAVE
the Group.
5. Select Dimmers: [CHANGE] Then press the ENTER key. Use the ENTER key or the
F4 key to select or deselect dimmers to include in the group. Press the F1 key to SAVE
the Group.
20
6. Dimming Mode controls whether dimmers in the group
are set to a dimming level when an ON or OFF event
occurs, if applicable.
7. Move the arrow keys left/right while highlighting the Dimming
Mode to change to ON-only, Off-only or ON+OFF if applicable.
Then change the ON or OFF level to the percentage specified,
highlighting the value and using the alphanumeric keypad to
change from 0% to 100%.
Schedules
Schedules allow for individual Relay, Groups, Presets or Dimmers to be turned ON and OFF as well as Dim using Clock Times,
Astro-Clock Sunrise or Sunset calculated times, or Open/Close Times. Schedules may be programmed as ON only, OFF only or
ON/OFF in a single schedule. Schedules may be selected to block execution on Holiday Dates. Schedules may be programmed
to occur during a calendar date range. ON/OFF Schedules may have priorities applied individually to ON and OFF events. The
following instructions will describe all of these functions.
Create Schedule, Name Schedule and Select Schedule Control
1. From the Main Menu, select Schedules. Then press the ENTER key.
2. Select Schedule – Scroll Schedule to program. Select
any of the 64 Schedules Press the ENTER key or the F1
key to create a Schedule.
3. Name Schedule – Use the Function keys and the
alphanumeric keypad to edit the Schedule name. Refer to
“Function Keys” section at the beginning of the Programming
Section of this manual.
4. Select Control: [CHANGE] Then press the ENTER key.
5. Select Relay, Group or Preset for the Schedule to
Control: Use the arrow Up/Down keys to highlight the desired
Relay, Group or Preset. Press the ENTER key to save the
highlighted Relay, Group or Preset to be controlled by the
schedule. Use the F2 key to go Groups as needed.
NOTE: Relay MR01 = Master Panel Relay 01. Relay SR01
= Secondary Panel Relay 01. Only Groups that have been
programmed will appear at the end of the relay list.
21
Schedules – Days of the Week
1. Select Times: [CHANGE]. Then press the ENTER key.
2. In the SCHEDULE ON/OFF TIMES screen, use the right and left arrow keys to change Days of week. There are three Days of
week selections; <Mon-Fri>, <M-F + Sat> and <Full Week>
a.<Mon-Fri> - This selection allows for a single entry ON and OFF Times that will repeat every week on Monday through
Friday
b. <M-F + Sat> - This selection allows for a single entry ON and OFF Times that will repeat every week on Monday through
Friday and Saturday
c. <Full Week> - This selection allows for the entry of ON and OFF Times that are individual for any day or all days of the
week. Times may be different on each day. An entry selection of <None> on a day will have no action on that day.
When in the <Full Week> selection, scroll down to Days: [CHANGE] to select or deselect days to include in the schedule. When
complete use the F1 key to Save changes.
CX Programming TIP:
Mon-Fri Schedules allow for a single entry of ON and OFF times for weekdays, M-F + Sat adds Saturday to the single entry list (Same ON/OFF
for all 6 days). To create a schedule with a different ON/OFF time for Saturday, Use a Mon-Fri schedule for the weekdays in combination with a
separate Full Week schedule using ON/OFF times input only on Saturdays.
Schedules – ON Only, OFF Only or ON/OFF Actions
After completion of the Days of week selections, while in the SCHEDULE ON/OFF TIMES screen, set the ON and OFF times. ON
and OFF events can be programmed using Clock Times, Astro-Clock Sunrise or Sunset calculated times, or Open/Close Times.
Schedules may be programmed as ON only, OFF only or ON/OFF in a single schedule.
1. To program Schedule On/Off times, while still in the SCHEDULE ON/OFF TIMES screen, use the up/down arrow keys to
scroll to the ON time: or OFF time: line. Use the right and left arrow keys to select <Clock>, <Sunrise>, <Sunset>, <Open
#1, #2, #3, or #4>, <Close #1, #2, #3, or #4>, or <None>. The following is the function of each selection:
d.<Clock> - Action will occur at a specific Clock Time. Scroll down to [CHANGE], and then press ENTER. Use the numeric
keys to enter hours/minutes, F1 – am or F2 – pm. Scroll down to [SAVE] and press ENTER to save your changes.
e. <Sunrise>, <Sunset> - Action will occur at sunrise/sunset based on the time calculated Astro-clock time. Scroll down
to Offset: -___min. Use the Function Keys and the numeric keys to set the offset time in minutes. (-) is before and (+) is after
Sunrise/Sunset.
f. <Open #1, #2, #3, or #4>, Close #1, #2, #3, or #4> - Action will occur based on programmed Open/Close Time
schedules. Scroll down to Offset: -___min. Use the Function Keys and the numeric keys to set the offset time in minutes. (-)
is before and (+) is after Open/Close Time.
g. <None> - Select <None> to eliminate ON or OFF action to create an ON Only or OFF Only schedule.
2. When finished, scroll down to highlight [SAVE], and then press ENTER to save your changes.
22
Schedules – Blocked/Unblocked on Holidays, Date Range and Priorities
After completion of the Schedule ON/OFF actions, while in the SCHEDULE ON/OFF TIMES screen, set the “blocked holidays
function, date range and priorities. Schedules may be set to be blocked by programmed Holiday dates. Refer to “Holidays” section
for programming instructions for Holiday dates.
•
•
•
•
•
To Block Schedule on Holidays - scroll down to and highlight the Not Blocked by holidays / Blocked by Holidays line. Use
the F4 function key to enable or disable your selection. Enabling this function will block the schedule from executing on all
programmed Holiday Dates.
To Set a Date Range for a Schedule - scroll down to and highlight Date Range: [CHANGE] line. Press the ENTER key.
Scroll right/left from <All Year> to <Date Range>. Scroll down to the Start and End fields and enter the desired dates.
Note that the system default <All Year> allows schedules to execute in all 52 weeks in a calendar year.
When finished, scroll down to highlight [SAVE], and then press ENTER to save your changes.
In the SCHEDULE ON/OFF TIMES screen scroll down to highlight [SAVE], and then press ENTER to save your changes.
Apply Priorities to a Schedule - In the EDIT SCHEDULE screen, scroll down to the ON Priority: or OFF priority: line.
Right/Left scroll through the priority choices to the desired selection. When finished, scroll down to highlight [SAVE], and
then press ENTER to save your changes. Priorities can only be applied to ON/OFF Schedules. If there is nothing else is
controlling what the Schedule is controlling then don’t change these values.
WARNING: Be sure to review the Priorities Section before changing any default <Normal> Priorities! Changes to Priorities if not properly
implemented can effect expected system operation resulting in Relays/Groups getting stuck in the ON or OFF state or creating situations where
devices do not initiate actions as expected.
Holidays
The CX Panel Holidays programming allows for the blocking of schedules on designated holiday dates. Additionally, the CX Holiday
Schedules function allows for any of four Holiday Schedules to be run on selected Holiday Dates. The following programming
functions are available in the Holidays Menu:
Standard U.S. Holidays
The CX panel is pre-populated with Standard U.S. Holidays that can be selected to occur year-over-year.
1. From the Main Menu, select Holidays. Then press the ENTER key.
2. Select Standard U.S. Holidays. Then press the ENTER key. Scroll to each desired standard holiday and press the ENTER key
or the F4 key to select/deselect.
3. Press the F2 key to see a list of the actual recurring dates for the highlighted Holiday
4. When finished, press the F1 key save your changes
23
Holiday Dates – Select, Name and Edit Holiday Dates
1. From the Holidays Menu, select Holiday Dates. Then press the ENTER key.
1. Select Holiday – Scroll to Holiday to program. Select any of the 99 Holiday Dates
Press the ENTER key or the F1 key to create a Holiday.
1. Name Holiday – Use the Function keys and the alphanumeric keypad to edit
the Holiday name. Refer to “Function Keys” section at the beginning of the
Programming Section of this manual.
1. Scroll down to Year: 2000. Use the numeric keypad to enter the last two digits for
the year that the holiday date will occur.
1. Scroll down to Date Range: [CHANGE]. Then press the ENTER key.
1. Scroll down to Date 01/01. Use the numeric keypad to enter the Month as two digits
first and then the Day as two digits second. When finished, scroll down to highlight
[SAVE], and then press ENTER to save your changes. Holiday Schedules
The Holiday Schedule function allows for a Holiday specific schedule to be run on any Holiday Date. Holiday Schedules
programming is the same as normal Schedules in function and capability. Refer to “Schedules” section for details about
programming the schedule actions.
1. From the Main Menu, select Holidays. Then press the ENTER key.
1. Select Holiday Schedules. Then press the ENTER key. Scroll to any of four Holiday Schedules and press the ENTER
key or the Function keys as indicated at the bottom of the display.
1. Refer to the “Schedules Section to program the Holiday Schedule.
1. To apply a Holiday Schedule to a Holiday Date, From Holidays Menu, select Holiday Dates. Then press the ENTER key.
1. Scroll to the desired Holiday to program, press the ENTER key or the F3 key to edit the Holiday.
1. Scroll down to Schedule: Use the right/left arrow keys to select the desired Holiday Schedule.
1. When finished, scroll down to highlight [SAVE], and then press ENTER to save your changes.
Clear Expired Holidays
The CX panel allows for the easy removal of programmed Holiday Dates that have occurred in the past with the “Clear Expired
Holidays” function.
1. From the Main Menu, select Holidays. Then press the ENTER key.
1. Select Holiday Schedules. Then press the ENTER key. Scroll to any of four Holiday Schedules and press the ENTER
key or the Function keys as indicated at the bottom of the display.
24
Inputs
Inputs allow for the mapping of connected low voltage devices or outside contact closures to relays or groups. CX Panels
allow for inputs to be defined as any type of device. The input types are assignable to be “Switch,” “Motion,” or “Photocell”.
Any Input, regardless of where it is connected in the panel, can be mapped to any relay or group.
The CX Panel system can have a Master Panel of 8, 16, or 24 Relays used individually or connected to a Secondary panel of
8, 16, or 24 Relays. CX 4 Relay Panels are designed as Stand Alone panels only and cannot be connected to make a system.
Select Inputs – Input Designations and Naming Inputs
Panels contain Inputs that are either an integral part of a CXR Relay card or located on the panel motherboard. The Inputs that
are integral to the CXR Relay cards are indicated in the input selection screen as “MIXX” for Master Panels and 4-Relay Stand
Alone panels OR “SIXX” for Secondary Panels. The “XX” indicates the relay number. The relay number is screen printed on
the motherboard adjacent to the relay card connector. The Inputs that are located on the panel motherboard are indicated on
the input selection screen as “MAXX” for Master Panels and 4-Relay Stand Alone panels OR “SAXX” for Secondary Panels.
The “X” indicates the auxiliary input number. These inputs have “AUX INPUT X” screen printed adjacent to them on the
motherboard.
1. From the Main Menu, select Inputs. Then press the ENTER key.
2. Select Input – Scroll to an Input to program. Select any of the Inputs available based on the *Panels in the CX Panel
system. NOTE that the all Inputs that are connected to the system will be present and visible by continuously scrolling up
and down, When highlighted, press the ENTER key or the F1 key to select an Input.
3. Name Input – Use the Function keys and the alphanumeric keypad to edit the Input name. Refer to “Function Keys”
section at the beginning of the Programming Section of this manual
NOTE that the solid box between the Input number and the Input name indicates that the Input has been programmed. The F1
“New” key will open the next available un-used Input. The F4 “Delete” key will delete all programming for the highlighted Input.
CX Programming TIP:
It is very important to create names for all inputs so that users in the future can better understand the programming and function of the system. For
Inputs the type of device, location, or function are useful possibilities. The F2 Function Key allows the user to view the relay or group that is mapped
to the input.
25
Input Type and Function
CX Panel Input type is assigned in the programming process. Inputs can be selected to be a Switch, Motion Sensor,
Photocell, Timed On/Off or Timed-On-Only. From the EDIT INPUT Screen, Scroll to Type: Use right/left arrow keys to select
type. Type selections will appear in the line as they are available. Each selection is defined as follows:
<Switch>
• Momentary NO: Lights are toggled when the switch is closed
• Momentary NC: Lights are toggled when the switch is opened
• Maintained NO: Lights are turned ON when the switch is closed or Lights are turned OFF when the switch is
opened
• Maintained NC: Lights are turned ON when the switch is open or Lights are turned OFF when the switch is closed
• Momentary NO/NC Temp Pri: Momentary switch for which priority is not remembered after ON/OFF events
<Motion>
• Motion: Defines the input as connected to a motion sensor. The functionality is for practical purposes the same as
a maintained switch, but for use in understanding the type of control and assigning use in relation to Scenarios,
Priorities and Masking, it is important to select the input type properly.
<Photocell>
• Range: The range of the photocell input. Settings are 0-100%, 0.3-30ft-c, 3-300ft-c, and 30-3000ft-c, 50-750ftc, and 60-6000ft-c, 200-2500ft-c, 1000-7500ft-c. Photocell instructions indicate internal jumper settings for the
LUXSTATLS models.
• ON threshold: Light level below which lights are turned ON
• OFF threshold: Light level above which lights are turned OFF
• OFF delay: Time that OFF threshold must be maintained before lights are turned OFF
• Note that the OFF threshold must be higher than the ON threshold
<Timed-On/Off>
• A Momentary NO switch
• ON time: Defines the time after which the lights will be turned off, up to 999 minutes. The Timed On/Off switch
allows an OFF command if activated after the start of the Timed-On event. Once the relay is OFF the next
activation will start a new Timed-On event.
<Timed-On-Only>
• A Momentary NO switch
• ON time: Defines the time after which the lights will be turned off, up to 999 minutes, The Timed-On-Only switch
does not allow for any Off events. The switch functions as a Timed-On device only. Additional activations during
the timed-on event while the relay or group is ON are ignored. The next Timed-On event can only be initiated when
the relay or group controlled is in the OFF state,
Select Input Type - Switch
Select Input Type – Timed-On/Off
26
Mapping Input Control and Masking
Any CX Panel input can be mapped to any relay, group or preset. All inputs on a relay are defaulted to control that specific relay
with a Momentary NO switch station. All Auxiliary inputs default to un-configured. If a relay space does not have a relay installed,
the input will not be available to select. If an input is already programmed, it will show a solid box between the input number and its
name. The CX panel user interface will present all possible inputs based on filled relay slots, size of panel and whether there is a
secondary panel present.
Use the following process to program panel Inputs to control a relay or group:
•
•
•
•
•
•
From the Main Menu, select Inputs. Then press the ENTER key.
Select Input – Scroll to an Input to program. Select any of the Inputs available based on the Panels in the CX Panel
system. NOTE that the all Inputs that are connected to the system will be present and visible by continuously scrolling up
and down. When highlighted, press the ENTER key or the F1 key to select an Input.
From the EDIT INPUT Screen, after deciding and editing the Name, Scroll to Type: and choose, (left or right), the type of
Input that will be controlling the relay, Group or Preset.
Scroll to Control: [CHANGE], then press the ENTER key.
Scroll to the desired Relay, Group or Preset to control, press the ENTER key. Note that any programmed Groups or
Preset will appear at the end of the relay list. Use the F2 key to skip down to the Groups list. If no Groups have been
created, none will appear. See the “Groups” section for instructions to create Groups. Use the F3 key to skip down to
the Presets list. If no Presets have been created, none will appear. See the “Presets” section for instructions to create
Groups.
When finished, press ENTER to save your changes
Edit Input – Map Control
•
•
•
Select Relay/Group/Presets – Map Control
Masking: This field allows for an input to be masked (ignored) for a select time
period. Masking is used to program a device so that it does not function for
the programmed time period. Masking can be applied to ON, OFF or ON/OFF
functionality.
From the EDIT INPUT Screen, scroll to Masking: use the right/left arrow keys to
select masking options.
Scroll to Times: [CHANGE]. This field allows for setting of the specific masking
times. This function is the same as for selecting times in schedules. Refer the
“Schedules” section for instructions to input Masking Times.
Edit Input – Masking
Inputs – Applying Prioities
Input ON and OFF actions may have Priorities applied to them. Priorities allow for different
inputs to affect the way they interact with each other to provide a desired programming
Scenario to occur. The best way to apply Priorities with the CX system is to use the
Scenarios programming tools. Refer to the “Scenarios section of this manual for detailed
instructions about using Scenarios.
•
•
Apply Priorities to an Input - In the EDIT INPUT screen, scroll to the ON Priority:
or OFF priority: line. Right/Left scroll through the priority choices to the desired
selection.
When finished, scroll down to highlight [SAVE], and then press ENTER to save
your changes.
27
Inputs – Using Photocells and Photocell Settings
CX Panel Photocells are defined as “Open Loop” sensors. Open Loop sensors operate such that the photo sensor views daylight
directly and does not respond to or “see” the electric light that it controls. This means the actual value displayed on the CX Panel
User interface AND the ON and OFF set points programmed for the Inputs ARE NOT THE ACTUAL light levels in the space. They
are relative values used to turn lights ON and OFF at appropriate times to use available daylight.
Additionally, to make using the photocells easier the CX Panel has the values defaulted to 0-100%. The panel can be programmed
to allow settings to be made in foot-candles based on the photocell internal jumper settings if desired. Using the default 0-100%
values can help to disassociate the reading as actual room design foot-candles.
Placement of the photocell has significant ramifications to the ability to get the system set properly. The following are guidelines to
help in developing the optimum energy savings:
•
•
Outdoor Photocell – The LUXSTATLSO should be mounted on a vertical north facing surface on the rooftop with the
lens portion of the head facing up. Care should be given to place the photocell where it has a clear view to the horizon
and is not obstructed by trees, rooftop equipment or other close by buildings.
Indoor Photocells – The LUXSTATLS should be mounted on the ceiling with the lens facing windows. The photocell
should have a clear view and be located at a distance from the window created by a view line at 45° from the lens to
the center of the glass. Care should be taken to be sure that indirect light fixtures do not emit light energy directly into
the photocell. When placing photocells in skylight cells mount the head on the north facing vertical surface with the lens
facing up. Be sure the head is positioned that it does not receive direct sunlight.
Photocell Control with ON/OFF Functionality Only
For fixtures that do not dim and require photocell control the CX Panel can turn the relays on/off based on daylight contribution.
Prior to programming the photocell settings create your Group as instructed in the Group section. This will be the relay or collection
of relays that will be turned on/off based on the settings below.
•
•
•
•
•
•
•
•
•
•
•
•
From the Main Menu, select Inputs. Then press the ENTER key.
Select Input – Scroll to an Input to program. Select any of the Inputs available based
on the CX Panel system. NOTE: All Inputs that are connected to the system will be
present and visible by continuously scrolling up and down. When highlighted, press
the ENTER key or the F1 key to select an Input.
From the EDIT INPUT Screen, after deciding and editing the Name:, scroll to Type:
and choose, (left or right), <Photocell>.
Scroll to Settings: [CHANGE], then press the ENTER key.
Once inside the Settings select the Range: (left or right), 0-100%, 0.3-30ft-c, 3-300ftc, and 30-3000ft-c, 50-750ft-c, and 60-6000ft-c, 200-2500ft-c, 1000-7500ft-c, based
on the photosensor’s range configuration.
Scroll down to choose the On thresh: (Threshold) – The light level below which the
photocell will turn the lights ON. This is a numerical value that must be entered by the
alphanumerical keypad.
Scroll down to choose the Off thresh: (Threshold) - The light level above which the
photocell will turn the lights OFF. This is a numerical value that must be entered by
the alphanumerical keypad.
Scroll down to the choose Off delay: - This numerical value, (in minutes) is to
determine how long the photo sensor must see the ambient light above the OFF
threshold for this amount of time before the light will be turned OFF.
When finished, scroll down to highlight [SAVE], and then press ENTER to save your
settings.
Once back in the Edit Input screen scroll down to Control: [CHANGE] and select your
Relay, Group or Preset that you would like the Photo Sensor to control.
If Masking or Priorities are needed fill out accordingly, (see Masking and Priorities
sections).
When finished, scroll down to highlight [SAVE], and then press ENTER to save your
photocell settings.
28
Photocell Control with Dimming Functionality Only
The CX Panel also has the ability to control 0-10V dimming loads. The following is a step
by step of how to setup the Photocell programming only. When using the dimming feature
of the CX panel, it is required that the CX is equipped with a CX Dimming Option Card,
(CXDIMCONTRBD), the quantity of cards is based on the Panel(s) being used.
PART 1
Photocell Settings:
• From the Main Menu, select Inputs. Then press the ENTER key.
• Select Input – Scroll to any of the Inputs available based on the CX Panel system.
NOTE: All Inputs that are connected to the system will be present and visible by
continuously scrolling up and down. When highlighted, press the ENTER key or the F1
key to select an Input.
• From the EDIT INPUT Screen, after deciding and editing the Name:, scroll to Type:
and choose, (left or right), <Photocell>.
• Scroll to Settings: [CHANGE], then press the ENTER key.
• Once inside the Settings select the Range: (left or right), 0-100%, 0.3-30ft-c, 3-300ft-c,
and 30-3000ft-c, 50-750ft-c, and 60-6000ft-c, 200-2500ft-c, 1000-7500ft-c, based on
the photosensor’s range configuration.
• After the range is set appropriately scroll to the Sensor lvl:. This value is reflective of the Range: setting and is intended
to be the value that the Photo Sensor is “seeing”during programming. Either enter a known value that will be used to
average the calculation to maintain a dimmed FC Level or Scroll down to [SET LEVEL] and press the ENTER button on
the keypad, the value will fill itself based on the light level the photo sensor head is “seeing”at that moment.
• Scroll to Design lvl.: and enter the percentage that the fixture is intended to maintain per design intent.
• Scroll down to [SAVE] and press ENTER. This will take you back to the EDIT INPUT screen.
• Next scroll down to [SAVE].
PART2
Dimmer Settings:
• From the Main Menu, select Dimming, then press the ENTER key.
• Scroll down to Dimmers and press the ENTER key.
• Next scroll down to the Dimmer the Photocell is controlling and press ENTER.
• Once in the Dimmer select and edit the Name:
• Dim-to-off: - (left or right) This feature, when enabled, allows the Relay or Group
selected to turn off when the photocell dims the fixtures to a percentage level for a set
amount of time in minutes. If the dim loads are not to turn off due to the photo sensor
level then this section will not be programmed <Disabled>.
• Level: - The percentage, 0-100%, that the Dim-to-off will function. This is a
numerical value entered by the alphanumeric keypad.
• Time: - This is the length of time in minutes that the relay or group selected will
turn Off after the Level: has been maintained. This is a numerical value entered by
the alphanumeric keypad.
• Relay: [CHOOSE] When selected this will show the list of Relays and Groups
available. Simply highlight the Relay or Group and press ENTER.
• Fade-down rate: - This is the time, (in minutes), it takes to dim from 100% to 0% using
daylight harvesting.
• Ramp-up rate: - This is the time, (in minutes), it would take to dim from 0% to 100%
using daylight harvesting.
• Photocell: [CHOOSE] – When this is selected the user will choose the Input that has
the associated photocell that will be used to determine the appropriate dimmed level
for the Dimmer.
• Task level: - This value is a percentage value at Task, (work plane), that will determine
the calculation to maintain the dimmed level of the Dimmer.
• Scroll to [SAVE] and press the ENTER key.
Notes:
1. If additional control devices are to be used to work in conjunction with the Photo Sensor than additional programming will be required.
2. If a Group of relays are to be controlled with the same settings, a single Dimmer and photo sensor may be able to control the entire
Group as long as the dimming channel and relay amperage do not exceed the specifications of the CX panel and dimming card.
29
Outputs
Any programmed Input or Schedule can be mapped to an Output. The Dry Contact Outputs are Normally Open/Normally Closed
low voltage relays that can be used to initiate any programmed control to other systems. Outputs are available in Master Panels of
8, 16, or 24 Relays or Secondary Panels of 8, 16, or 24 Relays. CX 4 Relay Panels do not include Outputs
Select Inputs – Input Designations and Naming Inputs
Panels contain Outputs that are located on the panel motherboard. The Inputs that are located on the panel motherboard are
indicated on the input selection screen as “MDCX” for Master Panels OR “SDCX” for Secondary Panels. The “X” indicates the
output number. These outputs have “DRY CONTACT OUTPUT” screen printed adjacent to them on the motherboard.
•
•
•
•
•
•
From the Main Menu, select Outputs. Then press the ENTER key.
Select Output – Scroll to an Output to program. Select any of the Outputs available based on the Panels in the CX Panel
system. When highlighted, press the ENTER key.
Name Output – Use the Function keys and the alphanumeric keypad to edit the Output name. Refer to “Function Keys”
section at the beginning of the Programming Section of this manual.
Type: – Use the right/left arrow keys to select <Toggle> for maintained (Latching) action or <Momentary> action.
Control: – Use the right/left arrow keys to select <Input> or <Schedule> to map for control. If <Input> is selected scroll to
[CHANGE], Press ENTER and select an Input, If <Schedule> is selected scroll to [CHANGE], Press ENTER and select a
Schedule,
After-hours Sweep: Select <Yes> or <No> to be included in the After-hours sweep.
Presets
Presets are used to control multiple relays from a single input or schedule. There are 32 Presets available. There are 8 Actions
available in each Preset. There are 9 functions selectable for every Action. When programming an Input device or Schedule that
requires a Preset event to occur, select the Preset when choosing the Control of the Input or Schedule. Note: Presets do not exist
until they have been created. Create a Preset prior to programming the Input or Schedule.
<ON> - This would turn On a Relay or Group in response
to an ON command.
Device: [CHANGE] – Select the Relay or Group to
control.
Priority: - Off priority level
<OFF> - This would turn Off a Relay or Group in
response to an OFF command.
Device: [CHANGE] – Select the Relay or Group to
control.
Priority: - On priority level
30
<DIM> - Set the dimming level of a dimmer or group of
dimmers in response to an On event.
Level: - The Dimming level to be set in percentage units
<PRESET> - Activates another preset to allow more
actions
Only one level of preset changing is allowed.
<TOGGLE> - “Toggles” the state of a relay or group.
If this action is the first action in the Preset, this will determine
if a push button is sending an ON or an OFF event.
Device: [CHANGE] - Select the Relay or Group to control.
Note: This is to be used with low voltage switch stations.
<OFF->ON> - Turns ON a Relay or Group in response
to an OFF event.
Device: [CHANGE] – Select the Relay or Group to
control.
Priority: - Off priority level
<OFF->DIM> - Set the dimming level of a Dimmer or
Group in response to an OFF event.
Dimmer: [CHANGE] – Dimmer or Group to set level
Level: - The Dimming level to be set in percentage units.
<OFF->ON> - Turns OFF a Relay or Group in response to
an OFF event.
Device: [CHANGE] – Select the Relay or Group to control.
Priority: - On priority level
<DELETE> - When selected the Action will be removed after [SAVE] has been selected. If more than one Action has been
created in a Preset they will remain until <DELETE> has been selected for all the Actions or the Preset has been deleted on
the SELECT PRESET screen by using the F4 key button and selecting Delete.
Once all Actions are created per plan Scroll to [SAVE] and create next Preset or ESC to the Main Menu.
31
Dimming
In the Main Menu scroll down to Dimming and press the ENTER key. Once in the DIMMING menu there
are four choices.
Demand Response - Configures the Demand Response settings.
Dimmers – Configures the dimmer outputs.
Dimmer Inputs – Configures dimmer inputs
Power-on Settings – Defines power-on state of dimmers that do not have a photocell configured.
Dimmers can be set to zero or maximum level or to the last dimming level when power was removed.
Demand Response
The purpose of Demand Response is to accept a signal, (contact closure), from a power/Utility
company and to translate the signal into dimming all channels of the CX panel to conserve energy
consumption. When Demand Response is selected there are two settings to set.
• D.R. input: [CHANGE] – Choose the Input that will be receiving the dry contracts from the
power/utility company to override and dim all Dimmers to the specified level. This can be any
Input whether on a relay card or an auxiliary input.
• Dimming Level: - Using the alphanumeric keypad, enter the percentage value required by the
power/utility company for the Dimmers to maintain when the power/utility signal is triggered.
Note if a Dimmer is at a dimmed level lower than the percentage defined, then that Dimmer(s)
will not be affected when the Demand Response is triggered.
• Scroll down to [SAVE] and press the ENTER.
Dimmers
Dimmers refers to the 0-10V dimming channels, (8 per Dimming Card). These settings in the Dimmers
are to work with Photocell Control and switch stations that are connected via the CAT5 cable into the
Dimming Card.
• From the Main Menu select Dimming and press the ENTER on the keypad.
• Scroll to Dimmers and press ENTER
• Scroll to the Dimmer channel that will need to be programmed and press ENTER on the
keypad or F3 to Edit the selected Dimmer channel.
• Dim-to-off: - (left or right) This feature, when enabled, allows the Relay or Group selected to
turn off when the photocell dims the fixtures to a percentage level for a set amount of time in
minutes. If the dim loads are not to turn off due to the photo sensor level then this section will
not be programmed <Disabled>.
• Level: - The percentage, 0-100%, that the Dim-to-off will function. This is a numerical value
entered by the alphanumeric keypad.
• Time: - This is the length of time in minutes that the relay or group selected will turn Off
after the Level: has been maintained. This is a numerical value entered by the alphanumeric
keypad.
• Relay: [CHOOSE] When selected this will show the list of Relays and Groups available.
Simply highlight the Relay or Group and press ENTER.
• Fade-down rate: - This is the time, (in minutes), it takes to dim from 100% to 0% using
daylight harvesting.
• Ramp-up rate: - This is the time, (in minutes), it would take to dim from 0% to 100% using
daylight harvesting.
• Photocell: [CHOOSE] – When this is selected the user will choose the Input that has the
associated photocell that will be used to determine the appropriate dimmed level for the
Dimmer.
• Task level: - This value is a percentage value at Task, (work plane), that will determine the
calculation to maintain the dimmed level of the Dimmer.
• Scroll to Raise/Lower sw: [CHOOSE] and press the ENTER key. This will take the user to
the Dimmer Input section to define what input will have the Raise/Lower switch attached. The
Raise/Lower switch is not programmed in the Dimmer Input section.
• Input select : (x+x) - scroll left/right to define the Raise/Lower switch input type. (Typically C+D)
• Ramp Speed: - Selects the speed for the raise/lower dimming control: (Slow = 10 seconds, Medium = 8 seconds and Fast =
5 seconds.)
• When complete scroll down to [SAVE] and press the ENTER on the keypad.
32
Dimmer Inputs
These are the Inputs that are located on the Dimmer Card they are designed to function with Zone 5
Switch Stations. These Zone 5 switch stations are connected via a CAT5 cable into an RJ45 connector
located on the Dimming Card. Typically ON/OFF or Preset functions will be programmed in the Dimmer
Input section. The Z5-SW-OO switch is an ON/OFF switch which will be an “A” (for the ON) and a “B” (for
the OFF”) functionality.
Note: If a Raise /Lower switch is to be used, programming is NOT completed in this section. (See
Dimmers)
Dimmer Input Types:
• <Switch> - The input is used as an ON/OFF toggle switch.
• <Timed On/Off> - The input is used as a Timed-ON switch. Pressing the switch a second time
will cancel the Time–ON function turning Off the relay(s).
• <Timed-On-Only> - The input is used as a Timed-ON switch. Pressing the switch a second time
will extend the Time–ON function.
• <Switch- ON> - The input is used as an ON only switch
• <Switch –OFF> - The input is used as an OFF only switch
Once Dimmer Inputs is selected:
ON Action
• Scroll to the available Dimmer Input that will need to be configured. If a Dimmer Input has
programming in it, there will be a black filled in box between the DI designation and the Dimmer
Input text.
• Change the Name of the Dimmer Input to designate the Input function.
• Then scroll down to Switch A: [CHANGE] and press ENTER on the keypad. If a Dimmer Input Switch
has been programmed the box on the left will be filled in.
•
Type: - Move the arrow key (left or right) to select <Switch-ON>. This will make the top or ON button on
a Z5-SW-OO station an On only function.
• Temp priority: - If <Yes>, the priority level of this input is not maintained between button presses.
Unless more information is defined for the Temp priority of the switch station the default, (<No>) should
be not adjusted.
• Scroll to Control: [CHANGE] – Select the Relay, or Group that the switch will control, and then press
ENTER on the keypad.
• Scroll down to the ON priority: or OFF priority: and if needed change to meet functionality, (left or right
arrow). Priorities need to be planned with a sequence of operation if no sequence has been defined
leave the defaults to <Normal>.
• When completed scroll down to [SAVE] and press ENTER on the keypad. This will allow the
user to program the B or OFF function.
OFF Action
• Scroll to Switch B: [CHANGE] and press ENTER on the keypad.
• If a Dimmer Input Switch has been programmed the box on the left will be filled in.
• Type: - Move the arrow key (left or right) to select <Switch-OFF>. This will make the bottom
or OFF button on a Z5-SW-OO station an Off only function.
• Temp priority: - If <Yes>, the priority level of this input is not maintained between button
presses. Unless more information is defined for the Temp priority of the switch station the
default, (<No>) should be not adjusted.
• Scroll to Control: [CHANGE] – Select the Relay, or Group that the switch will control, and then
press ENTER on the keypad.
• Scroll down to the ON priority: or OFF priority: and if needed, change to meet functionality,
(left or right arrow). Priorities need to be planned with a sequence of operation if no sequence
has been defined leave the defaults to <Normal>.
• When completed scroll down to [SAVE] and press ENTER on the keypad.
33
Power-on Settings - Defines power-on state of dimmers that do not have a photocell
configured. Dimmers can be set to zero or maximum level or to the last dimming level when
power was removed then re-applied.
•
Once the POWER-ON SETTINGS is selected, scroll to the Dimmer that will need to
change the power–on state and choose the appropriate Function,(F), key button.
o
Zero - Open circle,F1 - >Full Dim
o
Last - Half filled circle, F2 –>return to the dimmed state prior to power removal.
o
MAX – Filled circle, F3 –> Full Bright
o
Save- F4 -> Save settings a return to Dimming Main Menu.
System Tools
The following programming selections are available in the System Tools Menu:
• Manual Control
• System Status
• Save/Restore Program
• Priorities/Masking
• Access Control
• Diagnostics
• Update Firmware
• Controller Version
• Relay Version
• Reboot System
Manual Control
The Manual Control function allows for manual operation and testing of panel components and programming. The Manual Control
Menu allows the user to manually turn override:
• Relays
• All Relays ON/OFF
• Groups
• Schedules
• Inputs
• Outputs
• Presets
• Dimmers
From the Main Menu select System Tools and select Manual Control. Once in the manual screen choose one of the selections
above to override and press ENTER on the keypad. For ON/OFF devices, select UP arrow on the keypad to turn ON and DOWN
arrow on the keypad to turn OFF the selection. For the Dimmers select the dimming channel and use the UP keypad to dim up
and the DOWN keypad to dim down.
System Status
The System Status function allows for the user to observe the status of the selections below whether they are seen by the
Controller, to be On or Off, the dimmed state of a dimmer and/or the Sunrise/Sunset times based on programming and operation
for trouble shooting and verification of functionality.
• Panels
• Relays
• Groups
• Inputs
• Outputs
• Dimmers
• Dimmer Inputs
• Sunrise/Sunset
34
Save/Restore Program
The Save/Restore Program function allows the user to have a backed up version in the controller, save new programming for
documentation purpose or even gives the user the ability to program the CX Panel form the CX Configurator software and
Import the program into the CX Panel.
Save Back-up Program – This selection will save a copy of the current program into the CX Panel, only 3 slots are available.
This “Back-up” can always be accessed if changes are made and the user “just wants to get back to a saved setting that was
working”. An SD Card is not needed.
Restore Back-up Program – This selection takes the user to retrieve the “Back-up” saved previously.
Export Program - An SD Card must be inserted into the CX Panel. Using this feature allows the user the ability to download the
current programming into the before mentioned SD Card. This .cx file can be saved for documentation purposes or analyzed to
determine if the programming is complete.
Import Program – The CX Panel can be programmed via a CX Configurator programming tool available on the
www.Hubbell-Automation.com website. This program can be saved onto an SD card and inserted into the CX Controller. Once
inserted select Import Program, select the file desired and the file will be transferred into the panel and this program will be the
current program in the CX Panel.
Logging Feature – As long as a CX Panel has an SD card installed it is logging this file can be read as a text file. This is an
automatic feature whenever an SD card is present.
Priorities/Masking
When an ON or OFF event occurs, the affected relays are checked to see what input or schedule last put them into their current
state. If this opposite state’s priority is higher than that of the event, it is blocked. The exception is that any input or schedule can
override its own priority.
Priorities and Masking can be set in this section only after an Input or Schedule has been created through the Main Menu
choices. In this section the user can make changes to those selections.
Priorities Programming Guide
Priorities establish a HIERARCHY to the lighting control strategy, allowing for custom applications and some “if (this happens),
then (that can’t happen)” logic to be applied. Priorities can be assigned to any input command that controls a relay such as a
switch, a motion sensor, a photocell or a time schedule. While priorities are extremely powerful and useful, sometimes it can be
difficult to see how multiple priorities will interact and to see the effect these priorities may have on the lighting system control.
As a result, priorities should be used with caution and after some thought. You can contact Technical Support at 1 (888) 6983242 to check your prioritization scheme with Hubbell Building Automation prior to implementation.
General Concepts
There are four levels of priority for any command from an input such as a switch, motion sensor, photocell, or time schedule.
Available priorities, starting with the lowest level and progressing to the highest level are as follows: LOW, NORMAL, HIGH,
and MASTER.
•
•
ON Priority: This field allows for the ON Priority setting input. The priority selections are Low, Normal, High, and Master.
OFF Priority: This field allows for the OFF Priority setting for the input. The priority selections are Low, Normal, High and
Master.
Most control strategies will need no more than three of these priorities. All inputs and schedules are defaulted to the NORMAL
priority and can be changed through the User Interface keypad of the CX panel or via the CX PC-based program. All levels of
priority are available via the CX panel User Interface and the CX PC-based program.
35
Commands that are at equal priority will behave as parallel logic control devices with the last command controlling the relay.
Remember that control devices such as switches, motion sensors and photocells only issue commands when they change state.
They are not continuous monitoring devices.
Priority Rules
The control panel recognizes a hierarchy of priorities as indicated in these general priority rules:
•
A command at the LOW level can only override other commands at the LOW level. All commands at equal priority behave
in the same way.
•
A command at the NORMAL level is able to override any command at the LOW level as well as any other command at
the NORMAL level. While the NORMAL command is in effect, any command from any other input at the LOW level will be
disregarded.
•
If a command is set at the HIGH level it can override any command except for a command at the MASTER level. For
example, you use a Switch command at the MASTER level to turn ON a relay. Then a time scheduled at a HIGH priority
wants to turn OFF that relay. The HIGH priority OFF command from the schedule is at a lower level of priority than the
MASTER priority ON. The relay will not turn OFF until an input command at the MASTER level can turn the relay off.
•
Exceptions to Normal Priority Rules:
•
If a Timed ON is assigned to a switch and the ON command of that input is prioritized, it exerts a ½ step priority up from
priority that is set on that command. For instance, if the ON command of Auxiliary Input 1 is set as NORMAL and has a
60-minute timed ON, when the timer is running, the priority level is actually NORMAL +. This means that an OFF at the
NORMAL level from another switch or input will not be able to override this command. Only the switch that issued the
Timed ON will be able to cancel the Timed ON command before the timer finishes counting down. Other inputs that are a
full priority level higher, such as HIGH, in this case, would be able to cancel the NORMAL + Timed ON.
•
Usually a LOW priority command will not work to override higher priority commands. However, to allow release of the
higher priorities, it is necessary to allow for some exception to the rule. For this reason, if you have a prioritized command
from a switch or other input, it is recommended that you use the opposite command from that same input to release the
priority back to the LOW level. For example, set up the ON of the input to be MASTER and the OFF of the input to be
LOW. When the MASTER is in effect, other switches at the lower priorities will not be able to function. When the MASTER
switch is turned OFF, its effect is to release the MASTER priority. The CX Panel software will then check to see if there is
a previously actuated input that should now control the lighting. This priority release and re-evaluation allows lower level
priority inputs to take control of the lighting.
•
Time schedules set at LOW can override Time Schedules set at the NORMAL or HIGH level if they are controlling the
same relay. This will allow release of time scheduled prioritized commands.
•
If a keypad manual command is affected on a relay and a Timed ON is assigned, this command is the highest priority in
the lighting controller. No other commands will be processed until the timer finishes counting down.
•
Keypad manual commands and manual relay commands from the manual override buttons on the relay boards will force
the relay to the commanded state and to the LOW priority. This will temporarily allow any input regardless of priority to be
able to control that relay again until the next reevaluation occurs. Manual relay override button commands are not tracked
by the CX Controller.
USING PRIORITIES
Priorities, whether they are ON or OFF events should be considered individually. At each programming event the CX panel will
check the ON and OFF priorities for each controlling input or schedule and then issue actions based on the priority status of each
that is mapped to control the same relay or group.
Control inputs are treated equally. Switches, photocells and motion sensors if at the same priority will behave as though they
are logically in series. The control in this situation would change state based on last in command. The exception for Timed ON
switches in indicated above. A motion sensor and switch with equal priorities mapped to a single relay will allow either device to
turn lights ON or OFF at each state change command. Equal priorities are most often used with like devices that control the same
relay or group. Multiple switches controlling the same zone would be set with ON and OFF priorities at equal levels.
When higher or lower priorities are applied to these input devices the commands that are lower are ignored while higher
commands are in effect. The highest priority must be released before other commands of lower priorities can take effect. It is
recommended that when inputs are given higher priority ON commands that the OFF command be set at LOW to clear the control
to all other devices. This recommendation is illustrated in the examples below.
36
Schedules may also be given differing ON and OFF priorities. Schedules that are assigned priorities MUST have both ON and OFF
events. This is required because the higher priority event must be canceled by an opposite event set at priority = LOW in order
to be canceled. A schedule with a higher priority ON event will hold the relays in the ON state until either the priority = LOW OFF
event for the same schedule occurs or a mapped input with a higher priority than the schedule ON occurs.
PRIORITY EXAMPLES
Example 1: The project has an area that requires a Manual-ON-Automatic-OFF control scenario where the switch at the entrance
of the space must be activated before the ceiling mounted motion sensor is allowed to turn lights ON. Once the lights are ON the
switch may be used to turn them OFF or the sensor will turn them OFF automatically once vacancy is detected and timeout period
has passed. Once lights are turned OFF the area is reset for the next ON event to be manual with the switch again.
Example 1 Programming Steps:
1. Set the wall switch priority as ON command = HIGH, OFF command = LOW.
2. Set the motion sensor priority as ON command = NORMAL (Default) OFF command = LOW.
How it works:
When an occupant enters the motion sensor will see them and initiate and ON command. The panel will check to see if there
are any other devices controlling the relay with a higher level priority ON command. In the case since the wall switch has an ON
command at priority HIGH and the sensor with priority ON command at Normal, the panel will ignore the sensor ON command until
the switch initiates its ON command. In order to turn the lights ON the occupant will first need to initiate an ON command from the
switch.
When the occupant leaves the room the switch and the sensor have equal priority OFF command at LOW. This means that either
the switch or the sensor can turn the lights OFF at any time. Once the OFF event has been executed then the system returns to the
original manual ON state requiring the higher priority ON switch to be activated to turn lights ON.
Example 2: The project has time schedules set up during the day with a 7:00AM ON and an 8:00PM OFF schedule for Monday
through Friday. They do not want the wall switches to work at all during the day but would like them to work after the 8:00PM OFF
time.
Example 2 Programming Steps:
3. Set the wall switch priority as ON command = NORMAL (Default), OFF command = NORMAL (Default).
4. Set the 7:00AM ON schedule to be at the HIGH level. Set the 8:00PM OFF schedule to be at the LOW priority.
How it works:
At 7:00AM the time schedule will turn the lights on, with a priority level of HIGH. The lower priority wall switch will not be able to
work.
At 8:00PM the time schedule will turn the lights off, with a priority of LOW, releasing control of the relay to other inputs. The wall
switch will now work until the next 7:00AM priority level HIGH on Schedule activates.
ALTERNATE Method Using MASKING:
Example 2 – Alternate – Programming Steps:
1. Set the wall switch masking for the OFF command for a start time of 7:00AM and end at 8:00PM
2. Set the wall switch priority as ON command = NORMAL (Default), OFF command = NORMAL (Default).
3. Set the 7:00AM ON schedule to be at the NORMAL (Default) level. Set the 8:00PM OFF schedule to be at the NORMAL
(Default) priority.
How it works:
At 7:00AM the time schedule will turn the lights on, with a priority level of NORMAL.
Starting at 7:00AM the switch OFF commands will be ignored since they are masked. The wall switch will not be able to turn
lights OFF until the mask period ends at 8:00PM. During the mask period ON commands can still be sent, but since the relays
are already ON the state will not change. The purpose of leaving the ON un-masked is so that if for any reason relays are manual
turned OFF they can always be turned back ON.
37
At 8:00PM the time schedule will turn the lights off, with a priority of LOW, releasing control of the relay to other inputs. The wall
switch will now perform both ON and OFF commands until the next masking period starts at 7:00AM.
Example 3: The project has an indoor photocell that turns ON or OFF interior lights nearest the windows as needed using ON and
OFF light level set points. The desired programming is to turn OFF lighting entirely at 8:00PM and enable the photocell to run the
lighting starting at 7:00AM.
Example 3 Programming Steps:
1. Set up the photocell with the ON command at a priority = NORMAL (Default) ON and the OFF command at a priority =
NORMAL OFF.
2. Set up the Time Schedule at 8:00PM to issue a priority = HIGH OFF.
3. Set up a Time Schedule at 7:00AM to issue a priority = LOW ON.
How it works:
The 8:00PM priority = HIGH OFF schedule goes through. All lights that are currently ON from photocell priority = NORMAL ON will
turn OFF because the schedule OFF is a higher priority. Any additional ON or OFF commands from the photocell will be ignored
until the 7:00AM priority=LOW ON command goes through.
The time schedule priority = LOW ON goes through at 07:00. This command releases the higher priority ON command and gives
control back to the photocell. In this case, lights that are in areas that the photocell is in the ON state will turn on or if the photocell
is in the OFF state they will not turn ON. This occurs because both the OFF and ON state of the photocell are higher priorities
than the ON command of the schedule.
Example 4: The project has a fire system that gives the lighting system a dry contact closure when the alarm goes on. This
closure is connected to one of the auxiliary inputs on the CX Panel. In an alarm event, all of the emergency lighting is to turn on
and remain on regardless of wall switch state or time schedules when an alarm happens. When the alarm system is turned off by
the fire department the all lighting is to resume its normal scheduled state.
Example 4 Programming Steps
1. Set the fire alarm input ON command as priority = MASTER ON.
2. Set the fire alarm input OFF command as priority = LOW.
3. Set the time schedules and other inputs to be priority = NORMAL level.
How it works:
Normal commands go through to control relays in a NORMAL level. Because commands are all at the NORMAL level, they can
override each other.
For the purposes of this example, we will say that the last command to this relay was an ON command from a wall switch.
When the fire alarm input sends an ON command, the designated lighting will go ON, at a MASTER priority level.
When the fire alarm input is turned OFF it will issue a priority = LOW OFF command. The CX Panel will re-evaluate and give
control of the relays to the last command at the NORMAL level, in this case the wall switch.
Masking
Masking can be applied to Inputs and Outputs. The purpose of masking is to block actions or events for selected periods of time.
When selecting and programming Masking, it is essentially like programming a schedule, (see Schedules), to NOT function.
38
Access Control
The System Status function allows for manual operation and testing of Relays, Groups, Schedules, Inputs and outputs.
Access Control settings allow a master user to create up to 10 Usernames and Passwords for the panel’s access. To create a new
Access Control user, do the following:
From the Main Menu, use the navigation arrows to select Access Control. From the keypad, press ENTER.
Scroll to and select a User. From the keypad, press ENTER.
Under Name: use the keypad to type a name.
Use the down arrow key to select Level: then use the left and right arrow keys to highlight <Master> <Limited> or ViewOnly>.
5. After making your selection, press the down arrow key to select Password: and use the keypad to type a 4-digit password.
Note: Keep the Password in an accessible place. Contact Tech Support if the Password has been lost or misplaced.
6. Press the down arrow key to highlight [Save]. From the keypad, press Enter to save your changes.
7. The first user must always have a Master user level. If the first user is not defined, Access Control will not be used by the
CX Controller. A password of 0000 can be entered by simply pressing ENTER at the CX Controller main screen. This can be
useful when the 0000 user is set to a View-Only user level.
1.
2.
3.
4.
Diagnostics
Diagnostics allows the user to view the status of Battery Back-Up, Panel Communications, and Relay Communications.
Update Firmware
If a power cycle is not possible to update firmware, this section is where this task would be accomplished.
Simply insert the SD card with the appropriate Firmware.
•
•
•
From the Main Menu scroll and select System Tools and press ENTER on the keypad.
Scroll and select Update Firmware and press ENTER on the keypad.
Select the Firmware and Select <YES> and press ENTER on the keypad
Controller Version
Controller Version displays the date and time of the CX Panel’s most recent version update.
•
From the Main Menu, use the navigation arrows to select System Tools > Controller Version.
Relay Version
• Relay Version displays the date and time of the CX Panel’s most recent version update.
• From the Main Menu, use the navigation arrows to select System Tools > Relay Version.
Reboot System
The Reboot System function reboots the controller and allows for a refresh of all system status.
Warning: Programmed lighting control functions will not operate during a system reboot.
To Reboot System the following steps are required:
•
•
From the Main Menu, use the navigation arrows to select System Tools > Reboot System. From the keypad, press ENTER.
Using the left and right keypad arrows change the status from <NO> to <YES>. From the keypad, press ENTER to reboot
39
PART 3 - CX Lighting Control Panels Troubleshooting Guide
Troubleshooting Guide
The troubleshooting guide provides information about issues that can arise due to physical installation, wiring connections and
programming functionality. Every CX Panel is fully factory tested for all functionality prior to shipment and should be in proper
working order once mounted and connected. The issues listed below primarily occur due to wiring errors and/or incorrect
programming. HBA has attempted to make all connection requirements and programming steps clear and understandable, but
understands that issues can arise in the field. Our hope is that we have details that will allow for corrections to be made using this
guide in most cases.
Should additional assistance be required HBA Technical Services can be called at 1 (800) 888-8006. Hours are M-F 8:00AM to
5:00PM CDT.
“Hot Swapping”
Hot Swapping is when an individual removes components of the CX Panel with the Main Power On. Items referred to as a CX component: CX
Motherboard(s), CX Dimming Card, CX Master/Secondary Card, CX Relays, CX Controller or the Ribbon Cable connecting the Controller to the
CX Motherboard. If this is Hot Swapping is done the Panel will be damaged and all CX components will need to be replaced.
Line Voltage Power Connections
If the relay appears to stay on, (OFF) or closed, (ON),
1. Verify the Green indicator LED on the Relay Card is on if the relay should be closed and off if the relay should be open.
2. Check the continuity of the relay to verify the Relay is open or closed.
3. Check the Status of the Relay through the Controller Status function.
• The Relay may not be seen by the controller. Indicating a damaged relay or a loss of communication with the
motherboard.
• Power down and remove a known good relay and replace the relay that is questioned.
• If the known good relay is still not “seen” by the Controller it may be the Motherboard.
• If the known good relay functions correctly, then the questioned relay may need to be replaced.
Low Voltage Control Inputs
An input is not seen when programming.
1. If the Input is on a Relay card, verify the relay can be seen via the manual override section or the status section. If the Relay
is not seen either, the Relay may be suspect.
• Power down and remove a known good relay and replace the relay that is questioned.
• If the known good relay and input are still not “seen” by the Controller it may be the Motherboard.
• If the known good relay and input functions correctly, then the questioned relay/input may need to be replaced.
• An input device has been installed and it is not turning on or off
2. At the CX Panel input remove the low voltage wires. Use a 2 inch or jumper wire and jumper between 24V and the Control
terminal. This should simulate an input function, if the action does not occur, test via option 1 in Low Voltage Control Inputs.
3. Remove the Switch station from its location and walk it to the CX Panel input and connect the switch, occupancy sensor or
photocell to the input. Does it work?
• If not then it may be the device and the device may need to be replaced.
• If it does work, it may be the low voltage wire. Check the wires.
4. To check the wires remove the switch and short the 24V wire to the Control wire, does anything happen?
• If nothing happens the wire may need to be replaced.
• If it works then check the connections to the low voltage device and try again.
CX Dimming Card
“The Dimming card is not working.”
1. Verify the Card/Dimming channels are seen in the Controller.
2. Verify the dipswitches are set correctly, see Dimming Card instructions.
40
CX Master/Secondary Configurations
“I’m unable to see Secondary Panel.”
1. With the Power removed to both panels, remove the CX Controller form the Master Panel and connect it to the Secondary
Panel. Remove the Interface card and power up the Secondary Panel.
• The Secondary Panel is still not seen. Check the dipswitch configurations on the CX Panel.
•
If these are correct, with the power removed disconnect all relays and see if the Motherboards can be seen.
•
If not then the Motherboards needs to be replaced.
• If so then reinstall all the relays one at a time. Power cycling between re-installation and verifying after each reinstall
that they are seen.
• If a relay is reinstalled and not seen, verify the relay by following #3 under Line Voltage Power Connections.
2. Verify the installation of Both Interface Cards
• Both Cards look similar however the Master Card has the text Master Card on the card and the Secondary Card has the
text Secondary Card on it.
3. Test the CAT5 Cable being used to insure a non damaged cable.
4. Verify the dipswitches on both panels represent the correct configuration per Panel function.
41