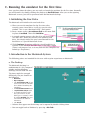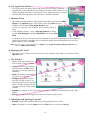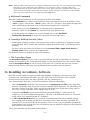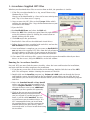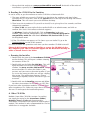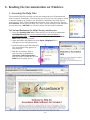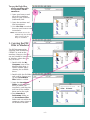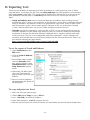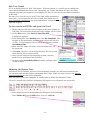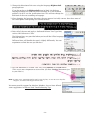
1
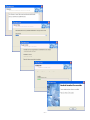
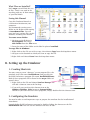
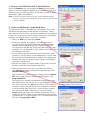
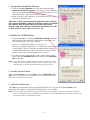
Accordance
with the
Macintosh Emulator
BasiliskII
Installation & User Manual
For running
Accordance® Bible Software Version 9
on a Windows® PC
–1–
Version 6, © 2011 OakTree Software, Inc.
All rights reserved
Thanks to TorahResource and Tim Hegg for help with the BasiliskII Installers and the
documentation.
The Macintosh emulation software contained in the downloaded emulator installer files and on
the emulator CD is BasiliskII, which is an open-source, free emulation software obtainable from
the Internet (http://www.students.uni-mainz.de/bauec002/B2Main.html). We are not selling
BasiliskII. We have packaged the emulation software together with these instructions in order to
make installation easier, and to aid users of Accordance Bible Software who wish to utilize this
superior software tool for biblical and related studies.
If you purchase this package, you receive the Emulator CD bundled for easy installation, and
this printed manual. In addition, you are entitled to receive technical support from OakTree
Software, Inc. for the installation of the emulator software (BasiliskII). We cannot offer technical
support for those who have obtained BasiliskII software from sources other than TorahResource
or OakTree Software. If you have difficulty installing the emulation software, please contact us
via e-mail: [email protected] or telephone: 407-339-0266.
Throughout this manual, Windows refers to the registered trademark of Microsoft Windows;
Accordance refers to the registered trademark of OakTree Software, Inc.; Macintosh refers to the
registered trademark of Apple Macintosh.
Apple Rom Image
In order to run the Macintosh emulator software (BasiliskII), an Apple ROM image must be
loaded onto your Windows PC. Apple, like all computer manufacturers, retains ownership of
the ROM chip on the motherboard of their computers. When a person buys a computer, the
manufacturer gives that person the right to use the ROM chip contained in the computer, but
does not give the buyer ownership of that ROM chip. In the strictest technical sense, it is illegal
to use the ROM image unless you actually own a Macintosh computer.
Apple no longer manufactures the 68K ROM chip (Motorola 68K series), nor does Apple support
any Macintosh computer running the 68K ROM chip. Though Apple would never relinquish
ownership of the ROM chips used for their computers (since this would present an unworkable
legal precedence), it is clear that Apple is not concerned about the websites which openly offer
the 68K ROM images.
The ROM image included in the installer is available elsewhere on the internet. By using the ROM
image in the installer, you accept full responsibility for its use. If you are concerned about the
strict interpretation of the copyright and/or trademark law and desire to own the physical Apple
Macintosh ROM, please contact us.
Note: The images will be seen most clearly at 200% magnification.
–2–
Table of Contents
Introduction . . . . . . . . . . . . . . . . . . . . . . . . . . . . . . . . . . . . . . . . . 5
Installation and Setup . . . . . . . . . . . . . . . . . . . . . . . . . . . . . . . . . 5
A. Installing the Macintosh Emulator . . . . . . . . . . . . . . . . . . 5
To use Basilisksetup.exe: . . . . . . . . . . . . . . . . . . . . . . . . . . . . . . . . . . . . . . . 5
What Files are Installed? . . . . . . . . . . . . . . . . . . . . . . . . . . . . . . . . . . . . . . . 7
Saving this Manual: . . . . . . . . . . . . . . . . . . . . . . . . . . . . . . . . . . . . . . . . . . . 7
B. Setting up the Emulator . . . . . . . . . . . . . . . . . . . . . . . . . . . 7
1.Creating Shortcuts . . . . . . . . . . . . . . . . . . . . . . . . . . . . . . . . . . 7
2.Configuring the Emulator . . . . . . . . . . . . . . . . . . . . . . . . . . . . 7
a. Increase the RAM allocated to the Emulator: . . . . . . . . . . . . . . . . . . . . . 8
b. Create an additional virtual hard drive: . . . . . . . . . . . . . . . . . . . . . . . . . 8
c. Set up the External File System: . . . . . . . . . . . . . . . . . . . . . . . . . . . . . . . 9
d. Enable the CD-ROM Drive: . . . . . . . . . . . . . . . . . . . . . . . . . . . . . . . . . . . . 9
e. Set the Screen Colors: . . . . . . . . . . . . . . . . . . . . . . . . . . . . . . . . . . . . . . . 9
f. Quit the Preferences . . . . . . . . . . . . . . . . . . . . . . . . . . . . . . . . . . . . . . . . 9
C. Running the emulator for the first time . . . . . . . . . . . . . 10
1.Initializing the New Drive . . . . . . . . . . . . . . . . . . . . . . . . . . . 10
2.Introduction to the Macintosh System . . . . . . . . . . . . . . . . . 10
a. The Desktop . . . . . . . . . . . . . . . . . . . . . . . . . . . . . . . . . . . . . . . . . . . . . . 10
b. The Application Menu . . . . . . . . . . . . . . . . . . . . . . . . . . . . . . . . . . . . . . . 11
c. Shutting Down . . . . . . . . . . . . . . . . . . . . . . . . . . . . . . . . . . . . . . . . . . . . . 11
d. Emptying the Trash . . . . . . . . . . . . . . . . . . . . . . . . . . . . . . . . . . . . . . . . . 11
e. The Window . . . . . . . . . . . . . . . . . . . . . . . . . . . . . . . . . . . . . . . . . . . . . . . 11
f. Launching and Quitting Programs . . . . . . . . . . . . . . . . . . . . . . . . . . . . . . 11
g. Keyboard Commands . . . . . . . . . . . . . . . . . . . . . . . . . . . . . . . . . . . . . . . 12
h. Creating a Desktop Shortcut (Alias) . . . . . . . . . . . . . . . . . . . . . . . . . . . . 12
i. The Accordance Demo . . . . . . . . . . . . . . . . . . . . . . . . . . . . . . . . . . . . . . . 12
D. Installing Accordance Software . . . . . . . . . . . . . . . . . . . . 12
1.Accordance Supplied .HFV Files . . . . . . . . . . . . . . . . . . . . . . 13
Running the Accordance Installer . . . . . . . . . . . . . . . . . . . . . . . . . . . . . . . . 13
2. Installing Accordance Software from Downloads . . . . . . . 14
3.Installing from CD-ROMs (Windows XP or Vista 32 bit only)
a. Order of the CD-ROMs . . . . . . . . . . . . . . . . . . . . . . . . . . . . . . . . . . . . . . . 14
b. Reading the CD-ROM in the Emulator . . . . . . . . . . . . . . . . . . . . . . . . . . . 15
c. Running the Installer . . . . . . . . . . . . . . . . . . . . . . . . . . . . . . . . . . . . . . . . 15
d. Older CD-ROMs . . . . . . . . . . . . . . . . . . . . . . . . . . . . . . . . . . . . . . . . . . . . 15
E. Reading the Documentation on Windows . . . . . . . . . . . . 16
1.Accessing the Help Files . . . . . . . . . . . . . . . . . . . . . . . . . . . . . 16
To Find and Bookmark the Help Files in your Browser: . . . . . . . . . . . . . . . . 16
To use the Help files while working with Accordance in the emulator: . . . 17
–3–
14
2.Copying the PDF Files to Windows . . . . . . . . . . . . . . . . . . . . 17
3.Reading the PDF Files . . . . . . . . . . . . . . . . . . . . . . . . . . . . . . . 18
F. Setting up Accordance . . . . . . . . . . . . . . . . . . . . . . . . . . . . 18
1.Launching Accordance . . . . . . . . . . . . . . . . . . . . . . . . . . . . . . 18
a. Make an alias of Accordance for convenient access: . . . . . . . . . . . . . . . 18
b. Run and Register the program: . . . . . . . . . . . . . . . . . . . . . . . . . . . . . . . . 19
2. Setting Preferences . . . . . . . . . . . . . . . . . . . . . . . . . . . . . . . . . 19
G.Printing . . . . . . . . . . . . . . . . . . . . . . . . . . . . . . . . . . . . . . . . 20
To use PrintToPDF: . . . . . . . . . . . . . . . . . . . . . . . . . . . . . . . . . . . . . . . . . . . . 20
PrintToPDF Fixes . . . . . . . . . . . . . . . . . . . . . . . . . . . . . . . . . . . . . . . . . . . . . 21
Printer Drivers . . . . . . . . . . . . . . . . . . . . . . . . . . . . . . . . . . . . . . . . . . . . . . . 21
H. Exporting Text . . . . . . . . . . . . . . . . . . . . . . . . . . . . . . . . . . 22
To set the export of Greek and Hebrew: . . . . . . . . . . . . . . . . . . . . . . . . . . . 22
To copy and paste into Word: . . . . . . . . . . . . . . . . . . . . . . . . . . . . . . . . . . . 22
Rich Text Format . . . . . . . . . . . . . . . . . . . . . . . . . . . . . . . . . . . . . . . . . . . . . 23
To save text in an RTF file and open it in Word: . . . . . . . . . . . . . . . . . . . . . 23
Adjusting the Hebrew Text: . . . . . . . . . . . . . . . . . . . . . . . . . . . . . . . . . . . . . 23
J. Troubleshooting Tips . . . . . . . . . . . . . . . . . . . . . . . . . . . . . 25
Reading CD-ROMs . . . . . . . . . . . . . . . . . . . . . . . . . . . . . . . . . . . . 25
BasiliskII Preferences . . . . . . . . . . . . . . . . . . . . . . . . . . . . . . . . . . . . . . . . . . 25
Windows XP . . . . . . . . . . . . . . . . . . . . . . . . . . . . . . . . . . . . . . . . . . . . . . . . . 25
Windows CD-ROMs are ejected . . . . . . . . . . . . . . . . . . . . . . . . . . . . . . . . . . 25
Macintosh only CD-ROMs . . . . . . . . . . . . . . . . . . . . . . . . . . . . . . . . . . . . . . . 26
Vista Issues . . . . . . . . . . . . . . . . . . . . . . . . . . . . . . . . . . . . . . . . . 26
Other Issues . . . . . . . . . . . . . . . . . . . . . . . . . . . . . . . . . . . . . . . . . 26
Error 192 when running an Installer . . . . . . . . . . . . . . . . . . . . . . . . . . . . . . 26
Setting BasiliskII Preferences . . . . . . . . . . . . . . . . . . . . . . . . . . . . . . . . . . . . 27
Downloading Updates . . . . . . . . . . . . . . . . . . . . . . . . . . . . . . . . . . . . . . . . . 27
Toggling between Windows and Macintosh . . . . . . . . . . . . . . . . . . . . . . . . . 27
Transferring Files between Windows and the Emulator . . . . . . . . . . . . . . . 27
Transferring files from a Macintosh to the Emulator . . . . . . . . . . . . . . . . . 28
Transferring files from the Emulator to another Accordance . . . . . . . . . . . 28
Reinstalling the Emulator . . . . . . . . . . . . . . . . . . . . . . . . . . . . . . . . . . . . . . 28
Transferring Accordance from one Emulator Installation to Another . . . . . 29
Enlarging or Deleting a Virtual Hard Drive . . . . . . . . . . . . . . . . . . . . . . . . . 29
NO to Virtual Memory . . . . . . . . . . . . . . . . . . . . . . . . . . . . . . . . . . . . . . . . . 29
Reducing CPU Power Usage . . . . . . . . . . . . . . . . . . . . . . . . . . . . . . . . . . . . . 29
Screen Problems . . . . . . . . . . . . . . . . . . . . . . . . . . . . . . . . . . . . . . . . . . . . . 30
Installing BAS Pictures . . . . . . . . . . . . . . . . . . . . . . . . . . . . . . . . . . . . . . . . . 30
Hebrew Word Troubleshooting Tips . . . . . . . . . . . . . . . . . . . . . . . . . . . . . . 30
–4–
Introduction
The emulation software, called BasiliskII, creates an environment on your Windows machine that
in every way emulates a Macintosh computer (utilizing the Motorola 68K series processor). The
Macintosh system installed is 7.5.
After installation and setup, you will have a functioning Macintosh on your Windows PC.
Whenever you want to run Macintosh programs on your Windows machine, you will simply
launch the emulator as you would any other program (either from the Start menu or by doubleclicking a shortcut icon on your desktop). Once the emulator is running, you can install, launch,
and run any Macintosh program (compiled for the 68K Macintosh).
Remember, the emulator is like any other software you run on your Windows computer. You can
have the emulator running as well as other programs. Of course, the amount of RAM you have
determines how many programs can effectively be running at any given time. You can use the
<Alt+Tab> key combination to cycle between the active programs. You can also transfer text
and files between the two systems.
Updates to this manual, and helpful hints on the use of Accordance on the emulator are
available at:
www.accordancebible.com/support/emulator.php
Installation and Setup
In order to get Accordance running satisfactorily on your PC you must do the following:
A.Install the BasiliskII emulator.
B.Configure the emulator using the program called BasiliskIIGui.
C.Run the emulator.
D.Install the Accordance program and modules on the Macintosh system.
E.Set up Accordance and its Preferences
F. Open the Help and Documentation on the Windows side. .
A.Installing the Macintosh Emulator
The installer supplied by download or on a disk will install all the files needed to run BasiliskII
on your PC.
To use Basilisksetup.exe:
1.If you have Windows 7, Vista, Windows XP
or 2000, double-click on basilisksetup.exe.
2.You do not need to change the location of the
installation shortcut, just click Next on each
screen until the installer finishes.
3.Click on Finish, save this Manual to your
hard drive, and go on to Step B.
–5–
–6–
What Files are Installed?
In C: accpc you will find this set
of files. There is no need to do
anything with any of them except
as specified below.
Saving this Manual:
Copy this Emulator Manual to
a convenient location on your
computer.
We recommend creating a new
folder on the C: drive and naming
it Accordance files. You will
copy and save various files to this
location, including this manual.
To create a new folder:
1.Navigate to the C: drive in
My Computer and select
New Folder from the File menu.
2.Enter the name of the folder on the label in place of untitled.
To copy files in Windows:
1.Right-click on the file you wish to copy, then choose Copy from the drop-down menu.
2.Navigate to the location to which you want to copy the file.
3.Right-click and choose Paste from the drop-down menu.
B.Setting up the Emulator
1.Creating Shortcuts
You may want to create “shortcuts” to two program files: the
emulator itself (file name: BasiliskII.exe) and possibly the
BasiliskII Preferences program (file name: BasiliskIIGUI.exe).
Both of these programs will be found in the accpc folder on
your C: drive.
1.Right-click on the file and choose Send to: Destop. This
will add a shortcut icon to the Desktop.
2.If you wish you can drag this shortcut icon to the
Windows Task Bar, Start button or Startup folder.
Whenever you want to access these programs, simply double-click the shortcut icon.
2.Configuring the Emulator
You need to take several important steps to prepare the emulator for the installation of
Accordance:
Launch the BasiliskII Preferences program by double-clicking the shortcut or the file
BasiliskIIGUI.exe. You will see this window with rows of tabs:
–7–
a. Increase the RAM allocated to the Emulator:
Select the Memory tab, and change the RAM size to a higher
figure if you have sufficient RAM in your computer. It is best to
allocate at least 64 MB if possible. (If you have 128 MB or more,
allocating 64 MB is no problem.)
Note: in order to install certain large files such as Biblical World in
Pictures, you may need temporarily to increase this memory to as
much as 400 MB.
b. Create an additional virtual hard drive:
The default OS Drive is 200 MB drive and contains the system
and other files including an old demo of Accordance. There is
only room on this drive for a minimal installation of Accordance.
If you have or plan to get more than the most basic Accordance
package, you should create a new drive as follows:
1.Select the Disk tab, then click Create.
2.In the new window that appears, increase the size of
the virtual drive depending upon how many Accordance
modules you intend to install. You should increase the
size to at least 500 MB, but if you have the hard disk space
available, set it to 2000 MB (2 Gigs, which is the largest drive
the emulator will allow).
3.As you add Accordance modules, you’ll want more space.
Of course, you can always create another drive at any time
by using the BasiliskII Preference window, but splitting the
modules between two or more drives makes installation a
little more complicated.
4.You can also enter a new path name if you prefer to create
the new virtual drive on another hard drive.
5.When you have increased the size of the virtual drive,
click OK and the newly created drive will show up in the
Installed disks: pane.
You will now have two hard drives showing there: osdrive.
hfv, and the one you just created (default name is: C:\
accpc\New.HFV).
The osdrive.hfv contains the Macintosh operating system
and should be first in the list. If it is not, highlight it (click
on it once) and click the Up button until it is first in the list. The newly created drive (listed
second) is where you will install your Accordance software.
If you installing many large files, such as Library Premier,
you will need to make another drive. To do this, click
Create again and in the next window, change the size in
megabytes again to 2000. In the path field put the number
1 between the “w” in new and the “.HFV” (it should now look
like this: C:\accpc\New1.HFV).
–8–
c. Set up the External File System:
1.Click on the My Computer tab, and then check the box
Enable external file system. This will put a “My Computer”
icon on your Macintosh desktop, which allows you to save to
and retrieve files from your Windows folders.
2. Make sure that your hard drive is checked on the list, and
uncheck any other drives.
This icon is only a portal through which you may transfer
files between Windows and the Basilisk system. You should
not run any files through the portal, and you should
transfer only files that are recognized by Windows as well
as Mac such as: .htm, .pdf, .rtf, .txt, or .sit.
d. Enable the CD-ROM Drive:
1.Click on the CD tab, check the CD-ROM enabled check box,
and check that the installed CD-ROM drive represents the
correct letter/drive for your CD-ROM.
For XP it is usually the D drive, on Vista it is E.
However, if you have hard drives C and D, then your CD-ROM
is most likely E drive. If, besides two hard drives you have
a removable media drive (like a zip drive or extra CD-ROM
burner), then your CD-ROM might be F or even G.
2.Use the arrow key between the panes to move the correct
drive from the Available cds on the right to the Installed
cds on the left.
Note: This is important to enable Basilisk to read a CD, however, 64bit
computers do not allow BasiliskII to read a CD in any case. The
only option is to install downloads and prepared .HFV files.
e. Set the Screen Colors:
Click on the Screen and set the Colors menu to Thousands (16
bit). You can try the other screen settings if you wish, but Windows GDI
full screen is usually the most stable.
f. Quit the Preferences
Click OK to set the preferences and quit BasiliskIIGUI.exe. You can also clicking Run at the
bottom of the window to launch BasiliskII but this is less reliable.
Note: There are other customizations that can be made in the BasiliskII Preferences window, but for now,
these are enough to get the emulator up and running. The Troubleshooting Tips section at the end of
this manual suggests additional settings.
–9–
C.Running the emulator for the first time
Once you have done the above, you are ready to launch the emulator for the first time. Normally
you will launch it by double-clicking the shortcut to BasiliskII.exe. After you see the opening
Macintosh screens, you will be presented with the Macintosh desktop.
1.Initializing the New Drive
The Macintosh will initialize the new hard drive.
a.When you run the emulator for the first time after
creating a new virtual drive, it will give you the alert
window “This is not a Macintosh Disk.” Don’t panic!
b.Enter a name such as Accordance disk in the name field
in place of untitled. Then click Initialize.
c.A second warning appears that the drive will be erased.
This does NOT affect any data on your Windows hard
drive, but simply marks the space you allocated for the
hard drive as a special Macintosh sector.
d.Click Continue. Be patient while the virtual hard drive is
created. If you allocated the full 2 Gigs, it will take a while!
(There is no progress bar, so it may look like the computer has
locked up—be patient.)
2.Introduction to the Macintosh System
The following points are intended for the user with no prior experience on Macintosh.
a. The Desktop
The Macintosh desktop is a
combination of a “My Computer”
window and the Windows
desktop, and will look like this:
The icons might be arranged
differently, but you should see
the following:
• OS Drive
• My Computer
• The Accordance CD (if you
inserted it into the CD-ROM
drive before launching the
emulator)
• An Accordance Demo icon
• A QuickTime Player icon
• A second Hard drive (the
one you created—if you
didn’t give it a name, it will
be called untitled, but you
can click on the label to
rename it)
• The Trash.
• Volumes that appear on the desktop can be opened by double-clicking them.
• You can toggle back to Windows by pressing <Alt+Tab>.
– 10 –
b. The Application Menu
• The little icon in the upper right hand corner of the screen is like the
program bar at the bottom of your Windows desktop. While you are in the
Finder (Desktop) the icon is a Macintosh. Every program you are currently
running will show up under this icon when you click and hold.
c. Shutting Down
• Shut down the Macintosh by clicking on the desktop and selecting Shut
Down in the Special menu. (This menu is like your Start menu in
Windows that includes Shut down, Restart, etc.).
It is best to shut down the emulator before putting the PC to
sleep.
• If the emulator “hangs,” press <Ctrl+Alt+Delete> to bring
up the Task Manager, highlight BasiliskII, and choose End
Task.
• If you have to force a shut down of the emulator using the Task Manager, the next time you
launch the emulator a warning will be displayed noting that the Macintosh was not shut
down properly. Just click OK.
Note:You can suppress this warning in the Apple menu>Control Panels>General Controls and
uncheck Shut Down Warning.
d. Emptying the Trash
• The trash can is similar to the recycle bin on the Windows side. Empty the trash with the
Special menu.
e. The Window
• Double-click on a hard drive
icon to open a Finder window.
• Close the window by clicking
the box in the top left corner
(not the X in the top right as in
Windows).
• Move the window by dragging
the title bar at the top.
• Collapse the window to just
the title bar and restore it by
clicking the box in the top right
corner. Double-clicking on the
Title bar will also collapse that
window.
• Expand the window to full screen and restore it by clicking the box inside the top right
corner.
• Resize the window by dragging the box in the bottom right corner.
f. Launching and Quitting Programs
• Launch a program by double-clicking on the application or its alias.
• Quit a program by selecting Quit from the File menu, or pressing <Alt+Q>.
– 11 –
Note: Unlike Windows, when you close a window in Macintosh, it does not stop the program from running.
Programs can run without any open windows. To see and access what is running, look in the
Application menu in the top right corner of the screen. When you bring a program to the front, the
menus and the icon of the Application menu change to that program, even if there are no windows
open. You can usually open a new window from the File menu.
g. Keyboard Commands
Many key command shortcuts are the equivalent to those on Windows.
• The Command key (=Alt on your keyboard) is the equivalent of Control on Windows. Thus
<Alt+C> copies selected text, <Alt+O> opens a file, etc. This key is also called the Apple key,
and is identified on the menus and in the documentation by this symbol: ⌘.
• Some shortcuts use the Control key in addition to the Command key.
• Shortcuts which use the Option key will work with your Windows key.
If you do not have a Windows key on your laptop, you can use BasiliskII
Preferences>Keyboard to assign the Option key to one of the F keys.
h. Creating a Desktop Shortcut (Alias)
• Unlike some Windows systems, you cannot create an alias (=shortcut) by dragging an item
to the desktop. Do NOT move the Accordance program to the desktop, it will not run there
properly.
An alias can be placed on the desktop, or in the System Folder>Apple Menu items or
Startup items for easy access to an application.
See below for details on making an alias of Accordance.
i. The Accordance Demo
The Accordance demo alias lets you try out an old demo version of Accordance. If you have
purchased Accordance, you do not need the demo, so you can drag both the alias and the folder
entitled Accordance demo in the OS Drive to the trash can. If you do not have the version 9
demo with the Starter Collection, you can download the installers from the website.
D.Installing Accordance Software
Most files cannot simply be copied to and from Windows into Basilisk since they lose their
“resource fork” and become unusable. Text, RTF, older PDF, and HTML files can be copied.
Basilisk cannot read a DVD, nor most CD-ROMs, nor any external drives.
Thus there are only three ways to install Accordance software and modules:
• You can download small files from the internet as compressed .sit files, copy them into
Basilisk, and double-click to unstuff using the supplied StuffIt Expander. The unstuffing can
be rather slow on large files. (Files can also be transferred on a thumb drive from a Mac in
this way, as long as an older StuffIt compression is used.)
• Accordance CD-ROMs can be read in Basilisk (except on Windows 7 and Vista 64 bit
computers). Be sure to follow the directions. (To burn a CD-ROM for Basilisk, use Toast and
make it Mac & PC compatible and HFS Standard.)
• A .HFV virtual hard drive can be prepared on another copy of Basilisk, loaded with the
files, copied, and installed into Basilisk. Accordance offers some software, including the
Primary DVD, on special DVDs for this purpose. For 64 bit PCs we also provide special disks
or downloads with .sit and .HFV files for modules that are normally supplied by download to
Mac and iOS or on CD-ROM.
These three methods are described in detail below.
– 12 –
1.Accordance Supplied .HFV Files
Whether you download these files or receive them on disk, the procedure is similar:
1.If the files were downloaded as a .zip, unstuff them using
WindowsZip or 7-Zip.
Winzip can be downloaded as a free trial at www.winzip.com,
and 7-Zip is free from www.7-zip.org.
2.Copy or move the .HFV files to the C:/accpc folder which
contains the emulator files. Copy the documentation to your
Accordance files folder.
3. Eject the DVD.
4.Run BasiliskGUI.exe and select the Disk tab.
5.Move the .HFV files which you copied from the right column
to the left column, either by clicking the arrow button or
double-clicking the file name.
6.Click OK to quit the preferences.
7.Run Basilisk. You will see the additional virtual drives
8. Follow the instructions supplied with each disk, and run the
68k installers as described below.
9. Once installation is complete you can return to BasiliskGUI.
exe and move the supplied .HFV files from the left column to
the right column so that they do not appear on the Basilisk
desktop until you need them again for further installations.
10. For some DVDs with large files, you are instructed to open the modules directly on these
drives. In these cases, keep the .HFV files in the left column.
Running the Accordance Installer
For each .HFV you must find the correct installer, select the items and location for installation,
and wait while the installer completes the installation.
1.If you do not see an alias of the installer on the desktop, double-click the icon of the .HFV
disk. This will open a window showing the contents of the disk.
2.Double-click on the Installer program (e.g. Primary 9-1.68K) and run through the license
and Read Me screen. You will come to the installation screen where you can pick the level
and modules you will install, and the location where you will install the Accordance program
and files.
4.Select the Standard Install or Easy Install
unless you have the code for another level
such as Graphics Bundle. Scroll down and
click on the boxes next to any additional
modules you have purchased separately.
5.Click on the pop-up menu showing OS
Drive and pick the virtual hard drive
you just created (if you did not give it a
name, it will be called untitled). Be sure
to install onto your Accordance drive. It is
NOT recommended that you install onto
the supplied drives, nor that you open the
modules directly on these drives, unless
instructed to do so. Please install them using
the installers.
– 13 –
6.Now click Install.
Do NOT install Accordance on the OS Drive as there
is not enough space on that drive.
7. You may be prompted for the unlock codes for the
packages and modules you purchased. The unlock
codes are on your invoice from Accordance, in your
online account, or on an insert in the disk package.
8.Be patient. Installation of large modules can take up
to an hour. The progress bar does not move while
modules are being copied to the hard drive.
9.When the installer is finished, a Registration screen
appears. Click Later to dismiss it, and Quit to close
the Installer. If you did NOT purchase Accordance
from OakTree Software, please remember to send an
e-mail to [email protected] asking them
to register your purchases.
If you have other Accordance modules to install from other Accordance HFVs, follow the steps
above and repeat the installation process.
2. Installing Accordance Software from Downloads
The latest Accordance program, demo, certain modules and module updates, and many other
resources are available at:
www.accordancebible.com/downloads/index.php
You can download the installers to Windows using your Internet browser, transfer them to the
emulator, and run the installers to upgrade or add to your Accordance system as follows:
a.In the browser select the 68K installers for the items you need (some require you to
purchase an unlock code).
b.Download the file(s) to your Windows desktop or preferred location.
c.Move the downloaded .sit file to a folder on your C: drive (e.g., C:/Accordance files).
d.Launch the emulator, and open My Computer. Navigate to the location of the .sit file you
want to install, and drag the icon to one of your Macintosh disks to copy it.
e.Double-click the file to unstuff it on the Macintosh using StuffIt Expander (which is already
installed on the OS Drive)
f. Double-click the installer file to begin installation.
g.Select the correct drive for the installation and click Install.
3.Installing from CD-ROMs (Windows XP or Vista 32 bit only)
a. Order of the CD-ROMs
Please look through your Accordance CD-ROMs and decide which one you should install first.
• Installation of Accordance is easy if you only have one or two recent CD-ROMs to install. The
version number of Accordance on each CD-ROM is usually printed on the CD label itself. If
all your CD-ROMs have version 7 or higher, the order of installation does not really matter.
However, it is usually best to install from the earliest to the latest.
Note: Once you have installed version 7 or higher you should not run an earlier installer. You can copy over
modules from earlier CDs to the Accordance folder, and open them in Accordance.
– 14 –
• Please check the website at: www.accordancebible.com/install for details of the order of
installation, especially for older CD-ROMs
b. Reading the CD-ROM in the Emulator
In can be tricky to get the emulator to read a CD-ROM as a Macintosh disk.
1.The most reliable way to read a CD-ROM is to shut down the emulator each time before
inserting the CD. To do this, click on the Special menu at the top of the desktop and choose
Shut Down. This will return you to the Windows desktop.
2.Then insert the Accordance CD you wish to install, let it spin up for a few seconds, and then
relaunch the emulator.
On Vista 32 bit you must right-click to run BasiliskII as an administrator, and click to
confirm. (For Vista 64 bit contact technical support.)
On Windows 7 right click BasiliskII. Click on Properties in the next
window. Then click the compatibility tab, and choose“Run this program in
compatibility mode for: and choose Windows XP (Service Pack 3) from
the drop down menu.
3.If the CD still does not appear, or if it shows up as an Audio CD, go to the
Troubleshooting section of this manual.
It is best to follow this procedure each time you have another CD-ROM to install.
Please do NOT attempt to run an installer or access the CD-ROM via the
My Computer icon. The CD icon must appear on the Macintosh desktop in
order to install from it. See below.
c. Running the Installer
1.Double-click the icon of the Accordance CD-ROM
on the desktop. This will open a window showing
the contents of the CD.
2.Double-click on the folder for 68K Mac. This will
open the folder to reveal its contents in a new
window. You must use the .68K installer except
on certain older CDs where this folder is not
present, and you can use the main installer. If you
try to run the wrong installer you will get a dialog
box saying “The application program “(Name)”
could not be opened, because an error of type-192
occurred.”
3.Double-click on the Installer program and follow
the above instructions for installers on .HFV files.
If you have other Accordance modules to install from
other Accordance CDs, follow the steps above to insert
the next CD and repeat the installation process.
d. Older CD-ROMs
Modules from older CD-ROMs (version 6 or earlier)
can simply be copied to the Accordance folder/
Modules/Texts or Tools and then opened in
Accordance. Accordance will request an unlock code if
needed. This method is only recommended for CDs for
which there is no upgrade available.
– 15 –
E. Reading the Documentation on Windows
1.Accessing the Help Files
The rewritten Help files include current and comprehensive information on
your version of Accordance. The Help files are accessed via your browser (such
as Internet Explorer or Firefox). You should first bookmark the Help files in
your browser. Then, before loading the emulator, open your browser and use
the Favorites link to go to the Help file. Once you are working in the emulator
you can then use <Alt+Tab> to switch between the help and Accordance.
To Find and Bookmark the Help Files in your Browser:
1.Copy the AccHelp.68K folder from the DVD or CD-ROM, or download
AccHelp.68K.zip from www.accordancebible.com/downloads/
documentation.php, and unzip it. Move the folder to the Accordance
files folder you have created.
2.Open the folder and double-click the Open_Help.htm file. It
will open in your default browser.
3.Click the link to open the Help files.
The Accordance Help appears in
your browser.
5.Add the Accordance Help to
your favorites or bookmarks
(Favorites>Add to Favorites).
You may prefer to add this to your
Links bar, for quick access.
– 16 –
To use the Help files
while working with
Accordance in the
emulator:
1.Open your browser and
go to the Accordance
Help via your Favorites
(bookmark) link.
2.Open the emulator and
load Accordance.
3.Use <Alt+Tab> to switch
between your browser and
Accordance.
Note:You cannot access the
window help, but all the
other features of the
Help are available.
2.Copying the PDF
Files to Windows
The PDF documentation
supplied with Accordance
CANNOT be read on the
emulator. However, the files
can and should be transferred
to Windows where they are
easy to access.
1.Double-click the My
Computer icon on the
Macintosh desktop. A
Finder window opens
showing the available
drives.
2.Double-click the C: folder,
and scroll it if necessary
so your Accordance
files folder is visible.
3.Open the Accordance
folder on the emulator
drive on which you
installed it, and drag the
title bar of the window
down and to the right.
4.Drag Manuals &
Documents folder to
the Accordance files
folder and wait while the
computer copies them to
the Windows location.
– 17 –
3.Reading the PDF Files
1.In Windows, find the Manuals
& Documents folder in C:\
Accordance files and
double-click on any PDF file
to open it. The User’s Guide
and Supplements include
complete documentation for
all the features of Accordance
7.1. The Accordance Fonts
has details and keyboard
layouts for the special fonts
used in Accordance.
2.If Adobe Reader 5 or above
is correctly installed, it
will open the selected file.
The latest Reader can be
downloaded free from Adobe
Systems Incorporated.
F. Setting up Accordance
1.Launching Accordance
a. Make an alias of Accordance for
convenient access:
1.Open the Accordance folder on the
appropriate drive, and find the icon labeled
Accordance 9.x.68K, and click once on the
icon to select it.
2.Press Command-M <Alt+M> or select Make Alias from the File menu
to make an alias of the Accordance program
3.Drag the alias to the desktop if you want to run it from there.
4.Copy the alias to OS Drive>System folder>Startup items if you
want to launch Accordance when you run the emulator, and to OS
Drive>System folder>Apple Menu items to place it in the Apple
menu. (The Apple menu at the left top corner of the
desktop is equivalent (more or less) to the Start
menu at the bottom left of the Windows desktop.)
This is not generally recommended because of the
need to replace the alias for each program upgrade.
5.Remember to update the alias each time the
program is updated.
– 18 –
b. Run and Register the program:
1.Run Accordance by double-clicking on its icon.
2.The first time you run it, dialog boxes ask you to register the program with your name, and
to confirm the name.
3.After any installation of modules, the program hesitates as it opens while it adds the
modules to the pop-up menus. This will only happen the first time you start the Accordance
program. Thereafter, you will be amazed how quickly the program loads!
4.The first time you run Accordance the Setup Assistant will walk you through some
preliminary preference settings.
5.You can now begin to use Accordance.
2. Setting Preferences
At any time you can make
changes to your preferences so
that Accordance opens and runs
the way you like it. These are
just some useful examples:
• Edit menu>Preferences>
General lets you choose
to open the first window
in a Workspace with
tabs to help keep your
windows organized, and to
set Accordance to open to
a defined set of windows,
or to where it was when
you last quit it. You can
also suppress some of
the informational dialog
windows to speed up opening of windows.
• Edit menu>Preferences>Search window lets you choose the default
text to open, and the default Details (we recommend Graph and
Analysis).
• Edit menu>Preferences>Greek & Hebrew lets you set typing and
export options for these languages (see below).
• Display menu>Set windowtype Display lets you change the current
display of the front window or tab or selected pane, and save the changes
as new defaults if so desired.
• Window menu>Library Window opens this window which lets you
organize the Bibles and other modules with your favorites at the top.
The top module in each category will open by default.
For details of these and other features of the software, please see the Help
documentation supplied with Accordance.
– 19 –
G.Printing
Using the emulator you cannot print directly. You can try the PrintToPDF utility to create a PDF
file which you can then print in Windows. It is not always successful.
You can first use the Print Settings in the File menu to specify whether you want to print
parallel panes and other settings.
To use PrintToPDF:
1.Choose Print in the File menu of Accordance. The
PrintToPDF dialog box appears.
2.To include Greek and Hebrew you must
do the following one time setup:
a.Click Preferences and click the Fonts tab
and check the Accordance fonts: Arab, Helena,
MSS, Peshitta, Rosetta, Sylvanus, and Yehudit,
so that these are included in the output.
b.In the Output tab, you can choose
options to always have the PDF file saved
to a designated folder, or to choose the
destination each time you print. (You can
configure the rest of the tabs as you like).
c. Then click OK. This will return you to the
Print dialog. There should be no need to set
the Preferences again.
3. Click OK in the Print dialog. The printing procedure will
continue.
4. If you have selected a destination folder in the Preferences,
the PDF file will be saved there with a default name such as
workspace.pdf.
5. If not, you will be asked for the name and location where
you want the PDF file to be saved.
You can either save the file directly to Windows, or save it
on the Macintosh and then move it to Windows.
To save it to Windows: click Desktop on the right of
the dialog box. From the files that appear, select My
Computer. This will allow you to choose the location on
your Windows side where you want the file to reside (such
as C: Accordance files).
Give the file a name but leave the .pdf suffix and click Save.
(The “path” to this folder will be remembered during the
current Accordance session.)
6. If you saved the file to the Macintosh desktop or drive, you
can open it on the Macintosh side to check it. However, to
print it you must use the My Computer portal to copy it to
the Windows side.
– 20 –
7. Switch to Windows, locate and
open the file in Adobe Reader
(double-clicking the file should
open it if Reader is loaded
properly). Then print to your
default printer.
Note:Setting Preferences in Print
to PDF may cause the current
session of the emulator to
crash. Also be sure to wait
while the PDF file is written to
disk.
PrintToPDF Fixes
If PrintToPDF does not save or
use the Font preferences, try the
following fixes:
1. Trash the Preferences
for PrintToPDF in case
they are corrupt (in
the OS Drive>System
Folder>Preferences folder).
2. Another possibility is that not enough memory is allocated to the emulator. Increase the
memory in the BasiliskII Preferences>Memory tab (BasiliskIIGUI.exe) and see if this
makes any difference.
3. Also, in the BasiliskII Preferences>Disk tab, make sure that the OS Drive is set to “Mount this
volume read/write.”
4. Check if there is sufficient room on OS Drive to allow rewriting files, by opening the OS
Drive window on the Macintosh and looking just under the top right corner. You should see
at least 5 MB available.
5. One other possibility: in the BasiliskII Preferences>Screen tab, select DirectX(in a window)
or DirectX(full screen), not Windows GDI. In some systems Windows GDI causes conflict
Printer Drivers
Some printer drivers which allow direct printing such as Chuck’s Printer Drivers are available
on-line. If you want to try them, you can download them from: http://www.macdrivermuseum.
net/printer.shtml.
– 21 –
H.Exporting Text
There are two methods of exporting text from Accordance to a word processor such as Word:
copy-and paste, or saving a text file. You can select and copy text (and graphics) in Accordance
and simply paste it into Word. This works well for English text. OR you can save the text in the
front window or selected pane as a text file (plain ASCII text or RTF) which you can open in
Word.
• Greek and Hebrew text must be converted from the Accordance fonts to fonts that are
available on your system (as the “mapping” of the characters in our fonts is different from all
fonts on Windows). Accordance can be set to perform this conversion, either to older Greek
and Hebrew fonts such as those from Linguists Software or SBL, or to the newer Unicode
system. With the older fonts you can use either method to transfer the text.
• Unicode can only be exported by saving the file as RTF. It is not supported by the current
emulator clipboard so you cannot copy and paste the text. However, among the advantages
of Unicode is the fact that Word for Windows 2000 and above supports Unicode with right
to left text entry. The text is also compatible with other computers, e-mail, webpages etc.,
anywhere that Unicode fonts are used and available with the relevant characters. Please see
our Unicode webpage for more details:
http://www.accordancebible.com/support/unicode.php
To set the export of Greek and Hebrew:
1.Open Preferences in the
Edit menu.
2.Click on Greek & Hebrew
in the list.
3.For Unicode export simply
click the Unicode check
box, and for Hebrew select
Cantillation only from the
Strip characters pop-up
menu.
4.Alternately, for older fonts,
select the font from the
pop-up menus for Greek and
Hebrew.
5.Please see the Accordance
documentation for details of
all the options.
To copy and paste into Word:
1.Select the text you want to copy.
2.Choose Edit menu>Copy or press <Alt+C>.
3.Press <Alt+Tab> to switch to Windows.
4.Open Word and press <Ctrl+V> to paste the text.
5.You may need to select the Greek or Hebrew text and choose the desired (non-Unicode) font.
– 22 –
Rich Text Format
RTF is an abbreviation for “Rich Text Format”. Rich text format is a special type of coding that
saves special information such as text, formatting, etc. in your document in a way that other
software programs can recognize. For example, RTF files let you transfer text from Accordance
to MS Word.
You must first save the text as an RTF file, from within Accordance.
Afterwards, you can open the RTF file in Word. You should also set
your Accordance Preferences for Greek and Hebrew, so that the text is
exported properly.
To save text in an RTF file and open it in Word:
1.Display the text that you want to export in the front window or
text pane. The entire text displayed in this window will be saved.
2.On the File menu, select Save As Text File>RTF.
A dialog box appears.
3. In the dialog box, click Desktop and select My Computer, then
navigate to the location on your computer where you will save
.rtf files. In this example, files are saved in a directory named
Accordance files.
4.Name your file. Make sure that you do not delete the “.rtf”
file extension.
5.Click Save. The file is saved in the directory. Be sure to wait
while the RTF file is written to disk.
6.When you are ready to begin working in Word, you may
prefer to exit Accordance and BasiliskII.
7.Navigate to the Accordance files directory and open your
.rtf file in Word.
Adjusting the Hebrew Text:
For Hebrew text in Unicode, there are a few formatting changes you will need to make before
you can work with the text. Before performing these steps, make sure that you have the Hebrew
Language enabled for your Office programs.
Once you have set up your computer to handle Hebrew, follow the directions below.
The text is initially left justified. In addition, the English verse references are on the left.
1.Select all of the text in the document by doing one of the following:
Select Select All from the Edit menu, or press <Ctrl+A>.
– 23 –
2.Change the direction of the text using the language Right-to-Left
paragraph icon:
If you do not have the Right-to-Left icon in Word, the Hebrew
language module has either not been installed, or is not installed
properly. Do NOT use the justification icon. This will not change the
direction of the text according to language.
3.After changing the language direction, the text appears basically correct. Note that some of
the vowel points and spacing are still not correct.
4.Select all of the text and apply a dedicated Hebrew True Type font,
such as SBL Hebrew or Cardo.
The Hebrew fonts are provided when you install the Office Language
Pack for Hebrew.
Different fonts will handle the vowels slightly differently. You can
experiment to find the one you like best.
5.Save the document as a Word “.doc” file, using Save as in the File menu..
(This step is most important to assure that you have the Word document just
as you want it.)
Note: In some cases, quotation marks may be out of place, we are not sure why this
happens, as it does not happen all the time.
We cannot provide support for Word on Windows, but we have offered
some suggestions in Hebrew Word Troubleshooting Tips.
– 24 –
J. Troubleshooting Tips
Reading CD-ROMs
Q:I can’t seem to get the Accordance CD to mount on the Macintosh Desktop. It either does not
mount or appears as an Audio CD. What’s the problem?
A: First, see and follow the instructions above to:
1.Check that you are runninmg Windows XP
2.Enable the CD Drive in BasiliskII Preferences
3.Shut down the emulator, insert the CD, and restart the emulator: on Vista 32 bit right click
BasiliskII and run as admin.
4.If you still have problems, check the tips below:
BasiliskII Preferences
• If you are using a laptop that you dock at your desk, the CD drive designation may change
when docked or undocked (i.e., when docked the CD may be E:\ drive, but undocked it may
be D:\). Move all the drives that show up on the available side to the installed side.
• If you have a Zip drive or other removable media drive on your computer, the drive letters
will change depending upon whether or not you have a Zip disk (or other removable media)
loaded into the drive at start up.
• If you have more than one CD-ROM on your computer, make sure both drive letters appear in
the Installed cds pane. If your CD-Rom drive appears in the Available cds pane, highlight
it (click it once) and use the arrow between the two panes to move it to the Installed cds
pane.
• Also, make sure that your Windows hard drive is not listed in the Installed cds pane. If it is,
highlight it (click it once) and use the arrows to move to the Available cds pane.
Windows XP
• Windows XP has routine for accessing the CD-ROM of your computer. XP presumes every
CD has an “auto-run” so whenever you put a CD in, it captures the CD-ROM, meaning the
emulator is not given privileges to the CD-ROM functions. To overcome this, make sure the
CD is loaded BEFORE you launch the emulator. We have found that the majority of time this
overcomes the problem.
• You may need to copy the cdenable.sys file to your system. Check with tech support.
Windows CD-ROMs are ejected
• The emulator will often not mount a CD intended for a Windows environment, especially if
the Windows CD has an auto run feature (meaning it automatically opens an install window
when you put it in your Windows CD). The easiest workaround is simply to disable the CD
function from the emulator once you have loaded in the Accordance software. You disable
the CD function by unchecking the box on the CD Tab in the BasiliskII Preferences (C:\
accpc\BasiliskIIGUI.exe). This allows you to use your Windows CDs without conflicts with
the emulator.
• When you need to use a CD on the Macintosh side to load more Accordance modules, simply
enable the CD function for the install, and then disable it again when you are finished.
– 25 –
Macintosh only CD-ROMs
• If the CD was “burned” as a Macintosh only CD, it may not be readable by the CD-ROM drive
in your machine. Occasional disks from Accordance have had this problem. The workaround
is to burn a copy of the disk and then use the copy to load the Accordance program and/or
modules into the emulator (or order an upgrade CD).
Vista Issues
Q:What special issues occur with running BasiliskII on Vista?
A: Many users have successfully installed BasiliskII and Accordance on Vista, but we have seen
occasional problems:
1.On Vista 64 bit BasliliskII cannot read Accordance or other CD-ROMs. Only downloaded files,
or files supplied as .HFV files can be installed. Please contact tech support for assistance.
2.The fact that many new laptops and some desktops come with a virtual partition in the HD
that sectors a hidden part of the HD for automatic backup causes problems. Basilisk does
not see this hidden partition; thus, it numbers the drives incorrectly. The computer as from
the manufacturer has C: and hidden D: as auto backup, making CD-R reader E:, but Basilisk
sees it as D, thus it does not find it. This seems to be the case with all Hewlett Packard
computers, and a few others (newer Compaq and Toshiba).
3.In addition, if the computer has a number of other peripheral devices, the way Vista treats
the CD-Rom when it assigns a new drive letter (i.e., with hard drives or peripherals that
“look” like hard drives to the CPU), throws Basilisk off.
Solution: If you have the problem that the Accordance CD is not showing up on the Mac
desktop, start up the emulator by right-clicking and choosing “Run as Administrator.”
Then when asked for permission to run the program, answer in the affirmative. This helps
overcome those situations where the hardware is swapping the CD-Rom drive letter – it
allows Basilisk to access whatever drive is actually the CD-Rom.
4.In one case the cdenable files were not installed by the Basilisksetup.exe. They cannot be
manually installed in Vista.
Solution: In c:/accpc, open the “extra files” folder. Launch the application BII.exe. Once the
application is running, you may need to minimize the My Computer window if that is the
place from which you evoked the application. The BII.exe application is in a smaller window
behind the My Computer window. In BII.exe window, click “next.” Then choose the radio
button “custom” and click “next.” Uncheck all of the boxes except CD-Rom Drivers. Click
next. It will show Basilisk II in the “program folders”, and Accessories under the folder
“Existing folders”. Click next. It will install. Then click “Finish.” This should put the cdenable.
sys in the Windows/System32/drivers folder, and cdenable.vxd at the root-level of the
Windows/System32 folder. It may also write instructions to the registry.
Other Issues
Error 192 when running an Installer
Q:When I try to install my Accordance program and modules, or a downloaded updater, I get
the error “The application program “(Name)” could not be opened, because an error of type192 occurred.”
A: You have used the installer for the Power PC or for Macintosh OS X, rather than the 68K
installer for the emulator. On the Accordance CD, you will find a folder named for 68K Mac.
Open this folder, and use the installer inside this folder for installation on the emulator. On
the website select the download for Classic/68K/PC Emulator.
– 26 –
Setting BasiliskII Preferences
Q:How Do I Use the BasiliskII Preference Window?
A: The BasiliskII Preference Window is the program you use to set up preferences for the
emulator.
• You use this on the Windows side of your computer.
• You will find the file in the folder that has the rest of the emulator files. If you installed from
the CD before Nov 2002, then it will be in a folder called Macintosh Stuff on your C: drive
and it will also show up under your Start Menu\Programs\BasiliskIIGUI.
• If you installed with the newer CD dated Nov 2002 or later, it will be in a folder named accpc
on your C: drive and unless you installed it yourself into the Start menu, it will not show up
there.
• The Preference program file is named BasiliskIIGUI.exe. Double-clicking this will launch the
tool, and the various tabs in the window will take you to the preferences for that item.
• Each tab in the window has several options for configuring the emulator. The most important
are covered above, and others appear throughout these Troubleshooting Tips.
• When you have set the Preferences, click OK, or Run to launch the emulator directly.
Q:Where is the Manual for BasiliskII itself?
A: You can find BasiliskII_Manual.pdf in C:\accpc\extra files.
Downloading Updates
Q:I want to get the free updates from www.accordancebible.com.
A: See the instructions above for downloading updates.
Toggling between Windows and Macintosh
Q:How can I switch between my Windows programs and the Macintosh emulator?
A: Pressing <Alt+Tab> allows you to cycle between all open applications.
• Be sure to start up an application or open a window in Windows before launching the
emulator. If you launch the emulator before opening a Windows application, you will not be
able to toggle between the two.
• If WinXP hangs when you use <Alt+Tab>, run BasiliskIIGUI.exe again. Click the Screen tab,
and in the first drop-down box, choose DirectX[in a window] if you have plenty of video
ram, or DirectX[full screen] if you have limited video ram – that should solve the problem.
Transferring Files between Windows and the Emulator
Q:How do I move files between the Macintosh system and the emulator.
A: You will use the My Computer portal on the Macintosh desktop:
1.Be sure you have enabled the external file system. This installs a (My) Computer icon on the
Macintosh desktop. Clicking this icon opens a window showing your Windows hard drive(s),
so that you can navigate to any directory/folder, and even create folders.
2.We recommend creating a new folder on the C: drive and naming it Accordance files ( if
you have not already done so). You can copy and save various files to this location.
3.To get files from Windows into the Macintosh, simply drag or copy them to a designated
place on your Windows hard drive and then open that location with My Computer on the
Macintosh side.
– 27 –
4.To save files from the Macintosh to Windows, save or copy them to a designated location
on your hard drive via My Computer on the Macintosh desktop. They will now be available
on the Windows side. Icons may not show up in their native colors and pictures, because
Windows does not recognize Macintosh icons, and visa versa. But the file will be there, and
you can open it in the appropriate application.
See above for copying the PDF documentation to Windows, and saving text files or documents
for printing. See note on the My Computer portal.
Transferring files from a Macintosh to the Emulator
Q:How can I transfer Accordance and other files from a Macintosh computer to my emulator?
A: There are several ways to do this:
• One way is to stuff the files you want to transfer with an old copy of StuffIt, then transfer
them to the PC via an e-mail attachment or a Flash/Jump drive that is formatted for PC. In
the emulator, copy the files to the Macintosh HD via My Computer and unstuff them. (Do
not attempt to transfer unstuffed files as the emulator cannot read the Flash/Jump drive
directly, and copying the files to Windows will make them unreadable by the emulator.)
• Another way to accomplish file transfers is to burn them onto a CD on the Macintosh using
Mac and PC HFS Standard format. Insert the CD in your Windows machine, then launch the
emulator and open it on the Macintosh Desktop. Drag the files to the Macintosh HD.
Transferring files from the Emulator to another Accordance
Q:How can I transfer my Accordance user files from the emulator to another installation of
Accordance?
A: There is only one way to do this:
• You must stuff the files you want to transfer with DropStuff, then transfer them to Windows,
and then to the other computer where they can be unstuffed. A suitably old copy of
DropStuff is included with the latest emulator installer, and can be downloaded here:
http://www.accordancefiles1.com/products/StuffLite.sit.
Reinstalling the Emulator
Q:I need to reinstall the emulator. Can I avoid reinstalling all my Accordance files, and losing
all my work?
A: You may need or want to reinstall BasiliskII in order to use the latest version, or because the
Macintosh OS seems to be corrupted. It IS possible to preserve your Accordance and other
files to avoid needing to reinstall, by moving the file containing an entire virtual hard drive.
1.Make sure that all your Accordance files are on the second hard drive you created, and also
copy to it the Accordance Fonts file from OS Drive>System Folder>Fonts.
2.Check the Disk tab in BasiliskIIGUI.exe and note the name and location of the second drive
(default is C:\accpc\New.HFV).
3.Install the emulator using a DIFFERENT location or folder name than your current
installation. If you are using basilisksetup.exe you should move or rename your C:\accpc
folder otherwise it will be replaced.
4.Move or copy the New.HFV file containing the second drive from the old location to the new
one.
5.Run the BasiliskIIGUI.exe in the new installation. In the Disk tab click Browse, navigate to
and open the New.HFV in the new location. Complete the usual settings in BasiliskIIGUI.exe
and run the emulator.
6.Your second drive should appear in the new emulator. Copy the Accordance Fonts file back
to OS Drive>System Folder>Fonts.
– 28 –
7.When you are sure that everything is now working, you can delete the old installation (after
removing any files that you may have saved in those folders).
Transferring Accordance from one Emulator Installation to Another
Q:Can I transfer my entire Accordance installation to a new computer?
A: Yes, by following these steps:
1. Copy the C/accpc and the c/Accordance files folders to the new computer’s C drive.
2. Set up the shortcut to BasiliskII in the desktop, and the favorite for the Help in the browser.
Your Accordance should now be identical to the one on the old PC.
Enlarging or Deleting a Virtual Hard Drive
Q:Can I enlarge a virtual hard drive, or delete an unwanted drive?
A: You cannot change the size of an installed virtual drive, but you can create a new drive of the
size you want, copy to it any files, and delete any unwanted drives.
1.Create a new drive of the required size up to 2000MB in the Disk tab of BasiliskIIGUI.exe
(be sure to give it a different name and location from your current drives). You only need
to make sure you have this amount of hard disk space available in the location where the
Macintosh disk will reside. When you create a hard drive, it occupies the space and that
space is not available to your Windows programs.
2.Initialize the new drive in the emulator. The name on the Macintosh has no relation to the
Windows file that contains it.
3.Drag to the new drive any files you want to transfer (they will copy over). You must copy all
the files from OS Drive if you plan to delete that drive.
4.Shut down the emulator, run BasiliskIIGUI.exe again, and in the Disk tab move the drives
you no longer need from the left pane to the right. Be sure that the drive now containing the
System Folder is the top drive in the Installed disks list.
5.Run the emulator to make sure that everything is working as you want it.
6.In Windows you can now navigate to the accpc folder and delete the .HFV files that you are
certain you are no longer using.
NO to Virtual Memory
Q:Can I use Virtual Memory in the emulator?
A: Do NOT turn on Virtual Memory in the Memory Control Panel
It will corrupt your system and you will need to reinstall BasiliskII. The reason is that Virtual
Memory in the Macintosh OS presumes the Macintosh OS is managing memory. Of course, on the
emulator Windows is managing the memory, and Windows cannot handle Mac Virtual Memory.
Reducing CPU Power Usage
Q:What can I do about the emulator hogging all my CPU power (100%!) on my super fast WinXP
laptop machine?
A: Go to the BasiliskII Preference Window and click on the Misc tab.
In the miscellaneous preferences, check the Start in low power mode box, and enter 10
into the box marked “Milliseconds to sleep.” You can leave the rest of the settings as they
were.
This will hardly slow the emulator down (you won’t notice much difference when using
Accordance) and it will allow the idle threat to rest when you’re not actually typing or
using the mouse. This will also decrease the amount of time the CPU is processing for the
emulator, and will make your laptop run cooler. (Thanks to Tim Goltz for this tip!).
– 29 –
Screen Problems
Q:My Screen is not showing colors! What do I do?
A: Go to the Apple menu (click on the Apple in the upper left corner) and choose Control Panels.
Then choose Monitors. Click Colors. Close the windows.
Q:The colors are crude. How can I improve them?
A: Shut down the emulator and run BasiliskIIGUI.exe. Click the Screen tab, and beside Colors
select Thousands (16 Bit).
Q:Why is the Macintosh screen skewed diagonally and unreadable?
A: In the Screen tab of the BasiliskII Preferences (GUI), set the resolution for the emulator to the
same resolution that is set for Windows (you can find the resolution settings for Windows in
the Screen settings in the control panel).
Installing BAS Pictures
Q:I’m having trouble installing the new Biblical World in Pictures CD-ROM. How can I run it?
A: This particular graphics disk requires a lot of RAM to install.
1.Go to the BasiliskII Preferences (double click basiliskIIGUI.exe in the C:\accpc folder)
2.Click on the Memory tab. Increase the RAM size to 400.
3.Then install the disk. After installation, you can reset the RAM back to your original setting.
(Thanks to Tim Goltz for this tip.)
Hint: It will be easier to simply do a manual install of the BAS Pictures module.
Hebrew Word Troubleshooting Tips
Q:How do I enable the Hebrew language in Office?
A: Do the following:
1.Click the Start menu>Programs>Microsoft Office
Tools and select Microsoft Office Language
Settings.
2.In the Enabled Languages area, enable Hebrew and follow the onscreen instructions.
3.After you have rebooted your computer and Hebrew is enabled, the paragraph direction
marks are accessible in Word on the Formatting toolbar
If the above option is NOT available (Hebrew is not an available option) you must:
1.Open the Start menu>Control Panel.
2.In the Control Panel open Regional, and Language Options.
3.On the General tab, in the panel “Language settings for the system”, select Hebrew (or
Greek, or whatever other languages you need).
4.If HEBREW does not appear, click Advanced, and enable ALL of the Hebrew options there
(there are several).
5.After you click OK, the Microsoft Office Language Settings will be available.
Note: Hebrew setup in Windows differs, depending on the operating system and Office package installed
with your computer. If you need specific instructions for your computer, search for the phrase “rightto-left” in your Windows or MS Word online Help.
Q:Why does my toolbar look like this? I have the Hebrew enabled but I cannot see the Right-toLeft Paragraph
icon.
– 30 –
A: Word is displaying two toolbars together. The extra icons can be seen in a pop-up when you
click the arrow icon at the far right.
You can show all the icons if you separate the toolbars at the point where they are joined,
just to the right of the help icon. Drag the right toolbar down and below the left bar so it
looks like this:
Q:Are there special options for using Right-to-Left in
Word?
A: Yes, you can find them in Tools menu>Options>Rightto-Left tab.
Q:Can I suppress the spell checking squiggly line under
each word?
A: Yes, in Tools menu>Options>Spelling & Grammar
tab.
Q:How can I hide the funny characters on my page?
A: By clicking the Show/Hide button with the Paragraph
symbol on the tool bar..
– 31 –